Airsight XX39A User manual

Model XX39A
Indoor Wireless/Wired
IP Network Camera
(with H.264 image compression)
IPCam Client User Manual

2
Contents
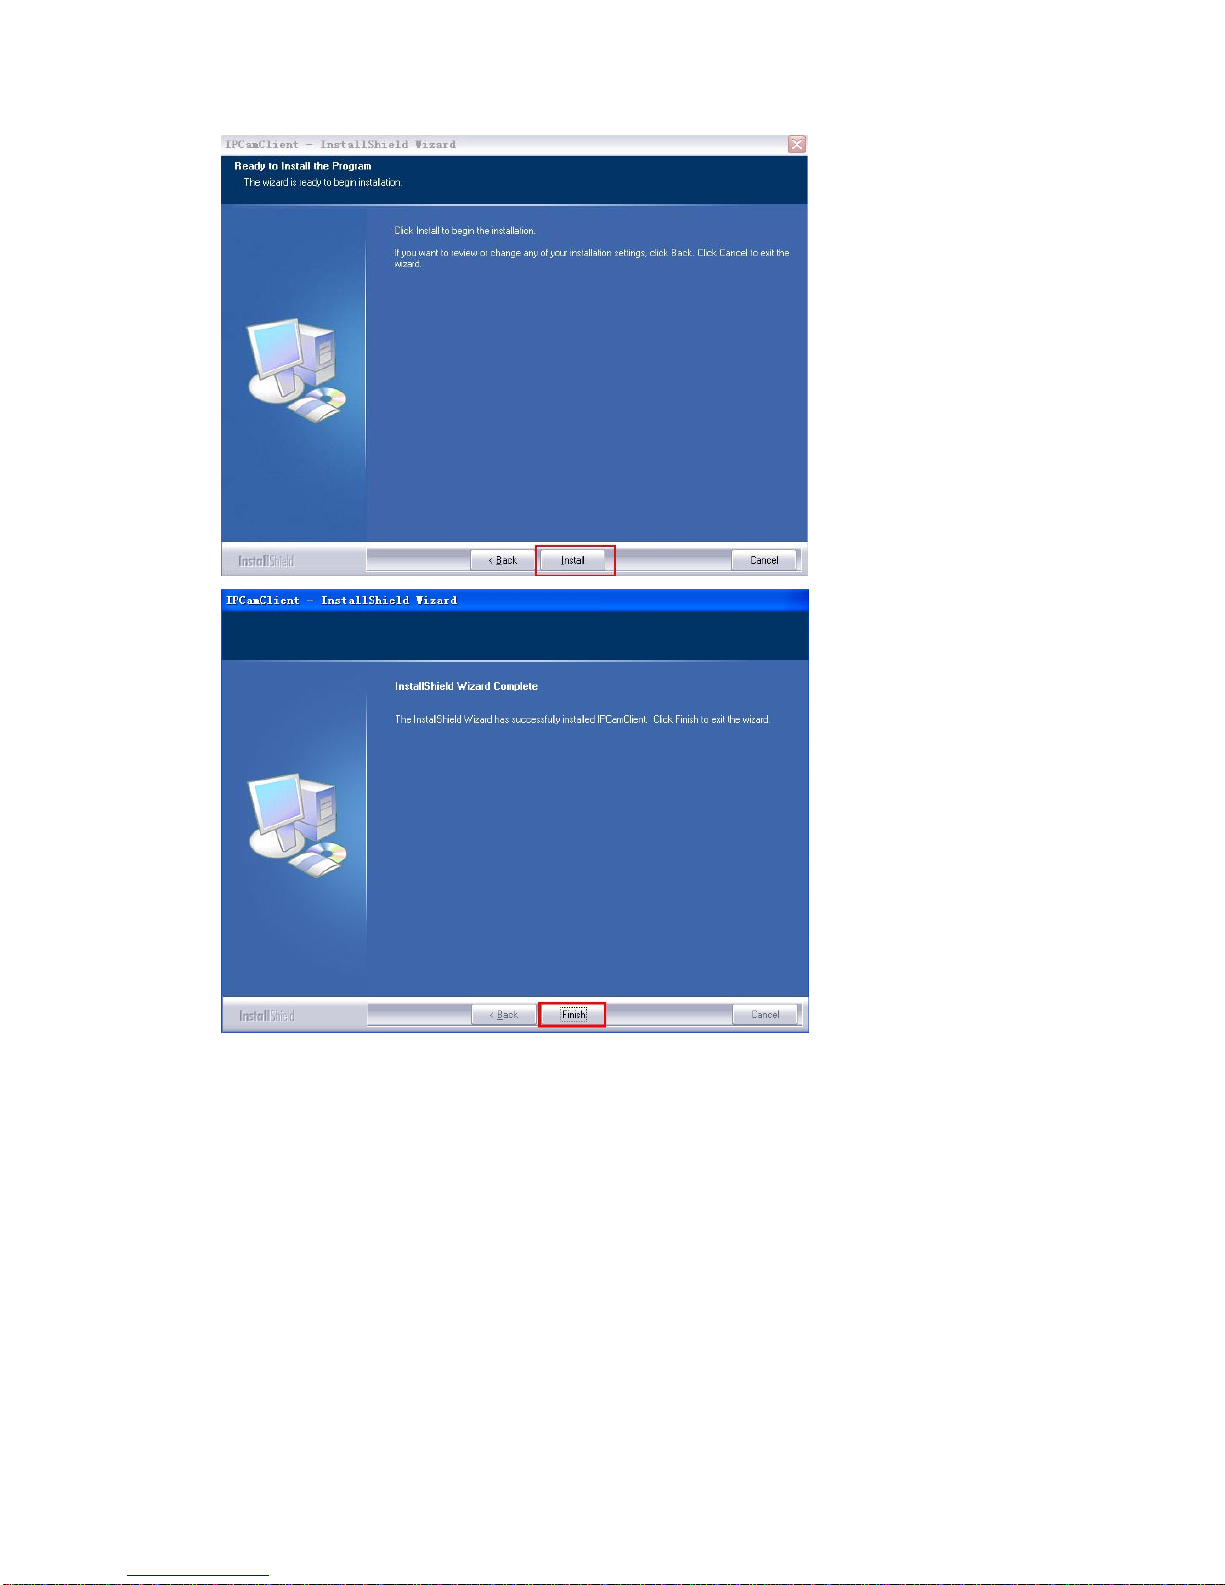
1. INSTALLATION ................................................................................................. 3
2. SOFTWARE OPERATION ................................................................................ 5
2.1. Login.......................................................................................................................5
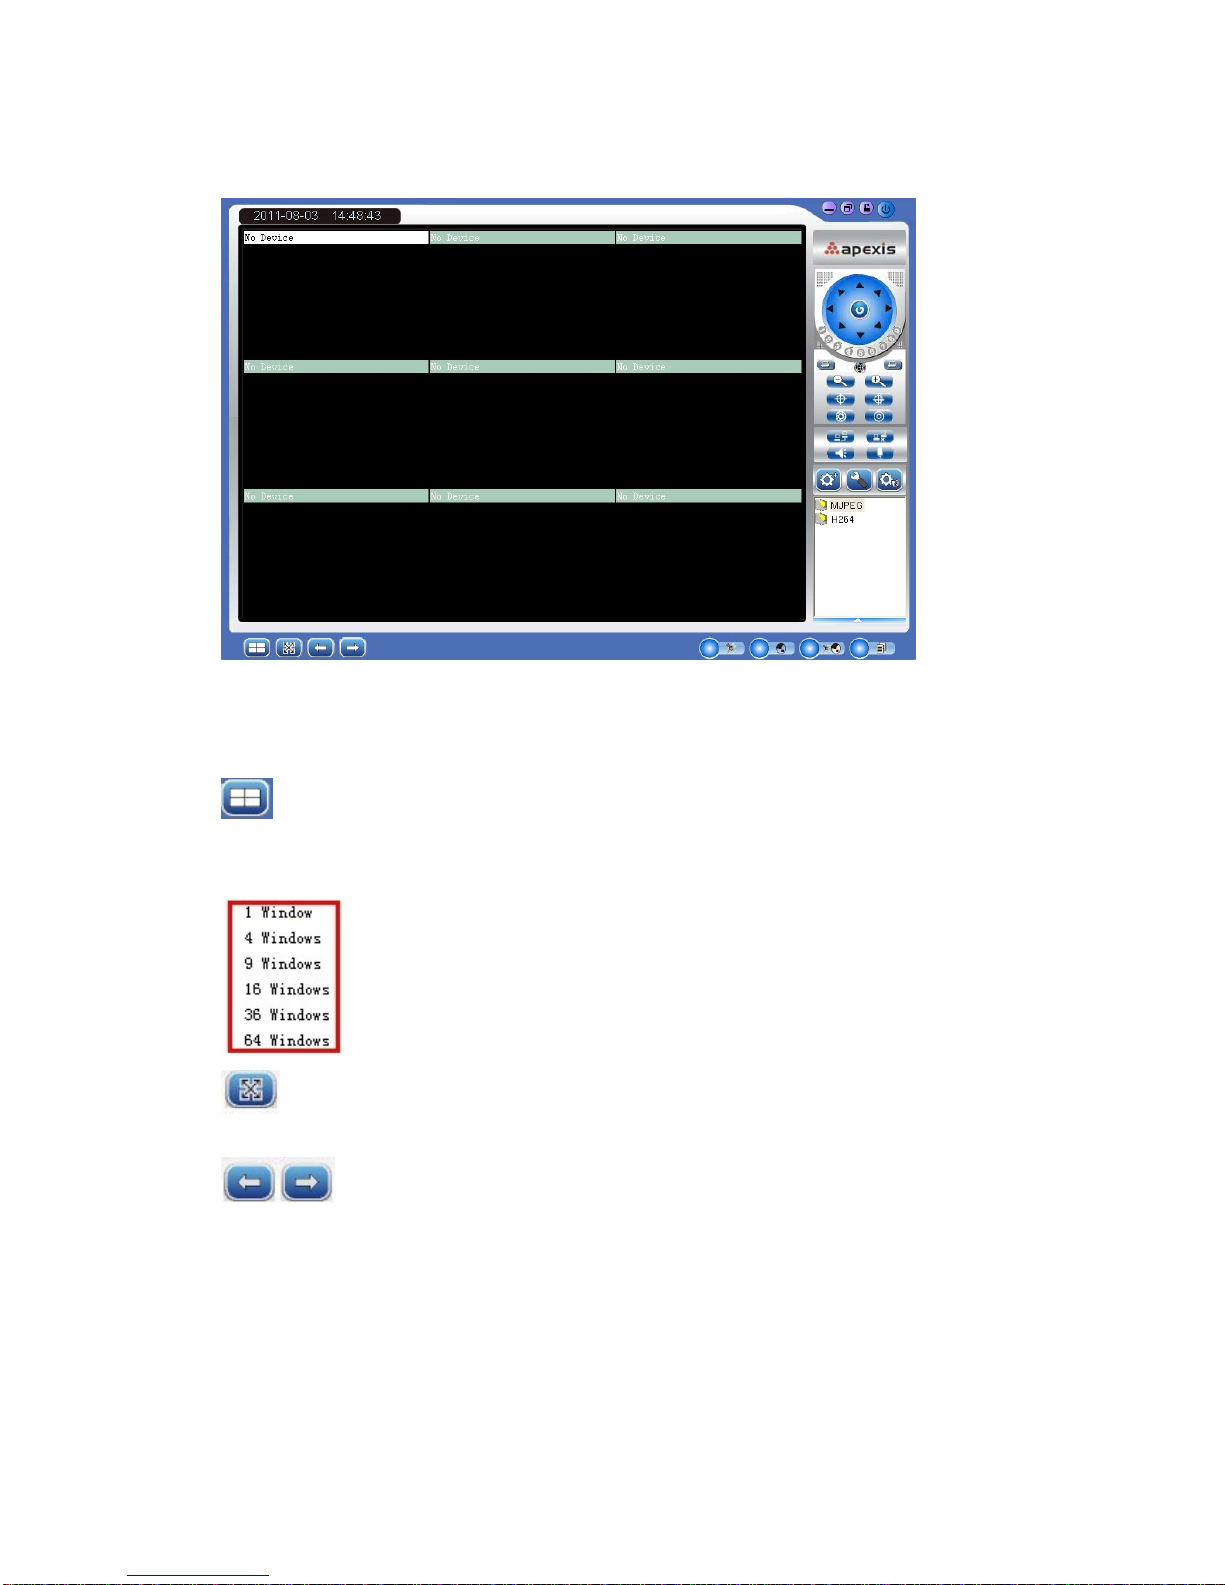
2.2. For Multi-windows...................................................................................................6
2.3. System Settings......................................................................................................7
2.3.1 Basic Settings.................................................................................................... 7
2.3.2 User Settings ..................................................................................................... 9
2.3.3 Device List ....................................................................................................... 10
2.3.4 Search File (Playback)..................................................................................... 11
2.4. For E-map............................................................................................................. 11
2.5. Log........................................................................................................................12
2.6. Software Interface Operation ................................................................................ 12
2.7. For Rightside Panel Icons..................................................................................... 13
3. HOW TO SET THE DEVICE (FOR MJPEG)................................................... 13
4. PRESET SETTINGS........................................................................................ 22
5. SHORTCUT KEY ON SCREEN ...................................................................... 23
5.1 Advanced Settings: ................................................................................................ 24
5.2 Three Icons on screen ...........................................................................................27
6. LOGOUT.......................................................................................................... 28
7. OBTAINING TECHNICAL SUPPORT.............................................................29

3
1. INSTALLATION
NOTE: This IP Client software can be used with all X10 MPJEG and H.264 IP cameras.
Before installation please turn off your firewall and disable any Antivirus software in your
computer so that this software can be installed successfully. After installation, restart your
computer, then you can use the IP Client software.
Double-click on the IPCamClient icon on the CD that came with your camera, or run the
installation if you downloaded it from our web site. Follow the steps on the screens that
appear.

4

5
2. SOFTWARE OPERATION
2.1. Login
Double-click the IPCamClient icon on your desktop you will see the login
interface below, choose English language:
Enter the username and password. The default username is admin, default password is
no password, i.e. leave blank. (Or try admin if that doesn’t work). Then click OK to login:

6
After login, the main software interface will be displayed as shown below:
2.2. For Multi-windows
Clicking this icon will pop-up the multi-windows options, it can be from 1 to 64
windows.
Click this to go to full screen view, double click the screen or press the Esc key on
the keyboard to go back to normal.
Click this to page up/down.

7
2.3. System Settings
System Setting: Click this to pop-up the system setting options as shown
below.
2.3.1 Basic Settings:
Click this to login to the basic settings interface as below:
2.3.1.1 Record:
1. Add/Delete: Click this to set/delete the path for record files to be saved.
2. Record file length: Click this to set the length for every record file, can be
30/60/120/180/300 minutes.

8
3. MJPEG add timestamp on record: Select this to enable the function.
4. MJPEG compressed into MPEG-4 format: Select this to enable the function, this will
use less space for recorded files.
5. Automatically recovered once recording space is full: If selected, once the hard
disk is full, it will recover automatically.
2.3.1.2 Capture:
1. Add/Delete: Click this to set/delete the path for snapshot files to be saved.
2. Open the folder when capture image: if selected, this will pop-up the folder when
capture image is saved.
2.3.1.3 Alarm:
1. Alarm Record: Select this to activate record function once alarmed.
2. Alarm recording time: Set the duration for every alarm, this can be
30/60/120/180/300 seconds.
3. MJPEG add timestamp on record: Select this to enable the function.
4. Alarm pop-up E-map: Select this to enable the function, this will pop-up the E-map
which was set once alarmed.
2.3.1.4 Auto run
1. Program runs automatically connect all the devices: If selected, when running the
program, this will connect all the devices which were set successfully automatically.
2. Auto run when computer powering on: If selected, when your computer starts up
the software will run automatically. You can save the username and password here in
advance.

9
2.3.1.5 Version
Click Version to get the version details of the software.
2.3.2 User Settings
Click this to login to the user settings interface as shown below:
Click Add to set user accounts.

10
Fill in the username, password, then click OK to submit.
2.3.3 Device List
Clicking this will show all the devices connected as shown below:

11
2.3.4 Search File (Playback)
Clicking this will pop-up the search file interface as shown below:
2.4. For E-map
Show Map: Clicking this will pop-up the E-map which has been set
successfully already.
Set Map: Clicking this will pop-up the E-map settings interface.

12
Add: Click this to add a new map, it will pop-up the window as shown below, set the map
name and browse the map to active it.
NOTE: Only supports “.bmp” format images.
Delete: Choose the map first, click delete to remove the map.
Modify: Choose the map first, click modify to change/modify the map.
2.5. Log
Search Log: Click this to search the log of the software.
Map settings: Please note that you need to set the map in your LAN network before using
map function.
2.6. Software Interface Operation
Shown at the top right corner of the screen, from left to right, this means:
1. Minimize the program interface.
2. Maximization the program interface.
3. Lock/Unlock the program.
4. Close the program.

13
2.7. For Rightside Panel Icons
NOTE: Choose the type which matches your IP camera.
MJPEG: For all the MJPEG series IP Cameras (Models XX34A, XX36A, and XX40A).
H.264: For the H.264 IP Camera (Mode XX39A).
Click the up arrow at the bottom, this will pop-up the image parameter settings:
3. HOW TO SET THE DEVICE (FOR MJPEG)
Before connecting the IP Camera, please make sure the firmware of your IP camera
(MJPEG) begins with: 17.22.2.**(XX34A) / 17.25.2.**(XX36A/XX40A).
NOTE: For H.264 series cameras, it’s the same settings.

14
3.1 Add Device
Clicking will pop-up the window as shown below:
Choose MJPEG, then click OK, this will pop-up the window as shown below:

15
Clicking Search, will pop-up the result:
If there are no cameras listed, check the firmware version to see if it starts with 17.*.*.*. If
the firmware version is correct, and there is still no cameras listed, maybe your computer’s
IP address doesn’t match with the camera’s IP address, or they are not in the same LAN.
Change your computer’s IP address to the same LAN as your camera’s.
Choose the IP camera, and click OK to show the Basic Info page:

16
Device Name: The name of the camera.
IP Address: The IP address of the camera.
If you use DDNS to view the camera, enter the DDNS domain name here, remove the
“http://”, for example, if the DDNS http://test.aipcam.com:95 sets successfully, then type
“test.aipcam.com” in the IP Address.
Port: The port of the camera.
Once all this information is shown, the firmware of the camera is correct, and the software
works well, then just enter the View Account and View Password you have set:
View Account: The user name of the camera. (Default is admin).
View Password: The password of the camera. (Default is no password).
Support PTZ: Enable this to active Pan/Tilt/Zoom (if available for your camera type).
Support Audio: Enable this to activate the audio function.
Flip Image: Enable this to vertically flip the image. I.E., for ceiling mount, etc.
Mirror Horizontal: Enable this to horizontally flip (mirror) the image.

17
After you’re done, click OK to go back to the software interface:
Move the mouse to the window where the camera name shows, then right-click, choose
Connect, it will show the live video:
To add more cameras, do the same steps.

18
3.2 Device Setting
3.2.1 Basic Info.
Click or right-click on the channel window, choose “Device Settings”, this will
pop-up the window showing the basic info for the device connected as shown below:
3.2.2 Device Params.
Click Device Params, this will show the information as below:
Resolution: 320*240, 640*480 optional.
Frequency: 50HZ, 60HZ, Outdoor optional.

19
3.2.3 Alarm
Clicking Alarm, will show the information as below:
Motion Alarm: Enable to active the motion detection alarm function.
Input Alarm: Enable to active the I/O input alarm function.
3.2.4 Cruise
Click Cruise, or click the icon on the rightside panel this will show the
information as below:

20
Clicking Add will pop-up the add cruise window:
Up to 10 cruise positions are supported.
Click Add to set a preset cruise position.
Preset: Choose the preset you set already, this can be from 1-9.
Pause: Set the duration for each preset, this can be from 1-60 seconds.
NOTE: Before using the cruise function, you need to set preset first, up to 9 presets can
be set. (For details see chapter 4. Preset Settings).
Other manuals for XX39A
2
This manual suits for next models
3
Table of contents
Other Airsight IP Camera manuals