EvaKool MAXI TRAC MT-45 User manual

POWERED BY
INSTRUCTION
MANUAL
FOR MODELS
MT-45 / MT-60 / MT075-DX


Please read operating manual carefully before using your new device.
Please keep manual in a safe place.
If lost find a digital copy at Evakool.com.au or contact Evakool on
(07) 5492 5495.
3
Contents
1 Safety Instructions ................................................................................................ 4
2 Operating Instructions ......................................................................................... 5
2a Initial Start Up ................................................................................................... 5
2b Control Panel .................................................................................................... 6
3 Energy Saving Tips . . . . . . . . . . . . . . . . . . . . . . . . . . . . . . . . . . . . . . . . . . . . . . . . . . . . . . . . . . . . . . . . . . . . . . . . . . . . . . . . . . . . . . . . . . . . . . . . 7
4 Defrosting & Cleaning .......................................................................................... 7
5 APP (selected models) ......................................................................................... 8
6 Trouble Shooting .................................................................................................. 9
7 Technical Data .................................................................................................... 11
7a Dimensions & Parts ...................................................................................... 13
8 Features ................................................................................................................ 18
9 Warranty ............................................................................................................... 18

4
1 Safety Instructions
• Do not use if any cabling is damaged, frayed or exposed. Especially on AC power supply.
• This appliance may only be repaired by a qualified technician.
• Do not attempt to operate this unit if wet.
• Not to be operated by children.
• Do not place or store any electrical devices inside the unit as they may be damaged.
• Disconnect from power supply and remove lead before defrosting, cleaning and
maintenance.
• When using the unit ensure the electrical circuit being used has a fuse or circuit breaker
(12V DC 15 Amps. 24V DC 7.5 Amps).
• Do place unit near naked flames and other heat sources (electric heaters, direct
sunlight).

5
2. Operating Instructions
2a Initial Startup
Pre check:
• For hygiene reasons we recommend cleaning the inside of the cabinet before use (see
section 4 defrosting and cleaning).
• Your unit requires good ventilation especially around the vents of the engine
compartment, allow at least 100mm gap around all vents.
(Warning: Do not operated unit in an unventilated confined space, E.g. storage box or
cupboards in caravans and camper trailers. Doing so may cause damage to the unit).
• When using the unit ensure the electrical circuit being used has a fuse or circuit breaker.
(12V DC 15 Amps. 24V DC 7.5 Amps).
Ready to go:
• 12 and 24 Volt DC: Plug the DC connection cable into the DC socket located on the
motor compartment end of the unit (the unit will automatically detect the DC voltage
applied 12 or 24 volts).
• Mains power AC: Plug the AC connection cable in the AC socket located on the motor
compartment end of the unit. Then plug the 3-pin plug into the wall socket.
• Press and hold the for 3 seconds. The display will light up, showing the temperature
inside the unit. You will hear the compressor start first then the cooling fan will start.
Your fridge is running.
• For a single zone. Press or buttons to set the desired temperature inside the
fridge.
• For a dual zone. Press once, the le display will start to flash, use the or
buttons to set the desired temperature. Press again, the right display will start to
flash, use the or buttons to set the desired temperatures. Press again to lock
in settings.
• The unit will start to cool. Depending on the size and design of the unit, and your set
temperature it should take between 60 and 120 minutes to reach its set temperature.
Single Zone - @24°C ambient, set at 4°C, no product inside.
Dual Zone - @24°C ambient fridge set at 4°C, freezer set at -16°C, no product inside.
*These are average cycle times, this will vary depending on ambient temperature, heat load, etc.
N.B: Always allow 24 hrs for unit to achieve proper running conditions
• Initial start up
• Aer changing the set temperature on the display.
• Allowing hot product to come down to temperature.

6
1. On/O button. press and hold for 3 seconds to turn on unit. The LED display will
light up and display the temperature inside the fridge.
2. Speed selection button. press set button once, the Turbo Light (4) will come on
indicating the compressor is running at high speed (use when ambient temperature
exceeds 28°C or when unit is loaded with hot product, requiring a quick pull down).
3. Fault light. the unit has a built-in fault-finding system refer to trouble shooting
guide.
4. Turbo light. ¢(see speed selection 2. Above).
5. LED Display. Displays the temperature inside the fridge. In the dual zone there
are 2 LED displays for the le and right bins.
5a.Select button. (dual zone)
When setting temperature, press select button to change between freezer and fridge
LED displays.
6. Up button. Changes the temperature setting warmer.
7. Down button. Changes the temperature setting colder.
2b Control Panel
1
DUAL ZONE
SINGLE ZONE
2 3 5 6 75a
4Freezer Fridge
1 2 3 5 76
4

7
3. Energy Saving Tips
• Run unit in a well-ventilated location, protect from direct sunlight.
• Keep lid openings to a minimum.
• Don’t leave lid open too long
• Try to pre chill product before loading into unit.
• Set your freezer warmer if your freezing needs are short term.
-18°C for long term
-12°C to -15°C for short term (based on an article from the CSIRO) .
• Defrost unit when a layer of ice forms. (see defrosting and cleaning 4).
4. Defrosting & Cleaning
WARNING: Always turn unit o and remove power cord before cleaning.
Do’s:
• Turn o and allow unit to defrost
• Wipe out water before restarting.
• Clean inside regularly with a clean damp cloth.
• When not in use ensure that inside the cabinet is completely dry.
• When not in use leave lid slightly open.
Don’ts:
• Do not use sharp objects to defrost ice buildup.
• Do not use heat to defrost ice buildup.
• Do not use abrasive liquids or pastes to clean unit
• Do not use abrasive cleaning pads to clean unit.
• Do not store food inside unit when o.
• Do not clean unit with running water.

8
5. APP (selected models)
Download Maxi Trac Repco app for your Apple or Android phone.
1. Press Enter. 2. Select WiFi or scan
QR code.
3. The device will
connect.
6. Press the Settings button to access
setting mode.
Setting mode
• WiFi Settings - Manage WiFi.
• Temperature Unit - Change between
Celsius and Fahrenheit.
• Mode - Change compressor speeds( see
2b control panel, speed selection).
Press BACK button to return to the home
screen.
4. This is the fridge
turned “o ”.
5. This is the fridge turned “on”.
• Press temperature control to adjust
temperature, use the blue arrow to
adjust colder and the red arrow to adjust
warmer.
• The temperature displayed near the
fridge logo, indicates the temperature
inside the cabinet.
• The temperature displayed below is the
set temperature.

9
6. Trouble Shooting
FAU LT CAUSE RECOMMENDED FIX
Not running
No LED display
No power to unit
• Try on both 12V DC and 240 AC
• Maybe a faulty lead
• Try a dierent power supply
• Check circuit breaker or fuse
Faulty electronic
component
Contact Evakool
(07) 5492 7777
LED display on
but not running
Faulty electronic
component
Contact Evakool
(07) 5492 7777
LED display on,
compressor running,
not cooling
Compressor or
refrigerant problem
Contact Evakool
(07) 5492 7777
LED display on
Fault light flashing Refer to chart below
The unit has its own built in fault
finding system depending on
how many fashes per 5 flashes
Led display shows
Error codes
ER1
ER2
This is a thermistor issue
contact Evakool (07) 54927777
Refers to fault light error
1 Flash: LOW VOLTAGE ERROR
Cause:
• Battery is flat. Check with multimeter, 12.70 Volts 100% charge, 12.05V 50% charge,
10.50V 0% charge.
• Faulty supply lead. Check that the plug and lead are not broken or frayed.
• Supply wiring not the correct size (refer to cable sizing chart below).
• To rule out that the fridge is not faulty, try running it on a dierent power source, either
on 240 Volt supply or a dierent vehicle or battery.
2 Flash: FAN ERROR
Cause:
• Condenser fan drawing too many amps (over 1-amp peak). Requires a replacement fan,
contact Evakool.

10
3 Flash: COMPRESSOR START ERROR
Cause:
• Stopping and starting too quickly (not giving the system time to equalize).
• Electronic box issue.
• Faulty compressor.
• Disconnect power for ten minutes, then re-start, if problem persists, contact Evakool.
4 Flash: MINIMUM MOTOR SPEED ERROR
Cause:
• If the refrigeration system is too heavily loaded, the motor cannot maintain minimum
speed at approximately 1,850 rpm.
• Very high ambient temperatures (move to a cooler area).
• Blocked or dirty condenser (clean and re-test).
• Fan not working (contact Evakool).
5 Flash: OVER TEMPERATURE ERROR
Cause:
• Ambient temperature too high (move to a cooler area).
• Blocked or dirty condenser (clean and re-test).
• Fan not working (contact Evakool).

11
7. Technical Data
MT45 MT60 MT75
Fridge Type Single Zone Single Zone Dual Zone
Cooling Range 10° to -18°C (40 ~ 45°C below ambient)
Volume 45 litres 60 litres 44 + 31 = 75 litres
Power 45 Watts
Power Consumption
@ 24°C ambient
Eco +5°C
1.0 to 1.5 A/Hr
Eco +5°C
1.0 to 1.5 A/Hr
Turbo +5°C
1.3 to 1.8 A/Hr
Turbo +5°C
1.3 to 1.8 A/Hr
Fridge /Freezer
2.5 A/Hr
Turbo -16°C
2.0 to 2.5 A/Hr
Turbo -16°C
2.0 to 2.5 A/Hr
Voltage DC 12/24 AC 100~240V 50/60hz
Insulation Cabinet 45 to 58mm / Lid 45mm / C-pentane, totally CFC Free
Refrigerant R134a 55 grams 62 grams 90 grams
Gross Weight 23 kg 30 kg 37 kg
Net Weight 18.5 kg 25.3 kg 31.5 kg
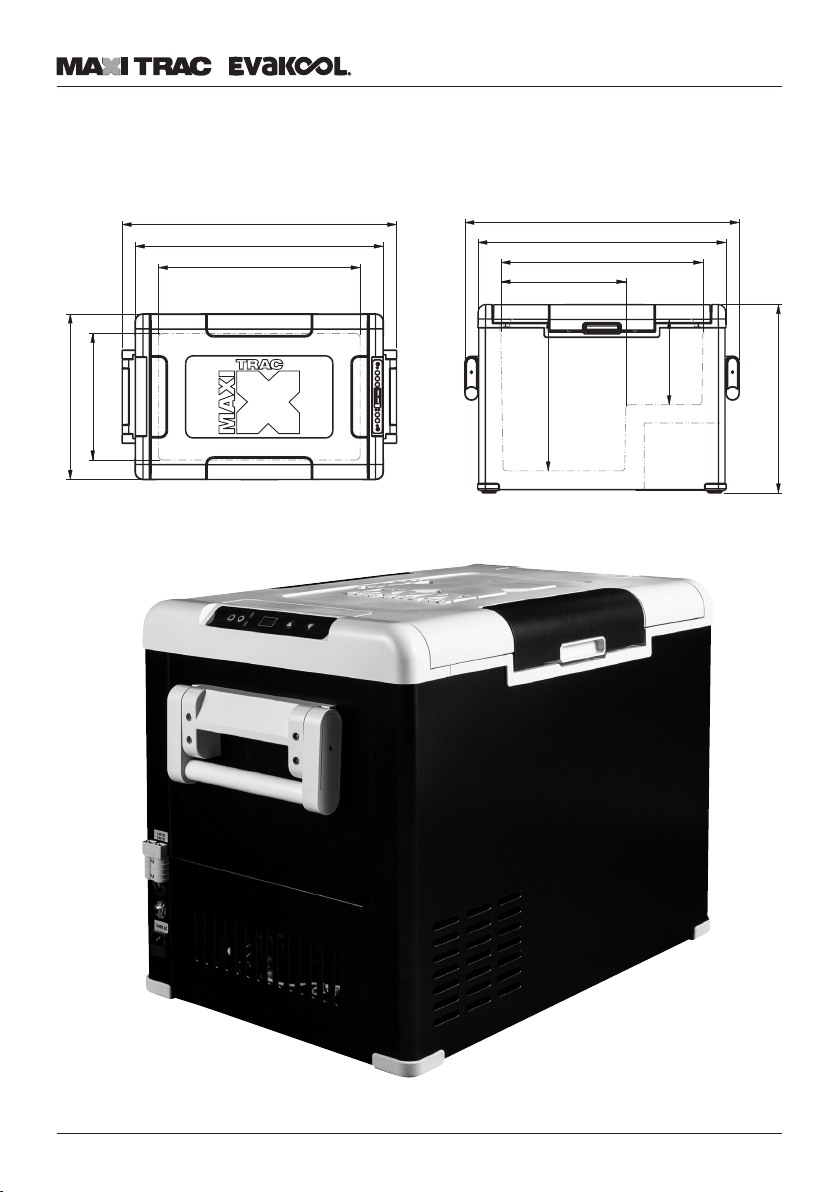
External Dimensions
(WxHxD) in mm 747 x 413 x 450 747 x 513 x 450 747 x 513 x 450
Carton Dimensions
(WxHxD) in mm 795 x 470 x 490 795 x 570 x 490 975 x 540 x 490
Compressor Evakool CK 25 (see table for technical data)

Compressor Evakool CK25
Displacement cm32.5
Application LBP
Rotation RPM 2000 2500 3000 3500
Capacity W 40 50 60 70
Input Power W 36 44 50 60
Operating Current A 3 3.7 4.3 5
COP W/W 1.1 1.14 1.15 1.16
Cooling Static or Fan Cooling
Lubricant Polyester
Weight of Compressor 3.1
Weight of Controller 0.16
Motor Type BLDCM
Refrigerant R134a
Throttling Device Capillary
Power Supply V.DC 12/24
Test Conditions
Evaporating Temp -23°C Suction Temp 32.2°C
Condensing Temp 54.4°C Sub Cooling Temp 32.2°C
Ambient Temp 32.2°C Test Voltage 12VDC
for 24V applications the current must be halved
Cable Length Specification
The DC cables must have a suitable cross-section for their length (measured from the
battery to the unit), according to this table:
Cable Thickness 12V Max Cable Length 24V Max Cable Length
(mm2) AWG (m) () (m) ()
2.5 14 2.5 8 5 16
4 12 4 13 8 26
6 10 6 20 12 39
10 8 10 33 20 66
12

13
7a Dimensions & Parts
MT45
14
MT60

15
MT75

16
MT45 & 60
1 RC45/65 - 001 Door 11 RC45/65/75D - 006 50A Plug
2 RC45/65/75D - 001 Door Handle 12 RC45/65/75D - 007 Circuit Breaker
3 RC45/65/75D - 002 Cabinet Handle 13 RC45/65/75D - 008 230V Socket
4A RC45/65 - 002 - A RC45 Cabinet 14 RC45/65/75D - 009 Angle Surrounding
4B RC45/65 - 002 - B RC65 Cabinet 15 RC45/65/75D - 010 Power Switch
5A RC45/65 - 003 - A RC45 Basket 16 RC45/65 - 006 Compressor
5B RC45/65 - 003 - B RC65 Basket 17 RC45/65/75D - 011 Compressor Base Board
6 RC45/65/75D - 003 Door Hinge 18 RC45/65 - 007 Dryer
7 RC45/65/75D - 004 LED Light 19 RC45/65/75D - 012 Condenser
8 RC45/65 - 004 Display Board 20 RC45/65/75D - 013 Fan
9 RC45/65 - 005 Display Sticker 21 RC45/65/75D - 014 Capillary
10 RC45/65/75D - 005 Display Plastic Frame 22 RC45/65/75D - 015 Rear Cover Board

17
MT75
1 RC75D - 001 Door 13 RC45/65/75D - 007 Circuit Breaker
2 RC45/65/75D - 001 Door Handle 14 RC45/65/75D - 008 230V Socket
3 RC75D - 002 Cabinet 15 RC45/65/75D - 009 Angle Surrounding
4 RC45/65/75D - 002 Cabinet Handle 16 RC45/65/75D - 010 Power Switch
5 RC45/65/75D - 004 LED Light 17 RC45/65/75D - 012 Condenser
6 RC75D - 003 Basket 1 18 RC45/65/75D - 013 Fan
7 RC75D - 004 Basket 2 19 RC45/65/75D - 014 Capillary
8 RC45/65/75D - 003 Door Hinge 20 RC75D - 007 Compressor
9 RC75D - 005 Display Board 21 RC45/65/75D - 011 Compressor Base Board
10 RC75D - 006 Display Sticker 22 RC75D - 008 Electronic Valve
11 RC45/65/75D - 005 Display Plastic Frame 23 RC75D - 009 Dryer
12 RC45/65/75D - 006 50A Plug 24 RC45/65/75D - 015 Rear Cover Board

18
8. Features
• Extremely powerful DC compressor cooling system.
• Digital control with LED display.
• Extremely high reliability and long-life expectancy.
• Smart start technology (so start to reduce power consumption).
• Fully insulated base, lid and walls.
• 12/24 and 240-volt operation built in.
• Turbo mode for faster cooling.
• Self-diagnostic fault system.
• Smooth interior walls, hygienic and easy to clean.
• Downloadable APP (Wi-Fi) to monitor and control the fridge.
• Handles can be used as tie down points.
• Will operate on angles up to 30 degrees.
• LED light.
• Nationwide warranty.
9. Warranty
The statutory warranty period applies if your unit is defective. Please contact Evakool on
(07) 5492 7777 or warranty@evakool.com for details of your closest Evakool service centre.


POWERED BY
For your nearest stockist contact EvaKool
T: 1300 385 665 (1300 EVKOOL)
E: warranty@evakool.com
or visit us at evakool.com.au
This manual suits for next models
2
Table of contents
Other EvaKool Freezer manuals


Popular Freezer manuals by other brands


GE
GE Profile FUM13 Owners & installation manual

Silver King
Silver King SKUCF7F Technical manual and replacement parts list

True Manufacturing Company
True Manufacturing Company T-23DF-HC installation manual

GE
GE Profile FUM13 Owners and installation manual

Amica
Amica FZ1334 operating instructions

True
True RESIDENTIAL manual