EVGA Z20 User manual


More...
QuickGuide
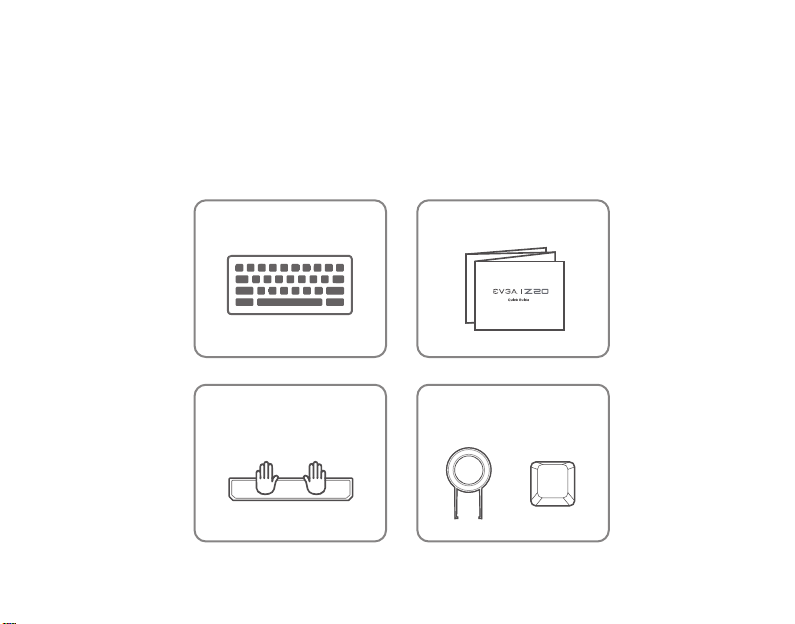
PLEASE CHECK ALL THESE ITEMS ARE INCLUDED.
EVGA Z20
MAGNETIC APPROACH
PALM REST
REMOVAL TOOL
& KEYCAP
QUICK GUIDE
INSIDE THEBOX

GETTING START YOURZ20 GAMING KEYBOARD
Plug USB Connection Cable to your PC.
Branchez le câble de connexion USB à votre PC.
Schließen Sie das USB Verbindungskabel an Ihren PC an.
Conecte o cabo de conexão USB ao seu PC.
Conecta una conexión USB por cable a tu computadora.
Inserire il cavo di collegamento USB nel PC.
Turn on your PC.
allumez votre PC.
Schalten Sie Ihre PC ein.
liga o seu PC.
Prende tu PC.
Avviare il PC.
Install EVGA Unleash RGB Software.
Installez le logiciel EVGA Unleash RGB.
Installieren Sie die EVGA Unleash RGB Software.
Instale o software Unleash RGB da EVGA.
Instala EVGA Unleash RGB Software.
Installare il software EVGA Unleash RGB.
Enjoy it!
profitez-en!
Genieß es!
Aproveite!
¡Disfruta!
Buon divertimento!
STEP 2
STEP 3
STEP 4
STEP 1

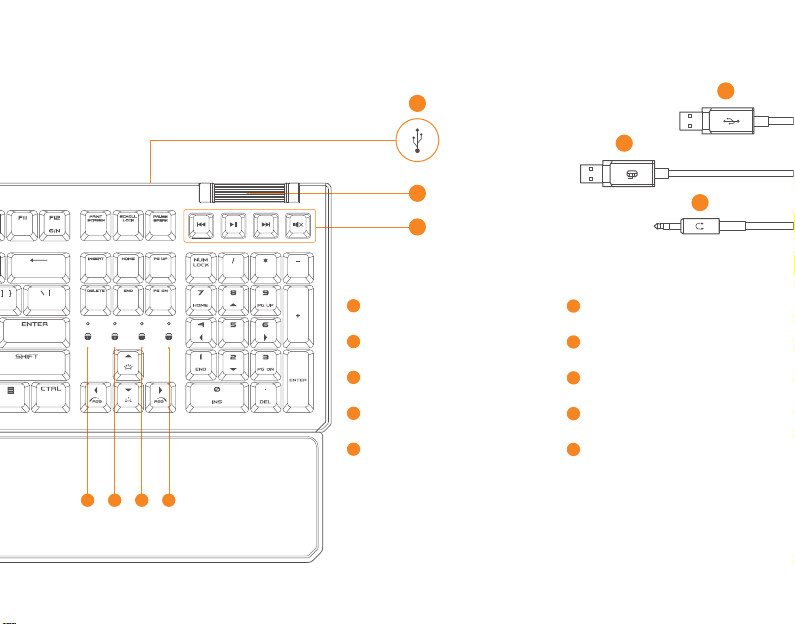
"E" game mode Key
Programmable Macro keys
Magnetic Approach Palm Rest
EVGA Time-of-Flight
Sensing System
EVGA RGB Light bar
3.5mm Audio Jack
A
B
C
D
E
F
INTRODUCTION
A
B
C D
E
F
M
CAPS Lock Led Indicator
H
NUM Lock Led Indicator
G
SCROLL Lock Led Indicator
I
Game Mode Indicator
J
USB 2.0 Passthrough Port
K
Volume control
L
Media Buttons
M
USB Passthrough Connector
N
USB Keyboard Connector
O
3.5mm Audio Plug
P
GHIJ
INTRODUCTION
L
N
P
O
K

INTRODUCTION
French
A Touche mode de jeu «E»
B Touche macro programmable
C Repose-paume approche magnétique
D Système de détection de temps de vol EVGA
E Barre lumineuse RVB EVGA
F Prose audio Jack 3,5 mm
G Voyant verrouillage NUM
H Voyant verrouillage MAJ
I Voyant verrouillage DÉFILEMENT
J Indicateur mode jeu
K Port USB 2.0
L Commande du volume
M Boutons de médias
N Connecteur USB
O Connecteur pour clavier USB
P Prise audio 3,5mm
Deutsch
A "E"-Spielmodus-Taste
B Programmierbare Makro-Taste
C Magnetische, abnehmbare Handballenauflage
D EVGA-Flugzeiterfassungssystem
E EVGA-RGB-Lichtleiste
F 3,5 mm Klinken-Anschluss
G NUM-Lock LED-Anzeige
H CAPS-Lock LED-Anzeige
I SCROLL-Lock LED-Anzeige
J Spielmodus-Anzeige
K USB 2.0-Anschluss
L Lautstärkeregler
M Medien-Buttons
N USB-Stecker
O USB-Tastatur-Stecker
P 3,5mm Klinken-Stecker
A Tecla do modo de jogo "E"
B Tecla programável de macro
C Aproximação Magnética Palm Ret
D Sistema de detecção de tempo de voo EVGA
E Barra de luz EVGA RGB
F Entrada de áudio de 3,5 mm
G Led Indicador NUM Lock
H Led Indicador CAPS Lock
I Led Indicador de bloqueio SCROLL
J Indicador do modo de jogo
K Porta USB 2.0 Passthrough
L Controle de volume
M Botões de mídia
N Conector USB Passthrough
O Conector de teclado USB
P Plugue de áudio de 3,5 mm
Português

INTRODUCTION
A Клавиша Е для переключения в игровой режим
B Программируемая клавиша
C Магнитная подставка под ладони
D Сенсорная система EVGA Time-of-Flight
E Светодиодная полоса EVGA RGB
F Разъем для наушников 3,5 мм (гнездо)
G Светодиодный индикатор клавиши NUM Lock
H Светодиодный индикатор клавиши CAPS Lock
I Светодиодный индикатор клавиши SCROLL Lock
J Индикатор игрового режима
K Порт проброса USB 2.0 -устройств
L Регулятор громкости
M Кнопки управления мультимедийными устройствами
N Разъем проброса USB-устройств
O Разъем для USB-клавиатуры
P Аудио штекер 3,5 мм
русский
A Tecla "E" para el modo juego
B Teclas Macro Programables
C Apoya muñecas magnético
D Sistema de sensado de tiempo de
vuelo de EVGA
E Barra de iluminación RGB de EVGA
F Salida de audio de 3.5mm
G Indicador de NUM Lock LED
H Indicador de CAPS Lock LED
I Indicador de SCROLL Lock LED
J Indicador de Modo de juego
K Puerto de traspaso USB 2.0
L Rueda de control de volumen
M Teclas Multimedia
N Conector de traspaso USB
O Conector de USB para el teclado
P Conector de audio de 3.5mm
España
A Tasto modalità gioco "E"
B Tasto macro programmabile
C Poggiapolsi ad attacco magnetico
D Sistema di rilevamento tempo di
volo EVGA
E Barra luminosa RGB EVGA
F Jack audio 3,5 mm
G Spia LED Bloc NUM
H Spia LED Bloc MAIUSC
I Spia LED Bloc SCORR
J Indicatore modalità gioco
K Porta passthrough USB 2.0
L Controllo volume
M Pulsanti multimediali
N Connettore USB passthrough
O Connettore USB tastiera
P Spinotto audio 3,5 mm
Italiano
繁體中文
A "E" 專屬遊戲模式按鍵
B 自訂義巨集按鍵
C 磁吸式鍵盤護腕手托
D EVGA飛時測距感測系統
E EVGARGB燈效光條
F 3.5mm音源孔
G NUM鎖定Led燈號
H CAPS 鎖定 Led燈號
I SCROLL鎖定Led燈號
J Game Mode燈號
K USB2.0延伸插槽
L 音量調整
M 媒體播放按鍵
N USB延伸插頭
O 鍵盤USB插頭
P 3.5mm音源插頭
简体中文
A "E" 专属游戏模式按键
B 自订义宏按键
C 磁吸式键盘护腕手托
D EVGA飞时测距感测系统
E EVGA RGB 灯效光条
F 3.5mm音源孔
G NUM锁定Led灯号
H CAPS锁定Led灯号
I SCROLL锁定Led灯号
J 游戏模式灯号
K USB2.0延伸插槽
L 音量调整
M 媒体播放按键
N USB延伸插头
O 键盘USB插头
P 3.5mm音源插頭

SETTING UP YOUR Z20 ELITE GAMING KEYBOARD
Using Your Z20 ELITE Gaming Keyboard
When the "FN" key is held down, all function keys with secondary functions including other
keys which you can combine with the "FN" key will light up. the function keys will activate
their secondary features on your PC.
Switch to Profile 1 ~ Profile 9
The backlight control keys allow you to decrease or increase
the brightness of your keyboard’s LEDs.
Switch to 6 key or N-Key Roll Over
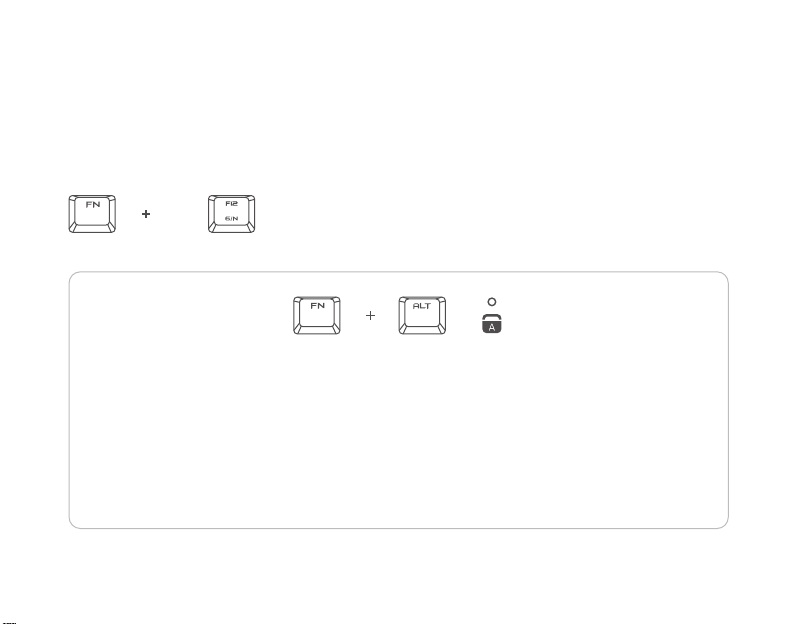
The Follow these steps to create an Macro Recording:
1. Press the key combination ( FN + ALT )to start recording.
2. The CAPS LOCK Indicator will light up to show that the device is ready to record.
3. Type in the keys you want to record.
4. Press the key combination to stop the recording. The CAPS LOCK Indicator will start blinking to
show that the device has stopped recording and is ready to save the macro.
5. Press the desired key (E1~E5) where you want to save your macro.
SETTING UP YOUR Z20 ELITE GAMING KEYBOARD
Using Your Z20 ELITE Gaming Keyboard
This manual suits for next models
1
Table of contents
Other EVGA Mouse manuals


