Evo-lite WIFI-104 Operating and safety instructions
1
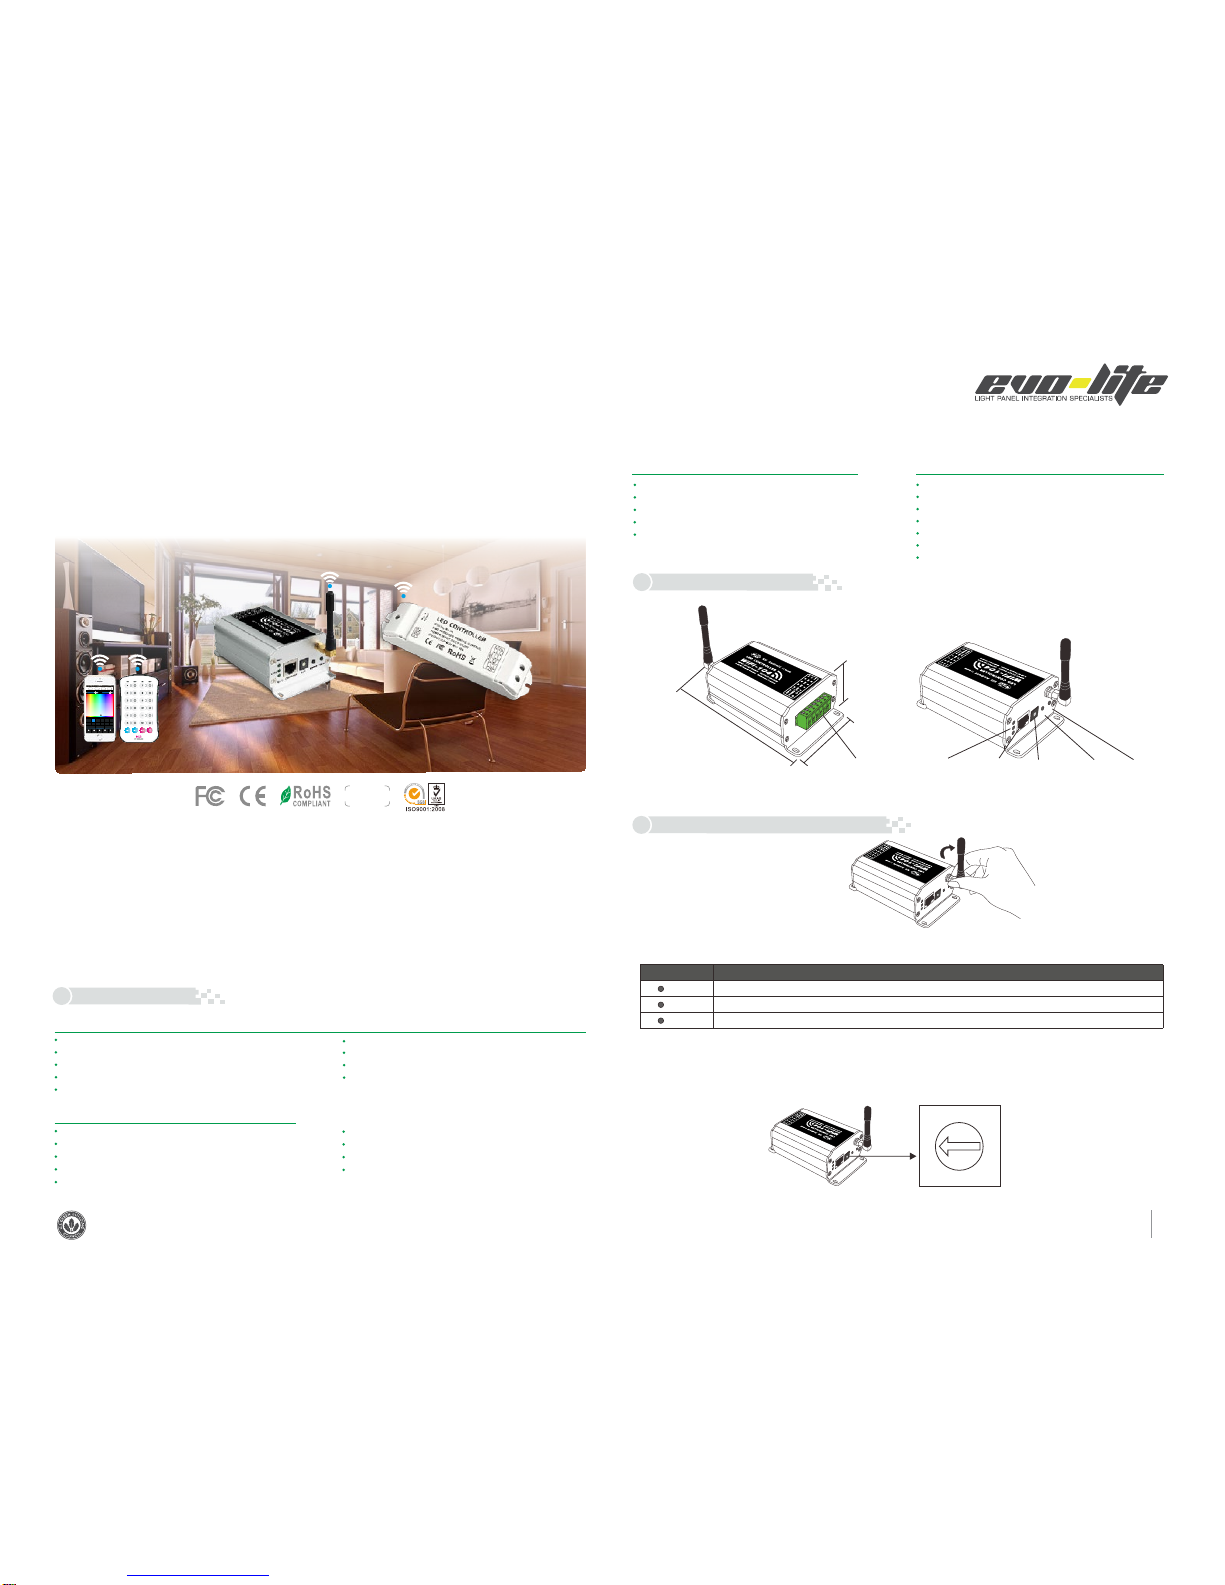
PRODUCT OVERVIEW
RGB WiFi Lighting Control System
WIFI-104
WiFi-104 Controller
4A x4CH AMax 16
Max Current Load:
Communication Standard: 2.4GHz Wi-Fi, 802.11b/g/n Protocol
DC12V~DC24V
Input Voltage:
109yd (Distance of cross-eyed)
WiFi Control Distance:
Indicator light Instructions
RUN
LINK
RX/TX
(2) Indicator Light Instructions
1.75in
RUN
RX/TX
LINK
EXTK EY SSID MATCHFU N
RUN
RX/TX
LINK
EXT KEYSSI D MATCHSCENE
192W/384W(12V/24V)
Max Output Power:
RUN
RX/TX
LINK
EXTKE Y SSID MATCH SCENE
5
4
6
3
7
2
8
1
9
0
A
F
B
E
C
D
L5.02×W2.87×H1.75 in
L5.31×W3.15×H1.97 in
0.64lbs
Working Temperature:
Product Size:
Package Size:
Weight(G.W.):
R4-5A Constant Voltage Zone Receiver
5A 4CH A× Max 20Max Current Load
Wireless Frequency: 2.4GHz
DC5V~DC24V
Input Voltage:
55yd (Distance of cross-eyed)
Remote Distance:
100W/240W/480W(5V/12V/24V)
Max Output Power:
Working Temperature:
Product Size:
Package Size:
Weight(G.W.):
L6.89×W1.73×H1.81 in
L7.01×W1.89×H1.30 in
0.24lbs
G255
R255 B255 W255
W
80% 80%
CONTROLLER1
Longpresstoturn off single zone or group
Mode
Device Scene
Group On/off
2 3 456
78
RGBW
1
RGB CT1 RGB
RGBW
10 11 129
RGBW DIM
Group1 Group2 Group3
DIM
DIM RGBW RGBW
CT2
WiFi-104
WiFi-104 R4-5A
R4-5A
warranty
5 years
1. Product Parameter:
Operation Platform:
Screen Resolution:
WiFi Function:
Byte:
Language:
Category:
Other:
No Lower Than Android 2.2 or iOS5.1
Above 960*640
Must Have WiFi Function
Android Edition (919K); iOS Edition (2.9MB)
English
Appliance
Free, No Plug-ins
M12 Remote Control
Working Voltage:
Dimensions:
Transmitting Frequency:
Remote Distance:
Weight (G.W):
DC
(Distance of cross-eyed)
L4.09 × W2.36 ×H0.35 in
3V(CR2032 button battery)
2.4GHz
32.8yd
0.09lbs
Software Technology Parameters
Controller Operating Instructions
3.
2. Configuration Diagram
Side A Side B
Power Input / LED Output Manufacturer
Interface
SSID Code
switch
Learning ID
Key
Scene
Indicator
(1) Install / Uninstall ANT
ANT installation instruction
It flashes quickly about 25s during the electric initialization. Flashes once per second after initialization
It keeps on when the mobile device connects to WiFi-104, and turns off when disconnected.
It turns on when the controller receives or transmits the WiFi data. Turns off in the free time.
Use code switch to set the controller's SSID Number--WiFi-104-SSID-X, X stands for a certain No. ranging from 0-F, totally 16 options.
which means our product could set 16 isolated LAN in the same area. WiFi-104 will initialize each time the SSID NO. changed. Run LED
indicator quick flashes about 25s, mobile device need to search and connect WiFi again after Initialization finished.
(3) SSID Number Setting
clockwise to install the WiFi ANT,
counterclockwise to take off
-4ºF~122ºF
-4ºF~122ºF
2.87in
5.02in
The WiFi-104 is a versatile lighting control system utilizing WiFi connectivity of mobile devices to control various types of LED
lighting products. Free software downloads for iOS & Android phones as well as tablet PCs allows the user to connect and
control.
The WiFi-104 lighting control system integrates with four functional controls including dimming, color temperature adjustable,
RGB and RGBW, which could be set as single color, color temperature(nature white + warm white and nature white + warm
white + cool white), RGB and RGBW.
Supports a max of 12 separate zones.
WiFi-104 control system supports connection directly or through an existing router.
Direct connection: WiFi-104 and R4-5A/R4-CC can be controlled directly by a mobile phone or tablet without any the third
party network equipment.
Not
Included
Included
Sold
Seperately

2
1Network
Zone
WiFi-104-SSID-2
32:AA:3C:7E:B4:DB
Disconnected
2
Dev ice Lis t
234
56 7
1
8
10 11 12
9
WiFi-104-SSID-0
32:AA:3C:7E:B4:DA
Network
Zone
Connect to WiFi-104-SSID-1
A. App softwareDownload
Apple WiFi connectionAndroid WiFi connection
(1) Network Connection Setting
Connect to the WiFi-104 controller, the step as (1)same
B. Software Operating Instructions
Scene Interface
RUN
RX/TX
LINK
EXT KEYSSID MAT CH SCENE
SCENE
SCENE Key and MATCH Key
Scene Save
Scene 2
Scene 3
Scene 4
Back
Scene 1
WiFi-104 support 2 connection modes: Direct connection as router or connect by additional router.
WiFi-104 controller direct connection as router:
The mode of connect with a additional router:
Connnect WiFi-104 controller to the additional router network:
Click “Network” key to enter Network interface(as legend-3-1), start "connect to exiting LAN", software will search the workable WiFi net
SSID list, choose the specified router to connect (Att: do not choose WiFi-104 controller), can add the WiFi-104 controller to the
wireless router(as legend-3-2 the wireless router TP-LINK1)
C.
Network
Back
User setting
Wireless mode
Connect to existing LAN
Change SSID and password
Network
Back
Available wireless LAN networks
TP-LINK1
WiFi-104-SSID-0
WiFi 104 S SID 1- - -
User setting
Wireless mode
Connect to existing LAN
Change SSID and password
WiFi-104-SSID-2
WiFi-104-SSID-3
WiFi-104-SSID-4
( )Legend-1
( -2-1)Legend
( -3-1)Legend
B.
A.
( -2-2)Legend
1Network
Zone
WiFi-104-SSID-1
32:AA:3C:7E:B4:DB
Connect t o TP-LINK1
2
Device List
234
56 7
1
8
10 11 12
9
WiFi-104-SSID-0
32:AA:3C:7E:B4:DA
Network
Zone
Connect t o TP-LINK1
1Network
Zone
WiFi-104-SSID-2
32:AA:3C:7E:B4:DD
Connect t o TP-LINK1
D.
Connect a additional router interface
[ Restore factory settings/Delete password ]
MATCH
WiFi-104 as a router interface
Delete WiFi-104 controller list
Disconnect to WiFi-104 controller
Network interface
Zone function interface
Change the background interface
Connect to additional router TP-LINK1
Connect to WiFi-104
Manual searching the WiFi-104 controller
which connect to the additional router
Workable WiFi-104
WLAN settings
WL AN
Connect to WiFi-104-SSID-0
Network notification
Auto Connect
WiFi-104-SSID-0
TP- 008
ACW 1F
Notify me when an open network is
available
set the way of network’s connection
Connected
Remembered, secured with WPA/
WPA2 PSK
Remembered
WLA N netwo rks
16:0 7
Android scan for download
iOS scan for download
14:17 PM
Wi-Fi
Settings
Wi-Fi
O th e r...
Ask to jin Networks
Known networks will be joined automatically.
if no known networks are available, you will
have to manually select a network.
C HO OS E A N E TW OR K ...
WiFi-104-SSID-0
WiFi-104-SSID-1
100%
14:17 PM 100%
Network interface
( -3-2)
Legend
WLAN settings
WL AN
Connect to WiFi-104-SSID-0
Network notification
Auto Connect
WiFi-104-SSID-0
TP- 008
ACW 1F
Notify me when an open network is
available
set the way of network’s connection
Connected
Remembered, secured with WPA/
WPA2 PSK
Remembered
WLA N netwo rks
16:0 7
WiF i-104-SSID-0
Cancel Forget Disconnect
Status
Connected
Signal strength
Excellent
Link speed
65Mbps
Security
Open
IP address
10.10.100.103
Android cancel store the WiFi-104 connection
14:17 PM
WiFi-104-SSID-0
Wi-Fi
Fo rge t thi s Net nwo rk
IP AD DRESS
100%
DHCP BootP Static
IP Ad dress
Sub net Mas k
Router
DNS
Search Domains
10.10 .100.10 3
255.255.255.0
10 .10.100.254
10 .10.100.254
Hi_f lying
Apple cancel store the WiFi-104 connection
(4) MATCH Key and SCENE Key
Short press MATCH key, WiFi controller begins its learning ID status for the standard M12 remote (learning method, see P7)
Short press SCENE key sequentially to the user-saved scene modes, 4 scenes total.
Long press MATCH key and SCENE key simultaneously more than 2 seconds, the machine will back to the default parameter, including the
parameters of changing modes, zone and group parameters and network parameters. Machine default parameters: Only the 1st zone is
present, default RGBW mode, the changing mode is RGB skipping, the brightest is white, no groups, network SSID is WiFi-104-SSID-X (X is
the actual coding switch corresponding SSID values), WiFi-104 controller restore as directly connect and the connection password is blank.
The APP software:instructions of
4.
Enter mobile device's WiFi setting, click the WiFi function, mobile device search the WiFi and list the working WiFi controller
automatically(As Legend-1), Click the SSID number to connect (default is no password).
Click mobile device's icon to start the software, the software will search and list the working WiFi controller automatically,
and there is a blue wireless icon (as Legend-2-1)
Workable zone NO.
Exit WiFi-104 software, enter mobile device setting-wireless network setting, choose the wireless router to connect. Device List interface
shows as legend 2-2 when re-open the WiFi-104 software.
Completes the steps to connect to the additional router.
In this connection mode, to avoid the mobile device automatically connect to WiFi-104 after the setting has completed, please click
“workable WiFi-104" which under the mobile device "WiFi setting" and at the massage box please click "Forget this network"(apple iOS)
or "Cancel save" (SUMSUNG mobile phone is "forget") to cancel the save of WiFi-104 connection.
Repeat the ABC steps if you need connecting multiple WiFi-104 controller to this wireless router.
Att:
Ava ila ble o n the
App Store
ANDROID APP ON
Google play
14:17 PM 100% 14:17 PM 100%
14:17 PM 100% 14:17 PM 100%

3
(3) The learning method of Zone control
(2) Main interface ( 5 types total)
G255
R255 B255 W255
W
80% 80%
Name
Long press to turn off single zone or group
Mode
Device Scene
Group On/off
2 3 456
78
RGBW
1
RGB CT1 RGB
RGBW
10 11 129
RGBW DIM
Group1 Group2 Group3
DIM
DIM RGBW RGBW
CT2
RGBW Value
5 Main interface
White Value
Brightness Value
Color Bar
Zone Selection
Group Interface Mode Interface Scene Interface
Main Switch
Group Selection
Device List Interface
14:17 PM 100%
(1) Zones control
[Att]: Default WiFi-104 controller itself as NO.1 zone, which can select if to connect lights. If not, sub-control can be replaced as the first zone.
ZON E NAME LI NK
Zone Se t
TYP E
Back
CONTROLLER1 DIM
1
CONTROLLER2
CONTROLLER3
CONTROLLER4
CONTROLLER5
CONTROLLER6
CONTROLLER7
CONTROLLER8
CONTROLLER9
CONTROLLER10
CONTROLLER11
CONTROLLER12
Ct1
Ct2
RGB
RGBW
RGBW
RGBW
RGBW
RGBW
RGBW
RGBW
NONE
2
3
4
5
6
7
8
9
10
11
12
ZON E NAME LI NK
Zone Se t
TYP E
Back
CONTROLLER1 DIM
1
CONTROLLER2
CONTROLLER3
CONTROLLER4
CONTROLLER5
CONTROLLER6
CONTROLLER7
CONTROLLER8
CONTROLLER9
CONTROLLER10
CONTROLLER11
CONTROLLER12
Ct1
Ct2
RGB
RGBW
RGBW
RGBW
RGBW
RGBW
RGBW
RGBW
NONE
2
3
4
5
6
7
8
9
10
11
12
9
10
11
12
13
14
15
Select type
Cancel
DIM
CT1
CT2
RGB
RGB W
Dev ice Lis t
234
56 7
1
8
10 11 12
9
WiFi-104-SSID-0
32:AA:3C:7E:B4:DA
Network
Zone
Connect to WiFi-104-SSID-1
Zone
Name
Longpress to turn off single zone or group
Mode
Device Scene
Group On/off
2 3 456
78
RGBW
1
RGB CT1 RGB
RGBW
10 11 129
RGBW DIM
Group1 Group2 Group3
DIM
DIM RGBW RGBW
100%
W255
CT2
14:17 PM 100%
40%
WW
135120
NW
Name
Longpress to turn off single zone or group
Mode
Device Scene
Group On/off
2 3 456
78
RGBW
1
RGB CT1 RGB
RGBW
10 11 129
RGBW DIM
Group1 Group2 Group3
DIM
DIM RGBW RGBW
CT2
14:17 PM 100%
40%
WW
15 NW 240 C W 0
Name
Longpress to turn off single zone or group
Mode
Device Scene
Group On/off
2 3 456
78
RGBW
1
RGB CT1 RGB
RGBW
10 11 129
RGBW DIM
Group1 Group2 Group3
DIM
DIM RGBW RGBW
CT2
14:17 PM 100%
G255
R255 B255
40%
Name
Longpress to turn off single zone or group
Mode
Device Scene
Group On/off
2 3 456
78
RGBW
1
RGB CT1 RGB
RGBW
10 11 129
RGBW DIM
Group1 Group2 Group3
DIM
DIM RGBW RGBW
CT2
14:17 PM 100%
G255
R255 B255 W255
W
80% 80%
Name
Longpress to turn off single zone or group
Mode
Device Scene
Group On/off
2 3 456
78
RGBW
1
RGB CT1 RGB
RGBW
10 11 129
RGBW DIM
Group1 Group2 Group3
DIM
DIM RGBW RGBW
CT2
14:17 PM 100%
G152
R87 B255 W25 5
W
80% 80%
Name
Long press to turn off single zone or group
Mode
Device Scene
Group On/off
2 3 456
78
RGBW
1
RGB CT1 RGB
RGBW
10 11 129
RGBW DIM
Group1 Group2 Group3
DIM
DIM RGBW RGBW
CT2
14:17 PM 100%
1
2
3
Return
Type
Turn on
Turn off
Zone Set InterfaceDevice List Interface Select Type Interface
Zone name
Zone number
(2) Learning ID:
(3) Cancelling ID:
Long press” ID learning button” for 5 seconds, The buzzer in zone control long beep, succeed cancel the zone control learning.
ID learning button
Zone number
Color Bar
Short press "ID learning button" on the receiver, the running light go flash to keeps on. Then select the zone number on the software
interface and touch the color bar 2-3 seconds. The buzzer keeps on(meantime the running light returns to flash), zone control and master
control matched successful.
Groups
Back
1
RGB
234
RGBW CT 1
5
9
DIM
RGBW
6
10
7
11
8
12
RGB
RGBW
DIM
RGBW
RGBW
DIM
Group1 Group2 Group3
Only the s ame type of zone c an group
Group name Ent group name
Use this group
CT2
(4) Group
(5) Mode Interface for RGB / RGBW Type
(6) DIY Interface
Mode
Mode
Back
Long pres s can choose to cha nge the curren t pattern type s
CustomDefault
2
4
40 %
Set Play
23
Strobe
1
Jump
4
Fadeindimming
6
Gradual
7
Strobe
5
Jump
8
Fadeindimming
Gradual
10
Gradual
11
Strobe
9
Jump
12
Fadeindimming
Combined cycle set to play
Cancel
2
Gradual
3
Strobe
1
Jump
4
6
Gradual
7
Strobe
5
Jump
8
10
Gradual
11
Strobe
9
Jump
12
Fadeindimming
Fadeindimming
Fadeindimming
OK
Mode
Back
Long pres s can choose to cha nge the curren t pattern type s
CustomDefault
2
4
40 %
Set Play
23
Strobe
1
Jump
4
Fadeindimming
6
Gradual
7
Strobe
5
Jump
8
Fadeindimming
Gradual
10
Gradual
11
Strobe
9
Jump
12
Fadeindimming
Mode
Back
2
Gradual
3
Strobe
Long pres s can choose to cha nge the curren t pattern type s
CustomDefault
4
40 %
W40%
1
Jump
4
Slowly fade
The cu rrent s elect ed colo r combi natio n
6
Gradual
7
Strobe
5
Jump
8
Slowly fade
10
Gradual
11
Strobe
9
Jump
12
Slowly fade
2Select Style
Cancel
Jump
Gradual
Strobe
Fadein dimming
Mode
Back
Long press canchoose to change the current pattern types
CustomDefault
2
4
40 %
Set Play
23
Strobe
1
Jump
4
Fadeindimming
6
Gradual
7
Strobe
5
Jump
8
Fadeindimming
Gradual
10
Gradual
11
Strobe
9
Jump
12
Fadeindimming
Edit Back Apply
Select Color
Color E dit
Long pr ess to de lete si ngle co lor
G255
R0B0
current color combination
Back Apply
Select Color
Color E dit
Long pr ess to de lete si ngle co lor
G255
R255 B255
current color combination
Mode
Back
Long pres s can choose to cha nge the curren t pattern type s
CustomDefault
2
4
40 %
Set Play
23
Strobe
1
Jump
4
Fadeindimming
6
Gradual
7
Strobe
5
Jump
8
Fadeindimming
Gradual
10
Gradual
11
Strobe
9
Jump
12
Fadeindimming
Group Features:
Group
Mode
Selecting several zones at the same time in group operation, multi-zones can be adjusted color, color temperature and brightness together
Max. 3 groups, all zones at the same groups must be the same type, and one zone can belong to multiple groups simultaneously.
Set up the group to enabled status, then the corresponding group will appear in the main interface
It will automatically cancel the relevant zone group settings as you changed the type or set up enabled status of the zone at the Zone Set
interface.
Group Selection
Group Name
Open the Group
Group Interface
Zone Selection
Group operations in main interface
Changing mode
Play single
changing mode
Speed slider
Mode Interface
Brightness slider
long
press
Short
press
Play in a loop several changing
modes (Speed and brightness
unadjustable as play in a loop)
Select the type of changing effect
(skipping/flash/smooth/fade)
Selecting the changing mode
you want to play in a loop
Edit DIY Mode
DIY mode
Play single DIY Mode
Playback Loop
several DIY mode
DIY Mode interface
Save DIY
Color Frame
Edit single DIY Mode Edit single DIY Mode
Long press color frame
to delete the color
Click “Zone” on the Device list interface, enter Zone set interface. According to the lighting control requirements, turn on multiple zones,
select the light type and naming zone.
14:17 PM 100% 14:17 PM 100% 14:17 PM 100%
14:17 PM 100% 14:17 PM 100% 14:17 PM 100%
14:17 PM 100% 14:17 PM 100% 14:17 PM 100% 14:17 PM 100%
G255
R255 B2 55 W255
W
80% 80%
Name
Long press to turn off single zone or group
Mode
Device Scene
Group On/off
2 3 456
78
RGBW
1
RGB CT1 RGB
RGBW
10 11 129
RGBW DIM
Group1 Group2 Group3
DIM
DIM RGBW RGBW
CT2
14:17 PM 100%
14:17 PM 100%
Att: Reset function is available during ID cancellation.Considerring dysfunction in rare cases.please cancel the ID and resync.
4
D I M
RGB W
RGB
CCT
C T
Scene
Scene 2
Scene 4
Back
Save
Play
Save
Play
Scene 3
Save
Play
Save
Scene 1
Save
Play
Scene
Scene 2
Scene 4
Back
Save
Play
Save
Play
Scene 3
Save
Play
Save
Scene 1
Save
Play
Scene
Scene 2
Scene 3
Scene 4
Back
Scene 1
Cancel OK
Scene name
Scene1
Photo Setting
Cancel
Use C amera
Pho to Libr ary
Remove Photo
Scene
Turn on zone
Short press to play scene
Long press to save scene
synchronization for 12 zones
Turn off zone
Short press to turn off all zones
Short press to turn on all zones
Long press to turn on the key tone
Long press to turn off key tone
SCENE
MATC H
MATC H
MATC H
Network
Back
User setting
Wireless mode
Connect to existing LAN
Change SSID and password
14:17 PM 100%
User Setting
SSID
Password
WiFi-104-SSID-0
Ent the new Password
Back
Restore factory settings
Change the SSID name and password Apply
14:17 PM 100%
User Setting
Accoun
Change the account name and password
SSID
Password
Ltech-WiFi-104-0
Ent the new Password
Admin
Password
Restore factory settings
Change the SSID name and password
Cancel OK
Change the SSID password
Ent the NE W Password
Ent the NE W Password aga in
Back
14:17 PM 100%
Dev ice Lis t
234
56 7
1
8
10 11 12
9
WiFi-104-SSID-0
32:AA:3C:7E:B4:DA
Network
Zone
Connect to WiFi-104-SSID-1
14:17 PM 100%
DC5V-24V
RUN
+
B
R
G
+
B
R
G
511
511
331
511
511
331 331
511
511
331
511
511
331 331
+
B
R
G
+
B
R
GZone 4RGB
DC5V-24V
RUN
121
121
121
121
121
121
121
121
121
121
121
121
121
121
w
ww
121
121
cw
Zone 3
DC5V-24V
RUN
121
121
121
121
121
121
121
121
121
121
121
121
121
121
w ww
121
121
Zone 2
DC5V-24V
RUN
+
121
121
121
121
121
121
121
121
121
121
121
121
121
121
121
121
121
121
121
121
121
121
121
121
121
121
121
121
121
121
121
121
121
121
121
121
121
121
121
121
121
121
121
121
121
121
121
121
121
121
121
121
121
121
121
121
121
121
121
121
121
121
121
121
Zone 1
DC5V-24V
+
B
R
G
W
+
B
R
G
W
+
B
R
G
W
+
B
R
G
W
RUN
Zone 5RGBW
Back to the
main interface
Scene
Background
Click to change
the scene background
Play the
scenes
Play the scenes
Saving the current
effect in this scene Change the scene background Save scene interface
7). Scene Interface
WiFi Network SSID Name and Password Setting
Wiring Diagram
5.
Remote operating Instructions
6.
7.
In Device list interface, click “Network key” to enter Network interface, select “Change SSID and Password” (Click” ” ) to enter User Setting
interface. Typing new SSID name and password . Click “Apply” button on the top right corner of
the interface to save the changes.
(Min.: 8 characters, consist of 0-9, a-z and A-Z)
1.Device List interface 2.Network interface 3.Change SSID name interface
Restore the factory
default setting
4.Change SSID password interface
In direct connection of the WiFi-104 as a router. Please exit software after changed the SSID name and the password, then enter the mobile
device system setting to reconnect the WiFi-104
In additional wireless router connection, it only needs to click “ ” in Device List interface to search again the WiFi-104 controller after
changed SSID name.
If you forget the WiFi network password, please simultaneously press : “ ” and “ ” more than 2s to restore the factory
default settings, so that can delete the WiFi network password (More details in page 3 [Restore factory settings/Delete password]
[Att]: WiFi-104 default to first zone, LED lamps can be connected or disconnected in master controller. If disconnected, wireless slave control
can be the first zone.
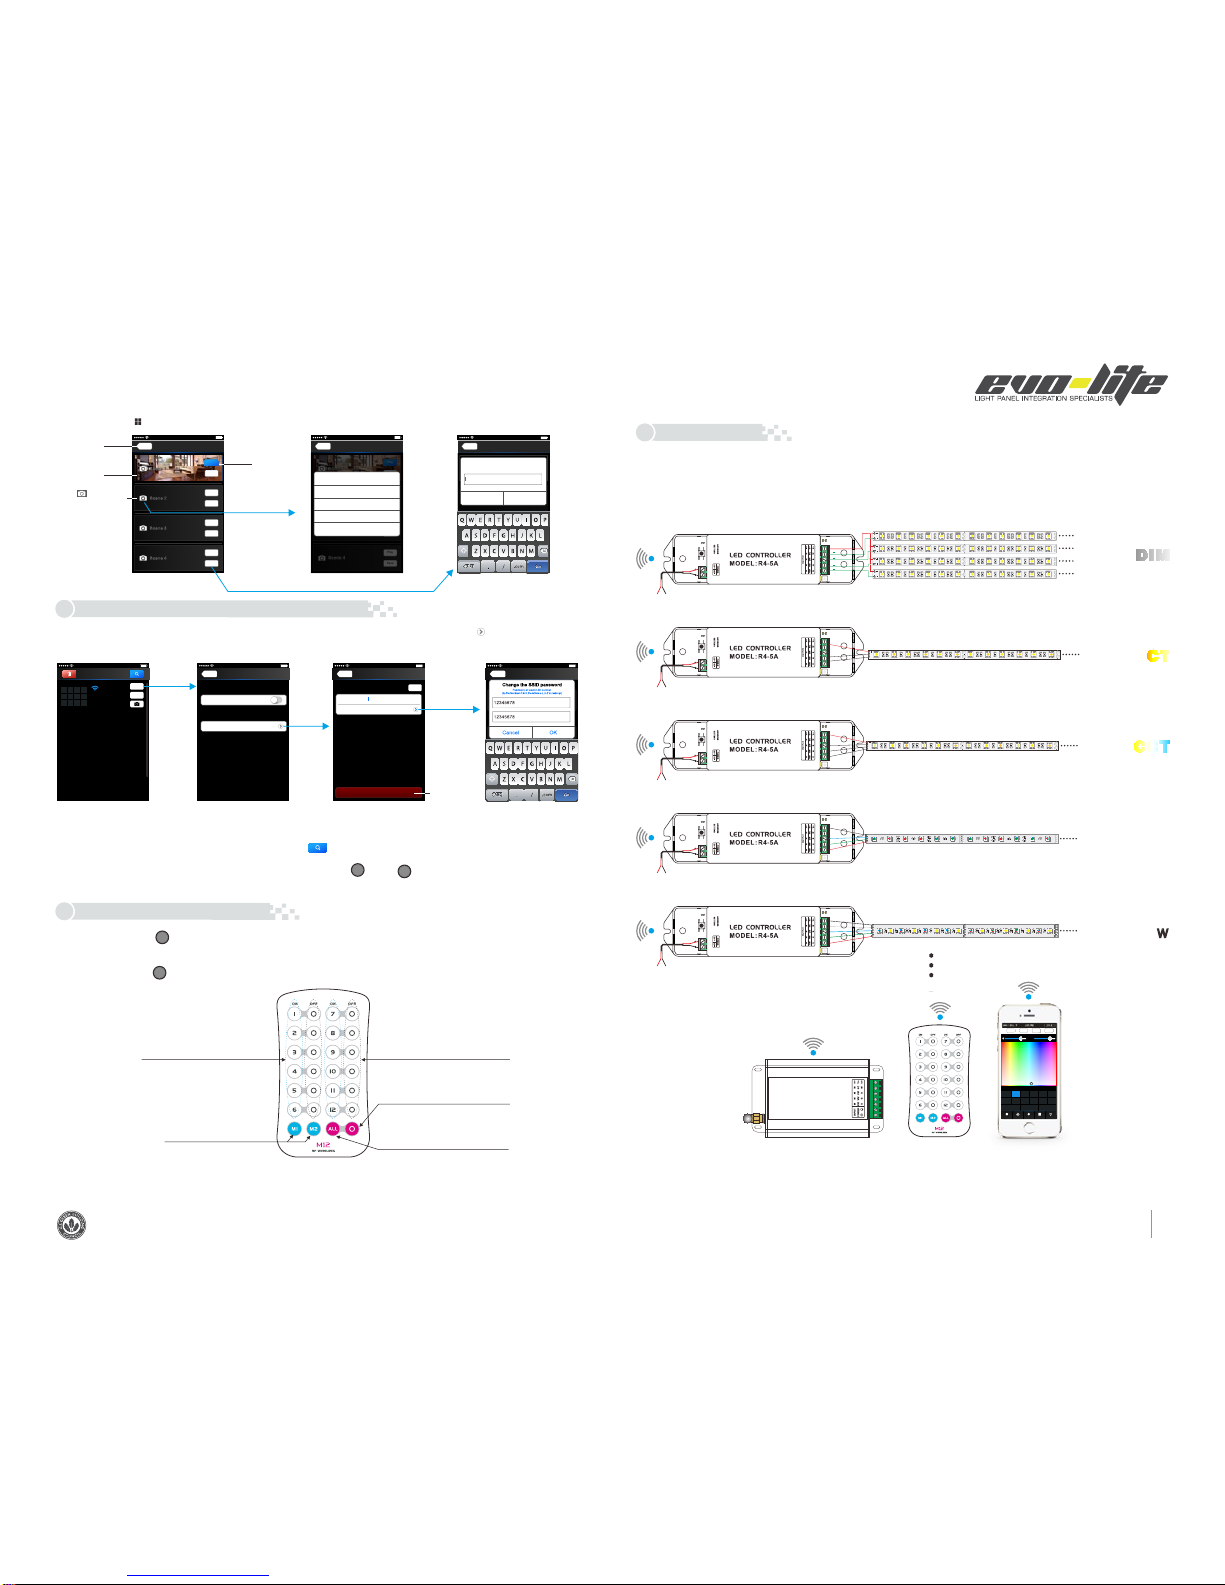
Single color strip
Nature white /Warm white strip
Nature white + Warm white + Cold white strip
RGB strip
RGBW strip
1) Connect to the zones controller and LED lamps (the same way of WiFi-104 connection)
Short press learning key “ ” in WiFi-104 controller, the buzzer long beep, then press any keys on M12 remote, the buzzer keeps on again,
succeed learning.
Learning ID
Cancel ID
Long press learning key “ ” in WiFi-104 controller more than 6s, the buzzer long beep, succeed cancel (cancel all learned remotes with
WiFi-104 ).
( Long press to decrease brightness slowly,
under the mode of dimming or color temperature)
(in addition to the separate key closed zone)
14:17 PM 100% 14:17 PM 100% 14:17 PM 100%
Multi-zones can be set to the same type or several types. For example, single color dimming in all zones, so all can be set to DIM type.
Different zones can be set in different lighting types in multiple light types: Dimming, CT or RGB, etc. Lighting connect as follows:
M12
WiFi-104
G255
R255 B255 W255
W
80% 80%
CONTROLLER1
Longpress to turn off single zone or group
Mode
Device Scene
Group On/off
2 3 456
78
RGBW
1
RGB CT1 RGB
RGBW
10 11 129
RGBW DIM
Group1 Group2 Group3
DIM
DIM RGBW RGBW
CT2
Mobile phone
( Long press to increase brightness slowly,
under the mode of dimming or color temperature)
[Att]:
[Att]:

5
2
) Direct connection of WiFi-104 as router.
(Max 12 Zones)
R4-5A
R4-5A
R4-5A
R4-5A
R4-5A
R4-5A
R4-5A
R4-5A
R4-5A
R4-5A
R4-5A
zone 3
zone
4
zone
5
zone
6
zone
7
zone
8
zone
9
zone
10
zone
11
zone
12
zone 2
zone 1
(Max 12 Zones)
R4-5A
R4-5A
R4-5A
R4-5A
R4-5A
R4-5A
R4-5A
R4-5A
R4-5A
R4-5A
R4-5A
zone 3
zone
4
zone
5
zone
6
zone
7
zone
8
zone
9
zone
10
zone
11
zone
12
zone 2
zone 1
(Max 12 Zones)
R4-CC
R4-CC
R4-CC
R4-CC
R4-CC
R4-CC
R4-CC
R4-CC
R4-CC
R4-CC
R4-CC
zone 3
zone
4
zone
5
zone
6
zone
7
zone
8
zone
9
zone
10
zone
11
zone
12
zone 2
zone 1
3)
Connect by a router
9. Warranty Agreement
8. Attention
[Att] Unlimited zone receiver R4-5A/R4-CC can be installed for each zone within effective range.
A B
A B
4) Remote distance reference
WiFi-104
Master controller
R4-5A/R4-CC
Slave controller
M12 Remote
50m
30m
100m100m
Wireless
Router
Mobile phone Router
[Att]: The following distance is measured at distance open environment, in an open environment testing wireless distance will be reduced.
Please refer to the actual test distance before installation.
1. The product shall be installed and serviced by a qualified person.
2. This product is non-waterproof. Please avoid the sun and rain. When installed outdoors please ensure it is
mounted in a water proof enclosure.
3. Good heat dissipation will prolong the working life of the controller. Please ensure good ventilation.
4. Please check if the output voltage of any LED power supplies used comply with the working voltage of the
product.
5. Please ensure that adequate sized cable is used from the controller to the LED lights to carry the current.
Please also ensure that the cable is secured tightly in the connector to avoid the accidents due to overheat
and poor contact on the wire.
6. Ensure all wire connections and polarities are correct before applying power to avoid any damages to the LED
lights.
7. If a fault occurs please return the product to your supplier. Do not attempt to fix this product by yourself.
1. We provide lifelong technical assistance with this product:
• 5 year warranty is given from the date of purchase. The warranty is for free repair or replacement and
covers manufacturing faults only.
• For faults beyond the 5 year warranty we reserve the right to charge for time and parts.
2. Warranty exclusions below:
• Any man-made damages caused from improper operation, or connecting to excess voltage and overloading.
• The product appears to have excessive physical damage.
• Damage due to natural disasters and force majeure.
• Warranty label, fragile label and unique barcode label have been damaged.
• The product has been replaced by a brand new product.
3. Repair or replacement as provided under the warranty is the exclusive remedy to the customer. Evo-Lite as well
as its suppliers shall not be liable for any incidental or consequential damages for breach of any stipulation in
this warranty.
4. Any amendment or adjustment to this warranty must be approved in writing by Evo-Lite only.
This manual only applies to this model. Evo-Lite reserves the right to make changes without prior notice.
Table of contents


