Evopower EVO3600DPW User manual


DO NOT leave the machine running longer than 1 minute without operating the pressure
washer trigger (to release pressure) or the pump will overheat.
DO NOT let the machine freeze.
ALWAYS wear eye protection.
HIGH PRESSURE sprays can cause serious bodily injuries –ALWAYS use with caution.
WARRANTY is void if the pre-set pressure PSi is exceeded, which may cause severe damage
to gauge and unloader valve.
Contact aftersales on 01646 687 880 for further information on servicing. Please have the product model
and identification numbers ready.
You will need to locate the model and serial number for the machine and record the information in the
places provided below.
Date of Purchase:
Dealer Name:
Dealer Phone:
Product
Identification
Numbers;
Model Number:
Serial Number:
Engine:
Horse Power:

CONTENTS
Section Description
OPERATION NOTES & RECORD of IDENTIFICATION NUMBERS
Page No/No’s
2
1. SAFETY
4 - 6
2. SAFE OPERATION
6 - 9
3. PART LOCATIONS
10 - 11
4. ASSEMBLY
11
5. PRE-OPERATION CHECKLIST
12
6. PREPARING YOU WASHER & ENGINE STARTING
12 - 17
7. SPRAY TIPS
17 - 18
8. MAINTENANCE
18
9. TROUBLESHOOTING
19 - 21
10. WINTER STORAGE
22 - 23
11. ENVIRONMENTAL DISPOSAL
23
12. SPECIFCATIONS
24
13. CONTACT DETAILS
25
14. DECLARATIONS
26

1. SAFETY.
1.1. The operator of the machine is responsible for and has a duty of care in making sure
that the machine is operated safely and in accordance with the instructions in this user
manual. Please note the following safety points
1.1.1. The machine should never be left it in a condition which would allow
an untrained or unauthorised person/s to operate this machine.
1.1.2. All due care and diligence should be taken by the operator for the safety of and
with regard to those around whilst using the machine
1.2. Some or all of the following PPE, Warning Signs and symbols may appear throughout this manual
and you must adhere to their warning/s. Failure to do so may result in personal injury.
Personal Protective clothing (PPE)
Warning Signs and Symbols –FOLLOW safety messages to avoid or reduce risk of injury or death.
DANGER - indicates a
hazard which if not
avoided could result in
serious injury or death.
WARNING - indicates a
hazard which if not
avoided could result in
serious injury or death.
CAUTION - indicates a
hazard which if not
avoided might result
in minor or moderate
injury.
NOTE - indicates a
situation that could
easily result in
equipmentdamage.
READ MANUAL
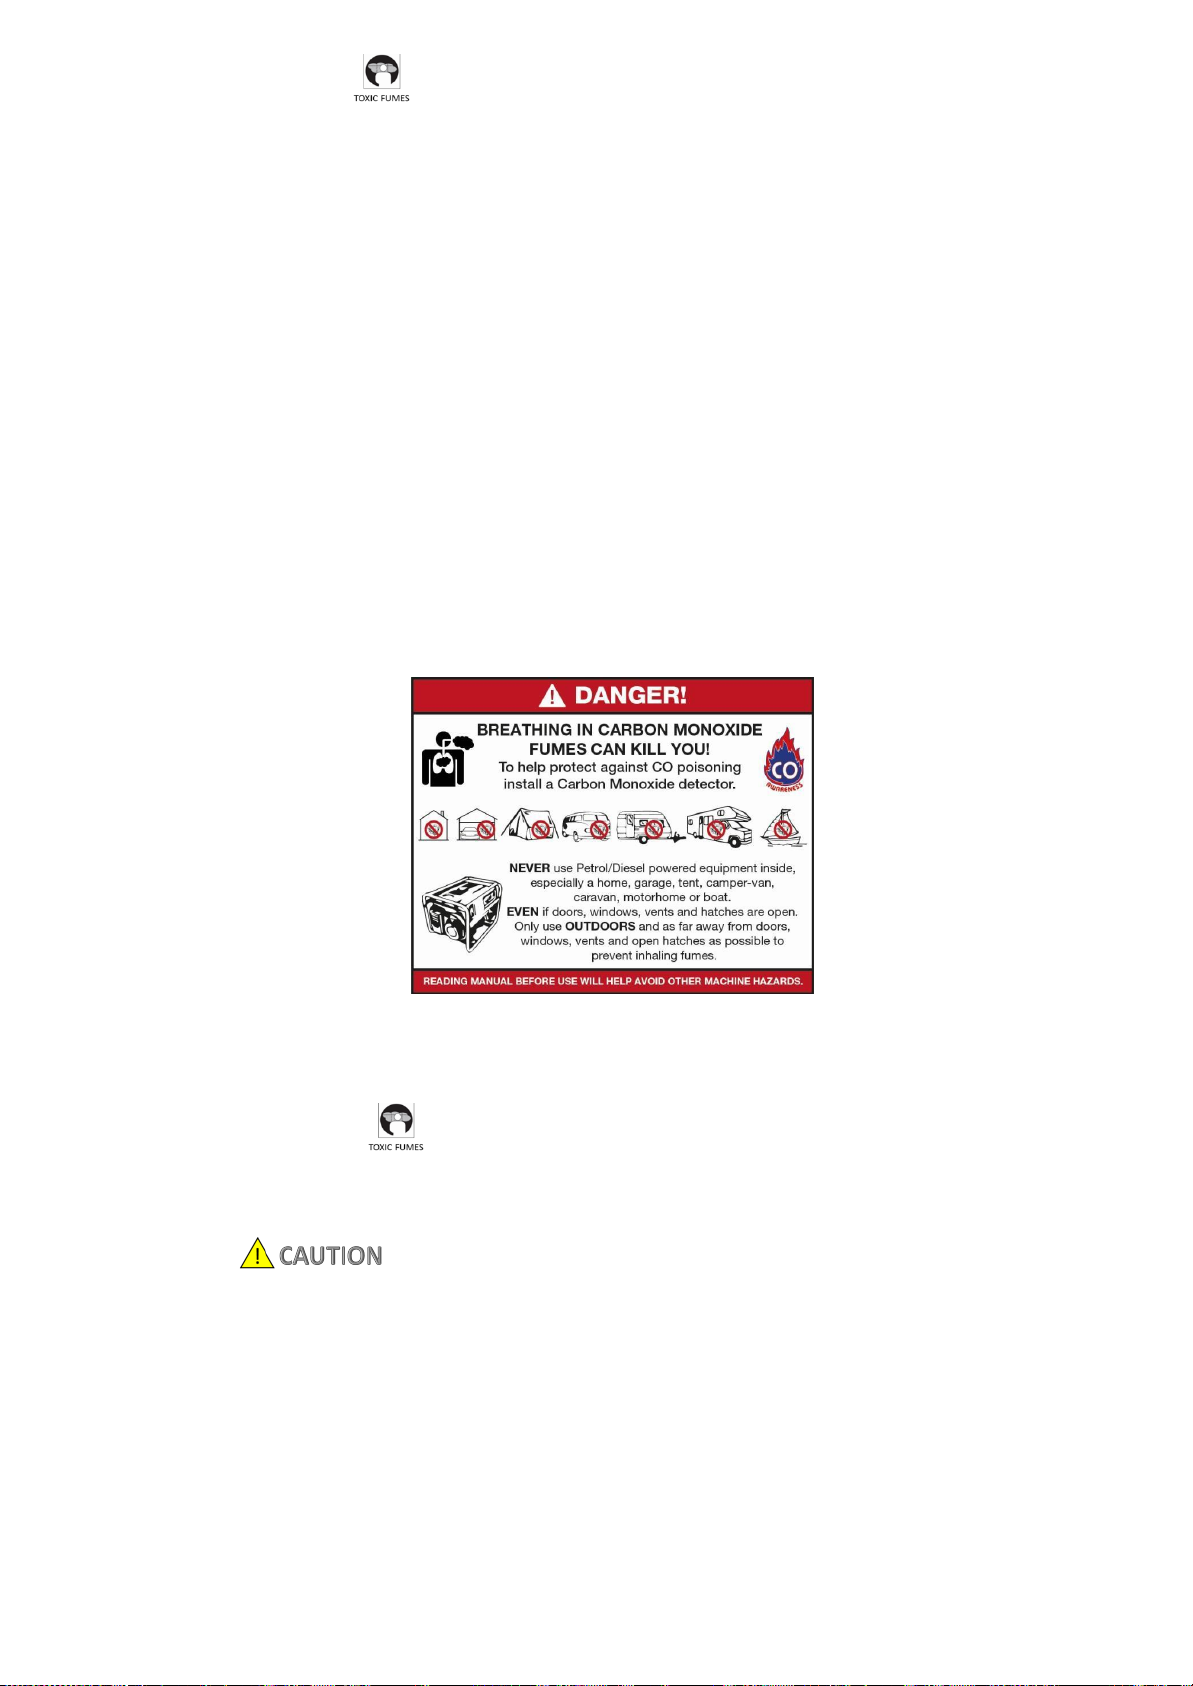
1.3. Carbon monoxide
1.3.1. Carbon monoxide gas is colourless and odourless. Breathing in this gas can
cause
death as well as serious long term health problems such as brain damage.
1.3.2. The symptoms of Carbon monoxide poisoning can include the following;
1.3.2.1. Headaches, dizziness, nausea, breathlessness, collapsing or Loss of
consciousness.
1.3.2.2. Carbon monoxide symptoms are similar to flu, food poisoning, viral infections
and simply tiredness. That’s why it’s quite common for people to mistake this
kind of poisoning for something else.
1.3.3. To avoid Carbon monoxide poisoning DO NOT Use Petrol/Diesel powered
equipment in an enclosed area or a moving vehicle.
1.3.4. If you think you or someone around you has been affected by carbon
monoxide poisoning you must take the following action;
1.3.4.1. Get fresh air immediately.
1.3.4.2. If you have used indoors open doors and windows, turn off machine
and leave the affected area.
1.3.4.3. See your doctor immediately or go to hospital - let them know that you
suspect carbon monoxide poisoning.
DO NOT use in an enclosed area or a moving vehicle.
1.4. General fuel safety.
1.4.1. Fuel Safety additional information can be obtained from the Health and Safety Executive.
1.4.2. All fuels are Flammable.
1.4.3. Keep away from all ignition sources i.e. heaters, lamps, sparks from grinding or welding.
1.4.4. DO NOT carry out hot work on tanks that have contained fuel is extremely dangerous
and should not be carried out.
1.4.5. Keep work area clean and tidy.
1.4.6. Clean up all spills promptly using correct methods i.e. absorbent granules and a lidded bin.
1.4.7. Dispose of waste fuels correctly.

1.5. Diesel safety.
1.5.1.1. Always fuel and defuel in well-ventilated area.
1.5.1.2. Always wear correct, suitable and fit for purpose Personal Protective Equipment
(PPE),
suggested items are as follows, but are not limited too.
1.5.1.3.
Hand protection.
1.5.1.4.
Protective clothing.
1.5.1.5.
If item 1.5.1.1. Cannot be fulfilled then - Respiratory protective equipment
should
be used.
1.5.1.6. When defueling always use a propriety fuel retriever.
1.5.1.7. Always carry fuel in the correct and clearly marked container.
2. SAFE OPERATION
2.1. Only operate the pressure washer outdoors in a well-ventilated area.
2.2. You must prevent exhaust gas from entering a confined area through windows, doors, ventilation
intakes, or other openings.
2.3. DO NOT start or run engine indoors or in an enclosed area, even if windows and doors are open.
2.4. You must operate pressure washer from a stable surface.
2.4.1. The cleaning area should have adequate slopes and drainage to reduce the possibility of a
fall due to slippery surfaces.
2.4.2. DO NOT use the pressure washer from a ladder, Use with extreme caution when operating
from scaffolding, or any other similar location.
2.4.3. Take a firm grip of the spray gun with both hands when using the high pressure spray to
avoid injury when spray gun kicks back.
A running engines give off carbon monoxide fumes which
are odourless, colourless and poisonous.
Inhaling carbon monoxide can cause headache, fatigue, dizziness,
vomiting, confusion, seizures, nausea, fainting or death.
Use of pressure washer can create puddles and slippery
surfaces.
Kickback from spray gun can cause you to fall.
Fuel and its vapours are extremely flammable and explosive.
Fire or explosion can cause severe burns or death.

2.5. When adding or draining fuel.
2.5.1. Turn the pressure washer OFF and let it cool at least 2 minutes before removing fuel
cap. Loosen cap slowly to relieve pressure in tank.
2.5.2. Only fill or drain fuel tank outdoors.
2.5.3. DO NOT overfill tank. You must allow space for fuel expansion.
2.5.4. If any fuel is spilt, wait until it evaporates before starting engine.
2.5.5. You must keep fuel away from sparks, open flames, pilot lights, heat, and other
ignition sources.
2.5.6. DO NOT use near any naked flames, other sources of ignition and lighting cigarettes?
2.6. When starting equipment.
2.6.1. Make sure that spark plug, exhaust, fuel cap, and air cleaner are in place.
2.6.2. DO NOT crank engine with spark plug removed.
2.7. When operating machine.
2.7.1. Tipping the machine at an angle may cause fuel to spill.
2.7.2. DO NOT spray flammable liquids.
2.8. When transporting or repairing machine.
2.8.1. Transport/repair with fuel tank EMPTY or with fuel shut off valve
OFF.
2.8.2. Disconnect spark plug wire.
2.9. When storing fuel.
2.9.1. Store away from furnaces, stoves, water heaters, clothes dryers, or other appliances that
have pilot light or other ignition source because they can ignite fuel vapours.
2.9.1. DO NOT store the machine with fuel left in the tank.
2.10. Electric shock risk.
2.10.1. NEVER spray near power source.
2.11. Starter cord kickback (rapid retraction)
2.11.1. en starting engine, pull cord slowly until resistance is felt, then move the
decompression lever to the horizontal position then pull rapidly to avoid kickback.
2.11.2. NEVER pull starter cord without first relieving spray gun pressure.
2.11.3. After each starting attempt, where engine fails to run, point the spray gun in safe
direction and squeeze spray gun trigger to release the high pressure.
2.11.4. Take a firm grip of the spray gun with both hands when using the high pressure spray to
avoid injury when spray gun kicks back.
Risk of electrocution.
Contact with power source can cause electric shock or burn.
Starter cord kickback (rapid retraction) can result in bodily injury.
Kickback will pull hand and arm toward engine faster than you can let
go.
It may result in broken bones, fractures, bruises, or sprains.
2.12. Exhaust.
2.12.1. DO NOT touch hot parts and AVOID hot exhaust gases.
2.12.2. w equipment to cool before touching.
2.12.3. Keep at least 5 feet (1.5 m) of clearance on all sides of pressure washer including overhead.
2.13. High pressure water.
2.14.1. DO NOT allow CHILDREN to operate pressure washer.
2.14.2. NEVER repair the high pressure hose. You must replace damaged hoses.
2.14.3. NEVER repair leaking connections with sealant of any kind. Replace O-ring or seal.
2.14.4. NEVER connect high pressure hose to nozzle extension.
2.14.5. Keep the high pressure hose connected to the pump and spray gun while
system is pressurised.
2.14.6. ALWAYS point spray gun in safe direction and squeeze spray gun trigger, to release
high pressure, every time you stop engine.
2.14.7. NEVER aim spray gun at people, animals, or plants.
2.14.8. NOT secure spray gun in open position.
2.14.9. DO NOT leave spray gun unattended while machine is running.
2.14.10. ALWAYS de-pressurise before disconnecting any hoses or hose attachments
2.14.11. NEVER use a spray gun which does not have a trigger lock or trigger guard in
place and in working order.
2.14.12. Always make sure that the spray gun, nozzles and accessories are correctly attached.
2.14. Starting and rotating parts.
2.15.1. NEVER operate the pressure washer without protective guards, housing or covers.
Contact with exhaust area can result in serious burns.
Exhaust heat/gases can ignite combustibles, structures or damage
fuel tank causing a fire.
The high pressure stream of water that this equipment produces can
cut through skin and its underlying tissues, leading to serious injury
and possible amputation.
Spray gun traps high water pressure, even when engine is stopped
and water is disconnected, which can cause injury.
The engine and other rotating parts can entangle hands, hair,
clothing, or accessories.
2.15.2. DO NOT wear loose clothing, jewellery or anything that may be caught in any rotating
parts.
2.15.3. Tie up long hair and remove jewellery.
2.15. Eye protection.
2.16.1. Always wear safety goggles when using this equipment or in vicinity of where equipment is
in use.
2.16.2. Before starting the pressure washer, make sure that you are wearing adequate safety
goggles.
2.16.3. NEVER substitute safety glasses for safety goggles.
2.16. Fragile Items.
2.17.1. DO NOT point spray gun at glass when using red 0° spray tip.
2.17.2. NEVER aim spray gun at plants.
2.17. Improper use and treatment of pressure washer.
2.18.1. If you have questions about intended use, ask your dealer or contact nearest authorised
dealer.
2.18.2. NEVER operate the machine with broken or missing parts, or without protective guards,
housing or covers.
2.18.3. DO NOT by-pass any safety device on this machine.
2.18.4. DO NOT tamper with the governed speed.
2.18.5. DO NOT operate the pressure washer above rated pressure.
2.18.6. DO NOT modify the pressure washer in any way.
2.18.7. Before starting pressure washer in cold weather, check all parts of the equipment to make
sure ice has not formed in the machine. DO NOT use if there is ice present, allow machine
to defrost before use.
2.18.8. Always use the handle provided on machine to move the machine. NEVER move the
machine
by pulling on the hose.
218.9. Check the fuel system for leaks or signs of deterioration, such as chafed or spongy hose,
loose or missing clamps, or damaged tank or cap.
2.18.10. You must correct all defects before operating pressure washer.
Risk of eye injury - Spray can splash back or propel objects.
High pressure spray can damage delicate items such as glass etc.
The Improper treatment of pressure washer can damage it and shorten its life.
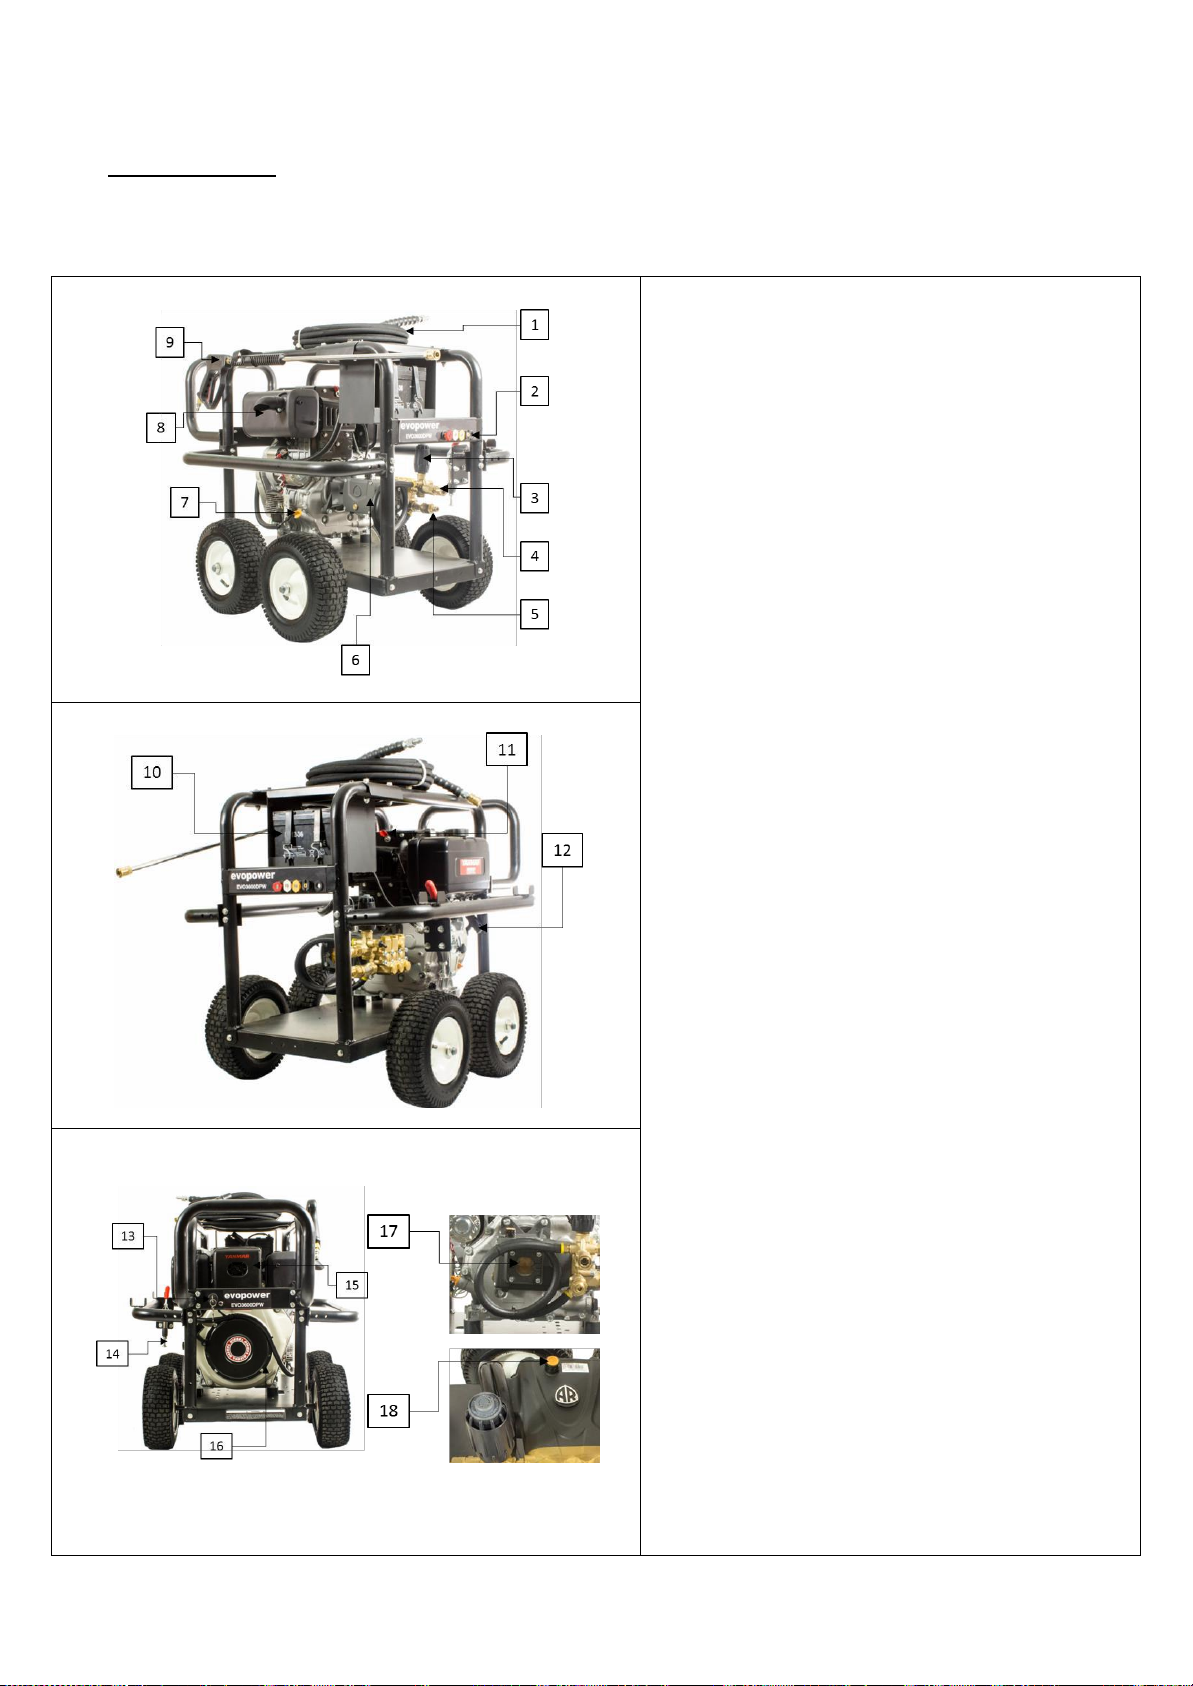
3. PART LOCATIONS
3.1. Machine.
1- High Pressure Hose - Connect one end to water
pump and the other end to spray gun.
2- Spray Tips - Detergent, 0°, 15°, and 40°: for
various high pressure cleaning applications.
3- Pressure Control Knob - Varies pressure of high
pressure spray.
4- High Pressure Outlet - Connection for high
pressure hose.
5- Water Inlet - Connection for garden hose.
6 - Pump - Develops high pressure.
7- Engine oil - Filler point for engine oil.
8- Engine exhaust - Caution! HOT when in use and
after use.
9- Operating trigger- Allows water to flow through
the pressure hose/lance.
10 - Battery - For electric start.
11 - Decompression lever- See instructions for use.
12 - Recoil starter handle - For non-electric starting.
13 - Key-switch - For electric start.
14 - Wheel lock - To lock wheels when in use.
15 - Air filter - Filters intake air.
16 –Engine
17 –Water Pump - Oil level indictor.
18 - Water Pump - Oil filling point.

3.2 Engine.
1 –Fuel drain plug
2 –Decompression lever
3 –Air cleaner
4 –Recoil starter handle
5 –Recoil starter
6 –Oil cap/Dipstick
7 –Oil drain plug
8 –Engine speed control
lever
9 –Fuel injection pump
10 –Fuel cock
11 –Fuel tank
12 –PTO Shaft
13 –Oil Filter
4. ASSEMBLY
Your pressure washer requires some assembly and is ready for use after it has been filled with the
recommended diesel fuel. If you have any problems with the assembly of your pressure washer,
please call the pressure washer help line at 01646 687 880. If calling for assistance, please have the
model and serial number ready.
4.1. Once opened.
4.1.1. Remove the parts bag, accessories, and inserts included with pressure washer.
4.1.2. Open box completely and retain packing in case you need to return for service and/or
repair.
4.1.3. Make sure you have all the included items prior to assembly.
4.2. Attaching the main handle.
4.2.1. Undo the four nuts and bolts (2) from the supplied handle (1), then offer up handle (1) to
main frame. connected to main machine.
5.2.1. Make sure holes in handle align with holes on frame use the nuts and bolts to secure
handle to frame. Make sure that they are all tight and handle is secure.

5. PRE-OPERATION CHECKLIST
5.1. Follow the checklist below prior to using the machine each time.
6.1.1. Check that the engine/water pump oil levels are at the correct levels. Use SAE 15W40 Oil (API
CH4/CF/SJ/SL Diesel engine oil or higher grade). See page 11 items 17/18.
6.1.2. Add fuel to the petrol tank.
6.1.3. Connect and tighten the garden hose to the water supply inlet connection, you will
need a hose adaptor (supplied).
6.1.4. Water MUST be turned on prior to starting the washer, pull the spray trigger to make
sure that water is moving the through the lines and out the nozzle without any leaks before
starting the
machine.
6.1.5. Review the safety guidelines in the manual prior to starting the machine.
6.1.6. If you have any issues operating the pressure washer, call Aftersales on 01646 687880.
6. PREPARING YOUR WASHER & ENGINE STARTING
6.1. How to prepare your pressure washer prior to starting the engine.
6.1.1. To start your pressure washer for the first time, follow these instructions step-by-step.
This starting information also applies if you have let the pressure washer sit idle for at least a
day.
6.1.2. Place pressure washer near an outside water source capable of supplying water at a flow
rate greater than 14.37 litres per minute and no less than 20 PSI at pressure washer end of
garden hose.
6.1.3. DO NOT siphon supply water.
6.1.4. Make sure machine is in a level position.
6.1.5. Connect garden hose to water inlet on pressure washer pump.
6.2. Attach wand extension to spray gun.
Tighten by hand.
6.3. Choose desired spray tip, pull back nozzle
extension collar, insert spray tip and
release collar.
ALWAYS check the level of the engine and pump oil prior to starting
the washer. Top up oils to correct levels. Failure to do so could cause
the engine to seize if the oil is low or empty. The L100 Yanmar
engine does not have an oil alert or low oil shutdown.
DO NOT start your pressure washer without the water supply turned on.
Failure to do so will result in damaging the pump from overheating and
void the warranty.
DO NOT run the pump without the water supply connected and turned on.
Damage to equipment resulting from failure to follow this instruction
will void warranty.
6.3.1. Tug on spray tip to make sure it is securely
in place. See Spray Tips.
6.4. Uncoil high pressure hose and attach
quick connect end of hose to base of
spray gun.
6.4.1. Pull down on collar of quick connect,
slide onto spray gun and let go of collar.
6.4.2. Tug on hose to be sure of tight
connection.
6.5. NEVER connect high pressure hose to nozzle extension.
6.5.1. Keep high pressure hose connected to pump and spray gun while system is pressurized.
6.5.2. Always make sure that the spray gun, nozzles and accessories are correctly attached.
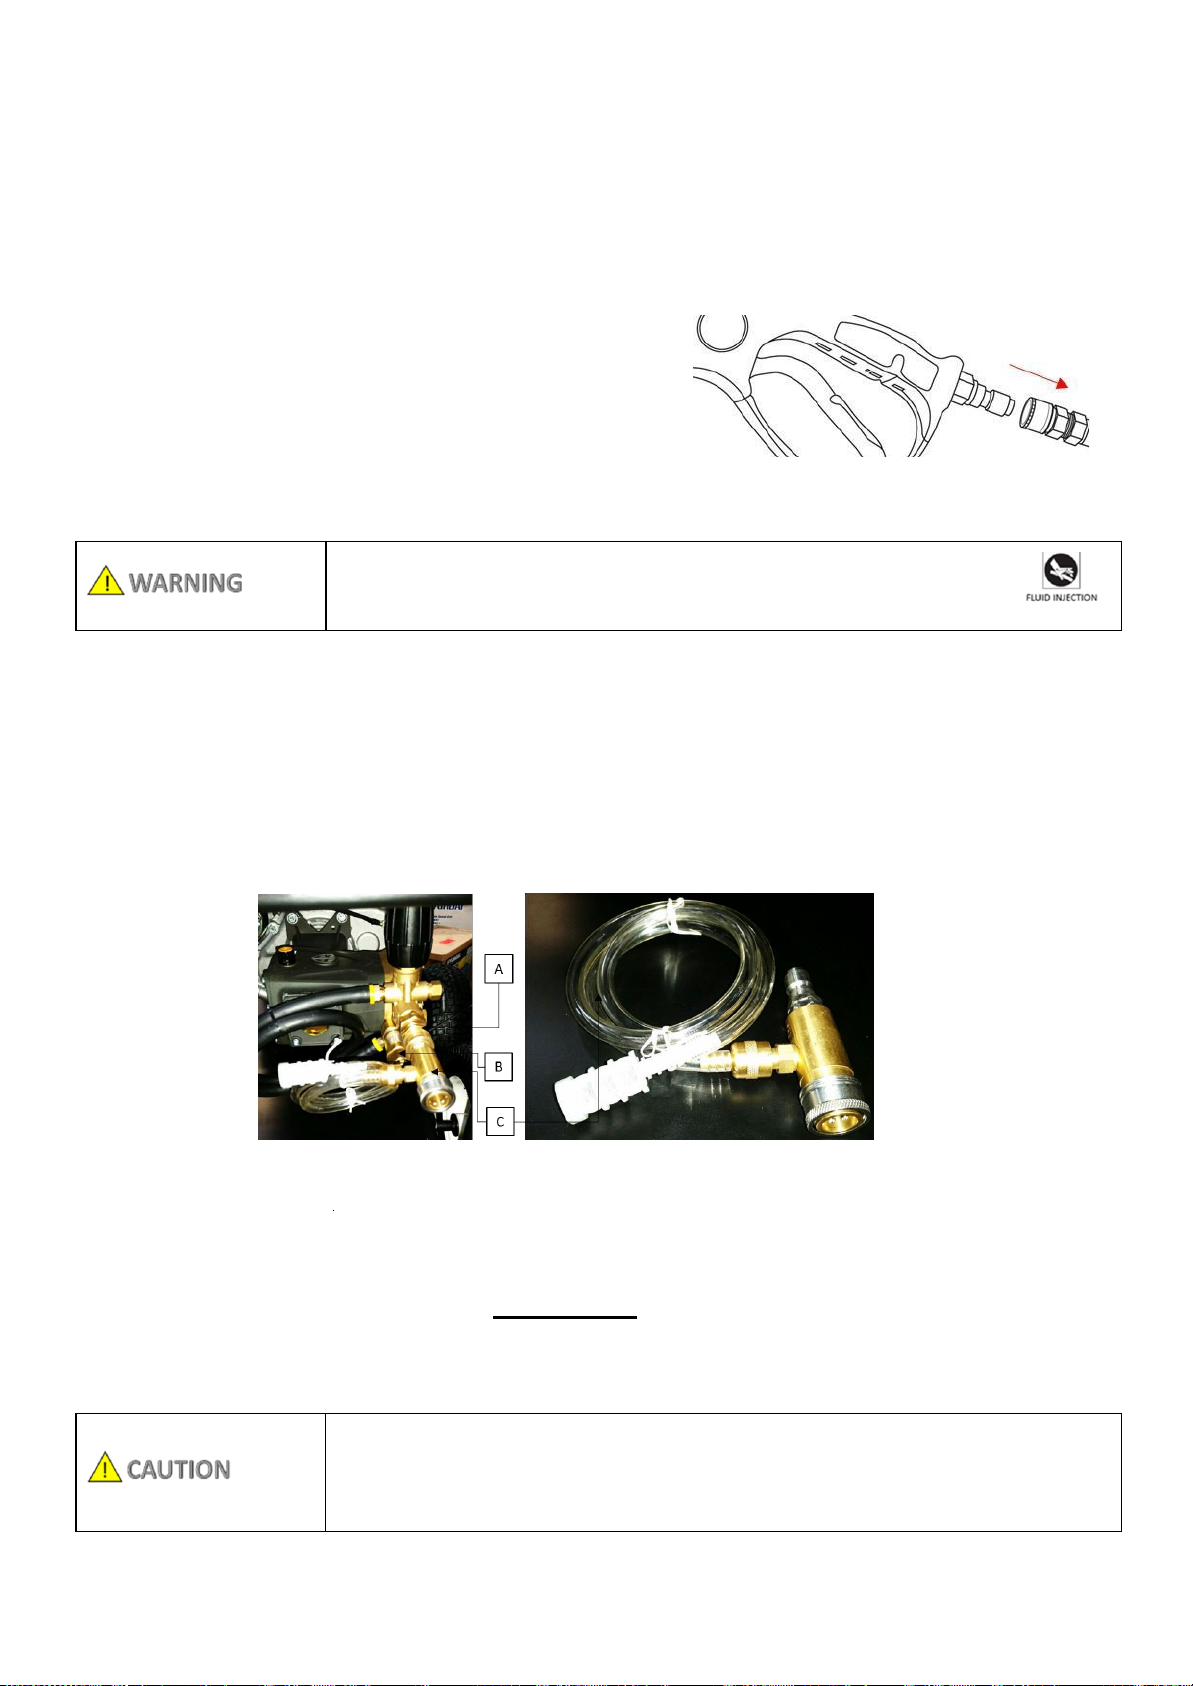
6.6. Attach other end of high pressure hose to high pressure outlet (A) on pump.
6.6.1. Pull down on collar of quick connect, slide onto pump and let go of collar.
6.6.2. Pull on hose to be sure of tight connection.
A = High Pressure Outlet. B = Water Supply Inlet. C = Detergent adapter and syphon tube.
6.6.3. The detergent adapter and syphon tube (C) need only be fitted when required.
IMPORTANT
You must flush the detergent siphoning system after each use by placing the filter into a bucket
of clean water, then run the pressure washer in low pressure for 1-2 minutes.
The high pressure stream of water that this equipment produces
can cut through skin and its underlying tissues, leading to serious
injury and possible amputation.
Contact with chemicals can cause bodily injury and/or property damage.
NEVER use caustic liquid with the pressure washer.
Use ONLY pressure washer safe detergent/soaps.
Follow all of the manufacturer’s instructions.

6.7. Turn Water Supply on, point gun in a safe direction and squeeze the trigger to purge the
pump of air and debris.
6.7.1. Do this for at least 30 seconds.
6.8. Take a look at all connections to make sure there are no leaks or loose connections.
IMPORTANT
DO NOT siphon standing water for the water supply.
Use ONLY cold water (less than 100°F).
6.9. Connect the garden hose to the water inlet.
6.9.1. Tighten by hand.
With the pressure washer working as normal, it is not advisable to reduce the
pressure on the unloader valve (by twisting adjuster anti-clockwise) for long
periods of time, as this redirects a proportion of the water flow back through
the by-pass system, which increases the temperature of the pump. If the
pressure is too high, it can be reduced slightly by reducing engine speed
marginally (from 3400rpm max to around 2800rpm). If the pressure needs to
be reduced further, it is recommended to use a larger nozzle size to reduce the
pressure.
If the nozzle size is too small, it will reduce the water flow and activate the by-
pass system, which will reduce the pump life, as it will run at a higher
temperature.
The pressure washer pump will move the same volume of water whatever the
pressure. The pressure is created by the size of the nozzle. The smaller the
nozzle the higher the pressure. It is important not to go too small as this will
reduce flow, which reduces cleaning efficiency and pump lifespan.
6.10. Starting the engine (RECOIL STARTING). For full engine starting and stopping details see
supplied engine manual.
6.10.1. MAKE sure that the pre-operation checks have been carried out.
6.10.2. Turn the fuel cock (1) is turned ON.
6.10.3. To start the engine, locate the engine speed switch on the side of the engine. Undo
the knob (1) in an anti-clockwise direction (2) and the slide in to the down (RUN) position (3)
and switch it to the ON position. Once in RUN position (3) turn the knob (1) in a clockwise
direction (4) to lock it in position.
NEVER use a starting aid such as ether. Engine damage will occur.
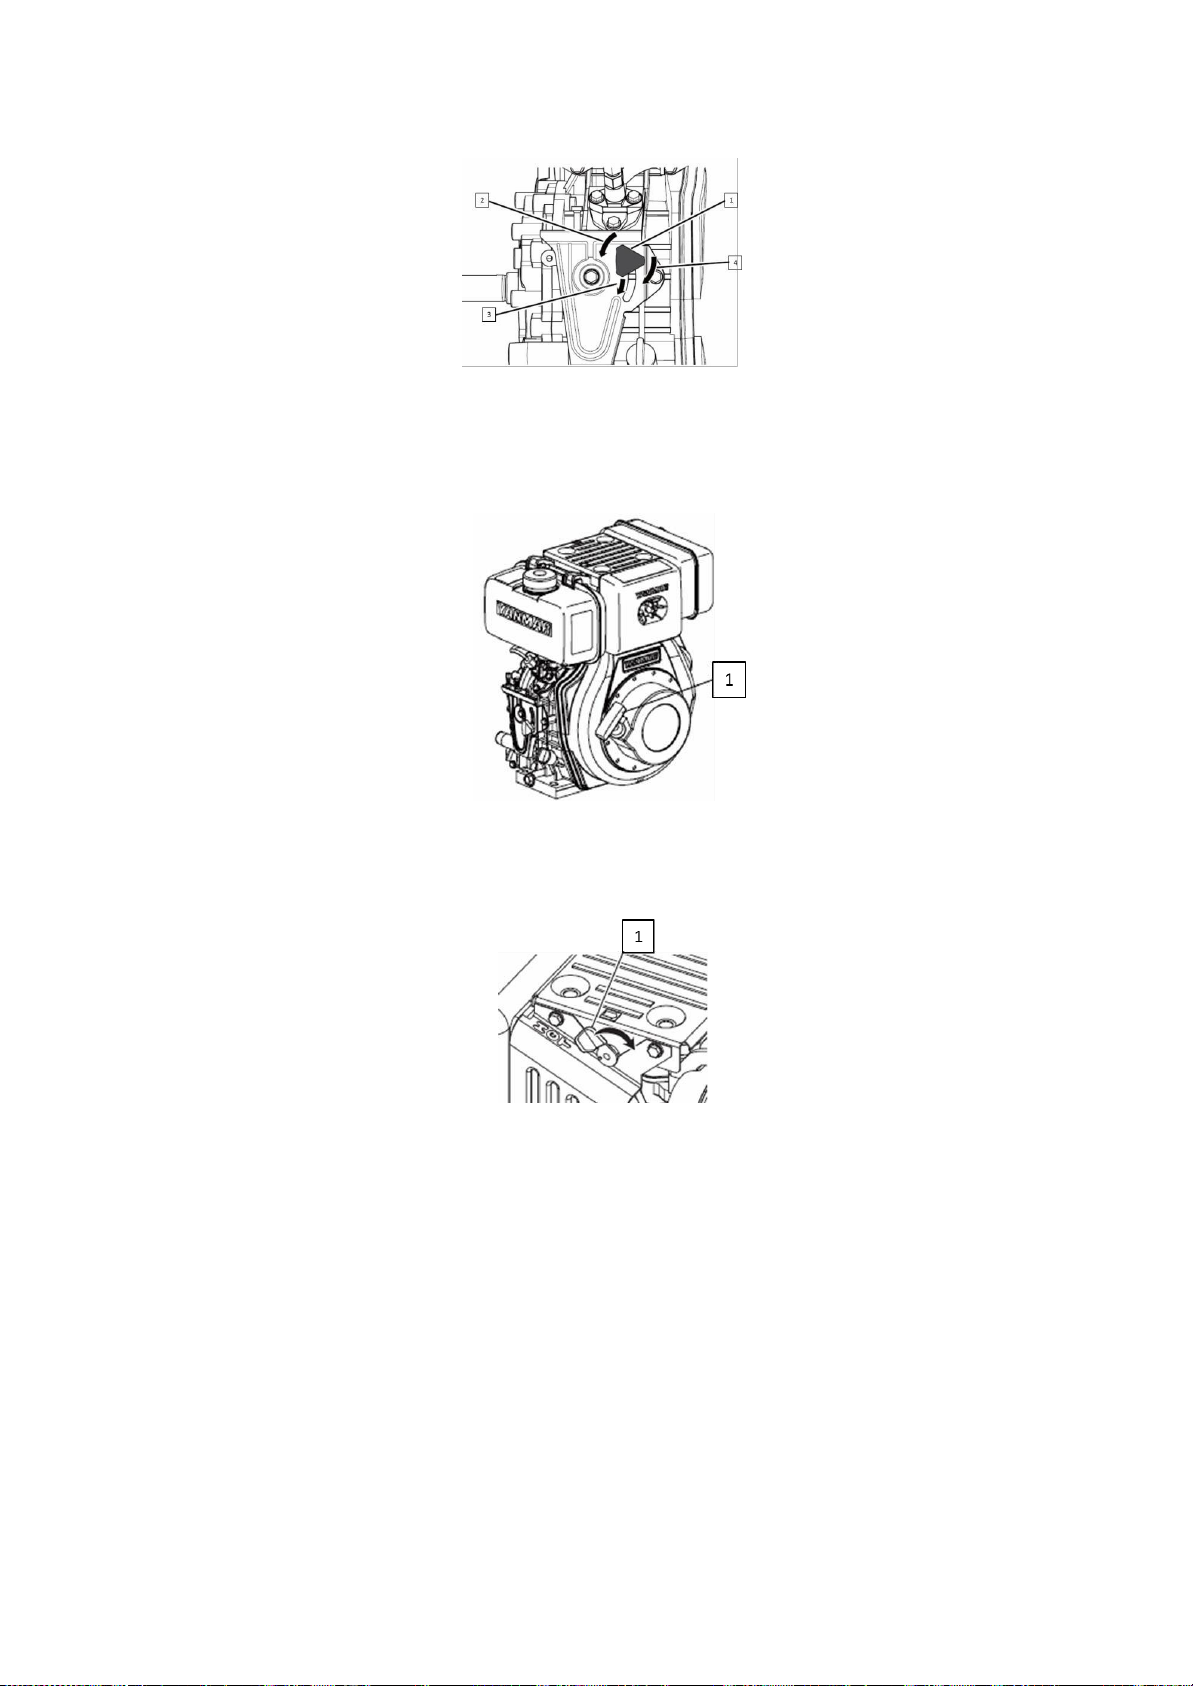
6.10.4. Grasp the recoil starter handle (1).
6.10.5. Pull the handle out slowly until you feel strong resistance, slowly return the recoil
starter handle to the initial position.
6.10.6. Push the decompression lever down (1) and release it. The decompression lever will
automatically return to the original position when the engine starts.
6.10.7. Grasp the recoil starter handle and pull it out with a strong and even motion using
both hands if required. Slowly return the recoils starter handle to initial position.
6.10.8. If the engine does not start repeat from 6.10.
6.11. Starting the engine (ELECTRIC STARTING). For full engine starting and stopping details see
supplied engine manual.
6.11.1. Follow steps 6.10.1. to 6.10.3.
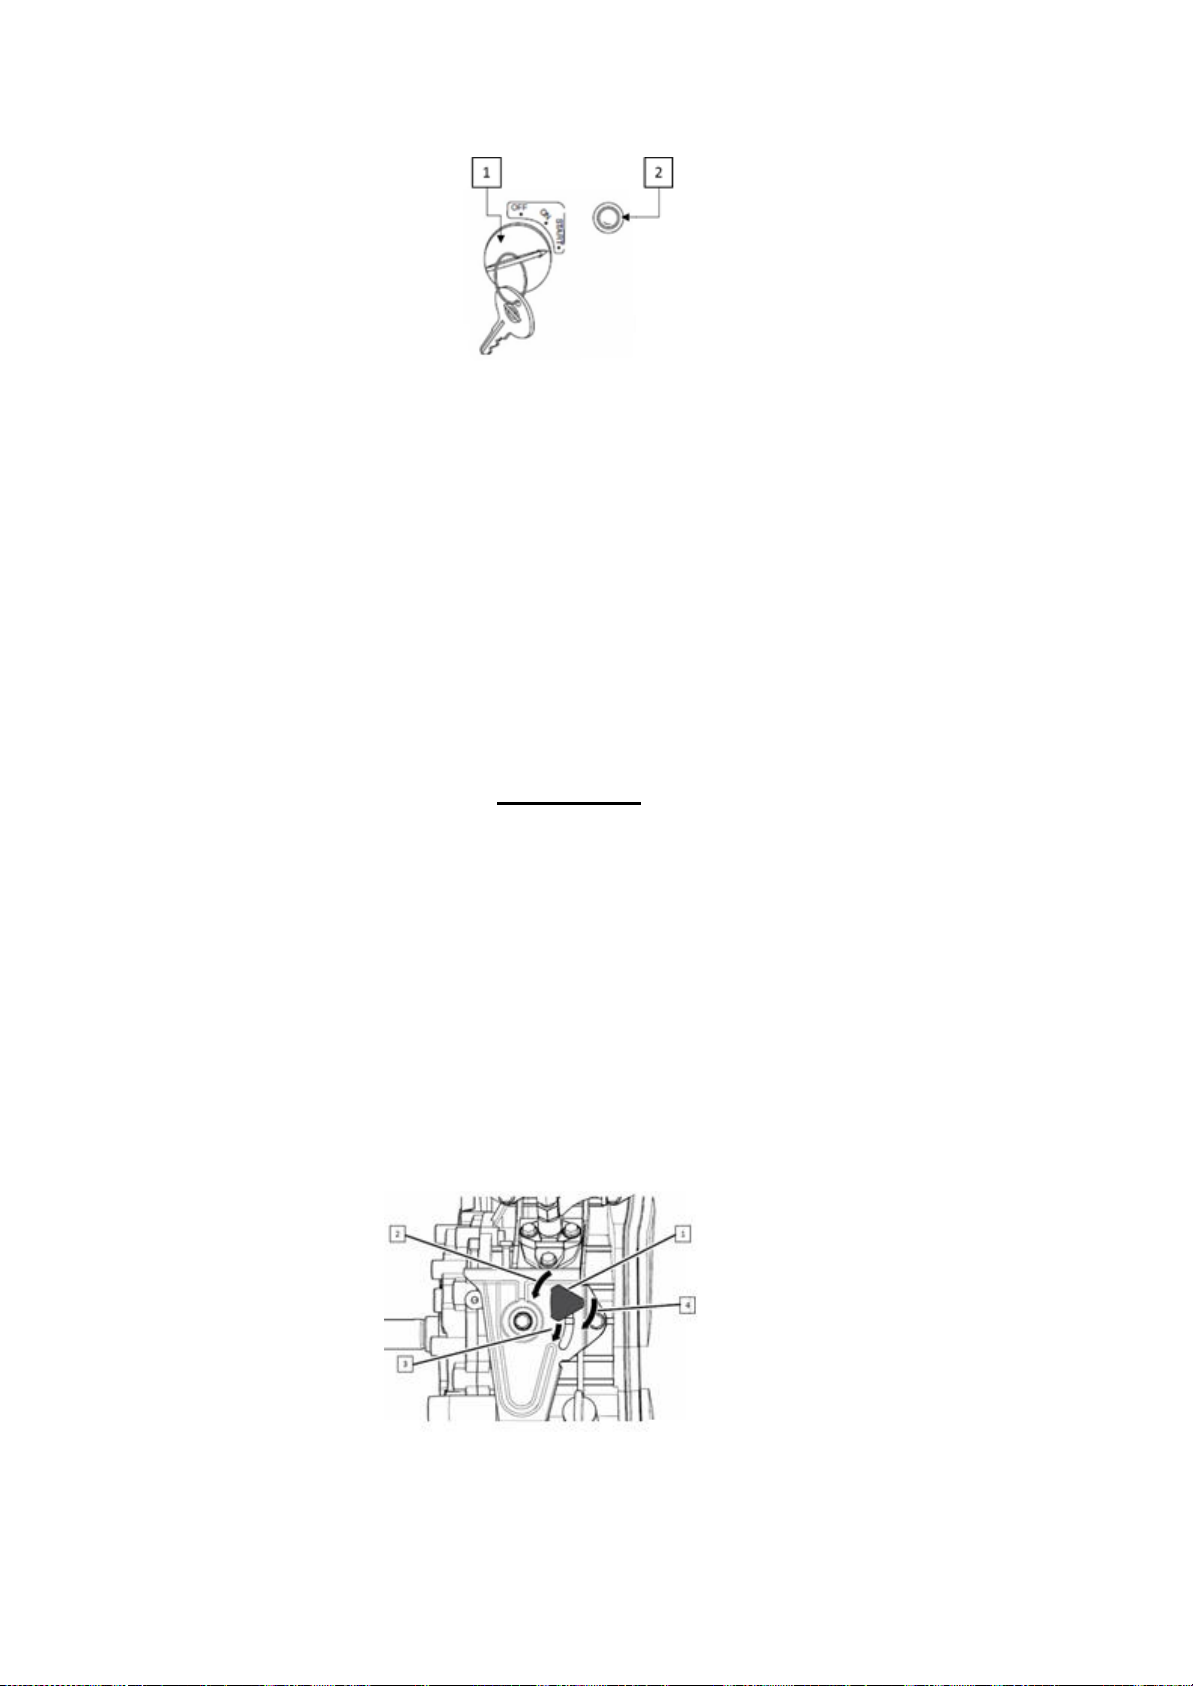
6.11.2. Insert key into key-switch (1), turn key in a clockwise direction to the START position. Release
the key as soon as the engine starts. The key-switch will return to the ON position, in the ON
position the ignition indicator lamp (2) will be ON (except when the engine is running).
6.11.3. If the engine fails to start;
6.11.3.1. Wait until the engine comes to a complete stop before you attempt to start it again.
Engaging the starter when the engine is still rotating will result in damage to the starter motor
and flywheel.
6.11.3.2. Wait at least 30 seconds before you attempt to start the engine again. This pause will
allow the battery to recover and to prevent damage to the starter motor due to a low battery
voltage.
6.12. Shutting down the engine.
6.12.1. Before shutting down the engine you MUST release the pressure in the wand by pulling the
trigger. ALWAYS point the spray gun in a safe direction, squeeze the spray gun trigger to
release the retained high water pressure. Once pressure is released shut down the engine.
IMPORTANT
The spray gun traps high water pressure, even when the engine has stopped and water
disconnected.
The couplings will not release if they are under pressure. To release hoses and coupling ALWAYS
de- pressurise by operating the trigger.
6.12.2. Run the engine at low idle speed or run without load for at least 5 minutes before you shut it
down.
6.12.3. To stop the engine.
6.12.3.1. Turn the key-switch to the off position or;
6.12.3.2. Locate the engine speed switch on the side of the engine. Undo the knob
(1) in an anti-clockwise direction (2) and the slide it up to the STOP position. Once in STOP
position turn the knob (1) in a clockwise direction (4) to lock it in position.
6.12.4. Once the engine has stopped turn the fuel cock (1) OFF.
6.12.5. DO NOT leave the key-switch in the ON position when not in use because the fuel
solenoid will remain energised and the ignition indicator lamp will stay which will run the
battery down.

7. SPRAY TIPS
Fuel cock Key-switch
7.1. How to use spray tips
7.1.1. The quick–connect on the nozzle extension allows you to switch between four different
quick connect spray tips.
7.1.2. The spray tips can be changed while pressure washer is running once spray gun safety
lock is engaged.
7.1.3. The spray tips vary the spray pattern angle as shown above.
7.1.4. NEVER exchange spray tips without the trigger safety lock engaged on the spray gun.
7.1.5. DO NOT twist spray tips while spraying.
7.2. Follow these instructions to change spray tips:
7.2.1. Pull back collar on quick–connect and pull current spray tip off.
7.2.2. Store spray tips in holder provided on the handle. Storing nozzles in the designated
holder will help prevent debris clogging the tip.
7.2.3. Select the desired spray tip:
7.2.3.1. For gentle rinse, select the white 40° spray tip.
7.2.3.2. To scour surface, select the yellow 15° or red 0° spray tip.
7.2.3.3. To apply detergent, select the black spray tip.
7.2.4. Pull back on collar, insert new spray tip and release collar.
7.2.4.1. Tug on the spray tip to make sure it is securely in place.
7.3. Usage tips
7.3.3. For most effective cleaning, keep the spray tip from 8 to 24 inches away from cleaning
surface.
The high pressure stream of water that this equipment produces
can cut through skin and its underlying tissues, leading to serious
injury and possible amputation.

7.3.4. If you get spray tip too close, especially using a high pressure spray tip, you may
damage surface being cleaned.
7.4. Using the Black soap nozzle.
7.4.3. To apply detergent, follow these steps:
7.4.3.1. Review use of spray tips.
7.4.3.2. Prepare detergent solution as required by job.
7.4.3.3. Place the small filter end of the detergent siphoning tube into the
detergent container.
7.4.4. Make sure the black spray tip is installed.
7.4.4.1. Make sure the garden hose is connected to the water inlet. Check that the high
pressure hose is connected to the spray gun and pump.
7.4.4.2. Turn on water.
7.4.5. Start the engine following instructions ‘Starting Your Washer’.
7.4.6. Apply detergent to surface, using long, even, and overlapping strokes.
7.4.7. Allow the detergent to “soak in” for 5 minutes before washing and rinsing.
Reapply as needed to prevent the surface from drying.
7.4.8. DO NOT allow the detergent to dry on the surface being cleaned.
8. MAINTENANCE
8.1. To keep the engine in good working condition, periodic maintenance is essential.
8.2. Engine.
10.2.1. For all engine maintenance, please refer to the engine manufacturers’ handbook
(supplied).
Make sure that the filter is fully submerged in detergent while applying
detergent. THIS WASHER WILL ONLY DRAW SOAP WITH THE BLACK
SOAPER NOZZLE. The WHITE, RED, AND YELLOW NOZZLE WILL NOT
DRAW SOAP.
You must attach all of the hoses before you start the engine.
Starting the engine without all the hoses connected and without the water
turned ON will damage the pump.
Damage to the equipment resulting from failure to follow this instruction will
void warranty.
Service and maintenance must be performed by an authorised agent.
DO NOT tamper with, or attempt to adjust, the pressure switch or safety
valve. Before moving, or carrying out any maintenance on the machine,
make sure the ignition switch is OFF, and that the tank pressure has been
vented. Allow the machine to cool down for a period of time.

9. TROUBLESHOOTING
9.1. If you are experiencing a problem that is not listed in this chart, or have
checked all
the possible cause listed and you are still experiencing the problem, see
your
authorised dealer.
9.2. Petrol Trouble shooting see supplied Engine
manual.
9.3. Troubleshooting pressure washer functions.

9.4 Troubleshooting pump functions.
Problem
Cause
Correction
No low pressure detergent
delivery.
1. Using wrong nozzle.
1. Insert black soaper
nozzle.
2. Siphon hose or filter is plugged.
2. Unplug siphon hose.
machine does not reach
required pressure.
1. Restricted or insufficient water
supply.
1. Check supply hose,
faucet and inlet water
filter. Must be
connected to water
source which provides
6GPM.
2. Unsuitable or worn out nozzle.
2. Replace nozzle.
3. Regulator set too low.
3. Reset unloader by
turning knob (clockwise
increases pressure).
Thermal Relief Valve is open
and discharging water from
side of pump.
1. Water temperature is too high.
1. Use cool water only.
2. Pump has operated more than 3
minutes without pulling trigger.
2. Pull trigger at least 30
seconds every 3
minutes.
Leak in the fittings.
1. Water leak in high pressure
fittings, hose or gun.
1. Use Teflon tape or
pipe sealant to
tighten hose fitting,
replace hose or gun.
**if problem
continues, take to
your pressure washer
dealer.
Pump oil is low.
1. Pump consumes oil in normal
use.
1. To gauge the oil
level, look directly Into
the sight glass. Oil level
should always be at the
centre dot. Do not
overfill replace W/30W
non detergent mineral
oil.
Oil is milky colour.
1. Seals have worn and water has
leaked into the oil.
1. Return machine to
have seals replaced.
Table of contents
Other Evopower Pressure Washer manuals

Popular Pressure Washer manuals by other brands


Coleman
Coleman Powermate PW0872400 Operator's manual

Easy-Kleen
Easy-Kleen Caribou Series owner's manual

SNOWJOE
SNOWJOE SUNJOE SPX2005P Operator's manual

Generac Power Systems
Generac Power Systems 6020-2 specification

Kärcher
Kärcher HD 3501 Operator's manual

cecotec
cecotec HYDROBOOST 1400 EASYMOVE instruction manual


