EVVA Xesar User manual

Xesar
Commissioning | network adapter
Diese Zeichnung kann verwendet werden obwohl
diese den Status Entwurf hat (Zukaufteil).
Der Adapter wurde am 16.05.2018 auf das neue Teil
abgeändert, JIRA-Ticket XS-7732.
Geistiges Eigentum der Fa. EVVA
Die unbefugte bzw. bestimmungswidrige
Verwendung dieser Unterlage ist nicht
gestattet und wird gerichtlich verfolgt.
87654321
F
E
D
C
B
A
Gepr.
Wandleser
Zeichnungsnummer:
Status
Allgemeintoleranz
Ersatz für:
Benennung:
Datum
Name
Sicherheitstechnologie GmbH
Wienerbergstraße 59-65
A-1120 Wien
Gewicht:
Werkstückkanten
ISO 13715
Werkstoff:
Oberfläche / Nachbehandlung:
Bearb.
Maßstab:
Material <nicht festgelegt>
1:2
160.64g
/
Netzwerkadapter
AT221000-B-MH14
Entwurf
28.09.2015
EZI
ISO 2768 mH
+0.1
-0.1
Index
E-Rev
Rev.

Any computer is suitable for configuring
the Xesar network adapter and you can
even use the PC running the Xesar software.
Please configure the settings of your
PC network adapter before starting to
commission the Xesar network adapter.
For this purpose, in Windows 7 go to
Network and Sharing Center > Change
adapter settings.
Open the Settings window (right-click the
LAN connection)
Important: Please note that additionally
active network connections (WiFi, etc.)
may impair communication with the Xesar
network adapter — deactivate these if
necessary.
In the window, select Internet protocol
version 4 (TCP/IPv4) and click Settings
PC configuration

Now configure the IP address and the
Subnet mask of the PC you are using for
the configuration.
Use the following details for this purpose:
IP address: 192.168.0.xxx (1-254)
Subnet mask: 255.255.255.0
DNS server: -
Make sure you do not use the
preconfigured IP address of the Xesar
network adapter (192.168.0.100) as
otherwise there will be an IP address
conflict which will inhibit a connection.
Please contact your system administrator if
you encounter any other issue during setup.

Check the jumper position of the Xesar
network adapter. Both jumpers must be set
to OFF (bottom position).
Now open your computer‘s Internet
browser.
Enter the standard address of the
Xesar network adapter in the URL bar – it is
listed on the bottom of the device and has
been set to 192.168.0.100 by default.
Note: If the configuration page fails to
open, check your PC‘s
firewall settings, the IP settings and the
cabling of the Xesar network adapter.
The Xesar network adapter login page
appears – click Login; it is not necessary to
enter a password.
Connect the mains adapter to the Xesar
network adapter.
The green, flashing status LED indicates
that the Xesar network adapter is supplied
with power.
Then connect the Xesar network adapter
to the configuration PC.
For this purpose, use an RJ45 LAN cable and
make sure the connector engages audibly in
the socket.
Commissioning a Xesar network adapter
On
21
Diese Zeichnung kann verwendet werden obwohl
diese den Status Entwurf hat (Zukaufteil).
Der Adapter wurde am 16.05.2018 auf das neue Teil
abgeändert, JIRA-Ticket XS-7732.
Geistiges Eigentum der Fa. EVVA
Die unbefugte bzw. bestimmungswidrige
Verwendung dieser Unterlage ist nicht
gestattet und wird gerichtlich verfolgt.
87654321
F
E
D
C
B
A
Gepr.
Wandleser
Zeichnungsnummer:
Status
Allgemeintoleranz
Ersatz für:
Benennung:
Datum
Name
Sicherheitstechnologie GmbH
Wienerbergstraße 59-65
A-1120 Wien
Gewicht:
Werkstückkanten
ISO 13715
Werkstoff:
Oberfläche / Nachbehandlung:
Bearb.
Maßstab:
Material <nicht festgelegt>
1:2
160.64g
/
Netzwerkadapter
AT221000-B-MH14
Entwurf
28.09.2015
EZI
ISO 2768 mH
+0.1
-0.1
Index
E-Rev
Rev.
RJ45
Ethernet
PC
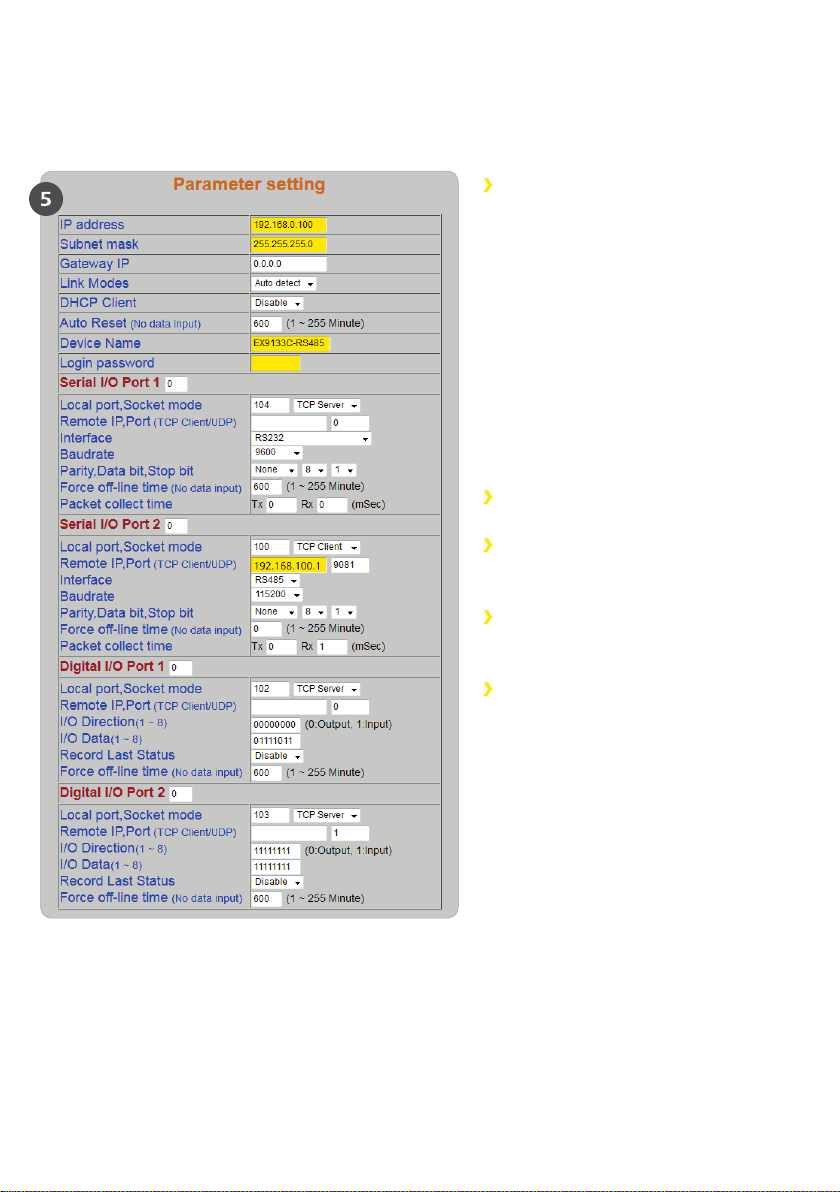
The IP address defines the IP address of
the Xesar network adapter.
Please note that changing this address and
clicking Update (or confirming with the
ENTER button) means the network adapter
can exclusively be opened and configured
using this address.
It is necessary to define up to 14 different
IP addresses for each of the 14 potential
Xesar network adapters within a system.
In this process, also check the network
settings of the PC and observe the valid IP
address range of your network.
The Subnet mask defines the used
subnet.
The Device Name can be specified
individually and it does not influence the
device function.
The Login password restricts access to
the device configuration page. A default
password has not been configured.
The Remote IP corresponds to the
IP address of the computer running
the Xesar software and it is responsible
for communication between the Xesar
network adapter and the Xesar software.
Attention: Please use the number
„100“ only once at „local port, socket
mode“ (serial & digital)!
Note: The Remote IP (PC) and IP address
(Xesar network adapter) must differ!
You are now on the Xesar network adapter
configuration page. As shown on the illustration,
the white fields must be filled. Configure the fields
highlighted in yellow as follows:

After having completed the parameter configuration, click Update to complete the Xesar network
adapter configuration. Our Xesar system manual features a detailed description on installation and
configuration in Section Commissioning the Xesar network adapter.
Sample configuration:
IP address 192.168.100.101
Subnet mask 255.255.255.0
Device Name Updater1
Login password passwordupdater1
Remote IP 192.168.100.1
Resetting network adapters:
If you are forced to reset the network adapter in the event of an error,
subsequently re-check the Parameter settings. In this process, particularly check
Socket mode (TCP client), Baudrate (115200) and Port (9081)!

IP address 192.168.100.101
Subnet mask 255.255.255.0
Device Name Updater1
Login password passwordupdater1
Remote IP 192.168.100.1

W.TD.MTA.X.CU7.V2.LN.SEN
Other manuals for Xesar
1
Table of contents
Other EVVA Adapter manuals


