Troubleshooting
Malfunction Possible Cause Solution
The device does not No power source Check electrical cable
switch on available and fuse
Air escapes from the The hoses for input Check hoses and
device (even when it and output are assemble them
is not switched on) attached in reverse of correctly
their proper order
Fill pressure too high Hoses leaking Replace hoses
Fill process does not Connector is not Half-turn to secure
start (even when the attached properly
valve is attached) Connector damaged Replace connector
Valve rod jams Detach and replace
valve rod
Tyres empty Press "flat tyre" button
Fill process functions Connector clogged Remove blockage or
alone, or alarm tone use open design
activated, even though
the connector is not
attached
E00 or E06 is blinking Error in the electrical Shut off the device,
mains or bad contact check the electrical
on the electrical connector, switch on
connector the device once more
E02 is blinking Pressure of compressor Activate or replace
lower than the selected compressor
pressure setting on the
device
Shutoff valve is closed Open shutoff valve
Device error Contact the supplier
E03 or E04 is blinking Device error/malfunc. Contact the supplier
E05 is blinking Error in the electrical Detach connector,
mains. Device under re-start filling process
current after the con-
nector has been
attached to the tyre
E08 is blinking "flat tyre" button pres- Then, briefly touch
sed over 8 seconds the "flat tyre" button
When in doubt, please always phone the manufacturer or its
representative.
– 2 –
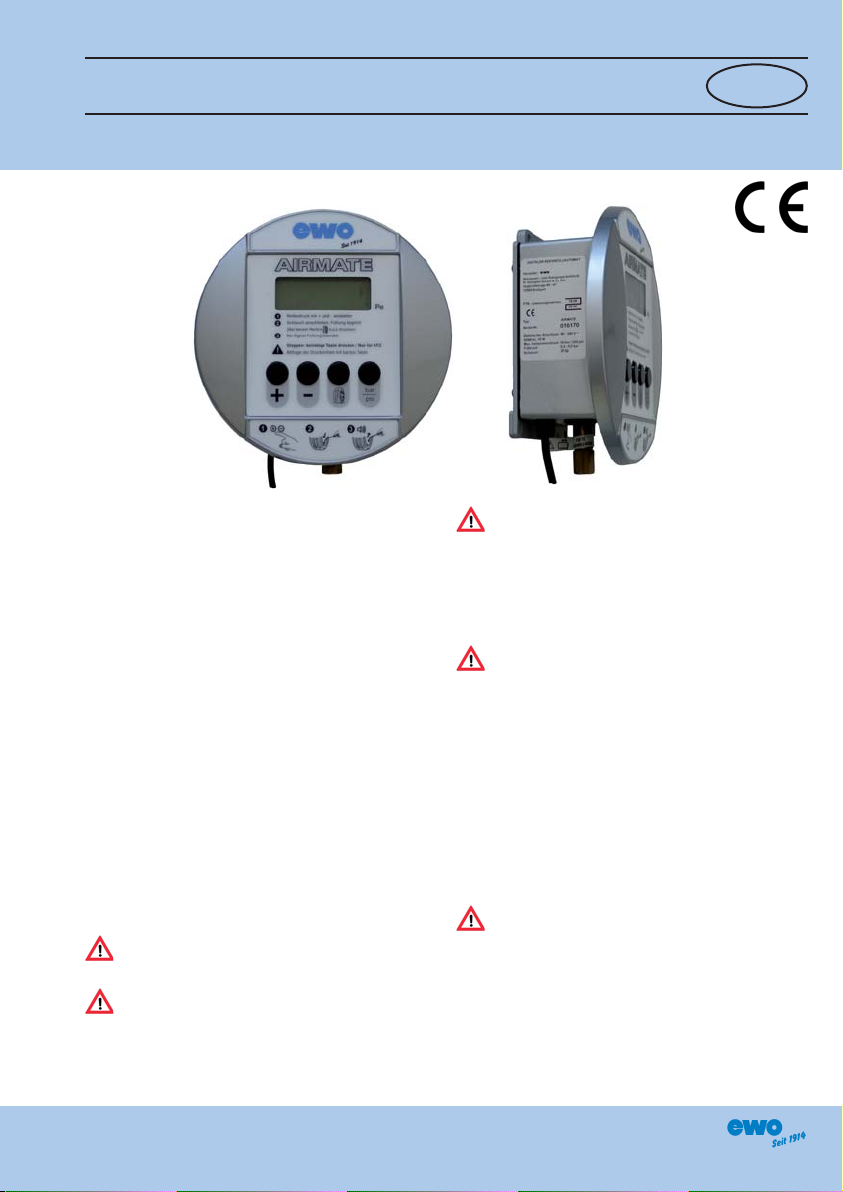
Operation
The manufacturer's pre-set fill pressure amounts to 1.8bar.
1. Set the desired tyre pressure with the plus/minus buttons.
2. Attach the fill hose with a clip connector to the tyre valve and secure it with
a half-turn. The fill process then begins automatically. In Breaks filling it
shows the current pressure.
3. The fill process has ended when the alarm tone sounds and the display
screen is blinking. The connector can now be removed.
4. For empty tyres (tyre pressure <0.2bar), the fill process does not begin
until the "flat tyre" button is pressed. After attaining the value of 0.3bar,
the fill process is automatically continued.
5. With the "bar/psi" button, the pressure check can be performed in anot-
her unit of measure. After this button is released, the reading appears
once again in bar.
• If the same pressure is required for the next tyre, it is sufficient to attach
the connector, and the fill process starts again.
• If the pressure in the tyre exceeds the desired level, the excess amount
of air is discharged.
• When the valve connector is re-attached following the fill process, a slight
drop is pressure occurs. The missing amount of air is then immediately re-
filled.
• After approx. 1 minute rest time, the fill-pressure indicator is reset to 1.8
bar for safety.
Safety Measures During Use
• Check to verify the moment connector is properly attached to the vehi-
cle's valve. After attaching, secure it with a half-turn. Any leakage will lead
to inaccuracies in the fill process.
• The fill process should not be interrupted. If the valve connectors detach
from the valve, first wait fort he air to dissipate, then re-attach the con-
nector.
• The filling process can be interrupted at any time with the "flat tyre" - but-
ton!
• Do not leave the hose on the floor, and do not drop the connector. After
each use, always retract the hose /hang it up
• If the fill process does not start after attaching the valve, check the valve
rod on the tyre and replace it if necessary.
• When the hose or connector leak, they should be replaced promptly.
Preventive Maintenance
Prior to performing any preventive-maintenance work on the electrical com-
ponents, the power supply must be disconnected and the air-shutoff valve
closed.
1. Replacement of hose
Detach the hose-connector fitting with an open-ended wrench. The com-
pressor symbol represents the air intake; the tyre symbol tyre filling. The
hoses must be designed for pressure levels up to 16 bar. When replacing
the hose, always ensure that the plastic sinter filters do not fall out.
Then, seal off the hose connectors (i.e., with Teflon strip) and screw them on
tightly.
2. Replacement of connector
Only use the moment connector supplied by the manufacturer. Other con-
nectors can lead to leakage. Only open design to use. The plug should be
rotated on the hose to be mounted.
3. Replacement of the fuse
Since the fuse is situated on the inside of the device, the tyre-filling machine
must be re-calibrated after it has been opened. The casing may only be ope-
ned by the respective technically trained personnel. Only use those fuses
which have been duly recommended by an accordingly certified testing in-
stitution: 2 mA with delay, and only Type 5 x 20 mm.
Guarantee
The airmate tyre-filling device has a 12-month guarantee period (starting
from the invoice date).
The guarantee applies to potential material defects or manufacturing errors
which occur in the course of proper use and have also been technically ve-
rified and determined by the supplier.
The following are excluded from the guarantee:
• Damage resulting from improper handling of the device or accidents of
any kind, such as i.e., power surges due to lightning strike.
• damages which have occurred due to abnormal electrical fluctuation in the
electrical mains.
• defects caused by the improper assembly of the device.
• expendable parts such as hoses and plugs.
• electrical fuses.
Expiry of the Guarantee Period
The guarantee period will end if and when:
• the term of validity elapses,
• any modifications and the installation of improper components are per-
formed,
• technical servicing has been performed by non-qualified personnel,
• the operation guide has not been observed,
• the seal (lead seal) has been removed or damaged.
Repair
• The device must be sent along with a description of the error/malfunction
to the manufacturer or its representative. Initially, the customer bears the
associated shipping costs.
• For on-site repairs performed by the manufacturer or its representative,
the principal must bear (in addition to the incurred material and labour
costs) the fitter's transportation costs.
• The parts replaced free of charge to the customer due to the warranty
conditions are the property of the manufacturer.
• Due to constant further technical developments, the product's technical
specifications are subject to change.