Exacq exacqVision User manual

Network Video Recorder
(updated
Information in this document is subject to change without notice.
© Copyright 2006-
2011
Exacq Technologies is a trademark
names may be used in this document to refer to either the entities claiming the marks and names
or their products. Exacq Technologies, Inc., disclaims any proprietary interest in trademarks and
Exacq Technologies makes no warranty of any kind with regard to this material, including, but not
limited to, the implied warranties of merchantability and fitness for a particular purpose. Exacq
Technologies shall not be liable
damages in connection with the furnishing, performance, or use of this manual.
Network Video Recorder
User Manual
(updated
January 21, 2011)
Information in this document is subject to change without notice.
2011
, Exacq Technologies, Inc. All rights reserved.
Exacq Technologies is a trademark
of Exacq Technologies, Inc. Other trademarks and trade
names may be used in this document to refer to either the entities claiming the marks and names
or their products. Exacq Technologies, Inc., disclaims any proprietary interest in trademarks and
trade names other than its own.
Exacq Technologies makes no warranty of any kind with regard to this material, including, but not
limited to, the implied warranties of merchantability and fitness for a particular purpose. Exacq
Technologies shall not be liable
for errors contained herein or for incidental or consequential
damages in connection with the furnishing, performance, or use of this manual.
Exacq Technologies, Inc.
11955 Exit Five Parkway, Bldg 3
Fishers, IN 46037 USA
Information in this document is subject to change without notice.
, Exacq Technologies, Inc. All rights reserved.
of Exacq Technologies, Inc. Other trademarks and trade
names may be used in this document to refer to either the entities claiming the marks and names
or their products. Exacq Technologies, Inc., disclaims any proprietary interest in trademarks and
Exacq Technologies makes no warranty of any kind with regard to this material, including, but not
limited to, the implied warranties of merchantability and fitness for a particular purpose. Exacq
for errors contained herein or for incidental or consequential
damages in connection with the furnishing, performance, or use of this manual.

exacqVision User Manual
1/24/2011
Network Video Recorder
1 Introduction
................................
What You Will Need to Begin
................................
Product Description
................................
Video Recording Overview
................................
Features................................
................................
2 Sample Configurations
Standalone exacqVision System
Remote exacqVision System
................................
Multi Branch Office exacqVision System
Enterprise exacqVision System
Network Connections for Analog Camera exacqVision System
Network Bandwidth Example for Analog Camera exacqVision System
Network Connections for IP Camera
Network Bandwidth Example for IP Camera exacqVision System
3 Chassis Layout
................................
Back Panel Layout
................................
Front Panel Layout –
Doors Closed
Front Panel Layout –
Doors Open
4 Hardware Installation
................................
Basic Connections
................................
Network Setup
................................
RS-422/RS485 Port Setup
................................
Trigger Input
................................
Alarm Output - Relay
................................
Alarm Output - TTL
................................
Audio Input................................
................................
5 Software Operation
................................
exacqVision Software Overview
St
arting the exacqVision NVR System
Logging In ................................
................................
Starting the Local Client
................................
Updating exacqVision Client Software
Operating Modes
................................
Live Mode Overview
................................
Layout Panel
................................
exacqReplay
................................
Live Event Monitoring
................................
Page 2
Network Video Recorder
TABLE OF CONTENTS
................................
................................
................................
................................
................................................................
................................
................................
................................................................
................................
................................
................................................................
................................
................................
................................................................
................................
2 Sample Configurations
................................................................
....................
Standalone exacqVision System
................................................................................................
...........................
................................
................................................................
...............................
Multi Branch Office exacqVision System
................................................................
................................
Enterprise exacqVision System
................................................................................................
...........................
Network Connections for Analog Camera exacqVision System
................................
................................
Network Bandwidth Example for Analog Camera exacqVision System
................................
............................
Network Connections for IP Camera
exacqVision System ................................
................................
Network Bandwidth Example for IP Camera exacqVision System
................................
................................
................................
................................
..............................
................................
................................................................
................................
Doors Closed
................................................................
................................
Doors Open
................................................................
................................
................................
................................
.....................
................................
................................................................
................................
................................
................................................................
................................
................................
................................................................
................................
................................
................................................................................................
..........................
................................
................................................................
................................
................................
................................................................
................................
................................
................................................................
............................
................................
................................
........................
exacqVision Software Overview
................................................................................................
..........................
arting the exacqVision NVR System
................................................................
................................
................................
................................................................
.............................
................................
................................................................
................................
Updating exacqVision Client Software
................................................................
................................
................................
................................................................
................................
................................
................................................................
................................
................................
................................................................
................................
................................
................................................................
................................
................................
................................................................
................................
................................
......5
................................
. 6
................................
................ 6
................................
..... 6
................................
... 8
....................
9
...........................
9
...............................
10
................................
............ 10
...........................
11
................................
........ 12
............................
13
................................
................ 14
................................
.... 15
..............................
16
................................
................ 16
................................
..................... 17
................................
....................... 17
.....................
18
................................
................ 18
................................
....................... 19
................................
..... 20
..........................
21
................................
............ 22
................................
............... 23
............................
24
........................
25
..........................
25
................................
................ 26
.............................
26
................................
....... 30
................................
................ 31
................................
................... 35
................................
............. 36
................................
.................. 38
................................
................... 42
................................
.... 44

exacqVision User Manual
1/24/2011
Event Buttons
................................
Site Tree Navigation
................................
Live Maps
................................
About exacqVision
................................
Online Help System
................................
Display Buttons
................................
PTZ Control
................................
Search Mode Overview
................................
Video Timeline
................................
Video Playback
................................
Smart Search
................................
Navigation Pane
................................
Searching Maps
................................
Searching Views
................................
Searching Events
................................
Exporting Files
................................
Setup Mode Overview
................................
Add System
................................
My Systems
................................
Client Setup
................................
Joystick Setup
................................
Enterprise User Setup
................................
Event Monitoring
................................
Group Setup
................................
Map Setup
................................
System Information
................................
System Setup
................................
Add IP Cameras
................................
IP Camera Recording Setup
IP Camera Setup
................................
eDVR 4000 Device
................................
Camera Recording Setup
................................
Camera Setup
................................
Audio Input Setup
................................
Trigger Input Setup
................................
Alarm Output Setup
................................
Video Output Setup
................................
Storage Setup
................................
Time-lapse Setup
................................
Serial Profile Setup
................................
Serial Port Setup
................................
Notifications
................................
exacqRecall
Button Configuration
Event Linking
................................
Schedule
................................
Users Setup
................................
Page 3
................................
................................................................
................................
................................
................................................................
................................
................................
................................................................
................................
................................
................................................................
................................
................................
................................................................
................................
................................
................................................................
................................
................................
................................................................
................................
................................
................................................................
................................
................................
................................................................
................................
................................
................................................................
................................
................................
................................................................
................................
................................
................................................................
................................
................................
................................................................
................................
................................
................................................................
................................
................................
................................................................
................................
................................
................................................................
................................
................................
................................................................
................................
................................
................................................................
................................
................................
................................................................
................................
................................
................................................................
................................
................................
................................................................
................................
................................
................................................................
................................
................................
................................................................
................................
................................
................................................................
................................
................................
................................................................
................................
................................
................................................................
................................
................................
................................................................
................................
................................
................................................................
................................
IP Camera Recording Setup
................................................................................................
........................
................................
................................................................
................................
................................
................................................................
................................
................................
................................................................
............................
................................
................................................................
................................
................................
................................................................
................................
................................
................................................................
................................
................................
................................................................
................................
................................
................................................................
................................
................................
................................................................
................................
................................
................................................................
................................
................................
................................................................
................................
................................
................................................................
................................
................................
................................................................
................................
Button Configuration
................................................................
................................
................................
................................................................
................................
................................
................................................................................................
.......................
................................
................................................................
................................
................................
................ 46
................................
....... 49
................................
....................... 57
................................
......... 59
................................
....... 60
................................
.............. 61
................................
.................... 62
................................
......... 65
................................
............... 70
................................
............... 71
................................
.................. 77
................................
............. 79
................................
............. 80
................................
............ 81
................................
........... 82
................................
............... 84
................................
........... 91
................................
.................... 92
................................
.................... 94
................................
.................... 96
................................
............. 103
................................
. 106
................................
.......... 108
................................
................. 111
................................
..................... 115
................................
...... 116
................................
............... 117
................................
........... 120
........................
122
................................
.......... 124
................................
........ 132
............................
133
................................
............... 135
................................
........ 147
................................
...... 149
................................
..... 150
................................
...... 152
................................
.............. 154
................................
......... 157
................................
...... 158
................................
.......... 164
................................
................. 166
................................
.............. 170
................................
............... 177
.......................
180
................................
.................. 187

exacqVision User Manual
1/24/2011
RAID Setup
................................
6 Remote Client Software Setup
Recommended Remote Client PC Requirements
Installing the Remote Client Application
Starting the exacqVision Remote Client Application
7 Special Features
................................
Multi Monitor Operation
................................
8 Active Directory/OpenLDAP
Windows Server & Client and Active Directory
Windows Server & Client and
OpenLDAP/Kerberos
Ubuntu Linux Server & Client and Active Directory
Ubuntu Linux Server & Client and OpenLDAP/Kerberos
Mac OS X
Client and Active Directory/OpenLDAP/Kerberos
Connecting to exacqVision Servers
9 Troubleshooting
................................
ExacqVision RAID system
................................
Display Issues
................................
10 Technical Support
................................
11
Regulatory Notice
................................
12
Warranty
................................
13
Manual Updates
................................
Release 2.8 ................................
................................
Release 2.9 ................................
................................
Release 2.10
................................
Release 2.11
................................
Release 3.0 ................................
................................
Release 3.1 ................................
................................
Release 3.2 ................................
................................
Release 3.3 ................................
................................
Release 3.4 ................................
................................
Release 3.5 ................................
................................
Release 3.6 ................................
................................
Release 3.7 ................................
................................
Release 4.0 ................................
................................
Release 4.1 ................................
................................
Release 4.2 ................................
................................
Release 4.3 ................................
................................
Release 4.4 ................................
................................
Release 4.5 ................................
................................
Page 4
................................
................................................................
................................
6 Remote Client Software Setup
................................
................................
Recommended Remote Client PC Requirements
................................................................
.............................
Installing the Remote Client Application
................................................................
................................
Starting the exacqVision Remote Client Application
................................................................
........................
................................
................................
..........................
................................
................................................................
................................
8 Active Directory/OpenLDAP
................................
................................
Windows Server & Client and Active Directory
................................................................
................................
OpenLDAP/Kerberos
................................................................
.........................
Ubuntu Linux Server & Client and Active Directory
................................................................
.........................
Ubuntu Linux Server & Client and OpenLDAP/Kerberos
................................
................................
Client and Active Directory/OpenLDAP/Kerberos
................................
................................
Connecting to exacqVision Servers
................................................................
................................
................................
................................
...........................
................................
................................................................
................................
................................
................................................................
................................
................................
................................
......................
................................
................................
........................
................................
................................
................................
................................
................................
...........................
................................
................................................................
..........................
................................
................................................................
..........................
................................
................................................................................................
........................
................................
................................................................................................
........................
................................
................................................................
..........................
................................
................................................................
..........................
................................
................................................................
..........................
................................
................................................................
..........................
................................
................................................................
..........................
................................
................................................................
..........................
................................
................................................................
..........................
................................
................................................................
..........................
................................
................................................................
..........................
................................
................................................................
..........................
................................
................................................................
..........................
................................
................................................................
..........................
................................
................................................................
..........................
................................
................................................................
..........................
................................
................... 192
................................
....193
.............................
193
................................
........... 193
........................
197
..........................
199
................................
...... 199
................................
........201
................................
. 201
.........................
204
.........................
207
................................
................. 211
................................
........... 215
................................
.................. 216
...........................
217
................................
.. 217
................................
..................... 225
......................
227
........................
228
................................
.......229
...........................
230
..........................
230
..........................
230
........................
231
........................
231
..........................
231
..........................
231
..........................
231
..........................
231
..........................
231
..........................
232
..........................
232
..........................
232
..........................
232
..........................
232
..........................
232
..........................
232
..........................
232
..........................
232

exacqVision User Manual
1/24/2011
1
Introduction
Thank you for purchasing the exacqVision high
manual was written to help you install your exacqVision hardware and software. Your new system
supports both
analog and IP cameras individually or simultaneously.
investment you already have in analog cameras while provi
network-
based IP camera technology.
The exacqVision software can also be purchased separately as a stand
install the software to a new or existing off
system. These systems can be linked with other exacqVision systems.
please contact your dealer.
Regardless of your camera technology, exacqVision offers you the most advanced video
networking, recording and surveilla
Again, thank you for selecting the
Page 5
Introduction
Thank you for purchasing the exacqVision high
-
performance network digital video recorder.
manual was written to help you install your exacqVision hardware and software. Your new system
analog and IP cameras individually or simultaneously.
It is designed to preserve any
investment you already have in analog cameras while provi
ding you the ability to migrate to
based IP camera technology.
The exacqVision software can also be purchased separately as a stand
-
alone NVR solution. Simply
install the software to a new or existing off
-the-
shelf PC and add IP cameras to
system. These systems can be linked with other exacqVision systems.
For more information,
Regardless of your camera technology, exacqVision offers you the most advanced video
networking, recording and surveilla
nce technology available in the market today.
Again, thank you for selecting the
exacqVision System.
performance network digital video recorder.
This
manual was written to help you install your exacqVision hardware and software. Your new system
It is designed to preserve any
ding you the ability to migrate to
new
alone NVR solution. Simply
shelf PC and add IP cameras to
create your own
For more information,
Regardless of your camera technology, exacqVision offers you the most advanced video
nce technology available in the market today.

exacqVision User Manual
1/24/2011
What You Will Need to Begin
Product Description
The exacqVision network
video recorder
4 advanced sim
ple profile (ASP), 30 images per second per channel security solution
designed for users who need
systems features
480 images per second 16 channel and 960 ips 32 channel MPEG
compression with
video motion detection,
Models range from a four-
channel
storage. N
etworking capabilities allow
a common PC or Mac
client application.
cameras with the same intuitive interface.
and smart pixel searching.
The
designed interface
that provides simple and efficient access to all setup and operation functions.
Overall, the
exacqVision NVR
intuitive user interface offering an unprecedented level of functionality.
Video Recording Overview
The fundamental functionality of the exacqVision NVR is to
cameras so that if there’s a breach of security you can quickly and easily search and find the video
that will help to solve your security problem.
settings that provide you with tools to cu
however searching
recorded video
video recording settings is important in knowing how to take full advantage of this powerful video
security solution.
You will find a detailed description with diagrams that explain how
the video recording settings in the Software Setup section of this manual but before we go there,
here’s a brief overview of the three video recording settings.
Mot
ion Detection Recording is the default video recording setting of the exacqVision NVR system
because it’s the most efficient and frequently used method of recording video.
recorded when the
exacqVision System
efficient method of recording because if the system doesn’t detect motion video is not recorded
saving a tremendous amount of disk capacity and extending the recording time.
recording is configured on the
Page 6
What You Will Need to Begin
video recorder
(“NVR”) is a next generation high
-
ple profile (ASP), 30 images per second per channel security solution
an easy to use, yet high performance NVR.
The
480 images per second 16 channel and 960 ips 32 channel MPEG
video motion detection,
event based
recording, and relay output controls.
channel
unit with 160 GB of storage to a 64-
channel unit with
etworking capabilities allow
local and
remote administration, playback, and export using
client application.
The exacqVision NVR supports a mix of analog and IP
cameras with the same intuitive interface.
Flexible high speed
search include time and date, event,
The
exacqVision NVR
offers users a highly intuitive and ergonomically
that provides simple and efficient access to all setup and operation functions.
exacqVision NVR
combines a feature-
rich security platform with a flexible and
intuitive user interface offering an unprecedented level of functionality.
Video Recording Overview
The fundamental functionality of the exacqVision NVR is to
record video
from
cameras so that if there’s a breach of security you can quickly and easily search and find the video
that will help to solve your security problem.
There are many additional features and configuration
settings that provide you with tools to cu
stomize your system to your specific requirements;
recorded video
is a fundamental feature of the system.
Understanding the basic
video recording settings is important in knowing how to take full advantage of this powerful video
You will find a detailed description with diagrams that explain how
the video recording settings in the Software Setup section of this manual but before we go there,
here’s a brief overview of the three video recording settings.
ion Detection Recording is the default video recording setting of the exacqVision NVR system
because it’s the most efficient and frequently used method of recording video.
exacqVision System
detects motion in the cameras fie
ld of view.
efficient method of recording because if the system doesn’t detect motion video is not recorded
saving a tremendous amount of disk capacity and extending the recording time.
recording is configured on the
Schedule Setup screen.
-
performance, MPEG-
ple profile (ASP), 30 images per second per channel security solution
. It’s been
The
exacqVision NVR
480 images per second 16 channel and 960 ips 32 channel MPEG
-4 hardware
recording, and relay output controls.
channel unit with
16 TB of
remote administration, playback, and export using
The exacqVision NVR supports a mix of analog and IP
search include time and date, event,
offers users a highly intuitive and ergonomically
that provides simple and efficient access to all setup and operation functions.
rich security platform with a flexible and
from
analog or IP
cameras so that if there’s a breach of security you can quickly and easily search and find the video
There are many additional features and configuration
stomize your system to your specific requirements;
Understanding the basic
video recording settings is important in knowing how to take full advantage of this powerful video
You will find a detailed description with diagrams that explain how
to configure
the video recording settings in the Software Setup section of this manual but before we go there,
ion Detection Recording is the default video recording setting of the exacqVision NVR system
because it’s the most efficient and frequently used method of recording video.
Video is only
ld of view.
This is a very
efficient method of recording because if the system doesn’t detect motion video is not recorded
saving a tremendous amount of disk capacity and extending the recording time.
Motion detection

exacqVision User Manual
1/24/2011
Continuous video recording (also known as free run recording) records every video image all the
time
for the specified schedule you have set for the camera.
recording because if a camera is pointed at a
activity at all, video is still recorded taking up disk capacity and reducing your recording time.
This feature is available because there are some applications and situations that require continuous
recording.
Continuous recording is configured on the
Event Recording provides a method of linking different types of events such as input triggers,
point of sale data, and loss of a video signal or video motion to cause an action such as
video.
There are additional action types that can be linked to the event types on the
screen.
Connecting a door sensor to a trigger input on the exacqVision NVR and linking it to a
camera to automatically record video upon tripping
configure event recording.
Page 7
Continuous video recording (also known as free run recording) records every video image all the
for the specified schedule you have set for the camera.
This is an inefficient method of
recording because if a camera is pointed at a
door, hall or wall and there is no movement or
activity at all, video is still recorded taking up disk capacity and reducing your recording time.
This feature is available because there are some applications and situations that require continuous
Continuous recording is configured on the
Schedule Setup
screen.
Event Recording provides a method of linking different types of events such as input triggers,
point of sale data, and loss of a video signal or video motion to cause an action such as
There are additional action types that can be linked to the event types on the
Connecting a door sensor to a trigger input on the exacqVision NVR and linking it to a
camera to automatically record video upon tripping
the sensor is an example of how you might
Continuous video recording (also known as free run recording) records every video image all the
This is an inefficient method of
door, hall or wall and there is no movement or
activity at all, video is still recorded taking up disk capacity and reducing your recording time.
This feature is available because there are some applications and situations that require continuous
screen.
Event Recording provides a method of linking different types of events such as input triggers,
point of sale data, and loss of a video signal or video motion to cause an action such as
recording
There are additional action types that can be linked to the event types on the
Event Linking
Connecting a door sensor to a trigger input on the exacqVision NVR and linking it to a
the sensor is an example of how you might

exacqVision User Manual
1/24/2011
Features
Up to 64 analog
camera inputs, auto
Choice of
hard disk capacities
System record rates
up to 1,920
MPEG-
4 ASP compression
Built-
in hardware motion detection
Adjustable image rates and resolution per camera
2U, 4U, or desktop chassis
Client viewing and administration software
24/7 scheduling
Transmission over Ethernet, DSL, or
Automatic IP address designation with DHCP
Will not stop recording in the event of network failure, watchdog timer
Bandwidth limitation for Ethernet/Dial
Simultaneous record, playback, background image archiving
Up to
16 internal alarm in
4-
channel full duplex audio with recording
PTZ Control via RS 232 and RS 485/RS422
Multiscreen monitor
(spot monitor)
Embedded Linux
or Windows® XP
Network
Time protocol (NTP) support for time synchronization
Interface with cash registers (POS) and ATMs for video + transaction text recording
DVD Recorder
Open API for third-
party integration and interoperability
Page 8
camera inputs, auto
-terminating
hard disk capacities
up to 16 TB
up to 1,920
images per second (NTSC)
4 ASP compression
with watermarking
in hardware motion detection
with definable zones per camera
Adjustable image rates and resolution per camera
2U, 4U, or desktop chassis
Client viewing and administration software
Transmission over Ethernet, DSL, or
Cable
Automatic IP address designation with DHCP
Will not stop recording in the event of network failure, watchdog timer
Bandwidth limitation for Ethernet/Dial
-up networks
Simultaneous record, playback, background image archiving
16 internal alarm in
puts, 15 alarm outputs, 1 relay outputs
channel full duplex audio with recording
PTZ Control via RS 232 and RS 485/RS422
(spot monitor)
output displays for live video
or Windows® XP
for stability and reliability
Time protocol (NTP) support for time synchronization
Interface with cash registers (POS) and ATMs for video + transaction text recording
party integration and interoperability
Will not stop recording in the event of network failure, watchdog timer
Interface with cash registers (POS) and ATMs for video + transaction text recording

exacqVision User Manual
1/24/2011
2
Sample Configurations
One of the
most appealing features of the exacqVision product line is its ability to address a wide
variety of installations all while providing live monitoring, searching, and configuration through
the same, easy to use interface.
exacqVision is well-suited.
Standalone exacqVision System
Page 9
Sample Configurations
most appealing features of the exacqVision product line is its ability to address a wide
variety of installations all while providing live monitoring, searching, and configuration through
the same, easy to use interface.
Below are some typical types of ins
tallations for which
Standalone exacqVision System
most appealing features of the exacqVision product line is its ability to address a wide
variety of installations all while providing live monitoring, searching, and configuration through
tallations for which

exacqVision User Manual
1/24/2011
Remote exacqVision System
Multi B
ranch Office exacqVision System
Page 10
Remote exacqVision System
ranch Office exacqVision System

exacqVision User Manual
1/24/2011
Enterprise exacqVision System
Page 11
Enterprise exacqVision System
exacqVision User Manual
1/24/2011
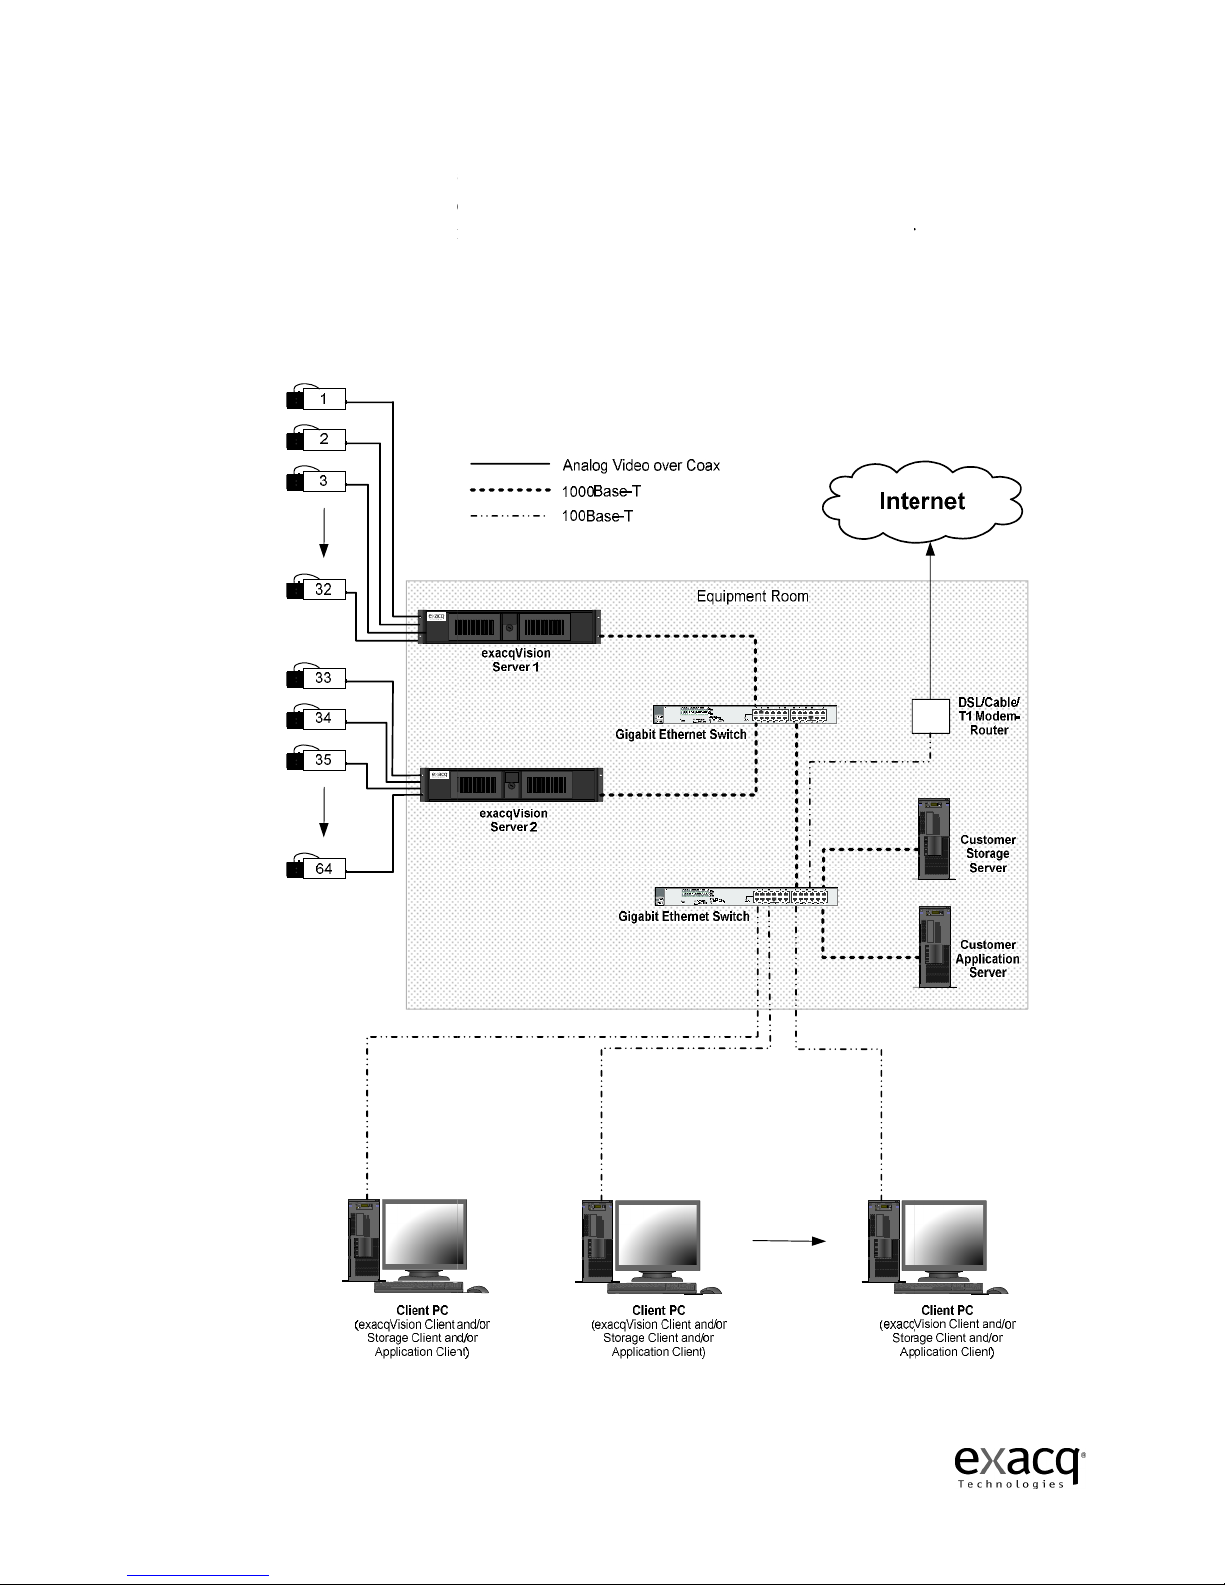
A detailed example of a small enterprise system is shown
which will provide satisfactory performance for your exacqVision systems.
it is assumed that the customer has a pre
centralized file
storage and/or a
client can be installed on as many of these client computers as desired.
is only required if there are more network client computers than ports on the first Ethernet
Network Connections for Analog Camera exacqVision System
Page 12
A detailed example of a small enterprise system is shown
to illustrate network configurations
which will provide satisfactory performance for your exacqVision systems.
In the
it is assumed that the customer has a pre
-
existing data network with servers that provide
storage and/or a
pplications
to client computers on the network.
client can be installed on as many of these client computers as desired.
The second
is only required if there are more network client computers than ports on the first Ethernet
Network Connections for Analog Camera exacqVision System
to illustrate network configurations
In the
drawing below,
existing data network with servers that provide
to client computers on the network.
The exacqVision
The second
Ethernet switch
is only required if there are more network client computers than ports on the first Ethernet
switch.

exacqVision User Manual
1/24/2011
Gigabit Ethernet connections are recommended between the exacqVision servers and the Ethernet
switch, and between Ethernet switches.
e
xacqVision Client is sufficient,
aggregate network bandwidth out
Network Bandwidth Example for Analog Camera exacqVision System
Page 13
Gigabit Ethernet connections are recommended between the exacqVision servers and the Ethernet
switch, and between Ethernet switches.
While a 100 Mbps connection from the switch to each
xacqVision Client is sufficient,
it can be seen that each
active exacqVision Client
aggregate network bandwidth out
of the exacqVision server.
Network Bandwidth Example for Analog Camera exacqVision System
Gigabit Ethernet connections are recommended between the exacqVision servers and the Ethernet
While a 100 Mbps connection from the switch to each
active exacqVision Client
increases the
Network Bandwidth Example for Analog Camera exacqVision System
exacqVision User Manual
1/24/2011
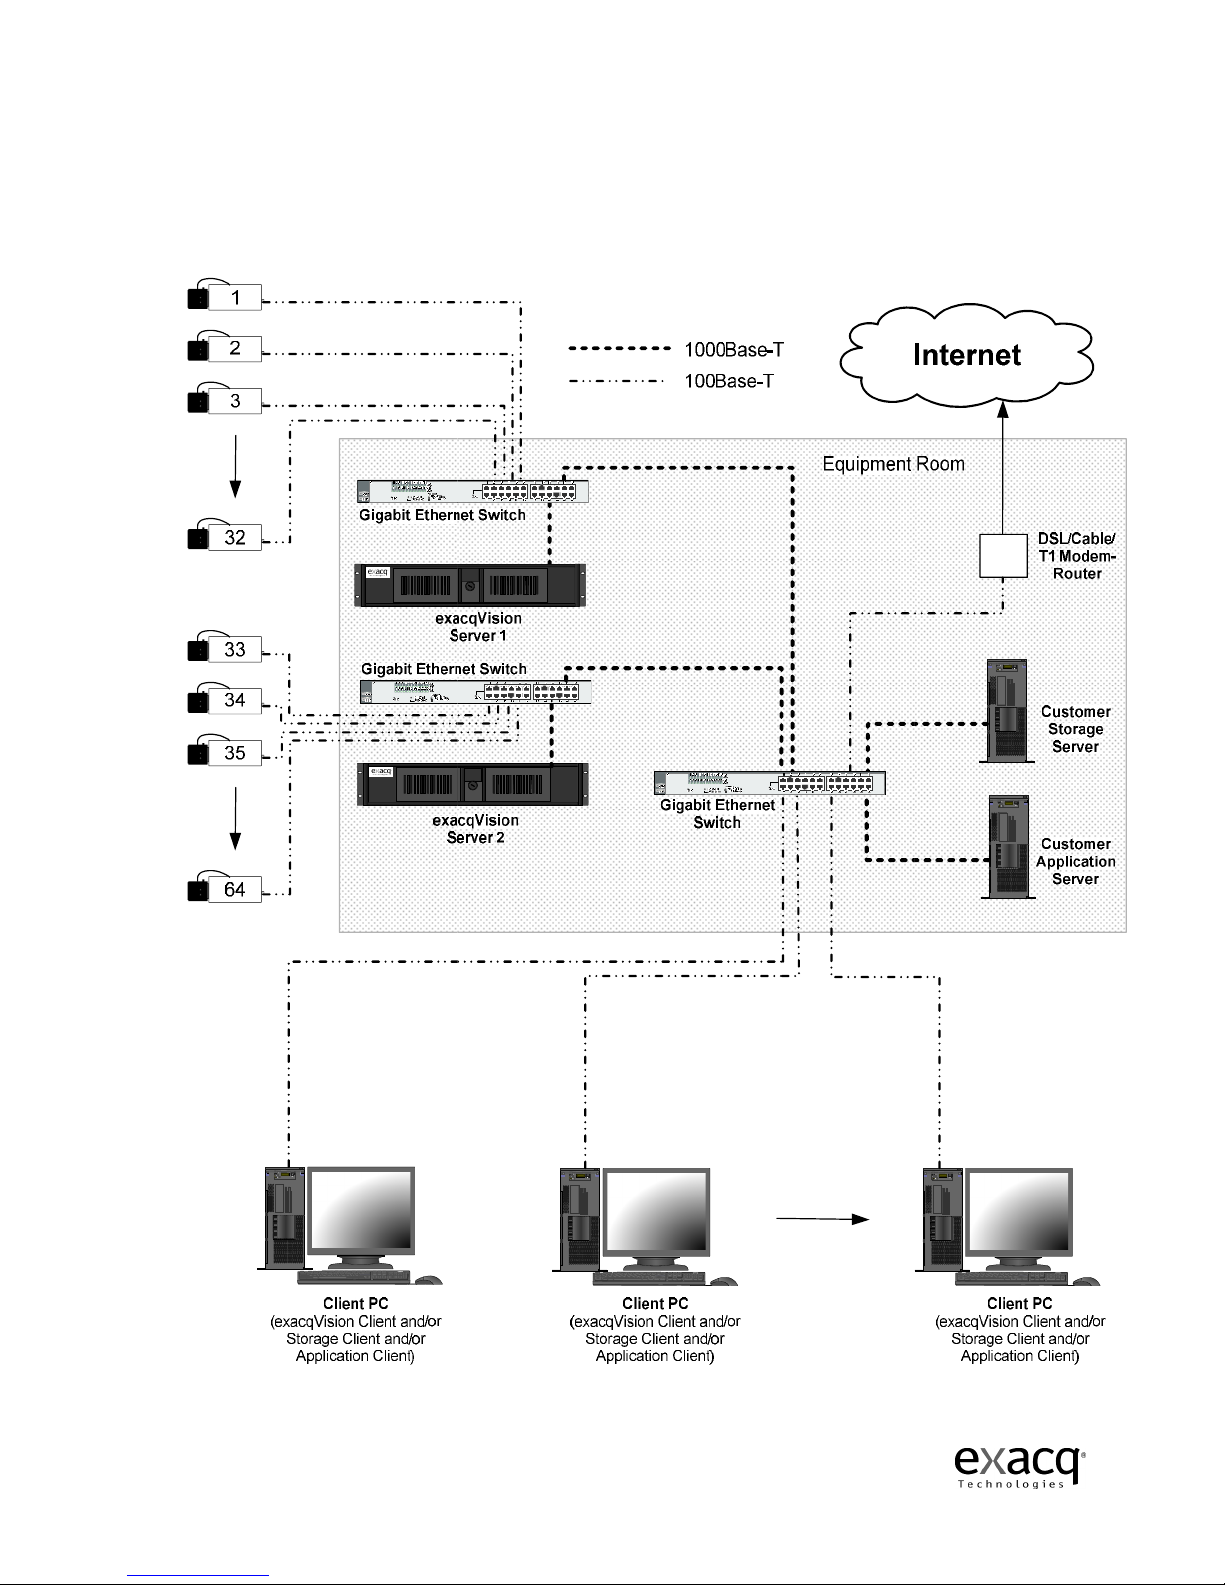
An installation with IP cameras
in “home-
run” style back to a
Net
work Connections for IP Camera exacqVision System
Page 14
An installation with IP cameras
is quite similar.
Exacq recommends that the IP cameras are wired
run” style back to a
n Ethernet switch near the exacqVision Server.
work Connections for IP Camera exacqVision System
Exacq recommends that the IP cameras are wired

exacqVision User Manual
1/24/2011
Again, referring to the diagram below, gigabit Ethernet
exacqVision servers and the Ethernet switches, but 100 Mbps connections from the switches to
each IP camera and exacqVision Client are sufficient.
Network Bandwidth Example for IP Camera exacqVision System
Page 15
Again, referring to the diagram below, gigabit Ethernet
connections are recommended between the
exacqVision servers and the Ethernet switches, but 100 Mbps connections from the switches to
each IP camera and exacqVision Client are sufficient.
Network Bandwidth Example for IP Camera exacqVision System
`
`
connections are recommended between the
exacqVision servers and the Ethernet switches, but 100 Mbps connections from the switches to

exacqVision User Manual
1/24/2011
3
Chas
sis Layout
Back Panel Layout
(1)
Keyboard (PS/2) Input
(2)
Mouse (PS/2) Input
(3) 9 Pin RS-232
Serial Port
(4)
LPT1 Printer Port
(5)
VGA Monitor Output
(6)
4 High Speed USB 2.0 Ports (2 additional USB 2.0 ports on the front of
(7) 10/100
/1000 Mbits/sec
(8) Audio Line Input
(9)
Microphone Input
(10) Audio Line
Output
(11)
16 TTL Input Triggers
(12)
4 Audio Inputs, 1 Audio Output
(13) 1 Relay Output
(14) 1 RS-485/RS-
422
(15) Ground
(16)
16 TTL Output Triggers
(17) 16 Camera
Inputs (1
(18)
16 Camera Outputs
(19) 1 Switched Multi
-
(20) AC Power Input
–
Page 16
sis Layout
Keyboard (PS/2) Input
Mouse (PS/2) Input
Serial Port
(COM1)
LPT1 Printer Port
– 25 pin port
VGA Monitor Output
– 15-pin output
4 High Speed USB 2.0 Ports (2 additional USB 2.0 ports on the front of
/1000 Mbits/sec
Gigabit Ethernet Adapter Port
Microphone Input
Output
16 TTL Input Triggers
4 Audio Inputs, 1 Audio Output
422
Serial Port (COM4)
16 TTL Output Triggers
Inputs (1
-8 row one, 9-16 row two)
16 Camera Outputs
– Loop Through (1-8 row one, 9-
16 row two)
-
Picture Composite Video Output
–
Switching Power Supply –
115V/230V, 50/60 Hz
4 High Speed USB 2.0 Ports (2 additional USB 2.0 ports on the front of
the unit)
16 row two)
115V/230V, 50/60 Hz

exacqVision User Manual
1/24/2011
Front Panel Layout –
Doors Closed
19” 2U High-E
nd Rackmount Chassis compliant to EIA RS
(1)
Lockable latch door (Air filter inside the door is removable and washable)
(2)
Lockable latch door (Air filter inside the door is removable and washable)
(3) Lock –
locks both doors
(4)
Network light indicator
(5)
Disk access light indicator
(6)
System power light indicator
(7)
Temperature light indicator
(8)
Network activity light indicator
Front Panel Layout –
Doors
(1) 2 USB 2.0 ports
(4 additional USB 2.0 ports on the back of the unit)
(2)
Quick Export button
(3) Power switch –
turns power on/off the system
(4)
DVD R/W disc drive
(5)
Open/Close DVD button.
Page 17
Doors Closed
nd Rackmount Chassis compliant to EIA RS
-310C Standard
Lockable latch door (Air filter inside the door is removable and washable)
Lockable latch door (Air filter inside the door is removable and washable)
locks both doors
Network light indicator
– on when a network connection is made
Disk access light indicator
–
flash on/off when the disk is being accessed
System power light indicator
–
on when the power is on to the system
Temperature light indicator
–
on if the system temperature is above 95 de
Network activity light indicator
–
flashes on/off with network activity
Doors
Open
(4 additional USB 2.0 ports on the back of the unit)
Quick Export button
–
quickly export and burn video to the DVD disc
turns power on/off the system
DVD R/W disc drive
– Used for exporting video to a DVD disc.
Open/Close DVD button.
Lockable latch door (Air filter inside the door is removable and washable)
Lockable latch door (Air filter inside the door is removable and washable)
flash on/off when the disk is being accessed
on when the power is on to the system
on if the system temperature is above 95 de
grees
flashes on/off with network activity
(4 additional USB 2.0 ports on the back of the unit)
quickly export and burn video to the DVD disc

exacqVision User Manual
1/24/2011
4
Hardware Installation
Basic Connections
(1)
Connect the keyboard to the top PS/2 port
(2)
Connect the mouse to the
(3)
Connect the VGA monitor to the 15 pin VGA port
(4)
Connect the power cord to the back of the unit and a power source
(5)
Connect the cameras to the BNC connectors
(6)
Connect the Ethernet switch to the
Port
(7)
Connect the IP camera to the Ethernet switch
Page 18
Hardware Installation
Connect the keyboard to the top PS/2 port
Connect the mouse to the
bottom PS/2 port
Connect the VGA monitor to the 15 pin VGA port
Connect the power cord to the back of the unit and a power source
Connect the cameras to the BNC connectors
Connect the Ethernet switch to the
10/100/1000 Mbits/sec Gigabit Ethernet Adapter
Connect the IP camera to the Ethernet switch
Connect the power cord to the back of the unit and a power source
10/100/1000 Mbits/sec Gigabit Ethernet Adapter

exacqVision User Manual
1/24/2011
Network Setup
exacqVision system
s can be connected to a local area network (LAN) or wide area network
(WAN) for the purpose monitoring or searching for video from a remote location.
syst
ems administration and configuration can also be performed from a remote client PC.
(1)
Connect the exacqVision
Ethernet Switch / Router with Cat5 cable and RJ
(2)
Connect the Ethernet
(3)
Connect the Cable or DSL modem to your cable outlet or
NOTE:
In the first three steps, please refer to your manufacturers Ethernet Switch /
Router and Cable / DSL modem installation guide for
(4)
Connect your remote client PC to an Ethernet Switch / Router and Cable / DSL modem.
(5)
Install Exacq exacqVision client software for remote viewing and administration of the
exacqVision System
NOTE:
Local Area Network (LA
DSL modem.
Simply connect the exacqVision and client PC directly to the Ethernet
Switch port.
Page 19
s can be connected to a local area network (LAN) or wide area network
(WAN) for the purpose monitoring or searching for video from a remote location.
ems administration and configuration can also be performed from a remote client PC.
Connect the exacqVision
10/100/1000 Mbits/sec Gigabit Ethernet Adapter Port
Ethernet Switch / Router with Cat5 cable and RJ
-45 connectors.
Connect the Ethernet
Switch / Router to a Cable or DSL modem.
Connect the Cable or DSL modem to your cable outlet or
DSL
connection port.
In the first three steps, please refer to your manufacturers Ethernet Switch /
Router and Cable / DSL modem installation guide for
specific installation instructions.
Connect your remote client PC to an Ethernet Switch / Router and Cable / DSL modem.
Install Exacq exacqVision client software for remote viewing and administration of the
exacqVision System
.
Local Area Network (LA
N) installations eliminate the need of the Cable or
Simply connect the exacqVision and client PC directly to the Ethernet
s can be connected to a local area network (LAN) or wide area network
(WAN) for the purpose monitoring or searching for video from a remote location.
exacqVision
ems administration and configuration can also be performed from a remote client PC.
10/100/1000 Mbits/sec Gigabit Ethernet Adapter Port
to an
Switch / Router to a Cable or DSL modem.
connection port.
In the first three steps, please refer to your manufacturers Ethernet Switch /
specific installation instructions.
Connect your remote client PC to an Ethernet Switch / Router and Cable / DSL modem.
Install Exacq exacqVision client software for remote viewing and administration of the
N) installations eliminate the need of the Cable or
Simply connect the exacqVision and client PC directly to the Ethernet

exacqVision User Manual
1/24/2011
RS-
422/RS485 Port Setup
The exacqVision System
has one RS
variety of Pan Tilt Zoom (PTZ) cameras.
the back of the exacqVision unit can be removed to easily connect the cable that controls th
camera.
There are four small screws on the top of the connector that need to be partially unscrewed
in order to insert the wire into the individual connections (Tx+, Tx
inserted into the connector, tighten each screw f
connector in
the back of the unit.
Page 20
422/RS485 Port Setup
has one RS
-485/RS-
422 serial port that can be configured to control a
variety of Pan Tilt Zoom (PTZ) cameras.
The RS-485/RS-422 serial port
terminal block plug
the back of the exacqVision unit can be removed to easily connect the cable that controls th
There are four small screws on the top of the connector that need to be partially unscrewed
in order to insert the wire into the individual connections (Tx+, Tx
-
, Rx+, Rx
inserted into the connector, tighten each screw f
or a secure connection and then
the back of the unit.
422 serial port that can be configured to control a
terminal block plug
on
the back of the exacqVision unit can be removed to easily connect the cable that controls th
e PTZ
There are four small screws on the top of the connector that need to be partially unscrewed
, Rx+, Rx
-). Once the wires are
or a secure connection and then
re-insert the
Other manuals for exacqVision
2
Table of contents


