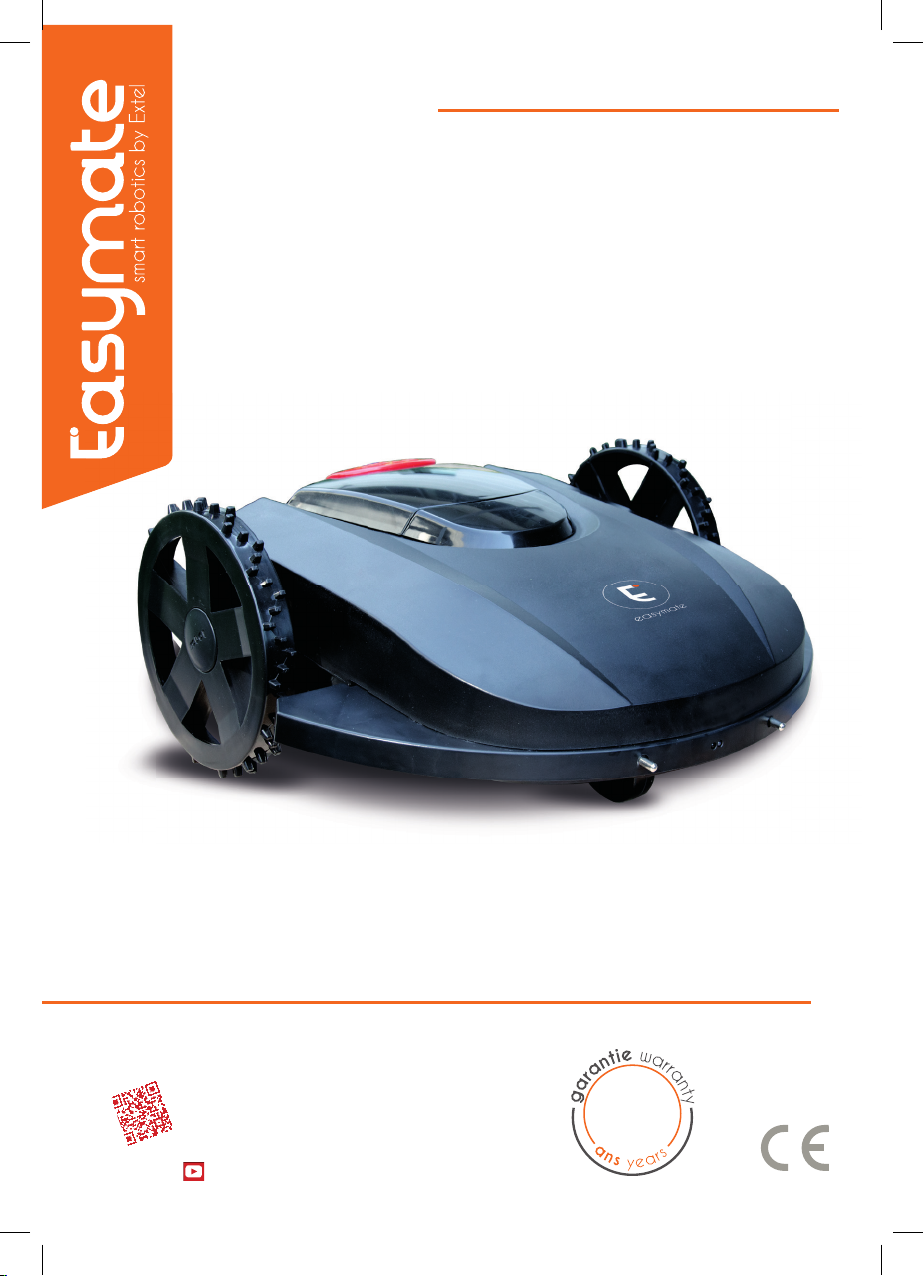
Extel Easymate Garden1000 User manual
330100
Installation and User Manual
•
Latest version of the downloadable instructions in colour:
www.extel.com 2
EXTEL TV
V3
Garden1000
Easymate by Extel - GARDEN 1000 -V3 Easymate by Extel - GARDEN 1000 -V3
Fig. 2
Fig. 3
12
3
4 5
6
7 9
8
Fig. 1
2
1
3
45
1
2310
45
6
7
8
9

Easymate by Extel - GARDEN 1000 -V3 Easymate by Extel - GARDEN 1000 -V3
Fig. 7
Fig. 5
Fig. 4
Fig. 6

Easymate by Extel - GARDEN 1000 -V3 Easymate by Extel - GARDEN 1000 -V3
Fig. 9
Fig. 8
Fig. 10
Fig. 11
Black Red
Easymate by Extel - GARDEN 1000 -V3
Easymate by Extel - GARDEN 1000 -V3
Fig. 12
Fig. 14
Fig. 13

Easymate by Extel - GARDEN 1000 -V3
Easymate by Extel - GARDEN 1000 -V3

Easymate by Extel - GARDEN 1000 -V3
EN1
Easymate by Extel - GARDEN 1000 -V3
CONTENTS
1 IMPORTANT INFORMATION .................................................p.2
2 SAFETY MEASURES.......................................................................p.2
3 DESCRIPTION....................................................................................p.3
4 COMPONENT NAMES..................................................................p.3
a. Mower
b.Automatic charger base
5 INSTALLATION ................................................................................p.4
a. Installing the charger base
b. Installing the boundary wire
c.Turning on and charging
d. Setting the cutting height
6 USAGE INSTRUCTIONS.............................................................p.5
a. Start
b. Settings
c. Setting the mowing area
d.Timer
e. Changing the PIN code
f. Setting the time and date
g. Language
7 TECHNICAL CHARACTERISTICS .......................................p.6
8 OPTIONS...............................................................................................p.6
9 TECHNICAL SUPPORT - WARRANTY ...........................p.7
10 SAFETY MEASURES....................................................................p.8
Easymate by Extel - GARDEN 1000 -V3 Easymate by Extel - GARDEN 1000 -V3
EN2
1. IMPORTANT INFORMATION
Important!
Please carefully read the user manual before installing or using this product.
Keep the manual in a safe place for future reference.
If you are installing this product for someone else, remember to leave the manual or a copy of it with the end
user.
Warning:
The various items should only be disassembled by a qualied technician.
For operation of this system in complete safety, it is essential that the installers, users, and technicians follow all of
the safety procedures described in this manual.
Specic warnings and warning symbols are given for items if necessary.
When cleaning or servicing, you must disconnect your product from the mains and switch it off, especially when
changing the battery.
The power supply should not be connected if the wire or plug is damaged (risk of electric shock)
The mower should only be charged on the provided base.
Only use the supplier's original batteries.
This mower is not a toy: do not allow children to play with the device.
Note: Be sure to respect all the operating instructions and safety measures contained in this manual. In the event of
non-compliance, CFI-Extel withdraws and declines all liability for any damage to property or persons.
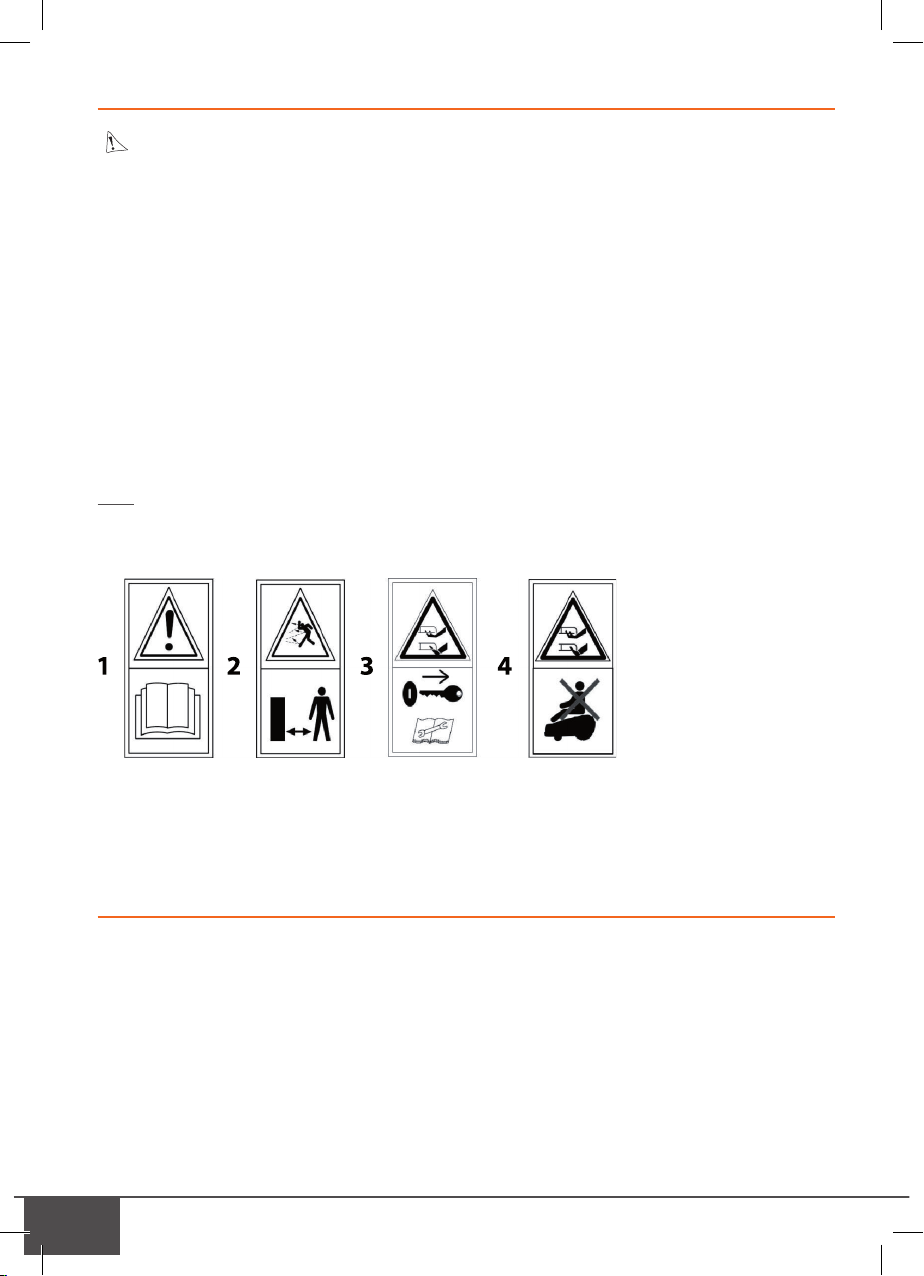
Symbols:
1) Note: Read the manual carefully before using the mower
2) Note: Maintain a safe distance from the mower while it is operating
3) Note: Press the power button to turn off the mower before inspecting or servicing
4) Note: Do not stand or sit on the mower. Never put your hands or feet under or near the mower while it is
operating.
2. SAFETY MEASURES
- Only use the power supplies (adapter, battery, etc.) that come with your mower.
- Keep your mower away from heat and ammable products.
- If the mower is not used for an extended period, remember to recharge the batteries at least once every three
months.
- Never remove the product cover.
- Avoid direct impacts as well as vibrations on the product
- Do not use the product if a connector or safety mechanism is broken
- Do not touch the product or its surrounding equipment with wet hands
- Do not leave children or pets unattended near the mower
- Never place your hands or feet near the blades
- Do not lift or carry the mower when the blades are turning
- Do not unplug the charger by pulling the cable, hold the connector rmly to unplug it.
- Do not attempt to repair the power cables or the product by yourself.Always use the product's
Easymate by Extel - GARDEN 1000 -V3
Easymate by Extel - GARDEN 1000 -V3 EN3
after-sales service for repairs
- Do not use the product when a sprinkler system is running
- Do not clean with a pressure washer
- Do not operate the mower during a thunderstorm
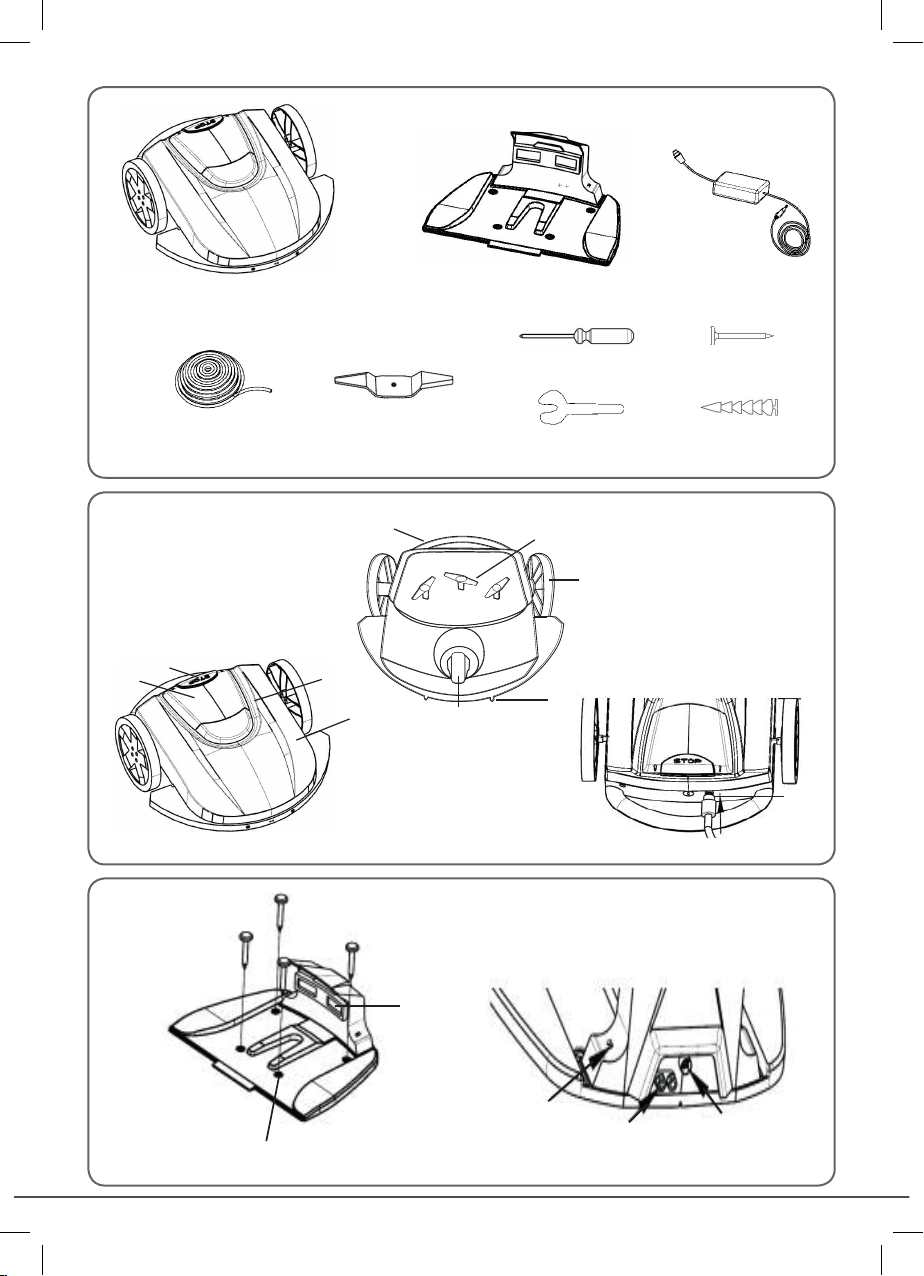
3. DESCRIPTION ( g. 1)
1.Automatic mower
2.Automatic charger base
3. Power adapter
4. Boundary wire (100 metres)
5. 3- and 5-cm cutting blades (x 3)
6. Screwdriver
7. Nut wrench
8. Nails for securing the base (x 4)
9. Pegs for securing the boundary wire (x 50)
General
The Extel GARDEN 1000 robotic lawn mower is a programmable automatic mower. Its charging base allows it to
mow your lawn with no action required on your part.
This robotic mower is intended solely for cutting grass on level outdoor surfaces with inclines up to 30°.
The robotic mower moves in a random pattern.
Three mowing zones can be programmed to ensure that the mower covers the entire area.
A rain sensor on the cover will stop the mowing and return the mower to the charging base.
For a longer product life, use on wet grass and at temperatures below 0°C is not recommended.
The robotic mower has a bumper on the front that detects obstacles and makes it change direction.
Robotic Extel EasyMate Operating Precautions
Check that there are no branches, toys or other objects on the lawn that can damage the mower.
Do not use the mower if pets, children or people are in the mowing area. Use the time programmer to operate
the mower when the mowing area is clear.
The mower will not operate (lock) if the boundary wire angle is less than 125°.
In case of emergency, press the STOP button on the mower.
When the mower is not in use, turn it off with this button
In case of emergency, press the STOP button on the mower.
4. COMPONENT NAMES ( g. 2)
a) Mower ( g.2)
1. Body
2. Cover for display screen and keypad
3. STOP button
4. Carrying handle
5. Cutting blade (x3)
6. Front wheel
7. Rear wheels (x2)
8. Contact strips
9. Charging connector
10. Rain sensor
b) Automatic charger base ( g. 3)
1. Contact strips for charging (x 2)
2. Hole for securing to ground (x 4)
3. Indicator lights
4. Boundary wire charging lug
5. Charging connector

Easymate by Extel - GARDEN 1000 -V3 Easymate by Extel - GARDEN 1000 -V3
EN4
5. INSTALLATION
a) Installing the charger base
1.The charging base should be installed on a level, sturdy surface in a location where it can be conveniently con-
nected to the power supply
2.Allow for at least 2 m of free space around the base clear of any obstacles or angles.The base must be posi-
tioned at least 40 cm from the edge of the lawn. (Fig. 4).
3. Start by securing the boundary wire under the base station then fastening the base to the ground with the four
nails provided. (Fig. 5). Centre the base on the wire and allow a reserve of at least 15 cm to secure the wire to
the back of the base.
Note: The mower reverses and moves forward to the right.The grass to be cut should therefore be to the right of the
base station. (Fig. 6).
b) Installing the boundary wire (g. 7)
1.The boundary wire starts at the back of the charging base, passes under the charging base, runs counterclock-
wise and ends at the back of the base.Allow a reserve of at least 15 cm at each end to secure the wire to the
back of the base.
2. The minimum passage width is 0.5 meters (see g.14 for more detail).
3. Right angles (90°) are prohibited; the angle must be at least 125°.
4. Flowerbeds and/or bushes and trees in the mowing area may be blocked off with the wire. Be careful not to
cross the wire and leave at most a 1-cm gap for the section that goes to the owerbed.
5.The wire must be placed 30 cm from the edge of the lawn, except for the 2 meters in front of the charging base
which must be 40 cm from the edge of the lawn. (Fig. 8).
6. Firmly secure the wire to the ground with the pegs provided.The recommended space between pegs is 2 to 3
meters.The pegs can be placed closer together if the terrain requires it (change of direction, hole, etc.). (Fig. 9).
7. The wire must be taut and perfectly ush to the ground so that it cannot be cut when mowing.
8. Once the entire wire is secured, strip 2 cm of both ends of the wire.
9. Unscrew the wire connectors at the back of the base. Connect the end of the wire passing under the base to
the red connector. Connect the other end to the black connector. (Fig. 10)
Note: the boundary wire has a polarity. Be sure to respect the wiring.
10. Firmly tighten the connectors to hold the wire in place.
Note: There is no need to bury the cord. It will settle into place in time.We therefore recommend that you start with
high-level mowing.
c) Turning on and charging
1. Start by connecting the supplied power adapter to the back of the charging base.
2. Connect the adapter to the mains.
Note: The green LED on the base should light up. If the red LED on the base is blinking, it means there is an issue with
the wire loop. Check that the wire is fastened firmly to the base and that it is not cut.
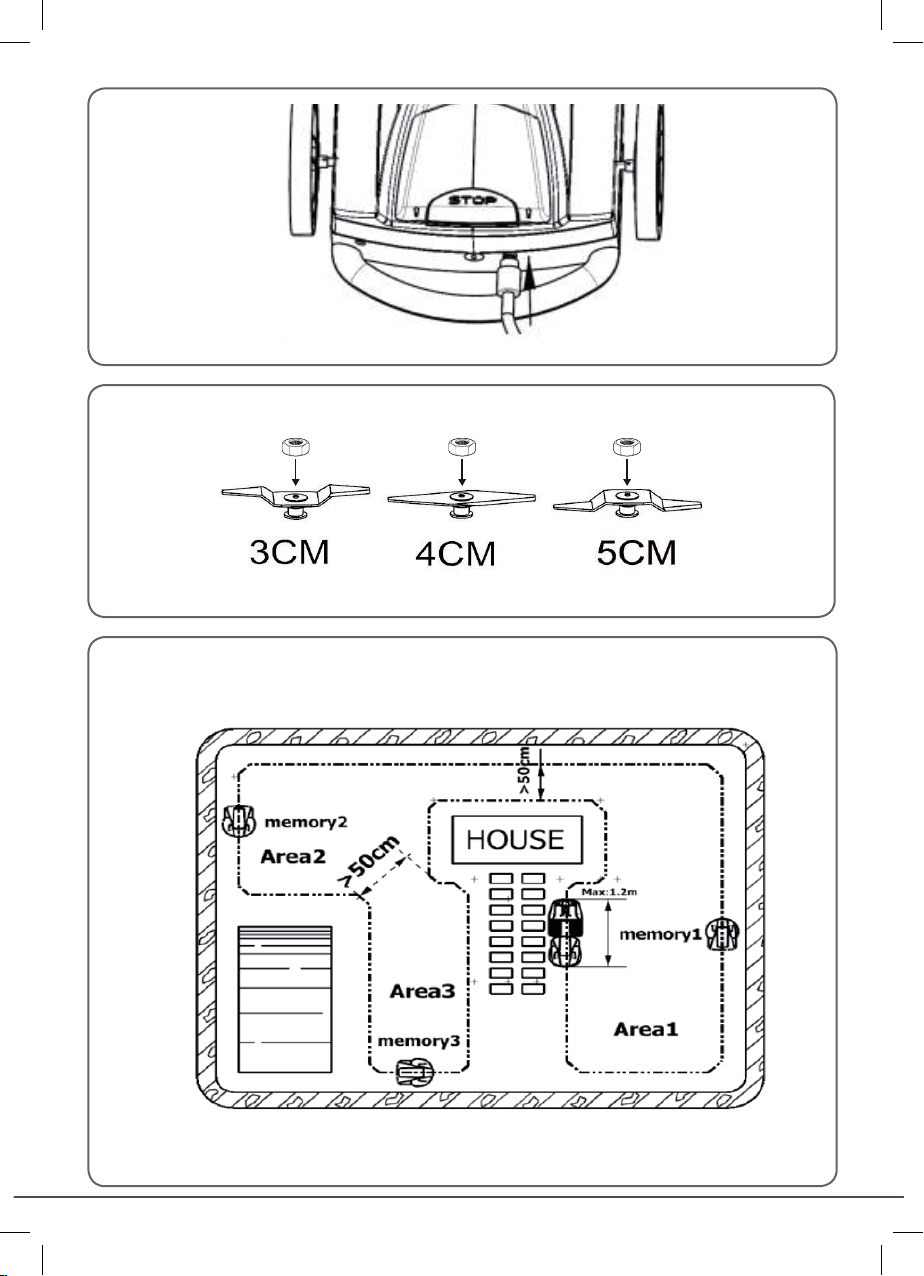
3.To charge the mower battery, connect the two contact pins on the front of the mower with the contact strips
on the base. (Fig. 11).The red LED will light up.
4.The mower can also be charged directly by connecting the supplied charger to the back of the mower. (Fig.
12).
Note:
- Fully charge the battery before first use
- The power adapter must be fully connected to the base and firmly screwed into place.
- When the mower needs to recharge, it automatically returns to its charging base.
Note: the base’s contact strips are electrified (24V DC).To avoid short circuits, they must never be touched with a con-
ductive object or by a person when the base is powered up.
d) Setting the cutting height
The cutting height can be adjusted by changing the blades or adjusting their positions.There are three cutting
Easymate by Extel - GARDEN 1000 -V3
Easymate by Extel - GARDEN 1000 -V3 EN5
heights available (3, 4 or 5 cm).The 4-cm cutting height is obtained using the flat blade set.The 3- and 5-cm
heights are obtained by reversing the set of curved blades. (Fig.13).
Use a wrench to unscrew the nut, then retighten it once the blades are in the desired configuration.
Note: The mower must be turned off before working on the blades.
Note: a high cutting height is recommended during the first use to avoid damaging the wire.The wire will gradually sink
into the ground and the cutting height can be lowered.
6. OPERATION
a) Start
1. Press the button under the cover to turn on the LCD screen.
2.The screen will display “’ENTREZ CODE PIN” (ENTER PIN CODE). Enter the PIN code then press OK to
validate (the default code is 0000).
3. Press Start to start up the mower.The mower will leave its base and start mowing. Note: during the fi rst use,
follow the mower to make sure that the front wheel does not catch on the wire.
4. When the battery is empty, the mower will nd the wire and follow it to return to the base to charge.
5. Once the battery is fully charged, the mower will begin mowing again (unless it is outside a programmed time
slot).
6. Press at any time to return the mower to its base.
7. Press MENU to access the settings
8. Press the red STOP button on the mower to stop it at any time, especially in case of immediate danger.When
the STOP button is pressed, all functions are deactivated. Press it again to disengage the security feature.
b) Settings
The main menu functions available are:
- Fixer zone (Set mowing area)
- Timer (Timer)
- Code pin set (Set PIN code)
- Fixer temps et date (Set time and date)
- Langue (Language)
Press OK to enter the submenu or to go back.
c) Set mowing area (Fig.14)
For complex yards and to make sure the mower goes everywhere, you can program three areas.
- Turn the mower off and place it on the wire at least 1 metre from the base.The mower will be facing away
from the base station, while the grass to be mown will be located to the left of the mower.
- Press the
from the base station, while the grass to be mown will be located to the left of the mower.
button to turn on the LCD screen.
- Enter the PIN code (default code in 0000).
- Press MENU and select Fixer zone (Set mowing area)
- Press OK to start the mower, which will follow the wire
- When the mower has reached the starting point of the first area, press OK to set the position.
- As the mower continues to follow the wire, follow the same procedure to set areas 2 and 3.
- Once all areas are programmed, turn off the mower with the button and return it to its base.
Note:
if there are only one or two areas to program, after the last one is set, turn the mower off with the button and
return it to its base.
d) Timer
- Heure de travail (Working times): allows you to set the start time, and the time spent in each mowing area (1,
2 and 3).The maximum time spent in each area cannot exceed 255 minutes.
- Jours de travail (Working days): allows you to set the mowing days
- Réinitialiser timer (Reset timer): resets the working times to 00 and selects all working days.
Note: The mowing area must be configured in order to use the timer function.

Easymate by Extel - GARDEN 1000 -V3 Easymate by Extel - GARDEN 1000 -V3
EN6
e) Changing the PIN code
- Enter the current PIN code and press OK
- Enter the new PIN code and press OK
- Enter the new PIN code again and press OK
- A message will confirm the success (or failure) of the code change.
Note: If you forget the PIN code, disconnect the battery for 10 seconds to reset it to the default (0000).
f) Set time and date
- Fixer heure (Set time) allows you to set the time
- Fixer date (Set date) allows you to set the date
- Format de l’heure (Time format) allows you to choose the display: 24h or 12h
g) Language
Allows you to select the language: English, German, French or Swedish.
7. TECHNICAL CHARACTERISTICS
Robotic Lawnmower (GARDEN 1000)
Reference: 330100
Power supply: 29.4V DC / 2A
Cutting power under 24V: 140 W
Charge time: 5 hours
Mowing time: 2.5 hours
Rotation speed: 5,000 RPM
Cutting width: 32 cm
Sound level: less than 73 dB
Battery: Li-ion 6.6 Ah 24 V
Dimensions: 590x580x230 mm
Weight: 15.2 kg
8. OPTIONS
Garden BL1 (ref 330101): kit with three sets of complete blades (3-, 4- and 5-cm blades)
Garden WR1 (ref. 330102): 100 m of wire and 50 pegs

Easymate by Extel - GARDEN 1000 -V3 Easymate by Extel - GARDEN 1000 -V3
EN7
9. TECHNICAL SUPPORT - WARRANTY
Problem Cause Solution
• The mower doesn't
turn on
• No power
• Mower is turned off
• STOP button is pressed
• Incorrect programming
• Dead battery
• Check the power supply to the base
• Check that the mower's LCD screen is on.
• Disengage the STOP button by pressing it again.
• Check the timer programming.
• Charge the battery (at least every three months if
stored for winter).
• The mower is out-
side the mowing area
• Damaged wire
• Wire angle
• Wire length
• Check the entire boundary wire and repair it.
• The wire angle must not be less than 125°.
• The boundary wire is too long. Exceeding 300 m is not
recommended.
• The mower doesn't
move
• Bumper is blocked
• Grass is too high
• Wire is cut
• Clear the bumper and check that it returns to its origi-
nal position.
• Cut the grass with a conventional lawnmower first, then
use the robotic lawnmower for the rest of the season.
• Check the boundary wire
• The mower isn’t
mowing properly
• Blades • Turn off the mower and check that the blades are
secure and in good condition. Replace them if necessary.
• The mower keeps
stopping
• Incline is too steep
• Blades are blocked
• The incline must not exceed 30°.
• Turn off the mower and check that nothing is blocking
the blades
• The battery isn't
charging
• Poor contact
• Batter is out-of-order
• Check that the mower’s charging pins are connected to
the base’s contact strips
• Check that the mower's charging pins are clean
• Replace the battery
• The mower didn’t
return to its base
• Obstacle
• Wire is cut
• Check that the mower is not blocked by an object, a
bump or a hole.
• Check the boundary wire
The sensor LEDs on
the front of the
mower are not
working
NOTE: these LEDs are only active when the mower fol-
lows the cord, not during the mowing when only the
mechanical sensors work
The mower cannot
be stabilised on its
base
Set up problem Check that the base is perfectly level.At best, lower the
front of the base slightly to facilitate the mower’s entry.
Check that the cord lying underneath the base is not
coiled or bent.The mower must approach its base in a
straight line for at least 1 metre.
The indicator lights
on the base
do not come on
Check the power supply to the base. Check the 29V DC
power supply output
Beeps Beeps indicate a change in state: exiting the zone, a block-
age or simply that the battery is fully charged
Red LEDs flash Wire looping failure. Check the cord, it may have been
cut
Exits from the mow-
ing area
Check that there are no angles less than 90°
NOTE:

Easymate by Extel - GARDEN 1000 -V3 Easymate by Extel - GARDEN 1000 -V3
EN8
before performing any work on the mower, it must be shut off.
If needed, consult our technical website at www.extel.com
0 892 350 069
Service 0,35 € / min
+ prix appel
Latest version of the downloadable instructions in colour: www.extel.com
WARRANTY CONDITIONS: This product is guaranteed for parts and labour in our workshops.
The warranty does not cover consumables (batteries, etc.) or damage caused by misuse, improper installation,
external intervention, damage due to physical or electrical shocks, dropping or weather-related phenomena.
• Do not open the device as doing so will void the warranty.
• If returning the product for after-sales service, protect the cover to prevent scratches.
• Clean with a soft cloth only, no solvents.The warranty is void if parts have been dismantled. Before cleaning,
disconnect the equipment or switch it off at the mains.
Note: Do not use any carboxylic acid, alcohol, or similar chemicals on the product. In addition to damaging
your device, the fumes are also hazardous to your health and are explosive.
Do not use any tool that can conduct voltage (wire brush, sharp tool, etc.) for cleaning.
The receipt or invoice is proof of purchase date.
10. SAFETY MEASURES
Damage caused by failing to adhere to the manual nullies the warranty. We will not accept liability for damage
resulting from non-compliance!
We will not accept liability for any harm to goods or people caused by improper handling or failure to adhere to
safety instructions.
This product was manufactured in total compliance with safety guidelines. In order to maintain this status and
provide for the best possible conditions of usage, the user must adhere to the safety instructions and warnings in
this manual.
:This symbol indicates a risk of electrical shock or short-circuiting.
Only use this product with electrical current in the following ranges: 110-240 volts and 50-60 hertz. Never try to
use this device with an electrical current outside of these ranges.
Verify that all of the electrical connections of the system are consistent with the usage instructions.
In commercial establishments, be sure to adhere to accident prevention rules for electrical installations.
For schools, training equipment, workshops, etc., the presence of qualied personnel is needed to monitor
operation of the electronic devices.
Adhere to the usage instructions for other devices connected to the system.
Contact a person with experience if you are unsure about how to operate the system or about the safety of
devices.
Never plug in or unplug electrical devices with wet hands.
When installing this product, verify that the power wires are not at risk of being damaged.
Never replace damaged electrical wires yourself! If an electrical wire is damaged, remove it and ask for help from
a person with experience.
WARNING Let the user know about important instructions for usage and maintenance (includ-
ing repair) in the documents accompanying the device.
Let the user know about‘dangerous voltage’ without insulation inside the casing of the product.
The voltage is strong enough to pose a risk of electrocution.

Easymate by Extel - GARDEN 1000 -V3 Easymate by Extel - GARDEN 1000 -V3
EN9
GB - Don’t throw away batteries or out-of-order products with household waste (rubbish).They are likely to
contain hazardous substances that are dangerous to both health and the environment. Return the equipment to
your local distributor or use the recycling collection service provided by your local council.
0 892 350 069
Service 0,35 € / min
+ prix appel
France
Italy: +39 02 96488273 [email protected]
Spain: +34 902 109 819
BE-NL-LU-DE-CH-AT: +352 26302353 [email protected]
Printed in P.R.C.
This manual suits for next models
1
Table of contents
Popular Lawn Mower manuals by other brands


Husqvarna
Husqvarna Z 560 Operator's manual

Flymo
Flymo HOVER COMPACT Original instructions

Stiga
Stiga MCS 504 PRO Handle Series Operator's manual

Craftsman
Craftsman 944.363431 owner's manual

Poulan Pro
Poulan Pro PP175G46 Operator's manual

Snapper
Snapper Z-RIDER ZM2200K Safety instructions & operator's manual