Eyevis omniSHAPE User manual

Document Nr.:
Version:
1.Vers. from date:
1.Version from:
Modified from:
Modified at:
Page Nr.
OSH-Manual-EN
1.3
28.02.2012
A. Schutz
A. Schutz
11.05.2012
1 von 33
Manual
omniSHAPE
Contents
1. Safety Guidelines / Sicherheitsrichtlinien / Directives de sécurité......................................2
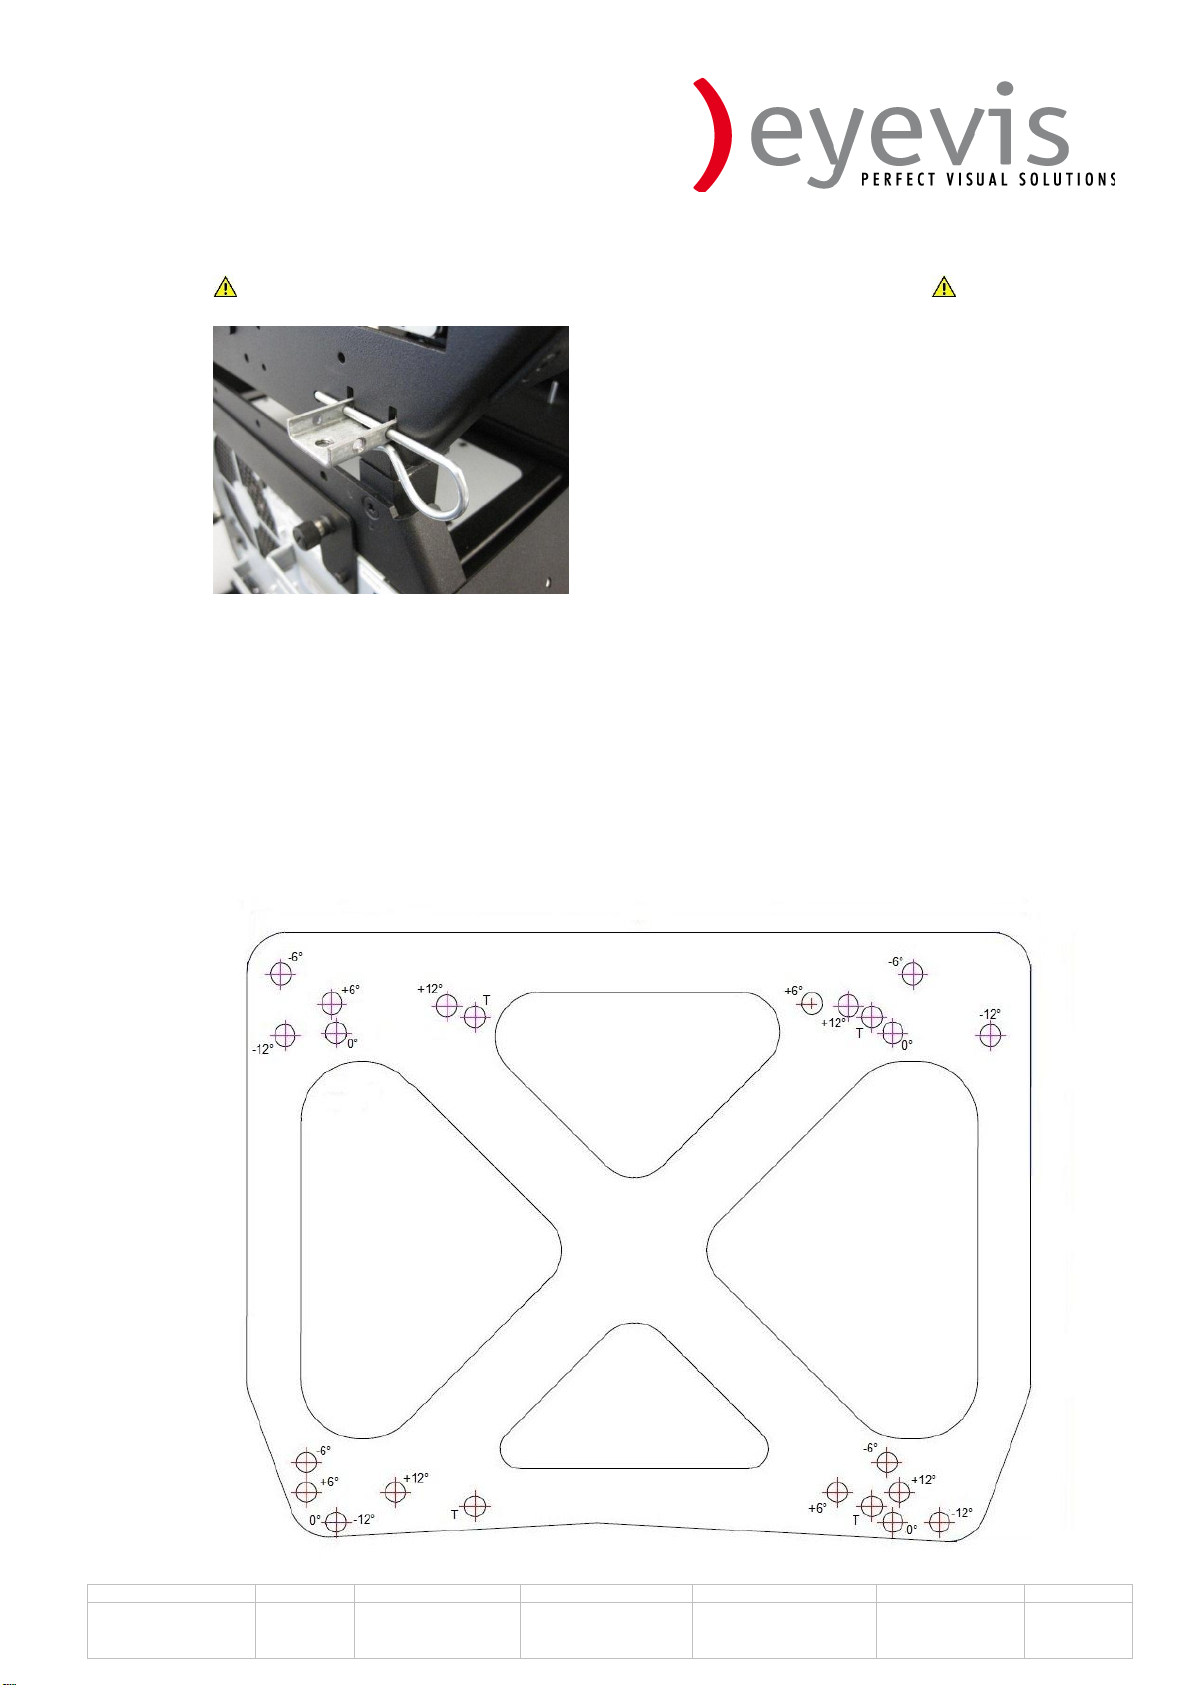
2. Stacking the omniSHAPE .......................................................................................................4
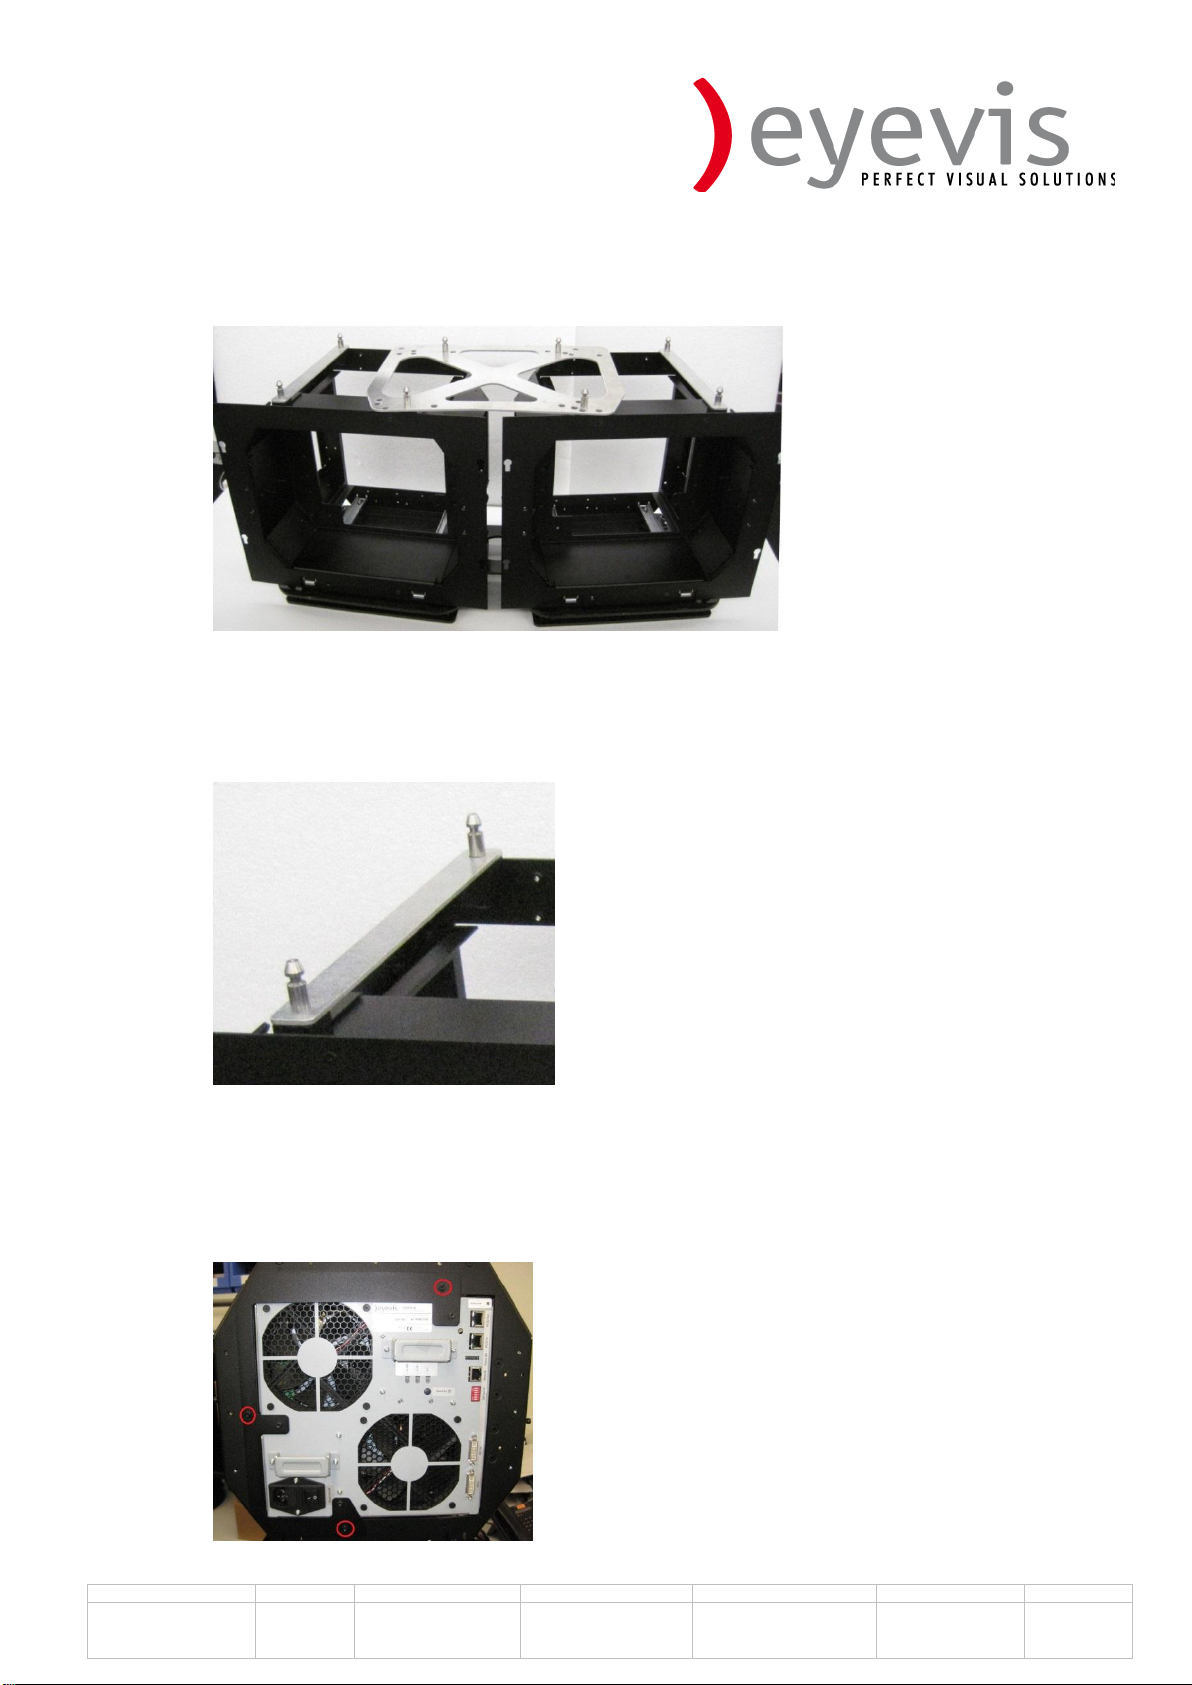
3. Building a concave or convex wall ........................................................................................ 6
4. Removing the Engine..............................................................................................................7
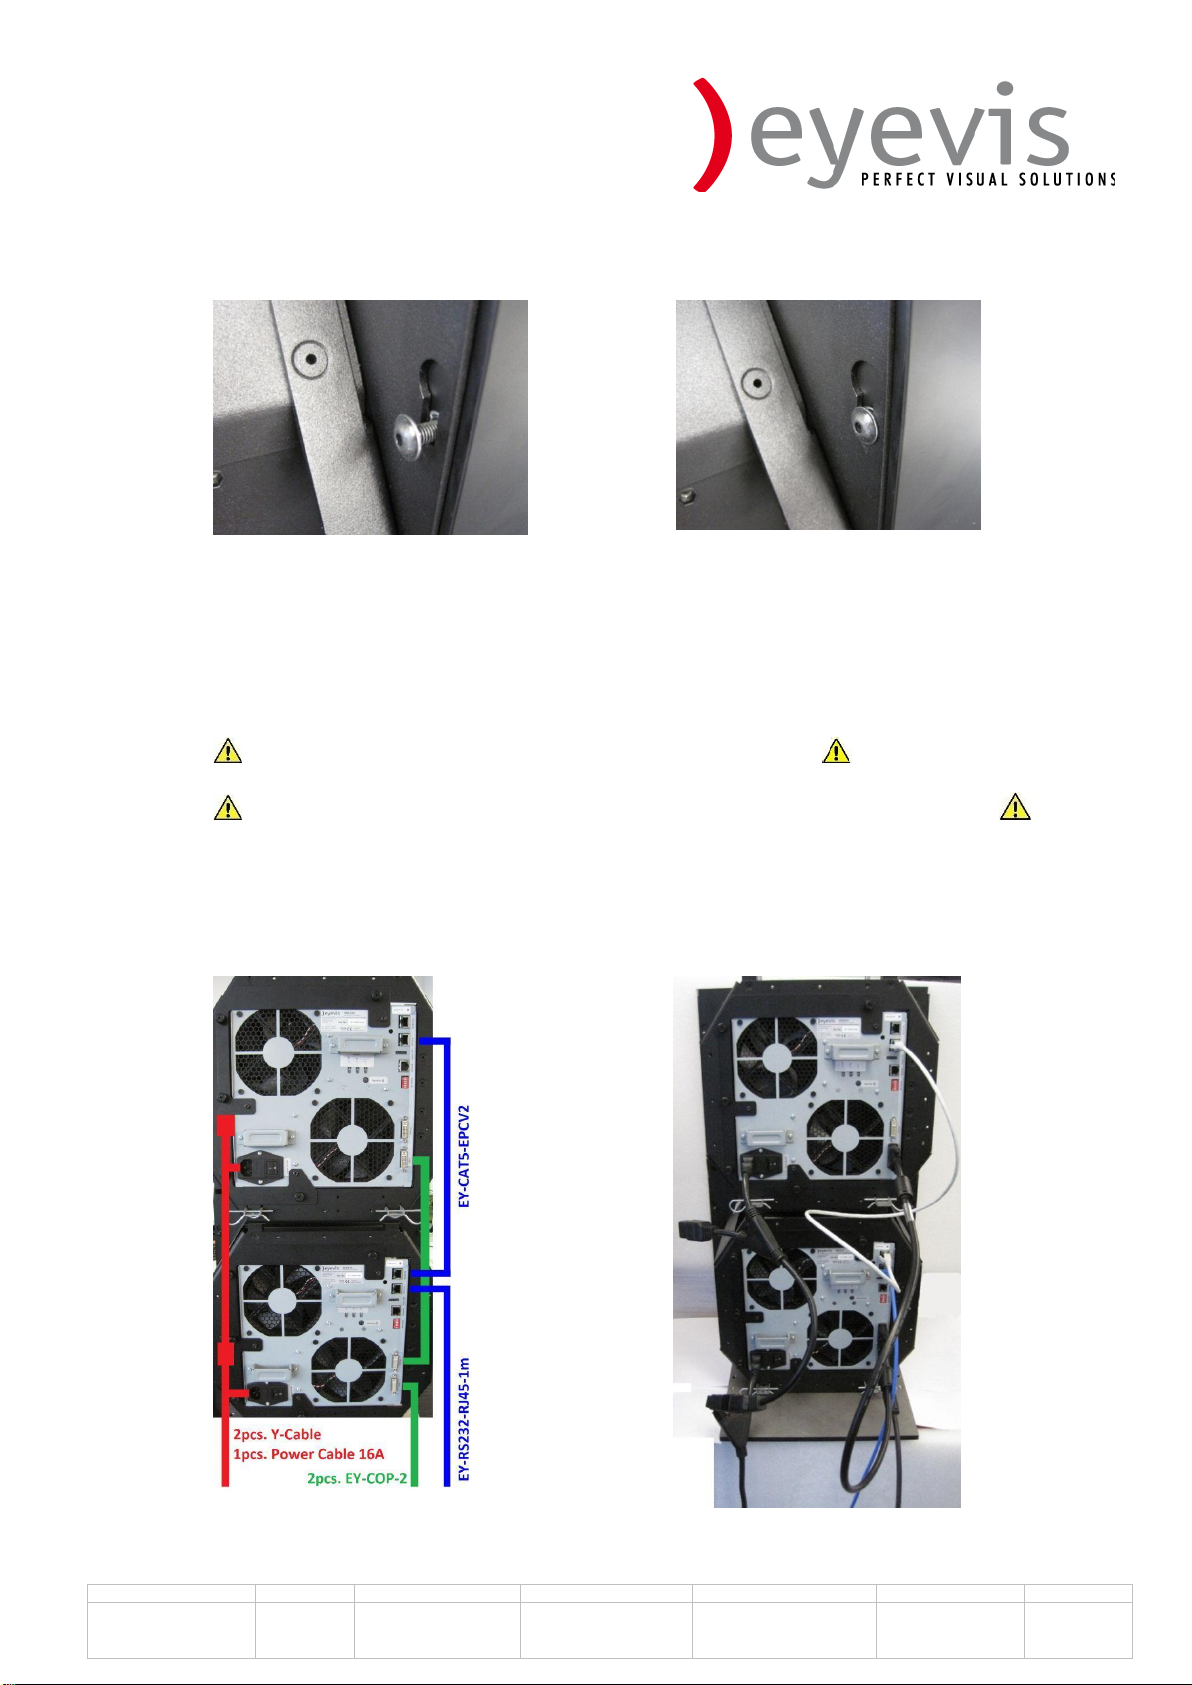
5. Assembling the Screen...........................................................................................................9
6. Plugging the cables ..............................................................................................................10
7. omniSHAPE Configuration Software...................................................................................12
7.1. Start Up of the Software.................................................................................................... 12
7.2. Designing a wall............................................................................................................. 13
7.3. Connecting to the omniSHAPE .....................................................................................15
7.3.1. Network connection Settings..................................................................................... 15
7.3.2. Serial connection Settings.........................................................................................16
7.4. Adjusting the Geometry................................................................................................. 18
7.5. Mapping..........................................................................................................................20
8. Color adjustment................................................................................................................... 21
8.1. Shading correction......................................................................................................... 21
8.2. Color Adjustment...........................................................................................................21
9. Saving of the Adjustment.....................................................................................................27
10. Packaging of omniSHAPE................................................................................................. 28
10.1. Packaging of the screen.............................................................................................28
10.2. Packaging of the Base Frame.................................................................................... 29
10.3. Packaging of the accessories .......................................................................................31
10.4. Packing all together.......................................................................................................31

Document Nr.:
Version:
1.Vers. from date:
1.Version from:
Modified from:
Modified at:
Page Nr.
OSH-Manual-EN
1.3
28.02.2012
A. Schutz
A. Schutz
11.05.2012
2 von 33
1. Safety Guidelines / Sicherheitsrichtlinien / Directives de sécurité
WARNING
WARNUNG
DANGER
Electrical shock hazard:
Do not open the housing of OSH-E-01 or cleaning the device
before turning the power switch off and unplugging all
connected cables.
Gefahr eines elektrischen Schlages:
Auf keinen Fall das Gehäuse öffnen oder eine Reinigung
durchführen, bevor das Gerät ausgeschaltet ist und alle Kabel
ausgesteckt sind.
Risque de choc électrique:
Ne jamais ouvrir le boîtier ou d'effectuer un nettoyage avant que
l'appareil est éteint et tous les câbles sont débranchés. =>
Ne jamais ouvrir le boîtier ou effectuer un nettoyage avant que
l'appareil ne soit éteint et que tous les câbles sont débranchés.
CAUTION
VORSICHT
GARE
Do not look directly into the projection lens in using any optical
lens, after the screen is removed.
Schauen sie niemals mit Hilfe eines optischen Instruments in
die Projektionslinse, nachdem sie die Scheibe entfernt haben.
Ne regardez jamais à travers un instrument optique dans la
lentille de projection après avoir retiré le disque. => Ne
regardez jamais à travers un instrument optique dans la lentille
de projection après avoir retiré l'écran.

Document Nr.:
Version:
1.Vers. from date:
1.Version from:
Modified from:
Modified at:
Page Nr.
OSH-Manual-EN
1.3
28.02.2012
A. Schutz
A. Schutz
11.05.2012
3 von 33
NOTICE
ACHTUNG
ATTENTION
Do not cover the fan-area of the OSH-E-01. Otherwise it may
result that the device overheats.
Verschließen sie niemals die Lüfter-Bereiche. Andernfalls kann
das Gerät überhitzen.
Ils n'ont jamais fermer les zones de fans. Sinon, l'appareil peut
surchauffer. => Ne jamais couvrir ou obturer les ventilateurs,
risque de surchauffe.

Document Nr.:
Version:
1.Vers. from date:
1.Version from:
Modified from:
Modified at:
Page Nr.
OSH-Manual-EN
1.3
28.02.2012
A. Schutz
A. Schutz
11.05.2012
4 von 33
2. Stacking the omniSHAPE
Before starting to build a wall you have to loosen the screws in the corners. If this isn’t done,
the accuracy of the screens flatness won’t be very good.
To build a tower of some omniSHAPES you have to put the first omniSHAPE on a stable
ground. Optional you can use the omniSHAPE Basements.
Make sure that the ground or the basement is in water level.

Document Nr.:
Version:
1.Vers. from date:
1.Version from:
Modified from:
Modified at:
Page Nr.
OSH-Manual-EN
1.3
28.02.2012
A. Schutz
A. Schutz
11.05.2012
5 von 33
Now you have to lock the latches with a soft-head hammer.
After this you can stack the omniSHAPES. You have to pull the latch of the next
omniSHAPE to the front side.
Stack the second omniSHAPE on the first.
Then lock the second omniSHAPE on the
first by using a soft-head hammer.

Document Nr.:
Version:
1.Vers. from date:
1.Version from:
Modified from:
Modified at:
Page Nr.
OSH-Manual-EN
1.3
28.02.2012
A. Schutz
A. Schutz
11.05.2012
6 von 33
For safety, as shown in the picture, pull the cotter pin into the guiderail
3. Building a concave or convex wall
You can use the connection plate to build walls in different angles. These angles are:
-12°/ -6°/ 0°/ +6°/ +12°
Look below for choosing the right holes for the angle you need.

Document Nr.:
Version:
1.Vers. from date:
1.Version from:
Modified from:
Modified at:
Page Nr.
OSH-Manual-EN
1.3
28.02.2012
A. Schutz
A. Schutz
11.05.2012
7 von 33
For example a wall, composed of two omniSHAPES in a +12° angle:
The connection barson the left and the right side are needed to get the same height,
when stacking the next omniSHAPES on top.
4. Removing the Engine
On the backside of the omniSHAPE you have to release the internal hexagon screws (Allen-
Key) that are marked in the picture.

Document Nr.:
Version:
1.Vers. from date:
1.Version from:
Modified from:
Modified at:
Page Nr.
OSH-Manual-EN
1.3
28.02.2012
A. Schutz
A. Schutz
11.05.2012
8 von 33
Now you have to put your fingers into the handhold pull to remove the OSH-E-01.
Now you can haul the engine out and in.
After removing the Engine you have to remove the cover of the lens.

Document Nr.:
Version:
1.Vers. from date:
1.Version from:
Modified from:
Modified at:
Page Nr.
OSH-Manual-EN
1.3
28.02.2012
A. Schutz
A. Schutz
11.05.2012
9 von 33
5. Assembling the Screen
The OSH-CS-480 has an upper and a lower side. The lower side is marked by the serial
number. The upper side is market by a label Oben / Top.
On the backside of the Screen there are 4 screws. You have to unscrew the screws to a
distance of 1cm between the screw head and the frame of the Screen.
You have to clip the screw heads into the keyholes of the screen adapter.

Document Nr.:
Version:
1.Vers. from date:
1.Version from:
Modified from:
Modified at:
Page Nr.
OSH-Manual-EN
1.3
28.02.2012
A. Schutz
A. Schutz
11.05.2012
10 von
33
After this you have to fasten the screws at the four positions.
6. Plugging the cables
It’s your choice to connect each omniSHAPE with the single power cable EY-SCHUKO-
VDE-1,8m or to connect some omniSHAPES together with the Y-cables. Connecting the
power supply is shown by using the Y-cables.
Do only use Y-cables at up to 10 omniSHAPES in one line
It’s not allowed to use the Y-cables in the countries China, Japan, and Korea
Plug the cables as shown in the pictures. When using the Y-cables, make sure that you have
a cable from you main power supply to the first Y-cable. It’s not included.
Notice: The DVI input signal must have a resolution of 1920x1080 pixels @ 50Hz / 60Hz.

Document Nr.:
Version:
1.Vers. from date:
1.Version from:
Modified from:
Modified at:
Page Nr.
OSH-Manual-EN
1.3
28.02.2012
A. Schutz
A. Schutz
11.05.2012
11 von
33
For connecting the omniSHAPES to your pc, plug the EYE-RS232-RJ45-1m cable into the
RS232 In slot. If you don’t have this cable, look at the pin configuration below:
Connector
Description
Configuration
RJ45 male connector for LAN-cables
1_RJ45 -> 3_Sub-D
2_RJ45 -> 5_Sub-D
3_RJ45 -> 2_Sub-D
Sub-D-9 female connector
3_Sub-D -> 1_RJ45
5_Sub-D -> 2_RJ45
2_Sub-D -> 3_RJ45
Configure the addresses of the omniSHAPES:
FIRST omniSHAPE Address 001
SECOND omniSHAPE Address 002
Switch on each omniSHAPE by pushing the ON / OFF switch at the backside.

Document Nr.:
Version:
1.Vers. from date:
1.Version from:
Modified from:
Modified at:
Page Nr.
OSH-Manual-EN
1.3
28.02.2012
A. Schutz
A. Schutz
11.05.2012
12 von
33
7. omniSHAPE Configuration Software
7.1. Start Up of the Software
Copy the folder “omniSHAPES-Designer Release” to a chosen directory of your computer.
Run the executable file:
The main window opens.
Description of symbols:
Wall:
To design a wall with the different shapes of screens
Source:
To place a source on the omniSHAPES
Geometry:
To adjust the geometry
Color:
For color adjustment
Components:
To create a complete component list of the things you have to purchase.

Document Nr.:
Version:
1.Vers. from date:
1.Version from:
Modified from:
Modified at:
Page Nr.
OSH-Manual-EN
1.3
28.02.2012
A. Schutz
A. Schutz
11.05.2012
13 von
33
Preferences:
To set up the connection settings
Service:
Service console for maintenance
Connect:
To connect to the omniSHAPES
Save:
To save the configured settings on the omniSHAPES
Power On:
To power on the chosen omniSHAPES
Standby:
To set the chosen omniSHAPES to standby mode
7.2. Designing a wall
To add a new omniSHAPE you have to choose the screen-shape in the drop down list.

Document Nr.:
Version:
1.Vers. from date:
1.Version from:
Modified from:
Modified at:
Page Nr.
OSH-Manual-EN
1.3
28.02.2012
A. Schutz
A. Schutz
11.05.2012
14 von
33
Also you have to choose the Screentype in the drop down list beneath.
Press the to add this omniSHAPE to the wall.

Document Nr.:
Version:
1.Vers. from date:
1.Version from:
Modified from:
Modified at:
Page Nr.
OSH-Manual-EN
1.3
28.02.2012
A. Schutz
A. Schutz
11.05.2012
15 von
33
7.3. Connecting to the omniSHAPE
7.3.1. Network connection Settings
For Network usage you can connect the first omniSHAPE by Network, then go on with the
cabling as seen at point 6 ->plugging the cables.
First you have to configure the network settings of your network adapter. Go to the
preferences of internet protocol version 4 (TCP/IPv4) as seen below.
Type in the IP-Address manually as shown below:
Go back to your omniSHAPES Designer Software and press the button Preferences for the
connection settings .
Choose the Network settings and set the IP-address of the omniSHAPE you want to
connect. The standard IP-address is 192.168.0.11.

Document Nr.:
Version:
1.Vers. from date:
1.Version from:
Modified from:
Modified at:
Page Nr.
OSH-Manual-EN
1.3
28.02.2012
A. Schutz
A. Schutz
11.05.2012
16 von
33
Notice: The connection by network is not as fast as the connection by RS232.
If you want to change the network settings of omniSHAPES, connect your PC to the
omniSHAPES by serial Port. Then choose the omniSHAPE on which you want to adjust the
IP-address, Gateway or Subnet Mask and set it to the values you want by pressing the
button Set to Device.
7.3.2. Serial connection Settings
Press the button Preferences for the connection settings .
You have to do some settings before.
1. Choose the com-Port
2. Choose the baud-rate 115200 baud or 256000 baud.
3. Choose “8N1”
4. Press “Open Serial Port”
Choose on omniSHAPE or the complete wall, after it’s chosen, the color switches from grey to
light purple.
Press Connect to get connected to the omniSHAPE.
After the omniSHAPE Designer is connected the omniSHAPE the color has changed to dark
purple.

Document Nr.:
Version:
1.Vers. from date:
1.Version from:
Modified from:
Modified at:
Page Nr.
OSH-Manual-EN
1.3
28.02.2012
A. Schutz
A. Schutz
11.05.2012
17 von
33
After being connected to the wall without chosen any omniSHAPE, all will have dark color.
Not connected
connected

Document Nr.:
Version:
1.Vers. from date:
1.Version from:
Modified from:
Modified at:
Page Nr.
OSH-Manual-EN
1.3
28.02.2012
A. Schutz
A. Schutz
11.05.2012
18 von
33
7.4. Adjusting the Geometry
At the point “Geometry” you can adjust the geometry settings. You have to set the picture
HD_XGA_Grid.bmp which is a content of the main folder of omniSHAPES-Designer. Set it
as the background picture of the source desktop.
On the picture beside you
can see the background grid
which is seen on the screens
of each omniSHAPE.
To adjust the geometry you first have to choose one omniSHAPE. Click on the symbol
in the main Window.
The omniSHAPE, what you want to adjust has to be chosen.
Not chosen
omniSHAPE ID:1 is chosen
Here you can see the geometry configuration of the omniSHAPES-Designer.
Adjusting features

Document Nr.:
Version:
1.Vers. from date:
1.Version from:
Modified from:
Modified at:
Page Nr.
OSH-Manual-EN
1.3
28.02.2012
A. Schutz
A. Schutz
11.05.2012
19 von
33
Picture
Description
Click inside the box and then use the arrow
keys to adjust the size. Up or right will let the
picture grow, left or down will let the picture
get smaller.
Click inside the box, you could use the
arrow keys to rotate. Press right to rotate the
picture clockwise, press left to rotate the
picture counterclockwise.
Click inside the green center, then use the
arrow keys to move the whole picture
To move the picture faster hold the shift
button on the keyboard while using the
arrow keys
Click inside the rectangles in the corners or
the other exteriors. Then use the arrow keys
to adjust geometry.
IMPORTANT
After adjusting the size or the position you
have to save the settings.
Notice: The settings will only be saved to
the omniSHAPES you have chosen.
Press the save-button to save.
After it’s saved you will see the advice in the
lower side of the program.
Notice: All configuration settings are not stored on the devices automatically. Without
choosing and pressing the save button, all data are lost after power down. After power on
the last saved data are used.

Document Nr.:
Version:
1.Vers. from date:
1.Version from:
Modified from:
Modified at:
Page Nr.
OSH-Manual-EN
1.3
28.02.2012
A. Schutz
A. Schutz
11.05.2012
20 von
33
7.5. Mapping
To add a source, press “+” after choosing the resolution.
Now you can move the Source over the omniSHAPE in any position you want to have.
By pressing the Apply Mapping button, the pictures on the chosen omniSHAPE will be
mapped.
To undo the mapping, press Mapping Off, and the mapping will be recessed you find the
button in the geometry settings. To get there press the button on the left.
Table of contents