Eyevis EYE-LCD-5500-LHD User manual

EYELCD5500LHD
User’s Manual
Version 1.1 (June 2011)
EYE-LCD-5500-LHD

EYE-LCD-5500-LHD
2
2
Contents
DOCUMENT HISTORY.................................................................................................................................................................. 3
IMPORTANT SAFETY INSTRUCTIONS .................................................................................................................................... 4
SAFETY PRECAUTIONS .................................................................................................................................................................. 4
INSTALLATION (WHEN INSTALLING THE MONITOR,PLEASE FOLLOW THE INSTRUCTIONS IN THE MANUAL).................................. 5
USE ................................................................................................................................................................................................ 6
CLEANING ...................................................................................................................................................................................... 7
WARNING FOR USE....................................................................................................................................................................... 7
USE ................................................................................................................................................................................................ 7
EXEMPTIONS .................................................................................................................................................................................. 7
FEATURES ....................................................................................................................................................................................... 8
PACKAGE CONTENTS.................................................................................................................................................................. 8
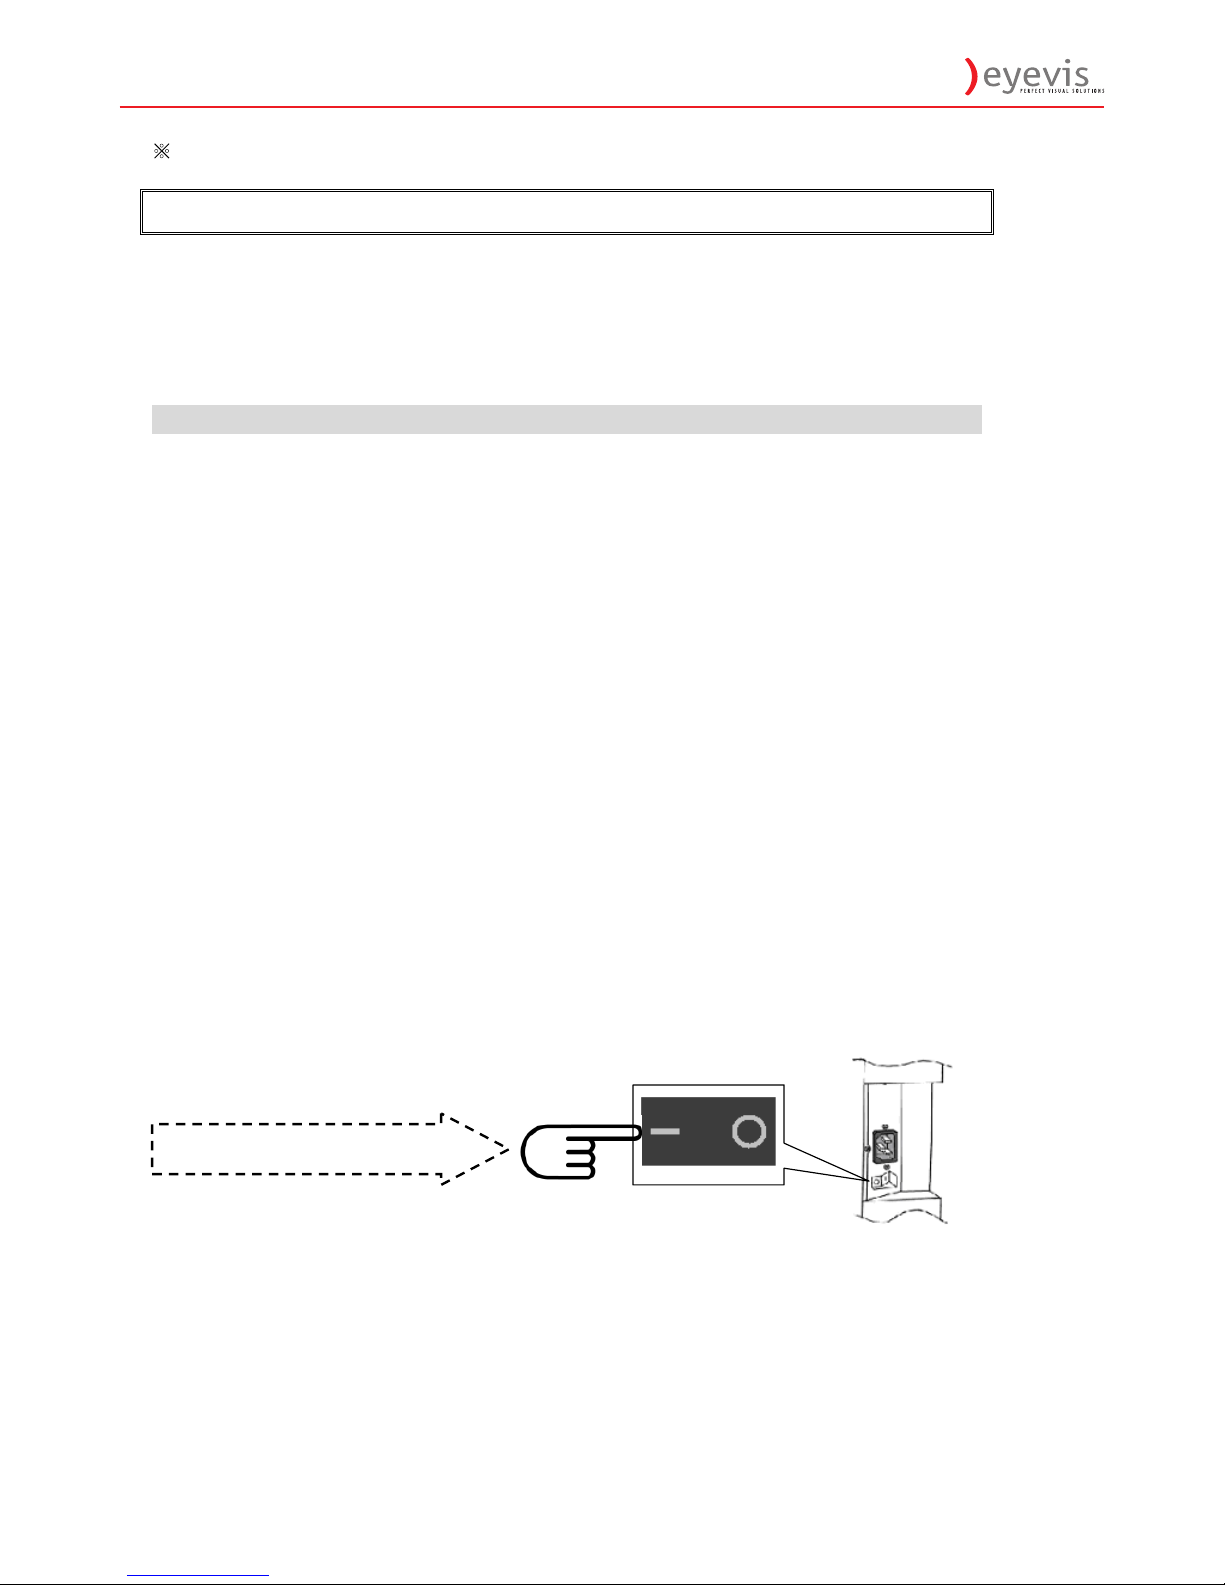
POWER INPUT .............................................................................................................................................................................. 12
POWER INTERFACE...................................................................................................................................................................... 12
SIGNAL SOURCE INPUT ............................................................................................................................................................... 13
OPERATING THE MONITOR..................................................................................................................................................... 14
THE TOP CONTROLLER OF THE MONITOR ................................................................................................................................... 14
ROTATING THE MONITOR ............................................................................................................................................................. 15
CHANGE THE RCU BATTERY ..................................................................................................................................................... 17
DISPLAY MODE ............................................................................................................................................................................ 18
OSD (ON SCREEN DISPLAY) MENU FUNCTION ......................................................................................................................... 21
ON-SCREEN DISPLAY (OSD) ...................................................................................................................................................... 25
DEFAULT SETTING ..................................................................................................................................................................... 36
SUPPORTED TIMING .................................................................................................................................................................. 37
SPECIFICATION ........................................................................................................................................................................... 38
TROUBLESHOOTING ................................................................................................................................................................. 39
COMPLIANCE............................................................................................................................................................................... 39
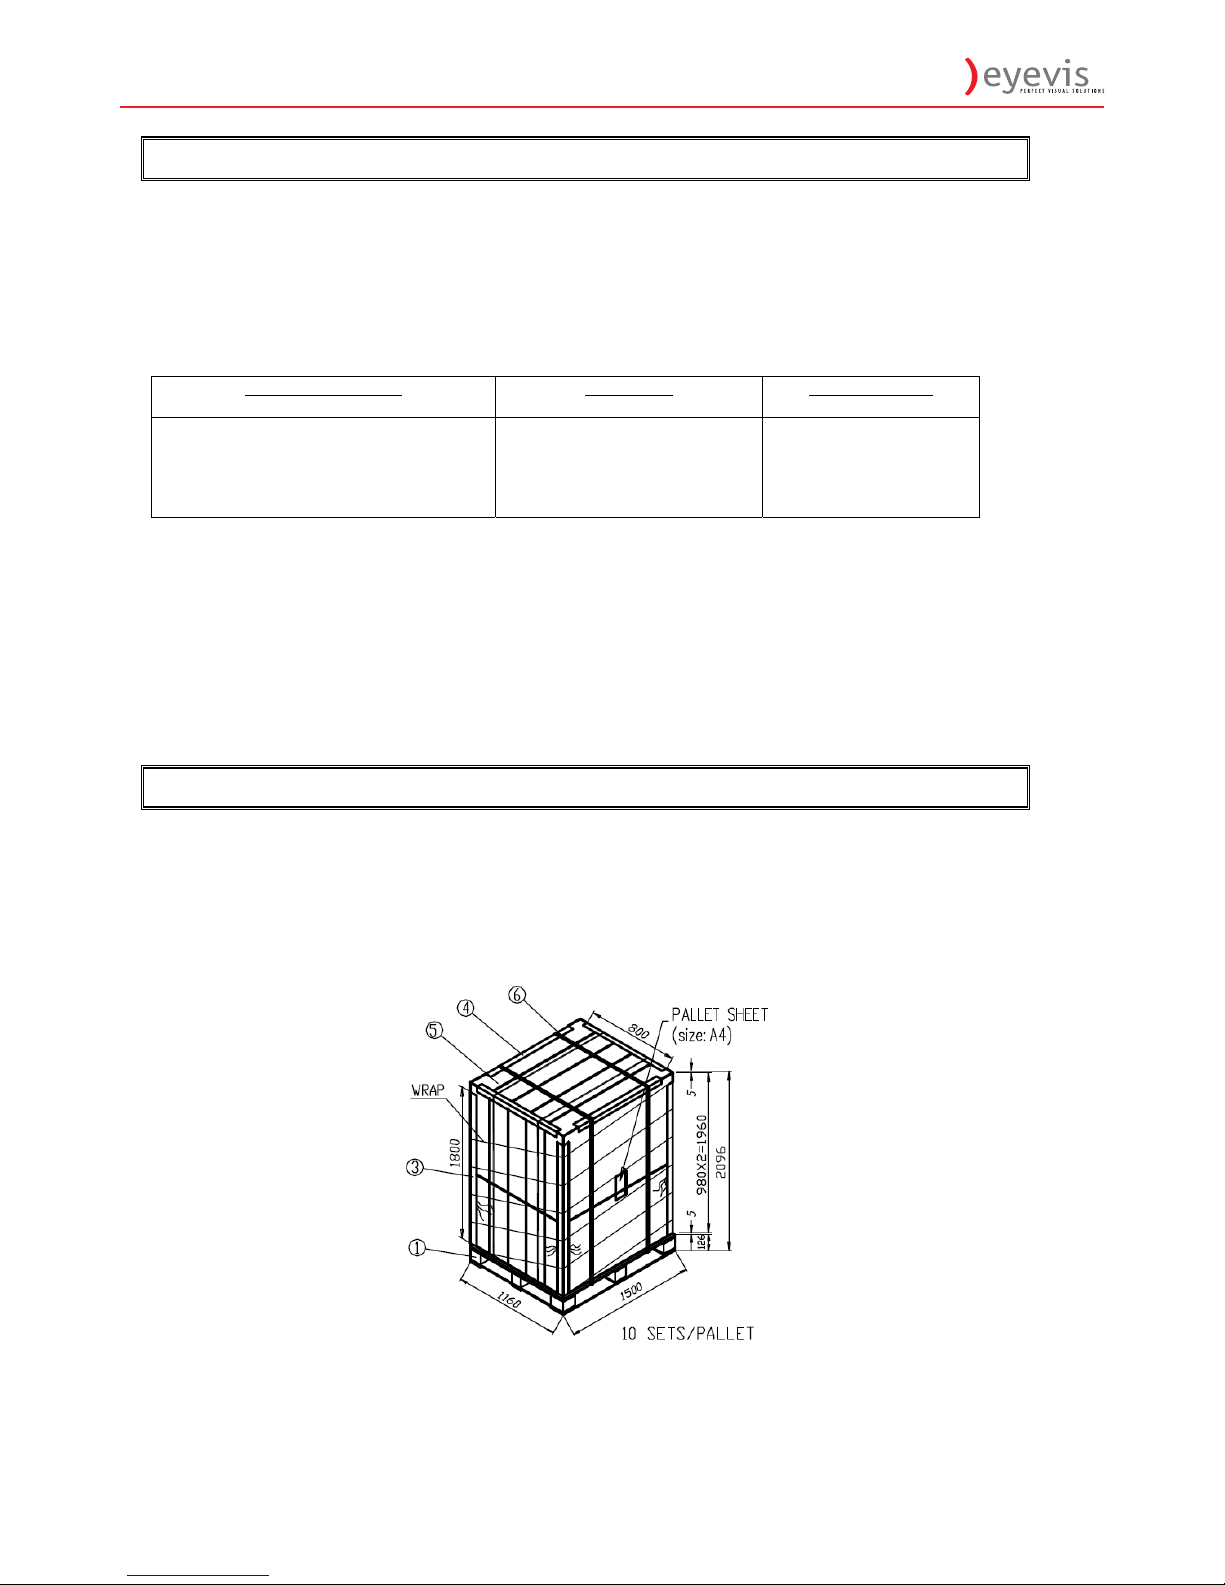
APPENDIX I: MOVING AND CARRYING NOTICE ................................................................................................................. 40
APPENDIX II: STANDS AND WALL MOUNT INSTALLATION............................................................................................ 41
APPENDIX III: WALL MOUNT SAFETY NOTES .................................................................................................................... 43

EYE-LCD-5500-LHD 3
3
Document History
Title: EYE-LCD-5500-LHD User Manual
Issue Date: Oct. 2010
Revision: 01
Version Update Remark
Ver.1.0 2010.Oct. First version release

EYE-LCD-5500-LHD
4
4
※ Please read this user’s manual thoroughly and completely before operating this monitor.
Important Safety Instructions
Before using the monitor, please read this user’s manual thoroughly to help protect against damage
to your own and other people’s property and ensure your own and other people personal safety.
Be sure to observe the following instructions.
For your safety, be sure to observe the warnings located in this manual.
For installation or adjustment, please follow this manuals instruction and refer all servicing to qualified
service personnel.
Safety Precautions
If smoke or peculiar smell comes from the monitor, remove the power plug from the outlet
immediately.
Failure to do so may result in fire or electrical shock. Contact your dealer for inspection.
If the monitor has been turned on but there isn’t a picture, remove the power plug from the
outlet immediately.
Failure to do so may result in fire or electrical shock. Contact your dealer for inspection.
If water is spilled or objects are dropped inside the monitor, remove the power plug from the
outlet immediately.
Failure to do so may result in fire or electrical shock. Contact your dealer for inspection.
If the monitor is dropped or the cabinet is damaged, remove the power plug from the outlet
immediately.
Failure to do so may result in fire or electrical shock. Contact your dealer for inspection.
To turn off the power of the monitor, press ”O” on the main power switch at side of monitor.
The power standby/on indicator will go off and the monitor cannot to be turned on/off by using the POWER
button on the remote control. (To turn on/off the monitor by the remote control, press the main power switch
again and light the power standby/on indicator.)
When turning off the monitor by pressing the POWER button on the remote control, the main power of the
monitor is not turned off completely.
To disconnect the monitor completely from power supply, remove the power plug from the outlet.
Press “O” to turn off the monitor completely

EYE-LCD-5500-LHD 5
5
If the power cord or plug is damaged or becomes hot, turn off the main power switch of the
monitor, make sure the power plug has cooled down and remove the power plug from the
outlet.
If the monitor is still used in this condition, it may cause a fire or an electrical shock.
Contact your dealer for replacement.
Installation (when installing the monito
r, please follow the instructions in the manual)
Don't install in a high-temperature environment.
If the monitor is used in high-temperature or in direct sunlight, it may cause the case or other parts become
distorted or damaged resulting in overheating or electric shock.
Don't install in a high-humidity environment.
This may cause overheating or electric shock.
Don't install near any heat sources such as radiators, heat registers, stoves, or other
apparatus that produce heat.
This may cause a fire or electric shock.
Don't overload outlets or cables beyond electrical capacity.
Don't use extension cords as it may cause a fire or electric shock.
Don't insert the power plug into an outlet other than 100~240V AC.
This may cause a fire or electric shock.
Don’t use a damaged power plug or worn outlet.
Don’t insert the improper power plug it may cause a fire and electric shock.
Don't place the monitor on an unstable shelf or surface.
The monitor may fall causing injury. Please install on a horizontal, stable, level surface.
Don't place objects on the monitor.
If the monitor is covered or the vents are blocked, the monitor could overheat and cause a fire.
If metal or liquid gets into the monitor, it may cause a fire or an electrical shock.
Do not put heavy objects on the monitor as it may fall causing injury.
Please keep a10cm minimum distance between the monitor and the wall for sufficient ventilation.
Don't move the monitor when it is connected to the power cord and AV cables.
When moving the monitor, make sure to remove the power plug and cables from the outlet or source.
When unpacking or carrying the monitor, at least 2 people are needed. Make sure the monitor is carried
upright.
Transport the monitor upright. Avoid placing the monitor face up or down.
Handle the monitor gently. Do not drop.

EYE-LCD-5500-LHD
6
6
Use
If you encounter a problem during installation, please contact your dealer for assistance.
Don’t repair or open the monitor by yourself.
Failure to do so may result in fire or electrical shock. Contact your dealer for inspection.
Protect and correctly use the power cord/plug.
Don't press heavily on the power cord/plug.
Don't step on the power cord/plug.
Before inserting the power plug into the wall outlet, connect the power cord to the monitor.
Don't operate the monitor with a damaged power cord or it may damage the monitor.
Using the extension cords (not recommended)
If an extension cord must be used, ensure the voltage rating exceeds the max power consumption of the monitor,
if the voltage rating is less than the monitor, it will cause the extension cord to overheat.
If there is thunder or lightning, don’t touch the monitor or the power plug.
This may cause an electric shock.
Don’t use any kind of liquid on the monitor.
If liquid is spilled on the monitor, remove the power and ask an qualified service personnel to check the
monitor.
If the liquid get’s on the monitor’s screen, please clean it with a dry and soft cloth immediately.
Don’t use any harsh chemical on the monitor.
If metal or liquid gets into the monitor, it may cause a fire or an electrical shock.
Don’t install or remove the power plug with wet hands.
This may cause an electric shock.
If the monitor will not be used for a long period of time, unplug the monitor.
This may cause premature wear of electrical components or fire.
Don’t press on the LCD panel.
This may cause personnel injury or panel damage.
Don't push or shake the monitor.
This may cause damage or injury.
If the glass of the monitor panel is broken, liquid may escape. Please don't touch the liquid.
If liquid get into your eyes or touches your skin, wash with the clean water and seek medical attention
immediately.
Precautions with the remote control batteries.
Please only use approved AAA type batteries.
Please be sure to insert batteries by matching the + and -.
Don’t recharge, heat, disassemble, short or throw batteries into a fire.
Don’t mix a new battery with a used one.
Don’t mix different types of batteries together (only use the specified type). Or, it may cause burn and injury.

EYE-LCD-5500-LHD 7
7
Cleaning
If dust has collected on the power plug, removed the plug from the outlet and clean off the
dust.
Dust build-up may cause a fire.
Take off the power plug before cleaning.
Failure to do so may result in electrical shock or damage.
Cleaning the surface of the monitor.
When the surface of the monitor becomes dirty, please wipe the surface lightly with a soft clean cloth.
If the surface requires additional cleaning, lightly moisten the cloth with rubbing alcohol.
Do not to let alcohol enter the monitor as it may cause electrical shock or damage.
Warning For Use
Use
Do not use this “EYE-LCD-5500-LHD” on the ground.
Transport the monitor upright with proper packaging. Avoid placing the monitor face up or down. Be careful
not to bump to the monitor.
Do not send a static (non moving) image this monitor, or it may cause image ‘burn-in’ or image retention.
“Burn in” and/or image retention is not covered under warranty.
Make sure to change the image on the monitor periodically. It is recommended to turn off the monitor for at
least 6 hours after 18 hours of usage in a day to avoid image retention.
Exemptions
This product isn’t warranted for any damage caused by natural disaster (such as earthquake, thunder, etc),
fire, acts by third parties, accidents, owner’s intentional misuse and fault, or uses in other improper
conditions.
This product isn’t warranted for incidental damages (such as profit loss or interruption in business,
modification or erasure of record data, etc.) caused by use or inability to use of this product.
This product isn’t warranted for any damage caused by inappropriate operation, or from not following the
user manual.
This product isn’t warranted for any damage caused by misuse or malfunction through simultaneous use of
this product and the connected equipment or software.
This product isn’t warranted for any damage caused by neglect of the instructions described about
installation.
This product isn’t warranted for any damage caused by improper installation.
This product isn’t warranted for any damage caused by disassembly, modification or repair by
non-authorized service center or people.

EYE-LCD-5500-LHD
8
8
Features
High-resolution Full-HD 120Hz panel
- This monitor supports a 1920 x 1080 HDTV format and can display true 1.073G colors.
- Optimized response time for 120 Hz frame rate
- Full range interface type support – DisplayPort / HDMI x2 / VGA / DVI / PC audio in / IR extender / Line Out
Component /Audio in ( Component) / S-V / Video / Audio in (S-V & VIDEO)
Full array of PID connectivity
Video system Input: RGB Input:
Communication
HDMI x2
COMPONENT (RCA) x3
VIDEO (RCA) x1
S-VIDEO (Mini Din 4 pin) x1
DisplayPort x1
PC (VGA) x1
PC (DVI-D) x1
RS-232C in
RJ-45(LAN in)
Other functions
High color saturation.
DisplayPort input
2 HDMI v1.3 inputs with HDCP.
Audio function output –Line out
Internal speaker 10Wx2
Signal source auto detection.
OSD keypad lock function.
PIP/ PBP function. Please see the chapter “Display mode ”
Overscan function.
Supports input main / sub source detection.
Package Contents
Unpacking
Display is packed in a carton box and may be banded to 2 types of custom pallet depends on the
number of units shipped. The display is packed using cushions to protect the monitor during shipping.
Before unpacking your monitor, prepare a stable, level, and clean surface near a wall outlet.
Set the LCD Monitor box in an upright position and open from the top of the box before removing the top
cushions.
Step 1: Remove the white handle and cut the banding

EYE-LCD-5500-LHD 9
9
Step 2: Remove the top cushion and take the accessories Bag out.
Packing list

EYE-LCD-5500-LHD
10
10
Contents of the Accessory Bag
VGA Cable (D-sub)
Power Cord –black
IR extender
OSD Remote Control
2 piece batteries (AAA) inside.

EYE-LCD-5500-LHD 11
11
Dimensions

EYE-LCD-5500-LHD
12
12
Installation
Environmental state
Operating temperature: 5C ~ 35C (Fahrenheit : 41F ~ 95F)
Humidity : 85% RH (Max)
Power Input
Power Cord
The included power cord is used to connect the side controls of the LCD monitor and the wall outlet.
Connect the power cord into main power of the monitor, “-” is power on, “O” is power off.
Input: 100-240V~ 5A 50/60Hz
Power Interface
Main power - switch & AC socket. Please see the chapter “Power input ”
The top controller of the monitor
The remote control (RCU)
Main power –
Switch
A
C In socket
The top of controller
Single Input Interface
“I“ is power on
“O” is power off

EYE-LCD-5500-LHD 13
13
Signal Source Input
Input Interface
Name Connecter Remarks
RS232C input x 1 D-Sub 9 pin
1 LAN input x1 RJ-45
2 DisplayPort x1
HDMI 1 input x1
3 HDMI 2 input x1
4 DVI-D input x1 D-Sub 24 pin
5 VGA (PC) input x 1 D-Sub 15 pin
6 PC audio in x1 Mini jack
7 IR Extender x1 Mini jack
8 Line Out x1 Mini jack
Y-Pb-Pr (Y-Cb-Cr) input x 1 RCA G/B/R
9 Audio for Component input x 1 RCA W/R
10 S-video input x 1 Mini Din 4 pin
Video input x 1 RCA
11 Audio for S-Video/Video input x 1 RCA W/R
12 Power cord input AC input
13 AC switch ON/OFF

EYE-LCD-5500-LHD
14
14
Operating The Monitor
The Top controller of the monitor
OSD Key Pad function List
Key Descriptions
Power Power on/Power off
Source Source selection (toggle)
Menu Right/Volume +
Menu Left/Volume -
Menu Up
Menu Down
Menu/Exit Menu/Exit selection
Main Power switch
AC In.
Input connecter

EYE-LCD-5500-LHD 15
15
LED ON:
Power Status Condition
Green Power on
Blink Orange No Signal
Sleep mode (Standby mode)
Orange Power saving mode
AC off
Off Power Off
LED OFF:
The LED turns completely off when in the “off” mode regardless of the monitor being on or off.
Rotating the monitor
When using the display in the portrait position, the monitor should be rotated anti-clockwise so that the right side
is moved to the top. This will allow for proper ventilation for the monitor. Improper ventilation may shorten the
lifetime of the monitor. Then change the OSD rotation item from 0° to 270° on OSD menu.
-Power ON-Stand by Indicator
-Remote Control Receiver

EYE-LCD-5500-LHD
16
16
The Remote Control (RCU) Instructions
Hot Key : OSD Menu Lock/Unlock Control
Lock: Press Enter, Enter, Exit, Exit, Enter and Exit on the controller by sequence and all keys(including remote and
keypad) will be locked except Enter and Exit.
Unlock: Press Enter, Enter, Exit, Exit, Enter and Exit on the controller by sequence again and all keys will be unlocked.
No Function Description
Turns the monitor on and off
INFO Provides source and resolution information
VGA Selects the PC RGB source
DVI Selects the PC DVI source
HDMI 1 Selects the HDMI source 1
COMP Selects the Component source
AV (VIDEO ) Selects the Composite Video source
HDMI 2 Selects the HDMI source 2
PIP position Selects the PIP position
DisplayPort Select the DisplayPort source
HD-SDi 1 Not available at this model.
PIP Turns the PIP feature on and off
S-V Selects the S-Video source
HD-SDi 2 Not available at this model.
SWAP Swaps the main source & sub source picture
P-SOURCE Selects the secondary sub-source
MENU
Opens the monitor’s on-screen menu system. When
the menu system is already open, pressing this
button will select the previous submenu
,, , Navigates through submenus and settings
EXIT Closes the menu system
ENTER Selects highlighted menu choices
SCALING Toggles between different aspect ratios
(Full Screen, Native, Letter Box and Pillar Box)
FREEZE Freezes the current source image
MUTE Turns off the sound
BRIGHT Adjusts the brightness
CONTRAST Adjusts the contrast
AUTO Auto adjustment VGA source
SOURCE Allows selection of the different sources
VOLUME- Decreases the sound volume
VOLUME+ Increases the sound volume

EYE-LCD-5500-LHD 17
17
Change The RCU Battery
1.
Remove the battery cover
Slide back and remove the battery cover in the
direction of the arrow.
2.
Insert the batteries
A
lign and insert two AAA batteries according to
their plus and minus ports (as indicated in the
remote control).
3.
Close the battery cover
Replace the battery cover in the direction of
the arrow and snap it back into place.
i. Used batteries needed to follow the city rule to be discarded.
ii. Avoid keeping used, old batteries inside the remote control, causing leakage of internal liquid resulting
metal rust or fatal damage to the remote control hand unit.
iii. Battery to be used according to the instruction
About the remote control
Don’t drop, shake or bump.
Don’t place on wet materials.
Don't dismantle.
Don’t place in locations with exposure to high-temperature or high-humidity levels.
CAUTION

EYE-LCD-5500-LHD
18
18
Display Mode
Turning the monitor on
1. Correctly insert the power cord into monitor and into the power outlet.
2. Ensure the AC switch is set to “—“.
3. Press the power button on the remote or side control panel.
Turning the monitor off
With the power on, press the power button on the remote or side control panel to put the monitor in a standby
mode. To turn off power completely, turn the AC switch to “O” or disconnect the AC power cord from the power
outlet.
Note:
If there is no signal input for a period of time, the monitor will automatically go to standby mode.
Adjusting the Volume
1. Using the remote, press the VOLUME- or VOLUME+ to increase or decrease the volume.
2. Press the MUTE button to temporarily turn off all sound. To restore the sound, press the MUTE button
again.
Selecting the input source
1. Using the remote, press the desired source button (VGA,
HDMI1, HDMI2, DVI, DisplayPort, VIDEO, S-V, Component)
2. Or press SOURCE on the monitor keypad, use the arrow
buttons () to navigate to the desired input source, and
press ENTER:
VGA
HDMI 1
HDMI 2
DVI
DisplayPort
Composite Video
S-Video
Component
3. When the monitor cannot find a source, a “No signal” message
will appear.

EYE-LCD-5500-LHD 19
19
PIP mode
1. Select the main source – Using the remote, press the desired source button (VGA, HDMI1, HDMI2, DVI,
DisplayPort, Composite Video(Video), S-V, or Component).
2. Turn on PIP: Using the remote, press PIP.
3. To select the PIP/ sub-source: Using the remote, press P-SOURCE and use the arrow buttons () to
navigate to the desired sub-source. Press ENTER.
4. To change the size and position of the sub-source: Using the remote, press P-POSITION to toggle
through the options.
5. To switch the main source and the sub-source: Using the remote, press S WA P.
Main
Top-Left Top-Right
Bottom-
Right
Bottom-Left
Small PIP
Large PIP
PIP
Main
Middle PIP
Small PIP
SWAP
Main

EYE-LCD-5500-LHD
20
20
6. To switch audio between the main source and the sub-source: Using the remote, press AUDIO.
7. Note: For additional PIP functionality, press MENU and navigate to the Display Settings menu. Use the
arrow buttons () to navigate to the desired PIP feature and press ENTER. Press to toggle through the
associated options and press ENTER to select the highlighted option.
8. Side by Side (Picture-by-Picture): Press P-POSITION button choose “Side by side” mode, then the main
source and the sub-source will be on the screen display.
PIP Screen Table
VGA HDMI 1 HDMI 2 DVI DisplayPort Video S-Video Component
VGA - Yes Yes Yes Yes Yes Yes Yes
HDMI 1 Yes - - - Yes Yes Yes Yes
HDMI 2 Yes - - - Yes Yes Yes Yes
DVI Yes
- - - Yes Yes Yes Yes
DisplayPort Yes Yes Yes Yes - Yes Yes Yes
Video Yes Yes Yes Yes Yes - - Yes
S-Video Yes Yes Yes Yes Yes - - Yes
Component Yes Yes Yes Yes Yes Yes Yes -
PIP
Main
Main Source
Sub
Source
Table of contents
Other Eyevis TV manuals