manuals.online logo
Brands
  1. Home
  2. •
  3. Brands
  4. •
  5. EZ CONNECT
  6. •
  7. Artificial Pine Tree
  8. •
  9. EZ CONNECT Pre-lit Aspen Tree User manual

EZ CONNECT Pre-lit Aspen Tree User manual

3.66 m / 12 ft EZ Connect™ Pre-lit Aspen Tree
ITM. / ART. 1455659, 587960, 41061, 229611
IMPORTANT, RETAIN FOR FUTURE REFERENCE: READ CAREFULLY
This tree assembles with EZ Connect™ and Simple Shape™ technology, allowing you to set up your tree with minimal
shaping required! Carefully follow the instructions below on how to quickly and easily set up your new tree.
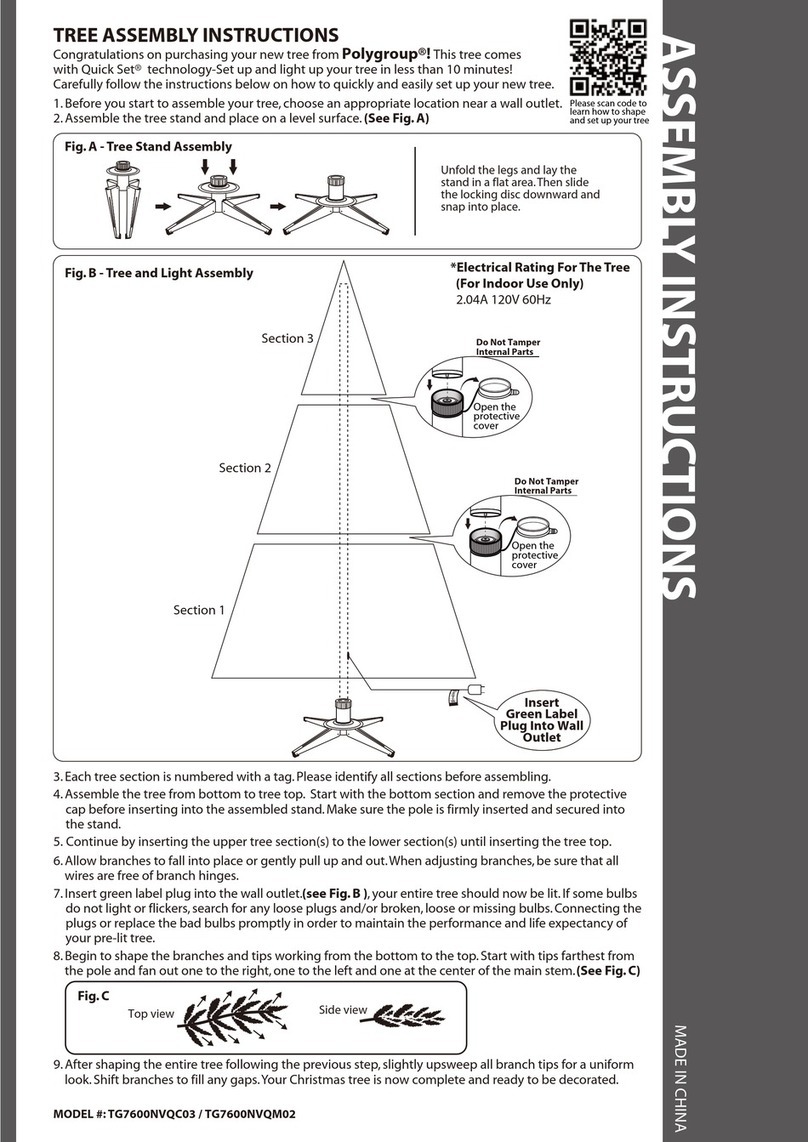
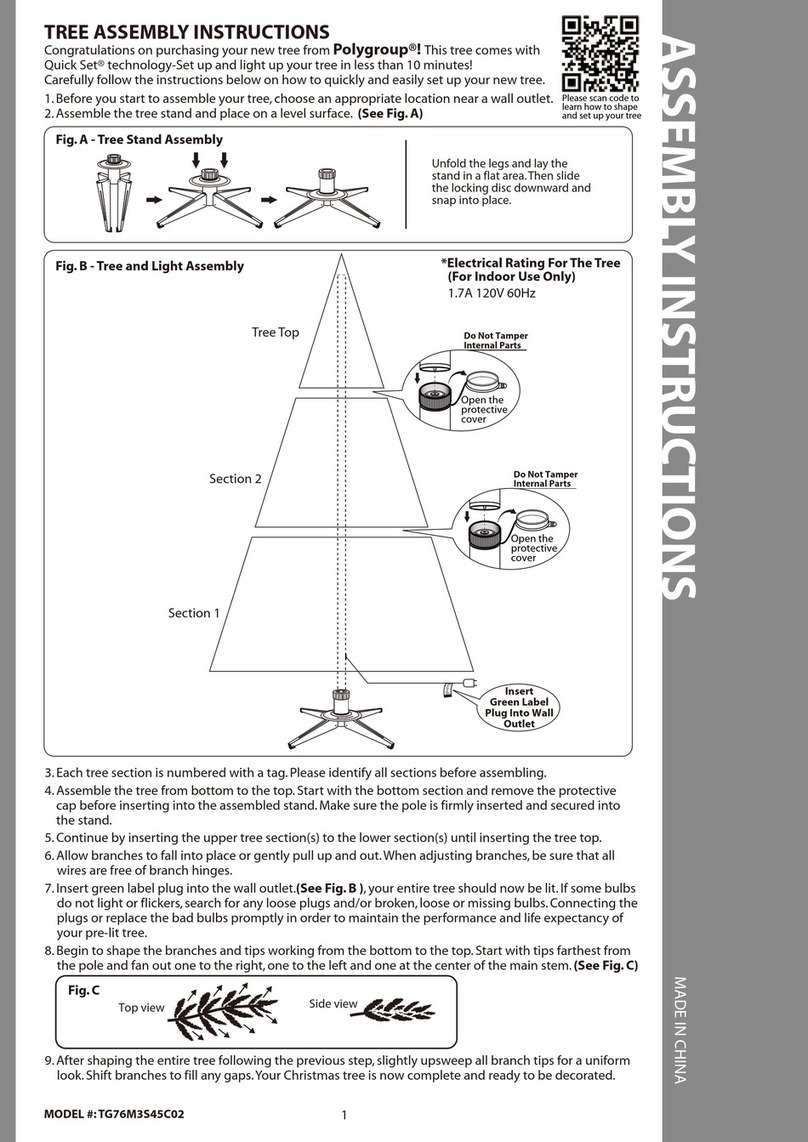
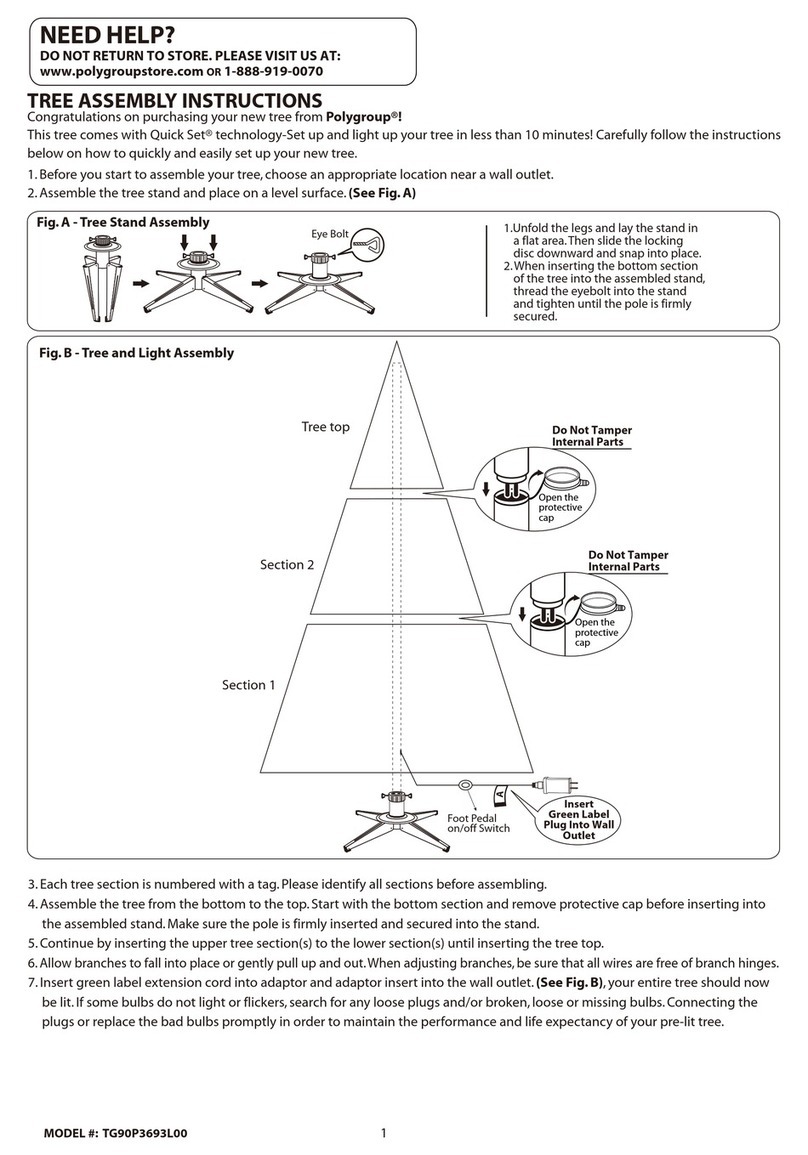
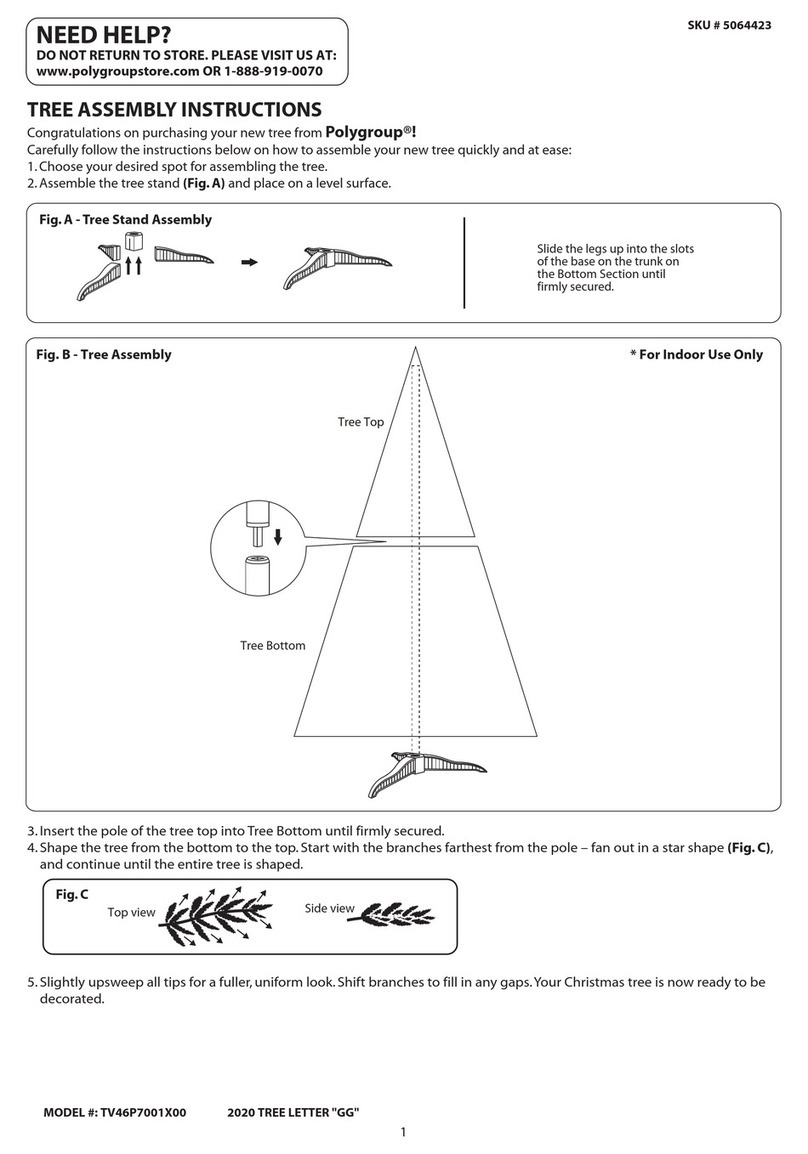
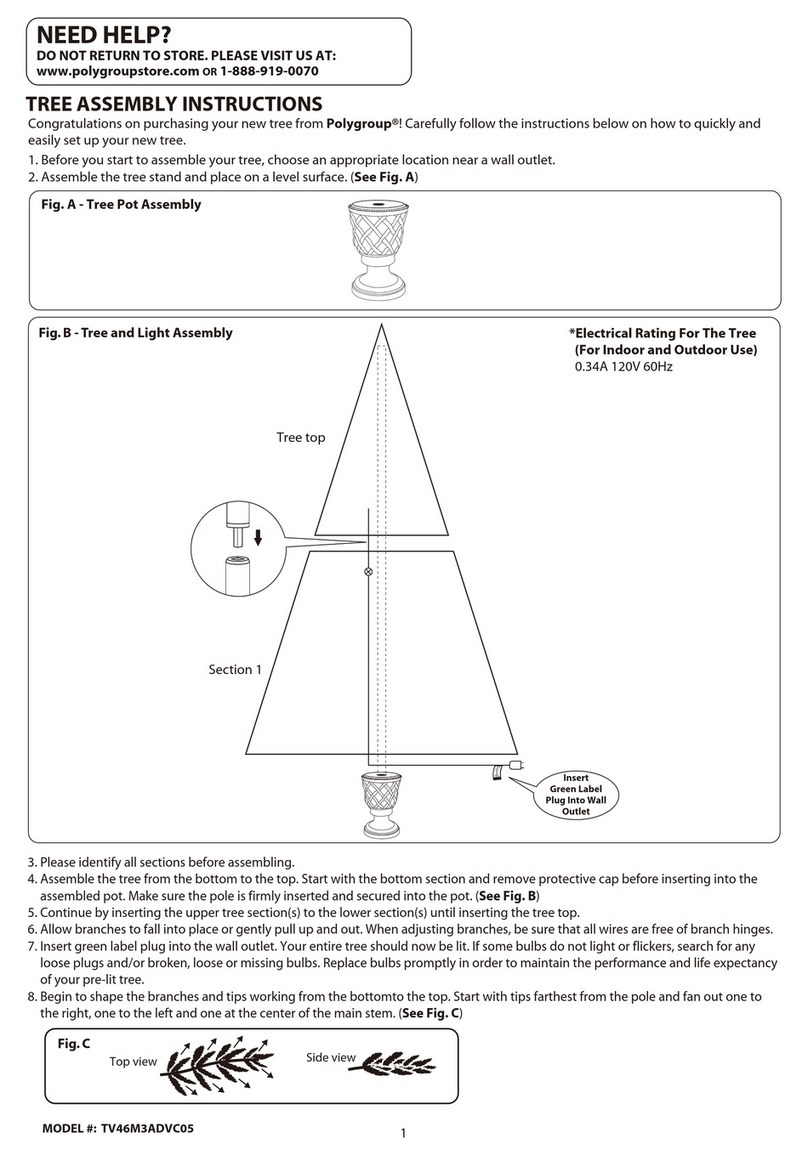
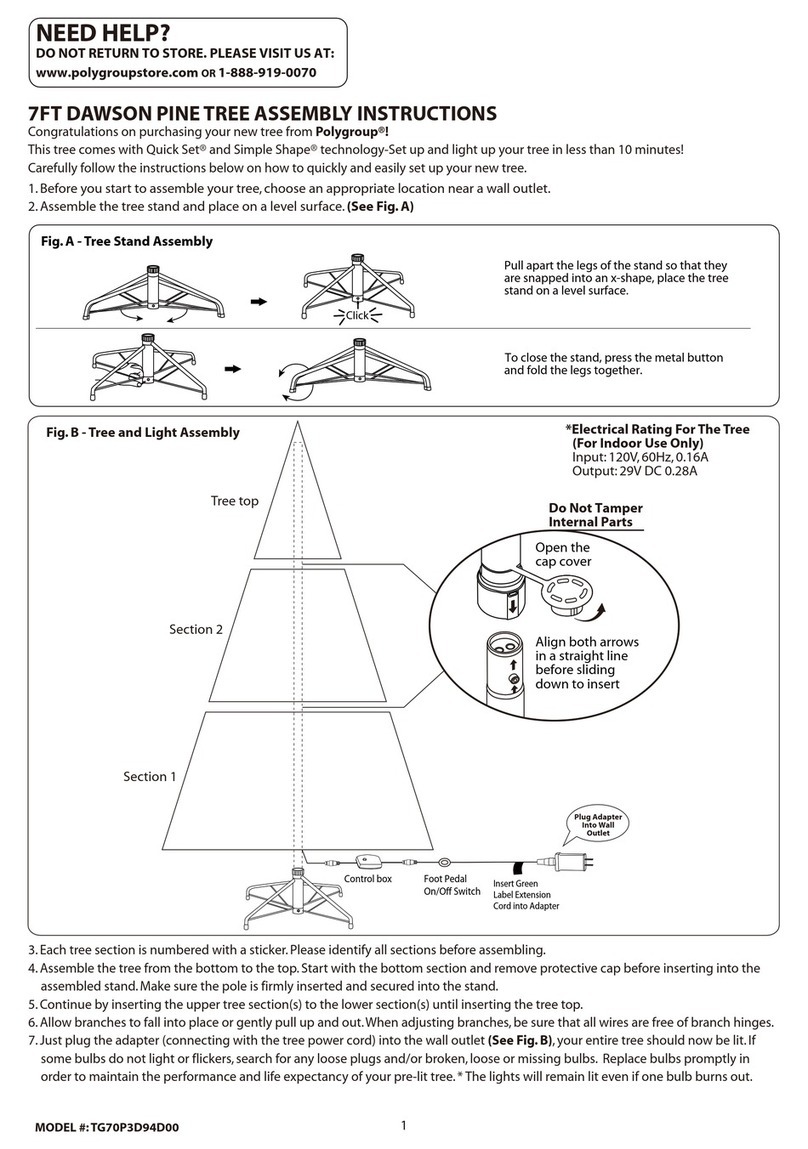
1. Before you start to assemble your tree, choose an appropriate location near a wall outlet.
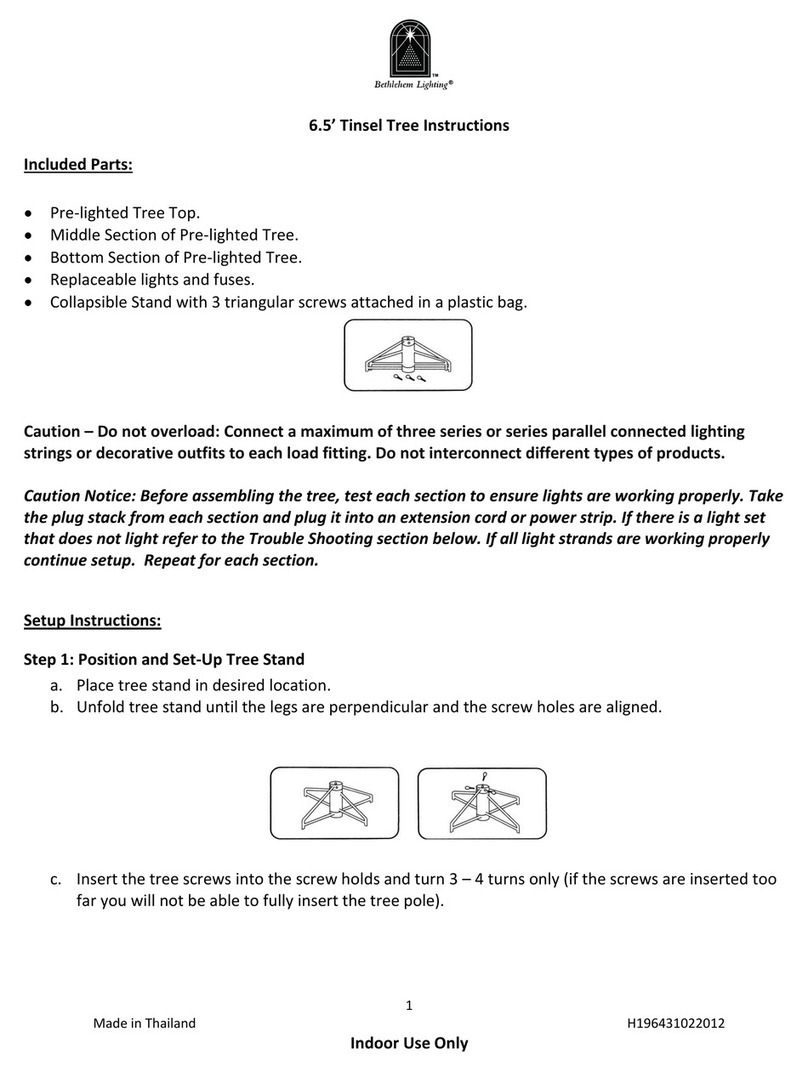
2. Assemble the tree stand on a level surface. (See Fig. A)
TREE ASSEMBLY INSTRUCTIONS
Page: 1 of 5
Fig. A Tree Stand Assembly
Tree Stand Disassembly
Eye Bolt
Eye Bolt
(For Indoor Use Only)
Fig. B - Tree and Light Assembly
Control box Foot Pedal
on/off Switch
Section 1
Section 2
Section 3
Section 4
Section 5
Section 6
Do Not Tamper
Internal Parts
Do Not Tamper
Internal Parts
Do Not Tamper
Internal Parts
SP, FR(JT-DC30V25W-M-IP44)
UK(JT-DC30V25W-M)
JP(K25V300083J)
KR(K25V300083K)
AU(JT-DC30V25W-M)
US, CAN, MX
(TS-29V0.9A)
TW(JT-DC300V0800-G)
For assistance with assembly, parts and customer service, call: 1-888-919-0070, email: [email protected] (English,
Spanish, French), (US, Canada only) 10:00am-6:00pm, Monday-Friday, Eastern Time, or go to www.polygroupstore.com.
Please note if you are calling outside of USA & Canada, international toll fees may apply.
Customer Service Hotline Hours: Monday – Friday, 8.00am – 4.00pm MST.
1. Unplug extension cord from the wall outlet first and then remove all ornaments and decorations.
2. Disassemble the tree from the top to the bottom. Start with the tree top and gently lift straight up to remove from
section below and fold all branches toward the pole.
3. Continue by gently lifting straight up each section(s) from the section below and fold all
branches toward the pole until the bottom section is removed from the tree stand.
Replace the protective cap on the poles to avoid damaging the internal parts. (See Fig. D)
4. Carefully place all tree sections into shipping box and tape (not included) it shut.
5. When not in use, please store your tree in a cool, dry place away from sunlight. Exposing
your tree to excessive heat or humidity may damage your tree.
STORAGE INSTRUCTIONS
For Pre-lit Trees, If The Tree Does Not Illuminate
1. Please check to make sure that all connectors are properly connected and the power adapter / extension cord is
plugged into the wall outlet.
2. Turn the poles gently to ensure pole-to-pole connection.
3. Check for loose, broken or missing bulbs and replace as needed.
4. Check on / off foot pedal.
Loose Hinge Pin
1. Extra hinge pins are included for repairing the hinges. Place the branch into the slot of the bracket.
2. Insert a new hinge pin through the hole and secure using the retainer washer. (See Fig. E)
TROUBLE SHOOTING TIPS
Each tree includes hinge pins/washers and spare bulbs. If extra parts are
needed, please contact our customer service center.
SPARE PARTS
3. Each tree section is numbered with a label. Please identify all sections before assembling.
4. Assemble the tree from the bottom to the top (See Fig. B). Start with the bottom section and remove protective
cap before inserting into the assembled stand. Make sure the pole is firmly inserted and secured into the stand.
5. Open the protective cap from the lower section(s) and continue inserting the upper section(s) until the tree top is
inserted.
6. Allow branches to fall into place or gently pull up and out. When adjusting branches, be sure that all wires are free
of branch hinges.
7. Plug the extension cord into a wall outlet (See Fig. B), your entire tree should now be lit. If some bulbs do not light
or are flickering, search for any loose plugs and/or broken, loose or missing bulbs. Replace the bad bulbs promptly
in order to maintain the performance and life expectancy of your pre-lit tree.
8. This is a Simple Shape™ tree, just slightly upsweep all branch tips for a uniform look, no shaping required. If
needed, shape the branches and tips to make the tree look fuller. Your Christmas tree is now complete and ready to
be decorated. (See Fig. C)
Top view Side view
Fig. C
Fig. D
Fig. E
Page: 2 of 5
Press the selector button on the “Dual Color Light Controller” to
select among: 1. CLEAR STEADY 2. CLEAR FADING 3. MULTI-COLOR
STEADY 4. MULTI-COLOR FADING 5. CLEAR / MULTI-COLOR ALTER-
NATING 6. CLEAR / MULTI-COLOR FADING 7. DEMO
HOW TO USE THE DUAL COLOR LIGHT CONTROLLER:
Remote
Controller Light
Controller
Selector Button
HOW TO USE THE REMOTE CONTROLLER :
The remote control is for the wired controller only:
(1) REMOVE THE INSULATION TAB OF THE REMOTE CONTROLLER.
(2) PRESS THE BUTTON TO SELECT DIFFERENT FUNCTIONS, REFER TO “HOW TO USE THE DUAL
COLOR LIGHT CONTROLLER”.
(3) TO REPLACE THE BATTERY, OPEN THE BATTERY COMPARTMENT WITH A COIN. REPLACE WITH
A CR2032 BATTERY.
Page: 3 of 5
Insulation Tab Battery
CR2032
Cover
(4) DISPOSE USED BATTERY PROPERLY. OBSERVE LOCAL REGULATIONS REGARDING DISPOSAL
OF HAZARDOUS WASTE.
(5) ENSURE THE BATTERIES ARE INSTALLED CORRECTLY WITH REGARD TO POLARITY (+ AND -).
1. Use only power adapter supplied with this product, using a different adapter can damage the lights and cause fire
or electrical shock hazards.
2. FOR INDOOR USE ONLY.
3. This product contains a button battery(CR2032). If swallowed, it could cause severe injury or death in just 2 hours.
Seek medical attention immediately.
WARNING
4. -KEEP BATTERIES OUT OF REACH OF CHILDREN
5. Swallowing may lead to serious injury in as little as 2 hours or death, due to chemical burns and potential
perforation of the oesophagus.
6. If you suspect your child has swallowed or inserted a button battery, immediately seek urgent medical assistance.
7. Examine devices and make sure the battery compartment is correctly secured, e.g. that the screw or other
mechanical fastener is tightened. Do not use if compartment is not secure.
8. Dispose of used button batteries immediately and safely. Flat batteries can still be dangerous.
9. Tell others about the risk associated with button batteries and how to keep their children safe.
WARNING
AUSTRALIA: Our goods come with guarantees that cannot be excluded under the Australian Consumer Law. You are
entitled to a replacement or refund for a major failure and for compensation for any other reasonably foreseeable
loss or damage. You are also entitled to have the goods repaired or replaced if the goods fail to be of acceptable
quality and the failure does not amount to a major failure.
Page: 4 of 5
Importado por:
Importadora Primex S.A. de C.V.
Blvd. Magnocentro No.4
San Fernando La Herradura
Huixquilucan, Estado de México
C.P. 52765
RFC: IPR-930907-S70
(55)-5246-5500
www.costco.com.mx
Importado por:
Costco Wholesale Spain S.L.U.
Polígono Empresarial Los Gavilanes
C/ Agustín de Betancourt,17
28906 Getafe (Madrid) España
NIF : B86509460
900 111 155
www.costco.es
Distribué par :
Costco France
1 avenue de Bréhat
91140 Villebon-sur-Yvette
France
01 80 45 01 10
www.costco.fr
Imported by:
Costco Wholesale Japan Ltd.
3-1-4 lkegami-Shincho
Kawasaki-ku, Kawasaki-shi,
Kanagawa 210-0832 Japan
044-281-2600
www.costco.co.jp
Imported and Distributed by:
Costco Wholesale Korea, Ltd.
40, lljik-ro
Gwangmyeong-si
Gyeonggi-do, 14347, Korea
1899-9900
www.costco.co.kr
Imported by:
Costco Wholesale Australia Pty Ltd
17-21 Parramatta Road
Lidcombe NSW 2141
Australia
www.costco.com.au
Imported by / Manufactured for:
Costco President Taiwan, Inc.
No. 656 Chung-Hwa 5th Road
Kaohsiung, Taiwan
Company Tax ID: 96972798
0800-885-889
www.costco.com.tw
Distributed by:
Costco Wholesale Iceland ehf.
Kauptún 3-7, 210 Gardabaer
Iceland
www.costco.is
Imported by:
Costco Wholesale UK Ltd /
Costco Online UK Ltd
Hartspring Lane
Watford, Herts
WD25 8JS
United Kingdom
01923 213113
www.costco.co.uk
Distributed by:
Costco Wholesale Corporation
P.O. Box 34535
Seattle, WA 98124-1535
USA
1-800-774-2678
www.costco.com
Imported by / Importé par :
Costco Wholesale Canada Ltd.*
415 W. Hunt Club Road
Ottawa, Ontario
K2E 1C5, Canada
1-800-463-3783
www.costco.ca
* faisant affaire au Québec sous le nom Les Entrepôts Costco
MADE IN CHINA / FABRIQUÉ EN CHINE / HECHO EN CHINA
Page: 5 of 5
- This device complies with Part 15 of the FCC Rules. Operation is subject to the following two conditions: (1) this
device may not cause harmful interference, and (2) this device must accept any interference received, including
interference that may cause undesired operation.
- “Warning: Changes or modifications to this unit not expressly approved by the party responsible for compliance
could void the user’s authority to operate the equipment.”
- “NOTE: This equipment has been tested and found to comply with the limits for a Class B digital device, pursuant to
Part 15 of the FCC Rules. These limits are designed to provide reasonable protection against harmful interference in
a residential installation. This equipment generates, uses and can radiate radio frequency energy and, if not
installed and used in accordance with the instructions, may cause harmful interference to radio communications.
However, there is no guarantee that interference will not occur in a particular installation. If this equipment does
cause harmful interference to radio or television reception, which can be determined by turning the equipment off
and on, the user is encouraged to try to correct the interference by one or more of the following measures:
FCC Verification User Manual
- The Canadian Government has announced an amendment of the radio act which will require computing equip-
ment to comply with EMI specifications in Canada. The effective date for products imported into Canada is January
31, 1989.
- The intent of the amendment is to establish Canadian Regulations which are harmonized with the existing FCC
Regulations. As such, no retesting is required and devices which have been tested and comply with the FCC Specifi-
cations (Class B) also comply with the Canadian Specification (Class B).
- There is however, an additional equipment label requirement. Units imported into Canada must be accompanied
by a label affixed to the device in both English and French.
“This Class B digital apparatus complies with Canadian ICES-003.”
“Cet appareil numérique de la classe B est conforme à la norme NMB-003 du Canada.”
Canadian Emissions Requirements
“This Class B digital apparatus complies with Canadian ICES-003.”
“Cet appareil numérique de la classe B est conforme à la norme NMB-003 du Canada.”
Reorient or relocate the receiving antenna.
Increase the separation between the equipment and receiver.
Connect the equipment into an outlet on a circuit different from that to which the receiver is connected.
Consult the dealer or an experienced radio/TV technician for help.
CUSTOMER SERVICE FOR CHRISTMAS TREES
For any questions, assistance,or missing parts, DO NOT RETURN YOUR TREE TO PLACE OF PURCHASE. please
contact us first, call: 1-888-919-0070, email: [email protected]om (English, Spanish, French),(US and Canada
only) 10:00am-6:00pm, Monday-Friday,Eastern Time, or visit our website at www.polygroupstore.com.
TREE ID# IS LOCATED ON END PANEL OF BOX.TREE ID# IS REQUIRED WHEN REQUESTING REPLACEMENT
PARTS.
Customer Name:
Address:(No P.O. Boxes)
City & State:
Zip Code:
Day Phone:
Date Purchased:
Tree ID#:
Tree UPC#:
Store Purchased:
Specify Problem:

This manual suits for next models

4

Popular Artificial Pine Tree manuals by other brands

Home Accents Holiday TG90M5311L05 manual

Home Accents Holiday

Home Accents Holiday TG90M5311L05 manual

Home Accents Holiday TG90M3AGTL04 manual

Home Accents Holiday

Home Accents Holiday TG90M3AGTL04 manual

Home Accents Holiday TV30P3E92L00 quick start guide

Home Accents Holiday

Home Accents Holiday TV30P3E92L00 quick start guide

Polygroup AR-P17004 Assembly instructions

Polygroup

Polygroup AR-P17004 Assembly instructions

ENCHANTED FOREST TG76M4C25X00 Assembly instructions

ENCHANTED FOREST

ENCHANTED FOREST TG76M4C25X00 Assembly instructions

Home Accents Holiday TG66M2X38D00 quick start guide

Home Accents Holiday

Home Accents Holiday TG66M2X38D00 quick start guide

Home Accents Holiday TY013-1614-1 Use and care guide

Home Accents Holiday

Home Accents Holiday TY013-1614-1 Use and care guide

Polygroup TGF0M3P07C00 quick start guide

Polygroup

Polygroup TGF0M3P07C00 quick start guide

Home Accents Holiday 23SV23789 Easy Assembly and operation instructions

Home Accents Holiday

Home Accents Holiday 23SV23789 Easy Assembly and operation instructions

Holiday Living TG76P2647Y00 quick guide

Holiday Living

Holiday Living TG76P2647Y00 quick guide

Home Accents Holiday 21RT0292114 Assembly instructions

Home Accents Holiday

Home Accents Holiday 21RT0292114 Assembly instructions

NOMA 151-0301-4 instruction manual

NOMA

NOMA 151-0301-4 instruction manual

Polygroup TG90P4826D01 Assembly instructions

Polygroup

Polygroup TG90P4826D01 Assembly instructions

Bethlehem Lights 6.5’ Balsam Fir IPT Ready Shape Tree instructions

Bethlehem Lights

Bethlehem Lights 6.5’ Balsam Fir IPT Ready Shape Tree instructions

Polytree TV70M2U28L01 Assembly instructions

Polytree

Polytree TV70M2U28L01 Assembly instructions

GE Just Cut ConstantON 17140 Assembly instructions

GE

GE Just Cut ConstantON 17140 Assembly instructions

Haute Decor DCCT4502 Assembly instructions

Haute Decor

Haute Decor DCCT4502 Assembly instructions

Polygroup TG7600NVQC19 Assembly instructions

Polygroup

Polygroup TG7600NVQC19 Assembly instructions

manuals.online logo
manuals.online logoBrands
  • About & Mission
  • Contact us
  • Privacy Policy
  • Terms and Conditions

Copyright 2025 Manuals.Online. All Rights Reserved.