EzCAP Game Link Plus User manual

manual
Game Link Plus
Model number: ezcap312

1
Overview
1. INPUT - HDMI input, connect to video source with HDMI cable
2. OUTPUT - HDMI Output, connect to TV or Monitor with HDMI cable to display video
source
3. LINE IN - 3.5mm audio line input
4. Headset - 3.5mm audio for line output to earphone and microphone input (CTIA)
5. PC - To connect to computer USB port
6. LINE IN - To adjust the volume of line in (Turn clockwise, the sound goes from low to
high)
7. MIC - To adjust the volume of microphone input (Turn clockwise, the sound goes from
low to high)
8. POWER/CAPTURE- Blue LED indicator, it will be on when connect to computer, and

2
flash when device runs.
9. HDMI - To adjust the volume of HDMI input video background sound (Turn clockwise,
the sound goes from low to high)
In the Box
ezcap312 Game Link Plus with volume adjustment x1, USB Cable x 1, Manual x1
Hardware
Connect your PC port of device to the USB port of the computer by included USB cable, wait a
moment, the system will automatically recognize the camera link device, and you will find the
device name - “ezcap GameLink” in “Cameras” catalog and “Sound, video, and game
controllers” catalog in the device manager, which means the device is ready to work.
Software
For professional live streaming or recording, we suggest use OBS, download link:
https://obsproject.com/
Note: ezcap Game Link Plus with volume adjustment device also can work with Mac OS X,
and please download OBS Mac version. The operation is similar as working under Windows
as below.
Work with OBS
Select Device
After download and installation, double click OBS Studio icon on desktop to run OBS. Click
icon +under Sources window at the bottom left of OBS panel, and select Video Capture
Device. Click OK in the new pop-up window. You also can insert a name you want to create for
the device. One window will appear you after above. Please click the drop-down box next to
Device and select ezcap GameLink.

3
Video Setting
You should get the video in window. If you want to set the video resolution, click the drop-down
box next to Resolution/FPS Type and select Custom, then click the drop-down box next
Resolution to select one resolution.
You can click the drop-down box next to FPS to select the appropriate FPS - 30,60,Highest
FPS, or Match Output FPS, and click the drop-down box next to Video Format to select the
video format.
Audio Setting
You may not be able to hear the sound after you finish above settings. Please tick Use custom
audio device, and click the drop-down box next to Audio Device and select HDMI (ezcap
GameLink). Then click the drop box next to Audio Output Mode, and select desktop

4
audio (WaveOut).You will hear the sound now.
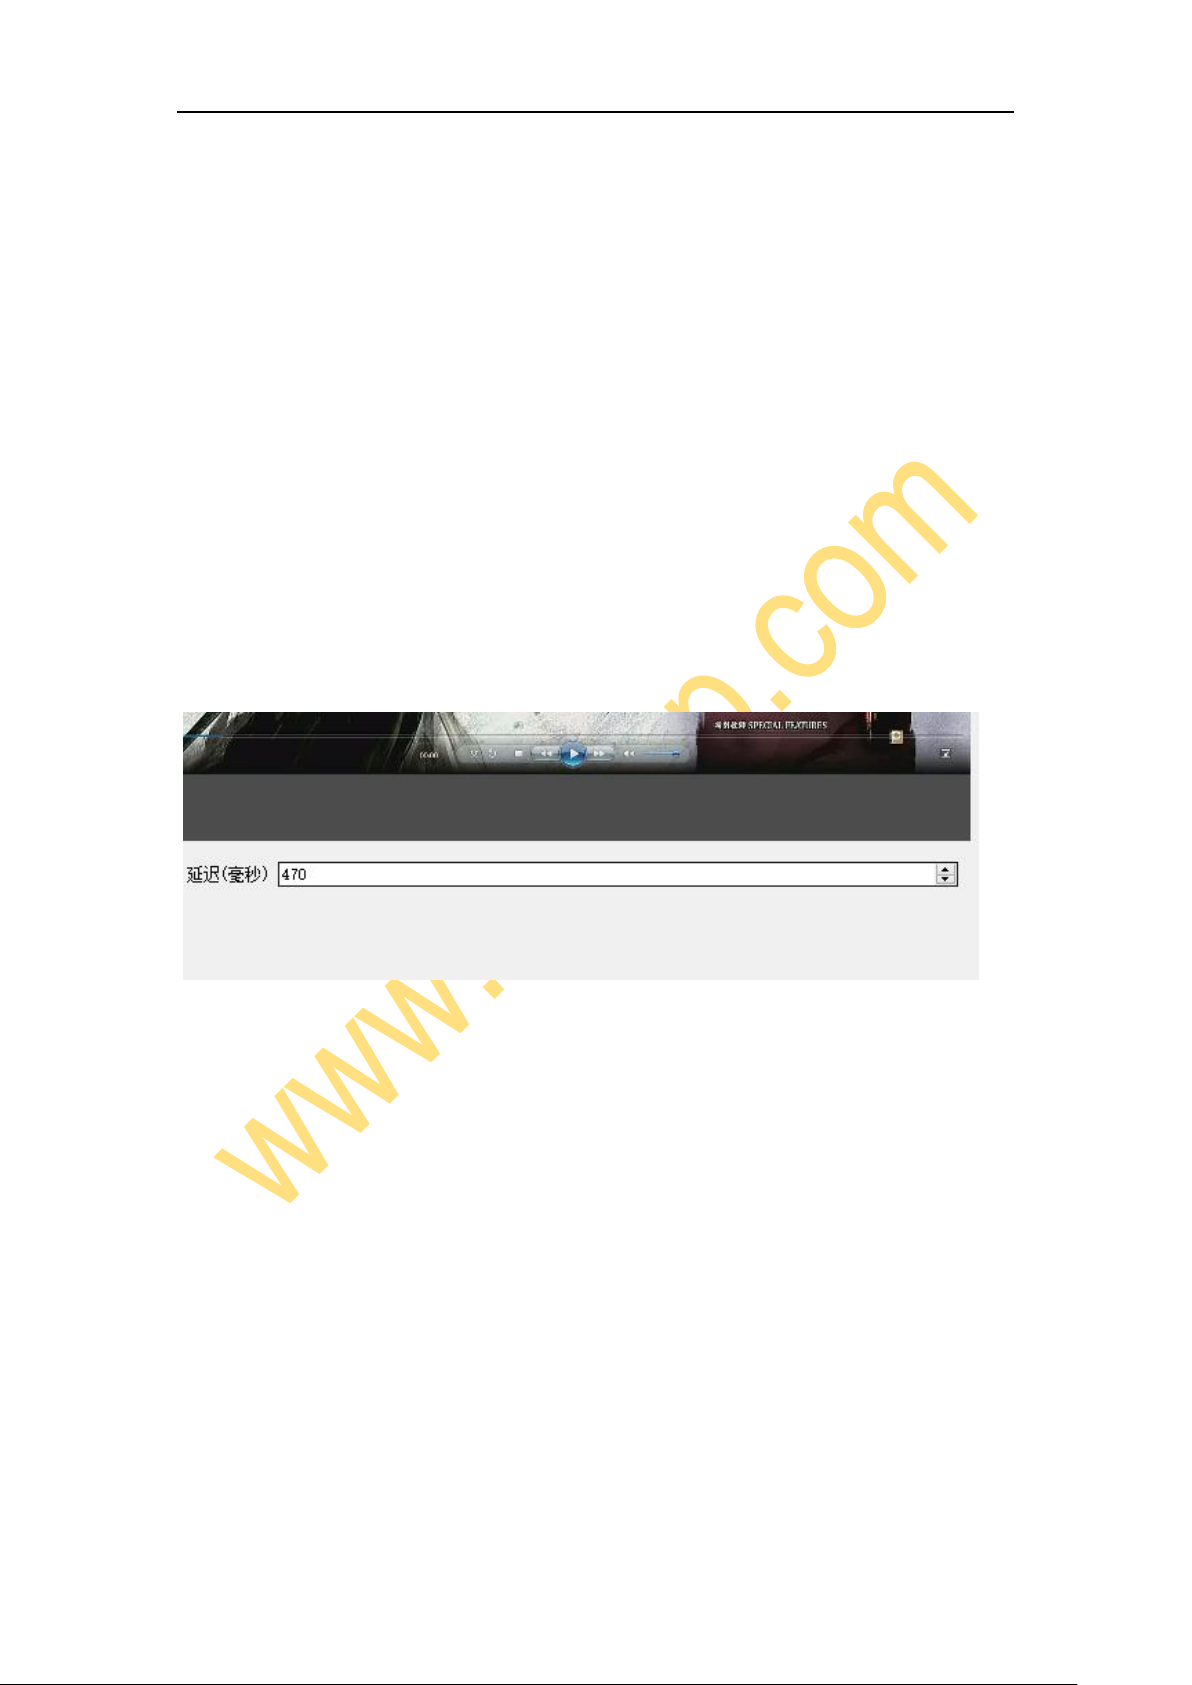
Setting for audio and video synchronized
Right click Video Capture Device then click Filters. Click to add Video Delay (Async). Set it
to 470ms (You can adjust it smaller or bigger until you found the audio and video
synchronized).
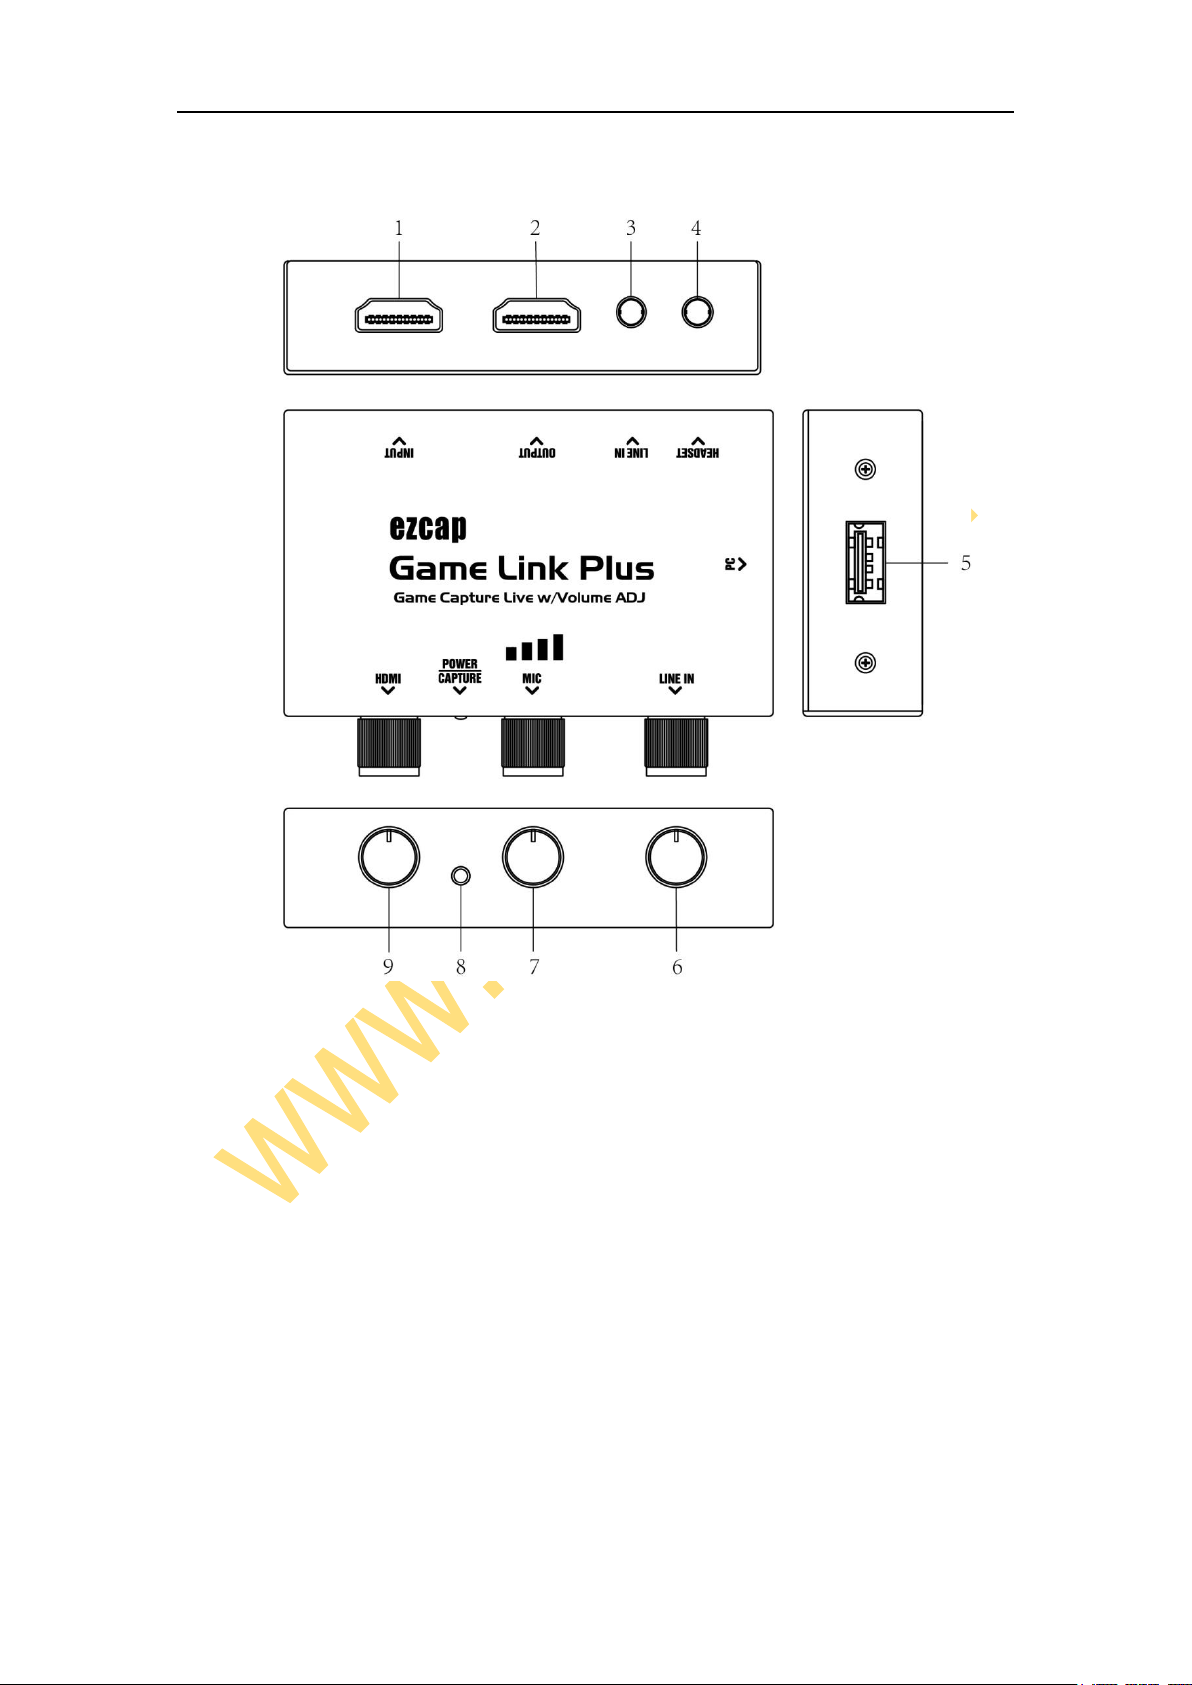
Adjust the volume of HDMI, Microphone and Line in
When we are capturing video or live game, we often need to adjust the microphone volume, or
line in volume, or HDMI video volume, and even need to mute them. ezcap Game Link with
volume Adjustment has designed unique knobs, you can adjust them at any time to meet you
needs. When the corresponding knob is turned fully counterclockwise, the corresponding
volume will be muted, and turned fully clockwise, the volume will be adjusted to the maximum.
EXAMPLE: You can adjust microphone volume by adjusting the microphone volume
adjustment knob. Connect the headset, speak into the microphone, and then adjust the
microphone volume knob at the same time until you feel it’s suitable. Turn the knob clockwise
to change the volume from low to high, turn it fully counterclockwise, and the microphone will
be muted.
Note: There may be differences between the volume you hear through the headset and the
volume of the actual captured video, as well as the volume of the live broadcast terminal.
Please adjust to a suitable position according to the volume of the captured video or the
volume of the live broadcast terminal in your actual application.
Recording
Click Settings in the low right corner of OBS panel, and click Video on the left in the pop-up
Settings window. Click the drop-down box next to Base (canvas) Resolution to select the
appropriate resolution, and click the drop-down box next to Output (Scaled) Resolution to
select the output resolution. Click the drop-down box next to Common FPS Values to select
the FPS values.
Click Output on the left of Settings window as above, in Recording column, you can set
Recording Path, Recording Quality, Recording Format, Encoder.
After setting, click Apply and Ok in the low right corner of Settings panel, then simply click
Start Recording in the low right corner of OBS panel to start recording videos, and click Stop
Recording to stop recording.

5
Streaming
Click Output in the Settings panel, in the Streaming column, set video quality for streaming
(adjust depends your computer, network speed), then click icon Apply and OK in the Settings
panel. Click Stream in the Settings panel, then you can click the drop-down box next to
Service to choose the software platform you want, then click icon Apply and OK in the Settings
panel.
Click Start Streaming in the low right corner of OBS panel to start streaming, and click Stop
Streaming to stop streaming.
Note: Please click the help at the top of the OBS panel, and learn more about OBS in the link
that pops up.
Specifications
Interface
USB 2.0
Video Input
HDMI
Audio Input
HDMI, 3.5mm microphone input (CTIA), 3.5mm line in
Video Output
HDMI
Audio Output
HDMI,3.5mm line out (CTIA)
User Interface
LED indicator: On for power, and flashing for device running. Three knobs
for volume adjustment of HDMI, microphone and line in.
Resolution
HDMI Input/Output: 720 x 480 (60p), 720 x 576 (50p), 1280 x 720p (50p),
1280 x 720p(60p), 1920 x 1080 (24p), 1920 x 1080 (25p), 1920 x 1080
(30p), 1920 x 1080 (50p), 1920 x 1080 (60p), 3840 x 2160 (30p), 3840 x
2160 (60p).
Record Quality
Max 1080P 60fps
Dimensions
87(L) x 65(W) x 22(H)mm
Weight
148g
Operating System
Windows 7,8,10, OS X 10.9 or later, USB 2.0/3.0 port X 1.
Desktop: Intel Core i5-3400 + NVIDIA GT630. Laptop: Intel Core i7-3537U 2.0 GHz + NVIDIA
GT735. VGA card supporting DirectX 10, Sound card, 4GB RAM
Mac: i5 quad-core or later

6
概览
1. INPUT - HDMI 输入,通过 HDMI 线连接视频源
2. OUTPUT - HDMI 输出,使用 HDMI 线连接电视或显示器以显示视频
3. LINE IN - 3.5mm 音频线路输入
4. 耳机 - 用于线路输出到耳机和麦克风输入的 3.5 毫米音频接口 (CTIA 标准)
5. PC - 连接到电脑的 USB 端口
6. LINE IN - 调整线路输入的音量(顺时针转动,声音由低到高)
7. MIC - 调整麦克风输入的音量(顺时针转动,声音由低到高)
8. POWER/CAPTURE-蓝色 LED 指示灯,连接电脑时常亮,设备运行时闪烁。

7
9. HDMI - 调节 HDMI 输入视频背景声音的音量(顺时针转动,声音由低到高)
包装内容
ezcap312 Game Link Plus 游戏采集卡 x1, USB 连接线 x1,说明书 x1
硬件
将设备连接到电脑的 USB 端口,稍等片刻,系统会自动识别该游戏采集卡,你会在设备管理器下
的相机目录下和声音、视频和游戏控制器目录下都看到设备名称 ezcap GameLink,则表示设
备已经可以工作了.
软件
我们推荐免费的专业的直播及录制软件 OBS, 下载地址:https://obsproject.com/
注: ezcap Game Link Plus 游戏采集卡也可在 Mac 系统下使用,下载 OBS Mac 版本即可.操作
与下面在 Windows 下使用说明类似.
配合 OBS 使用
设备选择
下载并安装后,双击桌面上的 OBS Studio 图标以运行 OBS。单击 OBS 面板左下角的图标+,
然后选择视频采集设备。在弹出的窗口中单击确定,在这个窗口你也可以为设备改写新的名称。
点击确定之后,在弹出的窗口中单击设备旁边的下拉框,然后选择 ezcap GameLink。

8
视频设置
这些设置完成后,应该能在软件捕获窗口中看到视频。如果你需要设置视频分辨率, 单击分辨
率/ FPS 类型旁边的下拉框,然后选择自定义,然后单击分辨率旁边的下拉框,选择一种你需要
的分辨率。
您可以点击 FPS 旁的下拉框以选择适当的帧率– 30,60,最高 或匹配输出帧率.还可点击视频格

9
式旁的下拉框以选择适当的视频格式。
音频设置
完成以上设置后,你可能听不到声音。请在上述视频设置的界面下勾选使用自定义的音频设备,
然后单击音频设备旁边的下拉框,选择 HDMI(ezcap GameLink),然后单击音频输出模式旁
边的下拉框,并选择桌面音频(WaveOut)。你应该能立即听到声音。单击窗口右下角的确定
按键完成设置。
设置视频延迟以使使音视频同步,
右击视频捕获设备,选择滤镜。在弹出的视窗中,点击+后选择视频延迟(异步)。在新弹出的对
话框里输入 470ms。(你需要根据情况自行调整数值大小,直至音视频同步为止)
注意:如果要更改视频或音频设置,可在软件界面下方的来源窗口,双击视频采集设备,进入视
频采集设备面板,按照上文所说的音视频设置操作步骤更改设置。
调整 HDMI、麦克风和线路输入的音量
我们在采集视频或者游戏直播的时候,经常需要调节麦克风音量,或者线路音量,或者 HDMI
视频音量,甚至需要静音。带有音量调节功能的 ezcap Game Link 设计了独特的旋钮,您可以
随时调节它们以满足您的需求。将对应旋钮逆时针转到底,对应音量静音,顺时针转到底,音量
调至最大。

10
示例:您可以通过调节麦克风音量调节旋钮来调节麦克风音量。连接耳机,您对着麦克风发出声
音,然后同时调节麦克风音量旋钮,直到您觉得合适为止。顺时针转动旋钮将音量从低变高,逆
时针转动到底,麦克风将静音。
注意:您通过耳机听到的音量与实际采集视频的音量以及直播终端的音量可能存在差异。请根据
您的实际应用中采集视频的音量或直播终端的音量来调节到合适的位置。
录制
单击 OBS 面板右下角的设置按键,然后在弹出的设置窗口中单击左侧的视频。单击基础(画布)
分辨率旁边的下拉框选择适当的分辨率,点击输出(缩放)分辨率旁边的下拉框选择输出分辨率。
单击常用 FPS 值(帧率)右侧的下拉框以选择 FPS 值.
单击设置窗口左侧的输出,在 录像这一栏目下可以设置录像路径,录像质量,录像格式,编码器。
在各项设置完成后,单击设置面板右下角的应用和确定,然后只需单击 OBS 面板右下角的开始
录制按键即可开始录制视频,单击停止录制即可停止录制。
推流(直播)
单击软件界面的设置按键,然后点击设置面板左侧的输出,在 串流这一栏目下,可以设置串流的
视频比特率,编码器,音频比特率(根据计算机配置及网络速度进行调整).然后单击设置面板
中的应用和确定图标
单击设置面板左侧的推流图标,然后单击服务这一栏旁边的下拉框以选择所需的软件平台,点击
设置面板右下角的应用和确定图标完成设置。
单击 OBS 软件面板右下角的开始推流就可以开始直播,点击停止推流就可以停止本次推流。

11
注意:您可以单击软件界面顶部的帮助菜单,登录 OBS 网站详细了解更多的使用方法.
产品规格
接口
USB 2.0
视频输入
HDMI
音频输入
HDMI, 3.5mm 音频输入, 3.5mm 麦克风输入(CTIA 标准)
视频输出
HDMI
音频输出
HDMI, 3.5mm 音频输出 (CTIA 标准)
用户界面
LED 指示灯:通电常量,设备运行闪烁。3个音量调节旋钮分别对应 HDMI 视频背景音、
麦克风和线路音频输入。
支持分辨率
HDMI 输入/输出:720 x 480 (60p), 720 x 576 (50p), 1280 x 720p (50p), 1280 x
720p(60p), 1920 x 1080 (24p), 1920 x 1080 (25p), 1920 x 1080 (30p), 1920 x 1080
(50p), 1920 x 1080 (60p), 3840 x 2160 (30p), 3840 x 2160 (60p).
采集质量
最高 1080P 60 帧
尺寸
87(长) X 65(宽) X 22(高) 毫米
重量
148 克
电脑系统需求

12
Windows 7,8,10, OS X 10.9 或以上, USB 2.0/3.0 接口 X 1.
台式机: Intel Core i5-3400 + NVIDIA GT630. 笔记本电脑: Intel Core i7-3537U 2.0 GHz +
NVIDIA GT735. 显卡兼容 DirectX 10, 声卡, 4GB RAM
Mac: i5 quad-core 或以上
VER:20210713
This manual suits for next models
1
Table of contents
Other EzCAP Camera Accessories manuals