F&U DVT98607 User manual

PORTABLE DVD WITH DIGITAL TV PLAYER
DVT98607
LED WIDE SCREEN 9"
BUILT-IN AV IN & AV OUT
BUILT-IN USB & SD/MMC CARD
BUILT-IN DVB-T2 TUNER
REMOTE CONTROL ALL FUNCTION

IMPORTAN SAFETY NOTES:
WARNING:
TO REDUCE THE RISK OF FIRE OR ELECTRIC SHOCK, DO NOT EXPOSE
MOISTURE. DO NOT REMOVE COVER (OR BACK). NO USER SERVICEABLE
PARTS INSIDE. REFER SERVICING TO QUALIFIED SERVICE PERSONNEL.
SERVICE MUST BE CARRIED OUT BY QUALIFIED PERSONNEL ONLY, OR
THE WARRANTY IS NOT VALID.
CAUTION
RISK OF ELECTRIC SHOCK
DO NOT OPEN
The lightening flash with arrowhead symbol, within an equilateraltriangle,
is intended to alert the user to the presence of non-insulated dangerous
voltage within the product. This may be of sufficient magnitude to constitute
a risk of electric shock to persons.
The exclamation point within an equilateral triangle is intended to alert
user to the presence of important operating procedures and maintenance
(service) instructions in the literature accompanying the appliance.
CLASS 1 LASER PRODUCT
Laser product symbol: located on the rear panel of the unit (in some cases at the
bottom side), indicates that this player is a class 1 laser product, it uses only weak
laser and no hazardous radiation outside of the unit.
Installation:
Ensure that the portable DVD player is installed in accordance with the instructions
and illustrations provided in this manual.

GENERAL PRECAUTIONS:
1) Read through this instruction manual before installation and use.
2) Do not touch the power plug with wet hand.
3) Switch off the main power when the unit is not in use. (Disconnect the power plug
from the power outlet when you do not intend to use the unit for a longer period of time.)
4) Do not open the cover or touch any of the components inside the unit, only for
qualified technicians.
5) Do not expose the unit to direct sunlight or nearby objects that radiate heat to avoid
damage to the unit.
6) Do not place the unit in moist and humid environments.
7)P lease ensure the ventilation holes are not covered to avoid overheating and malfunction.
8)C lean the panel and case with soft dry cloth only, do not apply any kind of thinner,
alcohol or sprays.
9)T he apparatus shall not be exposed to dripping or splashing, nor should any objects
filled with liquids, such as vases, be placed on the apparatus.
Clean the Machine:
1) Please ensure the machine is power off before cleaning.
2) Do not use any chemicals or cleaning agents to clean the machine.
3) Use slightly damp cloth to clean the outside of the machine.
Do not Open:
To reduce the risk of Electric Shock, Do not remove cover (or back). No user
-serviceable parts inside. Refer servicing to qualified service personnel.
Care of Disc:
1) Do not place disks near heat sources such as direct sunlight or high humidity areas.
2) Stack disks on top of each other, in the same way.
3) Do not touch the disk surface, hold the disc by the edges.
4) Do not use adhesive tape on the disk surface.
5) Wipe the disk from inside to outside with a soft cloth.
6) Do not use gasoline, non-disc special cleaning agents or antistatic apay to clean
the disc because these substances will cause damage.

IMPORTAN SAFETY NOTES ……………………………………………… 1
Table of Contents …………………………………………………………… 3
Remote Control ……………………………………………………………… 4
Indicators ……………………………………………………………………… 7
Powering and Installation ……………………………………………………8
Playing ………………………………………………………………………… 10
System Setup ………………………………………………………………… 14
DVB-T2 TV Operation ………………………………………………………… 16
Trouble Shooting …………………………………………………………… 24
Table of Contents:

BATTERY SAFFTY AND DISPOSAL
WARNING
DO NOT INGEST BATTERY . CHEMICAL BURN HAZARD
The remote control supplied with this product contains a coin/button cell battery.
Button cells are dangerous-if swallowed they can cause severe internal burns in
just 2 hours and can lead to death. if you think batteries might have been swallow-
ed or placed inside any part of the body, seek immediate medical attention.
If the battery compartment does not close securely,stop using the remote and keep
it away from children.
CAUTION-Danger of explosion if battery is incorrectly fitted/replaced.
Only use Cr2025lithium batteries in this remote control.
Batteriesa should be installed by an adult. Keep new and used batteries away from
children.
Be sure to insert correctly taking care to observe the correct polarity(+and-).
Use only batteries of the same or equivalent type as recommended.
Do not recharge non-rechargeable batteries.
Never try to dismantle batteries.
D not short-circuit the supply terminals.
Always remove exhausted or dead batteries from the product.
Remove batteries from the product bdfore extended storage.
Dispose of used batteries responsibly at local authority housedhold waste recycling
facility.
DO NOT dispose of batteries in a fire as the batteries may explode.
Remote Control:
1.USING THE REMOTE CONTROL
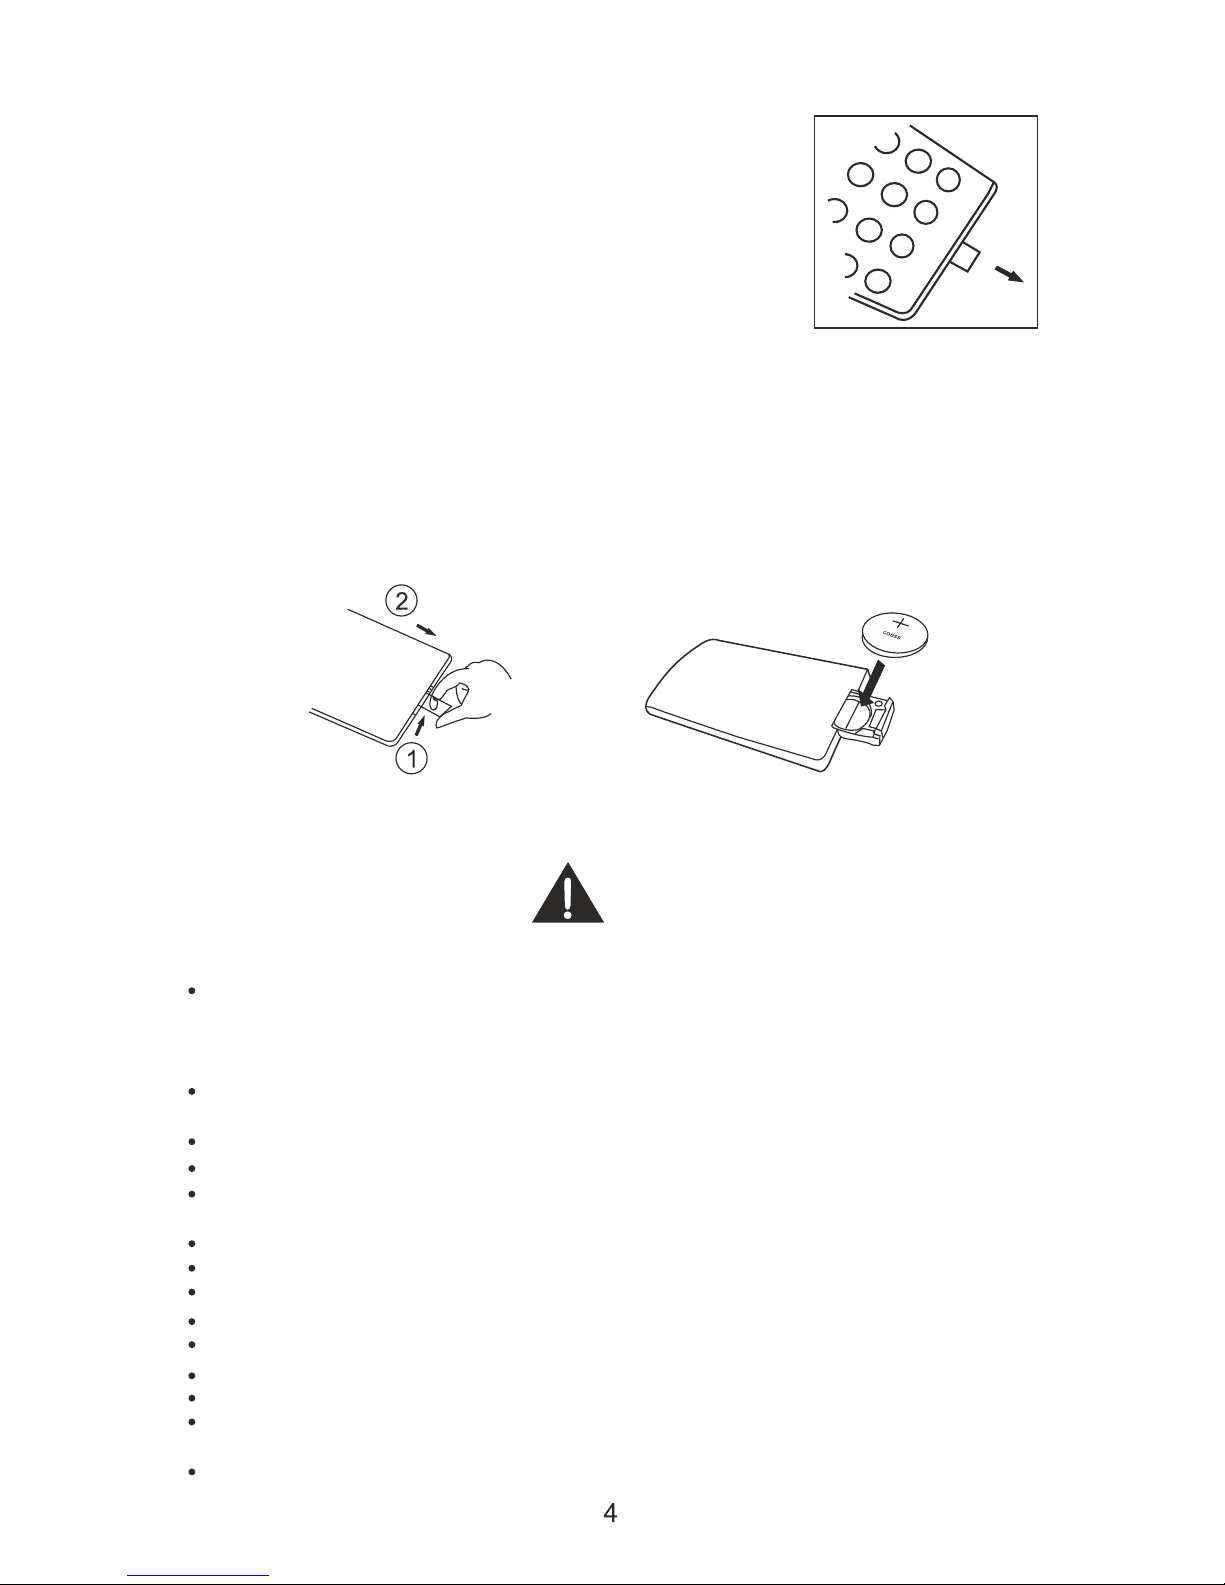
To use the remote control,pull out the clear isolation strip from
the battery compartment. Ensure that the OFF/ON switch at the
side of the main unit is switched to the ON position.Point the in-
frared transmitter on the remote control towards the remote co-
ntrol sensor on the main unit and select the function button of
choice/Point the remote control unit no more tha 5m frin the
remote sensor and at an angle of
nogreater than30
Th replace the batery-
Push the slider at the end of the remote control in the direction shown by arrow 1. Slide
out the battery holder and remove the spent battery.
2. Insert 1X Cr2025 lithium battery in accordance with the diagram taking care to observe
the correct poarity(+/-)
3.refit the battery holder.
4.Do not expose the battery or the installed battery to excessive heat(e.g.fire,sunshine
or position close to radiators etc.).

1.Subtitle /Copy
2.Standby
3.Number Button
4.10+
5.DVD Menu
6.Direction Button
7.OK Button
8.Stop/EXIT
9.Fast Reverse
10.Fast Forward
11.A-B repeat/TV /RADIO
12.Mute
13.Audio Button
14.Source
15.Search
16.Setup Button
17.repeat
18.Info Display
19.Program
20.Text Angle
21.Zoom
22.Slow
23.EPG
24.REC/PLAY/PAUSE
25.Next Button
26.Previous Botton
27.Volume+Button
28.Volume-Button

DVDMENU
SOURCE
SUB/COPY
MUTE
VOL+/-
AUDIO
INFO/DISPL AY
ZOOM
SEARCH
TEXT/ANGLE
ENTER
Press this button to enter into mode menu and select the mode between
DVD ,DVB-T2,AV and MEDIA.
TV/RADIO
EXIT/STOP
Key Functions:
Note:Some buttons are only on the remote control and not on the DVD player.
Press once for subtitle function and press twice for Copy function.
Enter or exit the setup menu.
Use to select an item in a menu or enter a password.
Run the option or validate the setting.
Repeat playing the title, chapter or track.
Repeat a specific portion of a disc or select TV or Rasio function.
Press this button to skip to previous chapter or track.
Press this button to skip to next chapter or track.
Start playback or pause playback.
Press this button to stop playback.
Press this button to fast forward or reverse. Fast forward or reverse speeds are 2X
4X,8X,16Xand 32X.
Press this button to select a title,chapter,track,title time,chapter time or tracking time.
MUTE function/No Sound.
Press[VOL+]to increase sound, Press[VOL-] to reduce sound.
Select the audio language for the DVD.
Return to the disc main menu.
Display information about the disc.
Enlarge the image2x,3x,4x,1/2,1/3,/1/4 times the original size.
Sele a title,chapter,track,title time, chapter time ot tracking time.
Display the available angles for discs containing multi-angles.

1.Source
2.Audio
3.Menu Button
4.Setup Button
5.Play/Pause Button
6.Direction and Ok Button
7.Stop Button
8.Mute
9.Volume+Button
10.Volume-Button
11.USB port (DVD function)
12.SD/MMC/CARD SLOT
13.Earphone Jack
14.AV Output Jack
15.AV Input Jack
16.Powe On/Off Switch
17.DC Input Jack

18.TV Antenna in
19.TV-USB port
Powering and Installation:
A. Powering the system indoors
Plug one end of the AC Adapter into the DC input jack on the side of the
main unit, then plug the other end into the 100-240V AC power outlet.
1.To“DC IN” Jack
on the unit
2.To power outlet
AC Adapter

Note: The included AC adapter is for use with this unit only. Do not use it with
other equipment. Disconnect the player from the main outlet if you don't intend
to use it for an extended period of time.
B. Built-in Battery
Plug one end of the AC to DC adapter into the DC jack on the side of the player,
then plug the other end into the 100-240V AC power outlet. When the battery is
charging, the LED indicator is lighting red color. Once fully charged, the LED
indicator will turn to green color.
C. Using and Maintenance of Batteries
1. Working temperature: 5 – 40
2. Please unplug the power plug when not in use.
3. This is normal when heat generated during playback. But please avoid the use
of excessively long.
4. To avoid collisions with other objects, to avoid placing too wet or overheated in
the environment.
D. AV Out
Connect one end of the supplied AV cable plug into the unit's DVD's AV OUT jack,
and connect the other end to the AV INPUT jacks on your TV or Monitor through
an optional RCA Cable.
E. Connecting to headphones
Wired headphone may be used with the DVD or Monitor, Simply plug in the
headphone jack on the Right DVD or Monitor.
F. AV In
Connect one end of the supplied AV cable plug into the unit's DVD's AV OUT
jack, and connect the other end to the AV INPUT jacks on your output device
through an optional RCA Cable. Press “MODE” button to switch to the AV IN
mode.

Playing:
A. Loading and Playing a Disc:
1. After connecting power to the DVD player, push the Power On/Off switch
to the “on” position.
2. Place a disc gently into the tray.
- You should hear and feel the disc snap firmly into place.
- Place a disc into the tray with the disc's label facing up.
3. Close the DVD cover until it clicks shut. The unit will now load disc and
commence playback.
4. Stopping Play.
Press the STOP (■) Button during play.
5. Play/Pause.
Press the Play/Pause ( ) button on the remote during play.
- Screen stops, no sound.
- To resume, Press the Play/Pause ( ) button once again.
6. Fast Forward/Fast Reverse
Press Fast Forward or Fast Reverse to achieve the place you desired with
speed adjustable during 2X, 4X, 8X, 16X, 32X times.
7. Menu
A DVD is divided into sections called titles and chapters. When you play
a DVD, a root menu of the disc will appear on the screen of your DVD
player or Monitor. The contents of the menu vary from disc to disc. Press
MENU during playback to display the menu.
B. Display:
1. Playing Time and Remaining Time
a. During playback press the “DISPLAY” button to display the current Title
Number, the total Number of Title, The current Chapter Number, The total
Number of Chapters, and the Playing elapsed Time for the title. The
heading will disappear automatically after 3 seconds if DISPLAY button
is not pressed.
b. Press “DISPLAY” constantly to choose the options below in sequence.
Title Elapsed: The elapsed time of the title.
Title Remain: The remaining time of the title.
Chapter Elapsed: The elapsed time of the chapter.
Chapter Remain: The remaining time of the chapter.
Display off: The DVD's time information will not be displayed.

2. ANGLE
During playback of a disc, press “ANGLE” to display the available angles
for discs containing multi-angles, with the current angle number and the
total number of angles displaying. Press “ANGLE” to select another angle,
then press again to exit and return to the normal viewing angle. The angle
display will disappear automatically if the “ANGLE” button is not pressed
again within 3 seconds.
Note: Not all discs contain this feature.
Title Elapsed Title Remain Chapter Elapsed
Display Off Chapter Remain
3. SUBTITLE
During disc playback press “SUB” to select the subtitle language you desire,
with the current Subtitle Language Number and the total Number of Subtitle
Languages displayed. If there are multiple languages press “SUB” again to
select another subtitle language. To turn subtitles OFF, press the “SUB”
button until “Subtitle Off” is displayed. The Subtitle display will disappear
automatically if the “SUB” button is not press again within 3 seconds.
Note: Some DVDs only allow access to this function through the DVD menu.
4. AUDIO
During playback press “AUDIO” to select the audio language you desire,
with the current Audio Channel Number and the total number of Audio
Channels displayed. Press “AUDIO” again to select another audio language.
The audio display will disappear automatically if the “AUDIO” button is not
pressed within 3 seconds.
5. ZOOM

During playback press “ZOOM” to enlarge the picture by 2X, 3X or 4X with
the current zoom multiple.
6. A-B REPEAT
a. During playback press a first time “A-B” to set the Starting Point A.
b. Press “A-B” a second time to set the Ending Point B and player will
repeatedly play the part between Point A and Point B.
c. Press “A-B” a third time to cancel “A-B” repeat and resume normal
playback.
A-B Repeat Starting Point A-B Repeat Ending Point A-B Repeat Cancelled
7. 1/ALL REPEAT
a. During playback press “REPEAT” constantly to see the repeat mode as
right.
Chapter: Repeat the current chapter.
Title: Repeat the current title.
All: Repeat all chapters and titles.
Off: Resume normal playback.
The “Chapter” repeat display shows below for example:
Chapter Title
off All
Chapter Repeat
C. Playback MP3/MPEG-4 Disc:

When a MP3/MPEG-4 disc is inserted into the unit, the menu screen appears
automatically. You can use the menu screen to select your desired folders
and songs or the system plays the songs in the order they were burned
onto the disc.
1. Press the ▲ or ▼ button to choose a folder from the folder list.
2. Press “OK” to select the highlighted folder. The songs available under the
folder will be listed.
3. Use ▲ or ▼ button to choose a song from the list. Press “OK” to select
and begin playback of the highlighted song.
4. Use the button to move to the next song. Press the button to move to
the beginning of the previous song.
5. Press the ▲ button to select the current folder and press “OK” to confirm.
Then you can back to the folder list.
D. Playback of MPEG-4 content:
1. The MPEG-4 codec is capable of holding high quality video and sound in
a highly compressed file format. File types such as AVI are typically able
to hold more data in a smaller file:
2. Comparing MPEG-1, MPEG-2 and MPEG-4:
However depending on how the file was encoded, compatibility may still
be and issue with certain types of AVI or MP4 type files.
E. Play USB and SD/MMC Card:
1.Insert the USB device in, Press[Source] button ont the Remoto control
and it will display MODE menu, Press▲/▼ button to choose the media,
press ENTER button to play.

System Setup:
A. On screen display Menu:
1) Press “SETUP” to display the main screen of the Setup Menu on the screen
and “General Setup Page” appears. At same time, “General” is highlighted.
Press to select other setting items. Press “SETUP” again to exit the Setup
Menu and the unit will resume it's last playback mode.
2) When “General” is highlighted, Press the “OK” button, “TV Display” is
highlighted.
3) Press the ▲ or ▼ button to select the other menus in general setup page.
4) Press to enter the sub menu.
5) Press the ▲ or ▼ button to select the sub menu and press the “OK” to
confirm your selection.
6) Repeat steps 3-5 for other menus.
Note: Press to return the previous menu.
B. Setting Page:
1. General Settings Page
1.1 Display Mode
a. Normal/PS: When the player outputs signal to a normal monitor. Wide-
screen images are shown on the screen. But with some parts cropped
automatically.
b. Normal/LB: When the player outputs signal to a normal monitor, a normal
picture is shown on the screen with a black strip at both the top and bottom
of the screen.
c. Wide: When the player outputs signal to a wide screen monitor, a wide
picture is shown on the full screen.
1.2 Angle Mark
On: The screen will show the angle mark icon. (If an angle option is available).
Off: The screen will not display the Angle Mark.
Note: Not all discs contain above features. The above features are disc
dependent.
1.3 OSD Language
You can choose one out of several different languages as the OSD setup
language.
1.4 Screen Saver
On: Enables screen saver.
Note: The DVD player will enter the Screen Saver mode after approximately
five minutes if the same image remains on the screen.
Off: Disables screen saver (off).
1.5 Last Memory
On: The unit will return to the last position on the disc.
Off: The unit will not return to the last position on the disc.
2. Audio Setup
2.1 Ch speaker setup

RIGHT/LEFT Channel: Mixes a 5.1ch audio signal to 2 audio channels
and then outputs to the left and right speakers.
Stereo: Outputs a stereo signal to the left and right speakers.
3. Dolby Setup
3.1 DUAL MONO
Stereo: Left/Right channel audio will be played back by the Left/Right
speakers.
Left Channel: Playback of Left channel audio only.
Right Channel: Playback of Right channel audio only.
Mixed Channel: Both Left/Right channels are mixed to one mono channel.
3.2 Dynamic Range Compression
Use this mode to level all sound channels to ensure even sound levels.
4. Video Setup
Use to set up the screen settings:
Sharpness: Select from High, Middle or Low sharpness settings.
Brightness and Contrast: Use or button to select the option, Press
“OK” to confirm your selection.
5. Preference Page (This should be set with no disc in the player)
5.1 Sound, Subtitles and Language:
In the Setup menu, you can choose the default settings of the sound,
subtitles and menu language.
5.2 Parental Controls:
Select the parental level you desire for disc with lock-out function or
multiple rating levels. There are listed from the level (1 Kid Safe) to the
highest level (8 Adult). The setting allows PLAYBACK to be restricted
via password.
Note: This function will only work if the disc contains a parental control
lockout.
5.3 Password Setting:
This function allows you to re-set a new password.
Note: You have to input the correct password to change the password
setting. The default password is 136900.
5.4 Default:
Select “Default” in preference page to make the setting return to the
factory-set mode.
6. Exit Setup Menu
Press “SETUP” to exit the Setup Menu.

DVB-T2 TV Operation
1. TV Start-UP
Inser the DVB-T2 TV antenna to the DVB-T2 TV signal input jack .
Press “SOURCE” button to switch to the TV mode.
2.Remote Control for DVB-T2
1.Power On/Off
2.Setup Button:Enter/Exit the menu operation of DVB-T2.
3.Number Button
4.Up Button: Add channels,move the cursor up in the menu opertion.
5. OK Button
6. Down Button: Reduce channels, move the cursor down in the menu operation.
7. Mute Button
8. Stop/Exit Button: Exit the current operation.
9. Volume+Button
10. Volume-Button
11. REC/Play/Pause button
Note:This DVB-T2 Function is not designed for Vehicle moving use.

DVB-T2 TV Operation
Select “Auto Search”, it will begin search all
of the frequences.
When searching,please wait for finish.
If you want to interrupt the search,press the
button.
When it is searching, it will display the current
frequency and the progress of the search.
During the search, if the program is received, it
will be displayed in the display field.
Select “Search Menu”, enter the search menu.
.Country : select country where the device is used.
.Auto Search:begin full-band search;
.Manual Search:enter the manual search menu
.Antenna Power: turn ON/OFF antenna power
Touch it on the Remote control:
Press or ,choose the option that you want.
Press to confirm .
Press or to select or change.
Under the TV mode Press on the remote control,
or touch it on the screen. enter the main menu.
.Search Menu:enter search menu;
.Picture Menu:enter picture menu;
.System Menu:enter system menu.
.Press or to choose the option
that you want,press to confirm ,
and press to get out of current option.
3.Function Operation
3.1 Main Menu
3.2 Search Menu
3.3 Auto Search

DVB-T2 TV Operation
3.4 Manual Search
Channel Search
During the search, if the program is
received, it will be displayed in the display
field.
Press to break the search if you don’t
want it to continue.
Press or , choose the frequency that
you want to search.
Press ,confirm and begin to search.
Press ,return to the previous menu.
or touch the screen icon.
When you change the frequency,the
"Sterngth"bar will display the signal level.
Select "Manual Search",Press on
the remote control or touch it on the screen
to enter the manual search menu.

DVB-T2 TV Operation
3.6 Picture Settings
In the “Picture” menu,there are three options:
(1)Aspect Ratio
(2)Resolution
(3)TV Format
(4)Video output
Press or ,choose the option that you
want.
Press or so that change the parameters.
Aspect ratio contains multiple 16:9 and 4:3
screen ratio.
Resolution contains 480i,480p,720,1080i,
1080p.
TV Format contains NTSC and PAL
3.7 Language Settings
The device includes multiple language of
many country.
OSD Language is the language of menu.
Press and to choose the language.
Press to return and you setting will auto
save.
3.8 Channel List
When the search is completed, if there is a
program that will automatically play.
Press to display the channel list.
Press and to browse the channel.
Press to choose and press to return.
Table of contents