Fantec TV-FHDS User manual

English

English
2 / 51
Table of Content
1. Introduction.......................................................................................................................... 3
1.1 Preface..............................................................................................................3
1.2 Packing List .....................................................................................................4
1.3 Cautions ...........................................................................................................4
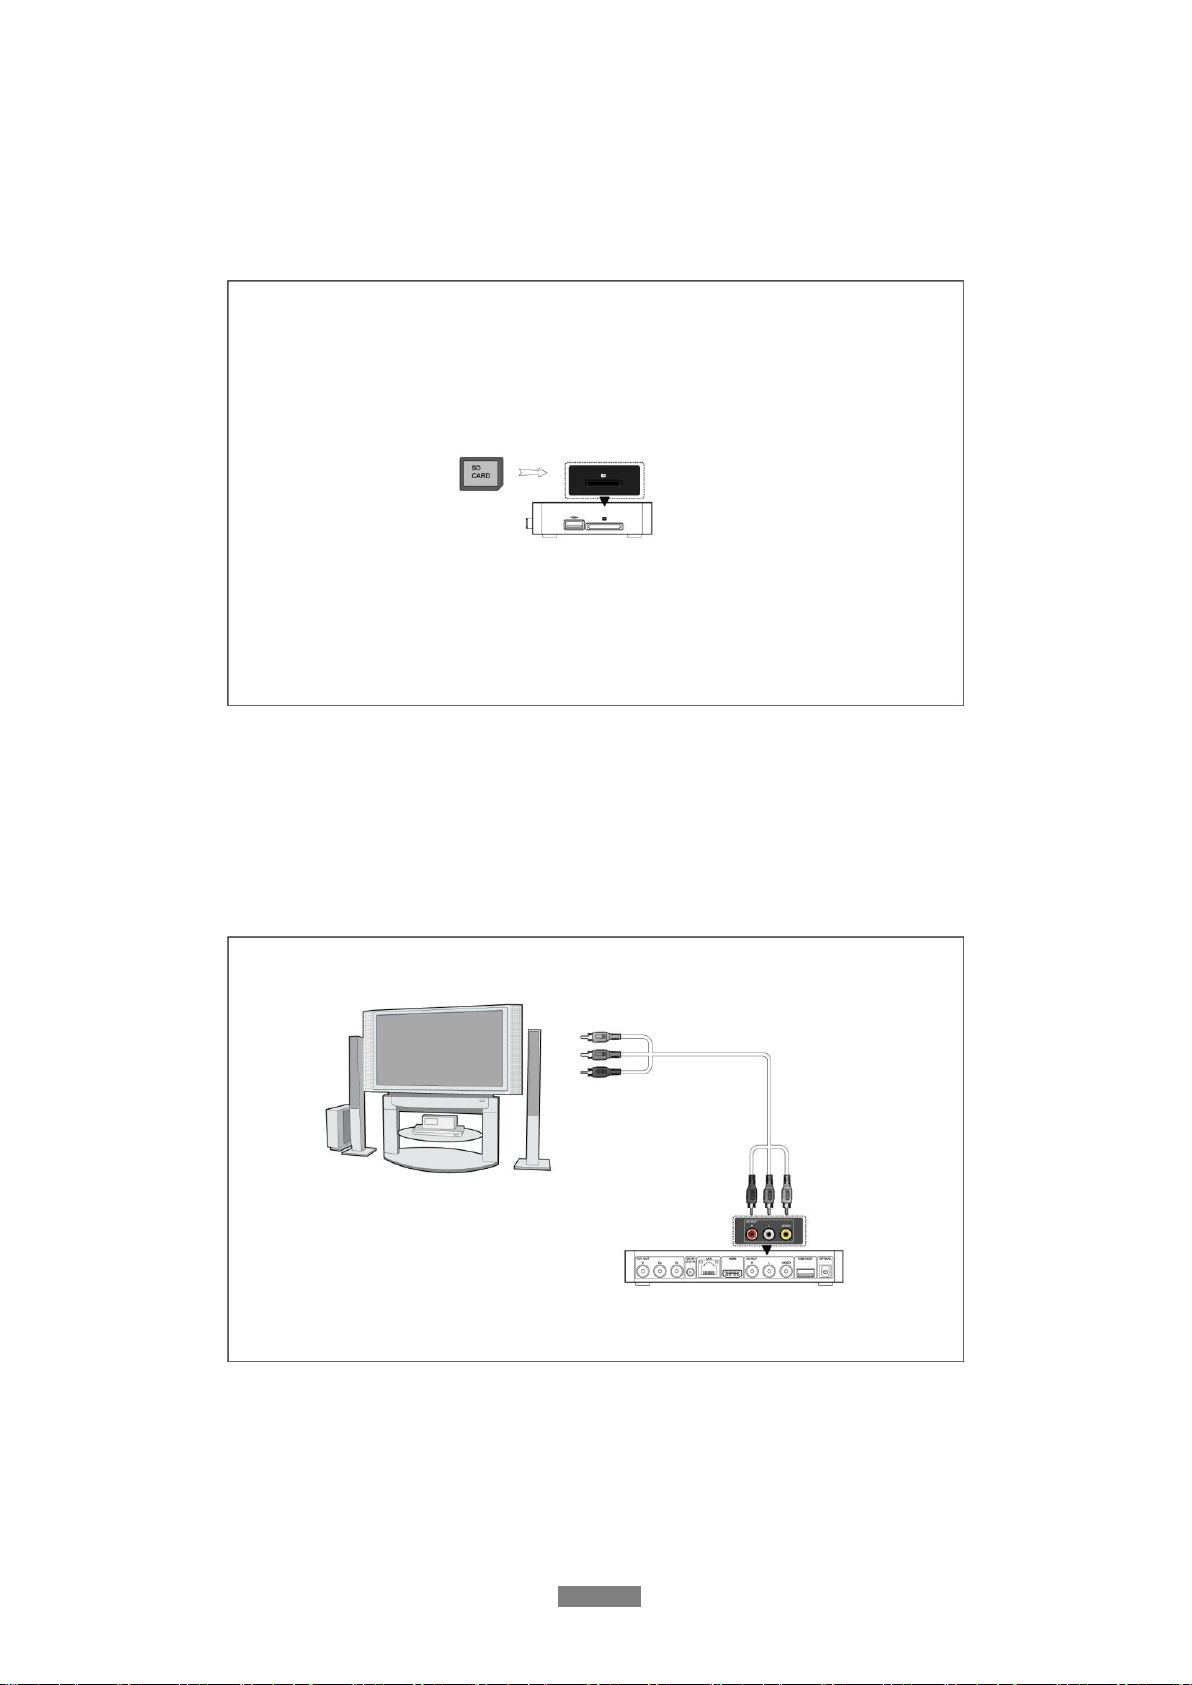
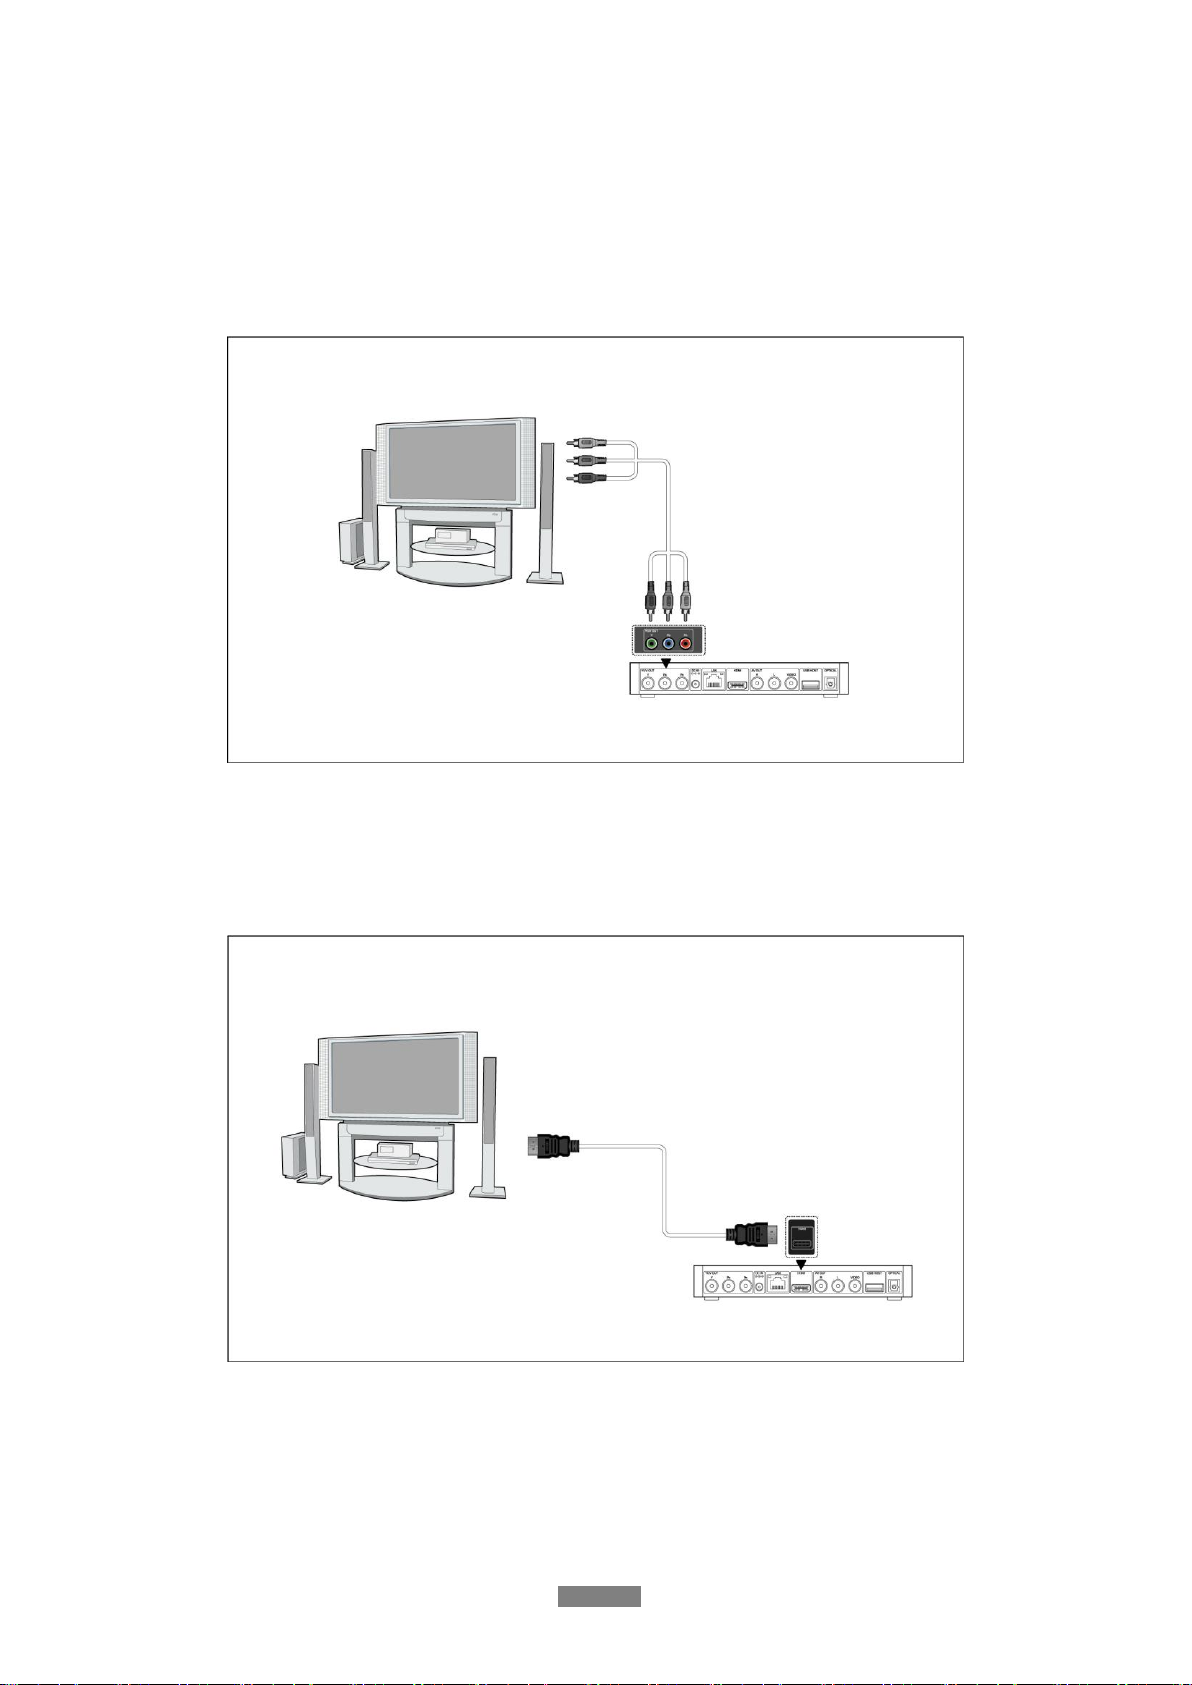
1.4 Connection.......................................................................................................6
1.5 Power On / Off...............................................................................................10
1.6 Menu Language .............................................................................................10
2. About the Player .................................................................................................................11
2.1 Remote Control..............................................................................................11
2.2 Front Panel.....................................................................................................13
2.3 Rear Panel......................................................................................................13
2.4 Side Panel.......................................................................................................14
3. Setup Menu ........................................................................................................................ 15
3.1 Changing Audio Settings ...............................................................................15
3.2 Changing Video Settings................................................................................16
3.3 Changing Network Settings...........................................................................17
3.4 Changing System Settings .............................................................................21
3.5 Miscellaneous ................................................................................................23
4. Browser Menu.................................................................................................................... 25
4.1 Browsing All..................................................................................................25
4.2 Browsing Music.............................................................................................26
4.3 Browsing Photos............................................................................................26
4.4 Browsing Movies...........................................................................................27
4.5 Audio / Video Streaming via Network...........................................................27
4.6 Audio Video Streaming via UPnP-server.......................................................29
4.7 Renaming / Deleting Files .............................................................................31
5. File Copy Menu.................................................................................................................. 32
6. Internet Radio..................................................................................................................... 33
7. Media Library ..................................................................................................................... 34
7.1 Music library..................................................................................................34
7.2 Photo Library.................................................................................................37
7.3 Movie Library................................................................................................39
8. IMS (Internet Multimedia Service) Menu ......................................................................... 42
9. Upgrading the Firmware ................................................................................................... 42
10. Virtual Remote Control.................................................................................................... 42
11. Appendixes....................................................................................................................... 43
11.1 Specifications...............................................................................................43
11.2 FrequentlyAsked Questions ........................................................................44
11.3 Copyrights and Trademarks .........................................................................45
11.4 Warranty.......................................................................................................46
11.5 GPL Statement .............................................................................................46

English
3 / 51
1. Introduction
1.1 Preface
Thank you very much for purchasing the product. We hope you will enjoy using it as a great
home entertainment partner. The FANTEC TV-FHDS has the following functionality.
Audio Video Output
HDMI V1.3 for high-definition video and digital audio
Composite & component video and stereo audio for analogue audio-visual connection
S/PDIF optical interface for high-fidelity digital audio
Adjustable video output resolution (NTSC, PAL, 480p, 576p, 720p, 1080i, 1080p)
Multimedia Playback
Supports major audio, video and image file formats (1080p HD video decoding)
Movie format: AVI, VOB, MKV, MOV, MP4, MPG, TS, WMV, DAT, IFO, RM, RMVB, ISO
(DVD & BluRay), AVCHD, MTS, M2TS, M4V, ASF, FLV, XviD, DivX 3/4/5
Music format: MP3/OGG/WMA/WAV/AAC/FLAC
Photo format: HD JPEG/BMP/GIF/TIF/PNG
Photo slide show with background music
Network Feature
A/V streaming/transmission via Ethernet (10M/100M) & Wi-Fi (802.11b/g/n, optional)
A/V streaming via UPnP Media Server
Internet Radio (SHOUTcast)
File Copy
Supports copying & moving files among USB devices, Card and Network
USB 2.0 Support
USB HOST port x 2 (for USB storage devices and USB-DVD drive)
Memory Card slot x 1
DVD playback: supports DVD, Mini BD, AVCHD, VCD, CD
Note: All the information contained in this manual was correct at the time of publication.
However, as our engineers are always updating and improving the product, your device’s
software may have a slightly different appearance or modified functionality than presented in
this manual.

English
4 / 51
1.2 Packing List
Part
Quantity
Player
1
A/V cable
1
Y/Pb/Pr cable
1
Remote Control
1
Remote Control Battery
2
AC/DC adaptor
1
User Manual (printed)
1
Warranty card
1
Note:
The actual contents in the package might be different from the packing list in this manual.
1.3 Cautions
This player’s design and manufacture has your safety in mind. In order to a safely and
effectively use this of this player, please read the following before usage.
1.3.1 Usage Cautions
User should not modify this player. The environmental temperature should be within +5℃~
+35℃.
1.3.2 Power
The player’s power voltage: DC 5V.
When using this player, please connect the supplied AC adapter or AC adapter cable to the
player’s power jack. When placing the adapter cable, make sure it can not get damaged or be
subject to pressure. To reduce the risk of electric shock, unplug the adapter first before
cleaning it. Never connect the adapter to the player in a humid or dusty area. Do not replace
the adapter or cable’s wire or connector.
1.3.3 Radio Interference
- If not properly shielded, almost all electronic devices will get radio interference. Under some
conditions, your player might get interference.
- The design of this player has followed the FCC/CE standard and has followed the following
rules:
(1) This player may not cause harmful interference;
(2) This player could accept some interference received including interference that may
cause undesired operation.
1.3.4 Repair
If the player has a problem, you should take it to an appointed repair centre and let the
specialists do the repair, never repair the player yourself, you might damage the player or
endanger yourself or your data.

English
5 / 51
1.3.5 Disposing of the Player
When you dispose of the player, be sure to dispose it appropriately. Some countries may
regulate disposal of electrical devices. Please consult with your local authority.
1.3.6 Others
When using this player, please do not let the player come into contact with water or other
liquids. If water is accidentally spilled on the player, please use a dry cloth to absorb the
spillage.
Electronic products are vulnerable, when using please avoid shaking or hitting the player and
do not press the buttons too hard.
Do not let the player come into contact with water or other liquid.
Do not disassemble the player; repair the player or change the design of the player, any
damage done will not be included in the repair policy.
Do not press the buttons of the player too hard.
Avoid hitting the player with hard object, avoid shaking the player and stay away from
magnetic fields.
During electrostatic discharge and the strong electromagnetic field, the product will
malfunction, and then unplug the power cable and the product will return to normal
performance next time it is powered on.

English
6 / 51
1.4 Connection
1.4.1 Connecting the Power Supply
(1) Follow the picture and connect the AC adaptor to the player’s DC IN jack;
(2) Follow the picture and plug in the AC adaptor to the power outlet.
1.4.2 Connecting a USB Device
(1) Make sure the player is powered on;
(2) Plug in the USB stick or USB HDD etc. to the USB HOST port of this player.
In this way, you can browse contents on the USB device.

English
7 / 51
1.4.3 Connecting a Memory Card
Memory cards can be used by inserting to the card slot.
(1) Follow the picture to insert the memory card into the card slot properly.
(2) Insert the card by following the arrow pointer in the picture.
In this way, you can browse content on the memory card.
1.4.4 Connecting to a TV
1.4.4.1 A/V OUT
(1) Follow the picture and plug in the 3 colour connector to the player’s A/V OUT jack;
(2) Follow the picture and plug in the 3 colour connector to the TV’s A/V IN jack.
In this way, you can enjoy the media files on TV or other display devices.

English
8 / 51
1.4.4.2 Y/Pb/Pr Component OUT
(1) Follow the picture and plug in the 3 colour connector to the player’s Y/Pb/Pr jack.
(2) Follow the picture and plug in the 3 colour connector to the TV’s Y/Pb/Pr jack.
Note: Audio Connection while using Y/Pb/Pr Video out:
First method: Use the audio output from the A/V OUT jack.
Second method: Use the audio output from the S/PDIF Optical jack.
In this way, you can also enjoy HD videos, music and photos on TV.
1.4.4.3 HDMI OUT
(1) Follow the picture and plug one connector on your HDMI cable to the player’s HDMI jack.
(2) Follow the picture and plug the other connector on your HDMI cable to the TV’s HDMI jack.
In this way, you can have the highest quality video and audio via a single cable.

English
9 / 51
1.4.5 Connecting to a Digital Amplifier
(1) Follow the picture and plug in the RCA connector on your coaxial cable to the player’s
S/PDIF Coaxial jack. Or if you use optical fibre, please plug in the Toslink connector on your
optical fibre to the player’s S/PDIF Optical jack.
(2) Follow the picture and plug in the other connector on your coaxial cable or optical fibber to
the digital audio device (digital amplifier or decoder).
In this way, you can enjoy powerful Dolby Digital or MPEG sound. (Please refer to ‘3.1
Changing Audio Settings’ for configuration)
1.4.6 Connecting to LAN
To connect to a LAN (Local Area Network) you require a cat5, cat5e or cat6 network cable.
(1) Connect one of the crystal plugs on the cable to the player’s RJ45 LAN socket.
(2) Connect the other crystal plug on the cable to a RJ45 LAN port on your router, switch or
hub devices.

English
10 / 51
1.4.7 Connecting to a WLAN
(1) Make sure the player is powered on.
(2) Plug the Wireless LAN USB Adapter (i.e. Wi-Fi USB Dongle) to the USB HOST port of the
player.
Note: The Wi-Fi Dongle is an optional accessory sold separately. (Please refer to ‘3.3
Changing Network Settings’ for more details about wireless setup).
1.5 Power On / Off
Power On
After connecting the DC IN jack and press the power button on the front panel, the player will
soon enter the home screen and the power indicator will turn blue.
Power Off
Press the power button on the front panel, the player will soon enter standby mode and the
power indicator will turn red.
1.6 Menu Language
The system language of this player can be set to English or other languages. Change the
language you wish in the setup menu, the selected language will take effect immediately.

English
11 / 51
2. About the Player
2.1 Remote Control
All procedures in this manual can be carried out using the remote control buttons.
See the following for details on each button and its function:
1. STANDBY
2. MUTE
3. TV SYSTEM
4. BROWSER
5. Numeric buttons
6. REPEAT
7. FR
8. VOL-
9. FF
10. PLAY
11. HOME
12. Navigational buttons
13. MENU
14. PAUSE/STEP
15. SLOW
16. INS REPLAY
17. CM SKIP
18. SELECT
19. CONFIRM
20. AUDIO
21. SUBTITLE
22. ZOOM IN
23. ZOOM OUT
24. A-B
25. ANGLE
26. SETUP
27. RETURN
28. STOP
29. NEXT
30. VOL+
31. PREV
32. GOTO
33. COPY
34. MUSIC
35. INFO
No.
Button
Function
1
STANDBY
Press to enter standby mode or wake up.
2
MUTE
Press to mute audio output and press again to resume.
3
TV SYSTEM
Press to switch between NTSC, PAL, 480P, 576P, 720P, 1080I
and 1080P.
4
BROWSER
Press to enter the browser menu.
5
Numeric buttons
Press to enter numeric input when changing settings.

English
12 / 51
6
REPEAT
Press to set repeat option: One
7
FR
Press to fast rewind the current playback. Press repeatedly to
select speeds.
8
VOL-
Press to decrease the volume.
9
FF
Press to fast forward the current playback. Press repeatedly to
select speeds.
10
PLAY
Press to begin playback.
11
HOME
Press to enter the home screen.
12
Navigational
buttons
Press the arrow buttons to select menu options and the ENTER
button to confirm.
13
MENU
Press to activate tools menus:
Press in the browser menu to rename and delete files.
Press in My_Shortcuts in NET of the browser menu to
add shortcuts for network access.
Press in internet radio menu to add favourite stations.
14
PAUSE/STEP
Press to pause the current playback. Press again to step to the
next frame. Press the PLAY button to resume playback.
15
SLOW
Press to play back in slow motion. Press the PLAY button to
resume regular playback.
16
INS REPLAY
Press to backward 10 seconds of the current playback.
17
CM SKIP
Press to advance 30 seconds of the current playback.
18
SELECT
Press to select files in browser and file copy menu.
19
CONFIRM
Not available
20
AUDIO
Press to select an audio track.
21
SUBTITLE
Press to set subtitle options.
22
ZOOM IN
Press to zoom in the image (photo or video).
23
ZOOM OUT
Press to zoom out the image (photo or video).
24
A-B
Press to set the beginning and end points of a section to repeat.
25
ANGLE
Press to change the view angle during DVD (with multi-angle)
playback.
26
SETUP
Press to enter the setup menu.
27
RETURN
Press to return to the previous screen while navigating menus.
28
STOP
Press to stop playback.
29
NEXT
Press to view the next file / page down.
30
VOL+
Press to increase the volume.

English
13 / 51
31
PREV
Press to view the previous file / page up.
32
GOTO
Press to jump to a specific point on a title. Specify the point
using Title, Chapter and Time.
33
COPY
Press to enter the file copy menu.
34
MUSIC
Not available
35
INFO
Press to hide or display the information bar during playback.
2.2 Front Panel
1. Power indicator & button
2.3 Rear Panel
1. Y/Pb/Pr OUT jack
2. DC IN jack
3. RJ45 LAN socket
4. HDMI jack
5. A/V OUT jack
6. USB HOST port
7. S/PDIF OPTICAL jack

English
14 / 51
2.4 Side Panel
1. USB HOST port
2. Memory Card slot

English
15 / 51
3. Setup Menu
The Setup menu allows you to personalize and configure the preferences for your player.
To select a Setup option:
- Select the Setup icon on the home screen or press the SETUP button on the remote
control.
- Use the LEFT/RIGHT navigational buttons to select an option and then press ENTER.
There are five Setup options, including Audio, Video, Network, System and MISC. Use the
UP/DOWN navigational buttons to select a menu. Press ENTER to confirm. Press RETURN to
cancel and display the previous menu screen.
3.1 Changing Audio Settings
Use this menu to configure audio settings.
Night Mode
Choose between Off / On / Comfort. If the option is turned on, the audio output volume will be
decreased to make you more comfortable.
HDMI Output
Choose among LPCM Dual CH, LPCM Multi CH and Pass-through.
SPDIF Output
Choose among LPCM Dual CH and Pass-through.

English
16 / 51
Note: In raw mode, Dolby Digital, DTS sound can be by passed to the HDMI TV or Digital
amplifier.
Due to the bandwidth requirement, Dolby Digital Plus sound and Dolby TrueHD only can be by
passed through HDMI cable.
3.2 Changing Video Settings
Use this menu to configure video settings.
Aspect Ratio
- Pan Scan 4:3: Display a wide picture on the entire screen and cuts off the redundant
portions. Select when a standard 4:3 TV is connected.
- Letter Box 4:3: Display a wide picture with two black borders on the top and bottom of 4:3
screen. Select when a standard 4:3 TV is connected.
- 16:9: Compress the image to convert the whole image. Select when a 16:9 TV is
connected.
Brightness
- Adjust the level of brightness.
Contrast
- Adjust the level of contrast.
Hue
- Adjust the level of hue.
Saturation
- Adjust the level of saturation.

English
17 / 51
TV SYSTEM
- Select to adjust video output resolution: NTSC / PAL / 480P / 576P / 720P 50HZ / 720P
60HZ / 1080I 50HZ / 1080I 60HZ / 1080P 50HZ / 1080P 60HZ.
Screen Size
- Adjust the video output size according to the size of TV screen.
Plasma Mode
- Help to protect your plasma TV by reducing the level of brightness.
3.3 Changing Network Settings
Use this menu to configure Ethernet and Wi-Fi (Wireless Local Area Network) settings.
Wired LAN Setup
- DHCP IP (AUTO)
Select to obtain IP address automatically.
- FIX IP (MANUAL)
Select to manually input the IP Address, Subnet Mask, Default Gateway, and DNS Server
IPAddress.

English
18 / 51
Wireless Setup
- Selecting a connection profile
This player can store up to three wireless network connections. Press ENTER to go to
next step, press RETURN to cancel, and press PLAY to connect.
- Get Connection Mode
Choose between Infrastructure (AP), Peer to Peer (Ad Hoc) or WPS (AP). Press
ENTER to go to next step, and press RETURN to cancel.
- Infrastructure (AP)
Infrastructure mode is used to connect computers with wireless network adapters, also
known as wireless clients, to an existing wired network with the help from wireless router
or access point.
Get SSID Name
Press ENTER to go to next step, press RETURN to cancel, and press SELECT to refresh
the SSID list.
Note: In the Security list, WEP (Wired Equivalent Privacy) and WPA (Wi-Fi Protected

English
19 / 51
Access) means the network is encrypted, i.e. an encryption key is needed to access the
network. NONE means it is an open system network.
Input WEP / WPA Key
Encryption keys can be inputted via the virtual keyboard. Press the navigational buttons to
select, ENTER to input, CAPS to switch between uppercase and lowercase, <- to delete a
character, -> to insert a space, shift to make more symbols available, and OK to confirm.
Test connection

English
20 / 51
The testing process will take for a while, please be patient to wait. If the test is ok, the
network information (Profile Name, IP address, Subnet Mask, Gateway, etc.) will be
displayed on the screen.
- Peer to Peer (Ad Hoc)
Peer to Peer mode, which is also called Ad Hoc mode or computer-to-computer mode, is
used to connect wireless clients directly together, without the need for a wireless router or
access point.
Ad-Hoc Setup
Press ENTER to go to next step, press RETURN to cancel, and press PLAY to connect.
- WPS (AP)
WPS, Wi-Fi Protected Setup, is used to connect a wireless router directly, without
searching SSID and inputting password. In this mode, you just need to configure the
parameters of your router which support WPS function. There are two modes for you to
select, PBC mode and PIN mode.
PBC
First press the WPS button on the router or select the button mode in the configuration menu
of the router, then select the PBC mode, the connection process will take for a while, please be
patient to wait.
PIN
Input the pin code when configure your router, then select the PIN mode, the connection
process will take for a while, please be patient to wait.
Other manuals for TV-FHDS
1
Table of contents