Fast Forward Video sideKick HD User manual

www.ffv.com
The design of the sideKick HD and the sideKick HD manual is proprietary.
No part of the sideKick HD Manual may be copied or modied without the written consent of Fast Forward Video, Inc.
Printed in the U.S.A.
June 2011
Phone (949) 852-8404 Fax (949) 852-1226
1151 Duryea Avenue Irvine, CA 92614, USA
User Manual
Version 1.0

Blank
2 sideKick HD Manual, Fast Forward Video, Inc
Important Notice .....................................................................................................4
Overview..................................................................................................................5
Quick Start Guide ...................................................................................................6
Drive Installation.....................................................................................................7
Connections ............................................................................................................8
Front Panel Controls ..............................................................................................9
The Screen Scheme .............................................................................................10
The Menu Button
The Monitor Screen ..............................................................................................11
Live View / Live Button
Record Mode
Playback Mode
Jog
Scrub
The CLIP Menu ......................................................................................................12
Clip List / Clip Window
Re-Name Clip
Name Next Clip
Delete Clip
Formatting the Drive ............................................................................................13
Table of Contents

3sideKick HD Manual, Fast Forward Video, Inc
The SET-UP Menu .................................................................................................14
Video Standard
Codec
The SET-UP Menu (continued) ............................................................................15
Loop Playback
Video Input
Auto Record
Audio Input
Audio Output
Record Format
Date / Time
Factory Defaults
Firmware Version
Serial Number
Updating Firmware ...............................................................................................16
Post Production ....................................................................................................17
Specications .......................................................................................................18
Limited Warranty ..................................................................................................19

STATIC PRECAUTIONS:
The sideKick HD has been built to meet the demands of a video production environment. However,
the hardware is subject to the same dangers from static as any other electronic device. Use care
when connecting or disconnecting cables.
IMPORTANT:
Take care not to introduce any moisture into the unit.
CLEANING AND HANDLING:
The unit should only require dusting with a soft cloth. Solvents may harm the painted surface and
leak to the inside causing severe damage.
PACKAGE CONTENTS:
1 – sideKick HD unit
1 - 128GB SSD Drive
1 – AC Adapter
1 – USB Drive Cable
PLEASE RETAIN THE ORIGINAL SHIPPING CARTON:
If you need to return the unit for service or upgrade it is STRONGLY recommended that you use the
original packaging, which was specically designed to protect it from damage while in transit. IF RE-
TURNED IN SOMETHING OTHER THAN ORIGINAL PACKAGING, A FEE WILL BE ASSESSED
FOR THE USE OF NEW SHIPPING MATERIALS WHEN THE UNIT IS RETURNED BACK TO
YOU (a protective metal shipping case is acceptable).
TECH SUPPORT:
If you experience any problems with the unit, please visit Fast Forward Video’s techncial support
page - http://www.ffv.com/tech-support. DO NOT ATTEMPT to repair or modify the unit as this
might cause further damage, which could void your warranty. A technician will determine whether
your problem is caused by a faulty component, and decide whether you need to return it for evalua-
tion and/or repair.
FCC Information to the user:
This device complies with part 15 of the FCC rules. Operation is subject to the following two conditions: (1) This device
may not cause harmful interference, and (2). This device must accept any interference received, including interference
that may cause undesired operation. This equipment has been tested and found to comply with the limits for a Class A
digital device, pursuant to part 15 of the FCC rules. These limits are designed to provide reasonable protection against
harmful interference when the equipment is operated in a commercial environment. This equipment generates, uses, and
can radiate radio frequency energy and, if not installed and used in accordance with the instruction manual, may cause
harmful interference to radio communications. Operation of this equipment in a residential area is likely to cause harmful
interference, in which case, the user will be required to correct the interference at his/her own expense.
4 sideKick HD Manual, Fast Forward Video, Inc
Important Notice

5sideKick HD Manual, Fast Forward Video, Inc
Overview
Ease your production workow with a versatile recording solution that the whole production team
can agree on. sideKick HD is a camera-mountable High Denition digital video recorder that gives
you the freedom and exibility to:
• Capture high quality video from your HD-SDI or HDMI capable camera.
- up to 220 Mbit/s (codec dependent)
- 4:2:2 sampling
- 10-bit quantization
• Record directly to high quality NLE formats, eliminating timely capturing, rendering and extra
transcoding which may degrade image quality.
• Be sure you've got the shot with the 4.3” on-board condence monitor, which provides simple
playback options including clip selection, scrub and jog.
• sideKick HD comes with a 128GB Solid State Drive (SSD) but you can easily increase record
times with larger capacity non-proprietary 2.5” solid state drives.
• Mount the sideKick HD anywhere with the standard 1/4" 20 mount and ample power options
including varible voltage battery input from 7-16 volts DC or from AC line voltage using the
included power adapter.
• Recording can commence by pressing the big red Record button, or sideKick HD can be set
to sense incoming time code from the camera and automatically start/stop recording when the
time code starts and stops. Frame Rate and Video Resolution can also be set automatically with
sideKick HD's sensing capabilities.
• sideKick HD allows for a variety of preferred recording codecs. Authors of popular codecs re-
quire license fees per distributed copy, so with FFV's Codec Download Program you only
purchase the codecs you need for your own indivdual workow.
- Apple ProRes 422 (this codec ships with the product)
- Apple ProRes 422 (HQ) (available now via purchase from ffv.com)
More codec options will become available via purchase from FFV, including:
- Avid DNx HD (available in the future via purchase from ffv.com)
- AVC Intra (available in the future via purchase from ffv.com)

6 sideKick HD Manual, Fast Forward Video, Inc
Quick Start Guide
1. Apply Power – Either plug the AC power adapter (transformer) into a 110 VAC wall socket and
connect the locking connector (mini XLR) to the POWER port located on the bottom of the unit,
or connect a battery power cable (not included) to an acceptable 7-16VDC battery system and
its locking connector (mini XLR) to the POWER port located on the bottom of the unit.
(Please note special battery mount cables are available as an accessory from www.ffv.com.)
2. Turn On sideKick HD - Turn POWER on by sliding down the recessed switch located on the
right of the unit.
3. Install Drive – Slide the 2.5” solid-state drive into the drive slot located on the back of the unit.
You will feel the drive secure to the connection within the unit and the disk icon located on the
MONITOR SCREEN will turn white. Wait a moment while the recorder reads the drive, this
will take a few seconds, perhaps longer if there is a lot of video on the drive. If the drive icon
remains red or a DRIVE REMOVED warning message appears see DRIVE INSTALLATION for
additional details.
*Please note it is normal for the drive enclosure to get warm; it quickly reaches a maximum
temperature and will not exceed recommended temperature throughout use.
4. Connect source – Connect to camera or another source using either HD-SDI (bottom) or
HDMI (left side) inputs and analog audio (left side) inputs if needed.
5. Set-Up Menu Setting – Press the MENU button twice to enter the SET-UP menu which allows
you to set the Video Standard, Codec, Video and Audio Input, Auto Record, and Audio Output.
Use the scroll wheel to move through the menu options and the wheel's center black button to
select your settings. See SET-UP Menu for addtional details.
6. Format Drive - If the drive is new, it should be formatted. From the MONITOR SCREEN, press
the MENU button once to access the CLIP Menu and using the scroll wheel, scroll to FORMAT
DISK. Press the black center button on the wheel once, highlight FORMAT, select by pressing
the black center button. A warning message will appear, highlight OK, select by pressing the
black center button. A "Formatting Disk" pop-up message will be displayed during the format-
ting process. When formatting is complete, you're ready to record.
7. Record – Press the RED Record button to start recording and press STOP ( ■) to stop record-
ing. Each REC and STOP will create a separate clip. Please note: if the Auto Record feature
is set to FOLLOW CAMERA TIME CODE the unit will start and stop recording based on the
rolling time code from the camera. See SET-UP Menu for additional details.
8. CLIP Menu – Press the MENU button once to enter the CLIP Menu. Use the scroll wheel
to move through the clips and select clip by pressing the scroll wheel's black center button.
Press the control buttons to play a clip within the clip window. Other menu options include the
ability to rename and delete clips as well as format the drive. Of course, clips can be played
from the MONITOR SCREEN as well.
9. Remove Drive - Drives can be removed or inserted with the unit's power on or off. Hold the
securing tab on back of the unit while sliding the drive out. You can now connect the drive us-
ing the provided SATA to USB cable to download les to a NLE system.
10. Turn Off sideKick HD - POWER off sideKick by sliding down the recessed switch on the right
side of the unit and holding for ve seconds.
7sideKick HD Manual, Fast Forward Video, Inc
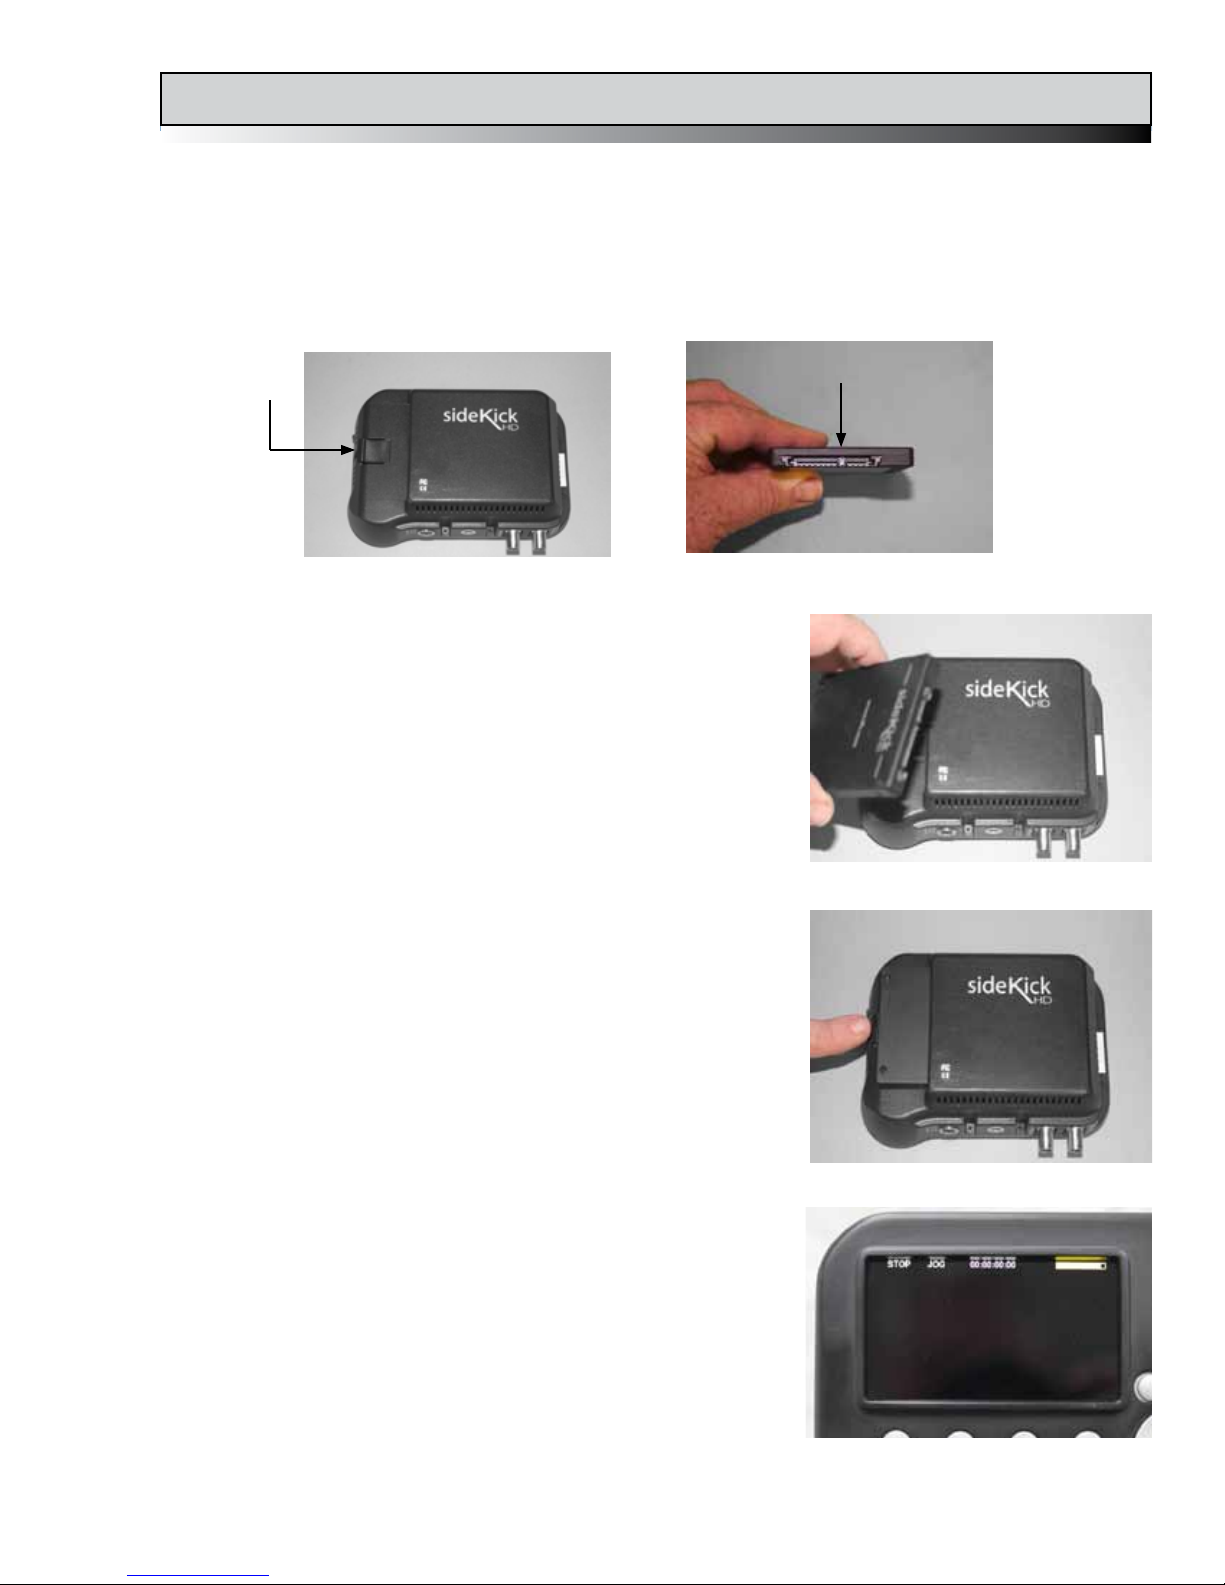
Drive Installation
The Solid State Drives (SSD) used by sideKick HD are not proprietary. We do recommend
that you use only the drives recommended by Fast Forward Video. See the sideKick HD
webpage for a list of recommended drives, their part numbers and vendors. These drives
have been tested and proven to have the best performance and reliability.
gure 1
gure 2
gure 3
1. Hold the drive so the sideKick HD logo is facing away
from the unit and the SATA connection is located on
the top of the drive (gure 1).
2. Place the drive with the SATA connections towards the
entrance of the drive bay located on the back of the
unit (gure 1).
3. Take the drive and gently slide it within the drive bay
until you feel a connection, which will align the end of
the drive with the drive lock tab located on the back of
the unit (gure 2).
4. Turn on the unit by sliding down the power button
located on the right side of the unit for one second.
5. Drive recognition will take a moment. When the drive
is activated, the Drive Space Icon in the upper right
corner of the LCD will turn white* (gure 3).
*If the Drive Space Icon is green it means the drive
is empty and needs to be formatted
(see FORMATTING THE DRIVE).
*If you are using a new drive and the Drive Space Icon
is Red there is a problem. You will need to format the
drive before proceeding
(see FORMATTING THE DRIVE).
Install a drive into sideKick HD using the following procedure:
DRIVE LOCK TAB SATA CONNECTION

8 sideKick HD Manual, Fast Forward Video, Inc
Connections
5 6 7 8 9 1 2 3 4
1. HD-SDI Output (BNC connector) - Route HD video and embedded audio output signal to a
monitor or another external device. Output is hot regardless of input being HD-SDI or HDMI.
2. HD-SDI Input (BNC connector) - Input HD-SDI uncompressed video with embedded audio
and time code from a camera or other source to record and display.
3. Standard 1/4" 20 Mount (threaded screw hole - female) - Allows sideKick HD to be mounted
to a camera using a hot shoe adapter, or an adjustable arm, as well as a tripod, 15mm rail rig
or any support system using a standard 1/4" 20 mount.
4. Power (locking Mini XLR connector) - Variable voltage power supply requirements 7-16VDC,
consumption 3-21W. Power changes with different modes (i.e. record vs. pass-thru) and fan
changes due to temperature.
5. Headphone Jack (3.5mm stereo jack connector) - Audio output for monitoring.
6. Audio/Line In (3.5mm stereo jack connector) - Records 2 line level analog audio channels
replacing embedded audio channels 1 and 2.
7. USB (USB-C port) - FOR FUTURE USE.
8. HDMI In (HDMI mini connector) - HD video and audio input from a camera or other source to
record and display.
9. HDMI Out (HDMI mini connector) - Route HD video and embedded audio output signal to a
monitor or another external device. Output is hot regardless of input being HD-SDI or HDMI.
Yes you can input HD-SDI and monitor via HDMI simultameously or HDMI in to HD-SDI out,
Cool, huh?
Bottom
Left Side
9sideKick HD Manual, Fast Forward Video, Inc
5 6 7 8
9
10
1 2 3 4
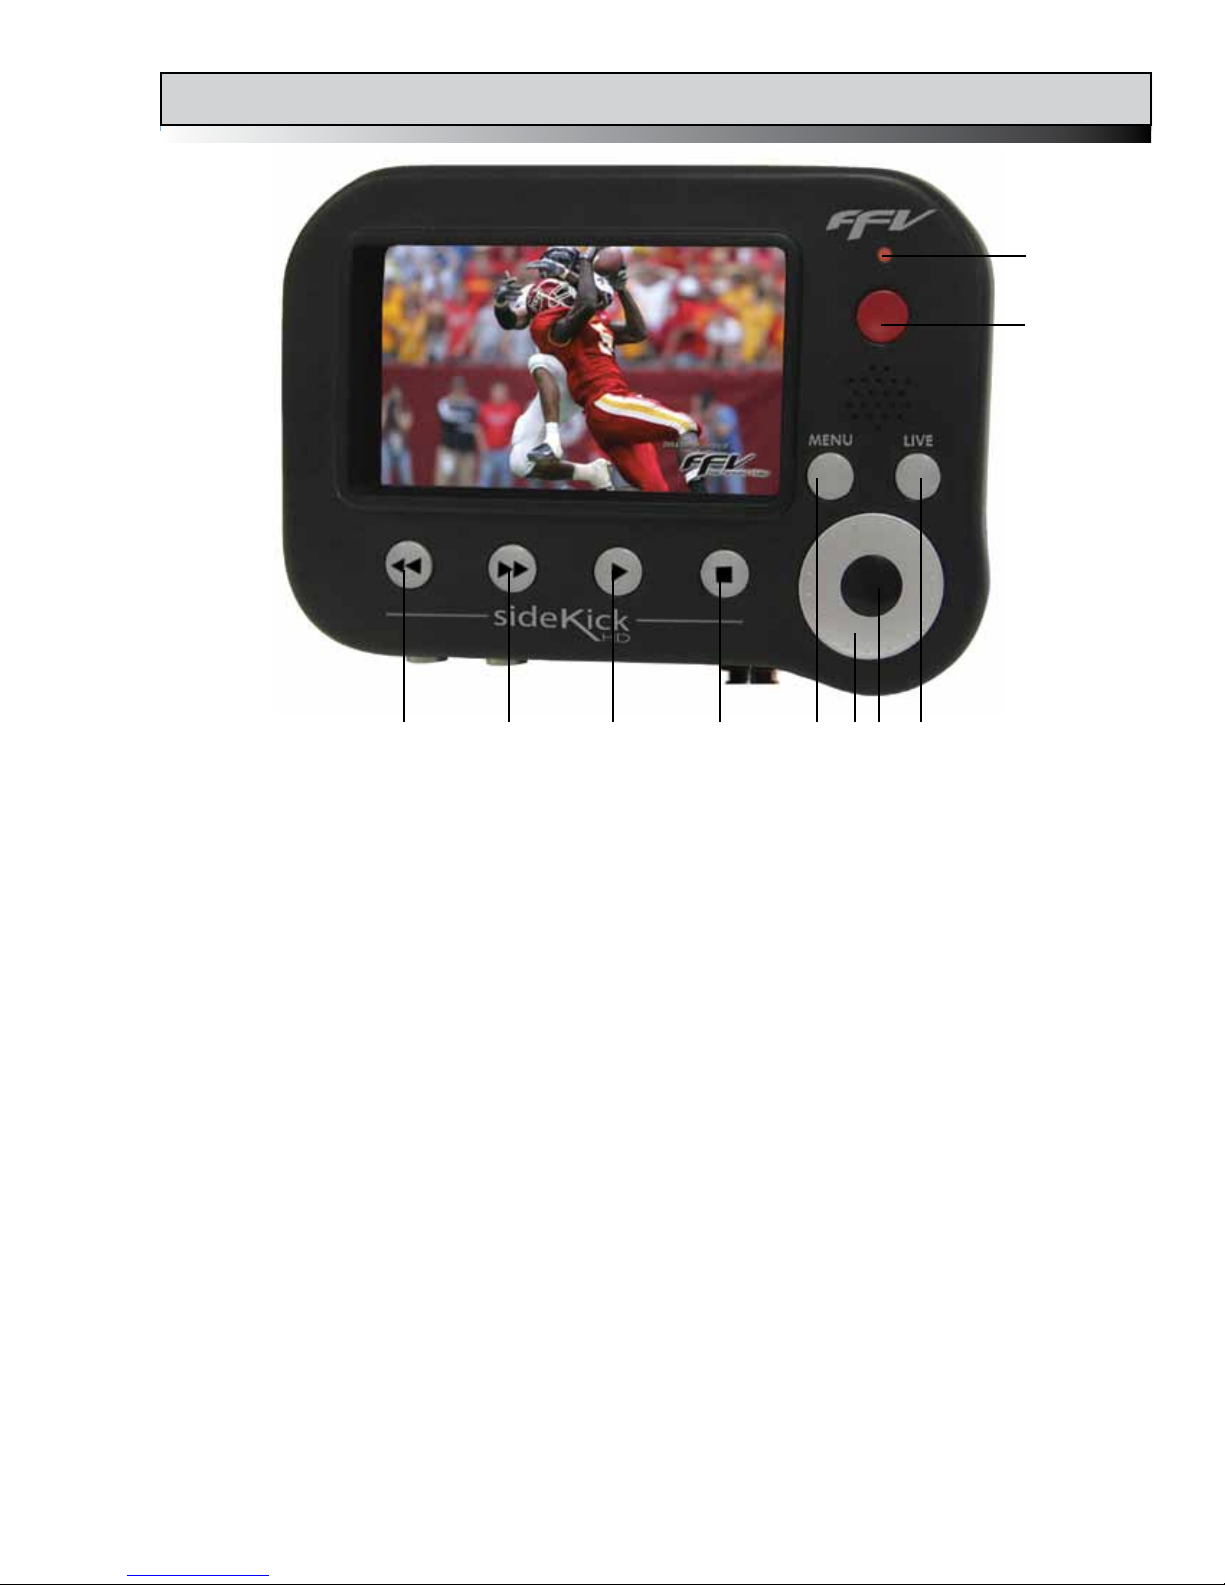
1. Rewind / Previous Clip (◄◄)- Press this button to move to the head of the current clip
or to the previous clip.
2. Fast Forward / Next Clip (►►) - Press this button to move to the head of the next clip
or the end of the very last clip.
3. Play (►) - Press this button to play the current clip.
4. Stop (■) - Press this button to stop recording or playback of the current clip.
5. Menu - from MONITOR SCREEN (LIVE view or PLAYBACK view), press this button
once to enter the CLIP MENU then a second time to enter the SET-UP MENU.
6. Scroll Wheel - Use this wheel to move through the video clip in either a JOG or SCRUB
fashion. Also used for navigating through the menus.
7. Center Select Button - Used to switch between the playback modes, JOG (single
frame at time) and SCRUB (fast forward and rewind). Also used to select menu choices.
8. Live / Cancel - Press this button to return to live camera (pass-thru) from PLAYBACK
view. Also used to cancel out of menu choices without changes.
9. Record - When the Record Mode from the SET-UP Menu is set to Manual, press this
button to begin recording. Use the STOP button to stop recording and complete the clip.
10. LED Indicator - This Light will appear RED when Recording, YELLOW in Playback and
Menus, and GREEN when in Live View.
Front Panel Controls

10 sideKick HD Manual, Fast Forward Video, Inc
The Screen Scheme
The MONITOR Screen
The Menu Button
The CLIP Menu
The SET-UP Menu
sideKick HD has a few different
screens, each with special purposes.
The MONITOR Screen is your main operational
view. This screen will be used for a few things,
such as camera pass-thru, a condence monitor
when recording and basic playback of clips.
The CLIP Menu deals with operations involving the clip such as selecting, naming or deleting
clips. The SET-UP Menu has a variety of recorder conguration settings.
The MENU button is used to switch between the different screens. Pressing the MENU button
moves from the MONITOR Screen to the CLIP Menu to the SET-UP Menu and back again to the
MONITOR Screen in a cyclical manner.

11sideKick HD Manual, Fast Forward Video, Inc
The Monitor Screen
Live View
Camera Pass-thru
Green LED
Record Mode
Condence Monitor
Red LED
Playback Mode - Jog
Yellow LED
Playback Mode - Scrub
Yellow LED
The MONITOR SCREEN has three primary
functions:
1. LIVE VIEW also known as Camera
Pass-thru is used for monitoring what
you are going to shoot. Pressing the
LIVE button returns to this view from
the RECORD and PLAYBACK modes.
2. In RECORD MODE this view is used
as a condence monitor so the Camera
Operator knows what is actually being
recorded.
3. In PLAYBACK MODE, the operator
can play clips forward normally, JOG
one frame at a time in either direction
or using the SCRUB feature play clips
in fast forward or rewind. The scroll
wheel controls the motion and the black
center button switches between JOG
and SCRUB.
MODE Indicator
(LIVE / REC / STOP / PLAY)
TIME CODE
LED
DRIVE SPACE Icon
The Drive Space Icon turns yellow and then red as the drive approaches 100% utilization. There
is also an exclamation icon (!) that shows up when the directory has not been loaded or if there
is a problem. The presence of this icon prevents button operation.
The Monitor Screen

12 sideKick HD Manual, Fast Forward Video, Inc
The CLIP Menu
When you press the MENU button, this will be the rst menu you see. It consists of features and
options pertaining to the clips themselves such as Naming and Deleting. Since you can delete
individual clips, formatting the drive which removes all clips from the disk media is also included
in this menu. Navigating in this menu is done by turning the scroll wheel.
CLIP LIST / CLIP WINDOW - Navigate to this eld to select or change the clip to be modied.
Press the center button on the scroll wheel to select the list and see a drop down listing of all the
clips on the current disk. Use the wheel to scroll through the list and then the center button once
again to select a particular clip. The clip will now show in the clip window, and the duration time
code will be displayed. Clips can also be played and navigated using the ◄◄ and ►► buttons
while in this view.
RE-NAME CLIP - Pressing the center button on the scroll wheel when this eld is highlighted will
bring up another window displaying the alphabet and some symbols. Navigating and selecting
characters with the scroll wheel will allow you to name clips with meaningful names rather than
just sequential clip IDs. Note that the physical buttons are used for Backspace, Delete All, Set
and Cancel name changes.
Clip List
Clip Duration
Clip Window
NAME NEXT CLIP - Selecting this eld will allow you to name the next clip to be recorded. If the
new name ends with a number, subsequently recorded clips will have the same name with the
next sequential number (e.g. Awards01, Awards02, Awards03, etc.). The unit will increment only
as many numerals as provided: if given "Clip 1" it will stop at "Clip 9", if given "Clip 01" it will stop
at "Clip 99". Also the user must set the clip name every time they format (or change) the drive.
DELETE CLIP - Selecting this eld will prompt you for a conrmation and upon that conrmation
the selected clip will be removed from the drive.

13sideKick HD Manual, Fast Forward Video, Inc
1. From MONITOR SCREEN, press the menu button
once – this will take you to the CLIP Menu.
2. Use the scroll wheel to highlight “FORMAT DISK”.
3. Press the center black selection button on the
scroll wheel to initiate the command.
4. A pop-up "question" window will appear – use the
scroll wheel to highlight “FORMAT” to proceed
with formatting the disk or "CANCEL" to exit at this
time.
5. Press the center black selection button on the
scroll wheel to select your choice.
6. If you choose to proceed with the formatting, a
second pop-up "warning" window will appear – use
the scroll wheel to highlight “OK” and press the
center black selection button on the wheel.
7. A Formatting Disk window with a progress bar will
be displayed until the formatting is complete.
8. When complete, press the MENU button twice to
go to the MONITOR SCREEN which will display a
white drive space icon.
Formatting the Drive
All new drives will need to be formatted before recording can be initiated. Please note that the
drive space icon will be red until the new drive is formatted properly.
CLIP Menu
2nd Formatting Pop-up
Warning Window
1st Formatting Pop-up
Question Window
14 sideKick HD Manual, Fast Forward Video, Inc
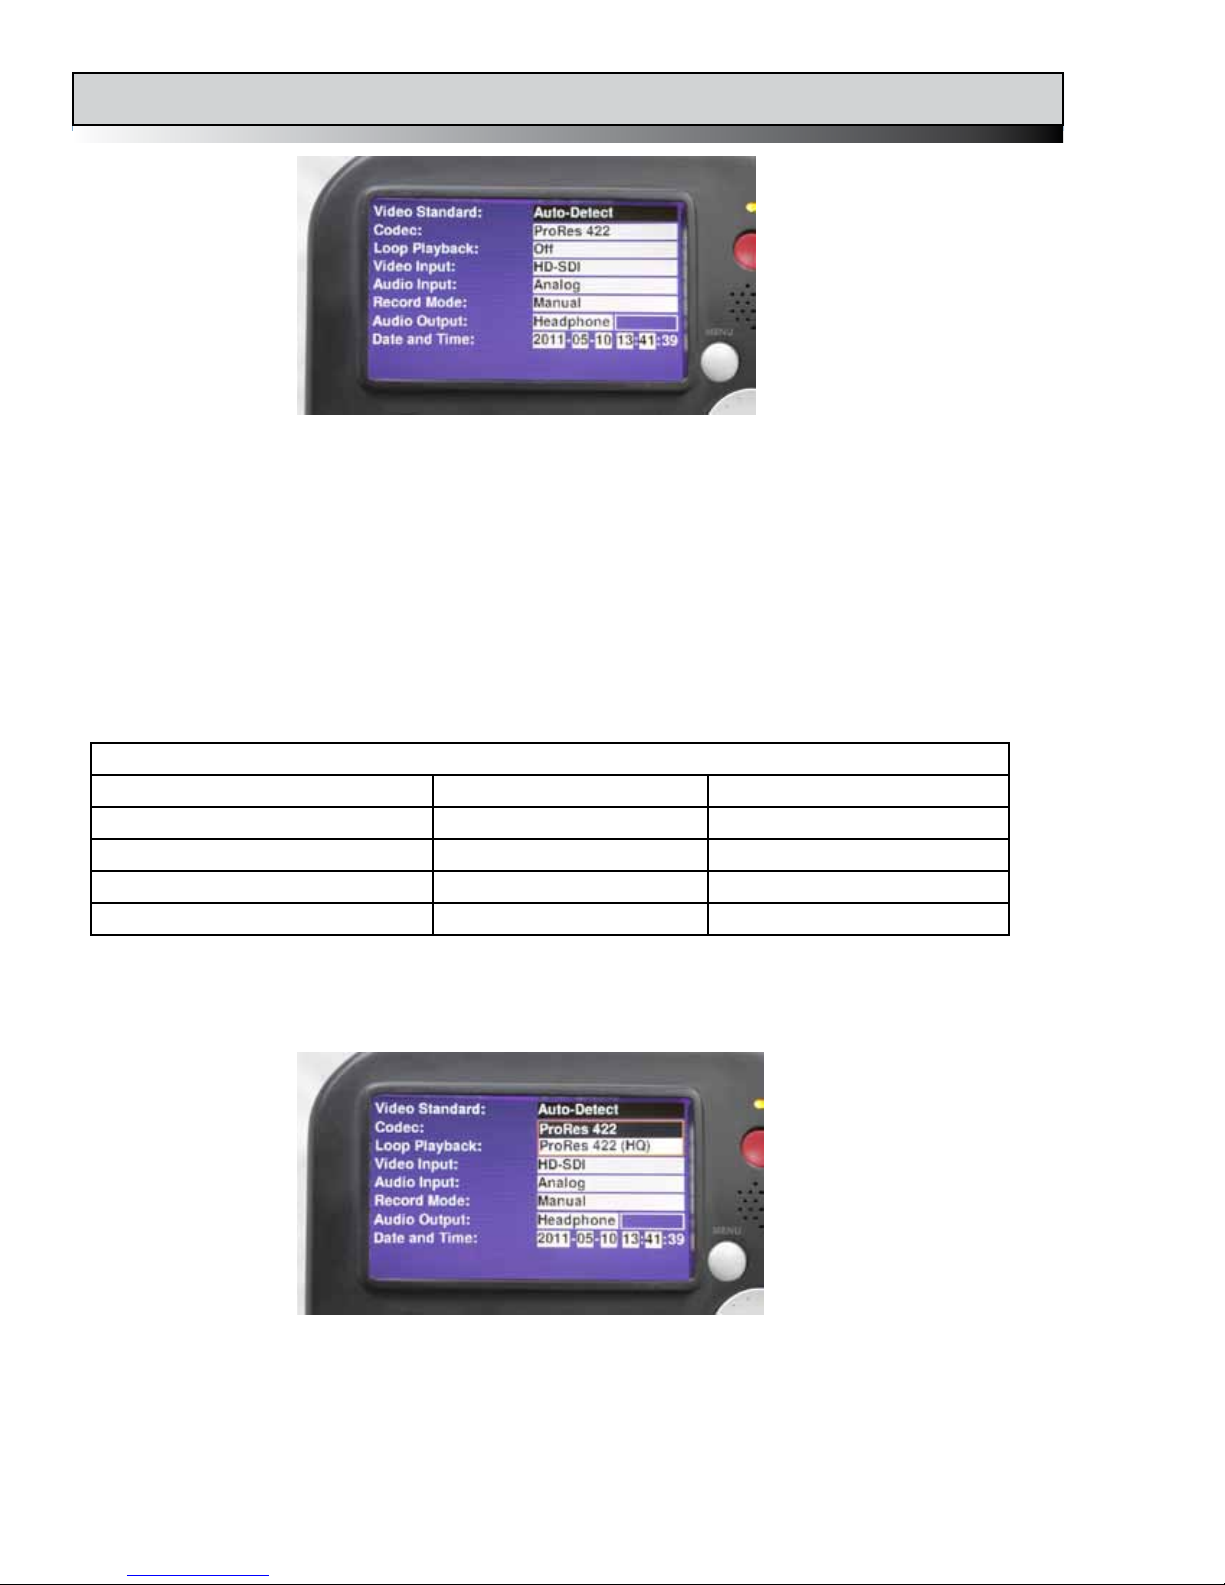
The SET-UP Menu
This SET-UP MENU is accessed by pressing the MENU button once from the the CLIP MENU or
twice from the MONITOR SCREEN. This menu contains all of sideKick HD's conguration settings.
Navigation in this menu works the same as the previous menu; move through the elds with the
scroll wheel and select the item to be modied by pressing the black center button on the wheel.
Page 1
VIDEO STANDARD - This setting allows you to specify the incoming video source signal for the
next clip to be recorded as well as the next clip to played. It is highly recommended to leave it on
Auto-Detect. If the user-selected signal choice does not match the actual incoming signal, video
WILL NOT be recorded properly and clips will not playback. Why worry, let us do the hard work!
Available Formats
1080 / 29.97 /P 1080 / 59.94 /I 720 / 59.94 /P
1080 / 25.00 /P 1080 / 50.00 /I 720 / 50.00 /P
1080 / 23.98 /P 720 / 29.97 /P
720 / 25.00 /P
720 / 23.98 /P
CODEC - sideKick HD is a multi-codec capable recorder. To select a codec for the next clip to be
recorded, scroll through the installed codecs in this list.This selection does not change the codec
for an already recorded clip.
sideKick HD ships with Apple's ProRes 422 codec. Other codecs are available, and since codecs are the
intellectual property of the writers who created them, individual license fees must be paid for each installed
use. Instead of charging everyone for all the codecs and raising the price of sideKick HD, Fast Forward
Video has made the additional codecs available for purchase on our website. This way you only pay for the
codecs you need for your specic workow. See FIRMWARE UPGRADES in this manual or www.ffv.com for
the proper procedure.

15sideKick HD Manual, Fast Forward Video, Inc
LOOP PLAYBACK - The choices here are ON or OFF depending on whether or not you want your
list of clips to continue playing again once it gets to the end of the list.
VIDEO INPUT - Is the signal to be recorded coming through the HD-SDI or the HDMI input.
AUDIO INPUT - EMBEDDED or ANALOG. If you choose ANALOG you must have your analog
audio input connected to the AUDIO / LINE In port on the left side of the unit. It is an unbalanced
analog connection. Using this input will replace embedded audio channels 1 and 2 with the analog
inputs. EMBEDDED uses the digital signal coming in with the video signal.
RECORD MODE - MANUAL or CAMERA TIME CODE. MANUAL requires that the operator push
the red RECORD button on the front of the unit to initiate recording and the STOP (■) button to
nish the clip. Assuming the camera is providing timecode through the video input cable, CAMERA
TIME CODE will allow sideKick HD to begin and stop recording based on rolling timecode from the
camera. If CAMERA TIME CODE is selected, the red RECORD button from the front of the unit will
not operate the record function.
AUDIO OUTPUT - Your choices here are OFF, HEADPHONE or SPEAKER depend on your work-
ow preference. The Bar next to this choice adjusts the output volume.
DATE / TIME - The format for Date and Time is YYYY-MM-DD and time is HH:MM:SS, SS or
seconds are set to zero when you set the other time elements.
Page 2
The SET-UP Menu (continued)
FACTORY DEFAULTS - This eld will reset the conguration back to the factory defaults via a
conrmation pop-up window.
FIRMWARE VERSION - This eld is not selectable. It states the current rmware version that is
installed in the unit.
SERIAL NUMBER - This eld shows the unit's Serial Number. This number should also be on the
back side exterior of the unit.

16 sideKick HD Manual, Fast Forward Video, Inc
Firmware maintenance releases and upgrades are posted to our website as they become
available. Customers have access to maintenance releases at no charge for the lifetime of
the product. Upgrades are available for a fee. Please check our website regularly to keep
your sideKick up to date.
New rmware les are located at http://www.ffv.com/page/support.htm.
1. Locate the latest revision of sideKick HD rmware on www.ffv.com.
2. Download the rmware le and copy it to a solid state drive (SSD) that will be used in
the sideKick HD.
3. Install that SSD in the sideKick HD.
4. Power up or re-boot the sideKick HD.
5. Drives with a new rmware le on them will automatically be identied and a message
will appear asking if you want to upgrade the rmware.
6. If you do, conrm the request.
WARNING:
PLEASE BE AWARE SOME FIRMWARE UPDATES WILL NOT ALLOW YOU TO PLAY
OLD FOOTAGE (see rmware notes at http://www.ffv.com/page/support.htm).
Updating Firmware

17sideKick HD Manual, Fast Forward Video, Inc
Post Production
Please note that, out of the box, sideKick HD produces a QuickTime .MOV le using
Apple's ProRes 422 codec and is compatible with any MAC or PC editing software
(NLE) that supports that codec.
The video les have been tested with:
- Apple Final Cut Pro 7.0
- Adobe Premiere CS5 for the Mac
Moving Clips to NLE System
1. Connect the Solid State Drive (SSD) to a computer (NLE) using either the provided
USB to SATA cable or insert the SSD into an already hooked up SATA drive dock.
2. Wait for your computer to recognize the drive - Once you see the icon that represents
the drive, click on the drive icon to see the les. They will have whatever names were
given to them when recorded by sideKick HD.
3. Either copy the selected clips to your computer or you can work directly from the
SSD. It is safer to use the clips from your NLE's working hard drive than directly from
the SSD since you will be removing the SSD to record again.
4. Bring clips into your NLE's project browser or timeline and edit accordingly.
BROWSER
TIMELINE

18 sideKick HD Manual, Fast Forward Video, Inc
*Specications Subject to Change
Specications
VIDEO INPUT / OUTPUT
Digital Input / Output HD-SDI, HDMI
Standards SMPTE 274 M
SMPTE 296 M
Connections BNC 75 Ohms
HDMI Type C mini
AUDIO INPUT / OUTPUT
Digital Input / Output 8 channels embedded HD-SDI
Connections BNC or HDMI unbalanced
Resolution 24 bits
Sampling Rate 48 kHz
Analog Input / Line 2 Line level
Connections 3.5 mm
Resolution 16 bits
DRIVES
Maximum number of Drives 1 removeable
Supported Drive 2.5" SATA SSD
Preferred Drive see sideKick Page at ffv.com
TIME CODE Embedded timecode
USB PORT For future use
HEADPHONE 3.5 mm stereo jack
VIDEO COMPRESSION
Method Apple ProRes 422 - standard
upgradable via www.ffv.com
Apple ProRes 422 (HQ)
future codecs available
Maximum Bit Rate 220 Mbit/s codec dependent
POWER
Power Supply 12 VDC
Power Connector Mini XLR
Power Requirement 7-16 VDC
Power Consumption 3-21 W
Power Options Battery or AC Power adapter
DISPLAY 4.3 color TFT display
Display Resolution 480 x 272 pixel resolution
GENERAL
Physical Dimensions 6.25"W x 4.2"H x 2.1"D
Weight 10 oz without drive
12 oz with drive
Noise <18dB
Operating Temperature 0-40° C
Humidity 90% non-condensing
WARRANTY 1 Year
INCLUDED ACCESSORIES 128GB Solid State Drive
AC Adapter
USB -SATA Drive Cable
Cool Looking Cardboard Box
OPTIONAL ACCESSORIES 256GB Solid State Drive
External Battery w/ Charger
Camera Battery Cable
Carrying Case
Protective Pouch
4 to 3 pin Power adapter
Camera Shoe to 1/4"20 riser

19sideKick HD Manual, Fast Forward Video, Inc
Limited Warranty
Warranty
12 Month Limited Warranty
Fast Forward Video, Inc. warrants to the original purchaser that the product (hardware
and components) shall be free from defects in material and workmanship for a period
of 1 year from the date of purchase, If a defect covered by this warranty occurs during
this 1 year period, Fast Forward Video, Inc. will repair or replace the defective product or
component, at its option, free of charge.
If customers register their sideKick HD by mail or on www.ffv.com, Fast Forward Video
will extend the warranty to two years from the date of purchase. Customers must
register their sideKick HD within 30 days (from date of purchase) to receive the extended
warranty period.
Warranty Limitations
THIS WARRANTY SHALL NOT APPLY IF THIS PRODUCT: (a) IS DAMAGED BY
NEGLIGENCE, ACCIDENT, MISUSE, OR BY OTHER CAUSES UNRELATED TO
DEFECTIVE MATERIALS OR WORKMANSHIP; OR (b) HAS HAD THE SERIAL
NUMBER ALTERED, DEFACED, OR REMOVED.
ANY APPLICABLE IMPLIED WARRANTIES ARE HEREBY LIMITED IN DURATION
TO THE WARRANTY PERIOD DESCRIBED ABOVE. IN NO EVENT SHALL FAST
FORWARD VIDEO, INC. BE LIABLE FOR CONSEQUENTIAL OR INCIDENTAL
DAMAGES RESULTING FROM THE BREACH OF ANY IMPLIED OR EXPRESS
WARRANTIES. SOME STATES DO NOT ALLOW LIMITATIONS ON HOW LONG AN
IMPLIED WARRANTY LASTS OR EXCLUSION OF CONSEQUENTIAL OR INCIDENTAL
DAMAGES, SO THE ABOVE LIMITATIONS MAY NOT APPLY TO YOU.
This warranty gives you specic legal rights and you may also have
other rights, which vary from state to state.
Table of contents
Other Fast Forward Video DVR manuals


