Fast UCD Series Quick start guide
Trattamento dell’aria
UNITA’ DI CONDIZIONAMENTO
Serie UCD
AIR CONDITIONING UNITS
UCD Series
9611-6059002
GB
I
SELECTION, INSTALLATION, USE AND
MAINTENANCE MANUAL
MANUALE DI SELEZIONE, INSTALLAZIONE,
USO E MANUTENZIONE
MANUEL TECHNIQUE, D’INSTALLATION ET
DE MAINTENANCE
AUSLEGUNG-, BEDIENUNGS– UND BETRIEB-
SANLEITUNG
I
F
I
D
UNITÉS DE CLIMATISATION
UCD Série
LÜFTUNGS– UND KLIMAEINHEITEN
UCD Baureihe

3
INHALTSVERZEICHNIS Seite
Hauptbestandteile . . . . . . . . . . . . . . . . . . . . . . . . . . . . . . . 5
Technische Daten . . . . . . . . . . . . . . . . . . . . . . . . . . . . . . . 6
Hauptmerkmale . . . . . . . . . . . . . . . . . . . . . . . . . . . . . . . . . 9
Bauelemente . . . . . . . . . . . . . . . . . . . . . . . . . . . . . . . . . . . 9
Gehäuse . . . . . . . . . . . . . . . . . . . . . . . . . . . . . . . . . . . . 9
Lüftereinheit . . . . . . . . . . . . . . . . . . . . . . . . . . . . . . . . . 9
Wärmeaustauscher . . . . . . . . . . . . . . . . . . . . . . . . . . . 9
Zubehörteile . . . . . . . . . . . . . . . . . . . . . . . . . . . . . . . . . . . . 9
Schalterblende « PX » . . . . . . . . . . . . . . . . . . . . . . . . . 9
Schalterblende « PCT 2 » . . . . . . . . . . . . . . . . . . . . . . 9
Zustimmungsthermostat « TC 152 » . . . . . . . . . . . . . . 9
Ausblasgitter « GM » . . . . . . . . . . . . . . . . . . . . . . . . . . 9
Ansauggitter « GA » . . . . . . . . . . . . . . . . . . . . . . . . . . 11
Gegenrahmen « CMA » . . . . . . . . . . . . . . . . . . . . . . . . 11
Frostschutzschieber « SR » . . . . . . . . . . . . . . . . . . . . . 11
Ausblaßplenum « PM » . . . . . . . . . . . . . . . . . . . . . . . . 11
Mischkammer « SM » . . . . . . . . . . . . . . . . . . . . . . . . . 11
Ansaugfilter « FAF » . . . . . . . . . . . . . . . . . . . . . . . . . . . 11
Nacherhitzer « BP » . . . . . . . . . . . . . . . . . . . . . . . . . . . 11
Elektroheizung « BR » . . . . . . . . . . . . . . . . . . . . . . . . . 11
Verpackung . . . . . . . . . . . . . . . . . . . . . . . . . . . . . . . . . . . . 11
Auswahlkriterien . . . . . . . . . . . . . . . . . . . . . . . . . . . . . . . . . 13
Installationsanleitungen . . . . . . . . . . . . . . . . . . . . . . . . . . . 13
Montage der Kammern « BP - BR - SM - FAF » . . . . . 15
Montage der Gitter « GM - GA » . . . . . . . . . . . . . . . . . 15
Hydraulikanschlüsse . . . . . . . . . . . . . . . . . . . . . . . . . . 15
Elektroverbindungen . . . . . . . . . . . . . . . . . . . . . . . . . . 15
Betriebsanweisungen . . . . . . . . . . . . . . . . . . . . . . . . . . . . . 17
Reinigung des Luftfilters . . . . . . . . . . . . . . . . . . . . . . . . . . . 17
Zubehör-Kompatibilitätstabelle . . . . . . . . . . . . . . . . . . . . . 17
Tabellen . . . . . . . . . . . . . . . . . . . . . . . . . . . . . . . . . . . . . . . 18
Diagramme . . . . . . . . . . . . . . . . . . . . . . . . . . . . . . . . . . . . . 22
Schaltpläne . . . . . . . . . . . . . . . . . . . . . . . . . . . . . . . . . . . . . 35
Abmessungen . . . . . . . . . . . . . . . . . . . . . . . . . . . . . . . . . . 37
Abbildungen . . . . . . . . . . . . . . . . . . . . . . . . . . . . . . . . . . . . 44
INDEX Pag.
Main components . . . . . . . . . . . . . . . . . . . . . . . . . . . . . . . . 5
Technical data . . . . . . . . . . . . . . . . . . . . . . . . . . . . . . . . . . 6
General features . . . . . . . . . . . . . . . . . . . . . . . . . . . . . . . . . 8
Description of components . . . . . . . . . . . . . . . . . . . . . . . . 8
Casing . . . . . . . . . . . . . . . . . . . . . . . . . . . . . . . . . . . . . 8
Electric ventilation section . . . . . . . . . . . . . . . . . . . . . . 8
Heat exchanger . . . . . . . . . . . . . . . . . . . . . . . . . . . . . . 8
Accessories . . . . . . . . . . . . . . . . . . . . . . . . . . . . . . . . . . . . 8
Control panel « PX » . . . . . . . . . . . . . . . . . . . . . . . . . . 8
Control panel « PTC 2 » . . . . . . . . . . . . . . . . . . . . . . . . 8
Starting thermostat « TC 152 » . . . . . . . . . . . . . . . . . . 8
Air delivery grill « GM » . . . . . . . . . . . . . . . . . . . . . . . . 8
Suction grill « GA » . . . . . . . . . . . . . . . . . . . . . . . . . . . 10
Counter-frame « CMA » . . . . . . . . . . . . . . . . . . . . . . . . 10
Antifreeze damper « SR » . . . . . . . . . . . . . . . . . . . . . . 10
Discharge plenum « PM » . . . . . . . . . . . . . . . . . . . . . . 10
Mixing box « SM » . . . . . . . . . . . . . . . . . . . . . . . . . . . . 10
Suction filter « FAF » . . . . . . . . . . . . . . . . . . . . . . . . . . 10
After-heating coil « BP » . . . . . . . . . . . . . . . . . . . . . . . 10
Electric coil « BR » . . . . . . . . . . . . . . . . . . . . . . . . . . . . 10
Packing . . . . . . . . . . . . . . . . . . . . . . . . . . . . . . . . . . . . . . . . 10
Selection . . . . . . . . . . . . . . . . . . . . . . . . . . . . . . . . . . . . . . . 12
Installation . . . . . . . . . . . . . . . . . . . . . . . . . . . . . . . . . . . . . 12
Mounting the boxes « BP - BR - SM - FAF » . . . . . . . . 14
IMounting the grilles « GM - GA » . . . . . . . . . . . . . . . . 14
Water connections . . . . . . . . . . . . . . . . . . . . . . . . . . . . 14
Electric connections . . . . . . . . . . . . . . . . . . . . . . . . . . . 14
Operation . . . . . . . . . . . . . . . . . . . . . . . . . . . . . . . . . . . . . . 16
Filter cleaning . . . . . . . . . . . . . . . . . . . . . . . . . . . . . . . . . . . 16
Accessory compatibility table . . . . . . . . . . . . . . . . . . . . . . 16
Tables . . . . . . . . . . . . . . . . . . . . . . . . . . . . . . . . . . . . . . . . . 18
Charts . . . . . . . . . . . . . . . . . . . . . . . . . . . . . . . . . . . . . . . . . 22
Wiring diagrams . . . . . . . . . . . . . . . . . . . . . . . . . . . . . . . . . 35
Dimensions . . . . . . . . . . . . . . . . . . . . . . . . . . . . . . . . . . . . . 37
Figures . . . . . . . . . . . . . . . . . . . . . . . . . . . . . . . . . . . . . . . . 44
INDICE Pag.
Componenti principali . . . . . . . . . . . . . . . . . . . . . . . . . . . . 5
Dati tecnici . . . . . . . . . . . . . . . . . . . . . . . . . . . . . . . . . . . . . 6
Caratteristiche generali . . . . . . . . . . . . . . . . . . . . . . . . . . . 8
Descrizione dei componenti . . . . . . . . . . . . . . . . . . . . . . . . 8
Carpenteria . . . . . . . . . . . . . . . . . . . . . . . . . . . . . . . . . 8
Gruppo elettroventilante . . . . . . . . . . . . . . . . . . . . . . . 8
Batteria di scambio termico . . . . . . . . . . . . . . . . . . . . . 8
Accessori . . . . . . . . . . . . . . . . . . . . . . . . . . . . . . . . . . . . . . 8
Pannello comandi « PX » . . . . . . . . . . . . . . . . . . . . . . . 8
Pannello comandi « PCT 2 » . . . . . . . . . . . . . . . . . . . . 8
Termostato di consenso « TC 152 » . . . . . . . . . . . . . . 8
Griglia di mandata « GM » . . . . . . . . . . . . . . . . . . . . . . 8
Griglia di ripresa « GA » . . . . . . . . . . . . . . . . . . . . . . . 10
Controtelaio « CMA » . . . . . . . . . . . . . . . . . . . . . . . . . . 10
Serranda antigelo « SR » . . . . . . . . . . . . . . . . . . . . . . . 10
Plenum di mandata « PM » . . . . . . . . . . . . . . . . . . . . . 10
Camera di miscela « SM » . . . . . . . . . . . . . . . . . . . . . . 10
Filtro di ripresa « FAF » . . . . . . . . . . . . . . . . . . . . . . . . 10
Batteria di post-riscaldamento « BP » . . . . . . . . . . . . . 10
Batteria elettrica « BR » . . . . . . . . . . . . . . . . . . . . . . . . 10
Imballo . . . . . . . . . . . . . . . . . . . . . . . . . . . . . . . . . . . . . . . . 10
Criteri di scelta . . . . . . . . . . . . . . . . . . . . . . . . . . . . . . . . . . 12
Istruzioni per l’ installazione . . . . . . . . . . . . . . . . . . . . . . . . 12
Montaggio dei cassonetti « BP - BR - SM - FAF » . . . . 14
Montaggio delle griglie « GM - GA » . . . . . . . . . . . . . . 14
Collegamenti idraulici . . . . . . . . . . . . . . . . . . . . . . . . . 14
Collegamenti elettrici . . . . . . . . . . . . . . . . . . . . . . . . . . 14
Istruzioni per il funzionamento . . . . . . . . . . . . . . . . . . . . . . 16
Pulizia del filtro . . . . . . . . . . . . . . . . . . . . . . . . . . . . . . . . . . 16
Tabella di compatibilità degli accessori . . . . . . . . . . . . . . . 16
Tabelle . . . . . . . . . . . . . . . . . . . . . . . . . . . . . . . . . . . . . . . . 18
Diagrammi . . . . . . . . . . . . . . . . . . . . . . . . . . . . . . . . . . . . . 22
Schemi elettrici . . . . . . . . . . . . . . . . . . . . . . . . . . . . . . . . . . 35
Dati dimensionali . . . . . . . . . . . . . . . . . . . . . . . . . . . . . . . . 37
Figure . . . . . . . . . . . . . . . . . . . . . . . . . . . . . . . . . . . . . . . . . 44
INDEX Pag.
Composants principaux . . . . . . . . . . . . . . . . . . . . . . . . . . . 5
Données techniques . . . . . . . . . . . . . . . . . . . . . . . . . . . . . 6
Caractéristiques générales . . . . . . . . . . . . . . . . . . . . . . . . 9
Description des composants . . . . . . . . . . . . . . . . . . . . . . . 9
Carrosserie . . . . . . . . . . . . . . . . . . . . . . . . . . . . . . . . . . 9
Groupe d'électro-ventilation . . . . . . . . . . . . . . . . . . . . . 9
Echangeur de chaleur . . . . . . . . . . . . . . . . . . . . . . . . . 9
Accessoires . . . . . . . . . . . . . . . . . . . . . . . . . . . . . . . . . . . . 9
Panneau de commande « PX » . . . . . . . . . . . . . . . . . . 9
Panneau de commande « PCT 2 » . . . . . . . . . . . . . . . 9
Thermostat d’autorisation « TC 152 » . . . . . . . . . . . . . 9
Grille de refoulement « GM » . . . . . . . . . . . . . . . . . . . . 9
Grille de reprise « GA» . . . . . . . . . . . . . . . . . . . . . . . . 11
Contre-cadre « CMA » . . . . . . . . . . . . . . . . . . . . . . . . . 11
Registre antigel « SR » . . . . . . . . . . . . . . . . . . . . . . . . 11
Plénum de refoulement « PM » . . . . . . . . . . . . . . . . . . 11
Chambre de mélange« SM » . . . . . . . . . . . . . . . . . . . . 11
Filtre de reprise « FAF » . . . . . . . . . . . . . . . . . . . . . . . . 11
Batterie de post-chauffage « BP » . . . . . . . . . . . . . . . . 11
Batterie electrique « BR » . . . . . . . . . . . . . . . . . . . . . . 11
Emballage . . . . . . . . . . . . . . . . . . . . . . . . . . . . . . . . . . . . . 11
Critères de choix . . . . . . . . . . . . . . . . . . . . . . . . . . . . . . . . 13
Installation . . . . . . . . . . . . . . . . . . . . . . . . . . . . . . . . . . . . . 13
Montage des caissons « BP - BR - SM - FAF » . . . . . . 15
Montage des grilles « GM - GA » . . . . . . . . . . . . . . . . 15
Raccordements hydrauliques . . . . . . . . . . . . . . . . . . . 15
Raccordements électriques . . . . . . . . . . . . . . . . . . . . . 15
Fonctionnement . . . . . . . . . . . . . . . . . . . . . . . . . . . . . . . . . 17
Nettoyage du filtre . . . . . . . . . . . . . . . . . . . . . . . . . . . . . . . 17
Tableau de compatibilité des accessoires . . . . . . . . . . . . 17
Tableaux . . . . . . . . . . . . . . . . . . . . . . . . . . . . . . . . . . . . . . . 18
Diagrammes . . . . . . . . . . . . . . . . . . . . . . . . . . . . . . . . . . . . 22
Schémas électriques . . . . . . . . . . . . . . . . . . . . . . . . . . . . . 35
Dimensions . . . . . . . . . . . . . . . . . . . . . . . . . . . . . . . . . . . . . 37
Figure . . . . . . . . . . . . . . . . . . . . . . . . . . . . . . . . . . . . . . . . . 44
5
20
25
30
15
10
C
°
ON
OFF
2
1
3
5
6
4
3
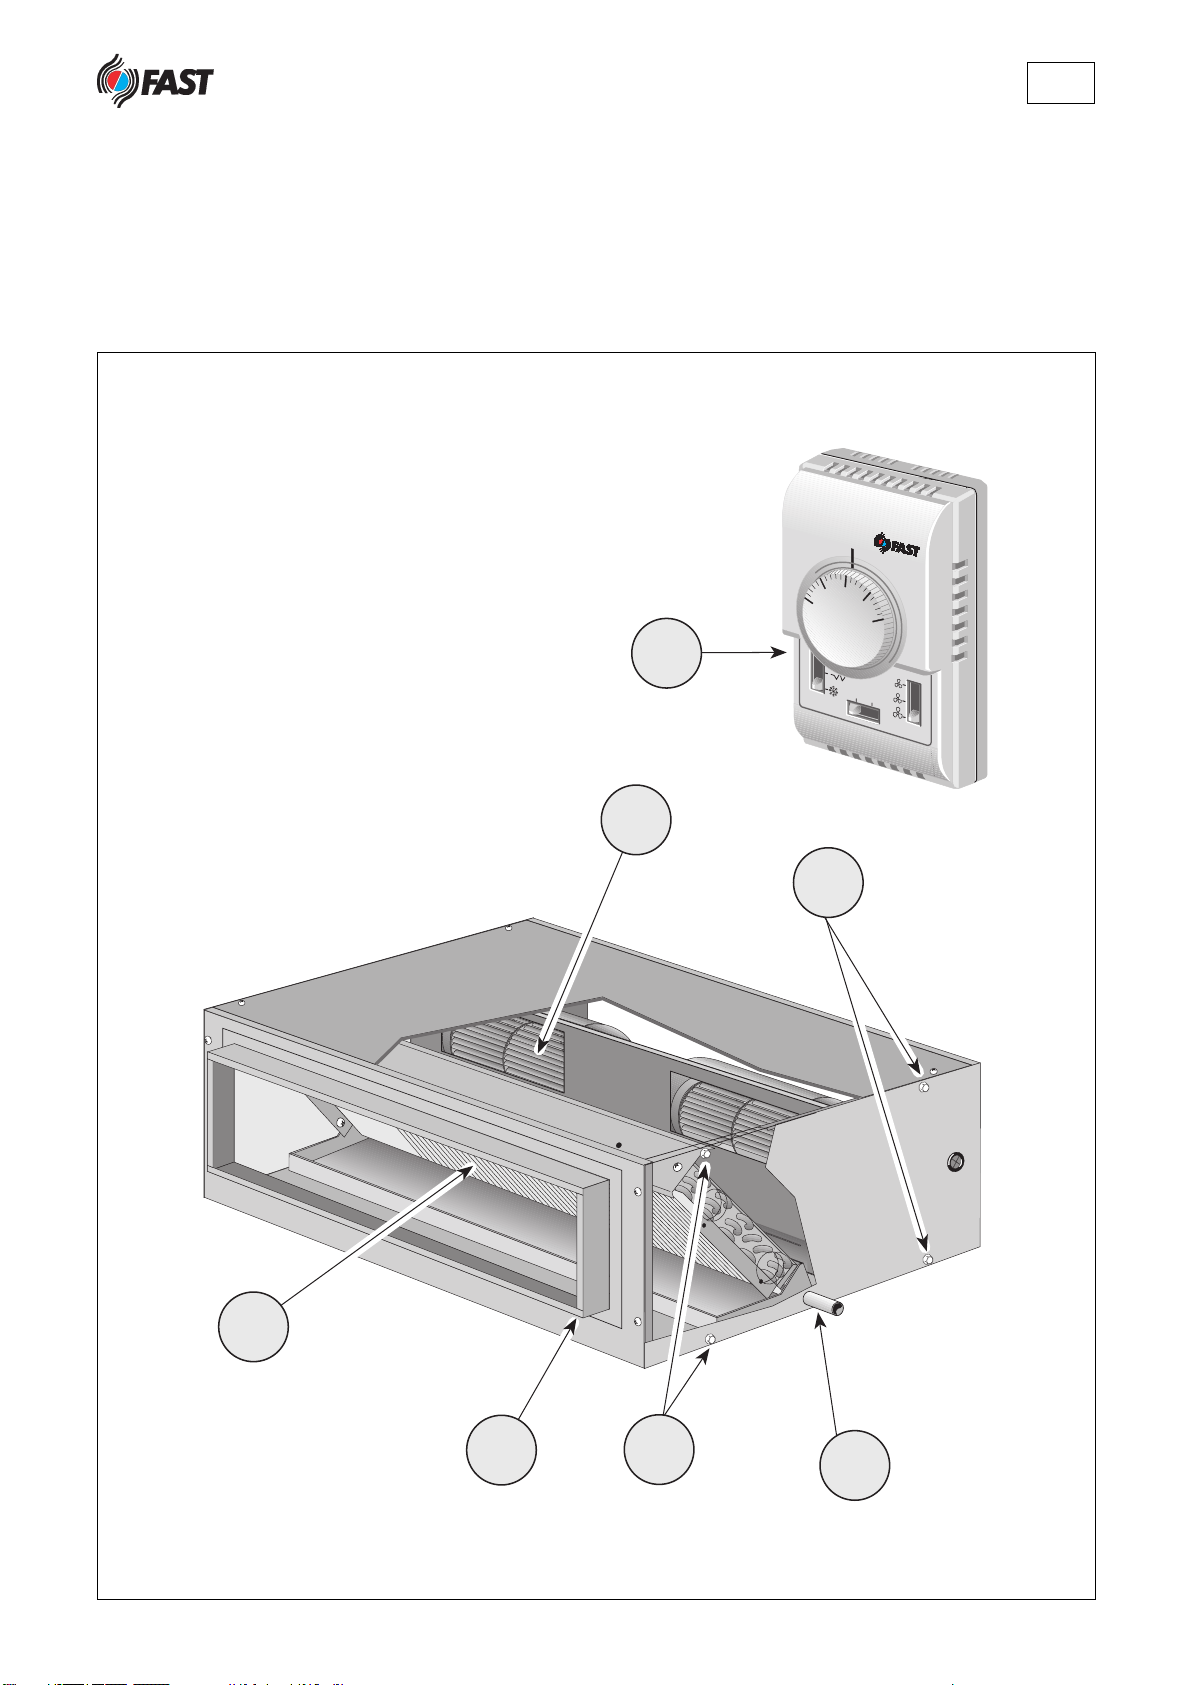
COMPONENTI PRINCIPALI MAIN COMPONENTS COMPOSANTS PRINCIPAUX HAUPTBESTANDTEILE
1 – Pannello comandi 1 – Control panel 1 – Panneau de commande 1 – Fernbedienung
2 – Gruppo ventilante 2 – Ventilation group 2 – Groupe de ventilation 2 – Lüftereinheit
3 – Viti di fissaggio 3 – Fixing screws 3 – Vis de fixation 3 – Befestigungsschrauben
4 – Scarico condensa 4 – Condensate discharge 4 – Evacuation condensats 4 – Kondenswasserablauf
5 – Flangia di mandata 5 – Air delivery grill 5 – Bride de soufflage 5 – Ausblasflansch
6 – Batteria 6 – Heat exchanger 6 – Echangeur 6 – Wärmeaustauscher

6
DATI TECNICI - TECHNICAL DATA - DONNEES TECHNIQUES - TECHNISCHE DATEN
Mod.
❄Potenzialità frigorifera - Cooling capacity W
Puissance frigorifique - Kälteleistung frig/h
❄Umidità asportata - Moisture removed - Déshumidification - Entfeuchtungsleistung l/h
❄Portata acqua - Water flow l/s
Débit d'eau - Massenstrom-Wasser l/h
❄Perdita di carico acqua - Water pressure drop kPa
Perte de charge eau - Wasserseitiger Druckverlust m C.A. - W.G. m - m C.E. - m W.S.
❄❄ Potenzialità termica - Heating capacity W
Puissance thermique - Wärmeleistung kcal/h
❄❄ Portata acqua - Water flow l/s
Débit d'eau - Massenstrom-Wasser l/h
❄❄ Perdita di carico acqua - Water pressure drop kPa
Perte de charge eau - Wasserseitiger Druckverlust m C.A. - W.G. m - m C.E. - m W.S.
Ventilatori - Fans - Ventilateurs - Lüftern n°
Portata aria nominale - Nominal air flow m3/s
Débit d'air nominal - Nennvolumenstrom m3/h
Max. pressione statica utile (portata nominale) - Max. available static pressure (nominal air flow) Pa
Press. statique utile max. (débit d'air nominal) - Max. externe Pressung (Nennvolumenstrom)mm C.A. - W.G. mm - mm C.E. - mm W.S.
Velocità ventilatore - Fan speed g/s - rps - t/s - U/s
Vitesse ventilateur - Lüfterdrehzahl g/m - rpm - t/m - U/m
Potenza massima motore - Max. motor power - Puissance max. moteur - Max. Motorleistung W
Corrente massima assorbita - Max. input current - Intensité max. absorbée - Max. Stromaufnahme A
Corrente di spunto - Initial current - Courant de décollage - Anlaufstrom A
Superficie frontale batteria - Coil front surface - Surface frontale batterie - Anströmfläche m2
Ranghi batteria - Coil rows - Rangs batterie - Wärmetauscher-Rohrreihen n°
Tubi batteria - Coil tubes - Tubes batterie - Wärmetauscher-Rohre n°
Passo alette - Fin pitch - Pas ailettes - Lamellenabstand mm
Contenuto acqua - Water content - Contenu eau - Wasserinhalt dm3
Collegamenti idraulici - Water connections - Raccordements hydrauliques - Wasseranschlüsse Ø
Scarico condensa - Condensate discharge - Sortie condensation - Kondenswasserablauf Ø
Dimensioni Altezza - Height - Hauteur - Höhe mm
Dimensions Larghezza - Width - Largeur - Breite mm
Dimensions
Profondità - Depth - Profondeur - Tiefe mm
Abmessungen
Peso netto - Net weight - Poids net - Nettogewicht kg
Tensione di alimentazione - Power supply: 220 / 230 V - 1 - 50 Hz ( - 5 % / +10 % ).
Le prestazioni sono riferite alle seguenti condizioni: Performances refer to the following conditions:
– con tensione di alimentazione a 220 V. – with 220 V power supply.
❄temperatura aria ambiente 27 °C b.s., 19 °C b.u.; ❄room temperature 27 °C d.b., 19 °C w.b.;
temperatura acqua entrante 7 °C; water inlet temperature 7 °C;
³t = 5 °C. ³t = 5 °C.
❄❄ temperatura aria ambiente 20 °C b.s.; ❄❄ room temperature 20 °C d.b.;
temperatura acqua entrante 70 °C; water inlet temperature 70 °C;
³t = 10 °C. ³t = 10 °C.

7
Tension d'alimentation - Betriebsspannung: 220 / 230 V - 1 - 50 Hz ( - 5 % / +10 % ).
Les performances se réfèrent aux conditions suivantes: Die angegebenen Werte beziehen sich auf die folgenden Bedingungen:
– avec tension d’alimentation à 220 V. – mit Betriebsspannung 220 V.
❄température ambiante 27 °C b.s., 19 °C b.h.; ❄Raumtemperatur 27 °C T.K., 19 °C F.K.;
température de l'eau à l'entrée 7 °C; Wassereintrittstemperatur 7 °C;
³t = 5 °C. ³t = 5 °C.
❄❄ température ambiante 20 °C b.s.; ❄❄ Raumtemperatur 20 °C T.K.;
température de l'eau à l'entrée 70 °C; Wassereintrittstemperatur 70 °C;
³t = 10 °C. ³t = 10 °C.
UCD 9 B UCD 9 P UCD 15 B UCD 15 P UCD 21 B UCD 21 P UCD 28 B UCD 28 P UCD 37 B UCD 37 P
3.950 4.850 5.800 7.200 8.750 10.750 11.600 14.300 14.100 17.250
3.400 4.150 5.000 6.200 7.550 9.250 10.000 12.300 12.100 14.850
0,65 1,31 0,81 1,49 1,56 2,61 2,32 3,31 2,8 4
0,19 0,23 0,27 0,34 0,42 0,51 0,55 0,68 0,67 0,82
680 830 1.000 1.240 1.510 1850 2.000 2.460 2.420 2.970
11,3 5,9 11,9 5,7 18,1 7,8 23 9,6 21,5 8,5
1,2 0,6 1,2 0,6 1,8 0,8 2,3 1 2,2 0,9
9.200 10.850 14.300 17.500 20.900 25.400 27.600 33.600 35.200 43.300
7.900 9.350 12.300 15.050 18.000 21.850 23.750 28.900 30.250 37.200
0,22 0,26 0,34 0,42 0,50 0,61 0,66 0,80 0,84 1,03
790 935 1.230 1.505 1.800 2.185 2.375 2.890 3.025 3.720
11,6 5,7 13,7 6,3 19,4 8,2 24,6 9,8 25 10
1,2 0,6 1,4 0,6 2 0,8 2,5 1 2,5 1
22223 3 3 3 3 3
0,22 0,22 0,39 0,39 0,56 0,56 0,75 0,75 0,97 0,97
800 800 1.400 1.400 2.000 2.000 2.700 2.700 3.500 3.500
94 87 118 106 102 91 156 143 149 130
9,6 8,9 12 10,8 10,4 9,3 16 15,6 15,2 13,2
24 24 20,8 20,8 21,4 21,4 21,6 21,6 23,4 23,4
1.440 1.440 1.250 1.250 1.285 1.285 1.295 1.295 1.405 1.405
120 120 120 120 200 200 400 400 700 700
1,1 1,1 1,1 1,1 1,6 1,6 2,7 2,7 4,3 4,3
3,3 3,3 3,3 3,3 5,6 5,6 9,5 9,5 15 15
0,19 0,19 0,23 0,23 0,34 0,34 0,42 0,42 0,42 0,42
23232 3 2 3 2 3
20 30 22 33 22 33 28 42 28 42
2,1 2,1 2,1 2,1 2,1 2,1 2,1 2,1 1,8 1,8
1,2 1,7 1,5 2,1 2,1 3 2,6 3,7 2,6 3,7
1” 1” 1” 1” 1” 1” 1” 1” 1” 1”
3/8” 3/8” 3/8” 3/8” 1/2” 1/2” 1/2” 1/2” 1/2” 1/2”
300 300 320 320 320 320 380 380 380 380
920 920 1.000 1.000 1.400 1.400 1.400 1.400 1.400 1.400
630 630 670 670 670 670 790 790 790 790
41 42 52 53 69 71 86 88 89 91

CARATTERISTICHE GENERALI
Le unità di condizionamento della serie UCD sono disponibili in
5 grandezze con portata d'aria nominale da 800 a 3.500 m3/h.
Sono progettate e realizzate per applicazioni in impianti di termo-
ventilazione e condizionamento in ambienti civili.
Vengono fornite in tre versioni:
1- base, con batteria a 2 ranghi (versione B);
2- potenziata, con batteria a 3 ranghi (versione P);
3 - con batteria ad espansione diretta a 2 ranghi (versione E):
(per i dati tecnici vedere la relativa tabella M).
Possono essere installate sia orizzontalmente che verticalmente.
Gli allacciamenti idraulici e lo scarico della condensa possono
essere effettuati sia sul lato destro che sinistro delle unità.
Nel caso di uso di acqua come fluido termovettore, deve essere
assolutamente evitato il pericolo di gelo.
DESCRIZIONE DEI COMPONENTI
CARPENTERIA
È costruita con pannelli sandwich di acciaio zincato a caldo con
successivo trattamento superficiale di fosfatazione e verniciatura
antigraffio (spessore 6/10 mm), con interposto poliuretano espanso
(40 kg/m3).
Lo spessore dei pannelli é di 15 mm.
Il trattamento superficiale garantisce la resistenza alla corrosione:
– per 250 ore in nebbia salina (ECCA T 8);
– per 1.000 ore a 38 °C col 100% di U.R. (ASTM D 2247).
L’iniezione del poliuretano éeffettuata senza l’impiego di gas
CFC, in pieno rispetto delle nuove normative europee.
I pannelli di aspirazione e mandata sono equipaggiati di flange per
il raccordo agli eventuali canali dell'aria.
Tali pannelli possono essere ruotati, per realizzare diverse configu-
razioni del flusso d'aria.
La bacinella di raccolta condensa, in acciaio zincato é provvista di
raccordo di scarico filettato su entrambi i lati, ed é adatta sia per
installazione orizzontale che verticale dell’unità.
GRUPPO ELETTROVENTILANTE
E' costituito da ventilatori centrifughi a doppia aspirazione con pale
rivolte in avanti.
Il motore elettrico é a cinque velocità, di cui tre potranno essere
selezionate agendo sul pannello di comando.
BATTERIA DI SCAMBIO TERMICO
E' in tubo di rame ed alettatura in alluminio di tipo turbolenziato con
trattamento di bagnabilità, bloccata mediante espansione mec-
canica dei tubi.
I collettori sono corredati di attacchi filettati femmina per l'entrata
e l'uscita dell'acqua, manicotti filettati e valvolina di sfiato dell'aria
da montare su uno dei manicotti.
ACCESSORI
«PX »PANNELLO COMANDI
Per installazione a parete, é costituito da un commutatore a tre
velocità per il comando dell'apparecchio.
«PCT 2 »PANNELLO COMANDI
Consente il controllo e la regolazione della temperatura ambiente.
Sul pannello sono presenti:
– interruttore acceso-spento;
– manopola di regolazione della temperatura;
– commutatore di velocità del ventilatore a tre posizioni (a scelta
tra le cinque disponibili);
– commutatore per raffreddamento - riscaldamento ad acqua -
riscaldamento contemporaneo ad acqua e con resistenza elettrica.
In fase d'installazione é possibile scegliere tra funzionamento con
ventilatore termostatato o sempre in funzione.
«TC 152 »TERMOSTATO DI CONSENSO
Nella fase di riscaldamento interrompe l’alimentazione al motore
elettrico nel caso in cui la temperatura dell’acqua scenda sotto il
valore di taratura.
«GM »GRIGLIA DI MANDATA
A doppio ordine di alette orientabili per l'immissione dell'aria nel
locale da trattare.
Può essere installata o direttamente sull'apparecchio togliendo le
flange, o a parete.
GENERAL FEATURES
The air conditioning units of the UCD series are available in 5 sizes,
with air flow from 800 to 3.500 m3/h.
They have been designed for civil applications in air conditioning
or thermoventilating plants.
They are supplied in three versions:
1- standard, with 2 row coil (version B);
2- uprated, with 3 row coil (version P);
3 - with 2 row direct expansion coil (version E): (for technical data
see relevant table M).
The units can be installed either horizontally or vertically.
The water connections and the condensate discharge may be
made either on the left- or right-hand side of the unit.
If water is used as convective fluid, it is essential that any danger of
freezing is avoided.
DESCRIPTION OF COMPONENTS
CASING
It is constructed with galvanized steel panels, phosphatized on the
surface and treated with scratch-proof paint (thickness 6/10 mm),
hot sandwiched with foamed polyurethane (40 kg/m3).
The panels are 15 mm thick.
The surface treatment guarantees resistance to corrosion:
– for 250 hours in saline fog (ECCA T 8);
– for 1000 hours at 38 °C with 100% R.H. (ASTM D 2247)
Polyurethane is injected without using CFC gas, in keeping
with the new European regulations.
The intake and delivery panels are equipped with flanges for
connecting with air ducts if required.
These panels can be rotated in order to obtain different air flow
configurations.
The tray for collecting the condensate, in galvanized zinc, is provided
with threaded drain connection on both sides, and is ideal for both
horizontal and vertical installation of the unit.
ELECTRIC VENTILATION SECTION
It is composed of centrifugal double-intake fans with forward blades.
The electric motor has five speeds, three of which can be selected
from the control panel.
HEAT EXCHANGER
This is constructed in copper tubes finned with turbulented alumi-
nium treated for wettability, locked by the mechanical expansion
of the tubes.
The manifolds are provided with threaded female attachments, for
the entry and outlet of water; threaded sleeves and air valves are
fitted to one of the sleeves.
ACCESSORIES
«PX »CONTROL PANEL
Wall mounted panel with three speed selector switch to control
the unit.
«PCT 2 »CONTROL PANEL
To control and adjust the room temperature, it contains:
– on - off switch;
– temperature regulation knob;
– three speed selector switch (selected among the five available);
– cooling - water heating - water and electric heating selector switch.
During installation it is possible to choose between operation with
thermostat controlled fan or ventilation always on.
«TC 152 »STARTING THERMOSTAT
During heating it cuts off the supply to the electric motor in the case
where the water temperature drops below the calibrated value.
«GM »AIR DELIVERY GRILL
A double row of fins that can be oriented for the emission of air into
the area to be treated.
It can be installed either directly on the appliance by removing the
flanges, or wall mounted.
8

CARACTERISTIQUES GENERALES
Les unités de climatisation série UCD sont disponibles en 5 modèles
avec débit d'air nominal de 800 à 3.500 m3/h.
Ces appareils ont été projetés et réalisés pour applications dans
les installations de thermoventilation et climatisation résidentielles.
Sont fournies en trois versions :
1- base, avec batterie à 2 rangs (version B);
2- àpuissance accrue, avec batterie à 3 rangs (version P);
3 - avec batterie à détente directe à 2 rangs (version E): (pour les
données techniques, voir le tableau M correspondant).
Ils peuvent être installés soit horizontalement soit verticalement.
Les raccordements hydrauliques et la sortie de la condensation
peuvent etre branchés soit sur le côté droit soit sur le côté gauche
de l'appareil.
Si on utilise l’eau comme fluide thermovecteur, on doit absolument
éviter tout risque de gel.
DESCRIPTION DES COMPOSANTS
CARROSSERIE
Réalisée avec des panneaux sandwiches en acier zingué à chaud
avec traitement superficiel successif de phosphatation et peinture
résistant aux rayures (épaisseur 6/10 mm), avec interposition de
polyuréthane expansé (40 kg/m3).
L'épaisseur des panneaux est de 15 mm.
Le traitement superficiel garantit la résistance à la corrosion:
- pendant 250 heures en brouillard salin (ECCA T 8);
- pendant 1000 heures à 38 °C avec 100% d'H.R. (ASTM D 2247).
L'injection du polyuréthane est effectuée sans utilisation de
gaz CFC, ce qui est pleinement conforme aux nouvelles normes
européennes.
Les panneaux de reprise et de refoulement sont équipés de brides
pour le raccord aux éventuels conduits de l'air. Ces panneaux peuvent
être tournés pour réaliser différentes configurations du flux de l'air.
La cuvette de récupération de la condensation, en acier zingué,
est dotée d'un raccord de sortie fileté sur les deux côtés et elle est
adaptée aussi bien à l'installation horizontale que verticale.
GROUPE D'ELECTRO-VENTILATION
Ce groupe est formé de ventilateurs centrifuges à double aspiration
avec pales orientées vers l’avant.
Le moteur électrique est à cinq vitesses, dont trois pourront être
sélectionnées en agissant sur le panneau de commande.
ECHANGEUR DE CHALEUR
En tube de cuivre et ailettes d’aluminium du type à haute turbulence
avec traitement de mouillabilité, bloquées par expansion mécanique
des tubes.
Les collecteurs sont dotés de raccords filetés femelle pour l'entrée
et la sortie de l'eau, de manchons filetés et d'une petite soupape
d'évent de l'air à monter sur l'un des manchons.
ACCESSOIRES
«PX »PANNEAU DE COMMANDE
Pour installation murale, composé d'un commutateur à trois vitesses
pour la commande de l'appareil.
«PCT 2 »PANNEAU DE COMMANDE
Pour régler et contrôler la température ambiante.
Comprend:
– interrupteur on - off;
– bouton de réglage de la température;
– commutateur de vitesse du ventilateur à trois positions (au choix
parmi les cinq disponibles);
– commutateur refroidissement - chauffage par eau - chauffage
simultané par eau et par résistance électrique.
En phase d'installation, il est possible de choisir entre fonctionnement
avec ventilation thermostatée ou toujours en marche.
«TC 152 »THERMOSTAT D’AUTORISATION
Dans la phase de chauffage, inerrompt l’alimentationdu moteur
électrique au cas où la température de l’eau descendrait sous la
valeur d’étalonnage.
«GM »GRILLE DE REFOULEMENT
A double rang d'ailettes orientables pour l'émission de l'air dans le
local à traiter.
Peut être installée soit directement sur l'appareil en retirant les brides,
soit sur paroi.
HAUPTMERKMALE
Die Klimageräte der Baureihe UCD sind in 5 Baugrößen mit
Volumenströmen von 800 bis 3.500 m3/h erhältich.
Sie wurden für Lüftungs- Heizungs- und Kühlanlagen in Wohnbereichen
entwickelt und gebaut.
Lieferung in drei Versionen:
1- Grundversion, mit 2 RR-Wärmetauscher (Ausführung B);
2- verstärkt, mit 3 RR-Wärmetauscher (Ausführung P);
3 - mit einem 2 RR-Direktexpansion-Wärmetauscher (Ausführung E):
(siehe technische Daten Tabelle M).
Die Geräte können sowohl waagerecht, als auch senkrecht ein-
gebaut werden.
Die Wasseranschlüsse und der Kondenswasserablauf können an
der rechten oder der linken Geräteseite ausgeführt werden.
Wird Wasser als Wärmeträger benutzt, muß auf jeden Fall Frost-
gefahr vermieden werden.
BAUELEMENTE
GEHÄUSE
Bestehend aus Sandwich-Platten aus feuerverzinktem Stahl
mit nachfolgender Phosphatierung und Kratzschutzlackierung
(6/10 mm dick) mit einer Zwischenlage aus PU-Schaum (40 kg/m3).
Die Platten sind 15 mm dick.
Die Oberflächenbehandlung garantiert die Beständigkeit gegen
Korrosion:
– während 250 Stunden in Salzsprühnebel (ECCA T 8);
– während 1000 Stunden bei 38 °C und 100% R.F. (ASTM D 2247).
Das Einspritzen des Polyurethans erfolgt unter voller Beachtung
der neuen europäischen Normen ohne CFC-Gas.
Die Einblaß- und Ausblaßplatten sind mit Flanschen für den
Anschluß an Luftkanäle ausgestattet.
Die Platten können gedreht werden, wodurch die Luftrichtung
unterschiedlich ausgerichtet werden kann.
Die Schale für die Kondensflüssigkeit aus verzinktem Stahl ist beid-
seitig mit einem Gewindeabflußfitting ausgestattet und eignet sich
für die horizontale oder vertikale Installation der Einheit.
LÜFTEREINHEIT
Sie besteht aus Radiallüftern mit doppelter Ansaugung und nach
vorn gerichteten Flügeln.
Der Elektromotor verfügt über fünf Geschwindigkeiten, von denen
drei von der Schalttafel aus eingestellt werden können.
WÄRMEAUSTAUSCHER
Dieser besteht aus einem Kupferrohr und Wirbelrippen aus
Aluminium mit Benetzbarkeitsbehandlung und wird mittels mecha-
nischer Spreizung der Rohre blockiert.
Die Kollektoren sind mit Anschlüssen mit Innengewinde für den
Wasser zu- und Ablauf, Gewindemuffen und einem an einer der
Muffen zu montierenden Entlüfterventil ausgestattet.
ZUBEHÖRTEILE
«PX »SCHALTERBLENDE
Für Wandmontage, bestehend aus einem für drei Geschwindigkeiten
ausgelegten Wahlschalter, zur Steuerung des vorgesehenen Gerätes.
«PCT 2 »SCHALTERBLENDE
Für die Kontrolle und Regelung der Raumtemperatur.
Auf der Schalterblende befinden sich:
– Netzschalter;
– Drehknopf für die Temperaturregelung;
– Schalter für die Lüftergeschwindigkeit mit drei Schaltstufen
(Auswahl unter 5 möglichen Geschwindigkeiten);
– Wahlschalter für Kühlung, Heizung mit PWW-Heizregister oder
gleichzeitig mit PWW- und Elt. Heizung.
Bei der Installation kann zwischen einem thermostatgeschalteten
oder ständigen Lüfterbetrieb gewählt werden.
«TC 152 »ZUSTIMMUNGSTHERMOSTAT
Während der Erwärmungsphase unterbricht es die Versorgung des
Elektromotors, falls die Wassertemperatur unter den eingestellten
Wert absinkt.
«GM »AUSBLASGITTER
Mit einer doppelten Reihe schwenkbarer Rippen für die Zufuhr von
Luft in die zu klimatisierenden Räume.
Es kann direkt am Gerät durch Abnahme der Flansche oder an der
Wand installiert werden.
9

«GA »GRIGLIA DI RIPRESA
Ad alette fisse inclinate a 45°; può essere installata o direttamente
sull'apparecchio togliendo le flange, o a parete.
«CMA »CONTROTELAIO
Per l’applicazione a muro delle griglie « GM » e « GA ».
«SR »SERRANDA ANTIGELO
Costituita da un telaio ad alette nervate in lamiera di acciaio zincato.
Movimento alette tramite ruote dentate in nylon.
Le alette sono contrapposte e hanno un passo di 50 mm.
Perno di regolazione in acciaio zincato del diametro di 8 mm, con
comando manuale e possibilità di motorizzazione.
Va installata sulla flangia di aspirazione.
«PM »PLENUM DI MANDATA (CON PARTENZE CIRCOLARI)
Pannello a sandwich di acciaio zincato a caldo con successivo
trattamento superficiale di fosfatazione e verniciatura antigraffio
(spessore 6/10 mm), con interposto poliuretano espanso (40 kg/m3).
Lo spessore del pannello è di 15 mm. Il pannello è corredato di
apposite flange circolari in lamiera di acciaio zincato.
Va installato in sostituzione del pannello di mandata con flangia
rettangolare (4) (Fig. 8) utilizzando le stesse 4 viti autofilettanti.
«SM »CAMERA DI MISCELA CON FILTRO E SERRANDE
Cassonetto in lamiera di acciaio zincato completo di due serrande
di taratura aria ad alette contrapposte in lamiera di acciaio zincato.
Movimento alette tramite ruote dentate in nylon.
Passo alette 50 mm; perno di regolazione in acciaio zincato del
diametro di 8 mm.
Le serrande sono già complete di comando manuale per la regola-
zione e sono comunque motorizzabili.
Il cassonetto è già completo di filtro in fibra sintetica come l’acces-
sorio « FAF ».
«FAF »FILTRO DI RIPRESA
Contenuto in apposito cassonetto é realizzato in fibra sintetica a
geometria pieghettata con rapporto tra superficie frontale e super-
ficie filtrante pari a 1/4; telaio a U in lamiera zincata con due reti di
supporto in filo zincato elettrosaldato.
È disponibile in classe EU 3 (vedi tavola 17).
Per l’installazione vedi Fig. 3.
«BP »BATTERIA DI POST-RISCALDAMENTO
Contenuta in apposito cassonetto, termicamente isolato, va installata
esclusivamente sulla flangia di mandata dell’aria ed é costituita da
una batteria ad un rango di tipo turbolenziato.
Le potenze sono riportate in tabella N e sono relative a condizioni
di portata d’aria nominali.
«BR »BATTERIA ELETTRICA
Le macchine possono essere corredate dell’accessorio batteria
elettrica di apposita potenza.
Tutte le batterie, contenute in apposito cassonetto, sono composte
da resistenze corazzate modulari, dotate di due termostati di sicu-
rezza, uno automatico, l’altro tarato a 100 °C con riarmo manuale.
Il sistema di riarmo prevede l’apertura del coperchio per consentire
l’ispezione interna.
Vanno montate unicamente a valle della batteria alettata fissandole
con le apposite viti, fornite a corredo, sulla flangia di mandata.
Potenza Tensione
Mod. Watt Volt
BR 1 per UCD 9 4.000 220 / 1
BR 2 per UCD 15 6.000 380 / 3
BR 3 per UCD 21 8.000 380 / 3
BR 4 per UCD 28 10.000 380 / 3
BR 5 per UCD 37 12.000 380 / 3
IMBALLO
Le unità vengono spedite con imballo standard costituito da una
scatola di cartone (per i modelli 9 e 15). Con pallet e scatola di
cartone per gli altri modelli.
Gli accessori vengono spediti a parte in scatole di cartone.
«GA »SUCTION GRILL
Louvers fixed at a 45° angle. It can be installed either directly onto
the appliance by removing the flanges, or wall mounted.
«CMA »COUNTER-FRAME
Suitable for wall application of « GM » and « GA » grilles.
«SR »ANTIFREEZE DAMPER
Made of a louvered frame in galvanised steel sheet. The fin move-
ment is effected by nylon cogged wheels. The fins are overlapping
and have a 50 mm spacing.
Regulation shaft in galvanised steel, 8 mm in diameter, with hand
control and designed to receive a motor.
It must be mounted on the suction flange.
«PM »DISCHARGE PLENUM (WITH ROUND SPIGOTS)
Double skinned panel in galvanised steel, phosphate coeted with a
scratchproof (6/10 mm thick) with injected polyurethane packing
(40 kg/m3).
The panel is 15 mm thick.
It is fitted with galvanised steel sheet spigots.
It is installed in replacement of the discharge panel having rectangular
flanges (4) (Fig. 8) using the same 4 self-tapping screws.
«SM »MIXING BOX WITH FILTER AND DAMPER
Box in galvanised steel sheet complete with two air regulation
dampers with overlapping fins in galvanised steel sheet.
The fin movement is effected by nylon cogged wheels.
50 mm fin spacing; regulation shaft in galvanised steel, 8 mm in
diameter.
The dampers are already fitted with a hand adjustment and are
designed to receive a motor.
The box is already complete with a filter in synthetic fibres as with
accessory « FAF ».
«FAF »SUCTION FILTER
Contained in its own cabinet and built with pleated synthetic fibre
with a front surface/filtering ratio of 1/4; the U-shaped frame in
galvanized sheet steel has two supporting nets made of electro-
welded galvanized wires.
Available in class EU 3 (see Table 17).
For installation, see Fig. 3.
«BP »AFTER-HEATING COIL
It is containedin a specific,thermally isolated housing,and has a
one row louver element.It must be installed exclusively on the air
discharge flange.
The powers are shown in Table N and are relative to the nominal
rate of air flow and the delivered capacity.
«BR »ELECTRIC COIL
Electric coils of varying power are provided for the various machines.
All the heaters contained in a suitable housing, are made of modular
armoured elements, fitted with two safety thermostats, one automatic,
the other calibrated at 100 °C with manual reset.
The reset enables the cover to be opened to allow for inspection.
They must only be mounted down-line to the finned elements, fixing
them to the discharge flange with the screws provided.
Power Power suppy
Mod. Watt Volt
BR 1 for UCD 9 4.000 220 / 1
BR 2 for UCD 15 6.000 380 / 3
BR 3 for UCD 21 8.000 380 / 3
BR 4 for UCD 28 10.000 380 / 3
BR 5 for UCD 37 12.000 380 / 3
PACKING
The units are shipped in standard packing consisting of a card-
board box (for models 9 and 15). With pallet and cardboard box for
all other models. The accessories individually packed in carton
boxes, are shipped separately.
10

«GA »GRILLE DE REPRISE
A ailettes fixes inclinées à 45°, peut être installée soit directement
sur l'appareil en retirant les brides, soit sur paroi.
«CMA »CONTRE-CADRE
Pour application murale des grilles « GM » et « GA ».
«SR »REGISTRE ANTIGEL
Formé d’un châssis à ailettes nervurées en tôle d’acier zingué.
Mouvement des ailettes par roues dentées en nylon. Les ailettes
sont opposées et ont un pas de 50 mm.
Axe de réglage en acier zingué d’un diamétre de 8 mm, avec com-
mande manuelle et possibilité de motorisation.
Doit être installée sur la bride d’aspiration.
«PM »PLENUM DE REFOULEMENT (AVEC DEPARTS CIRCULAIRES
Panneau sandwich en acier zingué à chaud avec traitement super-
ficiel successif de phosphatation et peinture anti-rayure (épaisseur
6/10 mm), avec interstice de polyuréthane expansé (40 kg/m3).
L’épaisseur du panneau est de 15 mm.
Le panneau est doté de bride circulaires spéciales en tôle d’acier
zingué. Doit être installé à la place du panneau de refoulement à
bride rectangulaire (4) (Fig. 8) en utiliant les 4 mêmes vis-tarauds.
«SM »CHAMBRE DE MELANGE AVEC FILTRE ET REGISTRES
Caisson en tôle d’acier zingué à deux registres d’étalonnage de
l’air à ailettes opposées en tôle d’acier zingué.
Mouvement des ailettes par roues dentées en nylon.
Pas des ailettes 50 mm; axe de réglage en acier zingué d’un diamètre
de 8 mm.
Les registres disposent déjà d’une commande manuelle pour le
réglage et ils sont dans tous les cas motorisables.
Le caisson possède déjà un filtre en fibre synthétique comme
l’accessoire « FAF ».
«FAF »FILTRE DE REPRISE
Logé dans un caisson prévu à cet effet, il est réalisé en fibre
synthétique à géométrie plissetée avec rapport entre surface
frontale / surface filtrante de 1/4; châssis en U en tôle zinguée
avec deux grilles de support en fil zingué électrosoudé.
Est disponible en classe: EU 3 (voir tableau 17).
Pour l'installation, voir Fig. 3.
«BP »BATTERIE DE POST-CHAUFFAGE
Contenue dans un caisson prévu à cet effet, thermiquement isolé,
ne doit être installée que sur la bride de refoulement de l'air et elle
est formée d'une batterie à un rang de type turbulencié.
Les puissances figurent dans le tableau N et se rapportent à des
conditions de débit d'air et de rendement nominaux.
«BR »BATTERIE ELECTRIQUE
Des batteries électriques de différente puissance sont prévues
pour les diverses machines.
Toutes les batteries, contenues dans un caisson prévu à cet effet,
sont formées de résistances cuirassées modulaires, dotées de
deux thermostats de sécurité, un automatique, l’autre étalonné
à 100 °C à réarmement manuel.
Le système de réarmement prévoit l'ouverture du couvercle de
l’appareil pour permettre l'inspection de l'intérieur.
Ne doivent être montées qu'en aval de la batterie à ailettes en les
fixant, à l'aide des vis prévues à cet effet et fournies de série, sur la
bride de refoulement.
Puissance Tension
Mod. Watt Volt
BR 1 pour UCD 9 4.000 220 / 1
BR 2 pour UCD 15 6.000 380 / 3
BR 3 pour UCD 21 8.000 380 / 3
BR 4 pour UCD 28 10.000 380 / 3
BR 5 pour UCD 37 12.000 380 / 3
EMBALLAGE
Les unités sont expédiées avec emballage standard formé d'une
boîte en carton (pour les modéles 9 et 15). Avec palettes et boîte
en carton pour les autres modèles.
Les accessoires sont expédiés à part en boîtes carton.
«GA »ANSAUGGITTER
Mit feststehenden, um 45° geneigten Klappen; kann entweder
direkt am Gerät durch Abnahme der Flansche oder an der Wand
installiert werden.
«CMA »GEGENRAHMEN«CMA »
Wird verwendet zur Wandbefestigung der Gitter « GM » und « GA ».
«SR »FROSTSCHUTZSCHIEBER
Besteht aus einem Rahmen mit gerippten Klappen aus verzinktem
Stahlblech. Bewegung der Klappen durch Nylon-Zahnräder.
Die Klappen mit einer Teilung von 50 mm sind entgegengesetzt
angeordnet. Einstellbolzen aus verzinktem Stahl mit Durchmesser
8 mm, mit manueller Steuerung und Möglichkeit der Motorisierung.
Installation am Ansaugflansch.
«PM »AUSBLAßPLENUM (MIT RUNDEN AUSGÄNGEN)
Sandwich-Tafel aus heißverzinktem Stahl mit nachfolgender
Oberflächenbehandlung durch Phosphatieren und Kratzschutz-
lackierung (Stärke 6/10 mm), mit PUR-Schaum-Füllung (40 kg/m3).
Die Dicke der Tafel beträgt 15 mm. Die Tafel ist mit runden
Flanschen aus verzinktem Stahlblech ausgestattet. Sie wird anstelle
der Ausblaßtafel mit rechteckigem Flansch (4) (Abb. 8) unter
Verwendung derselben 4 selbstschneidenden Schrauben installiert.
«SM »MISCHKAMMER MIT FILTER UND SCHIEBERN
Kammer aus verzinktem Stahlblech mit zwei Luftregelschiebern
und gegenübergestelltenKlappen aus verzinktem Stahlblech.
Bewegung der Klappen durch Nylon-Zahnräder.
Klappenteilung 50 mm; Einstellbolzen aus verzinktem Stahl mit
Durchmesser 8 mm.
Die Schieber sind bereits mit einer manuellen Steuerung für die
Einstellung ausgestattet und sind außerdem motorisierbar.
Die Kammer ist bereits mit einem Filter aus synthetischer Faser wie
das Zubehör « FAF » ausgestattet.
«FAF »ANSAUGFILTER
Mit separatem Gehäuse, aus Synthetikfaser mit gefalteter
Geometrie und einem Verhältnis zwischen Front- und Filterfläche
von 1 zu 4; U-förmiger Rahmen aus Zinkblech mit zwei Traggittern
aus verzinktem Draht.
Verfügbar in der EU-Klasse 3 (siehe Tafel 17).
Für die Installation siehe Abb. 3.
«BP »NACHERHITZER
Enthalten in einem wärmeisolierten Behälter wird sie ausschließlich
andem Luftausblaßflansch installiert und besteht aus einer einreihigen
Batterie mit Wirbeleffekt.
Die Leistungswerte sind in der Tabelle N aufgeführt und beziehen
sich auf Bedingungen mit Nennluftdurchsatz und Nennleistungen.
«BR »ELEKTROHEIZUNG
Für diese Geräte sind Elektro-Wärmetauscher mit unterschiedlicher
Leistung vorgesehen.
Alle in einem speziellen Behälter enthaltenen Batterien bestehen
aus modularen, gepanzerten Widerständen, versehen mit zwei
Sicherheitsthermostaten, ein automatisches und ein auf 100 °C ein-
gestelltes Thermostat mit manueller Rücksetzung.
Das Rücksetzungssystem sieht die Öffnung des Deckels vor, um
eine Kontrolle des Batterieinnenraums zu ermöglichen.
Sie werden ausschließlich hinter dem Klappensatz montiert und mit
den mitgelieferten Schrauben am Ausblaßflansch befestigt.
Leistung Spannung
Mod. Watt Volt
BR 1 für UCD 9 4.000 220 / 1
BR 2 für UCD 15 6.000 380 / 3
BR 3 für UCD 21 8.000 380 / 3
BR 4 für UCD 28 10.000 380 / 3
BR 5 für UCD 37 12.000 380 / 3
VERPACKUNG
Die Klimageräte werden in einer Standardverpackung aus Karton
versandt (für Mod. 9 und 15). Mit Palette und Kartonschachtel für
die anderen Modelle.
Das Zubehör wird separat in Kartons versandt.
11

CRITERI DI SCELTA
Le tabelle A, B, D ed E riportano, rispettivamente per batteria a 2
e a 3 ranghi, la potenza frigorifera totale e sensibile alla portata aria
nominale, al variare di:
– temperatura dell'acqua in ingresso,
– salto termico dell'acqua,
– temperature a bulbo secco o a bulbo umido dell'aria in ingresso.
Le potenze non tengono conto della dissipazione di calore dovuta
alla presenza del motore elettrico.
Per portate d'aria diverse dalla nominale correggere i dati utiliz-
zando le tabelle C e F.
Le tavole 1 e 2 riportano la potenza termica al variare della portata
d'aria, con salto termico tra acqua e aria in ingresso di 50 °C e con
salto termico dell’acqua di 10 °C.
Per valori diversi utilizzare i fattori di correzione delle tav. 3 e 4.
Le tavole 5 e 6 riportano le perdite di carico lato acqua per batteria
a 2 R e 3 R con temperatura media di 10 °C; per temperature diverse
il valore di perdita di carico va corretto utilizzando la tabella G.
Le tavole da 7 a 11 riportano le curve di ventilazione alle varie
velocità.
Ricordiamo che il motore é a 5 velocità mentre il pannello comandi
ha un commutatore di velocità a tre posizioni.
Si dovranno quindi scegliere le velocità più adatte di caso in caso.
La prevalenza (statica utile) é riferita al funzionamento con batteria
standard a 2 ranghi e senza nessun accessorio installato.
Per configurazioni diverse della macchina (batteria a 3 ranghi) la
prevalenza statica utile va diminuita dei valori che si ricavano dalla
tavola 12.
Le tavole da 13 a 17 riportano le perdite di carico degli accessori.
Le tabelle H ed L forniscono le potenze sonore emesse dalle varie
unità alle diverse velocità:
– la tabella H per installazione non canalizzata al variare della
velocità del ventilatore;
– la tabella L per installazione canalizzata, con portata nominale
al variare della prevalenza statica utile.
ISTRUZIONI PER L' INSTALLAZIONE
Vengono qui riportate le indicazioni essenziali per una corretta
installazione delle apparecchiature.
Si lascia comunque all'esperienza dell'installatore il perfeziona-
mento di tutte le operazioni a seconda delle esigenze specifiche.
Per il montaggio degli accessori si rimanda alle istruzioni allegate
a ciascuno di essi.
I pannelli flangiati per l’aspirazione e la mandata dell’aria, all'atto
della spedizione, sono disposti come nello schema C di Fig. 7.
Se si desidera una configurazione diversa (Fig. 1 e 2):
– smontare il pannello flangiato (4) e/o (8) (Fig. 8);
– smontare il pannello cieco corrispondente (6) e/o (7);
– scambiare i pannelli (4) con (6) e/o (8) con (7);
– rimontare il pannello fissandolo con le viti precedentemente tolte.
I pannelli flangiati vanno montati con il bordo più sottile in modo
che la luce di passaggio dell’aria sia in corrispondenza della batteria
di scambio termico (la posizione dei pannelli è indicata nelle figure
relative ai dati dimensionali).
L’unità é fornita completa di staffe di supporto per il montaggio a
parete o a soffitto.
Le staffe possono essere montate come illustrato in Fig. 7.
Per montaggi diversi le indicazioni riportate di seguito vanno modi-
ficate in base alle esigenze specifiche di cantiere.
In tutti i casi si consiglia di fissare prima le staffe al soffitto (con tappi
ad espansione o tiranti filettati) e poi di fissare l'unità alle staffe.
Nel caso di installazione verticale le viti di fissaggio alle staffe
vanno ad appoggiare nella parte più corta delle asole (Fig. 7)
Per il fissaggio dell'unità alla parete procedere come segue:
– posizionare la dima dove si desidera installare la macchina
tenendo conto che la larghezza B è maggiorata di 40 mm su
ambedue i lati per consentire il fissaggio delle staffe con le pieghe
rivolte all’esterno.
Si fa presente che il lato quotato E di Fig. 5 corrisponde al lato
ingresso aria;
SELECTION
Tables A, B, D and E show, for the relative standard coils in two
and three rows, the total cooling capacity depending on the nominal
air flow, according to the:
– entering water temperature,
– temperature rise of the water,
– dry-bulb and wet-bulb temperatures of entering air.
The capacities do not take into account the dispersion of heat
caused by the presence of the electric motor.
For air flows other than nominal, correct the data using Tables C and F.
Tables 1 and 2 show the heating capacity depending on air flow,
with temperature rise between the entering water and air at 50 °C,
and with the temperature rise of water at 10 °C.
For other values, use the correction factors given in Tables 3 and 4.
Tables 5 and 6 show the water pressure drops for 2 R and 3 R coils
at an average temperature of 10 °C.
For other temperatures, the value of the pressure drop is to be
corrected using Table G.
Tables 7 to 11 show the fan performance charts at the various
speeds.
Remember that the motor has five speeds while the control panel
has a three speed selector switch.
The appropriate speed must therefore be selected in each case.
The prevalent (available static pressure) refers to functioning with
2 rows of standard coils and without any accessories installed.
For other configurations of the machine (three rows of coils), the
available static pressure is to be deducted from the values shown
in Table 12.
Tables 13 to 17 show pressure drops for accessories.
Tables H and L show the sound levels emitted by the different units
at various speeds:
– Table H for non-ducted installation with fan speed variation;
– Table L for ducted installation, with nominal air flow with variation
of the available static pressure.
INSTALLATION
The essential indications to carry out a proper installation are given
here below.
The installer will use the proficiency and experience necessary to
meet any particular installation requirement.
To install the accessories please refer to the instructions contained
in their packing.
The flanged panels for the intake and delivery of air at the time of
delivery are arranged as shown in Diagram C of Fig. 7.
If a different configuration is desired, see figures 1 and 2:
– disassemble the flanged panel (4) and/or (8) (Fig. 8);
– disassemble the corresponding blind panel (6) and/or (7);
– replace panel (4) with (6) and/or (8) with (7);
– reassemble the panel using the screws removed earlier.
The flanged panels are mounted on the thinner side so that the air
passage is in line with the exchange coil (the position of the panels
is shown in the relevant dimensional drawings).
The unit is provided complete with supporting brackets for wall
mounting or ceiling mounting.
The brackets are fitted as shown in Fig. 7.
For other types of assembly, the instructions given below are to be
modified according to the specific requirements of the site.
In every case, it is advisable to first fit the brackets to the ceiling
(with expandable plugs or screw stays) and then fix the unit to the
brackets.
In the case of vertical installation, the screws fitted to the brackets
rest on the shorter side of the slot (Fig. 7).
Fix the unit to the wall as follows:
– position the template where the machine is to be installed,
bearing in mind that the width B is greater than 40 mm on both
sides in order to allow the brackets to be fitted with the folds
facing outwards.
Remember side E of Fig. 5 corresponds to the side for the
inlet of air;
12

CRITERES DE CHOIX
Les tableaux A, B, D et E donnent respectivement pour batterie
standard à 2 rangs et pour batterie à 3 rangs la puissance frigorifique
totale et sensible au débit d'air nominal, lorsque varient:
– la température de l'eau en entrée,
– le saut thermique de l’eau,
– les températures à bulbe sec ou à bulbe humide de l'air en entrée.
Les puissances ne tiennent pas compte de la dissipation de
chaleur due à la présence du moteur électrique.
Pour des débits d'air différents du débit nominal, corriger les
données en utilisant les tableaux C et F.
Les tables 1 et 2 donnent la puissance thermique lorsque le débit
d'air varie, avec saut thermique entre eau et air en entrée de 50 °C,
avec saut thermique de l'eau de 10 °C.
Pour des valeurs différentes, utiliser les facteurs de corrections des
tables 3 et 4.
Les tables 5 et 6 fournissent les pertes de charge côté eau pour
batterie 2 R et 3 R avec température moyenne de 10 °C.
Pour des températures différentes, la valeur de perte de charge
doit être corrigée en utilisant le tableau G.
Les tables de 7 à 11 donnent les courbes de ventilation pour les
différentes vitesses.
On rappelle que le moteur est à 5 vitesses, alors que le panneau
des commandes a un commutateur de vitesse à trois positions.
Il faudra donc choisir les vitesses les plus adaptées au cas par cas.
La pression (statique utile) se rapporte au fonctionnement avec
batterie standard à 2 rangs et sans aucun accessoire installé.
Pour des configurations différentes de l'appareil (batterie à 3 rangs),
la pression statique utile doit être diminuée des valeurs que l'on
obtient à partir de table 12.
Les tables de 13 à 17 montrent les pertes de charge des accessoires.
Les tableaux H et L fournissent les puissances sonores émises par
les différentes unités aux différentes vitesses:
– le tableau H pour installation non canalisée lorsque la vitesse
du ventilateur varie;
– le tableau L pour installation canalisée, avec débit nominal
lorsque la pression statique utile varie.
INSTALLATION
Ce paragraphe donne les indications essentielles pour l'installation
correcte des appareils.
On laisse à l'expérience de l'installateur la finition de toutes les
opérations en fonction de chaque exigence spécifique.
Pour le montage des accessoires, se rapporter aux instructions les
accompagnant.
Au moment de l'expédition, les panneaux bridés pour la reprise et
le refoulement de l'air sont disposés comme indiqué sur le schéma
C de la figure 7.
Si l'on désire avoir une configuration différente (Fig. 1 et 2):
– démonter le panneau bridé (4) et/ou (8) (Fig. 8);
– démonter le panneau aveugle correspondant (6) et/ou (7);
– échanger les panneaux (4) et (6) et/ou (8) et (7);
– remonter le panneau en le fixant avec les vis précédemment
enlevées.
Les panneaux bridés doivent être montés du côté du bord le plus
fin de façon que l’ouverture de passage de l’air se trouve en regard
de la batterie d’échange thermique (la position des panneaux est
indiquée sur les figures relatives aux données dimensionnelles.
L'unité est fournie avec les étriers de support pour le montage sur
mur ou plafond.
Les étriers peuvent être montés comme indiqué à la Fig. 7.
Pour des montages différents, les indications figurant ci-après doivent
être modifiées en fonction des exigences spécifiques de chantier.
Dans tous les cas il est conseillé de fixer d'abord les étriers au
plafond (avec des chevilles à expansion ou des entretoises filetées),
puis de fixer l'unité aux étriers.
En cas d'installation verticale, les vis de fixation aux étriers prennent
appui dans la partie la plus courte des trous ovales (Fig. 7).
Pour la fixation de l'unité au mur, procéder comme suit:
– positionner le gabarit à l'endroit où l'on désire installer l'appareil
en n'oubliant pas que la largeur B est majorée de 40 mm sur les
deux côtés pour permettre la fixation des étriers avec les plis
orientés vers l'extérieur.
On rappelle que le côté marqué E de la Fig. 5 correspond au
côté entrée air;
AUSWAHLKRITERIEN
Die Tabellen A, B, D und E führen jeweils die für den Nennluft-
durchsatz empfindliche Gesamt-Kühlleistung der zweirangigen
Standard-Batterien und der dreirangigen Batterien auf, und zwar
je nach:
– Temperatur des Zulaufwassers,
– Wärmesprung des Wassers,
– Temperatur bei trockener oder feuchter Kugel der zuströmenden
Luft.
Die Leistungswerte berücksichtigen nicht die aufgrund der Präsenz
des Elektromotors entstehende Wärmedissipation.
Für von den Nennwerten abweichende Luftdurchsätze können die
Daten mit Hilfe der Tabellen C und F abgewandelt werden.
Die Tafeln 1 und 2 zeigen die Wärmeleistungen je nach Luftdurch-
satz, mit Wärmesprung zwischen Wasser und zufließender Luft
von 50 °C, mit Wärmesprung des Wassers von 10 °C.
Für abweichende Werte können die Korrektionsfaktoren der Tafeln
3 und 4 angewandt werden.
Die Tafeln 5 und 6 zeigen die Energiegefälle der Wasserseite für
Batterien 2 R und 3 R mit durchschnittlichen Temperaturen von 10 °C.
Für abweichende Temperaturen wird der Wert des Energiegefälles
mit Hilfe der Tabelle G korrigiert.
Die Tafeln 7 bis 11 zeigen die Belüftungskurven bei den unter-
schiedlichen Geschwindigkeiten auf. Wir erinnern daran, daß der
Motor über 5 Geschwindigkeiten verfügt, während die Schalttafel
einen Geschwindigkeitsschalter mit drei Positionen hat.
Die geeignete Geschwindigkeit muß folglich von Fall zu Fall gewählt
werden.
Die statische Nutz-Förderhöhe bezieht sich auf den Betrieb mit
zweirangiger Standard-Batterie, ohne irgendwelche installierten
Zubehörteile.
Für abweichende Gestaltungen der Maschine (dreirangige Batterien)
wird die statische Förderhöhe um die aus den Tabelle 12 entnehm-
baren Werte vermindert.
In den Tafeln 13 bis 17 ist der Druckabfall der Zubehörteile angegeben.
Die Tabellen H und L zeigt die von den verschiedenen Einheiten
bei den unterschiedlichen Geschwindigkeiten erzeugte Geräusch-
entwicklung auf:
– die Tabelle H für nicht kanalisierte Installationen, je nach der
unterschiedlichen Gebläsegeschwindigkeit;
– die Tabelle L für kanalisierter Installation, mit Nennleistung je
nach der statischen Nutzförderhöhe.
INSTALLATIONSANLEITUNGEN
Hier werden die notwendigen Anweisungen zur richtigen Installation
der Geräte gegeben.
Der Monteur wird nach der eigenen Erfahrung und nach der
Installationsart das Verfahren am besten vollenden.
Die Anweisungen zur Zubehörinstallation sind den einzelnen
Bestandteilen beigelegt.
Die geflanschten Platten für die Ansaugung und den Ausblaß der
Luft sind bei der Lieferung gemäß dem Schema C der Abb. 7
ausgerichtet.
Für abweichende Gestaltungen siehe Abb. 1 und 2):
– die geflanschte Platte (4) und/oder (8) ausbauen (Abb. 8);
– die entsprechende Blindplatte (6) und/oder (7) ausbauen;
– die Platten (4) durch (6) und/oder (8) durch (7) ersetzen;
– die Platte mit den zuvor entfernten Schrauben befestigen.
Die geflanschten Tafeln werden mit dem dünneren Rand so montiert,
daß die Luftdurchgangsöffnung mit der Wärmeaustauschbatterie
übereinstimmt (die Position der Tafeln ist in den Abbildungen zu
den Abmessungsdaten angegeben).
Das Gerät wird komplett mit Bügeln für die Befestigung an der
Wand oder der Decke geliefert.
Diese Bügel können wie aus der Abb. 7 ersichtlich wird montiert
werden.
Für abweichende Montagearten werden die nachstehenden
Angaben je nach den spezifischen Anforderungen verändert.
Es empfiehlt sich in jedem Fall zunächst die Bügel an der Decke
anzubringen (mit Spreizdübeln oder Gewindebolzen) und anschlies-
send die Einheit an den Bügeln zu befestigen.
Im Falle der senkrechten Installation müssen die Schrauben für die
Befestigung an den Bügeln an der kurzen Seite der Ösen aufliegen
(Abb. 7).
Für die Befestigung der Einheit an einer Wand wird wie folgt
vorgegangen:
– die Schablone an der gewünschten Stelle auflegen; dabei
darauf achten, daß die Breite B beidseitig um 40 mm größer sein
muß, damit die Bügel mit nach außen zeigenden Winkeln montiert
werden können. Die mit E bezeichnete Seite der Abb. 5 entspricht
der Seite des Lufteintritts;
13

– segnare i quattro fori per i tappi ad espansione (o tiranti filettati)
utilizzando la dima in cartone fornita a corredo (Fig. 5);
la dima riporta 16 fori: 8 per il montaggio come nel caso A di
Fig. 7 (4 fori A1 per il montaggio a soffitto, 4 fori A2 per quello a
parete di Fig. 5), 8 per il montaggio come nel caso B di Fig. 7
(4 fori B1 per il montaggio a soffitto, 4 fori B2 per quello a
parete di Fig. 5)
– predisporre il sistema di fissaggio (tappi ad espansione o tiranti);
– fissare le staffe alla parete o al soffitto utilizzando dadi, rondelle
e controdadi;
– agganciare l’unità alle staffe mediante le 4 viti laterali (Fig. 7);
– nel caso di installazione orizzontale, prima di stringere definitiva-
mente viti, dadi e controdadi, verificare che la condensa venga
scaricata correttamente.
Si consiglia di dare una leggera pendenza verso lo scarico per
favorire il deflusso.
MONTAGGIO DEI CASSONETTI «BP », «BR », «SM »e «FAF »
Questi accessori sono contenuti in cassonetti aventi le medesime
caratteristiche dimensionali.
Il cassonetto va montato in corrispondenza della flangia di mandata
(per BP, BR e SM) o della flangia di ripresa (per FAF) e fissato
mediante le viti fornite a corredo.
MONTAGGIO DELLE GRIGLIE «GM »e «GA »
Le griglie di mandata GM e di aspirazione GA, fornite come acces-
sorio, possono essere montate direttamente sulle unità di tratta-
mento fissandole, con le viti a corredo, sui pannelli di mandata o di
aspirazione dopo aver tolto le flange.
Se le stesse griglie dovessero essere fissate a parete utilizzare
il controtelaio « CMA » da annegare nel muro.
COLLEGAMENTI IDRAULICI
La batteria di scambio termico è predisposta di serie con gli attacchi
idraulici posizionati in configurazione STANDARD come indicato nella
figura dei dati dimensionali.
Per spostarli sul lato opposto, bisognerà ruotare di 180° la batteria,
procedendo nel seguente modo:
– smontare il pannello superiore (1) e quello di mandata aria (4)
(lato batteria) (Fig. 8);
– smontare la fascia di chiusura (2);
– sfilare la batteria;
– ruotare la batteria di 180°;
– reinserire la batteria nel suo alloggiamento e fissarla;
– rimontare la fascia di chiusura (2);
– rimontare i pannelli (4) e (1).
Per i collegamenti idraulici (Fig. 6):
– collegare il condotto di scarico al tronchetto filettato della
bacinella (5) e tappare il tronchetto opposto non utilizzato;
– tagliare i due tappi in plastica (6);
– avvitare i manicotti filettati (4) sui collettori della batteria;
– avvitare lo sfiato aria (2) sul manicotto come indicato in figura;
tale manicotto, provvisto di attacco per lo sfiato aria, a macchina
installata, deve essere in posizione più alta rispetto all'altro e
lo sfiato aria deve essere posto verso l'alto.
Eseguire i collegamenti all'impianto, isolare tutte le tubazioni
(se necessario anche il tubo di scarico condensa) e verificare che
la condensa venga scaricata correttamente.
Nel caso di uso di acqua come fluido termovettore, deve essere
assolutamente evitato il pericolo di gelo.
COLLEGAMENTI ELETTRICI
Le unità sono predisposte per funzionare con tensione monofase a
220 / 230 V - 50 Hz.
Per i collegamenti elettrici riferirsi agli schemi riportati più avanti.
Il collegamento del motore alla morsettiera (Fig. 6) va scelto in
base alle caratteristiche di ventilazione richieste.
Per i modelli 9 e 15, la morsettiera (1) (Fig. 6) èfissata al pannello
superiore (7) mentre per i modelli 21, 28 e 37 èfissata al gruppo
ventilante.
Il pannello comandi può comandare 3 velocità, il motore elettrico è
a 5 velocità.
Passare i cavi elettrici (3) attraverso uno dei fori di Fig. 6 muniti di
anello passacavo in gomma.
– mark the four holes for the expandable plugs (or screw stays)
using the cardboard template provided in the kit (Fig. 5);
the template has 16 holes; eight for fitting as in case A in Fig. 7
(four A1 holes for fitting to the ceiling, four A2 holes for fitting
to the walls as in Fig. 5); eight for fitting as in case B of Fig. 7
(four B1 holes for fitting to the ceiling; or four B2 holes for fitting
to walls as in Fig. 5);
– prepare the fitting system (expandable plugs or screw stays);
– fit the brackets to the wall or ceiling using nuts, washers and
lock nuts;
– hook the unit to the brackets with the help of the four lateral
screws (Fig. 7);
– in the case of horizontal installation, before tightening the screws,
nuts and lock nuts, make sure that the condensate drains out
properly.
It is advisable to tilt the unit slightly towards the drain in order to
help the down flow.
MOUNTING THE BOXES «BP », «BR », «SM »and «FAF »
These accessories are housed in boxes which all have the same
dimensions.
The box is mounted on the discharge flange (for BP, BR and SM)
or the return flange (for FAF) and fixed with the screws provided.
MOUNTING THE GRILLES «GM »and «GA »
The discharge grilles GM and suction grille GA, supplied as an
accessory can be mounted directly onto the air handling unit by
fixing them onto the discharge or return panels with the screws
provided, after having removed the flanges.
If these grilles are wall mounted use the back plate CMA which
must be cemented into the wall.
WATER CONNECTIONS
The heat exchanger is standard arranged with water connection
set in STANDARD (same figure showing dimensions).
In order to move it to the opposite side, rotate the coil through 180°;
then proceed as follows;
– disassemble the upper panel (1) and the air delivery panel (4)
(coil side) (Fig. 8);
– disassemble the closing band (2);
– extract the coil;
– turn the coil through 180°;
– re-insert the coil in its housing and fix it;
– reassemble the closing band;
– reassemble the panels (4) and (1).
For water connections (Fig. 6):
– connect the condensate discharge pipeline with the threaded
tube of drip tray (5) and plug the opposite, unused tube;
– cut the two plastic plugs (6);
– screw the threaded sleeves (4) on to the manifolds of the coil;
– screw the air breather pipe onto the sleeve as shown in the figure;
this sleeve, which is provided with an attachment for the air
breather pipe, must be placed higher than the other once the
machine is fitted; the air breather tube must be placed higher.
Make all the required connections of the installation, insulate all
the pipes (the condensate discharge pipe as well, if necessary)
and check that the condensate is discharged properly.
If water is used as convective fluid, it is essential that any danger
of freezing is avoided.
ELECTRIC CONNECTIONS
The units are set up to function with single phase voltage of
220 / 230 V - 50 Hz.
For the electrical connections, refer to the diagrams given below.
The connection of the motor to the terminal block (Fig. 5) is chosen
according to the ventilation characteristics required.
For models 9 and 15. the terminal block (1) (Fig. 6) is fixed to
the top panel (7) while for models 21, 28 and 37 it is fixed to
the fan group.
The control panel allows three speeds; the electric motor has five
speeds.
Pass the electric cables (3) through one of the holes provided with
a rubber guide ring (see Fig 6).
14

– tracer les quatre trous pour les chevilles à expansion (ou
entretoises filetées) en utilisant le gabarit en carton fourni de
série (Fig. 5);
le gabarit contient 16 trous: 8 pour le montage comme dans
le cas A de la Fig. 7 (4 trous A1 pour le montage sur plafond,
4 trous A2 pour celui sur mur de la Fig. 5), 8 pour le montage
comme dans le cas B de la Fig. 7 (4 trous B1 pour le montage
sur plafond, 4 trous B2 pour le montage sur mur de la Fig. 5);
– prédisposer le système de fixation (chevilles à expansion ou
entretoises);
– fixer les étriers au mur ou au plafond en utilisant écrous, rondelles
et contre-écrous;
– accrocher l'unité aux étriers à l'aide des 4 vis latérales (Fig. 7);
– en cas d'installation horizontale, avant de serrer définitivement
vis, écrous et contre-écrous, vérifier que la condensation est
correctement évacuée.
Il est conseillé de donner une légère pente vers la sortie pour aider
l'écoulement.
MONTAGE DES CAISSONS «BP », «BR », «SM »e «FAF »
Ces accessoires sont contenus dans des caissons ayant les
mêmes caractéristiques dimensionnelles; le caisson doit être
monté en regard de la bride de refoulement (pour BP, BR et SM)
ou de la bride reprise (pour FAF) et fixé à l’aide des vis fournies
de série.
MONTAGE DES GRILLES «GM »e «GA »
Les grilles de refoulement GM et d’aspiration GA, fournies comme
accessoires, peuvent être montées directement sur les unités
de traitement en les fixant, avec les vis fournies de série, sur les
panneaux de refoulement ou d’aspiration après avoir retiré les brides.
Si ces mêmes grilles doivent être fixées sur paroi, utiliser le contre-
châssis CMA à noyer dans le mur.
RACCORDEMENTS HYDRAULIQUES
La batterie d'échange thermique est prédisposée de série avec
des raccords hydrauliques positionnés en configuration STANDARD
comme indiqué dans la figure montrant les dimensions.
Pour les déplacer sur le côté opposé, il faudra tourner la batterie
de 180° en procédant de la façon suivante:
– démonter le panneau supérieur (1) et celui de refoulement de
l'air (4) (côté batterie) (Fig. 8);
– démonter la bande de fermeture (2);
– dégager la batterie;
– tourner la batterie de 180°;
– remettre la batterie dans son logement et la fixer;
– remonter la bande de fermeture (2);
– remonter les panneaux (4) et (1).
Pour les raccordements hydrauliques (Fig. 6):
– relier le conduit d’écoulement au tube fileté du bac (5) et baucher
le tube du côté opposé inutilisé;
– couper le deux bouchons en plastique (6);
– visser les manchons filetés (4) sur les collecteurs de la batterie;
– visser l'évent d'air (2) sur le manchon comme indiqué sur la figure;
ce manchon, doté d'un raccord pour l'évent d'air, une fois la
machine installée, doit être en position plus haute par rapport à
l'autre et l'évent d'air doit être placé vers le haut.
Effectuer les raccordements à l'installation, isoler toutes les conduites
(si nécessaire, même le tuyau de sortie de la condensation) et
vérifier que la condensation est correctement évacuée.
Si on utilise l’eau comme fluide thermovecteur, on doit absolument
éviter tout risque de gel.
RACCORDEMENTS ELECTRIQUES
Les unités sont prédisposées pour fonctionner avec une tension
monophasée de 220 / 230 V - 50 Hz.
Pour les raccordements électriques, se rapporter aux schémas
figurant ci-après.
Le raccordement du moteur au bornier (Fig. 6) doit être choisi
en fonction des caractéristiques de ventilation requises.
Pour les modèles 9 et 15, le bornier (1) (Fig. 6) est fixéau panneau
supérieur (7) alors que, pour les modèles 21, 28 et 37, il est fixé
au groupe de ventilation.
Le panneau de commande peut commander 3 vitesses; le moteur
électrique est à 5 vitesses.
Passer les câbles électriques (3) à travers l'un des trous de la Fig. 6
dotés d’un anneau passe-câble en caoutchouc.
– mit Hilfe der mitgelieferten Karton-Schablone (Abb. 5) die vier
Bohrlöcher für die Spreizdübel (oder Gewindebolzen) anzeichnen;
die Schablone weist 16 Löcher auf: 8 für die Montage gemäß
Fall A der Abb. 7 (4 Löcher A1 für die Deckenmontage, 4 Löcher
A2 für die Wandmontage, Abb. 5), 8 für die Montage gemäß
Fall B der Abb. 7 (4 Löcher B1 für die Deckenmontage, 4 Löcher
B2 für die Wandmontage, Abb. 5)
– das Befestigungssystem (Spreizdübel oder Bolzen) bereitlegen;
– die Bügel mit Hilfe von Muttern, Unterlegscheiben und Gegen-
muttern an der Wand oder Decke befestigen;
– das Gerät mit den vier seitlichen Schrauben an den Bügeln
befestigen (Abb. 7);
– im Falle der waagrechten Installation muß vor dem endgültigen
Anziehen der Schrauben, Muttern und Gegenmuttern geprüft
werden, ob das Kondenswasser korrekt abgeführt wird.
Zu diesem Zweck empfiehlt es sich eine leichte Neigung in
Richtung des Auslaufs zu schaffen.
MONTAGE DER KAMMERN «BP », «BR », «SM »e «FAF »
Dieses Ausstattungszubehör ist in Behältern mit den gleichen
Abmessungsdaten enthalten.
Die Kammer wird in Übereinstimmung mit dem Ausblaßflansch
(bei « BP, BR et SM) oder mit dem umlaufflansch (bei FAF) montiert
und anhand der mitgelieferten Schrauben befestigt.
MONTAGE DER «GM »e «GA »
Die als Zubehör gelieferten Ausblaßgitter GM und Ansauggitter GA
können direkt an den Aufbereitungseinheiten montiert werden
durch Befestigung mit den mitgelieferten Schrauben an den
Ausblaß- oder Ansaugtafeln nach Abnahme der Flansche.
Solten die Gitter an der Wand befestigt werden, ist der in der Wand
einzulassende Gegenrahmen CMA zu verwenden.
HYDRAULIKANSCHLÜSSE
Die Wasseranschlüße sind SERIENMÄßIG angebracht, wie in der
Maßzeichnung angegeben.
Um sie an der entgegengesetzten Seite auszurichten muß die
Batterie wie folgt um 180° gedreht werden:
– die obere Platte (1) und die Luftausblaßplatte (4) (Wärme-
tauscherseite) ausbauen (Abb. 8);
– den Haltering (2) ausbauen;
– die Wärmetauscher abziehen;
– die Wärmetauscher um 180° drehen;
– die Wärmetauscher wieder in ihren Sitz einbauen und befestigen;
– den Haltering (2) wieder einbauen;
– die Platten (4) und (1) wieder montieren;
Für Hydraulikanschlüsse (Abb. 6):
– die Ablaufleitung an den Stutzen der Abtauwanne (5) anschliessen
und den nicht verwendeten Stutzen mit einer Kappe schliessen
– die beiden Plastikverschlüsse (6) aufschneiden;
– die Gewindemuffen (4) an den Kollektoren der Wärmetauscher
anschrauben;
– das Entlüfterventil (2) wie in der Abbildung gezeigt an der Muffe
anschrauben; diese Muffe mit Anschluß für das Entlüftungsventil
muß sich bei installierter Maschine höher als die anderen Muffen
befinden und das Entlüftungsventil muß nach oben gerichtet sein.
Die Verbindungen zur Anlage herstellen, sämtliche Leitungen
isolieren (falls erforderlich auch den Kondenswasserabfluß) und
kontrollieren, ob die Kondensflüssigkeit korrekt abgelassen wird.
Wird Wasser als Wärmeträger verwendet muß auf jeden Fall
Frostgefahr vermieden Werden.
ELEKTROVERBINDUNGEN
Die Geräte sind für den Betrieb mit einphasiger Spannung
220 / 230 V - 50 Hz vorbereitet.
Die Elektroanschlüsse sind auf den folgenden Schaltplänen
dargestellt.
Der Anschluß des Motors an das Klemmenbrett (Abb. 6) erfolgt
je nach den Charakteristiken der gewünschten Belüftung.
Bei den Modellen 9 und 15 ist das Klemmenbrett (1) (Abb. 6) an
der oberen Tafel (7) befestigt, während es bei den Modellen
21, 28 und 37 an der Ventilatorgruppe befestigt ist.
Bei den anderen Modellen ist es an der Belüftungsgruppe angebracht.
An der Schalterblende können drei Geschwindigkeiten vorgewählt
werden und der Motor verfügt über 5 Stufen.
Die Stromkabel durch eine der Öffnungen leiten (Abb. 6), nach dem
der mitgelieferte Gummiring eingesetzt worden ist.
15

16
Durante il montaggio del pannello comandi PCT 2 è necessario
eseguire un ponte sui morsetti di collegamento, altrimenti il venti-
latore non funziona (vedi schemi elettrici):
– ponticellando i morsetti 4 e 5 (schema A) il ventilatore resta sempre
in funzione;
– ponticellando i morsetti 2 e 5 (schema B) il ventilatore si ferma al
raggiungimento della temperatura ambiente, cioè è termostatato.
E' possibile collegare, singolarmente o contemporaneamente:
– una elettrovalvola di intercettazione dell'acqua (funzionamento
sia in riscaldamento che in raffreddamento);
– una batteria di resistenze elettriche BR per funzionamento in
parallelo alla batteria ad acqua (solo in riscaldamento).
Non épossibile collegare direttamente (in parallelo) piùunità
sotto lo stesso pannello.
ISTRUZIONI PER IL FUNZIONAMENTO
Sul pannello sono presenti (Fig. 4):
1- interruttore acceso - spento (ON - OFF);
2- manopola di regolazione della temperatura con scala graduata
da 10 a 30 °C;
3- commutatore di velocità del ventilatore a tre posizioni (a scelta
tra le cinque disponibili);
4- commutatore per la selezione del funzionamento:
= raffreddamento;
= riscaldamento ad acqua;
= riscaldamento con batteria e resistenza elettr. (in parallelo).
PULIZIA DEL FILTRO
Il filtro di ripresa può essere montato mediante l’apposita flangia
a corredo (Fig. 3), la quale permette una facile manovra di apertura
per le operazioni di pulizia.
Per l’estrazione del filtro, svitare i volantini filettati (2) e sfilare lo
sportello (1) dalla sua sede.
Il materiale filtrante è del tipo rigenerabile mediante lavaggio
o soffiatura.
Si raccomanda di rimontare il filtro quando il materiale filtrante è
perfettamente asciutto.
During the installation of the PCT 2 control panel, bridge the connecting
terminals to keep the fan fed (see wiring diagrams):
– bridge terminals 4 and 5 (wiring A) to keep the fan constantly on;
– bridge terminals 2 and 5 (wiring B) to perform thermostat control
of the fan; the fan is cut off when the required room temperature
is achieved.
It is possible to connect, individually or simultaneously:
– a water gate electrovalve (operation both on heating and on
cooling modes);
– an electric heater, installed in the delivery duct, operated in
parallel with the water coil (heating mode only).
It is not possible to connect directly (in parallel) more units to
the same panel.
OPERATION
The control panel includes (Fig. 4):
1- ON / OFF switch;
2- temperature knob with scale 10 to 30 °C;
3- three speed selector switch (out of five available by the motor);
4- operation selector switch (4):
= cooling;
= water heating;
= electric heating and water heating (in parallel).
FILTER CLEANING
The suction filter can be fitted by using the flange provided (Fig. 3);
this allows it to be opened easily for cleaning operations.
To remove the filter, unscrew the threaded hand wheel (2) and
remove the door (1) from its place.
The filtering material is of a type that can be renovated by washing
or blow drying.
It is advisable to reassemble the filter when the filtering material
is completely dry.
TABELLA DI COMPATIBILITA’DEGLI ACCESSORI - ACCESSORY COMPATIBILITY TABLE
Mod. UCD 9 UCD 15 UCD 21 UCD 28 UCD 37
Pannello comandi - Control panel PX PX PX PX PX
Pannello comandi - Control panel PCT 2 PCT 2 PCT 2 PCT 2 PCT 2
Termostato di consenso - Starting thermostat TC 152 TC 152 TC 152 TC 152 TC 152
Griglia di mandata - Air delivery grill GM 5 GM 6 GM 7 GM 8 GM 8
Griglia di ripresa - Suction grill GA 5 GA 6 GA 7 GA 8 GA 8
Controtelaio - Counter-frame CMA 5 CMA 6 CMA 7 CMA 8 CMA 8
Serranda antigelo - Antifreeze damper SR 1 SR 2 SR 3 SR 4 SR 4
Plenum di mandata - Discharge plenum PM 1 PM 2 PM 3 PM 4 PM 4
Camera di miscela - Mixing box SM 1 SM 2 SM 3 SM 4 SM 5
Filtro di ripresa - Suction filter FAF 1 FAF 2 FAF 3 FAF 4 FAF 4
Batteria di post-riscaldamento - After-heating BP 1 BP 2 BP 3 BP 4 BP 5
Batteria elettrica - Electric coil BR 1 BR 2 BR 3 BR 4 BR 5

17
Au cours de l'installation du panneau de commande PCT 2 faire un
pont sur les bornes de raccordement, sinon le ventilateur ne fonctionne
pas (voir schémas électriques):
– en faisant un pont entre les bornes 4 et 5 (schéma A), le ventilateur
reste toujours en service;
– en faisant un pont entre les bornes 2 et 5 (schéma B), le ventilateur
est thermostaté et s'arrête quand la température ambiante est
atteinte.
Il est possible de raccorder, séparément ou en même temps:
– une électrovanne d'interception de l'eau (fonctionnement aussi
bien en chauffage qu'en refroidissement);
– une batterie de résistances électriques BR, pour fonctionnement
en parallèle avec la batterie à eau (en chauffage seulement).
Il est impossible de raccorder directement (en parallèle)
plusieurs unités sous le même panneau.
FONCTIONNEMENT
Le panneau de commande comprend (Fig. 4):
1- interrupteur ON / OFF;
2- bouton de réglage de la température avec échelle de 10 à 30 °C;
3- commutateur de vitesse du ventilateur à trois positions (sur les
cinq disponibles au moteur);
4- commutateur pour la sélection du fonctionnement:
= refroidissement;
= chauffage par eau;
= chauffage par eau et électrique (en parallèle).
NETTOYAGE DU FILTRE
Le filtre de reprise peut être monté à l'aide de la bride prévue à cet
effet et fournie de série (Fig. 3), laquelle permet une manœuvre
aisée d'ouverture pour les opérations de nettoyage.
Pour retirer le filtre, dévisser les volants filetés (2) et dégager le
volet (1) de son logement.
Le matériau filtrant est du type régénérable par lavage ou soufflage.
Il est recommandé de remonter le filtre lorsque le matériau filtrant
est parfaitement propre.
TABLEAU DE COMPATIBILITE DES ACCESSOIRES - ZUBEHÖR-KOMPATIBILITÄTSTABELLE
Mod. UCD 9 UCD 15 UCD 21 UCD 28 UCD 37
Panneau de commande - Schalterblende PX PX PX PX PX
Panneau de commande - Schalterblende PCT 2 PCT 2 PCT 2 PCT 2 PCT 2
Thermostat d’autorisation - Zustimmungsthermostat TC 152 TC 152 TC 152 TC 152 TC 152
Grille de refoulement - Ausblasgitter GM 5 GM 6 GM 7 GM 8 GM 8
Grille de reprise - Ansauggitter GA 5 GA 6 GA 7 GA 8 GA 8
Contre-cadre - Gegenrahmen CMA 5 CMA 6 CMA 7 CMA 8 CMA 8
Registre antigel - Frostschutzschieber SR 1 SR 2 SR 3 SR 4 SR 4
Plénum de refoulement - Ausblaßplenum PM 1 PM 2 PM 3 PM 4 PM 4
Chambre de mélange - Mischkammer SM 1 SM 2 SM 3 SM 4 SM 5
Filtre de reprise - Ansaugfilter FAF 1 FAF 2 FAF 3 FAF 4 FAF 4
Batterie de post-chauffage - Nacherhitzer BP 1 BP 2 BP 3 BP 4 BP 5
Batterie electrique - Elektroheizung BR 1 BR 2 BR 3 BR 4 BR 5
Während des Anbaus der Schalterblende PCT 2 ist an den Ver-
bindungsklemmen eine Brücke zu schalten, andernfalls arbeitet
der Lüfter nicht (siehe Schaltpläne):
– bei Brückung der Klemmen 4 und 5 (Schaltpläne A) bleibt der
Lüfter ständig in Betrieb.
– bei Brückung der Klemmen 2 und 5 (Schaltpläne B) ist der
Lüfter thermostatgeschaltet, d.h. er stoppt bei Erreichen der
Raumtemperatur.
Es ist der einzelne oder gleichzeitige Anschluß der folgenden
Bauteile möglich:
– Sperrventil für Wasser (Betrieb im Kühl- oder im Heizbetrieb).
– Elt. Heizung im druckseitigen Leitkanal für die parallele Funktion
zum Wärmeaustauscher (nur im Heizbetrieb).
Der direkte (parallelgeschaltete) Anschlußmehrerer Einheiten
unter derselben Schalterblende ist nicht möglich.
BETRIEBSANWEISUNGEN
An der Schalterblende befinden sich (Abb. 4):
1- Netzschalter ON / OFF;
2- Drehschalter für die Temperaturregelung mit Reglerskala von
10 bis 30 °C;
3- Geschwindigkeitsschalter des Lüfters mit 3 Schaltpositionen
(Auswahl unter den fünf möglichen Geschwindigkeiten);
4- Betriebswahlschalter:
= Kühlung;
= Heizung mit PWW-Heizregister;
= Heizung mit PWW- und Elt. Heizregister.
REINIGUNG DES LUFTFILTERS
Der Ausgleichsfilter kann mit Hilfe des mitgelieferten speziellen
Flanschs (Abb. 3) montiert werden, der das Öffnen für das Reinigen
wesentlich vereinfacht.
Für den Ausbau des Filters die Gewindezwingen (2) aufschrauben und
die Klappe (1) aus ihrem Sitz nehmen.
Das Filtermaterial kann mittels Waschen oder Ausblasen regeneriert
werden. Der Filter darf erst dann wieder eingebaut werden, wenn
er vollkommen trocken ist.

18
³t (°C) = salto termico acqua refrigerata - chilled water temperature rise - différence de température eau glacée - Delta T Wasser.
Ti (°C) = temperatura ingresso acqua - entering water temperature - température de l'eau à l'entrée - Wassereintrittstemperatur.
T b.u. (°C) = temperatura aria a bulbo umido - wet bulb temperature - température à bulbe humide - F.K. Lufttemperatur.
T b.s. (°C) = temperatura aria a bulbo secco - dry bulb temperature - température à bulbe sec - T.K. Lufttemperatur.
BATTERIA 2 R - 2 R COIL TAB. A
BATTERIE 2 R - WÄRMETAUSCHER 2 RR
POTENZA FRIGORIFERA TOTALE - TOTAL COOLING CAPACITY
PUISSANCE FRIGORIFIQUE TOTALE - GESAMTE KÄLTELEISTUNG (Pt = kW)
³t = 3 ³t = 5 ³t = 7
Mod. Ti T b.u. T b.u. T b.u.
17 19 21 23 25 17 19 21 23 25 17 19 21 23 25
54,44 5,58 6,86 8,17 9,65 3,67 4,83 6,09 7,42 8,9 2,82 4 5,29 6,66 8,11
73,62 4,78 6,03 7,36 8,84 2,79 3,95 5,24 6,57 8,05 1,98 3,01 4,36 5,72 7,27
UCD 9 9 2,74 3,9 5,16 6,49 7,96 1,95 2,92 4,3 5,77 7,14 1,21 2,61 3,35 4,74 6,24
11 1,8 2,81 4,22 5,57 7,05 1,49 2,52 3,3 4,66 6,16 0,9 1,82 2,65 3,66 5,18
13 1,24 2,42 3,21 4,57 6,05 0,82 1,71 2,5 3,59 5,09 0,43 1,25 1,92 2,83 4,02
56,72 8,46 10,46 12,51 14,83 5,33 7,12 9,09 11,17 13,51 3,88 5,73 7,69 9,78 11,24
75,39 7,17 9,14 11,23 13,55 3,96 5,8 7,75 9,82 12,13 2,9 4,51 6,24 8,35 10,66
UCD 15 9 4 5,8 7,79 9,86 12,18 2,84 4,43 6,29 8,38 10,69 1,59 3,9 4,7 6,82 9,13
11 2,75 4,34 6,3 8,4 10,74 2,2 3,81 4,72 6,85 9,15 1,17 2,51 3,6 5,15 7,41
13 2,12 3,71 4,72 6,82 9,15 1,08 2,4 3,5 5,15 7,48 0,73 1,98 3,1 4,25 5,68
59,92 12,51 15,41 18,41 21,74 8,13 10,75 13,63 16,6 19,96 6,18 8,82 11,71 14,74 18,1
78,06 10,68 13,53 16,54 19,9 6,14 8,75 11,64 14,67 18,02 4,39 6,74 9,62 12,68 16,05
UCD 21 9 6,05 8,67 11,54 14,59 17,93 4,26 6,57 9,45 12,59 15,97 3,47 5,84 7,44 10,46 13,84
11 4,23 6,38 9,42 12,46 15,82 3,67 5,67 7,29 10,35 13,72 1,62 3,51 5,42 8,04 11,45
13 3,15 5,74 7,12 10,19 13,58 2,38 3,81 5,42 7,91 11,31 1,01 3,02 4,55 6,35 8,37
513,11 16,55 20,3 24,29 28,7 10,79 14,18 17,96 21,94 26,35 8,21 11,7 15,5 19,5 23,92
710,82 14,07 17,86 21,83 26,27 8,14 11,6 15,39 19,38 23,8 5,83 8,84 12,75 16,79 21,22
UCD 28 9 8 11,46 15,24 19,23 23,66 5,64 8,69 12,61 16,64 21,07 4,83 7,74 9,77 13,86 18,32
11 5,4 8,42 12,44 16,45 20,88 4,41 7,5 9,63 13,71 18,13 2,11 4,81 7,52 10,67 16,68
13 4,17 7,25 9,42 13,45 17,91 3,16 5,21 7,33 10,48 14,96 1,31 3,73 5,71 8,4 11,71
516,35 20,74 25,6 30,7 36,47 13,04 17,43 22,32 27,37 33,05 9,55 13,96 18,86 23,93 29,59
713,17 17,79 22,44 27,56 33,26 9,66 14,1 18,94 24,1 29,74 6,73 11,07 15,27 20,42 26,09
UCD 37 9 9,79 14,21 19,04 24,19 29,9 6,93 10,86 15,37 20,52 26,2 5,51 9,52 11,44 16,65 22,33
11 6,75 10,67 15,44 20,59 26,92 5,38 9,35 11,52 16,71 22,4 2,29 5,83 9,1 12,54 18,27
13 5,19 9,13 11,54 16,73 22,43 3,79 6,81 9,18 12,59 18,33 1,4 4,5 7,15 10,43 13,84
– I valori di tab. A e B sono riferiti a portata aria nominale
– La potenza totale dipende solo dalla temperatura a bulbo umido.
– La potenza sensibile dipende solo dalla temperatura a bulbo
secco.
– Per portate d’aria diverse utilizzare i fattori correttivi di tab. C.
N.B.: sono consentite le interpolazioni, non le estrapolazioni dei dati.
– Values of tab. A and B refer to nominal air flow.
– Total capacity depends on wet bulb temperature.
– Sensible capacity depends on dry buld temperature.
– For other values use correction factors of tab. C.
NOTE: Interpolations are allowed,
extrapolations are not permitted.
– Les valeurs du tab. A et B se réfèrent au débit nominal.
– La puissance totale ne dépend que de la température à bulbe
humide.
– La puissance sensible ne dépend que de la température à
bulbe sec.
– Pour d'autres valeurs utiliser les facteurs de correction du tab. C.
N.B.: Les interpolations sont permises, pas les extrapolations des
données.
– Die Werte in tab. A und B sind bezogen auf den Nennvolumenstrom.
– Die Gesamtleistung ist nur von der F.K. Lufttemperatur abhängig.
– Die sensible Leistung ist nur von der T.K. Lufttemperatur abhängig.
– Für andere Volumenströme siehe Korrekturfaktoren in tab. C.
Anm.: Es sind Interpolationen der Daten, aber keine Extrapola-
tionen zulässig.

19
BATTERIA 2 R - 2 R COIL TAB. B
BATTERIE 2 R - WÄRMETAUSCHER 2 RR
FATTORI DI CORREZIONE - CORRECTION FACTORS TAB. C
FACTEURS DE CORRECTION - KORREKTURFAKTOREN
UCD 9 UCD 15 UCD 21 UCD 28 UCD 37
Qa Fc Pt Fc Ps Qa Fc Pt Fc Ps Qa Fc Pt Fc Ps Qa Fc Pt Fc Ps Qa Fc Pt Fc Ps
600 0,84 0,79 1.050 0,84 0,81 1.500 0,84 0,81 2.025 0,84 0,81 2.625 0,84 0,82
700 0,92 0,9 1.225 0,88 0,85 1.750 0,92 0,91 2.360 0,92 0,91 3.060 0,93 0,91
800 1 1 1.400 1 1 2.000 1 1 2.700 1 1 3.500 1 1
900 1,07 1,1 1.575 1,07 1,09 2.250 1,07 1,09 3.040 1,07 1,09 3.940 1,07 1,08
1.000 1,15 1,2 1.750 1,14 1,17 2.500 1,14 1,17 3.375 1,14 1,17 4.375 1,13 1,16
1.100 1,21 1,3 1.925 1,2 1,25 2.750 1,22 1,25 3.710 1,2 1,25 4.810 1,2 1,23
1.200 1,28 1,4 2.100 1,26 1,33 3.000 1,26 1,33 4.050 1,26 1,32 5.250 1,25 1,3
Qa (m3/h) = Portata aria - Air flow - Débit d’air - Volumenstrom.
Fc Pt = Fattore di correzione della potenza totale rispetto al valore a portata nominale.
Correction factor of total capacity compared with the value at nominal flow.
Facteur de correction de la puissance totale par rapport à la valeur au débit nominal.
Korrekturfaktor der Gesamtleistung im Vergleich zum entsprechenden Wert bei Nennleistung.
Fc Ps = Fattore di correzione della potenza sensibile rispetto il valore a portata nominale.
Correction factor of sensible capacity compared with the value at nominal flow.
Facteur de correction de la puissance sensible par rapport à la valeur au débit nominal.
Korrekturfaktor der sensiblen Leistung im Vergleich zum entsprechenden Wert bei Nennleistung.
POTENZA FRIGORIFERA SENSIBILE - SENSIBLE COOLING CAPACITY
PUISSANCE FRIGORIFIQUE SENSIBLE - SENSIBLE KÄLTELEISTUNG (Ps = kW)
³t = 3 ³t = 5 ³t = 7
Mod. Ti T b.s. T b.s. T b.s.
22 27 32 22 27 32 22 27 32
52,98 4,06 4,9 2,66 3,75 4,61 2,33 3,43 4,24
72,64 3,73 4,57 2,31 3,42 4,29 1,98 3,01 3,99
UCD 9 9 2,29 3,39 4,27 1,95 2,92 4,01 1,21 2,61 3,66
11 1,8 2,81 3,94 1,49 2,52 3,64 0,9 2,21 3,32
13 1,24 2,42 3,61 0,82 2,12 3,3 0,43 1,81 2,83
54,49 6,12 7,39 3,94 5,6 6,9 3,38 5,08 6,41
73,96 5,62 6,92 3,41 5,1 6,43 2,9 4,51 5,94
UCD 15 9 3,43 5,11 6,44 2,84 4,43 5,95 1,59 3,9 5,43
11 2,75 4,34 5,95 2,2 3,81 5,46 1,17 3,27 4,93
13 2,12 3,71 5,45 1,08 3,19 4,93 0,73 2,64 4,25
56,57 8,95 10,79 5,85 8,25 10,12 5,09 7,52 9,46
75,82 8,23 10,1 5,07 7,5 9,44 4,39 6,74 8,76
UCD 21 9 5,04 7,47 9,4 4,26 6,57 8,73 3,47 5,84 8,04
11 4,23 6,38 8,68 3,67 5,67 8 1,62 4,93 7,28
13 3,15 5,74 7,95 2,38 4,76 7,24 1,01 4,02 6,35
58,7 11,86 14,27 7,75 10,93 13,4 6,77 10 12,54
77,78 10,89 13,37 6,75 9,96 12,5 5,83 8,84 11,63
UCD 28 9 6,69 9,91 12,45 5,64 8,69 11,58 4,83 7,74 10,68
11 5,4 8,42 11,51 4,41 7,5 10,63 2,11 6,53 9,69
13 4,2 7,25 10,55 3,16 6,3 9,63 1,31 5,31 8,4
510,5 14,27 17,3 9,18 12,99 16,09 7,84 11,7 14,89
79,23 13,13 16,16 7,88 11,75 14,95 6,73 11,07 13,72
UCD 37 9 7,93 11,79 14,98 6,93 10,86 13,76 5,51 9,52 12,52
11 6,75 10,67 13,78 5,38 9,35 12,54 2,29 8,02 11,26
13 5,19 9,13 12,54 3,79 8,03 11,28 1,4 6,47 10,43

20
POTENZA FRIGORIFERA TOTALE - TOTAL COOLING CAPACITY
PUISSANCE FRIGORIFIQUE TOTALE - GESAMTE KÄLTELEISTUNG (Pt = kW)
³t = 3 ³t = 5 ³t = 7
Mod. Ti T b.u. T b.u. T b.u.
17 19 21 23 25 17 19 21 23 25 17 19 21 23 25
55,38 6,72 8,22 9,75 11,46 4,51 5,87 7,38 8,94 10,69 2,29 4,91 6,45 8,04 9,81
74,36 5,75 7,26 8,8 10,55 3,42 4,85 6,39 7,93 9,69 1,97 3,77 5,34 6,97 8,75
UCD 9 9 3,35 4,73 6,27 7,81 9,53 1,85 3,7 5,26 6,85 8,62 1,58 3,13 4,12 5,79 7,6
11 2,19 3,59 5,11 6,69 8,45 1,46 3,02 4,04 5,67 7,46 1,18 2,07 3,15 4,49 6,33
13 1,68 2,89 3,91 5,51 7,28 1,07 2,01 3,12 4,39 6,2 0,77 1,25 1,98 3,28 4,94
58,28 10,47 12,9 15,41 18,31 6,61 8,82 11,45 13,8 16,64 3,24 7,06 9,52 12,09 15,09
76,75 8,88 11,32 13,85 16,69 4,91 7,2 9,59 12,15 14,99 2,68 5,34 7,72 10,32 13,19
UCD 15 9 4,96 7,19 9,63 12,18 15,02 3,35 5,41 7,78 10,36 13,22 2,12 4,76 5,75 8,41 11,31
11 3,39 5,39 7,82 10,38 13,23 2 4,69 5,83 8,45 11,31 1,57 2,51 3,96 6,31 9,22
13 2,6 4,53 5,88 8,45 11,31 1,44 2,93 4,33 6,36 9,26 0,99 2,07 3,32 5,21 6,97
512,25 15,39 18,9 22,52 26,62 9,99 13,19 16,72 20,39 24,49 4,5 10,78 14,38 18,10 22,23
79,93 13,12 16,64 20,28 24,38 7,52 10,75 14,33 18,02 22,13 3,72 8,15 11,79 15,57 19,72
UCD 21 9 7,46 10,68 14,2 17,88 21,98 5,14 8,19 11,74 15,47 19,6 2,94 7,12 8,95 12,82 17
11 4,99 8,06 11,6 15,3 19,42 4,06 6,9 8,91 12,71 16,87 2,16 4,1 6,33 9,79 14,46
13 3,83 6,62 8,88 12,53 16,65 1,99 4,51 7,03 9,71 13,91 1,36 3,5 5,52 7,71 10,79
516,22 20,42 25,08 29,9 35,35 13,37 17,51 22,18 27,04 32,49 5,87 14,34 19,08 24,18 29,49
713,18 17,41 22,08 26,92 32,37 9,97 14,3 19 23,91 29,37 4,85 10,89 15,72 20,65 26,16
UCD 28 9 9,9 14,16 18,85 23,73 29,18 6,88 10,81 15,56 21,08 26 3,82 9,44 11,89 17 22,53
11 6,6 10,67 15,39 20,31 25,76 5,34 9,16 11,8 16,87 22,36 2,8 6,01 9,21 12,99 18,72
13 5,09 8,81 11,64 16,62 22,08 2,6 6,05 9,34 12,87 18,44 1,76 4,4 7,17 10,26 14,31
520,25 27,56 31,74 37,95 45,01 15,92 21,43 27,59 33,76 42,59 6,58 14,63 21,31 28,36 36,22
716,28 21,73 27,79 34,06 41,11 11,7 17,25 23,31 29,88 37,76 5,39 12,69 16,26 23,46 31,18
UCD 37 9 12 17,54 23,59 29,91 36,96 8,45 12,71 18,83 24,48 32,7 4,22 8,5 12,5 17,94 25,99
11 8,12 13,01 19,05 25,45 32,54 6,57 11,41 13,97 19,39 27,27 3,06 6,1 9,52 14,23 19,96
13 6,35 11,14 14,19 20,64 27,81 2,86 6,1 9,84 14,31 21,45 1,89 4,31 7,1 10,5 13,73
BATTERIA 3 R - 3 R COIL TAB. D
BATTERIE 3 R - WÄRMETAUSCHER 3 RR
³t (°C) = salto termico acqua refrigerata - chilled water temperature rise - différence de température eau glacée - Delta T Wasser.
Ti (°C) = temperatura ingresso acqua - entering water temperature - température de l'eau à l'entrée - Wassereintrittstemperatur.
T b.u. (°C) = temperatura aria a bulbo umido - wet bulb temperature - température à bulbe humide - F.K. Lufttemperatur.
T b.s. (°C) = temperatura aria a bulbo secco - dry bulb temperature - température à bulbe sec - T.K. Lufttemperatur.
– I valori di tab. A e B sono riferiti a portata aria nominale
– La potenza totale dipende solo dalla temperatura a bulbo umido.
– La potenza sensibile dipende solo dalla temperatura a bulbo
secco.
– Per portate d’aria diverse utilizzare i fattori correttivi di tab. C.
N.B.: sono consentite le interpolazioni, non le estrapolazioni dei dati.
– Values of tab. A and B refer to nominal air flow.
– Total capacity depends on wet bulb temperature.
– Sensible capacity depends on dry buld temperature.
– For other values use correction factors of tab. C.
NOTE: Interpolations are allowed,
extrapolations are not permitted.
– Les valeurs du tab. A et B se réfèrent au débit nominal.
– La puissance totale ne dépend que de la température à bulbe
humide.
– La puissance sensible ne dépend que de la température à
bulbe sec.
– Pour d'autres valeurs utiliser les facteurs de correction du tab. C.
N.B.: Les interpolations sont permises, pas les extrapolations des
données.
– Die Werte in tab. A und B sind bezogen auf den Nennvolumenstrom.
– Die Gesamtleistung ist nur von der F.K. Lufttemperatur abhängig.
– Die sensible Leistung ist nur von der T.K. Lufttemperatur abhängig.
– Für andere Volumenströme siehe Korrekturfaktoren in tab. C.
Anm.: Es sind Interpolationen der Daten, aber keine Extrapola-
tionen zulässig.

21
POTENZA FRIGORIFERA SENSIBILE - SENSIBLE COOLING CAPACITY
PUISSANCE FRIGORIFIQUE SENSIBLE - SENSIBLE KÄLTELEISTUNG (Ps = kW)
³t = 3 ³t = 5 ³t = 7
Mod. Ti T b.s. T b.s. T b.s.
22 27 32 22 27 32 22 27 32
53,4 4,56 5,56 3,02 4,19 5,22 2,13 3,8 4,86
72,97 4,14 5,16 2,57 3,77 4,82 1,97 3,36 4,45
UCD 9 9 2,54 3,73 4,77 1,85 3,33 4,41 1,58 3,13 4,03
11 2,09 3,29 4,47 1,46 3,02 3,99 1,18 2,15 3,6
13 1,68 2,89 3,94 1,07 2,12 3,56 0,77 1,8 3,28
55,35 7,26 8,87 4,65 6,58 8,23 3,24 5,89 7,58
74,71 6,61 8,25 3,97 5,94 7,6 2,68 5,34 6,95
UCD 15 9 4 5,94 7,61 3,35 5,41 6,97 2,12 4,76 6,3
11 3,39 5,27 6,97 2 4,69 6,32 1,57 2,96 5,63
13 2,6 4,53 6,32 1,44 3,19 5,65 0,99 2,64 5,21
57,83 10,57 12,89 6,88 9,65 12,03 4,5 8,7 11,15
76,85 9,62 11,99 5,88 8,7 11,12 3,72 7,71 10,23
UCD 21 9 5,86 8,66 11,07 5,14 7,72 10,2 2,94 7,12 9,28
11 4,99 7,67 10,14 4,06 6,9 9,25 2,16 6 8,3
13 3,83 6,62 9,19 1,99 4,76 8,28 1,36 4,02 7,71
510,41 14,08 17,15 9,21 12,87 16,01 5,87 11,62 14,92
79,13 12,83 15,96 7,85 11,6 14,82 4,85 10,33 13,64
UCD 28 9 7,82 11,55 14,73 6,88 10,3 13,79 3,82 9,44 12,39
11 6,6 10,25 13,52 5,34 9,16 12,34 2,8 8 11,1
13 5,09 8,81 12,26 4 7,8 11,06 1,77 5,31 10,26
512,86 18,23 21,37 11,06 15,7 19,72 6,58 13,63 18,3
711,2 15,82 19,84 9,39 14,07 18,27 5,39 12,69 16,59
UCD 37 9 9,51 14,18 18,28 8,45 12,4 17,06 4,22 11,39 14,78
11 8,12 12,51 16,69 6,57 11,41 15,25 3,06 9,37 14,23
13 3,35 11,14 15,07 5 9,8 14,31 1,89 6,47 12,77
BATTERIA 3 R - 3 R COIL TAB. E
BATTERIE 3 R - WÄRMETAUSCHER 3 RR
FATTORI DI CORREZIONE - CORRECTION FACTORS TAB. F
FACTEURS DE CORRECTION - KORREKTURFAKTOREN
UCD 9 UCD 15 UCD 21 UCD 28 UCD 37
Qa Fc Pt Fc Ps Qa Fc Pt Fc Ps Qa Fc Pt Fc Ps Qa Fc Pt Fc Ps Qa Fc Pt Fc Ps
600 0,81 0,78 1.050 0,82 0,79 1.500 0,82 0,79 2.025 0,82 0,79 2.625 0,83 0,8
700 0,92 0,9 1.225 0,86 0,7 1.750 0,91 0,9 2.360 0,91 0,9 3.060 0,92 0,9
800 1 1 1.400 1 1 2.000 1 1 2.700 1 1 3.500 1 1
900 1,09 1,11 1.575 1,07 1,09 2.250 1,08 1,1 3.040 1,08 1,1 3.940 1,08 1,09
1.000 1,17 1,21 1.750 1,15 1,19 2.500 1,16 1,19 3.375 1,16 1,19 4.375 1,15 1,18
1.100 1,25 1,31 1.925 1,22 1,26 2.750 1,23 1,29 3.710 1,23 1,28 4.810 1,23 1,27
1.200 1,32 1,41 2.100 1,29 1,37 3.000 1,3 1,38 4.050 1,3 1,37 5.250 1,29 1,35
Qa (m3/h) = Portata aria - Air flow - Débit d’air - Volumenstrom.
Fc Pt = Fattore di correzione della potenza totale rispetto al valore a portata nominale.
Correction factor of total capacity compared with the value at nominal flow.
Facteur de correction de la puissance totale par rapport à la valeur au débit nominal.
Korrekturfaktor der Gesamtleistung im Vergleich zum entsprechenden Wert bei Nennleistung.
Fc Ps = Fattore di correzione della potenza sensibile rispetto il valore a portata nominale.
Correction factor of sensible capacity compared with the value at nominal flow.
Facteur de correction de la puissance sensible par rapport à la valeur au débit nominal.
Korrekturfaktor der sensiblen Leistung im Vergleich zum entsprechenden Wert bei Nennleistung.

22
BATTERIA 3 R - 3 R COIL TAV. 2
BATTERIE A 3R - WÄRMETAUSCHER 3 RR
500
1000
1500
2000
2500
3000
3500
4000
m3/h 4500
510 15 20 25 30 35 40 45 50 kW
UCD 9
UCD 15
UCD 21
UCD 28
UCD 37
Le potenze riportate sono riferite a:
– temperatura. ingresso acqua – temperatura ingresso aria = 50 °C;
– ³t acqua = 10 °C;
– per valori diversi utilizzare i fattori correttivi di tav. 3 e 4.
Les puissances indiquées se réfèrent à:
– température entrée eau – température entrée air = 50 °C;
– ³t eau = 10 °C;
– pour d’autres valeurs utiliser les facteurs de tab. 3 et 4.
Capacities shown refer to:
– entering water temperature – entering air temperature = 50 °C;
– water ³t = 10 °C;
– for other values use correction factors of tab. 3 and 4.
Die aufgeführten Leistungswerte beziehen sich auf:
– Wassereintrittstemperatur – Lufteintrittstemperatur = 50 °C;
– ³t Wasser = 10 °C;
– Für abweichende Werte die Korrekturfaktoren der Tafeln 3 und 4
erwenden.
POTENZA TERMICA - HEATING CAPACITY
PUISSANCE THERMIQUE - WÄRMELEISTUNG
BATTERIA 2 R - 2 R COIL TAV. 1
BATTERIE 2 R - WÄRMETAUSCHER 2 RR
500
1000
1500
2000
2500
3000
3500
4000
m3/h 4500
8 12 16 20 24 28 32 36 40 kW
Potenza termica - Heating capacity - Puissance thermique - Wärmeleistung
Portata aria - Air flow - Débit d'air - Volumenstrom
Portata aria - Air flow - Débit d'air - Volumenstrom
UCD 9 UCD 15
UCD 21
UCD 28
UCD 37
Potenza termica - Heating capacity - Puissance thermique - Wärmeleistung
This manual suits for next models
10
Table of contents
Other Fast Air Conditioner manuals


Popular Air Conditioner manuals by other brands

York
York DHP30NWB21SDCP30NWB21SDHP36NWB21SDCP36NWB21S Service manual

Lennox
Lennox CBX32M Elite Series installation instructions

Premium
Premium PAC9039 Service manual

Rinnai
Rinnai Brivis DINLU10Z7 Operation manual

Mitsubishi Electric
Mitsubishi Electric MSZ-A18YV-E1 Service manual

Samsung
Samsung AW18ECB7 Owner's instructions


Honeywell
Honeywell DLC203AE Series user manual

Termozeta
Termozeta TZAZC3 instruction manual

Friedrich
Friedrich WallMaster WS08 Installation and operation manual

Toshiba
Toshiba RAS-24UKHP-E3 Service manual

Hisense
Hisense AW-08TW1RAFUE20 Use and Installation Instructions

Samsung
Samsung AS09E Series User & installation manual