FastenMaster PAMFast User manual

PAMFast™AutoFeed System
Owner’s Manual
FastenMaster®and PAMFast™are trademarks of OMG Inc.
Copyright © 2021 OMG Inc. All rights reserved.
OMG Inc., 153 Bowles Road, Agawam, MA 01001
800·518·3569 FastenMaster.com
FMPAM-AFMAN (0322)

TABLE OF CONTENTS
Safety.................................................................................... 1
Precautions............................................................................. 2
In the Box............................................................................3–4
Getting to Know Your PAMFast Tool........................................5–6
Setup and Adjustment.........................................................7–10
Operating Instructions.......................................................11–12
Parts Diagram..................................................................13–14
Tips/Common Wear Parts/Cleaning ..................................15–16
Troubleshooting ............................................................... 17-18
Warranty ........................................................................19–20
I Warning
For your safety, read all instructions before use

1 2
• Never point or press the tool in the direction of yourself or
another person.
Contact FastenMaster at 800-518-3569 with any questions
related to the safe operation of the PAMFast tool prior to use.
a Precautions:
• Only use genuine PAMFast collated fasteners approved for
the PAMFast AutoFeed tool. The use of any other fastener is
not advised and will void the PAMFast limited warranty.
• Only use genuine PAMFast AutoFeed driver bits approved for the
PAMFast AutoFeed tool. The use of any other driver bit will result
in poor performance and will void the PAMFast limited warranty.
• Only use screw guns that are supplied with the PAMFast
AutoFeed tool or recommended by FastenMaster.
The use of any other screw gun may result in poor
performance and will void the PAMFast limited warranty.
• Always disconnect power prior to loading collated screw
strips into the belt guide, replacing driver bits, or performing
any adjustments or maintenance.
• Do not plug into AC outlet or install battery prior to reading.
• Do not operate any PAMFast tool without reading and
understanding all safety warnings and operating instructions.
Failure to abide by the warnings and operating instructions in
this manual may result in personal injury, injury to others, or
property damage.
• Any screw gun that is supplied with any PAMFast tool is not
manufactured or warrantied by FastenMaster. Screw gun
manufacturer warranties, operating instructions, and safety
warnings are provided by the manufacturer and must be read
and understood prior to operating. Failure to abide by the screw
gun manufacturer’s safety warnings and operating instructions
may result in personal injury, injury to others, or property
damage.
• Always disconnect power by unplugging from AC outlet
or removing battery prior to performing any adjustments,
driver bit changes, maintenance, or repairs.
• Always be aware of job site risks. Active job sites present a
number of safety risks, including but not limited to those that
may result in trips, falls, cuts, slips, etc. Some job sites present
greater hazards than others. The use of appropriate personal
protective equipment (PPE) including protective eye-wear, non-
slip protective footwear, and protective head-wear is required
when using any PAMFast AutoFeed tool. Additional PPE may be
required depending on the conditions of the job site. Refer to
the Occupational Safety and Health Administration (OSHA) or
prevailing governing body for a full list of PPE requirements and
safety guidelines.
• Always be aware of what lies below the surface. Electrical, gas,
and plumbing utilities may present a danger. Never install any
fastener prior to assessing potential risks.
• Ensure that all work surfaces are stable, secure, and free
from debris that may lead to trips, falls, or other injury.
Safety

3 4
Reference Guide:
1. PAMFast Owner’s Manual
2. Screw gun manufacturer owner’s manual
3. PAMFast AutoFeed tool (fully assembled)
4. Replacement bits & multi-tool
5. Bit holder for short tool
6. Short Tool Adapter
Screw Gun Options:
• SD-20-P13KUE
• SD-20-MAC13KUE
• SD-20-DWC13KUE
• SD-20-DWC13KIT
(motor not included)
• SD-20-MAC13KIT
(motor not included)
In the Box:
1
2
3
465
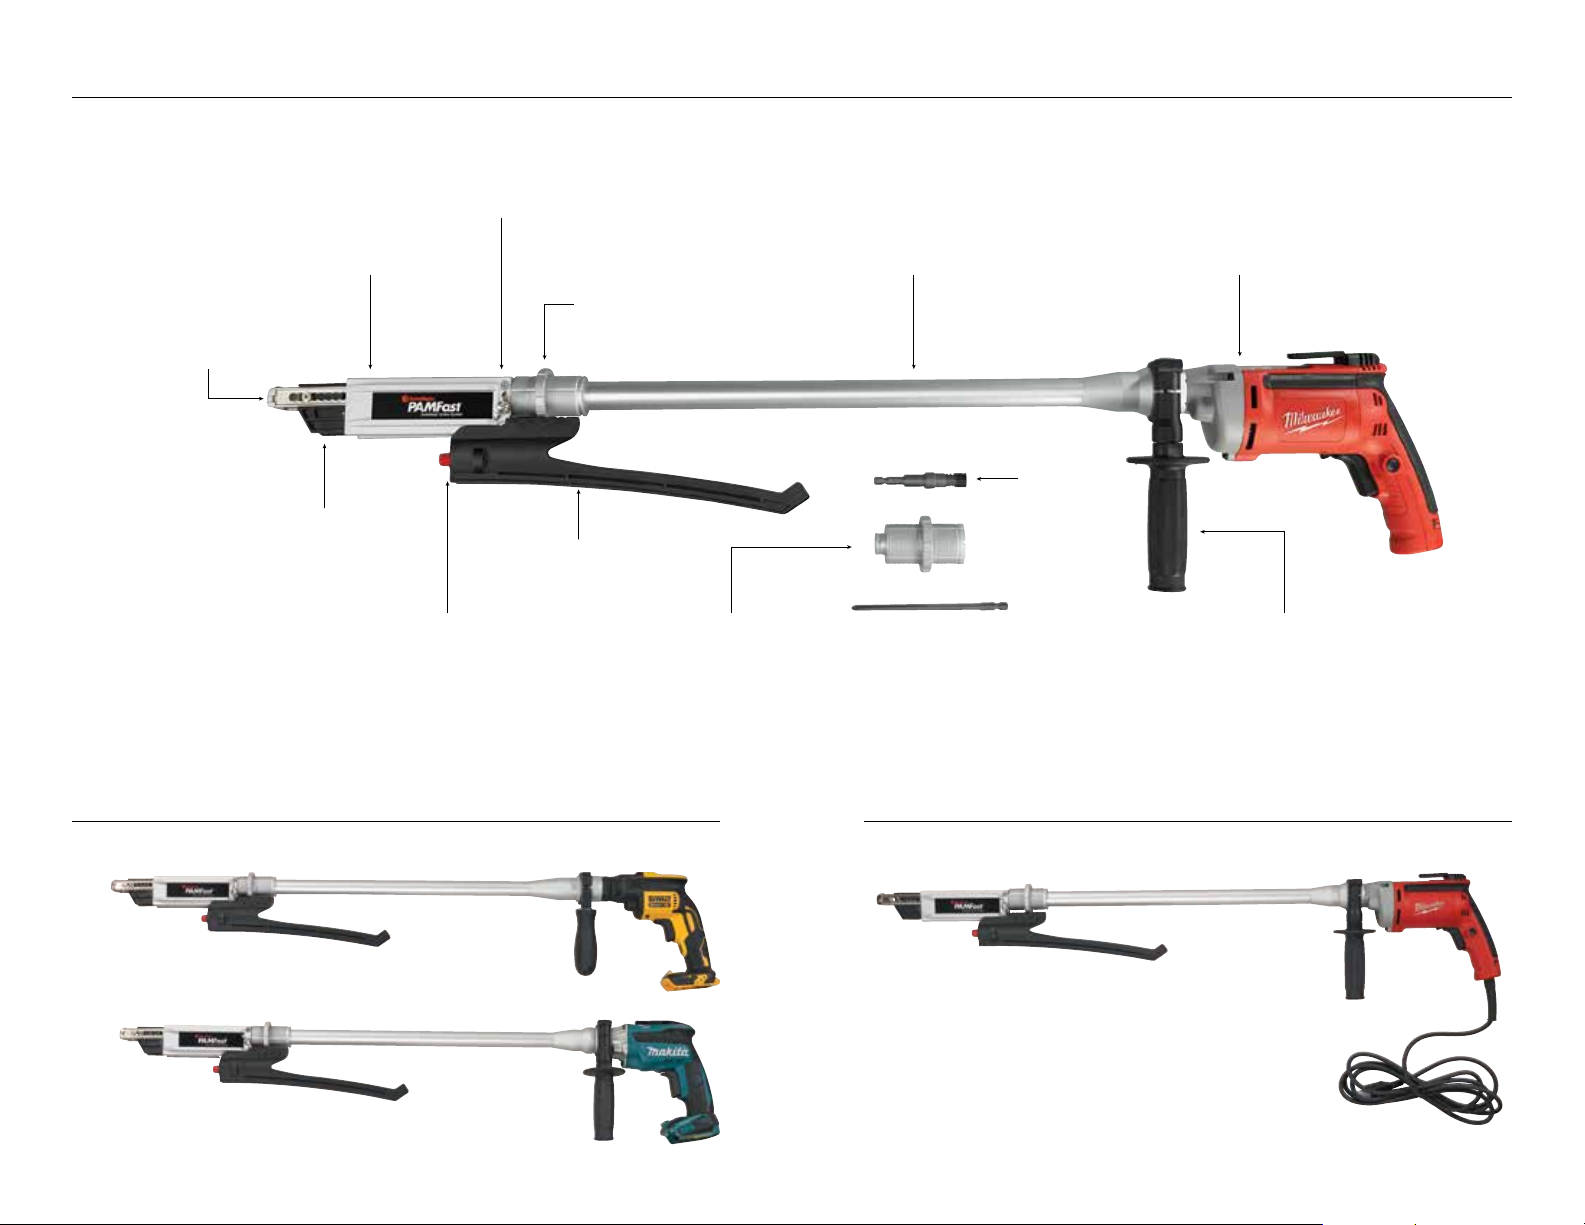
5 6
Wing Nut
1"– 3" Attachment Extension Pole
Countersink Ring
Depth Control
Gliding Piece
Belt Guide
Tension Knob/Belt Guide Adapter Bit
Bit
Holder
Extension Pole Handle
Screw Gun
Getting to Know Your PAMFast Tool
DeWALT Screw gun
Milwaukee Screw gun
Makita Screw gun
Cordless Drill Options: Corded Drill Option:
Batteries not included
7 8
Setup and Adjustment Setup and Adjustment (continued)
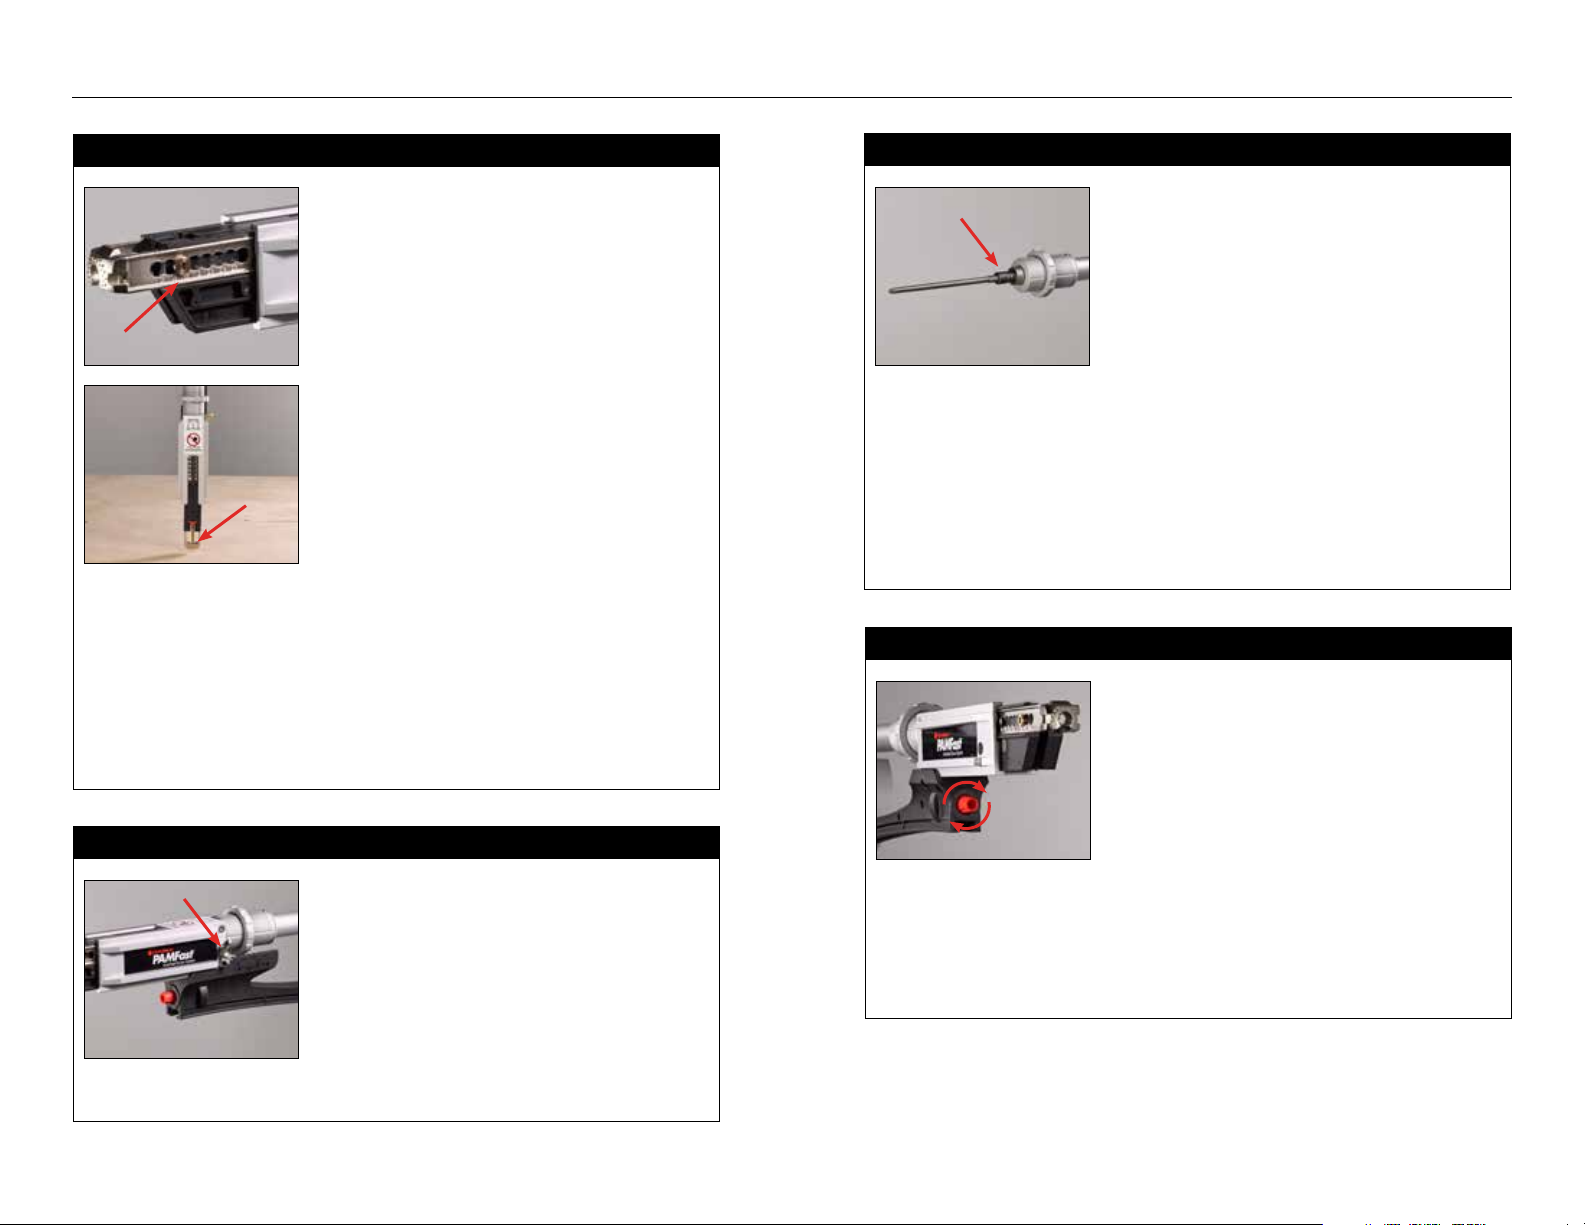
3) Belt Guide Adjustment
Belt tension on the PAMFast AutoFeed
tool is preset for 13⁄4" fasteners. Use
of alternate size fasteners may require
adjustment of the belt tension.
Turn the red Tension Knob clockwise
to increase belt tension, or counter-
clockwise to reduce belt tension.(Fig 3a).
I Do not overtighten This will prevent the collated screw
strip from properly feeding through the belt guide. Proper tension
prevents excessive slack in the collated strip and ensures precise
advancement of the strip between drives.
Fig. 3a
1) Screw Size Adjustment for Depth Control
Start by adjusting the PAMFast AutoFeed
attachment to accommodate the correct
screw length. The screw length is always
displayed on the side of the box of your
genuine PAMFast collated screws.
Loosen the shoulder screws on both sides
of the Depth Control and slide it to the
appropriate setting using the numbers
stamped on the Depth Control (Fig 1a).
When appropriately adjusted, the tip
of the fastener will be approximately
1
⁄
8
"
inside the face of the nose piece (Fig 1b).
I Note that the screws holding the Depth Control/
Nosepiece have collars so be sure that the collars of the
screws sit down in the cutouts of the Depth Control. If they
are not fully recessed, the gliding piece will not go back into
the housing fully and screw will not countersink.
2) Bit Replacement
For smooth operation and to reduce
cam-out, FastenMaster recommends
replacing drive bits after every
1,000 screws.
• Loosen the Wing Nut on the side
of the attachment assembly (Fig 2a).
2) Bit Replacement (continued)
• Remove the attachment assembly
to reveal the bit (Fig. 2b).
• Depress the lock collar and remove
the bit. After inserting the new bit,
release the collar to lock the bit
into place.
I Use only genuine PAMFast bits. Every tool comes
with one PAMDrive bit installed on tool. Additional bits such
as Phillips and Torx may be purchased.
• Bit should be approximately the same length as housing.
• Ensure bit type (Phillips, Torx or PAMDrive) matches
screw recess.
Fig. 1a
Fig. 1b
Fig. 2a
Fig. 2b

9 10
4) Countersink Adjustment
Prior to operating the
PAMFast
AutoFeed
tool, ensure that the countersink ring in
set to the proper screw length.
• Turn the countersink ring clockwise
to increase and counterclockwise to
decrease. Each click represents
1⁄64"
adjustment to the countersink depth.
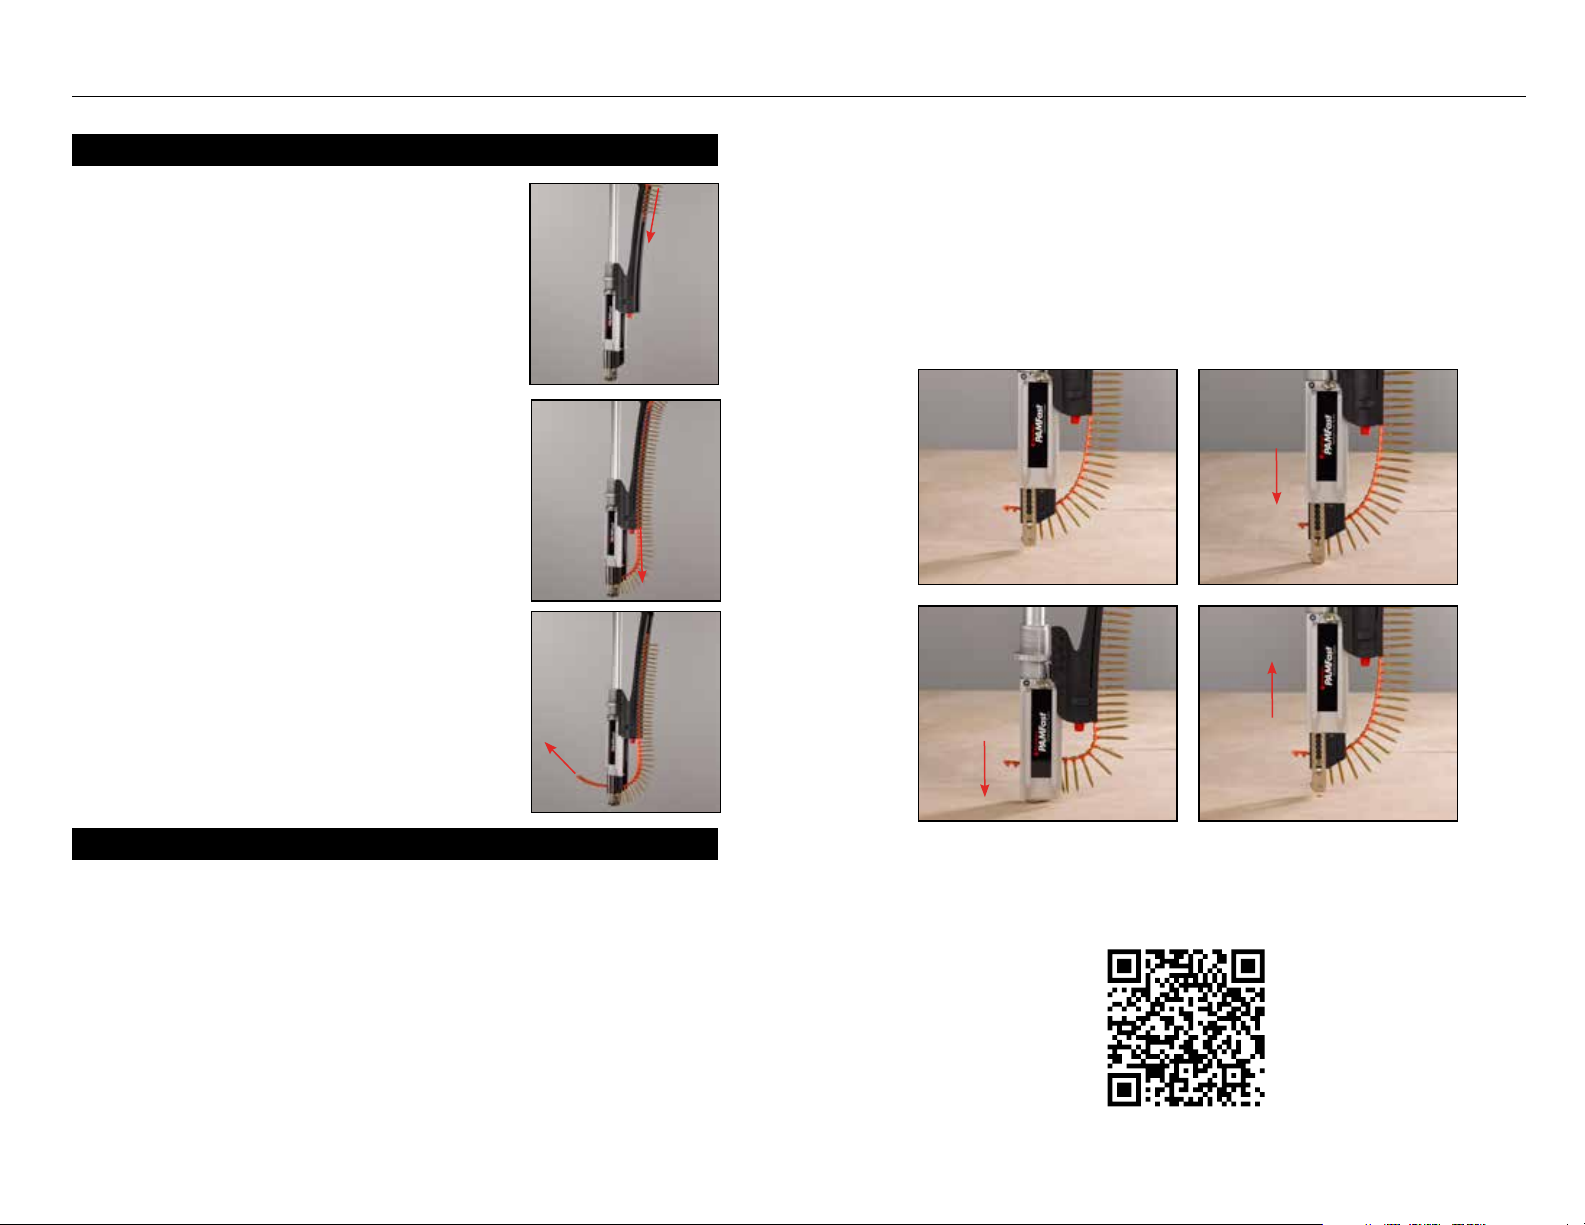
5) Extension (Changing between stand-up tool & short tool)
The extension pole can be removed for applications that require
a shorter version of the tool. (Fig 5a)
• Remove the 1– 3" attachment from the end of the PAMFast tool
by loosening the wingnut and pulling the attachment. (5.1)
• Twist the extension handle counterclockwise to loosen the
handle assembly. Slide the handle assembly away from the
screw gun motor to expose two hex screws. (5.2)
• Using the 3mm Allen wrench provided with your PAMFast
tool, loosen the two hex screws. Use caution when loosening
these screws as not to drop them. (5.2)
• Pull the extension pole away from the motor by twisting
and pulling simultaneously. The extension pole is designed
to require some force to pull away from the motor.
• Remove the inner rod by pulling it away from the motor.
• Insert the drive bit into the short bit holder. (5.2)
Extension (Continued)
• Remove the drive bit from the end of the extension pole
and insert it into the short bit holder. The short bit holder
and adapter will replace the inner rod and extension pole
respectively. (5.3)
• Slide the 1-3" attachment over the bit until it sets
securely in place and then tighten the wing nut. (5.4)
Fig. 4a
Fig. 5a
Setup and Adjustment (continued) Setup and Adjustment (continued)
I Warning Improper set up of the PAMFast tool will lead to
incorrectly installed screws and could damage the PAMFast tool.
Please call 800·518·3569 or visit fastenmaster.com
to contact a technical specialist if assistance is needed.
Short Handle Conversion
Long Handle Extension 5.1
5.2
5.3
5.4
11 12
feature. If utilizing this feature the screw gun will automatically
turn off between drives and start upon depressing the nose piece.
FastenMaster recommends utilizing a continuous drive mode or
“auto on” mode when using the PAMFast Autofeed tool.
• Between drives it is critical that the tool is fully lifted from the
surface to allow the nose piece to completely recoil. (Fig 8-11)
6) Loading Fasteners
• Feed the fastener strip into the belt guide
and load into the 1-3” attachment. (Fig
5-6). The fastener strip advances on the
down stroke, so the first screw should be
one spot prior to the drive position.
• If it is necessary to remove screws
from the PAMFast tool, pull the strip
forward, not backwards (Fig.7).
I Warning Only use genuine PAMFast
collated screws. Use of any other brand
fastener is not advised and will void the
limited warranty on your PAMFast tool.
7) Driving Fasteners
• Confirm that the motor is set to run in the forward
direction. Set the screw gun to “auto on” or “continuous” drive
mode. Refer to screw gun manufacturer’s operating instructions.
• With the motor running at full speed, apply and maintain
continuous pressure to drive the fastener until the drive bit
automatically disengages. For proper drive, it is critical that
the operator applies continuous pressure to fully depress
the nose piece when driving the fastener.
• When driving multiple fasteners consecutively, keep the motor
power on between drives. Some screw guns offer an “auto on”
Fig. 5
Fig. 6
Fig. 7
Operating Instructions (continued)Operating Instructions (continued)
Fig. 8 Fig. 9
Fig. 10 Fig. 11
For a video demonstration on how to setup and operate the
PAMFast Autofeed tool visit:
13 14
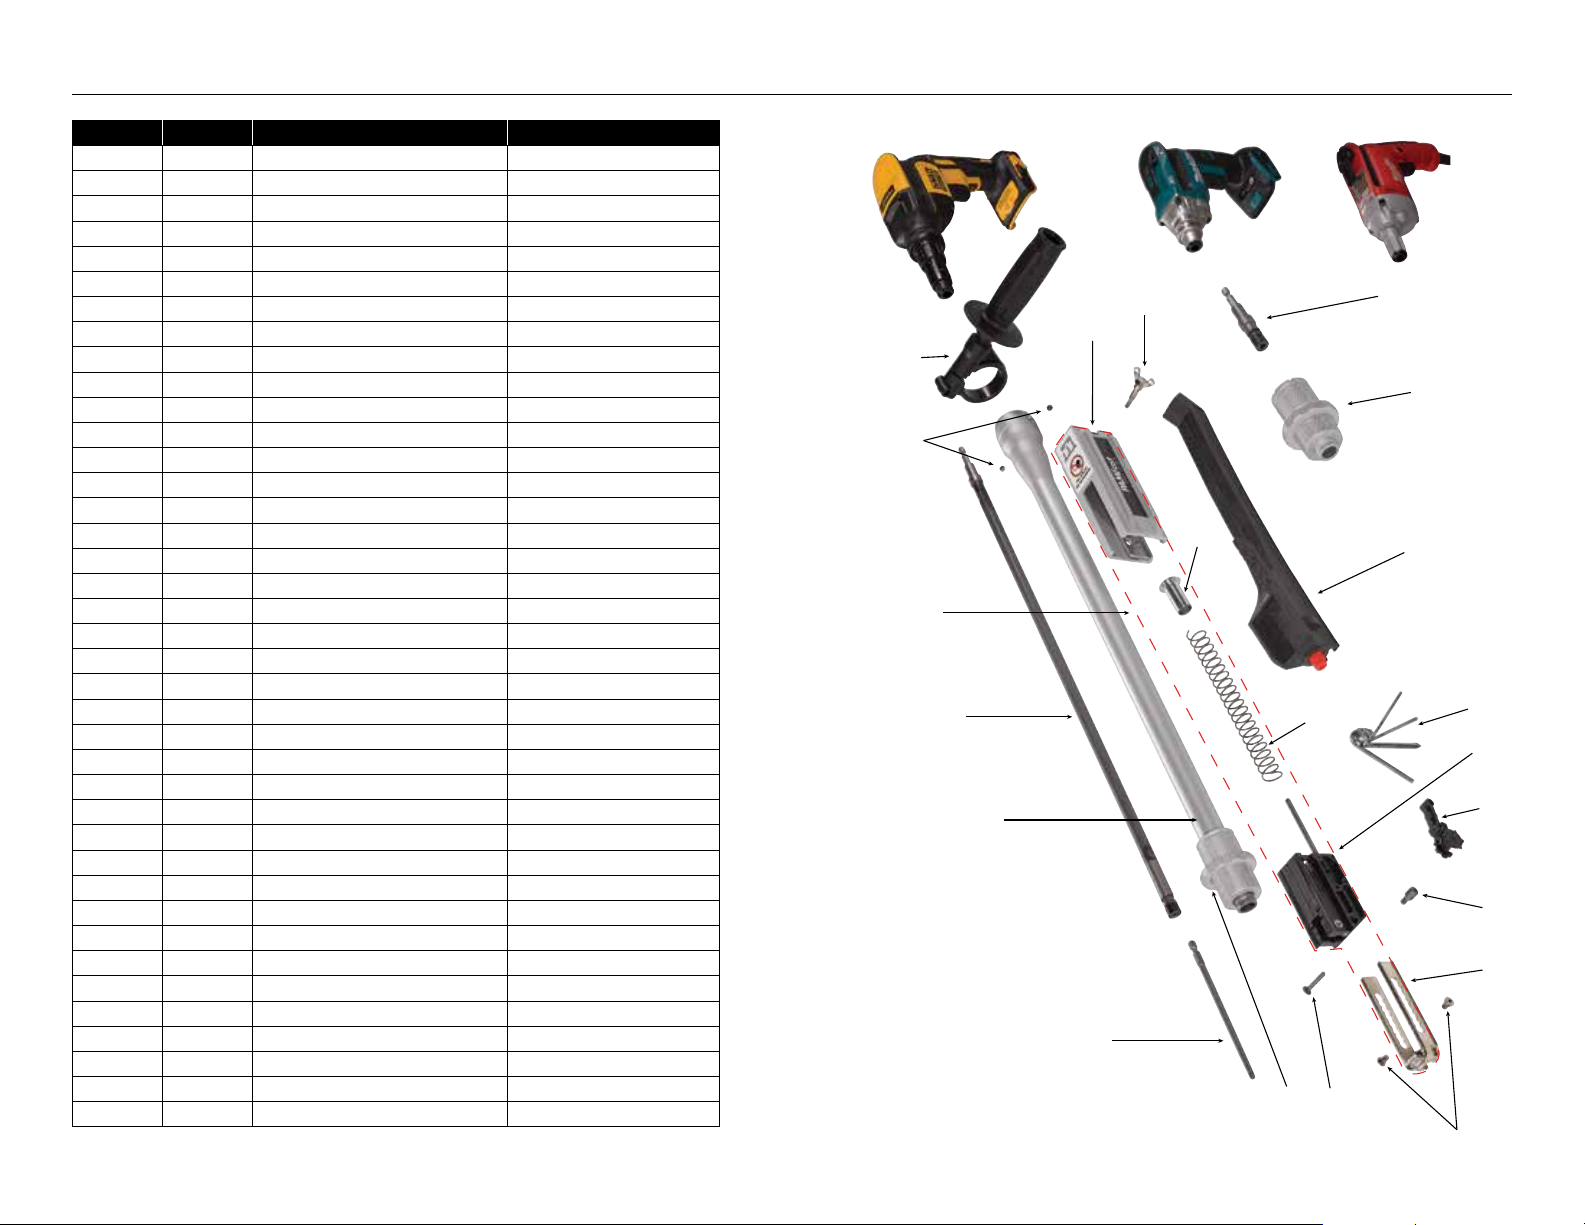
12
14
13
15
16
19
17
18 20
21
11
10
9
8
7
6
5
4
3
2
1
Parts Diagram Parts Diagram (continued)
Milwaukee Screw Gun
Corded 22a-b
Makita Screw Gun
Cordless 22c-d
DeWALT Screw Gun
Cordless 22e
POS. # PART # DESCRIPTION USED WITH
1 BGS0081 Depth Control 1"- 2" All 12K Series
1 BGS0083 Depth Control 1"- 3" All 13K Series
2 KFS0060 Depth Control Screws (2x) All Screw Guns
3 FXS0008 Gear Wheel Unit All Screw Guns
4 KFS0004 Screw with Roller All Screw Guns
5 EXS0070 Gliding Piece All 12K Series
5 EXS0060 Gliding Piece All 13K Series
6 NFS0305 Strong Yellow Spring * All 13K Series
6 NFS0227 Blue Spring All 12K Series
7 KBS0015 Spring Guide All Screw Guns
8 DXS0043P Plastic Belt guide All Screw Guns
9 BZS0002 Allen Key Set All Screw Guns
10 BAS0266 Milwaukee Adapter P12K & P13K Series
10 BAS0270 Adapter-F/Makita FS2200/ MAC13K/ MAC13K4
10 BAS0280 Adapter-F/Dewalt DCF622 DWC13K
11 BDS0012 BH- F/Milwaukee & D
e
WALT DCF622 P13K & DWC13K Series
11 BDS0068 BH- F/Makita FS4200 MAC13K Series
12 GXS0010 Stop Nut All Screw Guns
13 BITD2120 #2 x 120mm bit PAM Drive All 12K Series
13 BITP2120 #2 x 120mm bit Phillips Drive All 12K Series
13 BITD2140 PD #2X140mm F/P13 Series All 13K Series
13 BITP2140 PH #2X140mm F/P13 Series All 13K Series
14 KDS0022 Pin for Gear Wheel Unit All Screw Guns
15 BHS0218 Ext Pole-Milwaukee
All screw Guns w/ Milwaukee 6740 Motor
15 BHS0219 Ext Pole- Makita FS2200/FS4200
All Screw Guns w/ Makita XFS04 Motor
15 BHS0225 Ext Pole- Dewalt Cordless
All Screw Guns w/ D
e
WALT DCF622 Motor
16 BHS0208 Inner Rod All 13K Series
17 CXS0016 Housing Complete w/back plate & curve All 12K Series
17 CXS0064 Housing Complete w/ back plate & curve All 13K Series
18 NAS0394 Set Screw (2x) All 13K Series
19 ABS0044 1" – 2" Blank Attachment All 12K Series
19 ABS0047 1" – 3" Blank Attachment All 13K Series
20 BCS0011 Handle All 13K Series
21 KFS0066 Wing Nut Screw All Screw Guns
22a MILW01 Milwaukee 2500 rpm P12K/P13K/KDE/KUE
22b MILW02 Milwaukee 4000 rpm P12K4/P13K4
22c XSF04Z Makita 0-2500 rpm Bare Motor MAC13K Series
22d XSF03Z Makita 0-4000 rpm Bare Motor MAC13K4
22e DCF622B Dewalt 0-2000 rpm Bare Motor DWC13K

15 16
Nose Piece or Depth Control:
Nose Piece or Depth Control naturally
wears over time due to constant abrasion
of the screws and contact with the surface
being screwed down. If the nibs on the
front of the nose piece or the fastener
channel are worn, the nose piece may
be replaced. If it’s the channel that is worn,
the fastener may drive into the material off vertical,
causing countersink problems, jamming, and excessive bit wear.
Gear Wheel:
The gear wheel may wear with use.
If the gear wheel is worn, it will either
seize or spin freely instead of deliberately
advancing from one position to the next.
If the gear wheel does not advance
properly, it is likely damaged and may
need to be replaced. The purpose of the
gear wheel is to advance the fastener belt
forward but not allow it to roll back during
or after the advancing movement.
Spring for the Gliding Piece:
Over time, the spring for the gliding piece may become fatigued.
(Refer to part #6 in the Parts Diagram shown on page 14)
This may prevent the tool from properly recoiling between drives.
If the spring has worn replacement may be necessary.
I Warning: Do Not Use Oil
Oil will hold dirt and interfere with tool operation
• Graphite may be used to lubricate.
• To maintain proper operation of the PAMFast tool, ensure that
the gear wheel, inner spring, and gliding piece remain free from
debris and obstructions.
• Gliding piece must move freely in the housing.
Check periodically for damage. If burrs or obstructions
are found, smooth with a file.
Tips/Common Wear Parts Cleaning
Fig. 12
Fig. 13

17 18
Troubleshooting Troubleshooting (continued)
Symptom Remedy
Motor turns and bit engages,
but screw does not insert or
falls to the side when tool is
raised
•
Check that motor reversing switch is in forward position.
•
Check Depth Control screw setting as it may be too long.
Screw inserts but does not go
in all the way
•
Confirm the bit is the correct length for the attachment.
•
Check to be sure that collars on the depth control/nose
pieces screws are seated correctly (see Set Up,
Depth Control Adjustment).
Screw strip falls forward out
of belt guide when tool is
raised into position
•
Turn orange knob attached to the front of belt guide
to increase tension.
Screw does not countersink
properly
•
Turn countersink adjustment ring until the proper
countersink is achieved.
•
Check bit to be sure it is the right type and length.
Screw tip drags on surface
before installation of screw
•
Screw tip is likely beyond the outside of the Depth
Control. Adjust Depth Control until screw tip protrudes
halfway into Depth Control Throat.
First few screws advance then
the belt stops moving
•
Loosen tension control on the belt guide to allow
movement.
•
Check gear wheel movement as described under
Cleaning and Repair.
Call 800·518·3569 or access fastenmaster.com for a technical specialist
if assistance is needed
Symptom Remedy
Gliding piece will not retract
fully into housing on down-
stroke
•
Check that screws holding Depth Control in place are
fully seated into cut outs.
Gliding piece jams or is
difficult to move in the
housing.
•
Check first that there are no burrs on the front of the
housing that are interfering with the movement of the
gliding piece.
•
Check the width of the housing opening to ensure that
a bump or blow from something else has not forced the
front of the housing inward.
Screw is inserted only part
way before bit tip starts to
spin in recess.
•
Maintain constant downward pressure while screw is
being inserted. Too little or inconsistent pressure on
down-stroke will cause bit tip to lose full contact with
screw recess and potentially strip out recess.
Jammed fastener
•
Stop motor.
•
Pull screws completely through Gliding Piece.
Reinsert in belt guide and gliding piece.
•
To avoid jamming, be sure motor is running before
down stroke begins.
Screw becomes jammed in
Depth Control, gliding piece
or housing
•
Remove the fastener and test the tool.
Most of time the jam will cause no damage.

19 20
This warranty applies only to the original end-use purchaser.
Original proof of purchase is required. Proof of purchase must
clearly indicate purchase location, purchase date, and purchase
price. The purchase date indicated on the original proof of
purchase represents the start date of the Warranty Period. For the
avoidance of doubt, the screw gun supplied with the Products,
as the case may be, is not manufactured by or warranted by
FastenMaster.
This limited warranty is exclusive and replaces all other warranties,
conditions, representations and guarantees, whether express or
implied, whether by statute, at law or in equity, including the
implied warranties of merchantability or fitness for a particular
purpose. This limited warranty is your exclusive warranty from
FastenMaster and represents the sole remedy available to
any purchaser of the products. FastenMaster makes no other
representations, conditions, guarantees or warranties of any kind
other than stated herein. FastenMaster will not be liable in any
event for consequential, punitive, special, incidental, or other
similar damages of any kind, including damage to the interior or
exterior of any building, whether any claim against it is based upon
breach of this warranty, negligence, strict liability in tort, or for any
other cause. Some jurisdictions do not allow limitations on or the
exclusion of incidental or consequential damages, so the above
limitations may not apply to you.
For warranty assistance contact FastenMaster at 800-518-3569
or email your request to info@fastenmaster.com.
FastenMaster
153 Bowles Road
Agawam, MA 01001
800·518·3569
FastenMaster FrameFAST and PAMFast 3-year limited Warranty:
Effective 04/07/2022:
This warranty applies only to the following FastenMaster products:
FMFFTOOL-T2TP, FMFFTOOL-T2TP-MILC, FMFFTOOL-T2TP-DWC,
FMFFHEAD-P2R, FMFFHEAD-S2P, FMFFHEAD-T2TP, SD-20-P12K,
SD-20-P12K4, SD-20-P13K, SD-20-P13K4, SD-20-P13KUE, SD-20-
MAC13KUE, SD-20-DWC13KUE, (the “Products”).
OMG Inc. dba FastenMaster (“FastenMaster”) warrants that
the Products tool shall be free from defects in materials and
workmanship for a period of three (3) years from the date of
purchase (the “Warranty Period”). You must notify FastenMaster in
writing about any warranty claim within 30 days after you notice
a problem. If, after receiving prompt written notice, FastenMaster
determines that the Products are not as warranted, FastenMaster
will either, at its sole option, (a) repair the failed Product, or (b)
replace the failed Product, free of charge. The remedy under
this limited warranty is available only for those Products actually
exhibiting a manufacturing defect as set forth above. Any repaired
or replaced Product will be warranted only for the remainder of the
original warranty period. FastenMaster's liability under the terms of
this limited warranty will be limited to the direct cost of repairing or
replacing the failed Product.
This limited warranty does not apply where the Products have: (a)
been subjected to abuse, misuse, neglect, negligence, accident,
improper testing, improper installation, improper storage, improper
handling, abnormal physical stress, abnormal environmental
conditions (including corrosive or aggressive atmospheric
conditions such as chemical fumes or direct salt spray), metal
dust and shavings, or any use contrary to any instructions issued
by FastenMaster; (b) been reconstructed, repaired or altered by
persons other than FastenMaster or its authorized representative;
(c) been used with any third- party product, hardware or product
that has not been previously approved in writing by FastenMaster;
or (d) been damaged by other trades or materials substituted for, or
used in addition to, the Products. This limited warranty only covers
the Products and does not cover any other material obtained from
other sources.
Warranty Warranty (continued)
Table of contents


