Favor.it MSV 5000 User manual

Dishwasher
Instruction
InstructionInstruction
Instruction Manual
Manual Manual
Manual
MSV5000

1
ENGLISH
CONTENTS
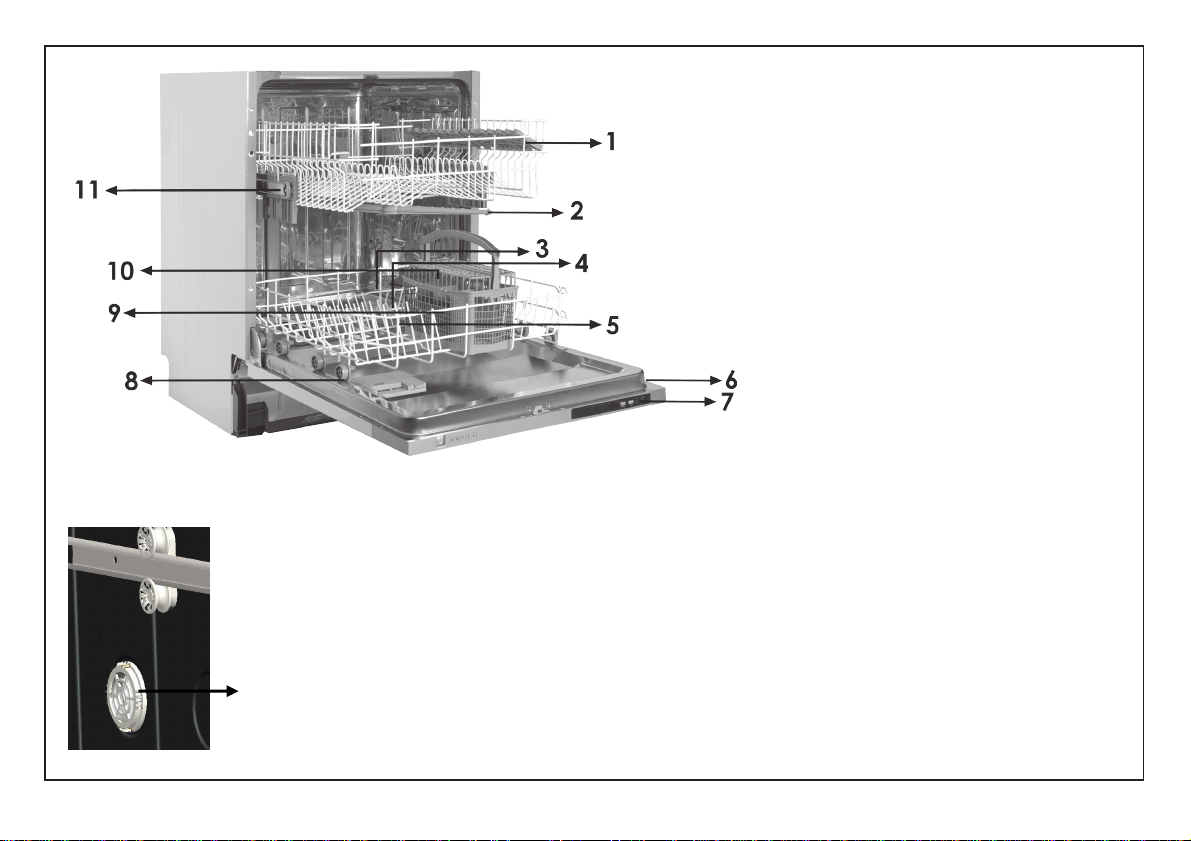
Getting familiar with your machine ..................................
Safety information and Recommendations . . . . . . . . . . . . . . . . . . . . . . . . . . . . 4
Installing the machine .............................................
Preparing the machine for use . . . . . . . . . . . . . . . . . . . . . . . . . . . . . . . . . . . . . .
Loading your dishwasher . . . . . . . . . . . . . . . . . . . . . . . . . . . . . . . . . . . . . . . . . . 1
Switching on the machine and selecting a programme . . . . . . . . . . . . . . . . . .
Maintenance and Cleaning . . . . . . . . . . . . . . . . . . . . . . . . . . . . . . . . . . . . . . . . .
Failure codes and what to do in case o ailure .................................
Practical and useful information . . . . . . . . . . . . . . . . . . . . . . . . . . . . . . . . . . . .
•Technical specifications . . . . . . . . . . . . . . . . . . . . . . . . . . . . . . . . . . . . . . . . . 3
•Conformity with the standards and Test data . . . . . . . . . . . . . . . . . . . . . . . . . 3
•Recycling .................................................... 4
•Safety information . . . . . . . . . . . . . . . . . . . . . . . . . . . . . . . . . . . . . . . . . . . . . . 4
•Recommendations . . . . . . . . . . . . . . . . . . . . . . . . . . . . . . . . . . . . . . . . . . . . . 7
•Items not suitable for dishwashing . . . . . . . . . . . . . . . . . . . . . . . . . . . . . . . . . 8
•Positioning the machine . . . . . . . . . . . . . . . . . . . . . . . . . . . . . . . . . . . . . . . . .
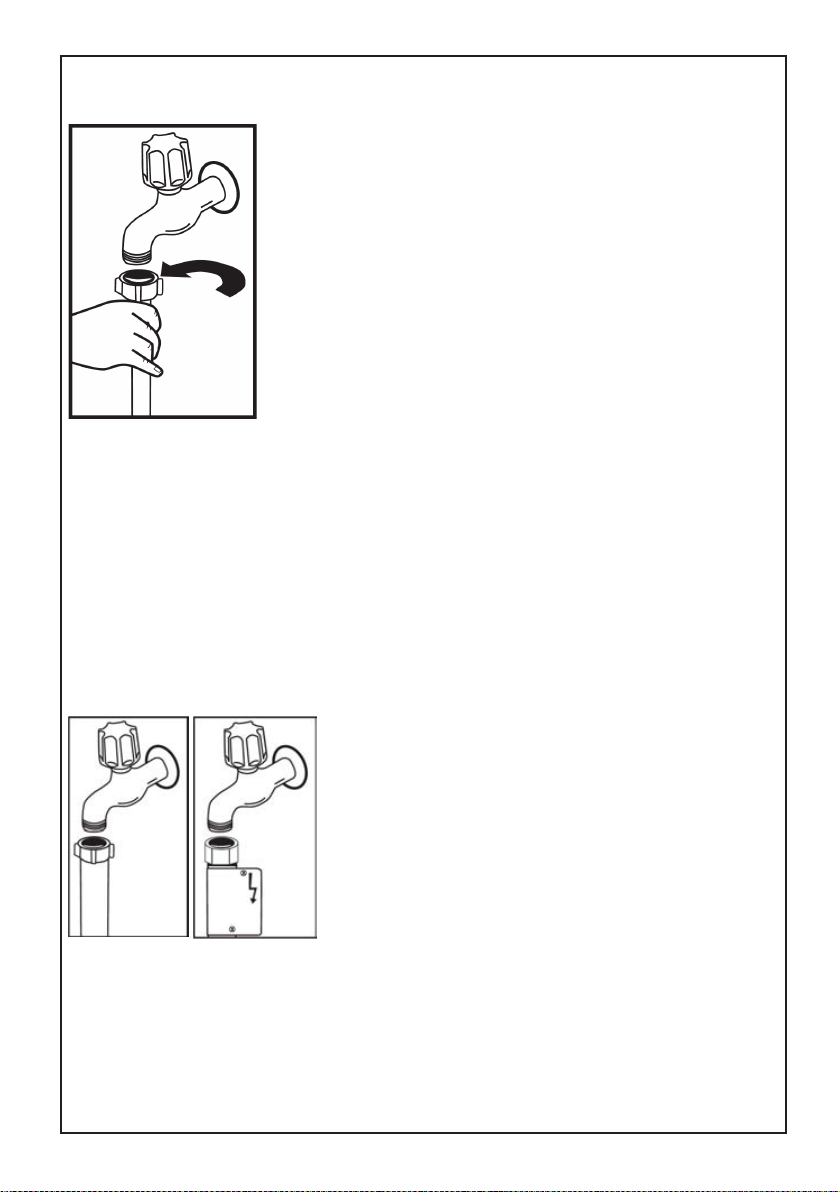
•Water connections . . . . . . . . . . . . . . . . . . . . . . . . . . . . . . . . . . . . . . . . . . . . . 9
•Water inlet hose . . . . . . . . . . . . . . . . . . . . . . . . . . . . . . . . . . . . . . . . . . . . . . . 10
•Water outlet hose . . . . . . . . . . . . . . . . . . . . . . . . . . . . . . . . . . . . . . . . . . . . . . 1 1
•Electrical connection . . . . . . . . . . . . . . . . . . . . . . . . . . . . . . . . . . . . . . . . . . . . 12
•Prior to using the machine . . . . . . . . . . . . . . . . . . . . . . . . . . . . . . . . . . . . . . . 13
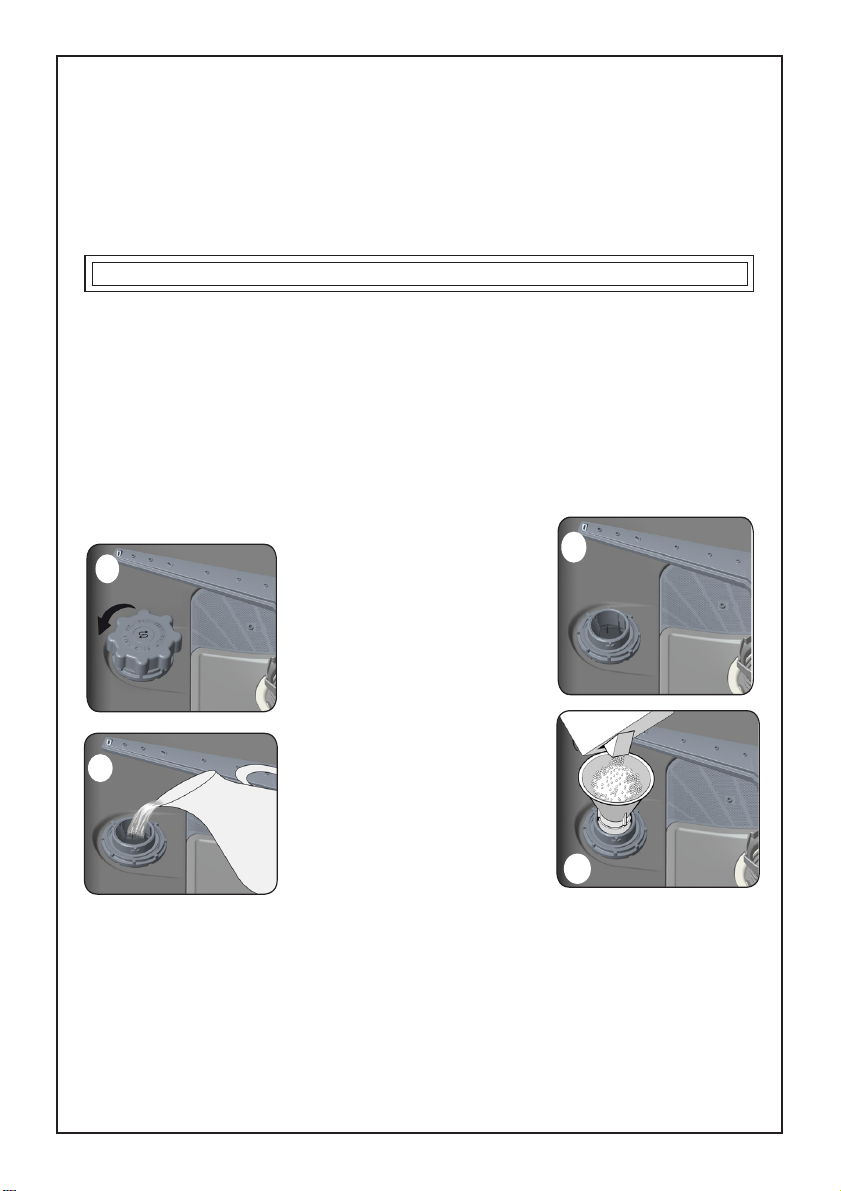
•The importance of water decalcification . . . . . . . . . . . . . . . . . . . . . . . . . . . . .
•Filling with salt . . . . . . . . . . . . . . . . . . . . . . . . . . . . . . . . . . . . . . . . . . . . . . . . .
•Testing strip . . . . . . . . . . . . . . . . . . . . . . . . . . . . . . . . . . . . . . . . . . . . . . . . . . . 14
•Adjusting salt consumption . . . . . . . . . . . . . . . . . . . . . . . . . . . . . . . . . . . . . . . 14
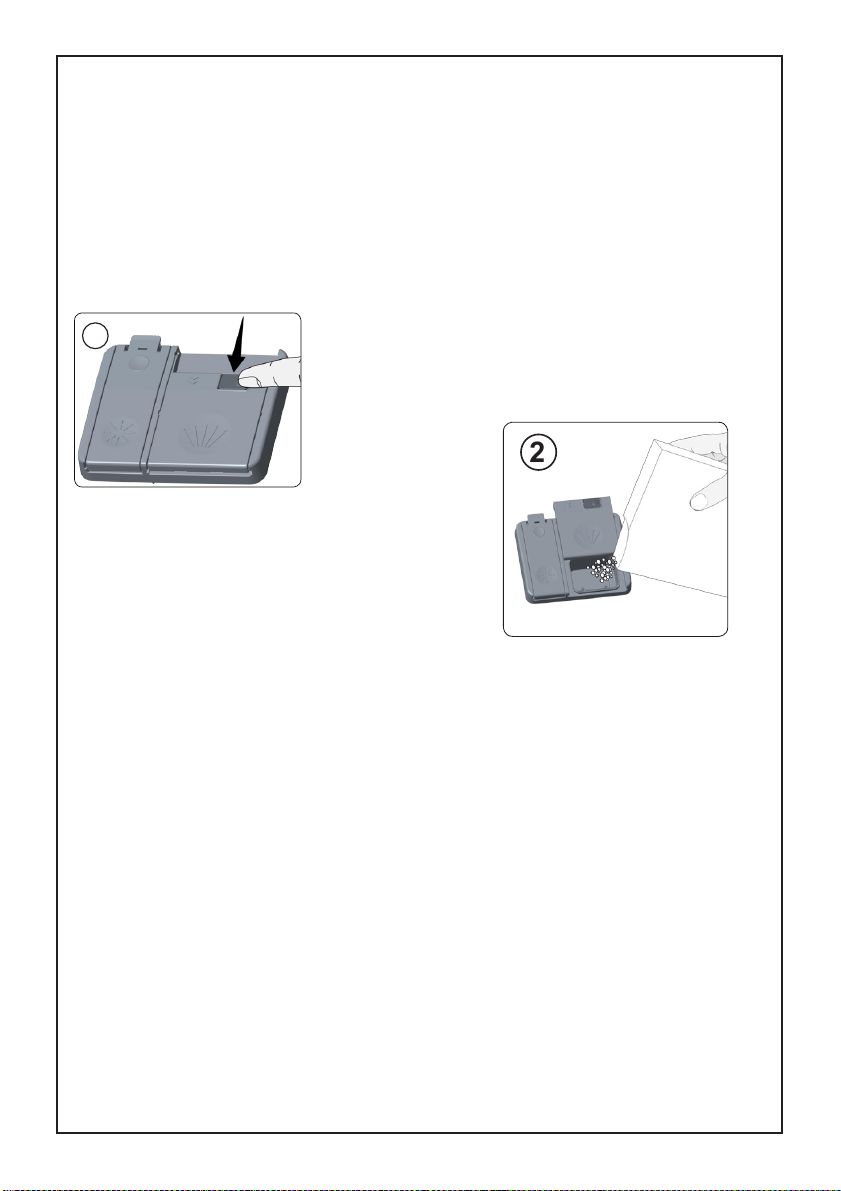
•Detergent usage . . . . . . . . . . . . . . . . . . . . . . . . . . . . . . . . . . . . . . . . . . . . . . . 16
•Filling the detergent compartment . . . . . . . . . . . . . . . . . . . . . . . . . . . . . . . . . 16
•Combined detergent . . . . . . . . . . . . . . . . . . . . . . . . . . . . . . . . . . . . . . . . . . . . 16
•Filling with rinse aid and making the setting . . . . . . . . . . . . . . . . . . . . . . . . . . 17
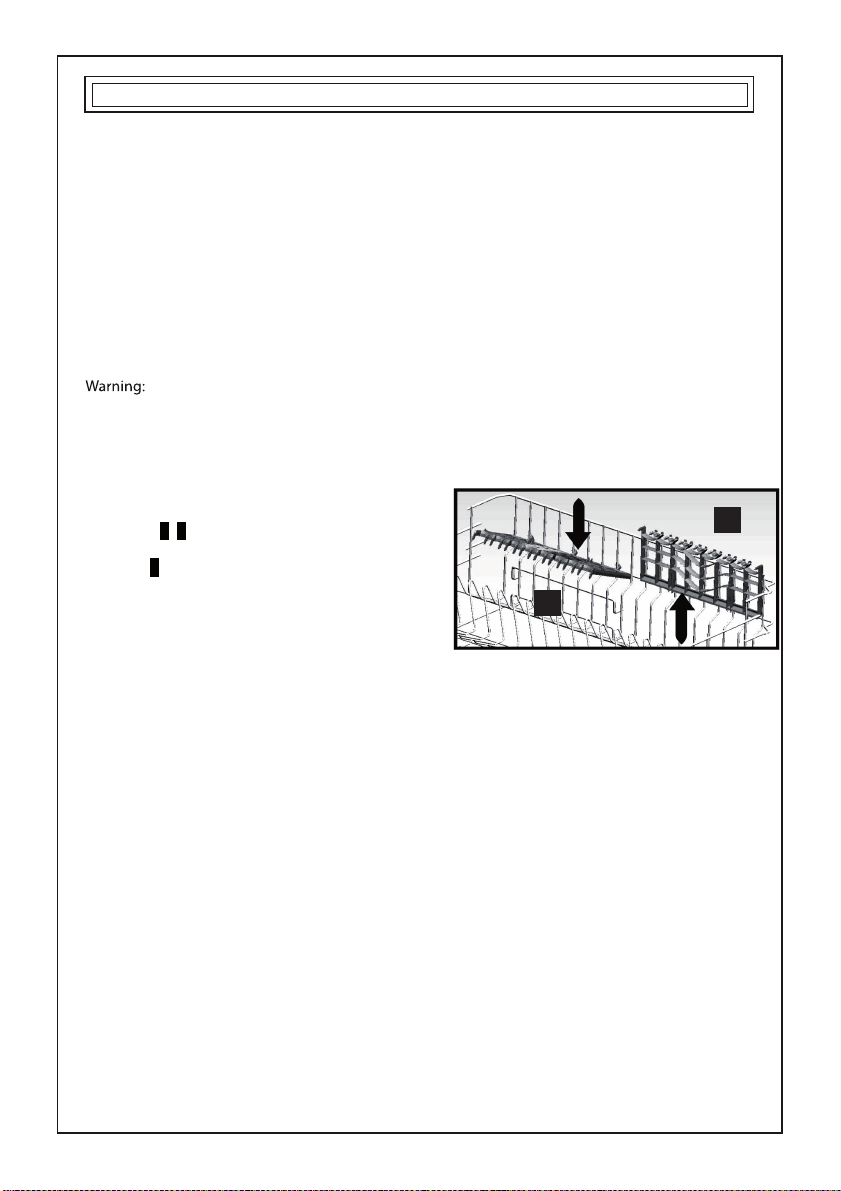
•TopBasket ...................................................18
•LowerBasket .................................................19
•Alternative basket loads . . . . . . . . . . . . . . . . . . . . . . . . . . . . . . . . . . . . . . . . . 19
•Programme items . . . . . . . . . . . . . . . . . . . . . . . . . . . . . . . . . . . . . . . . . . . . . . 21
•Switching on the machine . . . . . . . . . . . . . . . . . . . . . . . . . . . . . . . . . . . . . . . .
•Programme follow-up . . . . . . . . . . . . . . . . . . . . . . . . . . . . . . . . . . . . . . . . . . .
•Changing a programme . . . . . . . . . . . . . . . . . . . . . . . . . . . . . . . . . . . . . . . . .
•Changing a programme with resetting . . . . . . . . . . . . . . . . . . . . . . . . . . . . . . 24
•Switching the machine off . . . . . . . . . . . . . . . . . . . . . . . . . . . . . . . . . . . . . . . . 24
•Filters . . . . . . . . . . . . . . . . . . . . . . . . . . . . . . . . . . . . . . . . . . . . . . . . . . . . . . .
•Sprayarms ...................................................
•Hose filter . . . . . . . . . . . . . . . . . . . . . . . . . . . . . . . . . . . . . . . . . . . . . . . . . . . .
8
8
13
13
13
8
22
23
23
23
23
25
25
26
26
29
27

1.
Upper basket with racks
2. Upper spray arm
3. Lower basket
4. Lower spray arm
5. Filters
6. Rating plate
7. Control Panel
8. Detergent and rinse-aid dispenser
9. Cutlery basket
10.
11. Salt dispenser
Upper basket track latch
2
120LQLActive drying unit: This system provides
better drying performance for your dishes.

3
Capacity 12 place settings
Height 820 mm - 870mm
Width 598mm
Depth 570mm
Net Weight 38 kg
Electricity input 220-240 V, 50Hz
Total Power 1900 W
Heating Power 1800 W
Pump Power 100 W
Drain Pump Power 30 W
Water supply pressure 0.03 MPa (0,3 bar)-1 MPa (10 bar)
Current 10 A
Technical specifications
Conformity with the standards and Test data / EU
Declaration of Conformity
This product meets the requirements of all applicable EU
directives with the corresponding harmonised standards,
which provide for CE marking.
Important Note for User:For softcopy of this user manual,
please contact following address:
"[email protected]”.In your e-mail, please
provide the model name and serial number (20 digits) which
you can find on the appliance door.

4
SAFETYINFORMATIONANDRECOMMENDATIONS
Recycling
• Certain components and the packaging of your machine
have been produced from recyclable materials.
• Plastic parts are marked with international abbreviations:
(>PE< , >PS< , >POM<, >PP<, )
• Cardboard parts have been produced from recycled paper
and they should be disposed of into waste paper collection
containers for recycling.
• Such materials are not suitable for being disposed of into
garbage bins. They should be delivered to recycling centres
instead.
• Contact relevant centres in order to obtain information on
methods and points of disposal.
Safety Information
When you take delivery of your machine
• Check for any damage to your machine or to its packaging.
Never start a machine damaged in any way, make sure to
contact an authorised service.
• Unwrap the packaging materials as indicated and dispose
of them in accordance with the rules.
The points to pay attention during machine installation
•Choose a suitable, safe and level place to install your
machine.
• Carry out the installation and connection of your machine by
following the instructions.
•This machine should be installed and repaired by an
authorised service only.
• Only original spare parts should be used with the machine.
• Before installing, be sure that the machine is unplugged.

5
• Check whether the indoor electrical fuse system is connected
according to the regulations.
• All electrical connections must match the values indicated
on the rating plate.
• Pay special attention and be sure that the machine does not
stand on the electricity supply cable.
• Never use an extension cord or a multiple socket for making
a connection. The plug should be comfortably accessible
after the machine has been installed.
• After installing the machine to a suitable place, run it unloaded
for the first time.
In daily use
• This machine is for household use; do not use it for any
other purpose. Commercial usage of the dishwasher will void
the guarantee.
• Do not get up, sit or place a load on the open door of the
dishwasher, it may fall over.
• Never put into the detergent and rinse aid dispensers of
your machine anything other than those detergents and rinse
aids which are produced specifically for dishwashers. Our
company will not be responsible for any damage that might
occur in your machine otherwise.
• The water in the machine's washing section is no drinking
water do not drink it.
• Due to danger of explosion, do not put into the machine’s
washing section any chemical dissolving agents such as
solvents.
• Check whether plastic items are heat-resistant before
washing them in the machine.
•This appliance can be used by children aged from 8 years
and above and persons with reduced physical, sensory or

6
mental capabilities or lack of experience and knowledge if
they have been given supervision or instruction concerning
use of the appliance in a safe way and understand the hazards
involved. Children shall not play with the appliance.Cleaning
and user maintenance shall not be made by children without
supervision.
• Do not put into your machine those items which are not
suitable for dishwashing. Also, do not fill any basket above its
capacity.Our company will not be responsible for any scratch
or rust to form on the inner frame of your machine due to
basket movements otherwise.
• Especially because hot water may flow out, the machine
door should not be opened under any circumstances while
the machine is in operation. In any case, a safety devices
ensures that the machine stops if the door is opened.
• Do not leave your dishwasher’s door open. Failure to do so
may lead to accidents.
• Place knives and other sharp-ended objects in the cutlery
basket in blade-down position.
• If the supply cord is damaged, it must be replaced by the
manufacturer, its service agent or similarly qualified persons
in order to avoid a hazard.
•This appliance is not intended for use by persons (including -
children) with reduced physical,sensory or mental capabilities,
or lack of experience and knowledge, unless they have
been given supervision or instruction concerning use of the
appliance by a person responsible for their safety.
• If EnergySave option is selected as "Yes", The door will be
opened at the end of the program. Do not force to close the
door to avoid harm auto door mechanism during 1 minutes.
The door must be open during 30 minutes to get effective
drying.( in models with auto door opening system )
Warning: Do not stand in front of the door after the signal
sounds belonging auto-open.

7
For your children’s safety
• After removing the machine’s packaging, make sure that the
packaging material is out of reach of children.
• Do not allow children to play with or start the machine.
• Keep your children away from detergents and rinse aids.
•Keep children away from the machine while it is open
because there may still be residues of cleaning substances
inside the machine.
• Be sure that your old machine does not pose any threat to
your children. Children are known to have gotten themselves
locked in old machines. To forestall such a situation, break
your machine's door lock and tear off the electrical cables.
In case of malfunctioning
• Any malfunction in the machine should be repaired definitely
by qualified persons. Any repair work performed by anyone
other than the authorised service personnel will cause your
machine to be left outside the scope of warranty.
• Prior to any repair work on the machine, be sure that the
machine is cut off from the mains.Switch off the fuse or unplug
the machine.Do not pull by the cable when unplugging. Make
sure to turn off the water tap.
Recommendations
• For energy and water saving, remove coarse residues on
your dishes before placing the dishes into the machine. Start
your machine after having fully loaded it.
• Use the pre-wash programme only whenever necessary.
• Place such hollow items as bowls, glasses and pots into the
machine in such a way that they will face down.
• You are recommended not to load into your machine any
dishes different or more than indicated.

8
Items not suitable for dishwashing:
• Cigarette ashes, candle leftovers, polish, paint, chemical
substances, iron-alloy materials;
• Forks, spoons and knives with wooden or bone, or ivory or
nacre-coated handles; glued items,items soiled with abrasive,
acidic or base chemicals.
• Plastic items that are not heat-resistant, copper or tin-coated
containers.
• Aluminium and silver objects (they may discolour, become
dull).
•Certain delicate glass types, porcelains with ornamental
printed patterns as they fade even after the first wash; certain
crystal items as they lose their transparency over time,
adhered cutlery that is not heat-resistant, lead crystal glasses,
cutting boards, items manufactured with synthetic fibre;
• Absorbent items as sponges or kitchen rags are not suitable
for dishwashing.
Warning:Take care to buy dishwasher-proof sets in your
future purchases.
INSTALLING THE MACHINE
Positioning the machine
When determining the place to put your machine on, take
care to choose a place where you can easily load and unload
your dishes.
Do not put your machine in any location where there is the
probability for the room temperature to fall below 0°C.
Before positioning, take the machine out of its packaging by
following the warnings located on the package.

9
Position the machine close to a water tap or drain. You
need to site your machine, taking into consideration that its
connections will not be altered once they are made.
Do not grip the machine by its door or panel in order to move
it.
Take care to leave a certain clearance from all sides of the
machine so that you can comfortably move it back and forth
during cleaning.
Make sure that the water inlet and outlet hoses do not get
squeezed while positioning the machine. Also, make sure
that the machine does not stand on the electrical cable.
Adjust the machine’s adjustable feet so that it can stand level
and balanced. Proper positioning of the machine ensures
problem-free opening and closing of its door.
If the door of you machine does not close properly, check if
the machine is stable on the floor it stands; if not, adjust the
adjustable feet and ensure its stable position.
Water connection
Be sure that the indoor plumbing is suitable for installing a
dishwasher. Also, we recommend that you fit a filter at the
entrance of your place or apartment so as to avoid any damage
to your machine because of any contamination (sand, clay,
rust etc.) that might be occasionally carried in through the
mains water supply or the indoor plumbing, and to forestall
such complaints as yellowing and formation of deposits after
washing.

10
Water inlet hose
Do not use the water inlet hose of your
old machine,if any. Use the new water inlet
hose supplied with your machine instead.
If you are going to connect a new or long
- unused water inlet hose to your machine
,run water through it for a while before
making the connection. Connect the water
inlet hose directly to the water inlet tap.
The pressure supplied by the tap should
be at a minimum of 0.03 Mpa and and at a
maximum of 1 Mpa.If the water pressure is
above 1 Mpa,a pressure-relief valve should
be fitted inbetween.
After the connections are made, the tap should be turned on
fully and checked for water tightness.For the safety of your
machine, make sure to always turn off the water inlet tap after
each wash programme is finished.
NOTE: Aquastop water spout is used
in some models. In case of using
Aquastop, a dangerous tension exists.
Do not cut Aquastop water spout. Do
not let it get folded or twisted.

11
Water outlet hose
The water drain hose can be connected
either directly to the water drain hole
or to the sink outlet spigot. Using a
special bent pipe (if available), the
water can be drained directly into the
sink via hooking the bent pipe over
the edge of the sink. This connection
should be at a minimum of 50 cm and
at a maximum of 110 cm from the floor
plane.
Warning: When a drain hose longer than 4 m is used, the
dishes might remain dirty. In that case, our company will not
accept responsibility.

12
Electrical connection
The earthed plug of your machine should be connected to
an earthed outlet supplied by suitable voltage and current. If
there is no earthing installation, have a competent electrician
carry out an earthing installation. In case of usage without
earthing installed, our company will not be responsible for
any loss of usage that might occur.
The indoor fuse current value should be 10-16 A.
Your machine is set according to 220-240 V. If the mains
voltage in your location is 110 V, connect a transformer of
110/220 V and 3000 W inbetween. The machine should not
be plugged in during positioning.
Always use the coated plug supplied with your machine.
Running in low voltage will cause a decline in washing quality.
The machine’s electrical cable should be replaced by an
authorised service or an authorised electrician only. Failure
to do so may lead to accidents.
For safety purposes, always make sure to disconnect the
plug when a wash programme is finished.
In order not to cause an electric shock, do not unplug when
your hands are wet.
When disconnecting your machine from the mains supply,
always pull from the plug. Never pull the cord itself.

Prior to using the machine for the first time
The importance of water decalcification
Filling with salt
• Check whether the electricity and supply water specifications match the values indicated
by the installation instructions for the machine.
• Remove all packaging materials inside the machine.
• Set the water softener.
• Add 1kg salt into the salt compartment and fill with water up to a level at which it will
almost overflow.
• Fill the rinse aid compartment.
For a good washing function, the dishwasher needs soft, i.e. less calcareous water.
Otherwise, white lime residues will remain on the dishes and the interior equipment. This will
negatively affect your machine's washing, drying and shining performance. When water flows
through the softener system, the ions forming the hardness are removed from the water and
the water reaches the softness required to obtain the best washing result. Depending on the
level of hardness of the inflowing water, these ions that harden the water accumulate rapidly
inside the softener system. Therefore, the softener system has to be refreshed so that it
operates with the same performance also during the next wash. For this purpose, dishwasher
salt is used.
Use softener salt specifically
produced for use in dishwashers. To
put softener salt, first remove the
lower basket and then open the salt
compartment cap by turning it
counter clockwise.1 2 At first fill the
compartment with 1kg salt and
water3 at overflowing level If
available,using the funnel 4provided
will make filling easier. refit the cap
and close it.If the salt warning lamp
on the control panel becomes on fill
the salt compartment with salt again.
Fill the salt compartment with water
at first use only.
If you put a tablet into the salt
compartment, do not fill the
compartment completely.
We recommend that you use small-grained or powder softener salt.
Do not put table salt into your machine. Otherwise, the function of the softener compartment
may decrease over time. When you start your dishwasher, the salt compartment gets filled
with water. Therefore, put the softener salt prior to starting your machine.
This way, overflowing salt gets immediately cleaned up through the wash operation. If you are
not going to wash any dishes immediately after putting salt, then run a short washing program
with an empty machine in order to avoid any damage ( to prevent corrosion ) to your machine
due to the salt overflow while filling in the salt container.
PREPARING THE MACHINE FOR USE
13
ENGLISH
1
3
SALT
4
2

Testing strip
Adjusting salt consumption
Table of Water Hardness Level Settings
NOTE:
The washing effectiveness of your machine depends on the softness of the tap water. For this
reason, your machine is equipped with a system that reduces the hardness in mains water
supply. The washing effectiveness will increase when the system is correctly set. To find out
the water hardness level of water in your area, contact your local water board or determine
water hardness level by using the test strip(if available).
If the hardness of the water you use is above 90 dF (French hardness) or if you are using well
water; you are recommended to use filter and water refinement devices.
Hardness level is adjusted to level 3 as a factory setting.
14
ENGLISH
Open the
testing
strip.
Run
water
through
your tap
for 1
min.
Keep the
testing
strip in
water for 1
sec.
Shake the
testing strip
after taking it
out of water.
Wait for
1 min.
Make your machine’s water hardness
setting according to the result
obtained through the testing strip.
No Lime
Very low lime content
Low lime content
Medium lime content
Lime content
High Lime content

15
Adjust the water softener according to how hard your tap water is.
Press the program selector button and keep it pressed down. (3)
Meanwhile, energise the machine by pressing the Power On/Offbutton. (1)
Keep Start/Pause keys press until the leds “P1-P2-P3-P4-P5-end of program
indicator” are on and off. (3)
After the leds ”P1-P2-P3-P4-P5-end of program indicator ”have flashed (2) ,
release the program selector button .(3)
Your machine displays the latest entered water hardness setting.
You can adjust the levels by programme selector button (3) according to
Table of Water Hardness Level Settings.
After adjusting the water hardness level , press on/off button to save the
settings in memory.(1)
ENGLISH
123

16
Detergent usage
Filling the detergent compartment
Combined detergent
Points to consider when using this type of products:
Use a detergent specifically designed for use in domestic dishwashers.
You can find powder,gel,and tablet detergents in the market that have been designed for
household dishwashers.
Detergent should be put into the compartment prior to starting the machine. Keep your
detergents in cool, dry places out of reach of your children.
Do not fill detergent into the detergent compartment more than required; otherwise it may
cause scratches on your glasses as well as lead to a poorly dissolved detergent.
Should you need more information concerning the detergent you will use, contact detergent
manufacturers directly.
Push the latch to open the detergent container as shown in
the image. 1 Detergent pod has level lines inside. It is
possible to measure the right detergent amount using these
lines. Detergent pod can take totally 40 cm3 detergent.
Open the dishwasher detergent and pour into the larger
compartment b 25 cm3 if your dishes are heavily soiled or
15 cm3 if they are
less soiled.2 If
your dishes have
been kept dirty for
a very long time, if
there are dried
food wastes on them, and if you have overly loaded
the dishwasher, pour a 5 cm3 detergent into the pre-
wash compartment and start your machine.
You may have to add more detergent into your
machine, depending on the degree of soil and on the
water hardness level in your area.
Detergent manufacturers also produce combined detergents called “2 in 1”, “3 in 1” or “5 in 1”
etc.
“2 in 1” detergents contain detergent + salt or rinse aid. When using “2 in 1” detergents make
sure to check the specifications of the tablet.
Other tablet detergents contain detergent + rinse aid + salt + varlous extra functions.
Generally, combined detergents produce sufficient results under certain usage conditions only.
Such detergents contain rinse aid and/or salt in preset amounts
• Always make sure to check the specifications of the product you will use or whether or not
it is a combined product.
• Check if the detergent used is appropriate for the hardness of mains water that machine is
appertaining to.
• Observe the instructions on packagings when using such products.
• If such detergents are in the form of tablets, never put them into the interior section or the
cutlery basket of the dishwasher. Always put the tablets into the detergent compartment in
the detergent dispenser.
• They produce good results for certain types of usage only. If you are using this type of
detergents, you need to contact the manufacturers and find out about the suitable
conditions of use.
ENGLISH
1
2
DETERGENT
• When the conditions of use of such products and the machine settings are appropriate,
they ensure savings in salt and/or rinse aid consumption.
• Contact the detergent manufacturers if you are not obtaining good wash results (if your
dishes stay calcareous and wet) after having used 2 in 1 or 3 in 1 detergents. The scope of
warranty for your machine does not cover any complaints caused by the use of these types
of detergents.

17
: If you want to obtain better results while using combined detergents,
add salt and rinse aid into your machine and adjust the water hardness setting and the rinse
aid setting to the lowest position.
Solubility of the tablet detergents produced by different companies can vary
depending on the temperature and time. Therefore, it is not recommended to use such
detergents in short programs. It is more suitable to use powder detergents in such
programs.
Should any problem, which you have not encountered before, arise with the use of
this type of detergents, contact the detergent manufacturers directly.
• Fill the salt and rinse aid compartments.
• Adjust the water hardness setting to the highest position(6)andrunanempty-wash.
• Adjust the water hardness level.
• Make the suitable rinse aid setting.
Recommended usage
Warning:
When you give up using combined detergents
Filling with rinse aid and making the setting
ENGLISH
To fill the rinse aid compartment, open the rinse-aid compartment cap. Fill the compartment
with rinse aid to the MAX level and then close the cap. Be careful not to overfill the rinse aid
compartment and wipe up any spills.
In order to change the rinse aid level, follow the below steps before turning on the
machine:
• Push the programme button and hold it down.
• Turn on the machine.
• Hold down the programme button until all leds blink twice. Rinse aid setting follows
water hardness setting.
• The machine will display the current setting.
• Change the level by pushing the programme button.
• Switch off the machine to save the setting.
The factory setting is “4”.
If the dishes are not drying properly or are spotted, increase the level. If blue stains form on
your dishes, decrease the level.
Level Brightener Dose Indicator
1 Rinse-aid not dispensed P1-P5 LEDs are on
2 1 dose is dispensed P2-P5 LEDs are on
3 2 doses are dispensed P3-P5 LEDs are on
4 3 doses dispensed P4-P5 LEDs are on
5 4 doses dispensed P1-P4-P5 LEDs are on

18
LOADING YOUR DISHWASHER
If you properly place your dishes into the machine, you will be using it in the best way in terms of
energy consumption, washing and drying performance.
There are two separate baskets for you to load your dishes into your machine. You can load into
the lower basket such round and deep items as pots with long handles, pot lids, plates, salad
plates, cutlery sets.
The upper basket has been designed for tea plates, dessert plates, salad bowls, cups and
glasses. When placing long-stem glasses and goblets, lean them against the basket edge, rack
or glass supporter wire and not against other items. Do not lean long glasses against one
another or they cannot remain steady and may receive damage.
It is more appropriate to locate the thin narrow parts into the middle sections of baskets.
You can place spoons among the other cutlery sets in order to prevent them from sticking to one
another. You are recommended to use the cutlery grid in order to obtain the best result.
To avoid any possible injuries, always place such long-handle and sharp-pointed dishes as
serving fork, bread knife etc. with their sharp points facing down or horizontally on the baskets.
Place your dishes into your machine in a way that they will not prevent the upper and
lower spray arms from spinning.
ENGLISH
machine. abYou can use these dish racks in
open or closed position. When they are in open
position ayou can place your cups on them; and
when in closed position byou can place long
glasses on the basket. Also, you can use these
racks by placing long forks, knives and spoons
on them laterally.
There are dish racks on the upper basket of your
a
b
Top basket
Dish rack

19
ENGLISH
Top basket
Lower basket
Table of contents
Languages:
Other Favor.it Dishwasher manuals

Favor.it
Favor.it 78022 VI User manual

Favor.it
Favor.it 35020 I User manual

Favor.it
Favor.it F45-Y15 User manual

Favor.it
Favor.it MS 3000 INOX User manual

Favor.it
Favor.it SI60-I14 User manual

Favor.it
Favor.it F89088VI-M User manual

Favor.it
Favor.it 88420 VI User manual

Favor.it
Favor.it 86010 VI User manual

Favor.it
Favor.it MS 5000 User manual

Favor.it
Favor.it E60-A24 BLDC User manual