FenSens Smart HD Solar User manual
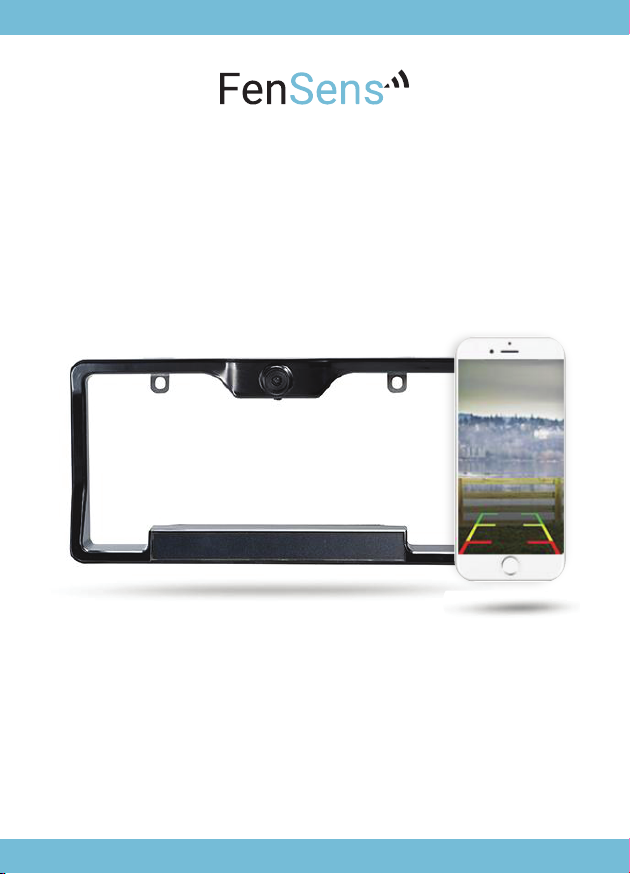
Smart HD Solar
Wireless Backup Camera
Important, retain for future reference:
Read carefully

Introduction
Package Contents
Product Specifications
Installation Guide
Settings and Operation
Troubleshooting and FAQs
Warranty
01
02
03
04
07
16
20
TABLE OF CONTENT

01
INTRODUCTION
Please read all of the installation instructions carefully before installing the
product. Improper installation will void manufacturer’s warranty. The
installation instructions do not apply to all types of vehicles, and are
written as guidelines to assist in installing the system.
Consult an experienced technician if you are not comfortable installing the
product. You can also contact FenSens at FenSens.com to speak to one
of our installation specialists if you have any specific questions regarding
the Smart HD Solar Wireless Backup Camera.
BEFORE using the Smart HD Solar Wireless Backup Camera, please
read the safety information provided in this user manual. ALWAYS
use the product as outlined in this user manual.
Please make sure to read and understand all local laws and regulations
regarding cameras and their use in a vehicle. Laws vary by state.

02
4.
6.
2..1.
3.
5.
Smart HD Solar Wireless Backup Camera
2 x Two Way Mounting Tab (Optional)
33” USB Cable for Charge License Plate Backup Camera Power
2 x Mounting Screw & Nut (Optional)
2 x License Plate Machine Screw (Optional)
2 x License Plate Self-Tapping Screw (Optional)
TAP Button
1.
2.
3.
4.
5.
6.
PRODUCT CONTENTS

PRODUCT SPECIFICATIONS
1. Download the app on the Google Play or Apple iTunes App Store.
2. Select whether the device will be mounted on the front or back of your
vehicle. Select only one option for now.
3. Make sure your smartphone Bluetooth and WiFi settings are turned
on, then pair your smartphone with the FenSens device and the
QuickLaunch button. Make sure you accept all the permissions
required by the app. On iOS the TAP QuickLaunch feature work best if
you have the app running in the background and your location settings
turned to “Always On” for FenSens. Lastly, please allow push notifications
form our app.
4. Launch FenSens anytime you want to use it by simply opening the app,
hitting the camera icon within the app’s navigation bar, or tapping the
included QuickLaunch button.
Smart HD Solar Wireless Backup Camera
2 x Two Way Mounting Tab (Optional)
33” USB Cable for Charge License Plate Backup Camera Power
2 x Mounting Screw & Nut (Optional)
2 x License Plate Machine Screw (Optional)
2 x License Plate Self-Tapping Screw (Optional)
TAP Button
1. Frequency: 2.4GHz
2. Operating Temperature: 14ºF~122ºF (-10ºC~50ºC)
3. Camera Water Resistance: IP65 rating
4. Battery Capacity: 2200mAh
5. Maximum Signal Range: 33 feet/10 meters
(without interference or obstruction)
SETTING UP THE MOBILE APP
*Make sure to charge your device with the provided USB cord for at least 2-3
hours to give it a full charge before installing on your vehicle. Always setup and
test the device and app first before mounting on your car.
03
Smart HD Solar Wireless Backup Camera
A) STANDARD INSTALLATION
FEN
Blue LED light
FENSENSFENSENS
*Please follow your local laws and regulations regarding constant
monitoring while driving. It is recommended that you glance at the image
only when in reverse, and use as an aid. Do not rely solely on the camera
view to back up.
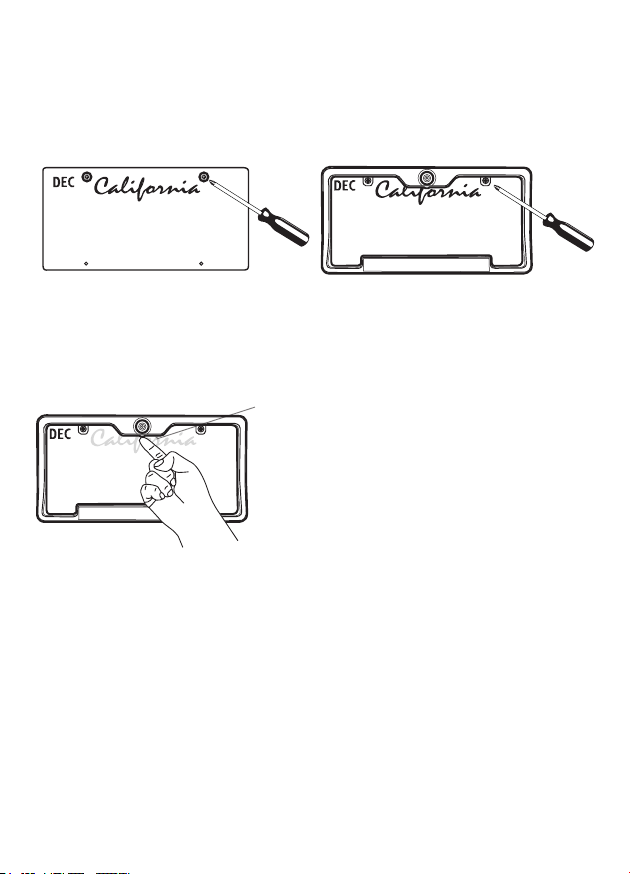
2. Secure the Smart HD Solar
Wireless Backup Camera and
license plate with with screws
back onto the rear of your
vehicle.
1. Unscrew your license plate.
3. Push and hold the power
button of the Smart HD Solar
Wireless Backup Camera for 1
second, the blue LED light will
flash 2 times.
04

B) LOWERING INSTALLATION- FOR VEHICLES WITH
TRUNK OR HATCH DOOR RELEASE (This allows more
clearance for finger tips to release door latch)
1. Unscrew and remove your
license plate.
2b. Install the Two Way Mounting
Tabs onto the Smart HD Solar
Wireless Backup Camera.
3. Install the license plate onto the
Smart HD Solar Wireless Backup
Camera with the Mounting
Screws & Nuts.
4. Secure the Smart HD Solar
Wireless Backup Camera with the
license plate back onto the rear
of your vehicle.
FENSENS
FENSENS
FENSENS
2a. Unscrew and detach the
original Mounting Tabs from
the back of the Smart HD Solar
Wireless Backup Camera.
05

C)RAISED INSTALLATION – FOR TRUCKS & SUV WITH
STEP BUMPERS (This will raise the camera frame out of
the cavity of the step bumper)
1. Unscrew and remove your
license plate.
2. Install the Two Way Mounting
Tabs using original Plates Screws
and Mounting Screws.
3. Finally, install the Smart HD Solar
Wireless Backup Camera and
license plate onto the rear of your
vehicle and tighten the Mounting
Nuts with a wrench.
Original Plate Screw
Step Bumper
Mounting
Screw
Two Way
Mounting Tab
Mounting
Nut
Warning: Lower tailgate on pickup trucks slowly and check for minimum ¼
inch clearance between gate and top of camera frame. This check is because
some bumpers are installed higher than others.
FENSENS
FENSENS
06

SETTING UP THE CAMERA IN THE ANDROID APP
There are 2 ways to start setting up the camera. One is from the settings menu under
“Manage Devices” > “Cameras” > Blue “+” sign. The other is by navigating to the camera
icon in your app navigation bar.
Select the TYPE_S_BUC01_
XXXXXXXXXXXX
Bluetooth device
07
Click “Setup” Button
Please continue steps on next page
TYPE_S_BUC01_
XXXXXXXXXXXX
08
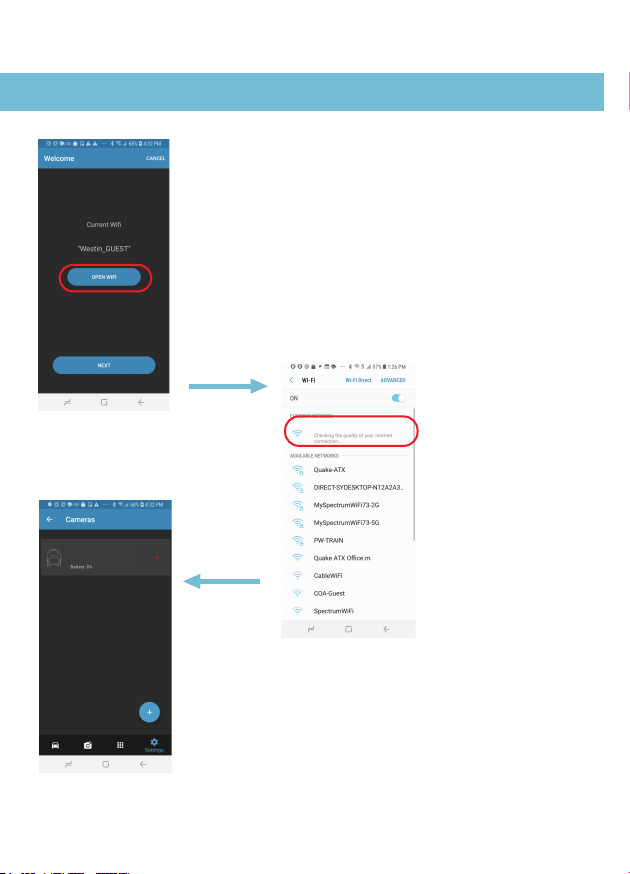
Connect with the Smart
Wireless Camera WiFi
network by looking for
“TYPE_S_BUC01_
1080P_XXXXXX”in your
WiFi settings. Once again, it
will show up as “Checking
for internet connection”
but the connection should
actually be complete if it
shows up here.
It should now say “TYPE_S_BUC01_1080P_XXXXXX”
under WiFi Settings. If it shows a different network, click
“Open Wifi” to manually switch to the Type S network.
After it updates, press “Next”. If you can’t click next and
the WiFi does not say “TYPE_S_BUC01_1080P_
XXXXXX”go back into your WiFi settings one more
time, click the WiFi name, then go back into the app.
Wait 5 seconds and it should now connect and you can
click “Next”.
If the camera is added successfully it
should show up in your list on
manage devices > cameras
SETTING UP THE CAMERA IN THE ANDROID APP
TYPE_S_BUC01_1080P_
XXXXXX
TYPE_S_BUC01_1080P_XXXXXX
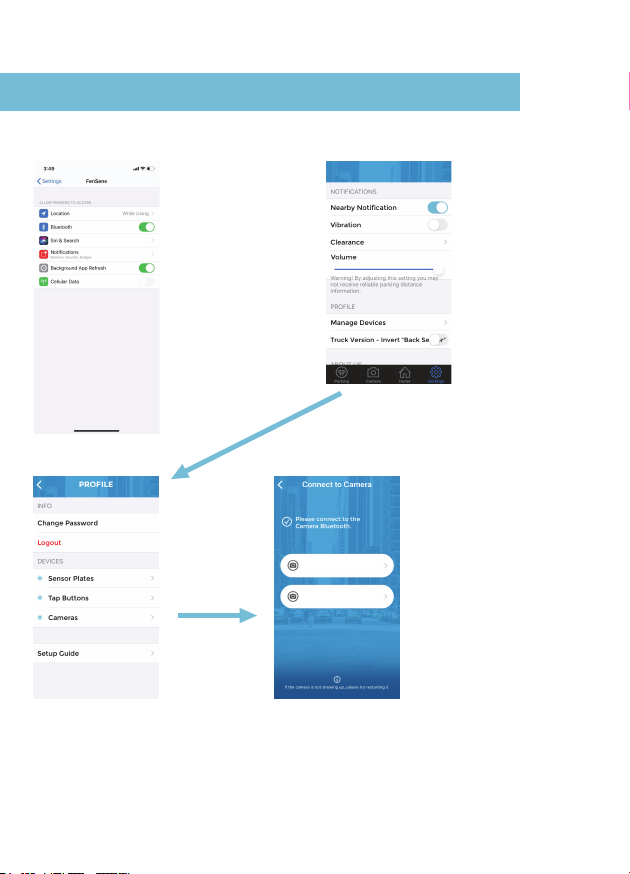
SETTING UP THE CAMERA IN THE iOS APP
Go to the
“Settings” tab, click
“Manage Devices”.
Disregard the
“Parking” tab unless
you have a parking
sensor
Please disable the
"Cellular Network"
permission for FenSens
app on your device (
iOS > Settings >
FenSens > Cellular
Network). This will make
the camera run more
smoothly for all iOS
phones.
Make sure your WiFi
and Bluetooth are on.
Select the nearest
FenSens Camera to
you by tapping on it. If
it doesn’t show up,
please restart
Bluetooth on your
phone or restart the
camera itself by
manually holding the
silver button down
until the red light
blinks, then again until
it blinks blue twice.
Click on
“Cameras”
09
TYPE_S_BUC01_XXXX...
TYPE_S_BUC01_XXXX...
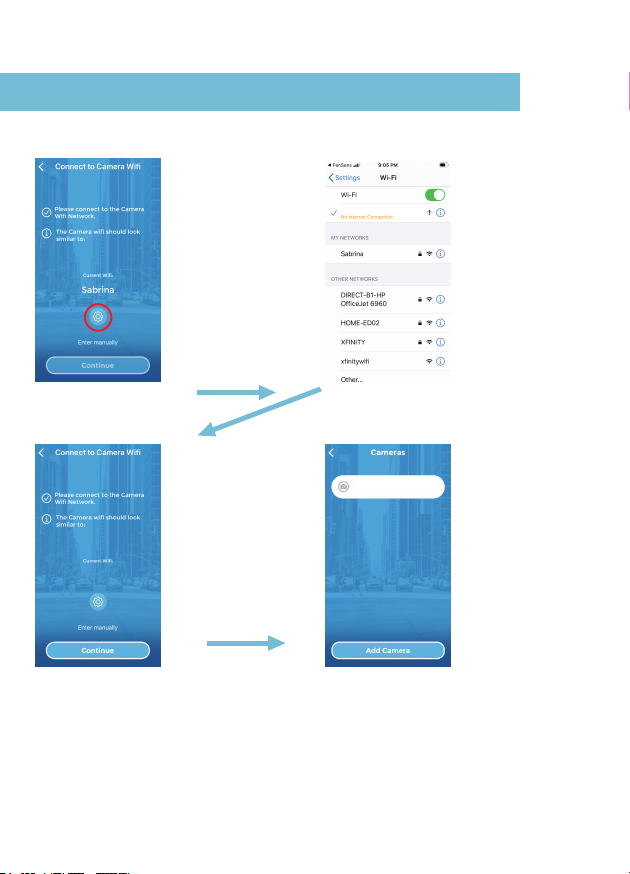
SETTING UP THE CAMERA IN THE iOS APP
Tap the “Gear Icon”
to connect to the
“TYPE_S_BUC01_
1080P_XXXXXX” WiFi
network If it doesn’t
show up, click back to
the bluetooth setup
page, click TYPE_S_-
BUC01_XXXXXXXXXXX
X to connect to
Bluetooth, then come
back to this page and
repeat the step above
(click on gear icon).
The “ TYPE_S_
BUC01_1080P_XXXX
XX” network should
show up here now, if
it doesn’t go into the
WiFi settings again, hit
the network name to
connect, then come
back into the app.
When this appears,
click continue.
The camera should
now show up in the
next, click the back
arrow several times to
go to the main screen,
then click the “camera
icon” to test out your
live streaming. The
camera always works
faster when you
manually connect to
the TYPE_S_BUC01_
1080P_XXXXXX WiFi
network, although it
will auto-connect on
its own, albeit a bit
slower.
Tap the “ TYPE_S_
BUC01_1080P_XXXX
XX” WiFi Network, it
will show up as
“Internet Not
Connected”,
because the device
only transmits
through WiFi, it
doesn’t host WiFi for
your phone.
10
TYPE_S_BUC01_1080P_X...
TYPE_S_BUC01_1080P_XX...TYPE_S_BUC01_1080P_XX...
TYPE_S_BUC01_XXXX...
“TYPE_S_BUC01_108...
“TYPE_S_BUC01_108...

11
Press your finger on
the screen between
the gridlines, then slide
up or down to adjust
the gridlines to your
liking. Be careful, the
nearest red area of the
gridline is where your
bumper is. Please do a
dry run first to get
used to how close
objects appear in the
camera view
Settings menu takes you
back to the “Manage
Devices” page where
you can add other
devices or your account
settings.
Goes to the parking
sensor screen, if you
have that product.
USING THE LIVE CAMERA FEED
Launching the Camera Feed:
The camera feed will launch in 1 of 2 ways
1. Hit the TAP QuickLaunch Button (make sure your settings are correct) and
the app should open to the camera page (iOS receives push notification)
2. Open the FenSens app and navigate to the “Camera” icon on the naviga-
tion bar or from the “Home Menu”
*Please note camera may shut off after 120 seconds for battery saving reasons,
simply close and relaunch the application. While the app will automatically try to
connect to the camera WiFi, the live camera feed always launches faster if you
manually connect to the Type S WiFi network.
12
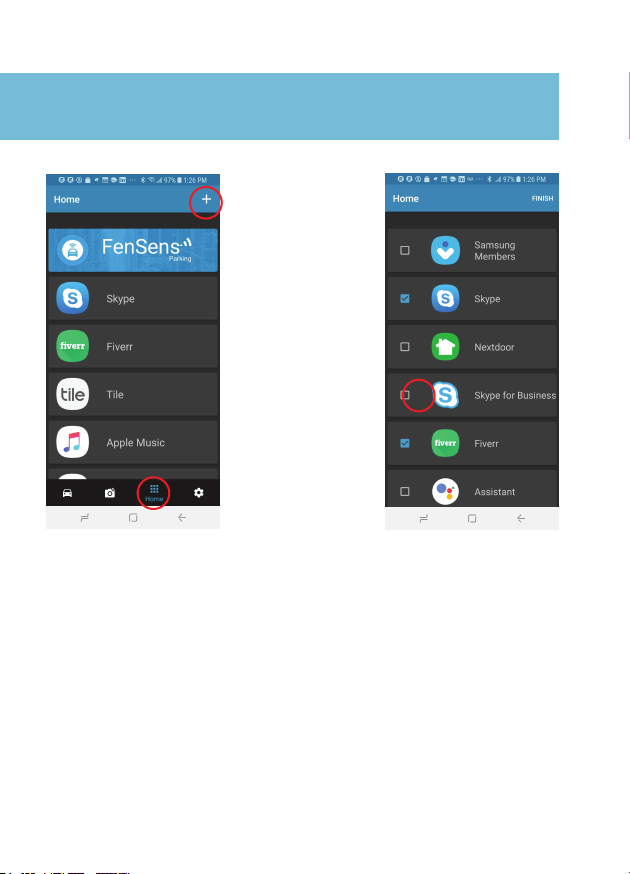
SETTING UP MORE APPS AND DEVICES
ON THE “HOME SCREEN”
At anytime from within the app
you can hit the “Home” icon to
launch the “Home Screen”. From
here you can access other
helpful apps while driving such
as music streaming apps, maps,
etc.
Select the apps you want on the
home screen by clicking on the
check box. Once you see a check
it is selected, you can deselect by
click on the box to remove the
check mark. This app will now be
easily accessible on your “Home
Screen” and in the future (Q1
2020) you will be able to access
without even touching your
phone (just use the TAP button).
Click the “+” sign in
the upper right to
add any app from
your phone to the
home screen
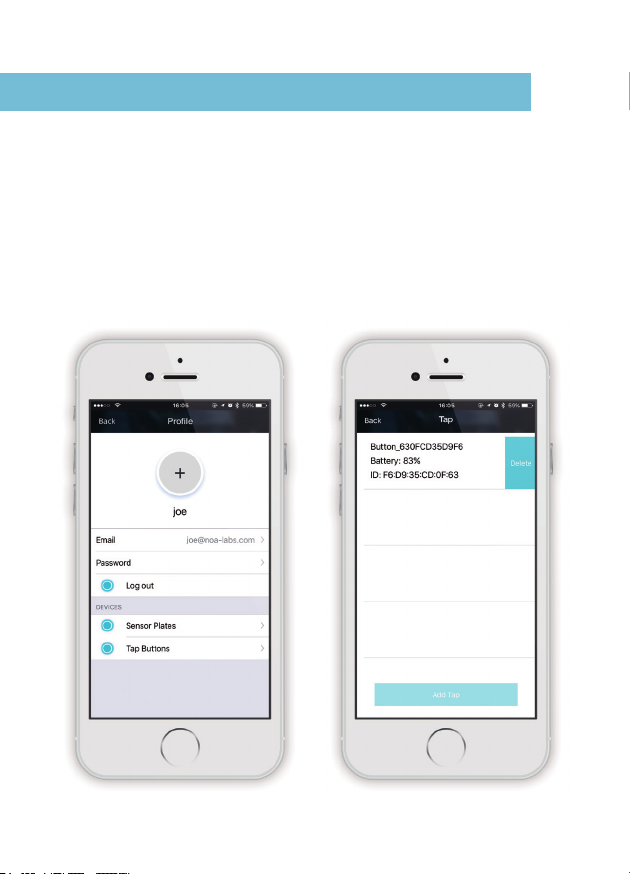
To make sure your TAP quicklaunch button works properly, do not hit the
button before attempting to pair, this will put it into advertising mode. You
can, however, hold the button down for 5 seconds to put the button into
Bluetooth pairing mode. If you do not hit the button, the button should be
available within 1 minute by going to Settings > Manage Devices > TAP >
Add TAP > Select The TAP Button By Name To Highlight It > Connect TAP
ADDING TAP QUICKLAUNCH BUTTON
13

Next make sure your Bluetooth setting is on in your phone and FenSens
has “Always On” permissions from your location settings and also allows
push from your phone’s settings. On Android, if you are
near the button and device, if you hit the TAP button it will open the app
automatically if you do not have screen lock on. If you are on iOS you
should get a push when you get near your car, hit the push
to launch the app and uses the sensors. Lastly, on iOS, if you
use the TAP button it’s best to have the FenSens app running in your
phone’s background and the above mentioned permissions. Tapping the
button will send a push notification on your phone that launches the app
automatically if it pressed. If the APP is not in the background hit the TAP
button once to pull it into the foreground, wait one second, then hit the
TAP button again to receive the push to launch the app.
Mount the include TAP QuickLaunch button on your steering wheel
or carefully take it out of the button holder by pinching the ring of the
button holder, then using two to gently pull out the button.
This button can be placed anywhere in the vehicle with the included 3M
tape from the screw kit.
14
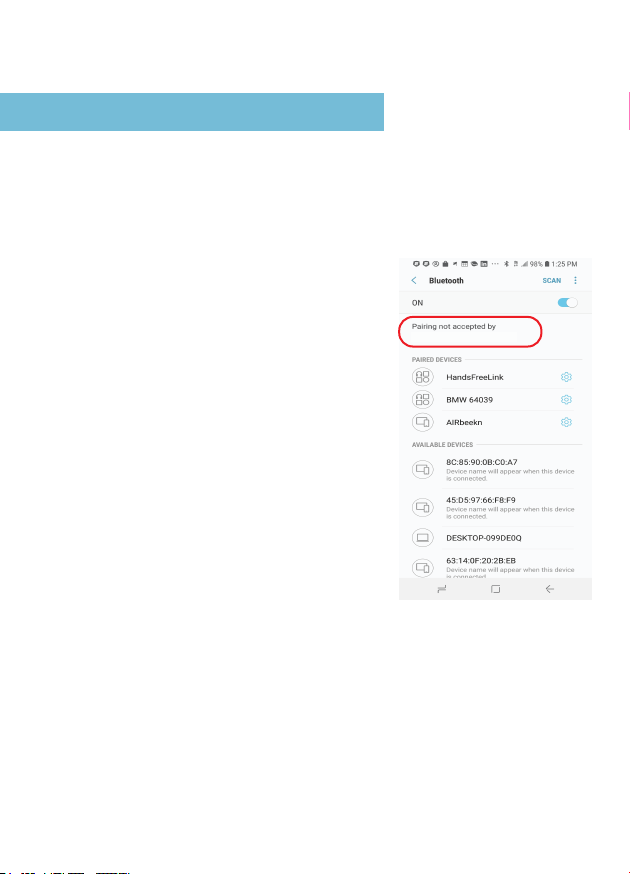
1. Unable to pair with smartphone or tablet
2. FenSens device keeps dropping signal
If your device signal keeps dropping, please
close out of the app and open it up again or
press the included Tap launcher button to
auto-launch.
3. Lost or damaged accessories
If you have lost or damaged one of the included accessories, please
require a replacement if it becomes lost, but the other screws can be
easily removed using a standard screwdriver kit.
TROUBLESHOOTING & FAQ
If you have yet to follow the setup instructions,
please walk through the setup process to pair
your FenSens device with your smartphone.
Due to software limitations it may show up
that the Bluetooth or WiFi connection is
rejected, but this is usually not the case, our
app will prompt you if you need to reconnect,
otherwise navigate to the live camera viewing
page after pairing with the camera WiFi and
Bluetooth and it should be streaming video.
While the app will automatically try to connect to the camera WiFi, the
live camera feed always launches faster if you manually connect to
the Type S WiFi network:
15
TYPE_S_BUC01_XXXXXXXXXXXX

4. How Long Is The Battery Life?
5.
Do I Have To Do Anything After Installing To Use It?
6. My Device Takes Too Long To Connect
The included QuickLaunch button launches Android application instantly
or sends a push notification to open the app if you are using iOS. The
Android app starts providing you feedback without you having to do
anything and the iOS app works by simply clicking the push notification
you receive.
The battery lasts upwards of a year or more with adequate amount of
sunshine per day. If you receive at least 2+ hours of daylight per day and
only use the device 5 minutes or less per day (average use), then it
should easily last over a year. Quality of daylight, initial charge, the
amount of time in use, and other factors can shorten the battery life,
however. If your device runs out of battery, you’ll know when you can’t
find the Bluetooth or WiFi signal for it, if that’s the case it’s time to
recharge the device with the Micro USB port.
We have found this is typically because the user attempts to turn on their
Bluetooth/WiFi settings while in the car. If the user turns off
Bluetooth/WiFi and then goes in the car, turns on the Bluetooth/WiFi
again, and opens the APP when they want to park, it might need a few
seconds to connect the sensor device. If the signal is not strong in the
car, it might need more time to connect.
We suggest to turn on Bluetooth/WiFi all the time which doesn’t use
much battery at all from the phone, the APP can then connect to device
when the user gets close to car and the app will connect much more
quickly.
Our device has a powerful antennae, but not every phone does, so it
takes a bit to connect usually on the smartphone side. Avoid this by
having your Bluetooth/WiFi turned on already.
16

18
7. What Is The Effective Range Or Object Detection Capabilities?
8. What Type Of Vehicles Does It Work For?
9.
The TAP Button And Auto-Launching The App
FenSens is perfect for all consumer and commercial fleet vehicles not
exceeding 9.14m in length.
While FenSens helps assist in safe parking, please pause for one second,
look behind to see if your path is clear, then move. FenSens can usually
works on vehicles 30 feet or less, however we would recommend it
mostly for cars less than 20 feet to have the best possible experience.
The TAP button automatically launches your app on Android and sends
you a push notification on iOS that you can use to tap (the notification)
and launch the iOS app on your phone instantly. Pair your TAP button
from the “Manage Devices” section, which you can access from the
settings page in the app itself. DO NOT CLICK THE TAP BUTTON BEFORE
LAUNCHING as this will put the button in an advertising mode and it will
not be discoverable by your app. If you do hit the button, you will have to
wait more than one minute before you can establish pairing again. Add
the TAP button from the “Manage Devices” page where it says “TAP
Buttons”, then click “Add TAP Button” to look for a nearby button you can
pair with and use to auto-launch the app going forward.
10. How Do I Use The Included Smartphone Mount?
Place the air vent phone mount on your air vent in your car. Place the
magnetic sticker on your phone or behind a smartphone case, then
place your smartphone on the air vent smartphone holder to safely use
your app hands-free while driving. Use the included TAP QuickLaunch
button to auto-launch the app without touching your phone.
My TAP Doesn’t Launch
For any button related issues, please see above FAQ’s and make sure to
check all permissions in APP. You should also turn on Location Services
on your phone as our beacon uses this to determine if you are close to
the device and send a push notification.
11.
17

Can I Take The Button Out Of The Holder?
13.
How Do I Use The TAP Button?
The TAP button launches the app automatically on Android and will send
you a push notification on iOS. For best operability, please make sure you
accept all permissions the app asks for and for iOS have the app running
in the background. One tap on Android will launch the parking sensor
page, another tap will take you out of the parking page to the home
screen. A long hold of 4 seconds on Android or iOS will put the button
into pairing mode if you are having trouble pairing with the button.
15. I Don’t Want To Mount The TAP Button On My Steering Wheel
The TAP button can be taken out of its included holder and placed
anywhere in the vehicle. Carefully pinch the bottom ring of the button
holder to loosen the top, then carefully pop the button out of the holder.
Use the included 3M tape from the screw kit to mount the button
anywhere you would like in the car.
14. TAP QuickLaunch Isn’t Working On IOS
Make sure you accept all the necessary permissions in the app and set
your Location settings on your phone to allow FenSens to use location
“Always”, not while using. The TAP button performs best when you have
the FenSens app on in the background of your phone.
If you are having issues pairing, then make sure to do a 5 second hold on
the button to put the button in Bluetooth pairing mode. The button
should appear available to pair with under Settings > Manage Devices >
Tapp > Add Tap > Connect.
12.
Yes, the button is fully removable from the holder. Simply pinch the
holder back to loosen the button, then use both fingers to carefully pluck
the button from the button holder. Use the included 3M tape that came
with your screw kit to place the button anywhere you want in the vehicle.
18


