Ferno SA-3BLP-01 Guide

CARE &
USE MANUAL
BUILT-IN & FREESTANDING GRILL
BY FERNO GRILLS
GOLETA, CALIFORNIA
T: 888.800.1688
E: info@fernogrills.com
www.fernogrills.com

WARNING!
READ THIS MANUAL CAREFULLY and completely before using your grill to reduce the risk of:
1. Fire
2. Burn hazard, personal injury, or property damage
3. Burned food or unpleasant cooking experiences
4. Unapproved installation orservicing
THIS PRODUCT IS DESIGNED FOR OUTDOOR USE ONLY. Improper installation, adjustment,
alteration, service, or maintenance can cause property damage, injury, or death.
Read this manual thoroughly before installation, use, or servicing of this product.
DANGER!
IF YOU SMELL GAS:
1. Shut off gas to the grill.
2. Extinguish any open flame.
3. Open lid. Use caution as the lid may be HOT.
4. If the gas odor continues, keep everyone away from the grill and immediately call your gas
company or your fire department.
WARNING!
1. DO NOT store or use gasoline or any other flammable liquids or vapors in the vicinity of this or any other
appliance.
2. Propane (LP) gas cylinders, not connected to the grill, shall NOT be storedin thevicinity of this, or any
other appliance. Propane cylinders must bestored outdoors.
WARNING! California Proposition 65
1. The burning of gas cooking fuels generates by-products which are on the list ofsubstances,
known by some states, to cause cancer or reproductive harm.
2. To minimize exposure to suchsubstances, always operate this appliance according to the care
and use instructions found in this manual.
3. NOTE TO INSTALLERS: ensure that grill owner receives this manual after installation.
WARNING!
1. NEVER cover slots, holes, or passages in the grill bottom or cover the entire grill surface with
material such as aluminum foil. Doing so blocks air flow through the grill and may cause carbon
monoxide poisoning.
2. Aluminum foil linings may trap heat causing a fire hazard.
Page | 2

This product conforms to ANSI STD Z21.58-2018 and has been tested and approved by
Intertek.
To obtain replacement parts or service, contact:
Ferno Grills
Goleta, California
Customer Service: (888) 800-1688 or info@fernogrills.com
WARNING!
·Never use dented, rusty, ordamaged propane cylinders. Never store additional or empty
propane cylinders in the grill cabinet, the island enclosure, or in the vicinity of this or any
other appliance. Never store propane cylinders indoors or on their sides.
·Children should NEVER be left alone or unattended in the area where the grill is located.
Place your grill well away from areas where children play. Do not store items that may be
of interest to children in or around the grill or island enclosure.
·Never attempt to move the grill when hot. When in use, portions of the grill are hot
enough to cause severe burns.
·Always maintain the required clearances to combustibles as detailed in this manual. The
grill is designed foroutdoor use ONLY. Never use inside a garage, building, shed,
breezeway, or other enclosed area. Do not use this grill under any overhead combustible
construction.
·Gas grills are not designed or certified to be used or installed on any recreational vehicle,
portable trailers, boats, or any othermoving installation.
·Always have an ABC Fire Extinguisher accessible. Never attempt to extinguish a grease
fire with water or other liquids.
·Store your grill in a well-ventilated area when not in use. If stored indoors, detach and
leave propane cylinders OUTDOORS in a well-ventilated area, away from heat or where
children may have access to them.
·Keep electrical supply cords and fuel supply hoses away from all heated surfaces.
Electrical supply cords should be placed away from walkways to avoid a tripping hazard.
·Do not repair or replace any part of this grill unless specifically recommended in this
manual.
·If this grill is installed by a professional installer or technician, be sure that he/she shows
you where the gas supply shut-off valve is located. All gas lines must have a shut-off valve
that is readily and easily accessible. If you smell gas, shut offall gas supply lines to the grill
and check for leaks IMMEDIATELY (refer to ‘Leak Test Procedure’ in the section entitled
‘FINAL CHECKS’). Check for leaks with soap and water only. Never use an open flame to
check for gas leaks.
·When using a propane cylinder, inspect the gas supply hose prior to each use of the grill.
If there is excessive abrasion orwear, or the hose is cut, it must be replaced before using
the grill.
·THIS MANUAL MUST REMAIN WITH THE PRODUCT OWNER FOR FUTURE REFERENCE.
Page | 3

TABLE OF CONTENTS
Introduction 5
Important Safety Precautions 5
Freestanding Grill Overview and Specifications 6
oFreestanding Grill Application Requirements 7
oUnpacking and Set-Up (Freestanding model) 8
Operation of Your Grill 9
oGrillingin Windy Conditions 9
oPre-Grill Checklist 10
oLighting Your Grill 11
oManual Lighting 11
oPre-Heating 12
oUsing the Firewheel 13
oOptional Smoker Box 13
oCleaning Your Grill 15
oCleaning the Burners 16
oLubricating the Chain and Jack Screw 18
Installations & Connections 19
oBattery Installation 19
Built-in Installations 20
Gas Connections 22
oLiquid Propane (LP) 22
oNatural Gas (NG) 25
Final Checks 26
Troubleshooting Guide 28
oTroubleshooting Quick Reference Guide 31
oGrill Wiring Diagram 32
oFreestanding Model Exploded View Parts Lists 33
oBuilt-in Model Exploded View Parts Lists 37
Ratings Plate/Serial Number Information 41
Ferno Grills Warranty Information 42
Page | 4

INTRODUCTION
Thank you and congratulations on your purchase of a Ferno Grill! Quality and performance are paramount at
Ferno and your purchase means that these values are important to you as well. Please take a moment toread
through this guide outlining the propercare and use of your new Ferno Grill. We are sure that youwill enjoy
many years of great grilling.
-The Ferno Grills Team
IMPORTANT SAFETY PRECAUTIONS
1. Insure all zip ties and packaging materials have beenremoved from the burners and grill interior.
2. Avoid wearing loose fitting clothing or long sleeves while grilling. They could ignite.
3. Never leave the grill unattended while cooking.
4. Never touch the grill racks, lid, or surrounding metalsurfaces with your bare hands while grilling. These
surfaces will be HOT.
5. The use of an insulated glove or mitt is recommendedwhile opening or operating the grill. Open the grilllid
slowly to allow heat and smoke to escape before fully opening.
6. The grill lid must be fully opened before attemptingto light the grill.Do not attempt to light with the grill lid
closed as an explosion could occur. Do not lean over the grill when lighting.
7. Do not heat unopened foodcontainers on the grill, as pressure will build up and the container can explode.
8. Do not repair or replace any part of the grillunless specifically recommended in this manual. A qualified
technician should perform all service.
9. Do not use aluminum foil on the grill racks. This willprevent proper ventilation and allow excessive heat to
build inside the grill. Such heat can damage components of the grill.
10. Use caution when cooking excessively fatty meats as the oils produced can cause flare-ups. Keep a water
spray bottle close by to reduce these flare-ups. Damage created by uncontrolled, internal fires is not
covered under the warranty.
11. Never remove the drip tray while grilling. Always ensure that it is pushed all the way in. Hot grease can leak
downward and produce a fire or explosion. The drip pan should be cleanedon a regular basis when thegrill
is cold.
12. Do not lean on the side shelves on freestanding grillapplications. Do not place any load of over 25 pounds
on the side shelves.
13. If any burner does not light within 5seconds, turn gas off and wait five (5) minutes before attempting to re-
light. If any burner goes out during operation, turn burner off and check for adequate fuel. Wait five (5)
minutes before attempting to re-light.
14. When using portable LP gas cylinders, always turn off the main valve on the cylinder after each use.
15. Use caution when operating the grill in windy conditions. When the lid is closed, wind can enter from the
back and cause an overheating condition. This can damage the grill and its components. If windy conditions
prevail, and the lid is closed, pay attention to the temperature gauge for a sudden drop in temperature.
This is a sign that the air flow has been interrupted.
16. Spiders and insects like to nest in the burner venturis. This can disrupt the gas flowand cause a very
dangerous condition thatcan result in a fire in the gas control area, damaging the grill andrisking personal
injury. If your grill has sat unused for a long time, inspect and clean the burners. See 'Cleaning The Burners'
in the section entitled ‘Cleaning Your Grill' for further details.
Page | 5

FREESTANDING GRILL OVERVIEW AND SPECIFICATIONS
Grill Model Fuel Temp Range Burners (ea)
SA-3BLP-01 Propane 150 - 750 Deg 12,000 BTU
SA-3BNG-01 Natural Gas 150 - 750 Deg 12,000 BTU
Height Width Depth Weight Cooking Surface
Grill Model Lid
Open Lid
Closed
Floor to
Topof
Surface Frame
Base
Surface
to
Surface Frame
Base Max.
Outer Grill w/o
Tank Primary Warming
SA-3BLP-01 63.5" 46" 37" 38" 66" 25" 24" 260 lbs 525 sq. in. 105 sq. in.
SA-3BNG-01 63.5" 46" 37" 38" 66" 25" 24" 260 lbs 525 sq. in. 105 sq. in.
Page | 6

FREESTANDING GRILL APPLICATION REQUIREMENTS
Because of their mobility, freestanding grills are
more versatile in their applications. They can be
moved around to various locations depending on
convenience and accessibility. Here are a few
points to consider when selecting a location:
1. Locate the grill in an open-air environment.
Do not locate under a breezeway, orinside
a garage, building, or shed. Proper distance
from combustibles must be maintained at
all times. Do not locate this grill under any
combustible, overhead construction.
2. Select a location where prevailing winds
occur from the front. Do not face the back
of the grill directly toward oncoming winds.
When grilling with the lid closed, winds can
enter from the back and disrupt air flow
and cause overheating. Damage caused by
this overheating is not covered under
warranty.
3. If the freestanding grill is using Natural Gas
(NG), position the grill in the vicinity of a gas
outlet/valve to minimize the amount of
piping required to hook up the grill.
4. See the following section entitled
‘Unpacking and Set-up’ for more
information on preparation of your grill
Page | 7

FREESTANDING GRILL UNPACKING AND SET-UP
The Ferno Freestanding & Built-in Grills arrives
almost fully assembled and requires only minor
assembly steps. Depending on the delivery
method, the Freestanding and Built-in Grills may be
palletized for ease of shipping and movement.
Shipping weight for either model is approximately
275-300 pounds.
WARNING
EXCESSIVE WEIGHT HAZARD
Use 2 or more people to move or install this unit.
Failure to follow this instruction can result in
personal injury.
CRATE & CARTON: HOW TO REMOVE THE CARTON
1. Cut the main strap holding the grill to the
pallet.
2. Remove the straps at the bottom of the
carton.
3. Lift off the carton.
4. With assistance, remove the grill from the
pallet and place in desired location.
INITIAL SETUP (Disregard side shelf related
instructions for Built-in Model applications)
1. Open the lid and cut all zip ties holding the
interior contents. Remove the side shelf
surfaces, side shelf frames, grill cover and
the small hardware andaccessories box.
2. Ensure that the burner radiants have not
shifted during transit and are seated
properly
3. Place each of the side shelf insulators on
the brackets, making sure that all of the
holes line up.
4. Place the side shelf frame, with the pegs
facing up, on the bracket with insulators
and align all holes.
5. Using the screws and allen wrench from the
provided accessories box, screw the side
shelf frame to the brackets. Tighten all
screws, do not over-tighten.
6. Set the side shelf surface ontop of the side
shelf frame with the holes facing down. The
side shelf surface holes will align with the
pegs on the side shelf frame.
7. Repeat on other side.
INTERIOR PACKAGING
Sturdy zip ties and straps are used to ensure
that your grill arrives at your home in the same
condition that it left our factory. MAKE SURE that
you have removed ALL zip ties beforeusing your
grill.
Page | 8

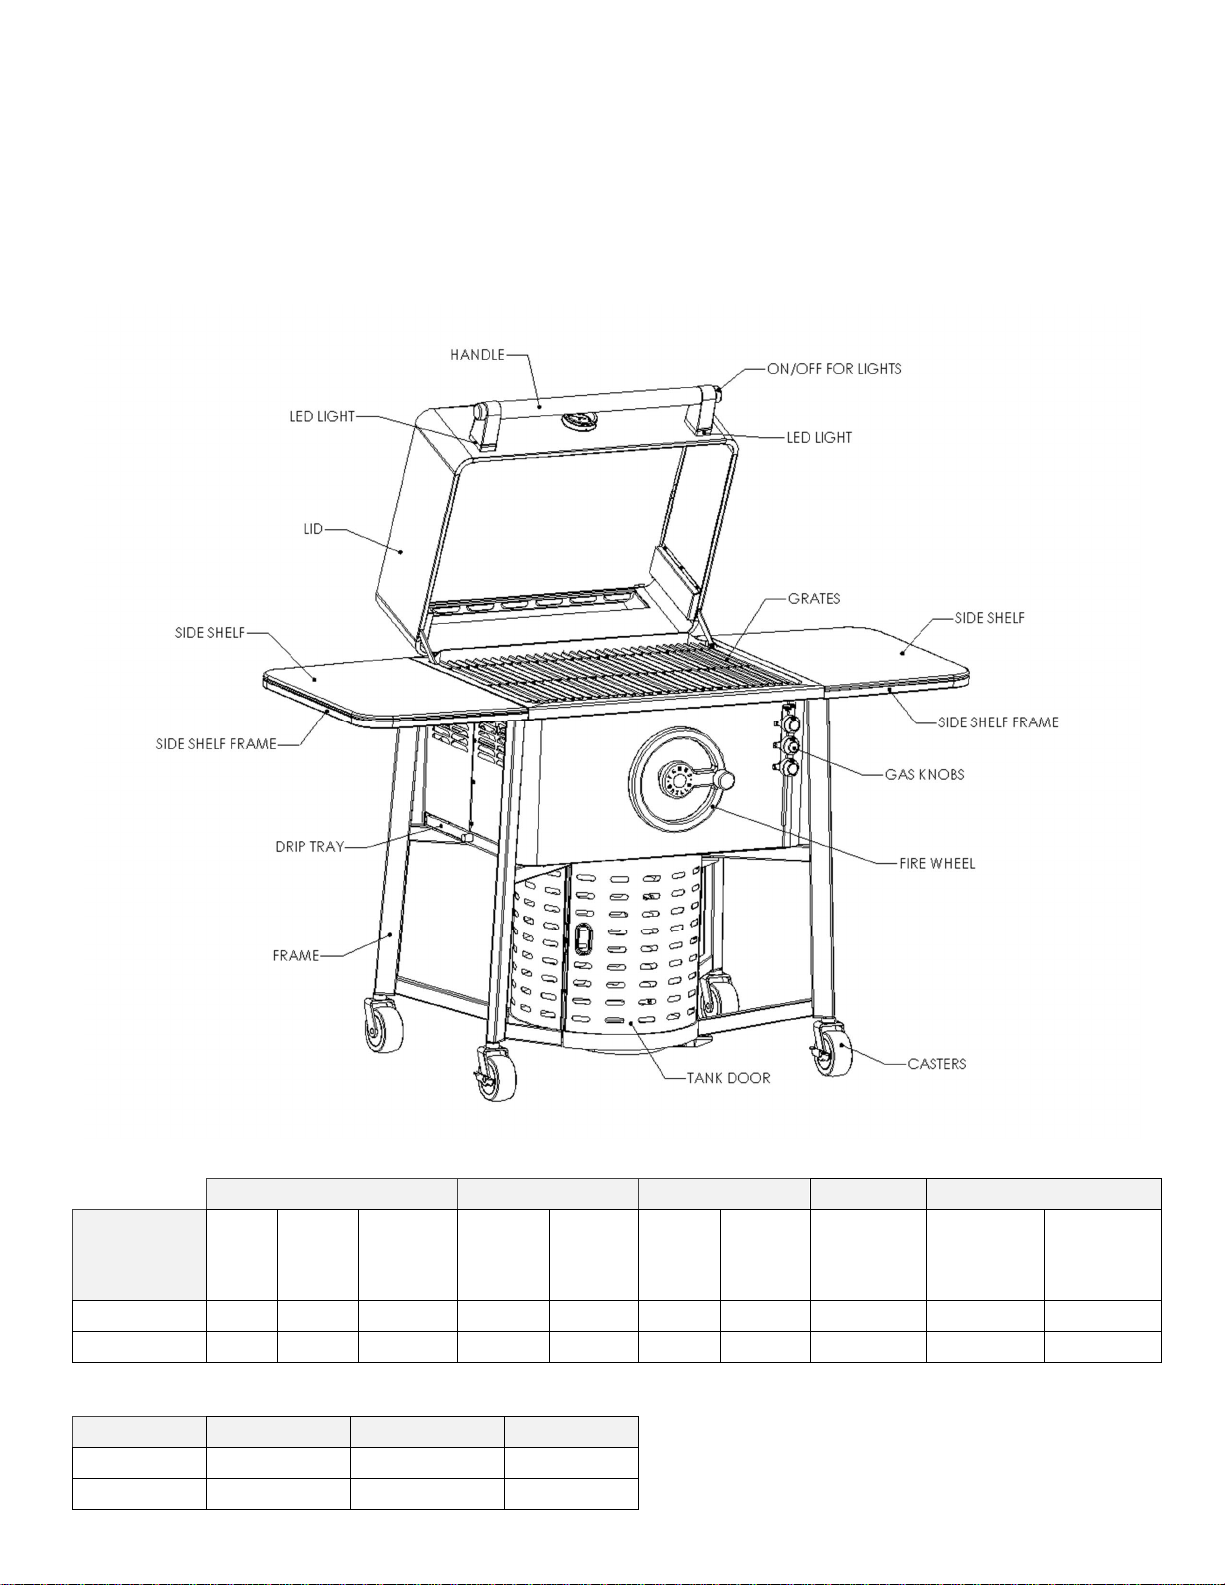
OPERATION OF YOUR GRILL
INTRODUCTION
Ferno’s firewheel gives you unparalleled control of
your grill. Turning it clockwise raises the burners
closer to the grates, perfect for pre-heating and
quick searing. Turning it counterclockwise lowers
the flame away from the grates, ideal for avoiding
flare-ups and for slow cooking.
GRILLING IN WINDY CONDITIONS
Using your grillin windy conditions may disrupt the
air flow. This can be particularly disruptive (and
damaging) if you are grilling ON HIGH with the lid
closed and excessive wind is coming into the grill.
This condition can trap the hot air and gasses
inside the grill and cause an overheating
condition. An early warning sign ofthis condition
can be seen if the grill had been previously
preheated, and the inside temperature shown by
the lid thermometer suddenly begins to DECREASE
or FAILS TO RISE. The wind has prevented the hot
gases from venting out of the rear, and are building
up inside of the grill, away from the thermometer
probe. The knobs and front panel will have become
extremely HOT. To immediately remedy this
condition, open the lid and turn down the heat.
Any damage caused by this overheating condition
is NOT COVERED by the warranty.
For freestanding grills, this condition can also be
remedied by moving the grill to a new location,
such that wind does not enter from the rear. See
section entitled ‘Freestanding Grill Application
Requirements’.
The grill andits individual shut-offvalve must be
disconnected from the gas supply piping system
during any pressure testing ofthat system at test
pressures in excess of 0.5psi (3.5 kPa).
Thegrill must be isolated from thegas supply piping
system by closing its individual manual shut-off
valve during any pressure testing of the gas supply
piping system at test pressures equal to orless than
1/2 psi (3.5 kPa).
WARNING
NEVER connect a gas line directly to the grill. A
pressure regulator MUST be installed on all gas
equipment. All local codes require this and Ferno
supplies the correct regulator with your grill.
Removing or failing to install the pressure
regulator can result in fire and serious personal
injury, and will void the factory warranty.
The grill is factory set to use eitherpropane (LP) or
natural gas (NG). It is critical that the gas you use
matches that which the grill is set up for. You can
verify this by checking the rating plate found in one
or more of the following locations.
Freestanding Model:
1. The rear of the tank shroud
2. On the insideof the tank shroud
Built-in Model:
1. The bottom of the Drip Tray
2. The lower left side of the grill body
Ensure that the gas supplied meets the minimum
pressure requirements. Do not operate the grill on
any gas otherthan that for which the grill has been
set.
WATER COLUMN REQUIREMENTS
Both the regulator and the manifold orifices have
been tuned for the type of gas specified on the
rating plate. All installation andall installation
parts must conform with local codes or, in the
absence of local codes, with either the National
Fuel Gas Code, ANSI Z223.1/NFPA 54, or the
Natural Gas and Propane Installation Code, CSA
B149.1, or the Propane Storage and Handling Code,
CSA B149.2, or the Standard for Recreational
Vehicles, NSI A119.2/NFPA 1192, and CSA Z240 RV
Series, Recreational Vehicle Code, as applicable.
Page | 9

PRE-GRILL CHECKLIST
BEFORE YOUR FIRST USE
1. Make sure ALL packing materials have been
removed from the interior ofthe grill, andthat
ALL zip-ties holding contents in place have been
removed.
2. Make sure the fuel lines have been connected
per instructions in the section entitled ‘Gas
Connections’.
3. Make sure that you have made all electrical
connections and/or installed fresh batteries.
4. A qualified plumber has performed a leak test
on all the gas fittings that supply fuel to the
grill.
AT EACH NEW SEASON
At the start of each new grilling season, the grill
should be inspected. Remove the cooking grates,
both upper and lower radiants, check the burners,
the burner venturis, the orifices, and the valves for
any apparent obstructions. Spiders and other small
insects often nest in these areas and can disrupt air
and gas flow and can cause damage to the grill or
personal injury. Also check all hoses and fittings for
damage.
CHECKLIST BEFORE EACH USE
Always make sure that:
1. You do NOT smell gas BEFORE you light the
grill. If yousmell gas, shut everything OFF and
call a qualified plumberto check for leaks. See
also ‘Leak Test Procedure’ in the section
entitled ‘Final Checks’.
2. The cooking area and cooking grates are free
from combustibles that could ignite.
3. The control knobs turnfreely.
4. The burners are seated properly.
5. If you are using a Propane cylinder, that the
connections have been leak tested. See also
‘Leak Test Procedure’ in the section entitled
‘Final Checks’.
6. If you are using a Propane cylinder, be sure that
the gas valve has been turnedON before
attempting to light the grill.
7. If you are using Natural Gas (NG), be sure that
the main gas valve has been turnedON before
attempting to light the grill.
8. Wind is not blowing too strongly into thegrill.
Page | 10

LIGHTING YOUR GRILL
WARNING
1. Never attempt to light the grill if you smell gas.
2. Always light the grill with the lid OPEN.
3. DO NOT release fuel into a closed grill before
lighting. This will increase the risk of explosion,
property damage, personal injury, and death.
4. When lighting, keep yourface and body as far
from the grill as possible.
5. If a burner does NOT light within 5 SECONDS,
turn the control knob to OFF, and WAIT 5
MINUTES for the gas to dissipate, before
attempting to re-ignite.
ELECTRIC IGNITION
1. Open the lid and confirm that all burner control
knobs are in the ‘OFF’ position.
2. For a Propane Tank setup, turn the propane
cylinder valve at least one full turn in the
counterclockwise direction.
3. For a Natural Gas setup, turn the main gas
control valve to ON. The valve is ON when the
valve lever is in line and parallel to the gas
piping and gas flow. See illustration in the
‘TROUBLESHOOTING’ section.
4. Depress andturn the
desired burner control
knob counterclockwise to
the LIGHT position,
indicated by the icon.
You will hear a rapid
‘clicking’ sound indicating
all ignitionelectrodes are sparking. The
selected burner should light. If the burner does
NOT light within 5 SECONDS, turn the burner
control knob to ‘OFF’ and WAIT 5 MINUTES for
the gas to dissipate before you try to re-light.
After ignition, set the burner control knob to
the desired position.
5. Repeat step 4 for lighting each additional
burner.
6. If a burner does not light within 5 SECONDS of
turning on the burner control knob, turn the
burner control knob to the ‘OFF’ position. WAIT
5 MINUTES before repeating step 4. If you
smell gas, follow the steps listed in the ‘GAS
CONNECTIONS’ section. If the burners still do
not light after several attempts, refer tothe
instructions below for manual lighting.
SHUTTING OFF THE GRILL
To shut the grill off, depress each burner control
knob and turn clockwise to the ‘OFF’ position.
Always close the valve from the gas supply after
each use of the grill.
MANUAL LIGHTING:
Carefully read the previous section ‘LIGHTING
YOUR GRILL’ before attempting to manually light
your grill. Manual lighting is used ONLY when the
9V battery used to power your ignition is
discharged and there is no replacement battery
immediately available.
1. Locate the ‘lighting rod’ attached inside the
tank door (Freestanding Model) or to the
right of the Drip Pan opening (Built-in
Model). Insert a match in the clip on the
end of the rod and light it.
2. Insert the match through an opening in the
grates andplace to the right side of the
burner near the electrode.
3. Push and turn the desired burner control
knob counterclockwise to the LIGHT
position indicated by the icon. If the
burner does NOT light within 5 SECONDS,
turn the burner control knob to ‘OFF’ and
WAIT 5 MINUTES for the gas to dissipate
before you try to re-light.
Page | 11

PRE-HEATING
PRE-HEATING
Pre-heating your grill is an important part ofthe
grilling process. It gives the burners, the radiants,
and the grates time to properly and evenly warm
up and provides for much more consistent cooking
results.
Light yourgrill per the instructions in the previous
section entitled ‘LIGHTING YOUR GRILL’. Light all
burners and set the burner control knobs to HIGH
indicated by the ‘III’ icon. If you are planning to use
only one burner, it is best to pre-heat with all the
burners ON and then turn off the burner(s) that
you do not plan to use. If the desire is to slow cook
food for an extended period of time below 300
degrees, then only light a single burnerand set it to
LOW indicated on the burner control knobs by the
‘I’ icon.
Pre-heat the grill for 10 minutes or to 350F
degrees, shown on the lid thermometer. NEVER
allow the thermometer togo above the 550F
degree mark, as this indicates that your grill has
become overheated. Damage can occur to the grill
because of this and is NOT covered by the
warranty.
WARNING
DO NOT leave the grill unattended during the
pre-heat process or at ANY time while the grill is in
use.
DO NOT pre-heat the grill formore than 15 minutes as
overheating can result causing damage to the grill.
TYPES OF HEAT
The ability to raise and lower the burners in your
Ferno Grill can create a wide range of heat
intensities. This coupled with which burners are
turned on, the temperatures set using the burner
control knobs, and the lid position (either open or
closed), leads to an endless list ofcooking
techniques. The following paragraphs introduce
the different types of heat you can achieve with
yourFernoGrill.
DIRECT HEAT
‘Direct Heat’ is also known as ‘Radiant Heat’. The
heat radiates directly from the burners through the
radiants, rising towards the food above. Direct heat
is a ‘must have’ forgeneral backyard grilling.
INDIRECT HEAT
‘Indirect Heat’ occurs when the heat source is not
directly below the food. Heat reaches the food
through air movement and not from direct flames.
This type of heat is also known as ‘convection’
cooking and is similar to how many ovens work. It
is achieved by placing the food on one side of the
grill and lighting the burner(s) on the other side.
The burner below the food is turned off. This type
of cooking requires that the lid remain closed
throughout most of the cooking process. On your
Ferno Grill, the heat is also regulated by using the
Firewheel to set the burnerheight as well as
adjusting the flame with the burner control knobs.
Page | 12

USING THE FIRE WHEEL
The Firewheel on your Ferno Grill is the first ofits
kind, adding functionality and bringing an entirely
new dimension to gas grilling.
RAISING AND LOWERING THE BURNERS
1. To raise the burners, turn the firewheel
clockwise until you’ve reached your desired
height. It is useful to put the burners closer to
the grates for pre-heating as well as high heat
searing of less flammable foods like fish and
vegetables.
2. To lower the burners, turn the firewheel
counterclockwise until you’ve reached the
desired height. The low position is crucial for
avoiding flare-ups. Additionally, the lowest
burner position, when combined with a single
burner set on low, allows your Ferno Grill to
achieve consistent low temperatures ideal for
slow cooking a large variety offoods.
OPTIONAL SMOKER BOX
The purchase of the optional ‘Smoker Box’ is a
great addition to the grilling experience, imparting
the flavor of wood smoke to your food.
CAUTION
Handle the smoker box with care. The cover
becomes EXTREMELY hot when in use. Use
properly insulated gloves or dry pot holders.
USAGE
The optional ‘Smoker Box’ is designed to install
directly on top of a burner radiant.
1. To use, remove the grate above the burner that
you desire to use for the smoker box.
2. Place the smoker box directly on topof the
radiant and make sure that the small tabs
located on both ends of the smoker box are
resting onthe edge of the burner bed.
Page | 13

OPTIONAL SMOKER BOX continued WOOD CHIPS
There are many wood chips available andselection
is based on personal taste. The most common are
mesquite or hickory. Soak the chips in water for at
least 30minutes before putting them in the box.
This will prolong their smoldering time and provide
more smoke.
The intensity of the smoke flavor is personal
preference, but with extended cooking times, such
as with large roasts, you may want to add wood
chips and water to the smoker box more than
once. Try to limit the number of times you open
the lid, as each interruption canadd up to 15
additional minutes to the overall cooking time. Use
medium heat to start the chips smoking, then
reduce to low to prevent them from drying out and
flaming up.
A high-quality meat thermometer is a very useful
tool to have when smoking orslow cooking as they
take the guesswork out of determining doneness.
Page | 14

CLEANING YOUR GRILL
STAINLESS STEEL
Your Ferno Grill firebox andtank shroud
(Freestanding Model) have been built with the
finest grade 304 Stainless Steel available. The
frame (Freestanding Model) is made of stainless
steel finished in powder coat and all the other
parts are aluminum finished in powder coat. These
finishes will last formany years, but as with a car,
they must be maintained. The following are tips to
keep your grill looking and functioning like new for
years to come.
After each use, wipe down the exterior of yourgrill
using a soft cloth and a commercially available
stainless-steel cleaner. It is important to remove
the grease splatters andfood debris at this time,
rather than allowing it to become ‘baked on’ over
time, as it will become much harder to remove.
When trying to remove heavy grease and dirt build-
up, a mild mixture ofdish soap and warm water
can be used.
Do NOT use metallic abrasives (like steel wool) to
clean your grill’s front surfaces.
Do NOT use ANY abrasives on the front panel, as it
will show rub marks.
SPECIAL NOTE FOR LOCATIONS NEAR POOLS AND
COASTAL AREAS
The stainless steel material used in the
construction of your grill is rust resistant, however,
chlorine in the air from swimming pools or the salt
from sea air may cause surface rust to appear and
even create some pitting if left on the grill. Here
are a few tips to avoid this:
1. Regularly wipe down the exterior surfaces with
a damp cloth. (Micro fiber cloths such as E-
cloth perform very well).
2. Allow the surfaces to dry before installing the
cover. Do not cover a damp grill.
3. In extreme environments apply a rust inhibitor.
Products that provide a layer of vapor corrosion
inhibitors canprotect the surface very well.
4. For seasonal storage, use a product referred to
above. Ensure that the grill is dry and then
cover to minimize the amount of damp air
getting to the surfaces.
THE 20-YEAR LIMITED LIFETIME WARRANTY
PROVIDES PROTECTION AGAINST RUST-THROUGH
OF PARTS THAT RENDER THE PRODUCT
INOPERATIVE. IT DOES NOT COVER OCCASIONAL
SURFACE RUST OR STAINING DUE TO
ENVIRONMENTAL CONDITIONS.
WARNING
It is CRITICAL to keep the drip pan free from
food build-up, as, this debris can cause flare-ups
and create a FIRE HAZARD.ALWAYS remember
to replace the drip pan. DO NOT USE THE GRILL
WITHOUT THE DRIP PAN IN PLACE.
Always check the contents of the drip pan after it
rains. If the grill is NOT covered, the drip pan will
collect water and cause overflow and spillage.
Ferno Grills is NOT liable for damage caused by
grease overflow.
CUSTOM FERNO GRILLS COVER
The grill coversupplied with your new Ferno Grill
is vital to keeping your grill looking new and
protecting it from the elements and dust/debris.
The cover should be in place over the grill
whenever it is not in use. Using the cover is very
important when there is a threat of rain. Doing so
will prevent the drip pan from over filling with
water. An overfill condition can result in a spill
below the grill causing a slipping hazard and a
significant mess.
Page | 15

CLEANING THE DRIP PAN
Regular cleaning of the drip pan is HIGHLY
RECOMMENDED. The drip pan can be removed
completely from the grill foreasier cleaning. Start
by draining any free-flowing grease by tilting the
pan over a waste container. Scrape up the food
debris with a metal spatula or similar device. Wipe
the remaining grease with paper towels, and then
finish by using a mild solution ofdish soap and a
kitchen sponge backed by a Scotch Bright material.
CLEANING THE GRATES
Your Ferno Grill is equipped with cast iron cooking
grates. These grates should be treated with care
and in a similar mannerto a cast iron pan. DO NOT
burn the grease and debris off using high heat, this
will destroy the ‘seasoning’ on your grates. It is
best to clean the grates immediately after each use
while the grill is still warm (but not turned on).
Wear long oven or BBQ mitt(s) to protect your
hand(s) from the heat and use a commercially
available grill brush to loosen grease and debris.
Dipping the brush in hot water can make it easier
to remove the grease. Follow up by wiping the
grates with arag. Periodically you should do a
more thorough cleaning by removing the grates
and deep cleaning them. They can be placed in a
pan of water with dish soap and then scrubbed
with a non-metallic medium grit abrasive (like a
sponge backed with Scotch Brite material). It is
NOT recommended to use metallic abrasives (like
steel wool) since portions of the steel fibers can
remain on the grates and contaminate food.
CLEANING THE RADIANT PLATES
If you are deep cleaning yourgrates, then it is a
good time to clean the radiant plate(s). They are
located directly BELOW the grates over top of each
burner. Tilt the radiant plates at an angle to
dislodge the locking tabs and thenpull the radiant
up and out.
The lower radiant plates are removed by pulling
out the cotter pins and lifting upwards. Start by
scraping off all heavy debris with a flat object (a
wide putty knife or metal spatula work well). Finish
by placing the plates in a pan of hot soapy water
and clean them with a sponge backed with a Scotch
Brite material.
CLEANING THE BURNERS
Once the grates and radiant plates have been
removed from the grill (see above), you will have
access to the main burners. MAKE SURE the grill is
cool and that all burner control knobs and main gas
supply valves are turned OFF.
TO REMOVE THE BURNERS
1. Remove all three grates from the grill.
2. Remove each of the upper radiants by tilting
the radiant at an angle to dislodge the locking
tabs and then pull the radiant up and out.
3. The lower radiant plates are removed by pulling
out the cotter pins and lifting upwards.
Page | 16

4. Pull out cotter pins from both ends of each
burner. Remove the RIGHT burner first by
lifting slightly upand to the left and then up
and out. Follow the same methodto remove
the CENTER andthen LEFT burners.
Inspect all burnerports (holes) ensuring that they
are not clogged or do not become clogged during
the cleaning process. Clear any clogged ports with
a paper clip. DO NOT use a wooden tooth pick as it
can break off inside the port.
Finish the cleaning process by tilting the burner
upright, with the venturi opening facing down.
Shake the burner so that all remaining debris inside
falls out from the venturi opening. Be careful not to
disrupt or change the air flow setting created by
the air shutter and its associated locking screw.
WARNING
PROPERPLACEMENT OF EACH BURNER IS
CRITICAL. AFTER CLEANING THEY MUST BE
CENTERED ON THE BRASS ORIFICE, RESTING
LEVEL WITHOUT ANY ROCKING. REPLACE THE
COTTER PINS TO SECURE THE BURNER.
FAILURE TO MEET THESE CONDITIONS MAY
CAUSE A VERY DANGEROUS CONDITION THAT
CAN CAUSE PERSONAL INJURY AND PROPERTY
DAMAGE.
TO RE-INSTALL THE BURNERS
1. Reverse the removing burner instructions as
listed above in steps 1-4 but note that the left
burner (longest burner) must be installed first,
followed by the center burner and finish with
the right burner.
2. When installing the burners, verify that the
burner inlet (gas inlet opening) sits over the
appropriate orifice. This canbe done by viewing
the burner inlets from the REAR of the grill
(Freestanding Model) through the ventilation
cutouts.
3. Finally, check all the burners for proper
operation. Make sure the burner control knobs
turn freely and completely through their full
range.
Page | 17

LUBRICATING THE CHAIN & JACK SCREW
The chain and jack screws that make it possible for
the burners to be raised and lowered inside of your
Ferno Grill leave the factory with enough
lubricationto last for many years. If at some point
the grill begins to squeak when raising orlowering
the burners then it may be time to consider
lubricating the chain andjack screws by following
these steps.
Freestanding Model:
1. Remove both side shelf surfaces.
2. Locate the opening on the top front edge
on the left side of the grill.
3. Through the opening, you will see the jack
screw threads that need to be lubricated.
4. Turn the firewheel counterclockwise until
the burner bed is fully lowered.
5. Using grease and a brush, lubricate the
entire length of the jack screw.
6. To lubricate the right side, remove the right
front quarter panel by first lowering the
burners to the lowest position and
unscrewing the five (5) screws holding it in
place. Gently maneuver it free ofthe grill.
7. Using grease and a brush, lubricate the
entire length of the jack screw and the
exposed sectionof chain.
8. Turn the wheel clockwise in ½ turn
increments and on each turn, apply
additional lubricant to the newly exposed
section of the chain.
9. Once the burner bed is fully raised, apply
lubricant to the newly exposed portion of
the jack screw.
Built-in Model (EXCESSIVE WEIGHT HAZARD, USE 2
PEOPLE TO PERFORM THE FOLLOWING STEP):
1. Very carefully slide the grill out of the
enclosure enough to reveal the lubrication
points (NO MORE THAN 6 INCHES).
2. On the left side of the grill, locate the jack
screw and lubricate according to the
Freestanding Model instructions above.
3. On the right side lubricate the jack screw
and chain according to the Freestanding
Model instructions above.
Page | 18

INSTALLATIONS & CONNECTIONS
BATTERY INSTALLATION
The small hardware and accessories box included
with your Ferno Grill comes with one (1)9V battery
that provides the power for the electronic ignition
system and three (3) C Cell batteries for the
integrated LED lights in the handle. To install or
replace the batteries, follow these procedures.
9V BATTERY (FREESTANDING MODEL)
1. Locate the battery compartment under the
right side of the firebox, next to the gas line
fittings.
2. Insert your fingernail orflat edged tool into the
notch located on the side of the battery
cartridge nearest the tank shroud, pull towards
you and down to release.
3. Remove battery and insert or replace with a
new 9V battery in the orientation as depicted
on the cartridge.
4. Re-insert cartridge in same orientation as it was
removed (it cannot be installed backwards).
9V BATTERY (BUILT-IN MODEL)
Locate the battery compartment on the lower right
side next to the drip tray opening and follow the
proceduredescribed above.
C CELL BATTERIES
1. Unscrew battery cap counterclockwise on the
right side of the handle (with the black button).
2. Remove the battery cartridge.
3. Remove batteries and insert or replace with 3
new C Cell batteries in the same orientation as
depicted on the outside ofthe cartridge. All
batteries must be new and/or fully charged –
do not mix new and used batteries or batteries
of different types.
4. Insert cartridge back into handle and turn
clockwise until snug. Do not overtighten.
The LED lighting in the grill lid occasionally requires
a simple cleaning. Inside the grill lid are two LED
lights, each covered by a thick piece of glass. To
clean grease build up use a Scotch Bright type
material with some dish soap and scrub vigorously.
Page | 19

BUILT-IN INSTALLATIONS
MINUMUM CLEARANCE to adjacent combustible
construction is 18" from the back of the grill and
18" from the sides. There must be a minimum of
10" of counter space behind the grill to allow the
grill hood to open properly. When choosing a
locationforthe grill, it MUST NOT be located under
any overhead combustible construction.
VENTILATION REQUIREMENTS (FOR ALLGAS
TYPES: NATURAL GAS, BULK PROPANE, L.P.
CYLINDER)
At least four(4)ventilation openings, both upper
and lower, MUST be provided on both sides of the
enclosure.
THE VENTS THAT ARE INSTALLED MUST MEET
ANSI STANDARDS REQUIREMENTS.
If installing vents in aside and rearwall of the
enclosure, they must be spaced at a minimum of
90 degrees. Upper vents must be located within 5
inches from the top of the enclosure to the bottom
of the vent. Lower vents must be located within 1
inch from the bottom of the enclosure to the
bottom of the first vent openings and no more
than 5 inches from the bottom of the enclosure to
the top of the vent.All vents must have openings
that have a total free area of not less than 10 sq. in.
and not less than 40 sq. in. total. Both upper and
lower vent openings must have minimum
dimensions so as to permit the entrance of a 1/8
inch diameter rod. ALL Vent openings MUST
REMAIN COMPLETELY FREE AND OPEN and MUST
NOT communicate with other enclosures.
WARNING!
ENCLOSURES BUILT TO HOUSE A FERNO BUILT-
IN GRILL MUST BE MANUFACTURED USING
ONLY NON-COMBUSTIBLE MATERIALS.
The grill, enclosure, and propane enclosure if
any, must be plumbed and vented in
accordance with local building and safety codes.
FAILURE TO PROPERLY VENT THE ENCLOSURE
MAY RESULT IN FIRE.
A leaking gas connection or a burner valve
unintentionally left on without properly venting
the enclosure may result in a fire or explosion
causing property damage, bodily injury, or
death.
DO NOT store full or empty spare L.P. cylinders
inside the enclosure.
Page | 20
This manual suits for next models
1
Table of contents
Popular Grill manuals by other brands

EDELHEISS
EDELHEISS ROSTBLOCK SAFETY, INSTALLATION, OPERATION AND MAINTENANCE INSTRUCTIONS

Beper
Beper 90.800 use instructions

George Foreman
George Foreman GRV160S owner's manual

Weber
Weber SUMMIT 56567 owner's guide

tepro
tepro VISTA instruction manual

Somogyi Elektronic
Somogyi Elektronic home HG GR 02 instruction manual