FERRETTI FE-HDG60SS User manual
INSTALLATION AND USER’S MANUAL
FE-HDG60SS
Thank you for purchasing this Ferretti Cooker Hood.
Please read this manual carefully before first use and retain for future reference.

2
CONTENTS
SAFETY PRECAUTIONS...........................................................3
PARTS OVERVIEW/DIMENSIONS………………………………………..4
INSTALLATION
…………………….............................................5-9
FILTERS……...........................................................................10
OPERATION……………………………………………………………………..11
MAINTENANCE....................................................................12
TROBULESHOOTING............................................................13
GUARANTEE…………………………………………………………………….14

3
SAFETY PRECAUTIONS
•Never let children operate the cooker hood.
•The cooker hood is for domestic use only.
•Clean the cooker hood according to the instruction manual. There is a risk of fire, if cleaning is not
carried out in accordance with the instructions.
•Please check that the power supply cord is not damaged. A damaged power supply cord must be
replaced by qualified service personnel only.
•Ensure there is adequate ventilation in the room when the cooker hood is used at the same time as
another appliance that is ucing gas or another fuel type.
•Regulations concerning the discharge of air have to be fulfilled.
•Do not Flambé under the cooker hood.
•This cooker hood is not intended for use by persons (including children) with reduced physical,
sensory or mental capabilities, or lack of experience and knowledge, unless they have been given
supervision or instruction concerning use of the cooker hood by a person responsible for their safety.
Children should be supervised.
CAUTION: Accessible parts may become hot when used with cooking appliance.
Electrical Shock Hazard
Only plug this unit into a properly earthed outlet. If in doubt, seek advice from a suitably-qualified
electrician.
4
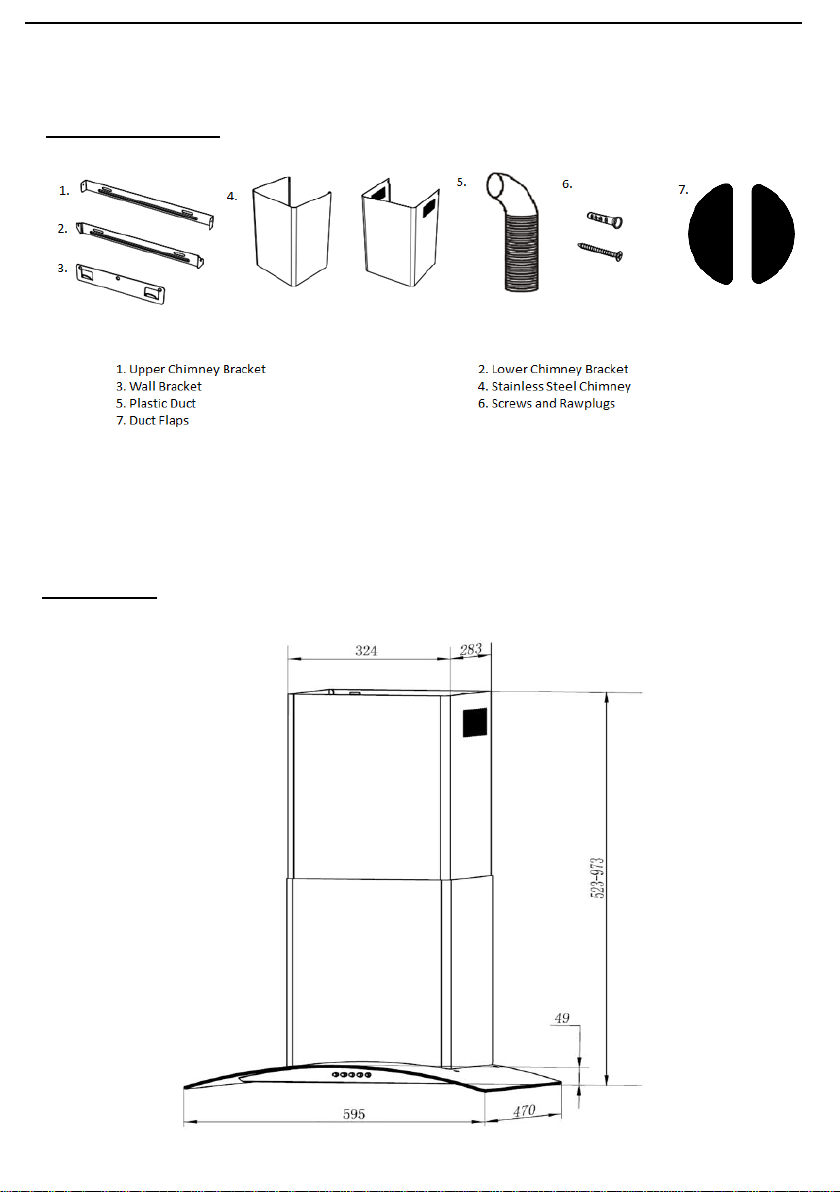
Overview of Parts
Dimensions

5
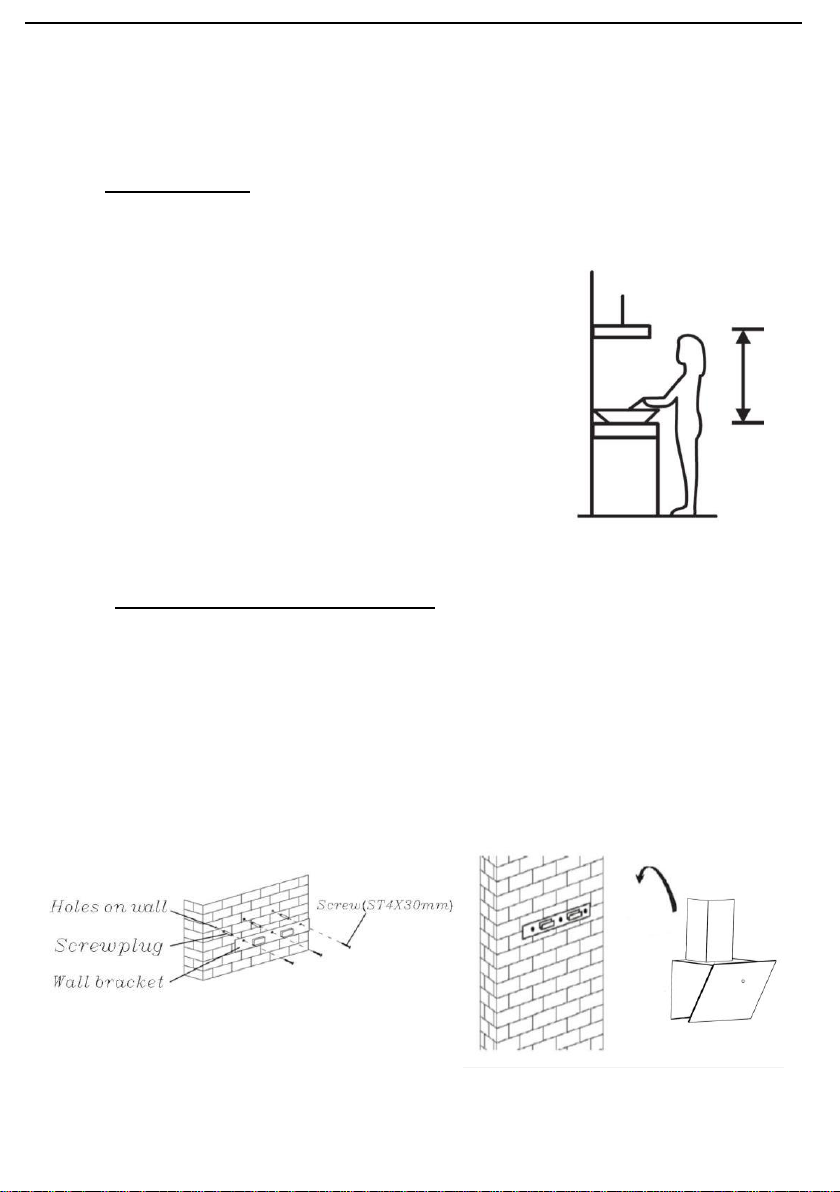
Installation
•Always adhere to the minimum safety distance between the top of the cooker / hob and the
under-side of the cooker hood, namely:
•650mm for electric hobs and cookers
•750mm for gas hobs and cookers
•Always ensure the hood is fitted in accordance with the safety distances recommended by the hob
manufacturer in their installation manuals.
•It is prohibited to fit a cooker hood over a solid fuel stove.
•All materials used in the fitment of this product must be non-flammable.
•This appliance must not be connected to a chimney or vent flue which is in use.
•Professional advice should be sought if ducting this appliance into a chimney or vent flue which is no
longer in use.
•This appliance should not be connected to ducting which ventilates rooms with fireplaces.
•Attention should be given to ensure that any applicable regulations concerning discharge of exhaust air
are fulfilled.
•This appliance should be installed and maintained by a suitably qualified and competent person in
accordance with the relevant safety regulations.
•Before connecting the appliance to the mains supply, ensure that the voltage and frequency details on
the rating plate are consistent with the source of supply.
•Always disconnect the appliance from the mains supply before any maintenance or repair work is
carried out.
This appliance has been produced in accordance with the relevant safety requirements.
Misuse of this product may lead to personal injury and / or damage to property.
Please read these instructions carefully before using this appliance for the first time and keep them in a
safe place for future reference.

6
Operation (Extraction Mode Only)
• Care should be taken if operating the cooker hood at the same time, and in the same vicinity, as other
heating appliances which depend on air for their operation. This may include such appliances as wood,
oil, gas or coal-fired boilers and heaters, gas ovens, hobs and cookers, and continuous flow or other
water heaters.
•The cooker hood, when used in extraction mode, will draw air from neighbouring rooms in addition to
the room in which it is fitted.
•If there is insufficient air in these rooms, an under-pressure will occur and the heating appliance may
be starved of oxygen and combustion may not occur.
•In addition, harmful gases from the heating appliance may be drawn from the chimney / ducting back
into the room with potentially fatal consequences.
•To ensure safe operation, an under-pressure of 0.04mbar (4pa) is the maximum permissible in the
room.
•Adequate ventilation can be maintained by:
oThe use of air inlets by means of windows, doors and external wall vents
oEnsuring none of the ventilation openings are blocked
oUsing either the cooker hood or heating appliance in isolation
•It is advisable to use a window contact switch if relying on an open window as the sole source of
ventilation. In this case, the cooker hood will not operate unless the window is opened sufficiently.
These can be obtained from all good builders merchants.
•Any doubts or concerns should be raised with a suitably qualified and competent person or, in the case
of a gas appliance, with a Corgi registered installer.

7
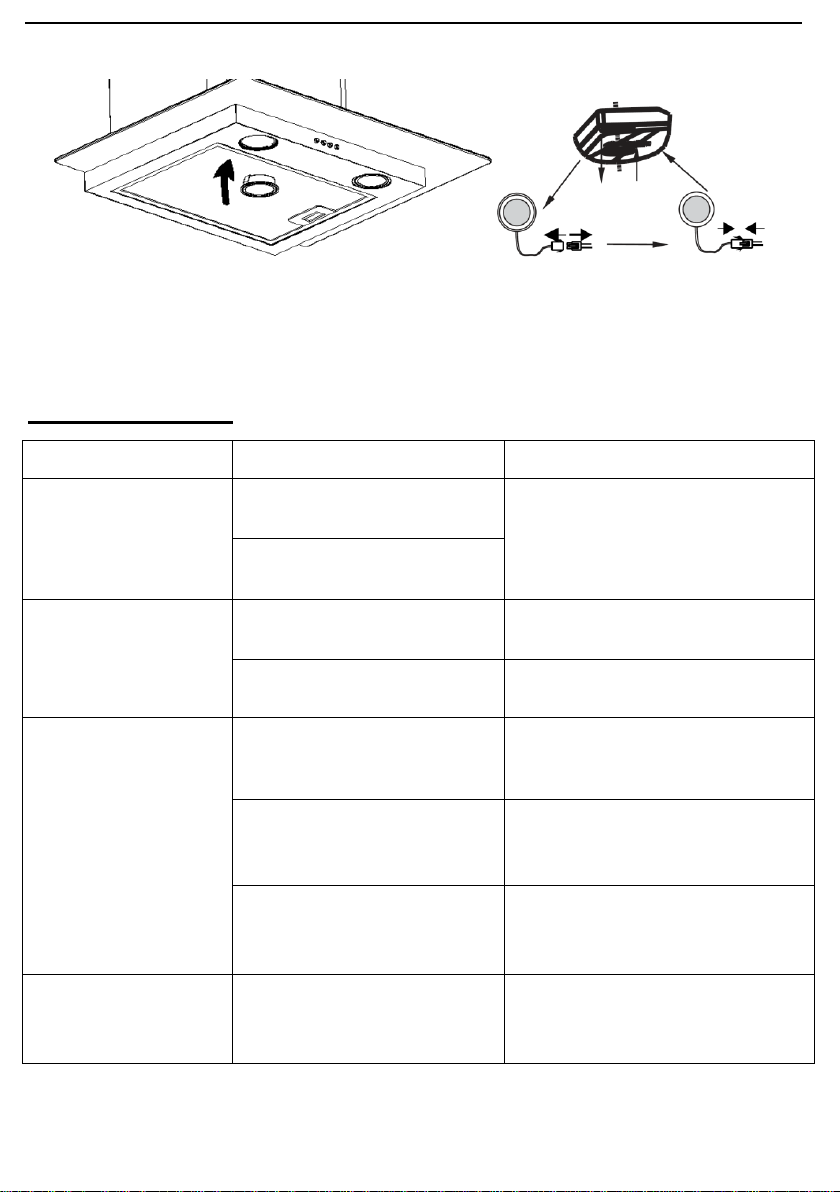
Fitting and Replacing the Active Carbon Filter (recirculating air)
If the cooker hood is used in re-circulation mode, an activated charcoal filter must be inserted in addition
to the aluminium grease filters. These charcoal filters (not supplied) are designed to absorb cooking
odours and are located in the canopy above the grease filters.
The charcoal filters are not washable and should be replaced when they no longer absorb kitchen odours
effectively. Under normal use, this would be approximately every 4 months, or more frequently for
particularly heavy usage. Used charcoal filters can be disposed of with normal household waste.
Before fitting or replacing charcoal filters, the grease filters must first be removed (see previous section).
Active Carbon Filters (not provided)
To fit the carbon filters, position them in place and rotate in direction B as shown below. For those
models fitted with round carbon filters, the filters are removed by placing one hand on the filter and
rotating it towards the front of the hood (A). The carbon filter can now be removed. Ensure the
aluminium grease filter is replaced once complete.
Fig 2: removing and fitting carbon filter.
8
1
INSTALLATION
Carefully mark the cooker hood position on the wall.
The cooker hood should be placed at a distance of 650mm to
750mm above the hob.
2
Drill three 8mm holes to accommodate the bracket (fig 1, pg4).
Screw and tighten the bracket onto the wall with screws & raw
plugs provided.
Lift the cooker hood into place and slot firmly into the grooves on
the bracket.
MOUNTING THE COOKER HOOD
9
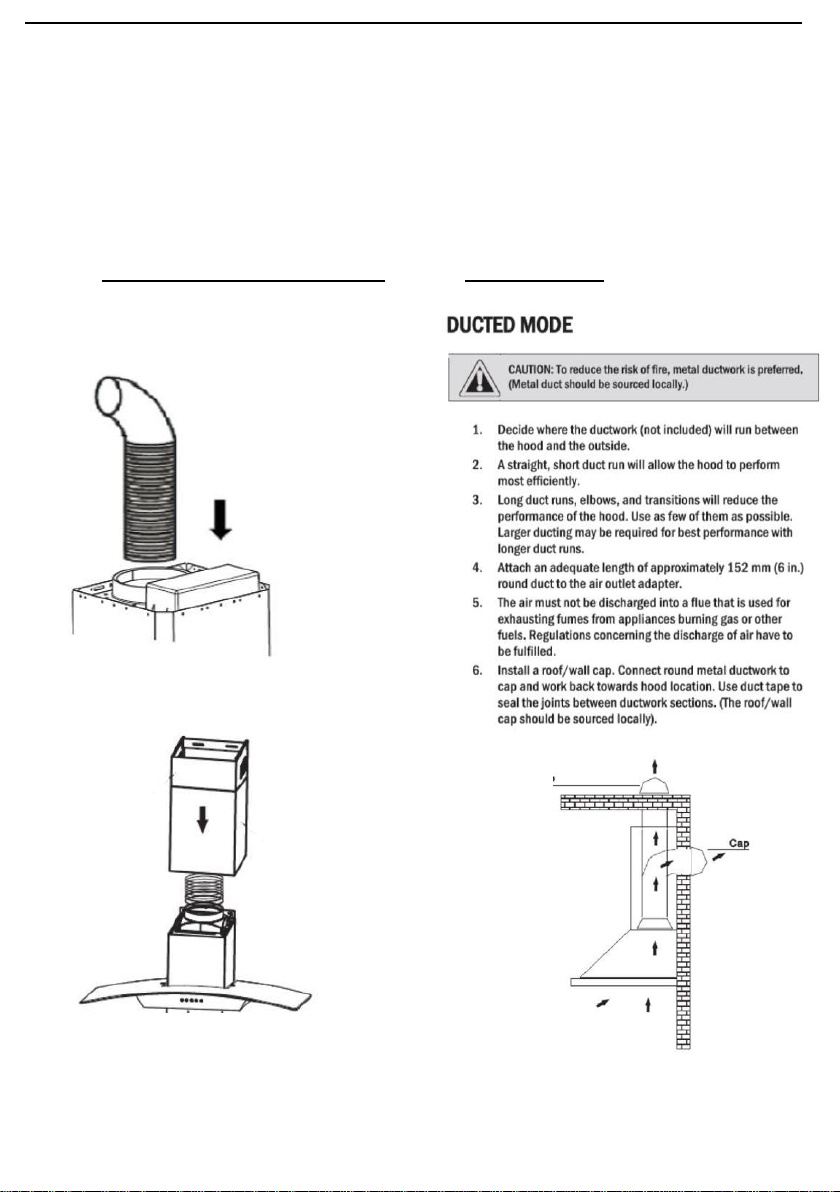
3
FITTING THE EXHAUST DUCT
Carefully slide down the chimney section over
the duct.
Adjust the height by raising the top chimney section with the
vent slots up inside the bottom chimney. Secure the top chimney
section with mounting bracket and screws provided.
Page 6
Attach and secure the exhaust duct to
the cooker hood vent.
4 DUCT FITTING

10
Aluminium Grease Filters
The re-usable aluminium grease filter supplied with this appliance should be cleaned every 3 –4 weeks
to avoid a build-up of grease.
• To remove the grease filter, push the filter button until it is released.
•To clean the filter, place it into a bowl of warm soapy water and soak for about 2 –3 minutes.
•Clean the mesh with a soft brush.
•Do not apply too much pressure as the mesh is delicate and will damage easily.
•Do not use a corrosive detergent.
•Whilst the filters are removed, clean off any residual grease from the housing unit to avoid the risk of
fire.
•After cleaning, leave the filters to dry before replacing them on the appliance.
•When replacing the grease filters, ensure that the locking mechanism is facing down.
Please note: The aluminium filters may alter in colour after several washes. This is quite normal and
is not a cause for customer concern.
Grease Filters can also be washed in the dishwasher but they will alter slightly in colour
which will not affect their effectiveness.
11
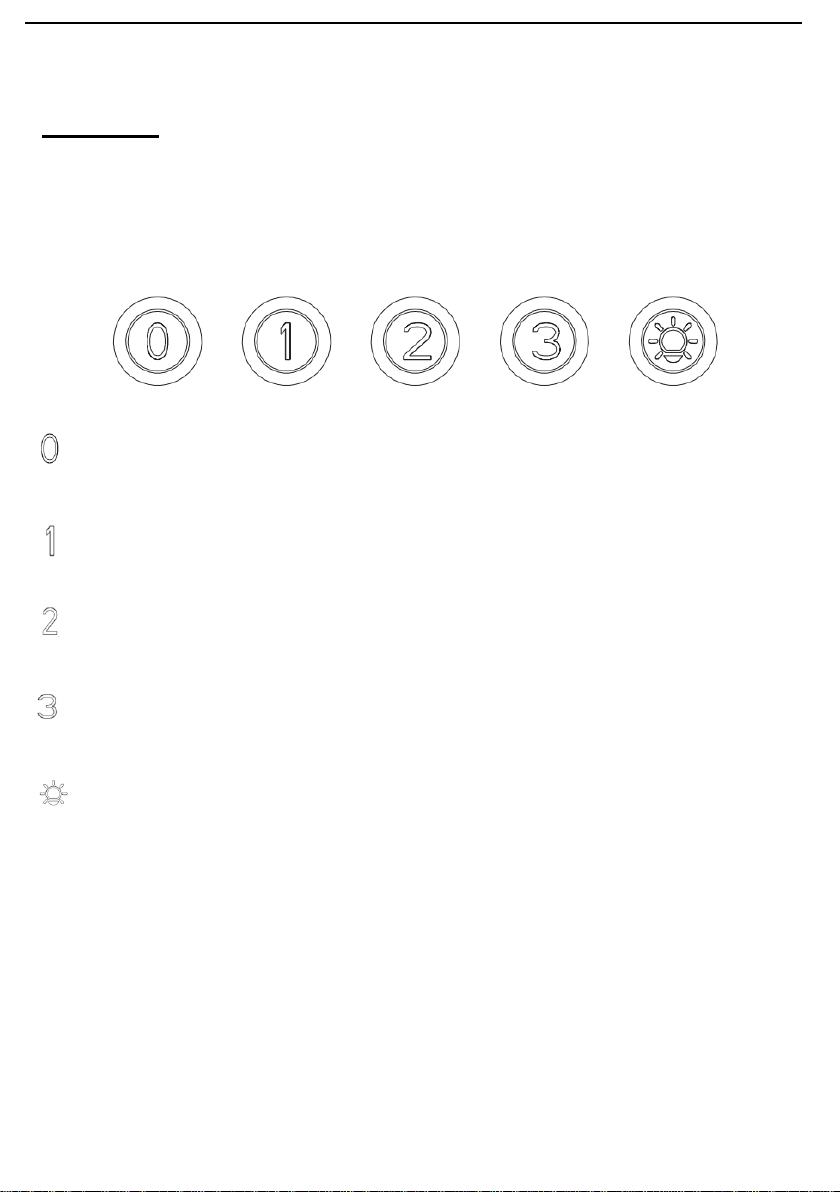
OPERATION
Push buttons
Off
Used for turning off the cooker hood.
Low Speed
Use for low temperature cooking where little steam is produced,
Medium Speed
Airflow speed is ideal for general cooking.
High Speed
When smoke or steam output are high, switch on the high-speed button for highest effective ventilation.
Light

12
MAINTENANCE
Before cleaning, switch off the unit and unplug from the mains.
Regular Cleaning
Use a soft cloth with warm soapy water or a household cleaning detergent. Never use metal pads,
chemicals, abrasive material or stiff brush to clean any parts of the cooker hood.
Aluminium Grease Filter
It is essential for the efficient working of the cooker hood to clean the grease filter regularly. We
recommend that this should be done once a month. It is best to use a household detergent or clean
the filter in the dishwasher.
Please refer to more detailed instructions under ‘’Aluminium Grease Filters’’, pg. 10.
Active Carbon Filters
Active Carbon Filters are only required if the hood is installed in recirculation mode, i.e. not vented to
the outside. The active carbon filter traps odours and must be replaced regularly depending on the
usage of the cooker hood. We recommend at least once a year for low use and every 3 months for
frequent and heavy use.
Please note that active carbon filters cannot be washed or cleaned otherwise they need to be
replaced.
Replacing the bulb
1. Switch the unit off and unplug the appliance.
2. Remove the filter. Disconnect the lights, by squeezing the connector and pulling it away from
the unit. The whole bulb unit will then push out for the bulb to be replaced.
3. Remove the lamp cover by unscrewing the 2 screws.
4. Replace with the same type and rated bulb/lamp. Replace the screws and push the unit back
into place and reconnect the wire connection.
Halogen lamp (max, 20W) & LED lamp (max,1.5W).
13
TROUBLE-SHOOTING
Fault
Cause
Solution
Light on, but fan does
not work
The fan blade is jammed.
Switch off the unit and repair by
qualified service personnel only.
The motor is damaged.
Both light and fan do
not work
Light bulb needs replacing
Replace the bulb with correct rating.
Power cord damaged or plug
lose.
Plug in to the power supply again.
Serious Vibration of the
unit
The fan blade is damaged.
Switch off the unit and repair by
qualified service personnel only.
The fan motor is not fixed
tightly.
Switch off the unit and repair by
qualified service personnel only.
The unit is not installed properly
on the bracket.
Take down the unit and check
whether the bracket is in the proper
location.
Suction performance
not good
Too long a distance between the
unit and the hob
Re-adjust the distance to 65-75cm

14
GUARANTEE
This product is guaranteed for a period of 24 months from the date of original purchase. If any defect
arises due to faulty materials or workmanship, the unit will either be repaired where applicable, replaced
or refunded at our discretion.
The following conditions apply:
The product must be returned to the retailer with original proof of purchase.
It must be used only for domestic purposes.
It does not cover wear and tear, damage, misuse or consumable parts.
We accept no responsibility for accidental or consequential loss or damage.
Disposal Information
According to the Waste Electrical and Electronic Equipment (WEEE) directive, WEEE should be separately
collected and treated. The above symbol on the product or its packaging indicates that this product is not
to be handled as normal household waste and needs to be taken to a recycling centre for electrical and
electronic goods. By correctly disposing of this product, you are contributing to the protection of the
environment and to the health of your fellow human beings. Improper disposal endangers health and the
environment. Further information about the recycling of the product may be obtained from your local
council, refuse collection department or the store where you purchased the product.
For your peace of mind register your appliance on the RMA website. The serial number can be found on
the rating plate.
Made in China.
Ferretti is a trademark of Kitchenways, Chorley, PR7 7NB
Table of contents
Popular Ventilation Hood manuals by other brands


KitchenAid
KitchenAid KWCU380WSS0 Installation Instructions and Use & Care Guide

SIGURO
SIGURO SGR-HD-G350B Original user manual

Aussie Traveller
Aussie Traveller 380 mm installation instructions

ELICA
ELICA Seagull Instruction on mounting and use

Faber
Faber INLT21SSV Installation instructions; use and care information

Best
Best WPD29M Series installation instructions