FESTA 28032 Instruction manual

1
Manual for use
Item number: 28032
Please read this manual carefully before using.

2
3
Technical specification
Item
Cordless angle grinder
Max. wheel diameter
115mm
Speed without load
8000min-1
Max. battery voltage
20V
Spindle thread size
M14
Max. thickness of cut material
15mm
Weight without battery
1,6kg
Protection marking
IPX0
Sound pressure level, uncertainty K
LpA= 76,67dB(A), K= 3dB(A)
Sound power level, uncertainty K
LwA= 87,67dB(A), K= 3dB(A)
Vibration during surface grinding
ah.AG= 5,324m/s2;K= 1,5m/s2
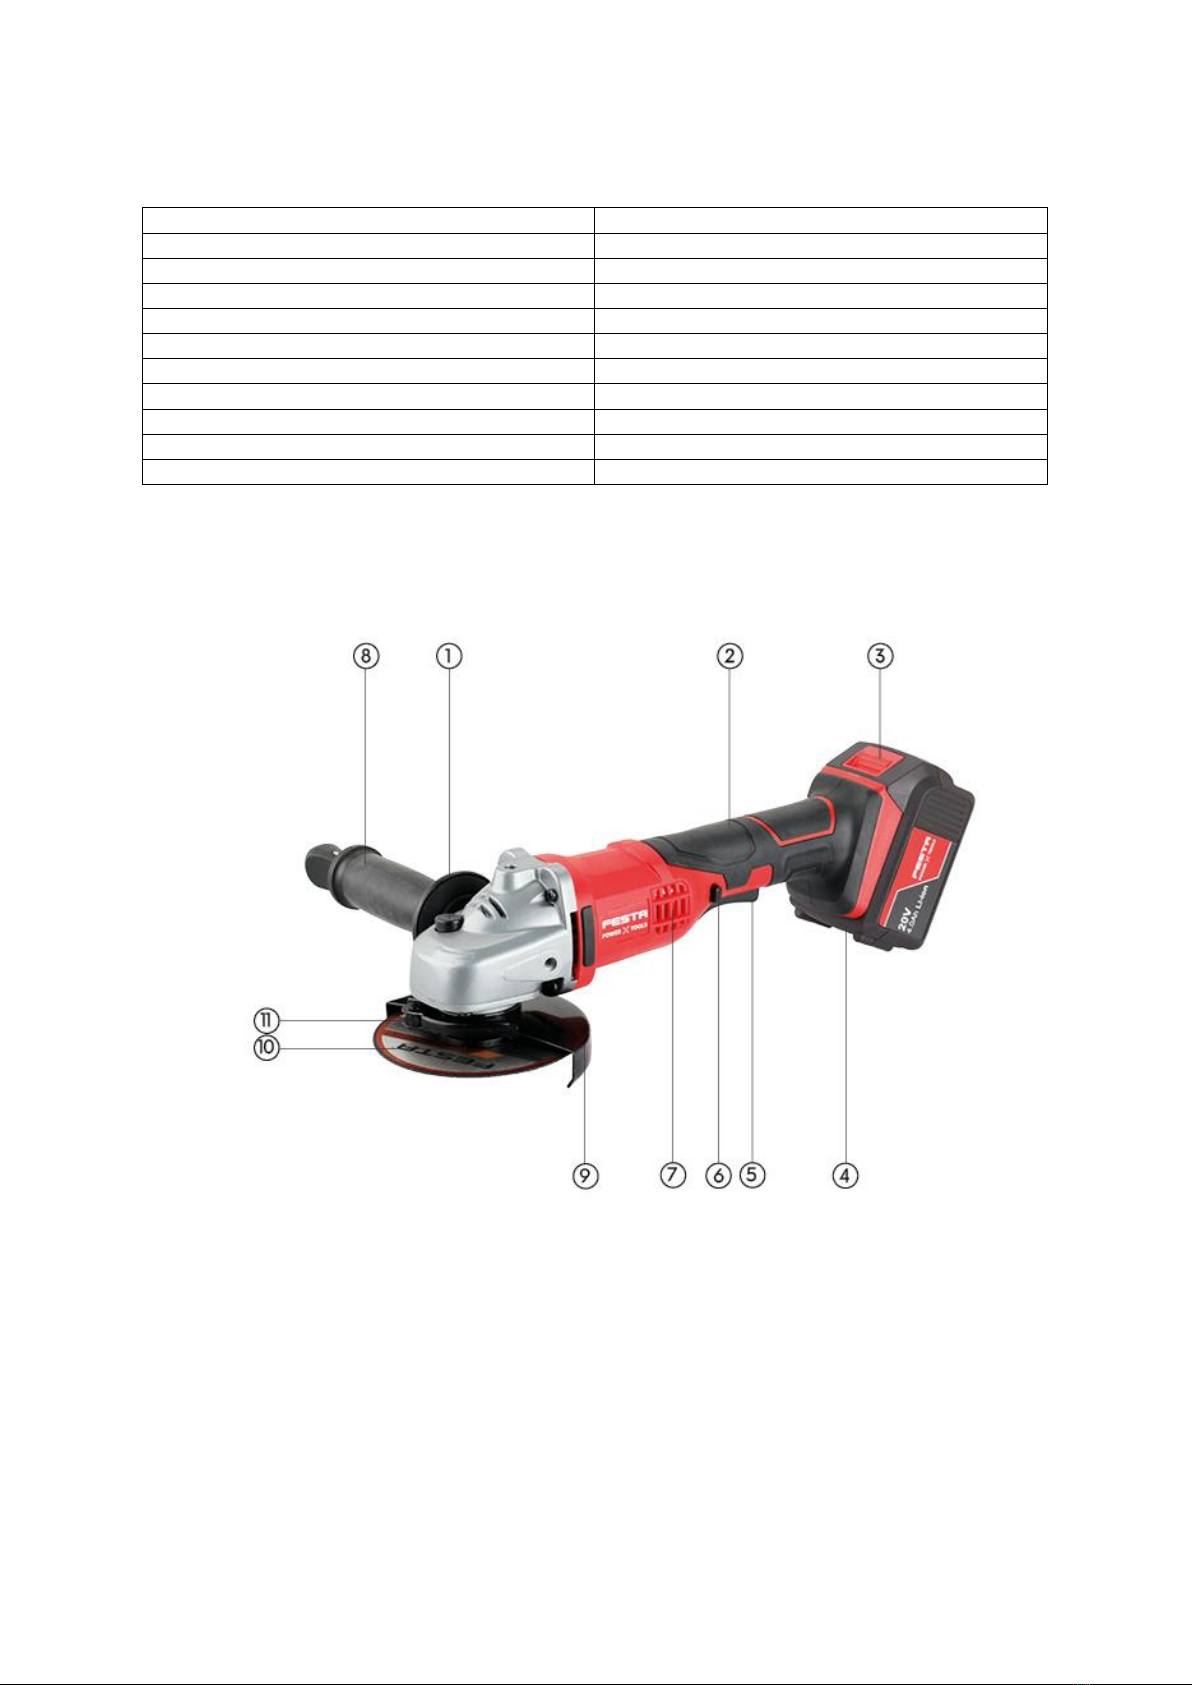
Components and controls
1) Spindle rotation lock button for tool change
2) Handle
3) Battery release button
4) Button for checking the battery charge level with leds
5) Trigger
6) Button for unlocking the operating switch
7) Engine vents
8) Front handle
9) Protective cover
10) Washer with disc clamping nut
11) Lever of the quick-release mechanism of the protective cover

4
Charging the battery
APPROXIMATE CHARGE TIMES WITH CHARGERS
4000 mAh
4 A quick charger (28086)
55 min.
2,4 A quick charger (28085)
90 min.
2000 mAh
4 A quick charger (28086)
30 min.
2,4 A quick charger (28085)
45 min.
WARNING
Before preparing and using the cordless tool for use, read the entire instruction manual and keep
it with the product so that the operator can familiarize himself with it.
If you lend or sell the product to anyone, enclose this instruction manual with it. Avoid damaging
this manual. The manufacturer is not liable for damages or injuries caused by using the device,
which is in conflict with these instructions. Before using the appliance, familiarize yourself with all
its controls and components, as well as how to switch off the appliance, so that you can switch it
off immediately in the event of a dangerous situation. Before use, check that all components are
securely fastened and that any part of the device, such as the safety guards, is not damaged,
incorrectly installed or missing in place. This also applies to the charger and its power cord. If the
cordless tool, battery or charger is damaged or incomplete, do not use it and have it repaired or
replaced with original parts.
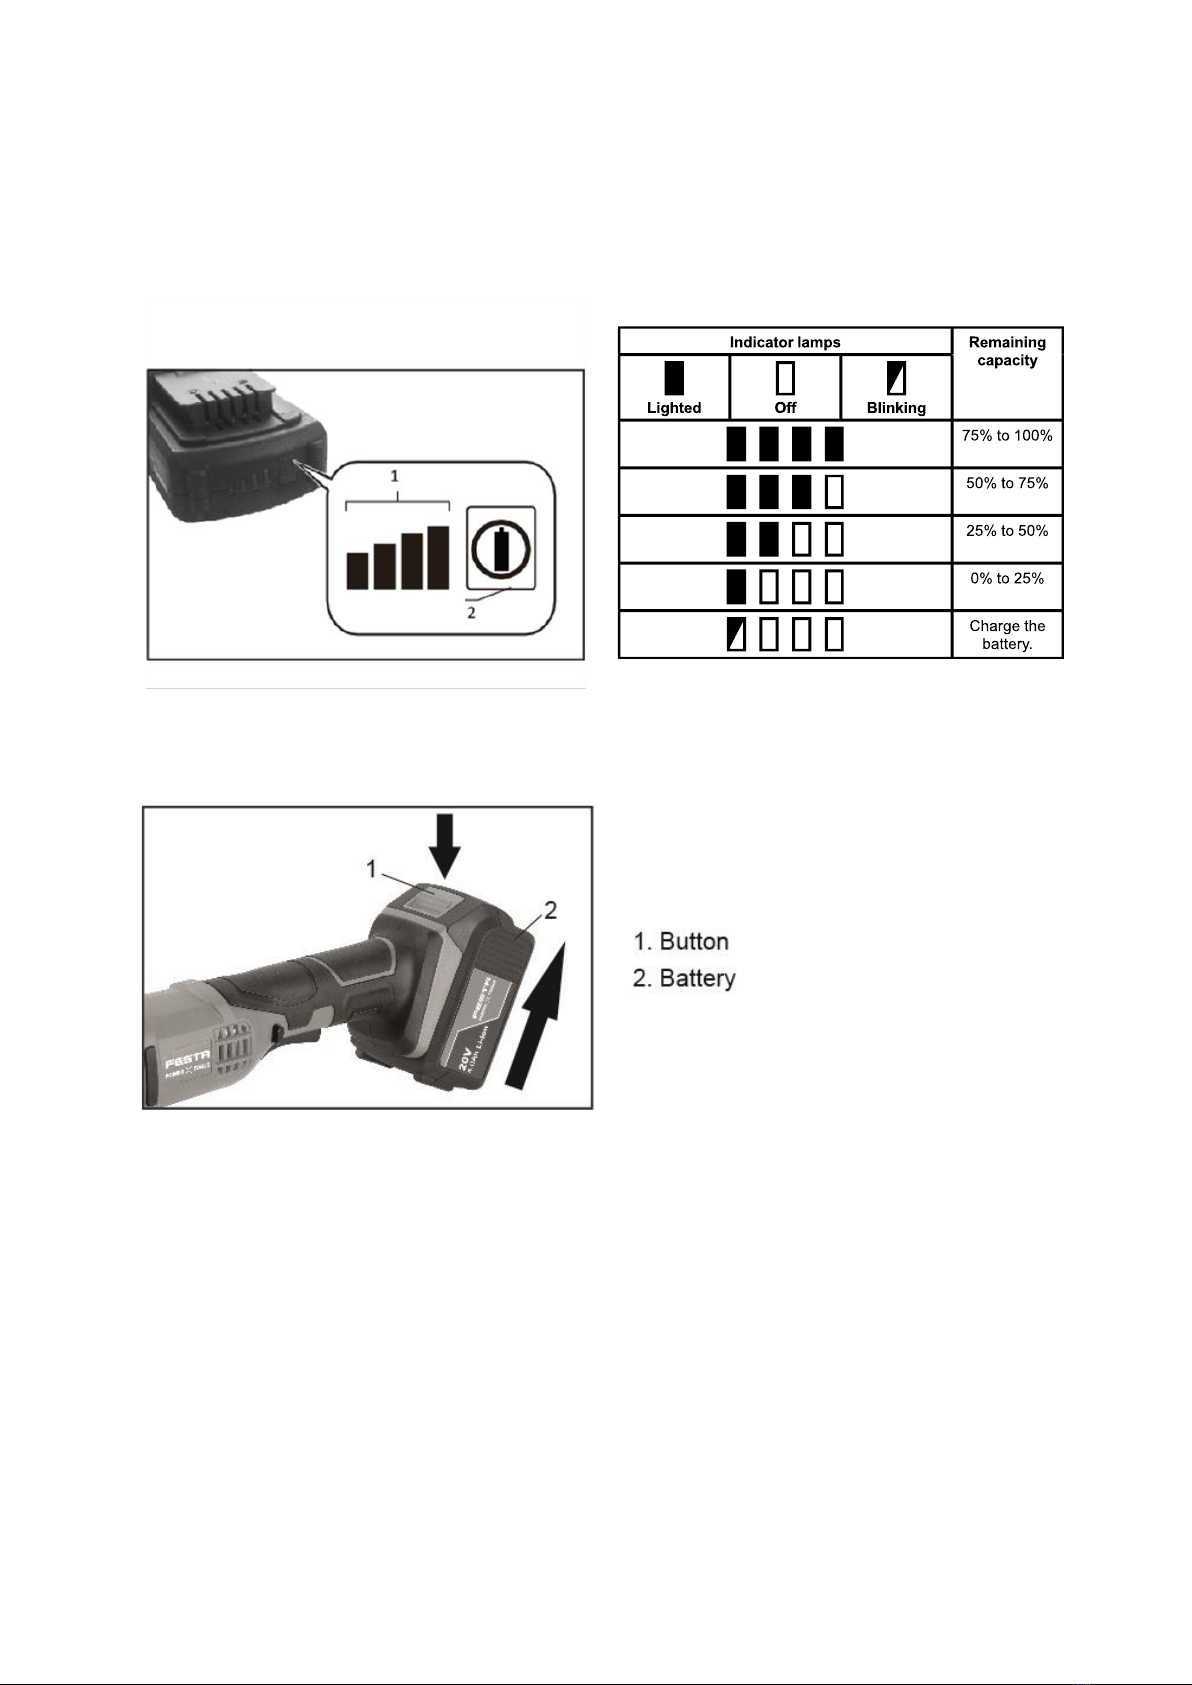
To check the battery charge level, press the button on the battery and, if necessary, charge the
battery according to the number of LEDs and the expected operating time of the cordless tool.
When the battery is fully charged, all LEDs are lit. The battery can be charged from any charge
level without reducing its capacity.
1. Insert the battery into the slots of the supplied charger first.
2. Before connecting the charger to a power source. current, check that the voltage in
the socket corresponds to the range 220-240 ~ 50 Hz and that the charger does not
have a damaged power cable (eg insulation) or cover or other part.
If the charger is damaged, have it replaced by a faultless original one from the manufacturer. Only
the original charger provided by the manufacturer must be used to charge the battery, otherwise
the use of another charger may cause a fire or explosion due to unsuitable charging parameters.
Protect the charger's power cord from damage.
3. Connect the charger to a wall outlet. current.
For 28085/28086 chargers
•when in charging process, it is indicated by a green flashing LED next to the red LED.
•when full charging, it is indicated only by a green LED on.
•when in abnormal charging process, it is indicated by both green and red flashing LED.
•The charge level of the battery can be monitored by the number of lit LEDs on the battery
that light up when the battery is being charged. We reserve the right to change the above
signaling of the charging and recharging process.
5
4. After charging, first disconnect the charger from the power source. power, and then
slide the battery out of the charger slots by pressing and holding the button on the
battery.
Description of battery functions
Display of remaining battery capacity
Attaching or removing the battery

6
Use
•Install the protective cover, handle and disc with the battery removed from the grinder!
INSTALLATION OF THE ADDITIONAL (FRONT) HANDLE
•The angle grinder must not be used without the front handle installed.
•Screw the frontauxiliary handle into the corresponding holes on the grinder body according
to the type of activity performed.
•To cut, screw it into the hole on the right or left side of the grinder, depending on whether
you are right-handed or left-handed.
When using a surface grinding machine, screw the handle into the hole at the top of the
grinder.
PROTECTIVE COVER INSTALLATION
•Install a protective cover on the neck of the angle grinder, which must be oriented so that
the cutting cover points towards the operator during cutting and protects the user from
possible flying fragments of material or discs and sparks. Place the metal protrusion on the
guard sleeve into the notch on the neck of the grinder so that the protrusion can be placed
in the groove on the neck, and then turn the guard with the protrusion in the groove into
position.
•Then lower the lever of the quick-release mechanism and secure the protective cover on
the neck of the grinder by screwing in the nut with a suitable mounting tool. Screw in the
nut so that the protective cover is well secured and also so that the lever of the quick-
release mechanism can be openedwithout loosening the nut if the positionof the protective
cover needs to be changed. If the quick release lever cannot be opened, loosen the nut no
more than necessary.
DISC INSTALLATION / REPLACEMENT
1. Place a washer on the grinder spindle so that it fits into the notches of the spindle and
rotates with it. Make sure it is seated correctly with your hand.
2. Place the disc on the washer.
•If the blade has a cup-shaped bend, the blade must be seated on the spindle so that the
blade bend is on the pad
3. Screw the outer clamping nut onto the grinder spindle.
4. To fasten a thicker (grinding) wheel with a maximum thickness of 6 mm, screw the outer
clamping nut to the side with the raised ring towards the wheel. To fasten the thin (cutting)
blade, screw the clamping nut towards the blade to the side without the protruding ring.
INSTALLATION OF PERMITTED ACCESSORIES ON THE GRINDING SPINDLE
•If the angle grinder is to be used with an M14 threaded accessory (eg wire brush, sanding
pad holder), first screw the lower washer from the spindle and unscrew the clamping nut
and then screw the required accessory onto the spindle by hand before screwing this
accessory onto the grinder spindle.
•The accessory must be designed for use with an angle grinder, and its maximum permitted
speed (marked on the accessory) must not be lower than the speed of the angle grinder
during no-load operation (indicated on the grinder label). The fact that the accessories can

7
be screwed onto the grinder spindle is not yet a prerequisite for safe work with the tool.
•Accessories with a larger diameter than specified in the technical data table must not be
installed on the angle grinder spindle. Under no circumstances may the protective cover be
removed in order to use accessories larger than the permitted diameter!
INSERTING THE BATTERY INTO THE ANGLE GRINDING MACHINE HANDLE
•Insert the battery into the handle of the angle grinder of the grinder so that it clicks.
USING ANGLE BATTERY
CUTTING WITH CUTTING WHEELS
1. When cutting, the grinder must be held perpendicular to the plane of the material to be cut
throughout the cut and must not be tilted to the sides. The grinder is not intended for liquid-
cooled cutting.
2. When cutting, the workpiece must be firmly secured with suitable clamping means, and
when cutting longer workpieces, the workpiece must be supported on both sides near the
cutting point so that the blade cannot be trapped inside the cut.
3. When circumferential grinding using grinding wheels (max. Thickness 6 mm) or cutting with
a cutting wheel, prevent the wheel from bouncing on the workpiece.
FLAT GRINDING
•For surface grinding, screw the additional handle into the hole on the "back" of the grinder.
•
ground plane.
•When sanding flat (using lamellar discs or sandpaper with attachment to the carrier disc),
do not apply excessive pressure to the grinder, the effect of the tool's own weight is
sufficient. Guide the grinder in a circular motion over the surface of the ground material.
BRUSHING WITH WIRE BRUSHES
•When brushing with wire brushes, do not apply pressure to the brush, as this will reduce
work efficiency, speed up brush wear and put too much strain on the grinder. When using
potted wire .
SAFETY INSTRUCTIONS FOR ANGLE BATTERY GRINDING MACHINE
SAFETY INSTRUCTIONS FOR ALL WORK ACTIVITIES
•Safety instructions common to grinding, surface grinding, wire brushing or abrasive cutting
work
1. This electromechanical tool is intended for use as a grinder, surface grinder, wire brush
grinder or cutting tool. All safety warnings, instructions, illustrationsand specifications given
for this electromechanical tool must be read. Failure to follow all instructions below may
result in electric shock, fire and / or serious injury.
2. It is not recommended to performwork activities such as polishing with this tool. Performing
work for which this tool is not intended can create a risk and cause personal injury.
3. Accessories that are not explicitly designed and recommended by the tool manufacturer
must not be used. The mere fact that an accessory can be connected to your tool does not

8
guarantee its safe operation.
4. The rated speed of the accessory must be at least equal to the maximum speed marked
on the tool. Accessories that operate at speeds higher than their rated speed may break
and fall apart.
5. The outer diameter and thickness of the accessories must be within the nominal range for
the electromechanical tool. Accessories of the wrong size cannot be adequately
protected or controlled.
6. The threaded attachment of the accessory must match the thread on the grinder spindle.
The clamping hole of the accessory, which is mounted on the flanges, must be suitable for
the defining diameter of the flange. Accessories that do not match the mountingdimensions
of the power tool will be unbalanced, may vibrate excessively, and may cause loss of
control.
7. 2. Damaged accessories must not be used. Before each use, check the accessories: for
grinding wheels, chips and cracks, for backing pads, cracks, tears or excessive wear, for
wire brushes, loose or cracked wires. If the accessory or tool has been dropped, check for
damage or install an undamaged accessory. After checking and fitting the accessory, the
operator and bystanders must stand so that they are out of the plane of the rotating
accessory and the tool must be idle at maximum speed for one minute. During this trial
period, damaged accessories will usually break or disintegrate.
8. Personal protective equipment must be used. Depending on the application, a face shield
or safety goggles must be worn. A dust mask, hearing protection, gloves and a work apron
capable of retaining small fragments of abrasive or workpiece must beused to a reasonable
extent. Eye protection must be able to contain flying debris that is generated during various
work activities. The dust mask or respirator must be able to filter out particles that are
formed during the activity. Prolonged exposure to high-intensity noise can cause hearing
loss.
9. Bystanders must remain at a safe distance from the work area. Everyone entering the work
area must use personal protective equipment. Fragments of the workpiece or damaged
accessories can fly off and cause injuries even outside the immediate work area.
10. When performing an operation where themachine toolmay touch a hidden guide or its own
supply, the power tool must only be held by insulated gripping surfaces. Contact of the
machine tool with a "live" wire can cause the non-insulated metal parts of the power tool to
become "live" and can lead to electric shock to the user.
11. 2. The flexible feed must be located out of reach of the rotating tool. If the operator loses
control, the moving lead may be cut or reground, and the operator's hand or arm may be
drawn into the rotating tool.
12. Electromechanical tools must never be setdown untilthe tool has come to a complete stop.
The rotating tool can catch on the surface and pull the tool out of the operator's control.
13. Electromechanical tools must never be started during transport on the operator's side. If
the tool is accidentally touched, it may hook on the operator's clothing and pull on the body.
14. The air vents of the tool must be cleaned regularly. The motor fan draws dust into the
housing, and excessive accumulation of metal dust can cause electrical hazards.
15. Electromechanical tools must not be used near flammable materials. These materials could
ignite from sparks.
16. Accessories that require liquid cooling must not be used. Use of water or other coolants
can cause electric shock or death.

9
ADDITIONAL SAFETY INSTRUCTIONS FOR ALL WORK ACTIVITIES
REVERSE AND RELATED WARNINGS
1. Kickback is a sudden reaction to a pinch or jam of a rotating disc, backing pad, brush, or
other accessory. Clamping or jamming will cause the rotating tool to stop abruptly, which in
turn will cause the uncontrolled tool to move in the opposite direction to the direction of
rotation of the tool at the point of jamming. For example, if a grinding wheel is pinched or
jammed in a workpiece, the edge of the wheel that enters the clamping point may penetrate
the surface of the material and cause the wheel to be pushed up or thrown. The blade can
either jump towards or away from the operator, depending on the direction of movement of
the blade at the jamming point. Grinding wheels can also break in these cases.
2. Kickbackistheresultofimproperuseofelectromechanicaltoolsand/orincorrectoperating
procedures or conditions and can be prevented by proper compliance with the safety
precautions described below.
3. The tool must be held firmly and the correct position of the body and arms must be
maintained so that it can withstand the forces of kickback. An auxiliary handle, if equipped,
must always be used for maximum control over kickback or reaction torque when starting
the machine. The operator is able to check the reaction torques and kickback forces if he
observes the correct safety precautions.
4. The hand must never come close to the rotating tool. The tool can throw the operator's
hand away.
5. It must not stand in an area where the tool can get in the event of a kickback. The kickback
throws the tool in the direction opposite to the direction of the blade movement at the
jamming point.
6. Special attention must be paid to machining corners, sharp edges, etc. It is necessary to
prevent bouncing and jamming of the tool. Corners, sharp edges or bouncing tend to jam
the rotating tool and cause loss of control or kickback.
7. The saw chain saw blade or toothed saw blade must not be attached to the tool. These
discs often cause kickback and loss of control.
ADDITIONAL SAFETY INSTRUCTIONS FOR GRINDING AND CUTTING WORK
ACTIVITIES
SAFETY WARNINGS SPECIFIC TO WORKING ACTIVITIES GRINDING AND
ABRASIVE CUTTING:
1. Use only the types of blades recommended for this electromechanical tool and the specific
guard that is designed for the selected blade. Discs for which the electromechanical tool
was not designed cannot be adequately covered and are dangerous.
2. The grinding surface of the discs, which are lowered in the middle, must be mounted below
the plane of the edge of the protective cover. An incorrectly mounted disc that protrudes
beyond the plane of the edge of the guard cannot be adequately protected.
3. The guard must be securely attached to the power tool and positioned for maximum safety
so that as little of the blade as possible is exposed in the direction of operation.
4. A protective cover helps protect the operator from blade debris, accidental contact with the
blade, and sparks that can ignite clothing.
5. The discs must only be used for their intended use. For example: grinding with the side of
the cutting disc is not permitted. Abrasive cutting discs are designed for circumferential
cutting, lateral forces acting on these discs could shatter them.
6. Undamaged disc flanges that are the correct size and shape for the selected disc must
always be used. Proper blade flanges support the blade, reducing the possibility of blade

10
breakage. Flanges for cutting wheels may differ from flanges for grinding wheels.
7. Wear discs of originally larger dimensions intended for larger electromechanical tools must
not be used. Discs designed for larger electromechanical tools are not suitable for higher
speeds of smaller tools and may break.
ADDITIONAL SAFETY INSTRUCTIONS FOR CUTTING ADDITIONAL SAFETY
WARNINGS SPECIFIC TO ABRASIVE CUTTING OPERATIONS:
1. The cutting disc must not be driven into the material or subjected to excessive pressure.
No effort should be made to achieve excessive depth of cut. Overloading the blade
increases the load and susceptibility to twisting or jamming of the blade in the cut and the
possibility of kickback or cracking of the blade.
2. Do not stand in line with or behind the rotating disc. As soon as the blade moves away from
the operator's body at the working point, a possible kickback may throw the rotating blade
and electromechanical tools directly at the operator.
3. If the blade jams or cutting is interrupted for any reason, the electromechanical tool must
be turned off and held still until the blade comes to a complete stop. The operator must
never attempt to remove the cutting blade from the cut while the blade is in motion, as
kickback may occur. It is necessary to check the situation and arrange a remedy to avoid
jamming the blade.
4. Cutting in the workpiece must not be restarted. The blade is allowed to reach full speed
and is carefully re-inserted into the cut. If the tool is restarted with the blade submerged in
the cut, it may jam, be pushed up, or kickback.
5. Panels and other large pieces of workpieces must be supported to reduce the risk of
jamming the disc and kickback. Large workpieces tend to sag under their own weight. The
supports must be placed under the workpiece near the cutting line and near the edges of
the workpiece on both sides of the blade.
6. Special care must be taken when making a "cavity cut" into existing walls or other blind
spaces. A penetrating blade can cut through gas or water pipes, electrical lines or objects
that can cause kickback.
ADDITIONAL SAFETY INSTRUCTIONS FOR FLAT GRINDING WORK ACTIVITIES
SAFETY WARNING SPECIFIC TO WORKING FLAT GRINDING WORK
ACTIVITIES:
1. Do not use oversized sandpaper for the grinding wheel. When choosing sanding paper, it
is necessary to follow the manufacturer's recommendations. Large sanding paper that
extends beyond the sanding plate poses a risk of tearing and can cause jams, wheel tears
or kickback.
ADDITIONAL SAFETY INSTRUCTIONS FOR WIRE BRUSH GRINDING WORK
ACTIVITIES SAFETY WARNINGS SPECIFIC TO WIRE BRUSH GRINDING WORK
ACTIVITIES:
1. Even during normal operation, wire bristles are thrown from the brush. The wires must not
be overloaded above the specific load of the brush. Wire bristles can easily penetrate light
clothing and / or skin.
2. If the use of a protective cover is recommended for grinding with a wire brush, ensure that
there is no contact between the wire wheel or brush and the protective cover.
•The wire disc or brush may increase in diameter when working due to loads and centrifugal
forces.

11
General safety instructions for power tools
CAUTION!
All safety instructions, operating instructions, pictures and regulations supplied with this
tool must be read. Failure to follow all of the following instructions may result in electric shock,
fire, and / or serious personal injury.
All instructions and instructions for use must be kept for future reference.
The term "power tool" in all of the following warnings refers to a mains-operated (flexible power
supply) or a battery-powered power tool (without a movable power supply).
1. SAFETY OF THE WORK ENVIRONMENT
a) Workplaces must be kept clean and well lit. Clutter and dark spaces are often the cause
of accidents.
b) Power tools must not be used in potentially explosive atmospheres where flammable
liquids, gases or dust are present. Power tools create sparks which may ignite the dust
or fumes.
c) When using a power tool, keep out of the reach of children and others. If the operator
is disturbed, he may lose control of the activity being performed.
2. ELECTRICAL SAFETY
a) The plug of the power tool's flexible lead must match the power outlet. The forks
must never be modified in any way. No socket adapters may be used with tools that
have a protective earth connection. Plugs that are not damaged by modifications and
the corresponding sockets will reduce the risk of electric shock.
b) Operators must not touch grounded objects, such as pipes, central heating units,
cookers and refrigerators. The risk of electric shock is greater if your body is connected
to the ground.
c) Power tools must not be exposed to rain, moisture or wetness. If water enters the
power tool, the risk of electric shock increases.
d) The flexible supply must not be used for other purposes. The power tool must not
be carried or pulled by the power cord, nor must the plug be unplugged from the
outlet. The inlet must be protected from heat, grease, sharp edges or moving parts.
Damaged or tangled leads increase the risk of electric shock.
e) If the power tool is used outdoors, an extension cord suitable for outdoor use must
be used. Using an extension cord for outdoor use reduces the risk of electric shock.
f) If the power tool is used in humid areas, a RCD protected power supply must be
used. Using an RCD reduces the risk of electric shock. The term "RCD" may be replaced
by "main circuit breaker (GFCI)" or "leakage circuit breaker (ELCB)".
3. PERSONAL SAFETY
a) When using a power tool, the operator must be careful, pay attention to what he is
doing, and concentrate and think soberly. Power tools must not be used if the
operator is tired or under the influence of drugs, alcohol or medication. Momentary
inattention while using a power tool can result in serious personal injury.
b) Use personal protective equipment. Always wear eye protection. Protective equipment
such as a respirator, non-slip safety shoes, hard headgear or hearing protection, used in
accordance with the working conditions, reduces the risk of personal injury.
c) Unintentional starting of the machine must be avoided. Make sure that the switch is

12
in the off position before plugging in and / or connecting the battery pack, lifting or
carrying the tool. Carrying a tool with your finger on the switch or plugging in a tool fork
with the switch on can cause accidents.
d) All adjusting tools or wrenches must be removed before turning on the tool. An
adjusting tool or wrench that remains attached to the rotating part of the power tool may
result in personal injury.
e) The operator must only work where he can reach safely. The operator must always
maintain a stable posture and balance. This will allow better control of the power tool in
unforeseen situations.
f) Dress appropriately. Do not wear loose clothing or jewelry. The operator must make
sure that hishair and clothing are far enough away from moving parts. Loose clothing,
jewelry and long hair can be caught in moving parts.
g) Where means are provided for the connection of dust extraction and collection
facilities, care shall be taken to ensure that such equipment is connected and used
correctly. The use of these devices can reduce the hazards caused by dust.
h) The operator must not allow the routine, which is based on the frequent use of the
tool, to become complacent and ignore the principles of tool safety. Careless
operation can cause serious injury in a fraction of a second.
4. USE AND MAINTENANCE OF BATTERY TOOLS
a) Power tools must not be overloaded. It is necessary to use the correct power tool
that is intended for the work performed. The right power tool will do the job it was
designed to do better and safer.
b) Power tools that cannot be turned on and off with the switch must not be used. Any
power tool that cannot be operated with the switch is dangerous and must be repaired.
c) Before making any adjustments, changing accessories or storing power tools,
unplug the power tool and / or remove the battery pack from the power tool, if
removable. These precautions reduce the risk of accidental starting of the power tool.
d) Unused power tools must be stored out of the reach of children and persons
unfamiliar with the power tool or these instructions must not be allowed to use the
power tool. Power tools are dangerous in the hands of inexperienced users.
e) Power tools and accessories must be maintained. It is necessary to check the
adjustment of moving parts and their mobility, focusing on cracks, broken parts and
any other circumstances that may jeopardize the function of the power tool. If the
tool is damaged, it must be repaired before further use. Many accidents are caused by
poorly maintained power tools.
f) Cutting tools must be kept sharp and clean. Properly maintained and sharpened cutting
tools are less likely to catch on the material or become jammed and easier to control.
g) Power tools, accessories and tool bits etc. must be used in accordance with these
instructions and in the manner intended for the particular power tool, taking into
account the working conditions and the work to be performed. Using power tools for
activities other than those for which they were designed can lead to dangerous situations.
h) Handles and grip surfaces must be kept dry, clean and free of grease. Slipperyhandles
and grip surfaces do not allow the tool to be held and inspected safely in unexpected
situations.
5. USE AND MAINTENANCE OF BATTERY TOOLS
a) Charge the tool only with the charger specified by the manufacturer. A charger that
may be suitable for one type of battery pack may present a fire hazard when used with
another battery pack.
b) Only use the tool with a battery pack that is specifically designed for the tool. Use of

13
any other battery pack may present a risk of injury or fire.
c) When the battery pack is not in use, protect it from contact with other metal objects
such as paper clips, coins, keys, nails, screws, or other small metal objects that may
cause onebattery contact to connect with another. Short-circuiting the battery terminals
may cause burns or fire.
d) If used incorrectly, liquids may leak from the battery; avoid contact with them. In
case of accidental contact with these liquids, rinse the affected area with water. In
addition, seek medical attention if fluid gets in your eyes. Liquids escaping from the
battery can cause inflammation or burns.
e) A battery pack or tool that is damaged or rebuilt must not be used. Damaged or
modified batteries can behave unpredictably, which can result in fire, explosion, or risk of
injury.
f) Battery packs or tools must not be exposed to fire or excessive heat. Exposure to fire
g) All charging instructions must be followed and the battery pack or tool must not be
charged outside the temperature range specified in the operating instructions.
Improper charging or charging at temperatures outside this range may damage the battery
and increase the risk of fire.
6. SERVICE
a) Have your cordless tool repaired by a qualified person using identical spare parts.
This will ensure the same level of tool safety as before repair.
b) Damaged battery packs must never be repaired. Repairs to battery packs should only
be performed by the manufacturer or an authorized service center.
Charger safety instructions
•Protect the charger from rain and moisture. The charger may only be used indoors.
•The charger is intended for charging only the battery supplied with this cordless tool and
no other batteries. Charging batteries other than those for which the charger is intended
may result in fire or explosion.
•Keep the charger clean.
•Before each use, check that the charger is in good condition, including the power cord.
•Do not operate the charger on highly flammable objects and substrates (eg paper) or in an
environment with an explosive and / or flammable atmosphere.
•Always provide adequate ventilation when charging, as vapors or electrolyte may leak from
the battery if the battery is damaged due to mishandling / damage.
•When charging is complete, disconnect the charger from the wall outlet. do not leave it
connected to the power supply for longer than necessary.
•Avoid using the charger by persons (including children) whose physical, sensory or mental
disability or lack of experience and knowledge prevents them from using the appliance
safely without supervision or instruction. Children must not play with the appliance. In
general, the use of the appliance by very young children (age 0-3 years inclusive) and use

14
by younger children without supervision (age over 3 years under 8 years) are not taken into
account. It is recognized that people with severe disabilities may have needs outside the
level specified in this standard (EN 60335).
Battery safety instructions
•Store and charge the battery in a dry environment and make sure that no water enters it.
•Never expose the battery to direct sunlight or temperatures above 5
•Chargethebatteryonlyforthetime requiredfor charging,see.indicatorlightonthecharger.
•Keep the battery connectors clean and free from clogging, deformation and short circuits.
•Protect the battery from shocks, moisture and never open or mechanically damage the
battery.
•Never incinerate, dispose of in water or the environment, but dispose of it in an
environmentally friendly manner.
•Avoid skin contact if the battery is damaged and electrolyte leaks due to improper handling
of the battery. If skin gets on, wash thoroughly with water. Liquids leaking from the battery
can cause inflammation, burns,or burns. In case of contact with eyes, rinse thoroughly with
clean water and consult a doctor immediately, in case of ingestion consult a doctor
immediately about the procedure.
Storage
•Store cordless tools in a dry place out of the reach of children. For safety reasons, remove
the battery before storing the cordless tool. When the battery is inserted in the cordless
tool, it discharges faster. Protect the battery and tools from frost, high temperatures,
humidity and water.

15
Meaning of symbols on labels
Read the instructions before
use.
Use certified eye and ear
protection with a sufficient
level of protection.
Use certified respiratory
protection with adequate
level of protection.
Meets relevant EU
requirements.
Second class protection
equipment. Double insulation.
The charger is intended for
indoor use only. Must be
protected from rain and
moisture.
DC current/ voltage.
The socket is designed for
charging the battery with
direct current.
Fuse with indication of
current value in A.
Caution, warning, follow
instructions.
Battery recovery, see
below.
Electrical waste, see below.
Do not expose the battery to
direct sunlight or
temperatures above 50 .
Do not dispose of the battery
in water or the environment.
Do not incinerate the
battery.

16
Serial number including year,
month of manufacture
Waste disposal
PACKAGING
•Dispose of the packaging in the appropriate waste container.
CORDLESS POWER TOOLS
According to the European Directive (EU) 2012/19, electrical and electronic equipment
may not be disposed of as mixed waste, but it is necessary to return them for ecological
disposal to the return of electrical equipment at designated collection points. Before
returning the cordless tool, remove the battery, which must be disposed of in an
environmentally friendly manner separately. You will receive information about collection points at
the municipal office.
BATTERY
The battery contains cartridges that are dangerous for the environment, so return it to the
batteries for ecological recycling / disposal. According to the European Directive on
Accumulators and Batteries 2006/66 EC, unusable batteries must not be disposed of with
mixed waste or the environment. You will receive information about collection points at
the municipal office.
Warranty period and conditions (rights from
defective performance)
•If the buyer so requests, the seller is obliged to provide the buyer with warranty conditions
(rights from defective performance) in writing in accordance with the law.
WARRANTY AND POST-WARRANTY SERVICE
To exercise the right to warranty repair of the goods, contact the dealer from whom you purchased
the goods.
EU Declaration of Conformity
-
marked devices, based on their concept and construction, as well as the designs listed on the
market, meet the requirements of the EuropeanUnion listed below. This declaration is issued under
the sole responsibility of the manufacturer.
Subjects of declaration-product identification:
Cordless angle grinder:
28032 Cordless angle grinder
comply with the following harmonized standards, including their amending annexes, if any, by
which conformity with the following harmonization provisions is declared:

17
2006/42 ES:
EN 62841-1:2015, EN 62841-2-1:2018, EN 62841-1:2015, EN 62841-2-2:2014 cordless drills; EN
62841-1:2015, EN 62841-2-2:2014 cordless impact driver; EN 60745-1:2009, EN 60745-2-6:2010
cordless hammer; EN 60745-1:2009, EN 60745-2-3:2011 cordless angle grinder; EN 62841-
1:2015, EN 62841-2-4:2014 cordless multi-function tool; EN 62841-1:2015, EN 62841-2-5:2014
cordless circular saw; EN 62841-1:2015, EN 62841-2-4:2014, cordless sander; EN 60745-
1:2009/A11:2010, EN 60745-2-16:2010 cordless stapler; EN62841-1:2015, EN 62841-2-11:2016
cordless reciprocating saw; EN 62841-1:2015, EN 62841-2-11:2016 cordless jig saw; EN 60598-
2-5:2015 used in conjunction with EN 60598-1:2015, clause 9.2 cordless led light; EN 62841-2015,
EN 62841-2-2:2014 cordless screwdriver.
(EU) 2014/35:
EN 60335-1:2012, EN 60335-2-29:2004; EN 62233:2008 chargers
(EU) 2014/30:
EN 55014-1:2006 until 28.4.2020/ thereafter EN 55014-1:2017; EN 55014-2:1997 until 25.3.2018/
thereafter pursuant to EN 55014-2:2015; for chargers furthemore: EN 61000-3-2:2014; EN 61000-
3-3:2013;
(EU) 2011/65: EN 50581:2012
EN 62133:2013 until 14.3.2020/ thereafter EN 62133:2017, UN 38.3 battery
The completion of technical documentation 2006/42 EC and 2000/14 EC was performed by
fice at the manufacturer's address.
The technical documentation (2006/42 EC, 2000/14 EC) is available at the manufacturer's
address.
Place and date of issue of the EU declaration of conformity:
Person authorized to draw up the EU declaration of conformity on behalf of the manufacturer
(signature, name, function):
Managing director Levior s.r.o.

18
Návod k použití
32
Tento

19

20
Technické údaje
115mm
8000min-1
20V
M14
15mm
Hmotnost bez baterie
1,6kg
IPX0
; nejistota K
LpA= 76,67dB(A), K= 3dB(A)
; nejistota K
LwA= 87,67dB(A), K= 3dB(A)
ah.AG= 5,324m/s2;K= 1,5m/s2
Součásti a ovládací prvky
1)
2)
3)
4)
5)
6)
7) oru
8)
9)
10)
11)
Table of contents
Other FESTA Grinder manuals


