Festivo CM User manual
Refrigerators, freezers and wine storage appliances
Installation and operating manual
Rev 062023
Rev 082023


3EN
Table of contents
Table of contents 3
Intended use 4
Models 4
Acceptance 4
Before using the appliance 4
Precautions 5
Installation 6
Operation principle of the appliance 14
Switches and thermostats: refrigerator and freezer 14
Switches and thermostats: wine storage appliance 15
Switching on 15
Switching off 16
Temperature adjustment: refrigerator and freezer 16
Button lock and unlock 17
Freezing 17
Temperature adjustment: wine storage appliance 17
Normal sounds of the appliance 19
Automatic defrosting 19
Storing goods 20
Cleaning 24
User maintenance 28
Malfunctions and repairing small faults 29
Error messages 30
Service 31
Warranty conditions 32
Decommissioning the appliance 32
Notes 33

4
EN
Intended use
Festivo refrigeration appliances are suited to refrigerating and freezing
food. The appliances are intended for domestic use. For institutional use,
regulations concerning the sector should be considered.
Festivo refrigeration appliances have been designed and tested in
accordance with the rules and regulations in force.
Festivo refrigeration appliances can be serviced only by an authorized
service center. Repairs by unqualified persons can endanger the user of the
appliance or the environment.
Models
Appliance models in the operating instructions are: refrigerator, freezer, refrigerator freezer, and wine storage
appliance. The refrigerator comes with a FRUIT AND VEGETABLE drawer, and the freezer has a ZERO drawer as
standard equipment.
Note!
The equipment and accessories in the instruction manual pictures are not necessarily standard
equipment of the appliance(s).
Acceptance
Check the appliance before accepting it. In case you detect damages in transit to the appliance please note it
down into the transport document, and inform the shipment company and seller immediately.
Note!
The manufacturer’s warranty does not cover damages in transit!
Before using the appliance
Read the installation and operating manual carefully. It includes important information about the installation, use
and maintenance of the appliance.
Do not start to use the appliance immediately after transportation or after it has been kept in a cold place, but let
it stand in its final location for a few hours so that the oil has time to flow down into the compressor.
Refrigerator CM Freezer FM Refrigerator freezer CFM
(consists of separate appliances)
Wine storage appliance
VLM
5EN
Precautions
The appliance must be attached to the wall (A) on the top of the cabinet or
prevent the appliance of falling over in another manner. If the angle plate
does not reach the wall use a suitable connecting piece for it.The wall
mounting screw and plug Ø 6 mm (B) are taped to the inside of the device.
Before cleaning, turn off the appliance from the power switch and unplug it
from the socket.
Leave the doors open when the appliance is not in use.
Alcoholic substances and conserves containing alcohol e.g. gherkins, pickled
beetroot and lingonberry puree must be stored upright in a tightly sealed
container.
Do not store opened sparkling wine bottles in the door locker, because of
the movement of opening the door can loosen the bottle cork with a lot of
pressure and it can cause damage with its trajectory.
Do not store glass bottles with freezing liquids in the freezer. The bottle can
break. Do not store explosive substances in the refrigerator freezer.
Warning!
It is not allowed to install the appliance in a space that is too small because of possible leakage of
refrigerant forming an explosive mixture of gas. The room size should be at
least 8 m².
The appliance contains a small amount of environmentally friendly but flammable refrigerant R600,
which does not damage the ozone layer or cause greenhouse effect. Check
the refrigerant piping for damages in transit or during installation. Leaking
refrigerant can injure eyes or ignite.
When noticing a refrigerant leakage:
• do not let open fire into the room
• turn off power to the appliance from the main switch
• unplug the appliance from the socket
• air the room for several minutes
• contact the Festivo service center
Note!
Keep the air circulation vents free of obstacles both up and down.
Do not use mechanical tools to speed up melting the ice or other than recommended methods by the
manufacturer.
Do not damage the refrigerant piping.
Do not use any electrical equipment inside the refrigerator freezer unless it is recommended by the manufacturer.
The refrigerator freezer must be fastened to a wall following instructions on page 4.
B
A

6
EN
Installation
PLACEMENT
The intended environmental temperature classification has been indicated on the appliance nameplate. The
nameplate is situated on the right inner wall of the refrigerator.
Place the appliance in a dry and well ventilated room with a size of at least 8 m².
Do not place the appliance in the immediate proximity of a radiator, stove, or an other heat source.
Proper functioning of the refrigerator engine requires a good air circulation.The air circulation vent at the front of
the appliance should not be covered.
Note!
Manufacturer’s warranty does not cover damages that are caused by faulty installation. Check that
the cooling air circulation meets at least the instruction requirement.
The placement floor must be even, horizontal, and at the same level with the finished floor.
Frost, that is formed in the refrigerator evaporator, will be defrosted automatically by the appliance. Melt water is
lead to an evaporation dish in the compressor space. Water evaporates from the evaporation vessel automatically.
In the case of a malfunction of the unit some water can be spilled onto the floor.
Note!
Always place a safety container under the unit.
If the refrigeration assembly includes several appliance modules, install a module wide safety container under
each unit. The picture shows an example of a 120 CFM refrigerator freezer safety container assembly. The safety
container is available as additional equipment.
Alternatively, the location of the refrigerator freezer can be made watertight in other ways. A watertight base
will be raised up onto the wall so that the possible leakage water cannot enter the structure via the floor or wall
joints.
SN +10 ... +32 °C
N +16 ... +32 °C
ST +18 ... +32 °C
T +18 ... +43 °C

7EN
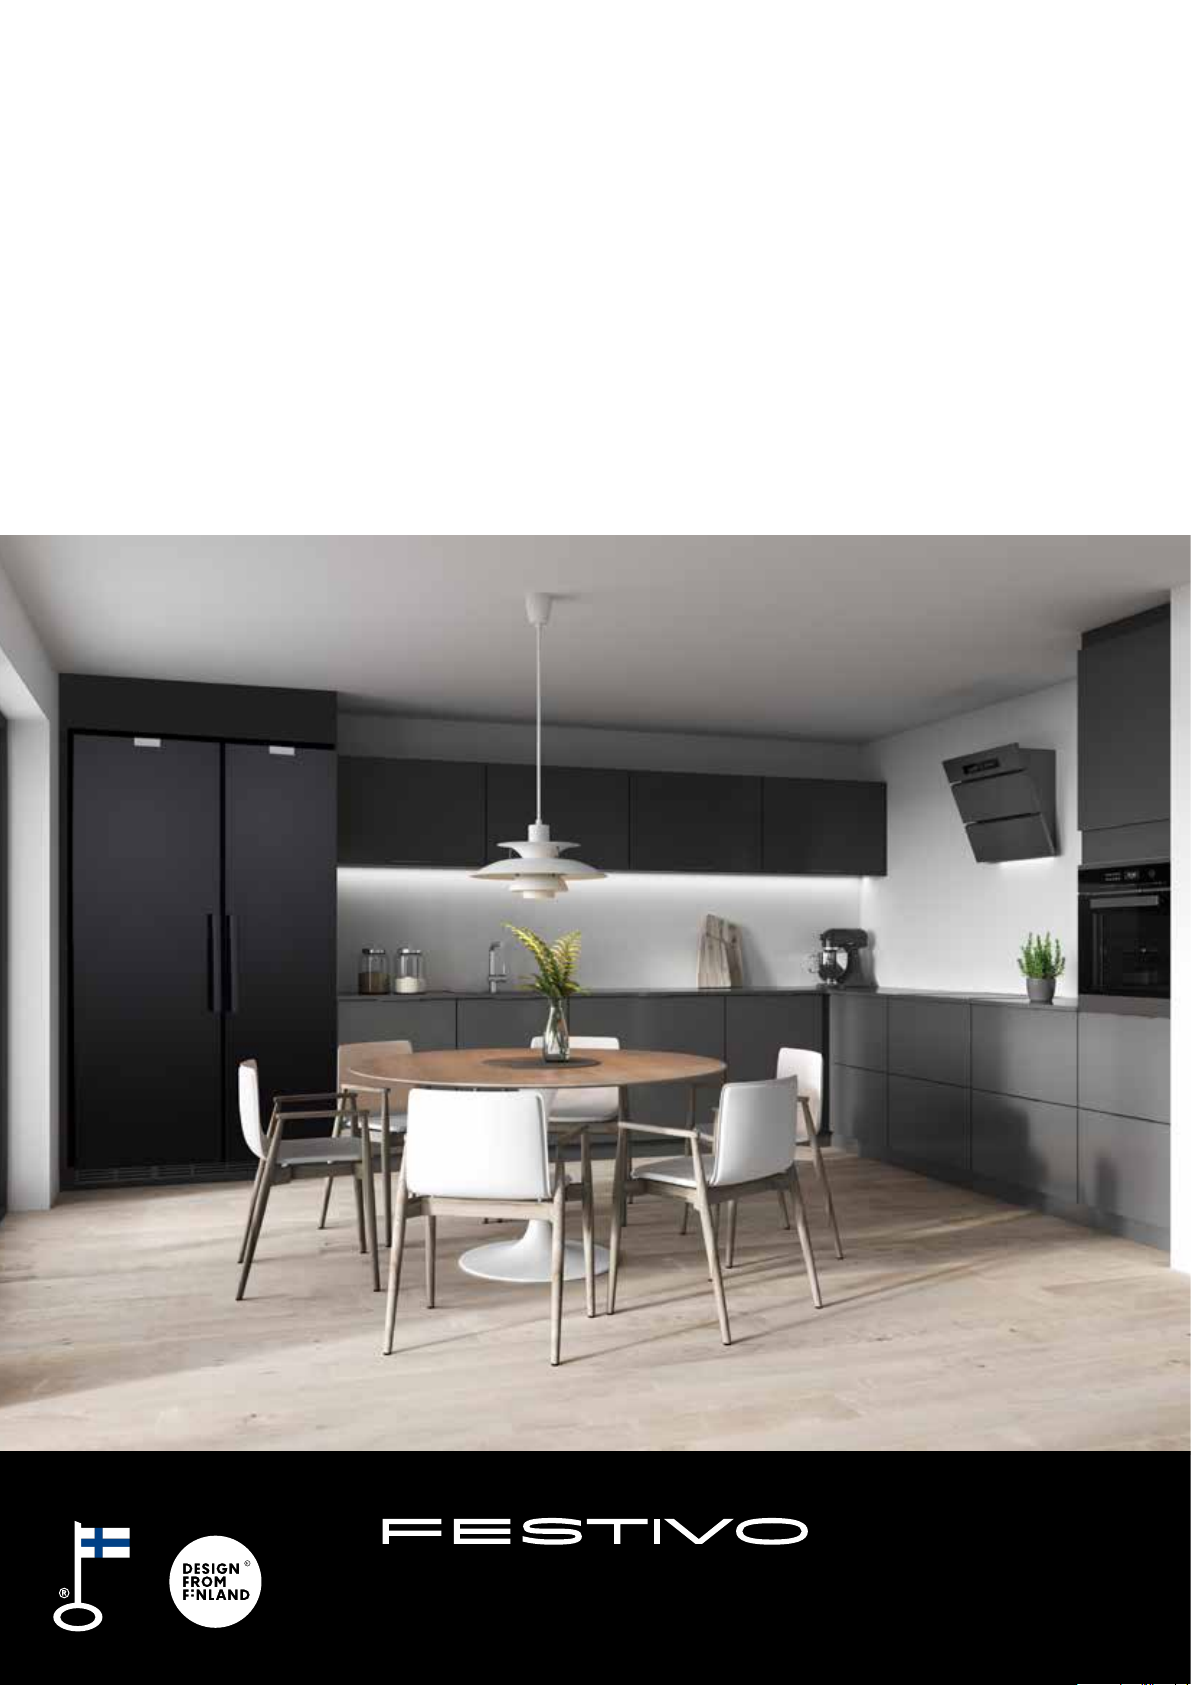
Check that the plastic evaporation basin on top of the compressor is
properly in place. Move the dish to its position if it has been misplaced in
transit.
Other furniture should not be fastened to the refrigerator freezer. One
should be able to pull it out for cleaning and maintenance.
INSTALLATION DISTANCES FROM OTHER DEVICES AND SURFACES
Note!
For more detailed installation dimensions and methods, see a separate installation manual that can be
downloaded address www.festivo.fi the product information of the device in question.
The refrigerator freezer can be placed touching the surfaces on the back and sides. In case the Festivo appliance’s
side surface is next to another cooling unit or outer wall, a ventilation gap of 10 mm width should be left in
between the surfaces.
If the appliance is installed next to a wall it should be off the wall with at least 35 mm gap, so that the door
opens sufficiently and the drawers can slide freely out from inside the cabinet.
When opening, the door corner crosses the outside line of the device. If the front surface of the door of the
appliance is on the same level as the outer surface of the cabinet, leave a minimum gap of 5 mm between the
hinge side of the appliance and the cabinet.
If a full deep upper cabinet is installed above the appliance, at least 40 mm of empty air circulation shall be left
between the appliance and the upper cabinet (1). If the top cabinet is immediately above the appliance, at least
80 mm of empty space shall be left behind and above the cabinet (2). There must be at least 80 mm of empty
space between the freestanding device and the ceiling of the room (3).
1. 2. 3.

8
EN
ELECTRICAL CONNECTIONS
Connect the refrigerator and freezer power cords and both refrigerator freezer power cords to a single phase
230 V 50 Hz socket. The socket fuse size is 10 A.
Only a electrician is allowed to make changes to the plugs change the power cord.
A suitable socket is a socket on the back surface at a height of 2060 mm measured from the floor surface until
the bottom edge of the socket. The socket can be in the ceiling at similar height and at a maximum of 500 mm
from the back wall.
The socket must be positioned in such a way that it is possible to pull the appliance’s plug from the socket
without having to move it.
The extra power cord cannot be pushed behind the furniture into the condeser space but it has to be left on top
of the refrigerator freezer.
Due to danger of overheating the appliance should not be connected to the power grid by means of a branch
outlet or an extension cord.
BALANCING AND LOCKING THE WHEELS: REFRIGERATOR, FREEZER AND WINE STORAGE APPLIANCE 45 VLM
Please check that the wheel locking screws
C of are open.
Push the appliance to its place. Install it
to the same level as the rest of the floor
surface.
Straighten the appliance with the adjusting
screws A (2 pcs) and tighten the locking
screws C. The work requires a 10 mm
spanner.
If the appliance tilts towards the back
even if the adjusting screws A have been
completely loosened it’s necessary to place
sheet material under the back wheels to
heighten the back edge.
120 cm wide appliances:
Turn the adjusting foot in the middle in such a way that it touches the floor.
INSTALLING FRONT PANEL OF THE PLINTH
Mount the front panel of the plinth to its place. The front panel
is attached to the plinth with two fasteners B (2 pcs). When you
have pressed the front panel in its place, lift it upwards as far as it
lifts.
FALL PREVENTION
Fasten the furniture to the wall with the angle plate on top of the
cabinet and prevent otherwise the appliance from falling over by
accident.
C
B
A
9EN
CONNECTING APPLIANCE COMBINATIONS OF 100 CFM AND 120 CFM TO EACH OTHER
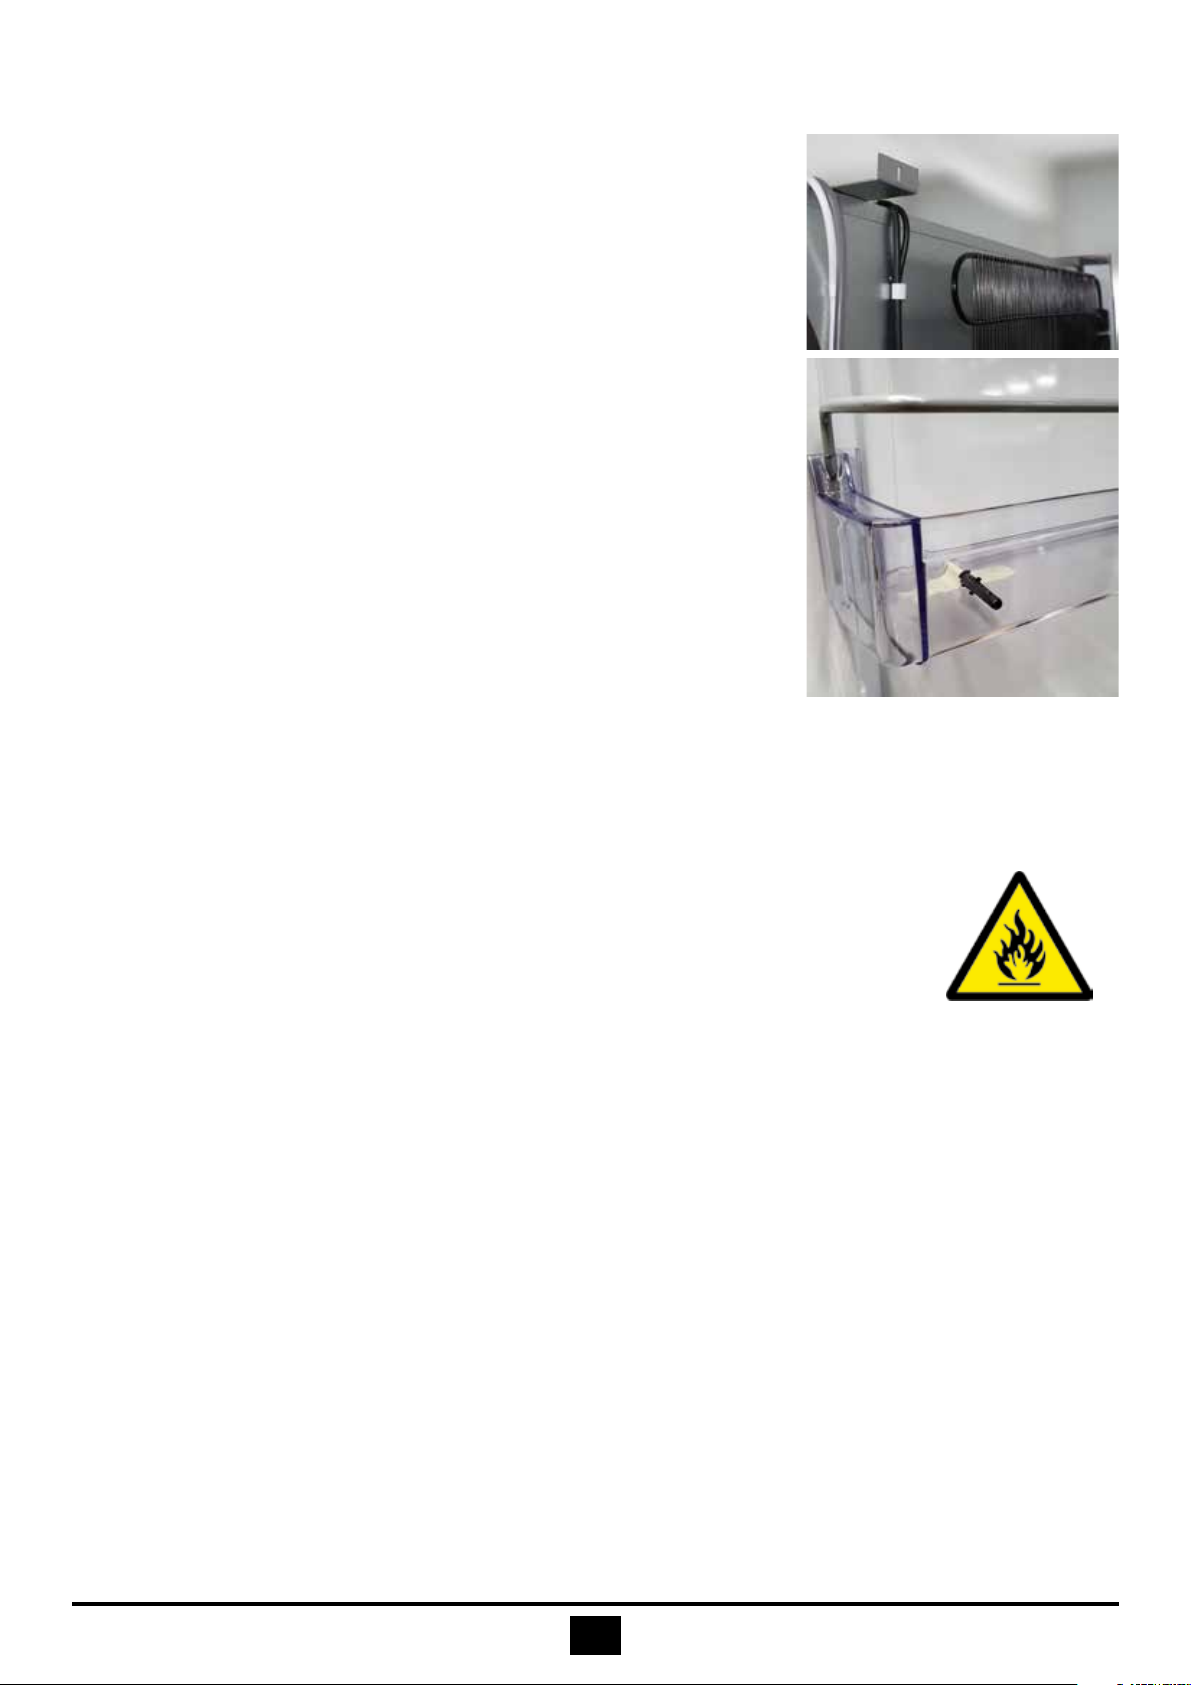
EXTENSION ACCESSORY PACKAGE INCLUDES:
(additional equipment to individually sold
modules of 55 CM, 75 CM, 45 FM and 45 VLM)
1. Aluminum profile for in between the
frames
2. Support strips for the top
3. Ceiling fastener
4. Plinth fasteners
5. Screws 4.2 and M6
Unpack the packages next to mounting location.
Adjust the appliances to a horizontal position (see
chapter ‘Balancing and locking the wheels’) and
fasten them to each other.
The frames will be attached to each other from the top (2, 3), front plinth (4)
and back plinth (4). An aluminum profile cover will be installed in between the
appliances (1).
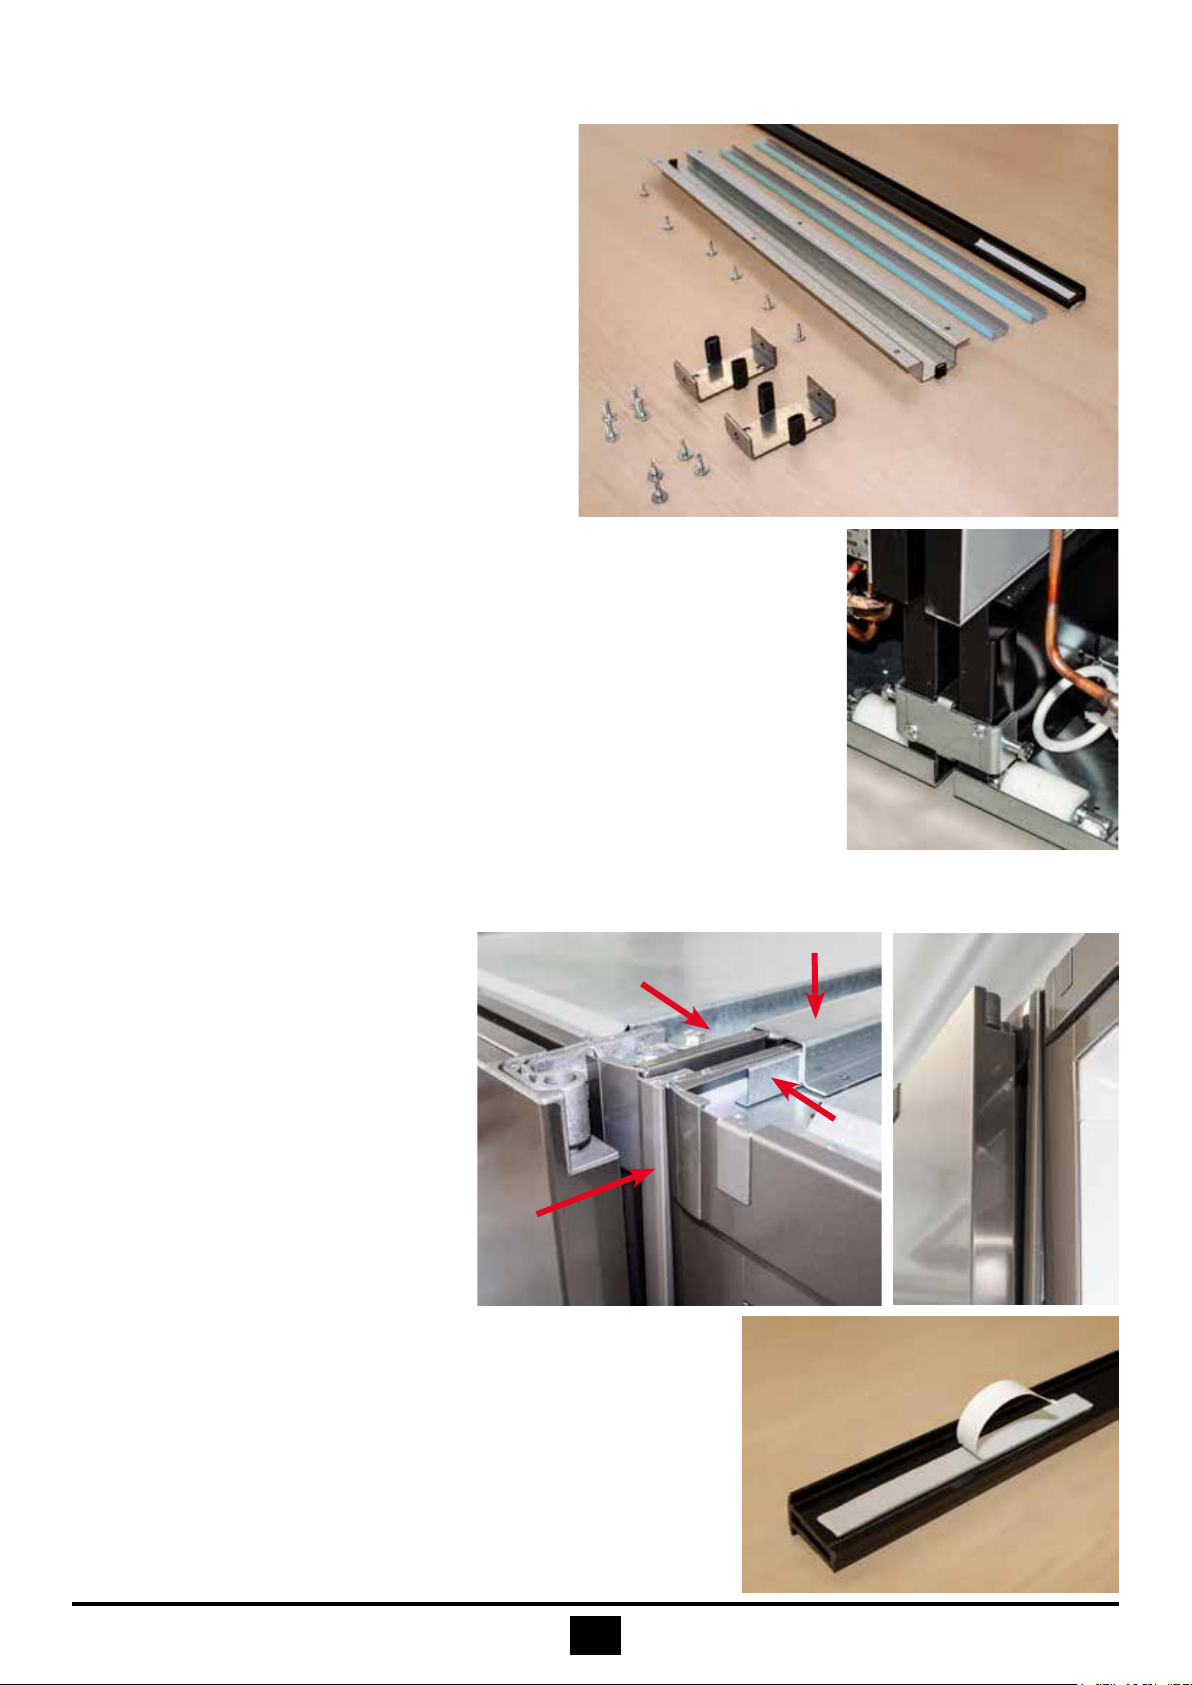
BACK PLINTH FASTENER (4)
Mount the plinth fastener to the lower edge of the plinth. Fasten the 4.2 drill
screws to the holes on the back edge and tighten the joint from both sides
evenly with M6 screws.
CEILING FASTENER (3) AND FRONT EDGE ALUMINIUM PROFILE FOR INBETWEEN THE FRAMES (1)
First install the support lists (2) on the
roof of the appliance under the top
lids and press the ceiling fastener (3)
against the ceiling.
Push the appliance to its place. Check
that the front surfaces of the frame
are on the same level.
Remove the protective tapes (1b) of
the sealing band on the aluminium
profile and first press
the top of the profile into place (1).
Finally, press the aluminium profile
tightly along its entire length against the front surface of the frame.
Fasten the ceiling fastener (3) 4.2 with screws (6 pcs) to the
mounting holes.
1.
2.
3.
4.
5.
2
23
1
1b
4
10
EN
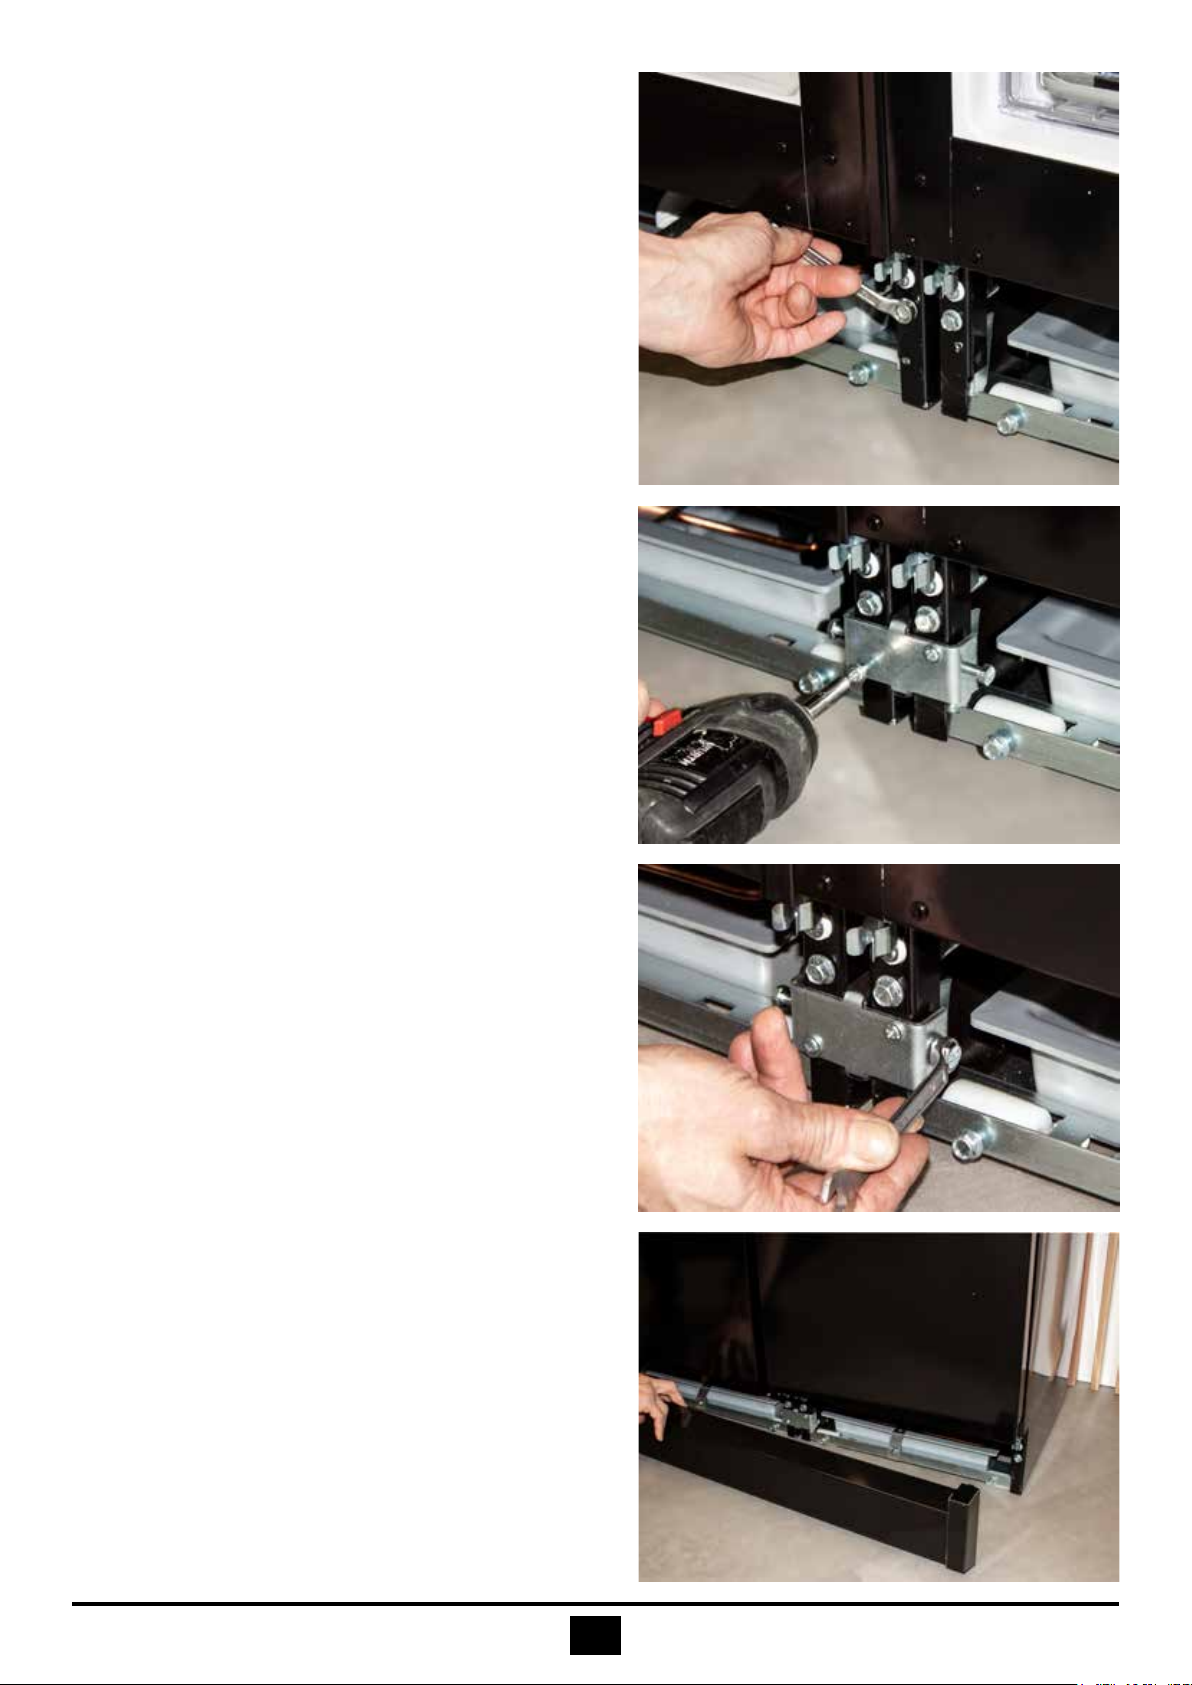
BALANCING AND LOCKING THE WHEELS
Adjust the appliances to the same level with
adjustment screws A and fasten the wheel locking
screws C. The work requires a 10 mm spanner.
FRONT PLINTH FASTENER (4)
Mount the plinth fastener to the lower edge of the
plinth. Fasten the 4.2 screws (a) to the holes on the
front edge and tighten the joint from both sides evenly
with M6 screws (b).
Mount the front panel of the plinth to its place.
A
C
C
a
b

11 EN
MOUNTING SHELVES (DOUBLE DOOR REFRIGERATOR MODELS 90, 100 AND 120 CM)
Adjust shelve brackets to desired height.
Slide the flanges of the back side bracket (A) to the pin
slots at the back of the cabinet.
Lower flanges of the front side bracket (B) to the pin slots
at the middle of the cabinet.
Place the shelve at its place. Make sure that both
ends of the shelve are on top of the bracket.
A
B
Shelf bracket

12
EN
MOUNTING SHELVES
RIGHT
WRONG WRONG
RIGHT
13 EN
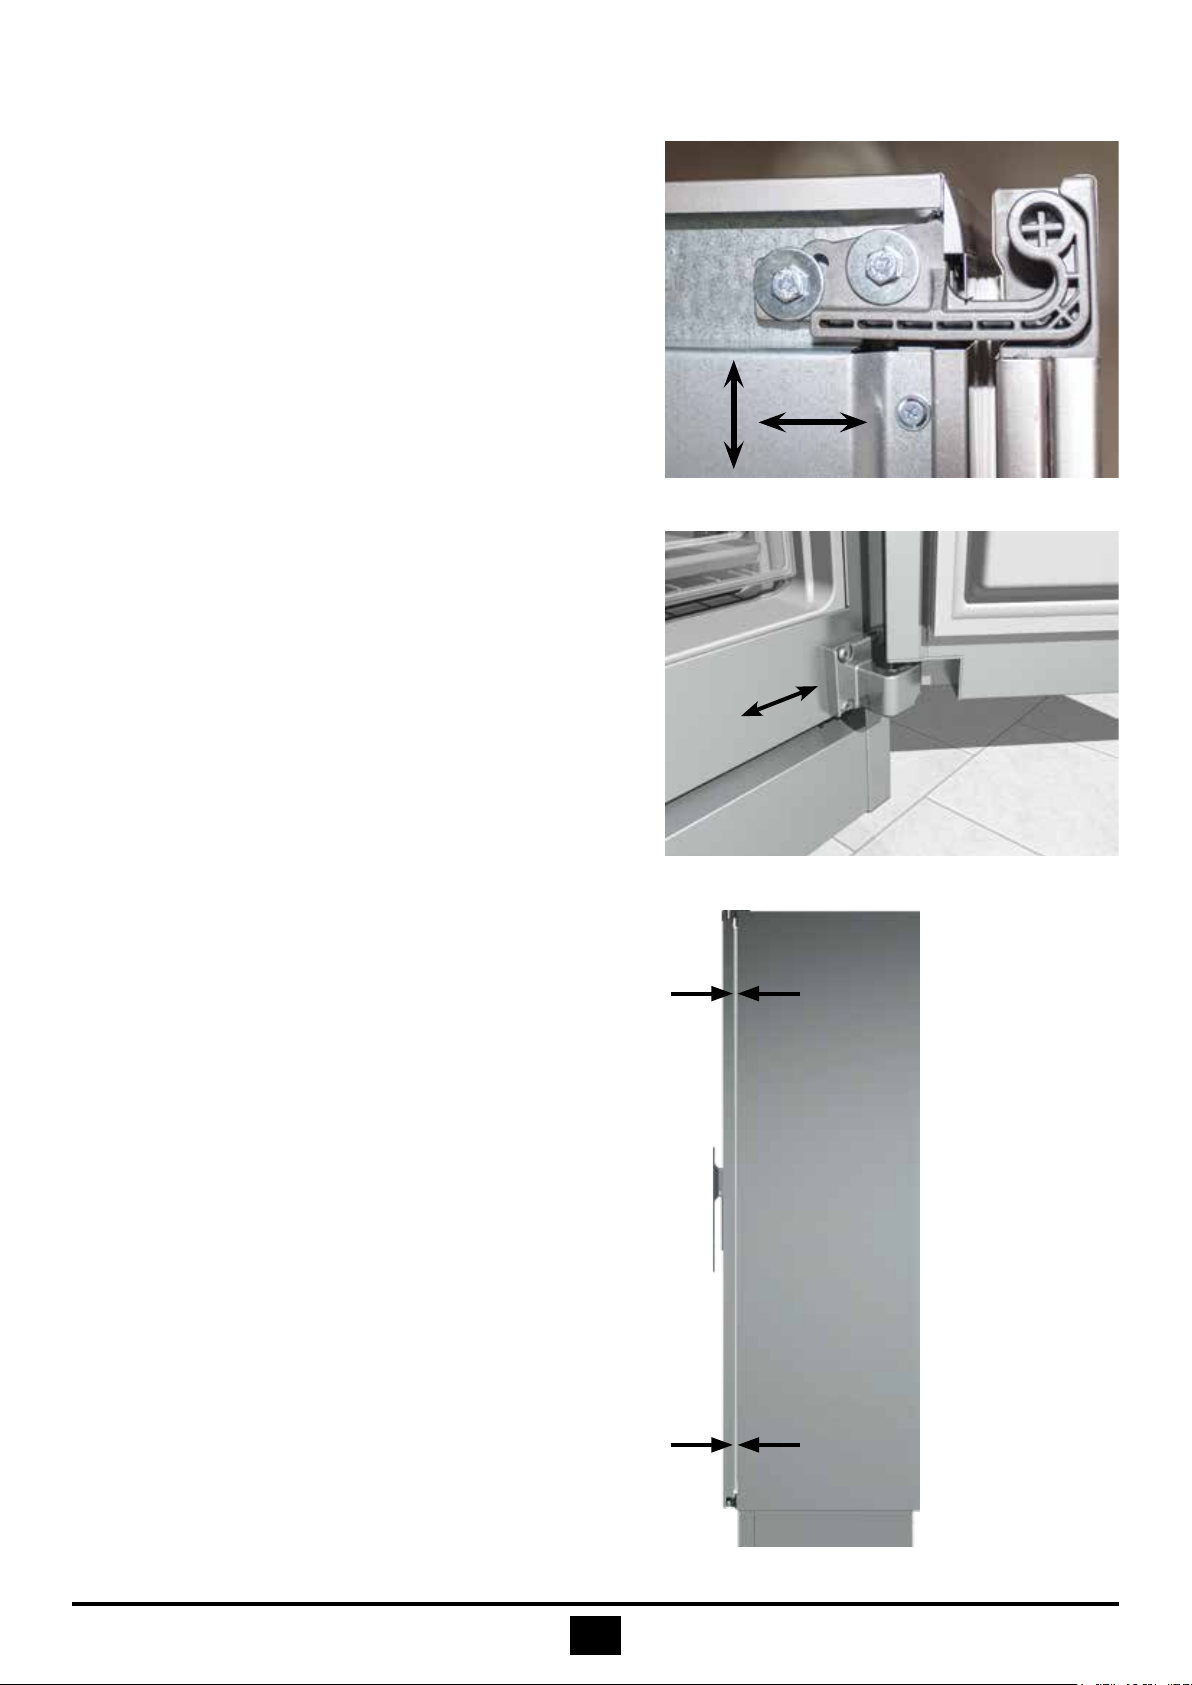
DOOR ADJUSTMENT: REFRIGERATOR, FREEZER, AND WINE STORAGE APPLIANCE 45 VLM
During the initial installation of a new device, there is
usually no need to adjust the doors, because the doors are
adjusted at the factory. If the doors need to be adjusted
when connecting the devices, it may be due to the
unevenness of the floor. Small unevenness in the floor can
be corrected with the adjustment screws on the base of the
device.
Check the position of the door in relation to the frame. If
the door is not straight, it can be adjusted with hinges.
Lateral adjustment, picture 1
Loosen top hinge screws. Turn the hinge sideways (arrows
C) until the door is straight and tighten the screws.
The measurement A (picture 3) has to be the same on the
top and bottom of the door. If it is not the same, more the
upper hinge. Loosen fastening screws and move the upper
hinge (arrows B) so that the measurement A is the same
both up and down. Tighten the screws.
Bottom hinge, picture 2
Bottom honge can only be adjusted sideways.
Please check how well the seal fits to the frame. If the
seal is too compressed on the hinge side, move the hinge
outward.
If the hinge is compressed and it does not touch the casing,
heat it CAREFULLY with a hairdryer and make the seal
higher by molding it by hand.
If the hinges are in the middle of the appliance the
protective case on the top has to be unmounted first so that
the top hinge can be adjusted.
Varoitus!
Turn off the power and unplug the power cord from
the socket before underheating the protective case.
Grease the hinges if necessary.
Top hinge, picture 1
A
A
Picture 3
Bottom hinge, picture 2
CB
14
EN
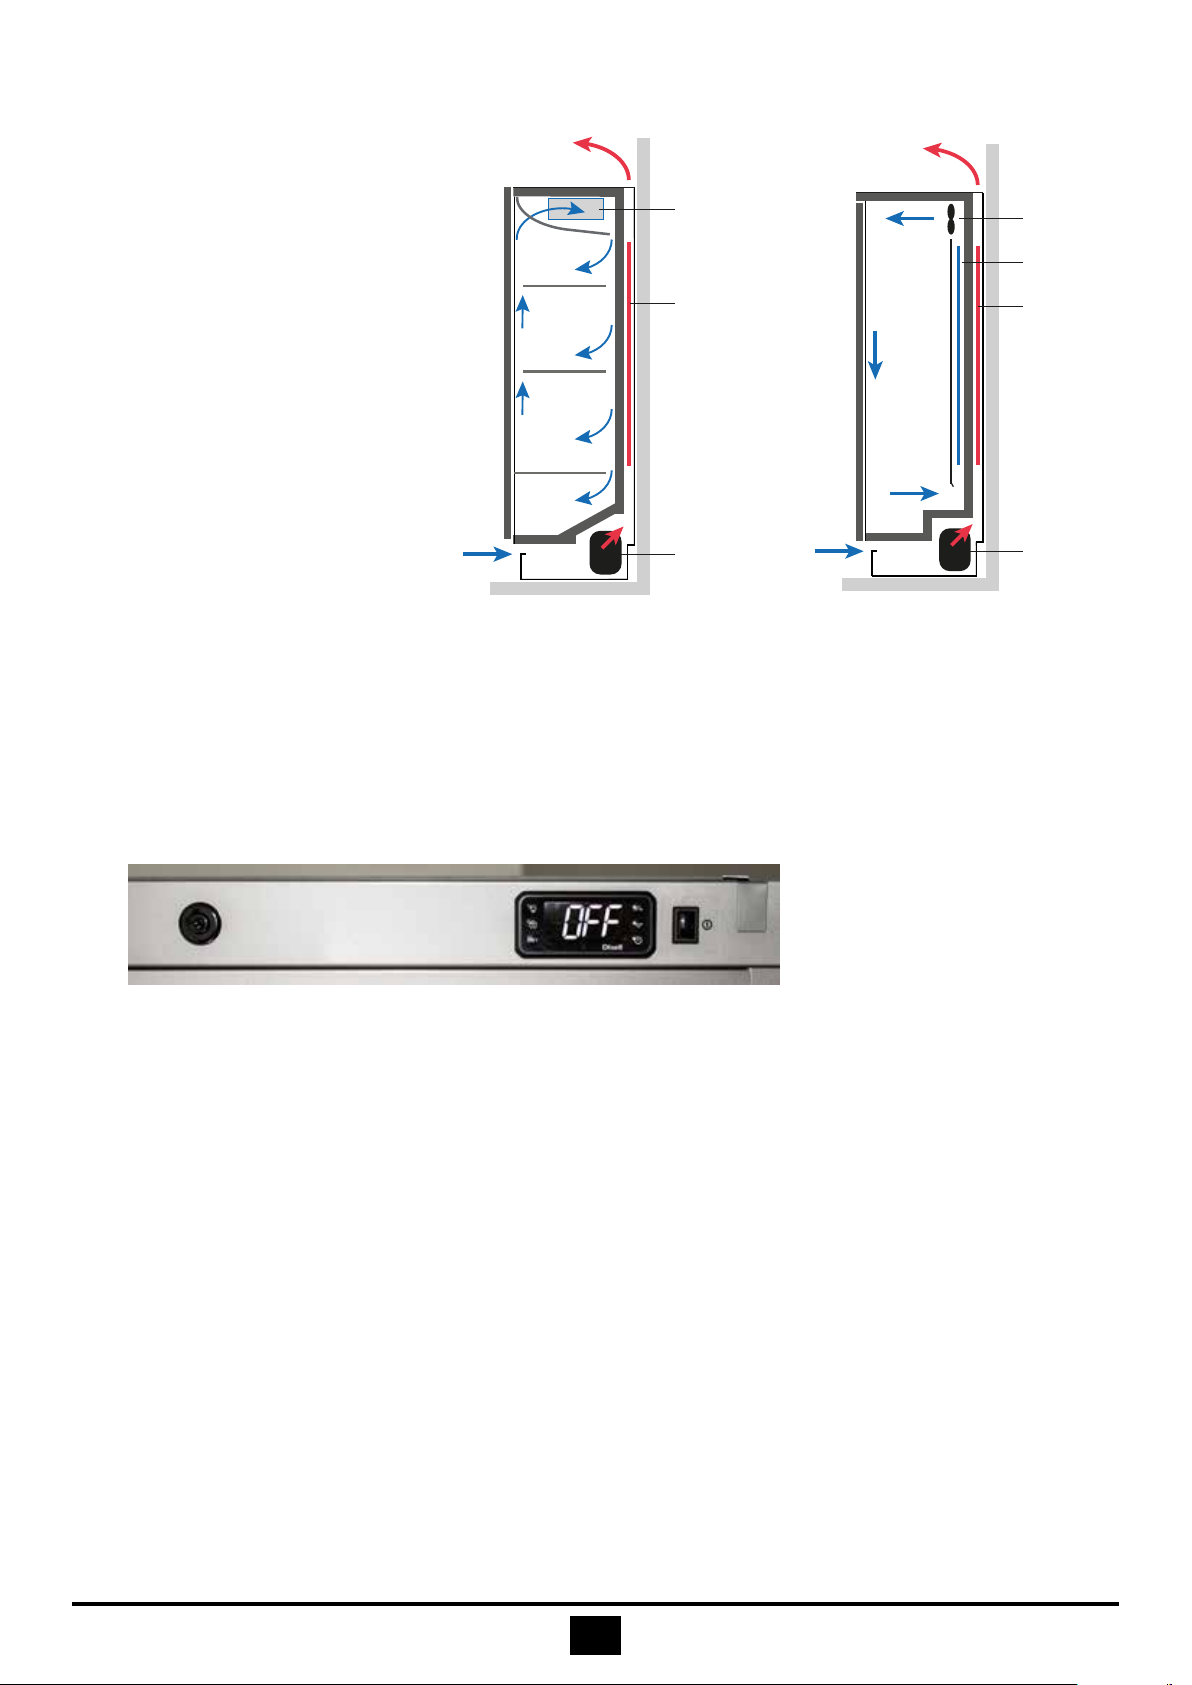
Operation principle of the appliance
The cooling system, consisting of
a compressor, a condenser and an
evaporator, operate as a closed
circuit, where the compressor
circulates the refrigerant.
In the evaporator the refrigerant
vaporizes and absorbs heat, cooling
the refrigerator and the freezer.
The heat, bound to the refrigerant, is
transferred into the surrounding air
via the condenser.
Any ice formed in the evaporator
melts automatically and melt water
will be lead into an evaporation dish
in the compressor space, where it
will evaporate automatically.
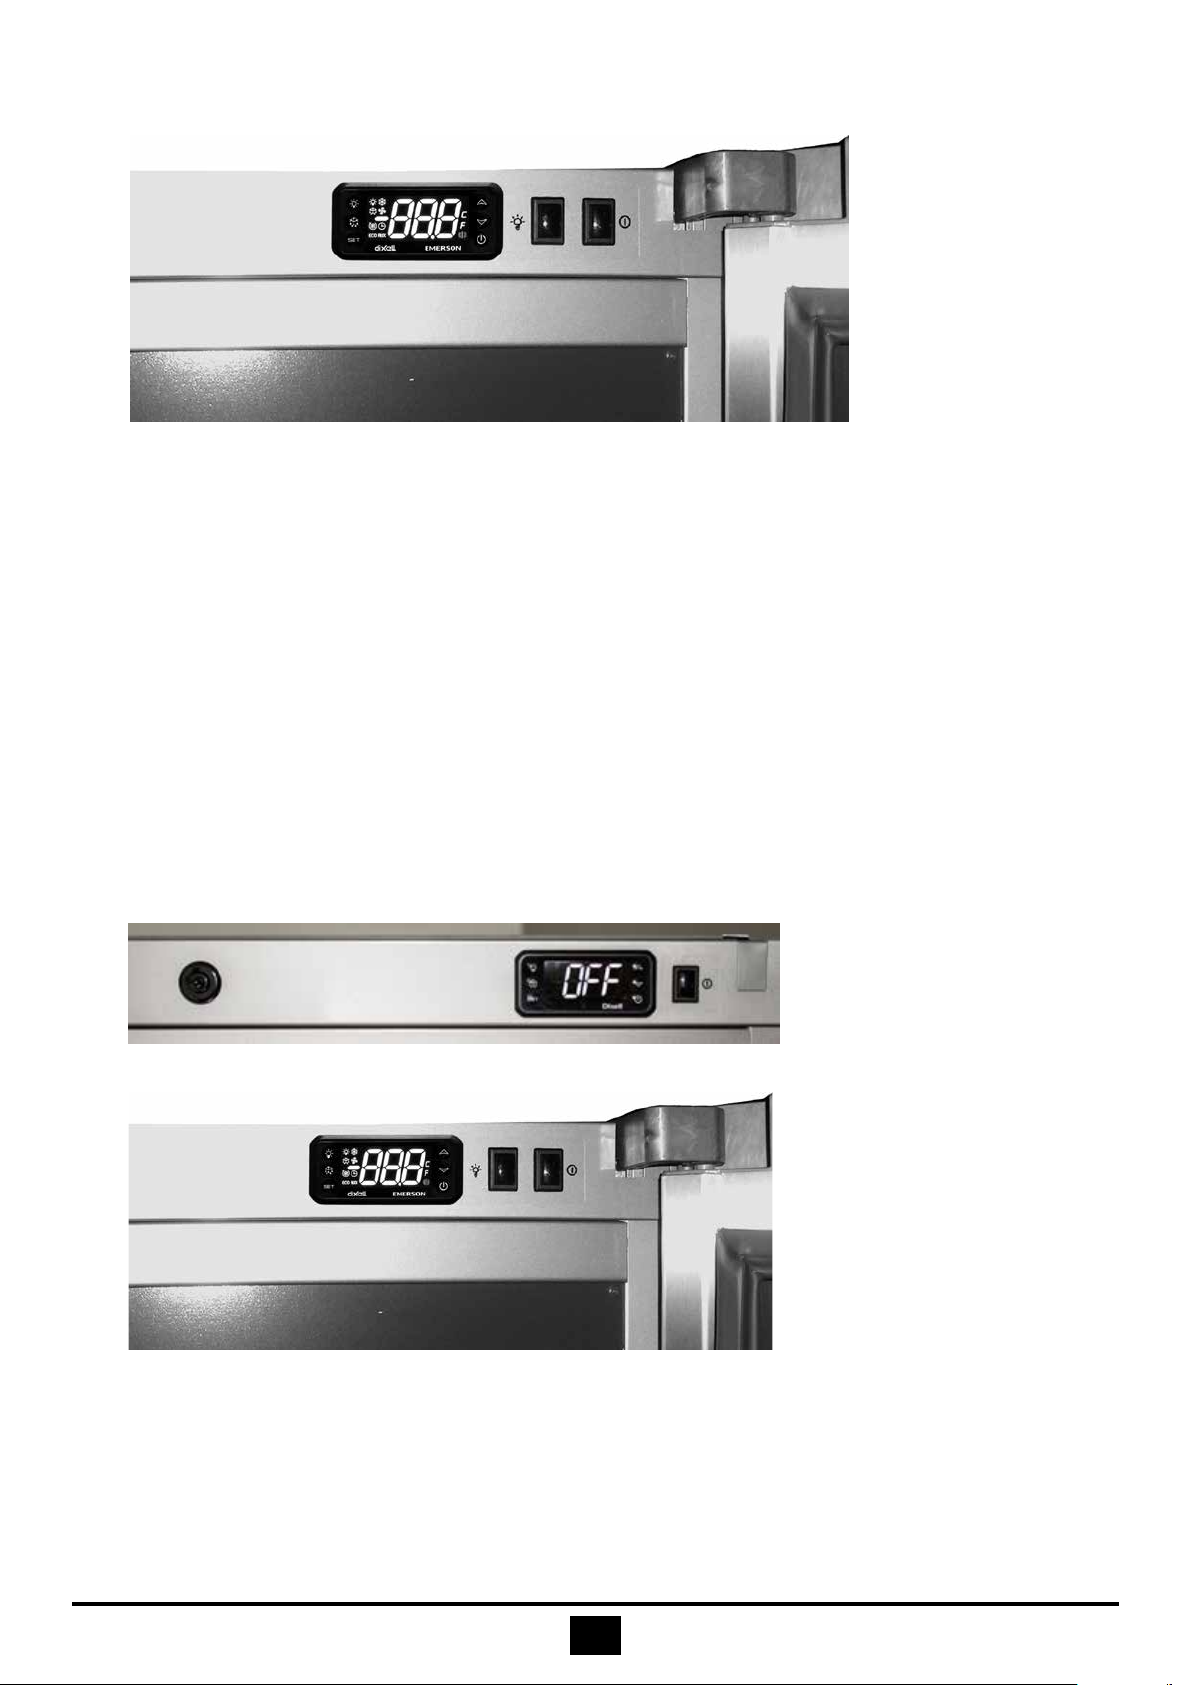
Switches and thermostats: refrigerator and freezer
The refrigerator CM and freezer FM have one temperature controller. Freezer cabinet CFM has two temperature
controllers; one for the refrigerator and the other for the freezer.
3 2 1
1. Main switch (switches the voltage for the appliance)
2. Temperature controller
3. Door switch
FM model ZERO drawer temperature has bee adjusted at the factory to as close as possible to zero degrees
Celsius. Temperature range is 0 ...+2 °C. The freezer has to be on for the ZERO drawer to cool.
Evaporator
Condenser
Compressor
Refrigerator, freezer Wine storage
appliance
Fan
Evaporator
Condenser
Compressor
15 EN
Switches and thermostats: wine storage appliance
1. Main switch (switches the voltage for the appliance)
2. Light switch
3. Cabinet temperature controller
Switching on
Do not start to use the appliance immediately after transportation or after it has been kept in a cold place, but let
it stand in its final location for a few hours so that the oil has time to flow down into the compressor.
Before using the appliance, clean its interior parts (see the chapter on “Cleaning”). Push the plug on the
connecting lead of the appliance into the electric socket.
Do not place food into the appliance before the temperatures in the refrigerator and freezer have reached their
set values.
At the factory, the main switch of the appliance (1) was left in the OFF position.
Tehtaalla laitteen pääkytkin (1) on jätetty OFF-asentoon.
Push the main switch (1) and then within 10 seconds the temperature of the refrigerator will appear on the
display.
Inside temperatures of the appliance can be monitored from the controller display.
1
Wine storage appliance
123
Refrigerator or freezer
1

16
EN
Switching off
1
Switch off the appliance using the main switch (1)
The appliance compressor can be switched off separately. Press display power button until the display
switches off.
Temperature adjustment: refrigerator and freezer
FACTORY SET RECOMMENDED TEMPERATURE VALUES
• refrigerator +5 °C
• freezer -18 °C
Temperature set-point can be shown by pressing the display button (refrigerator or freezer) in summary.
The display shows the temperature set to the controller.
Temperature for refrigerator can be set to range +2 to +7 °C.
Temperature for the freezer can be set to range -16 to -24 °C.
CHANGING THE TEMPERATURE
Press the display button approximately 3 seconds until the C-symbol begins to flash. Select
the desired temperature with the arrow keys and .
Arrow up raises the temperature and arrow down lowers it.
The display returns to show the interior temperature.

17 EN
Button lock and unlock
• Press simultaneously buttons and at least for three seconds. The text ‘PoF’ will display
when the keys are locked. If the keyboard is locked it is impossible to adjust the temperature or
switch of the power of the unit.
• Press simultaneously buttons and at least for three seconds. The text ‘Pon’ will display
when the keys are unlocked.
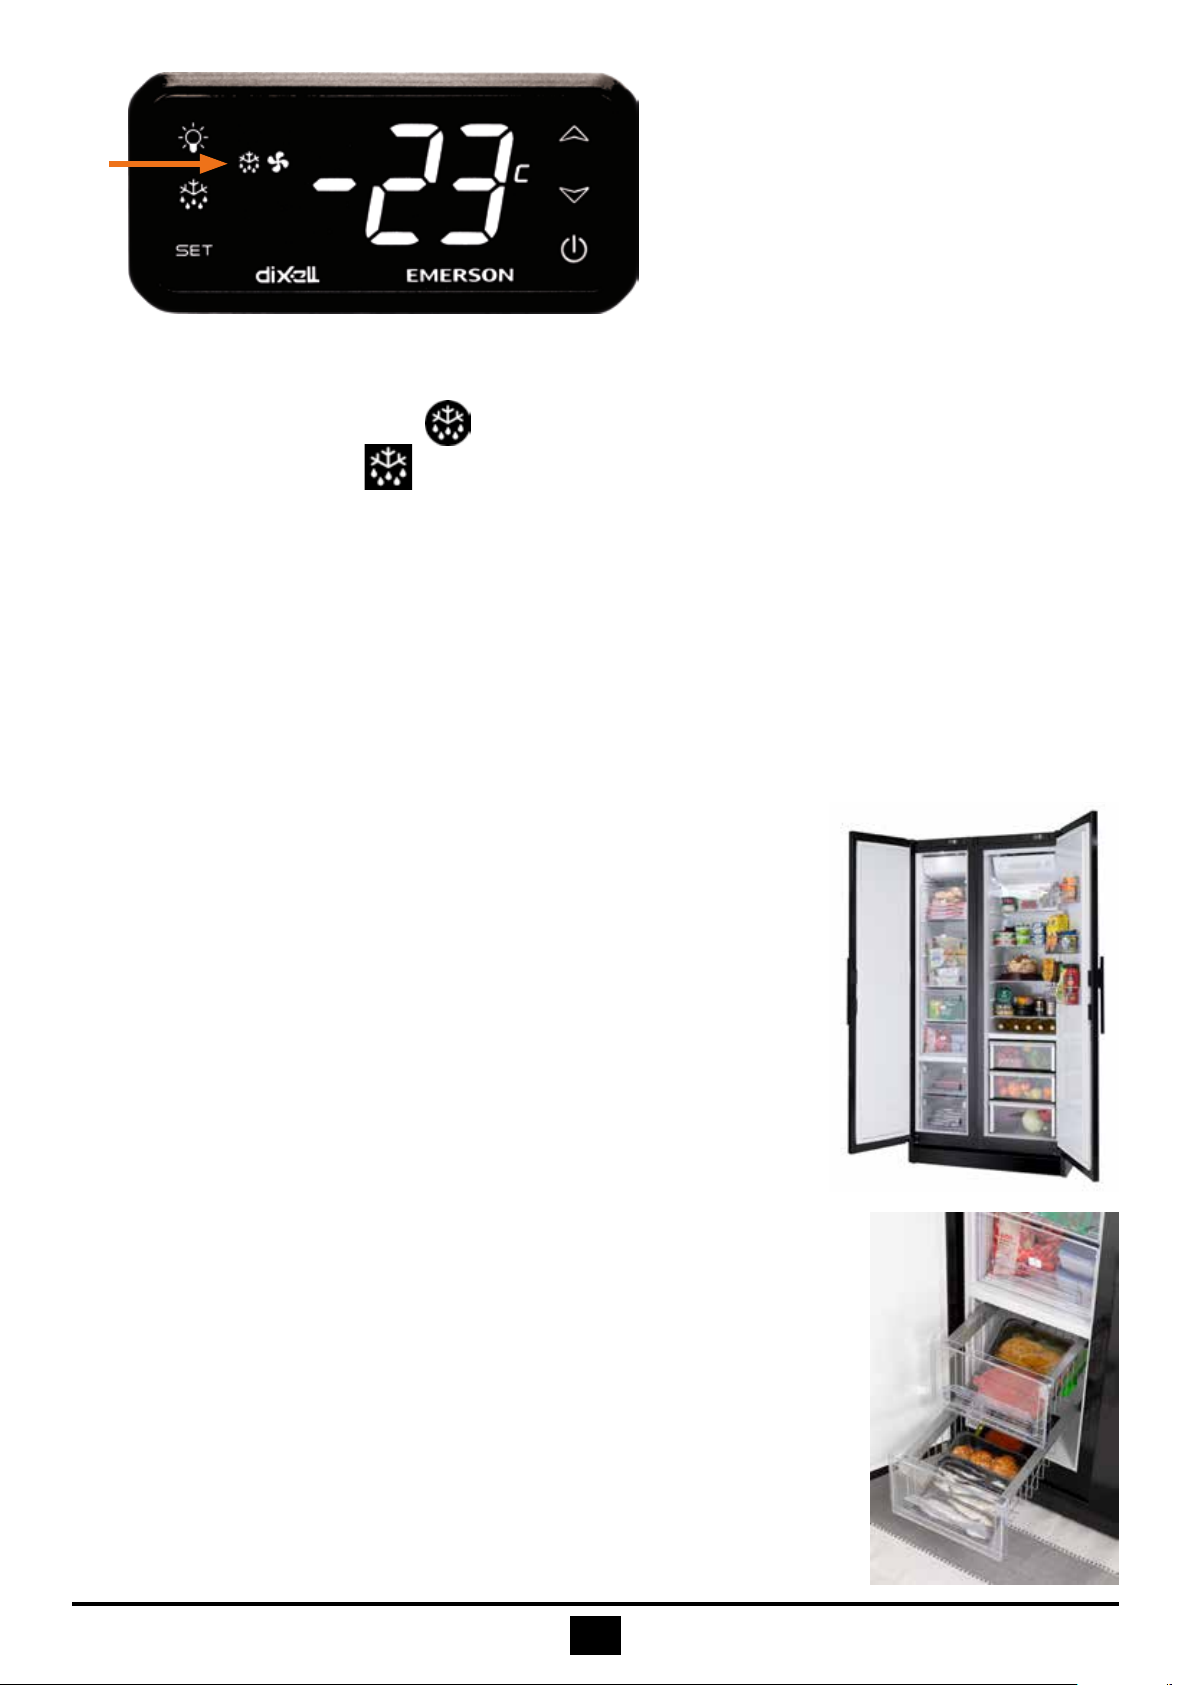
Freezing
Activate the freezing function six hours before putting goods into the freezer. This function is used when amounts
of goods larger than 2 kg are being frozen (see the chapter on “Freezing”). After six hours the temperature
returns to the set value without requiring any other action.
Setting the freezing:
Press the freezer’s temperature arrow button for approximately three seconds, until the freezing function
starts. On the display appears an indicator light for freezing .
Temperature adjustment: wine storage appliance
CABINET TOP PART TEMPERATURE
Cabinet top part temperature has been set at the factory to +13 °C and the display will normally indicate the
temperature at the top part.
You can CHECK top part set-point temperature by pressing the button briefly.
You can CHANGE the top part temperature set-point in the range between +9...+18 °C. Press the button
until °C symbol starts flashing. Select the desired temperature with the arrow keys
and . Arrow UP raises the temperature and arrow DOWN lowers it. The desired temperature
saves automatically and no separate checking out is required.The display returns to show the cabinet top part
temperature.

18
EN
CABINET LOWER PART TEMPERATURE (ONLY VLM 45)
The temperature in the cabinet’s lower part cannot be adjusted
separately with the temperature controller but the temperature
of the lower part will be adjusted by plastic adjustment sheets (A)
under the shelve.
The adjustment sheets you can adjust the temperature difference between
the top and lower parts at a maximum of approx. 5°C.
If the lower part temperature is too low you pull the adjustment sheet
slightly outward. If the temperature is too high, the sheet will be pushed
backward.The purpose of the adjustment sheet is to restrict or expand the
air circulation in the wine storage appliance.
After adjusting the temperature, it needs to stabilize for approximately 24 h,
where after the lower part temperature can be readjusted.
The temperature display of the appliance shows normally the temperature of the cabinet’s top part.
Lower part temperature can be displayed by pressing simultaneously the buttons and
for approximately 3 seconds until the text dP3 appears in the display. Then
press the button again and the wine storage appliance’s lower part
temperature will be displayed.The controller returns to normal after 15
seconds.
Note!
The air circulation inside is influenced by the wine storage appliance’s
filling level, which is at it’s maximum 70 normal size wine bottles.
Recommended temperature:
• Top part, white wine +9...+14 °C
• Lower part, red wine +14...+18 °C
A

19 EN
Normal sounds of the appliance
The appliance acquires its coldness from the compressor operated cooling system.The system makes sounds
of varying levels and they can increase especially during the defrosting phase. The volume of the noise is also
affected i.e. by the materials in the environment where it is placed (e.g. stone floors), the manner of positioning
the appliance, the way it is used and its age.
Resonance noise may be produced if the appliance is not completely straight, or if parts of the pipe system are
touching one another. The pipes can be bent apart carefully by hand.
It may be possible to hear noises generated by the thermal expansion of metal parts of different sizes, following
the start or stopping of the operation of the unit.
COOLING SYSTEM
When the refrigerant flows through the pipelines one may hear hissing or bubbling noises. During the defrosting
phase a cracking sound can be heard.
During the defrost cycle of the freezer, the sound of the refrigeration equipment is louder than normal and the
defrost valve clicks at the beginning and end of the defrost cycle.
THERMOSTAT
The compressor is started and stopped by a thermostat. When the thermostat switches on, it makes a low
cracking sound.The compressor is required to run more frequently if the doors are opened more often.
COMPRESSOR
When the refrigerant is being pumped, a droning or “snoring” noise is heard from the compressor motor and the
pump.
INDOOR FAN (FREEZER AND WINE CABINET)
The fan of the device keeps a steady low hum.
FREEZER DEFROST VALVE
When connected, the defrost valve makes a sharp click.
Automatic defrosting
Both the refrigeration and the freezer have an automatic defrosting function, which can be switched on as
required.
Refrigerator:
During defrosting the temperature of the refrigerator may temporarily rise by a couple of degrees. The
temperature always returns to the set value when defrosting is complete.
Freezer:
In the freezer the temperature may temporarily rise during energy-efficient defrosting.
20
EN
Defrosting can be activated manually if the temperature has begun to rise.
Press the manual defrost button for a couple of seconds to activate defrosting. During defrosting the
defrost indicator is shown and the display shows
DEF. Defrosting takes a couple of minutes. The temperature always returns to the set value when defrosting is
complete.
Storing goods
COLD STORAGE (CM AND CFM MODELS)
The factory setting of the refrigerator inside temperature has been set to +5 °C. The temperature may vary by
several degrees from the set value in different parts of the refrigerator. The relative air humidity in the cabinet is
about 70-90%.
Note!
In damp weather, water may condense on the surface of the drip-
water trough or on the inside wall. This may be remedied if the cabinet
temperature is adjusted to be a few degrees colder.
Juices and preserves can also be stored in the cooling cabinet for long periods of
time. Foodstuffs for day-to-day use will normally keep for a few days. Vegetables
keep best in the vegetable drawer.
FRESH STORAGE IN NOLLA DRAWER (FM AND CFM MODELS)
The temperature of the NOLLA drawer continually stays close to 0 ºC. The low
temperature ensures that fresh foodstuffs will keep well. These foods are fresh
meat, fish and leftovers. Foodstuffs that are sensitive to cold are not suitable for
keeping in the fresh storage compartment.These include vegetables and fruit that
contain a lot of water, e.g. potatoes, cucumber, marrow, pumpkin, bananas and
tomatoes.
Note!
NOLLA drawer is meant for storing already cooled foods, not for cooling
them down.
This manual suits for next models
3
Table of contents
Other Festivo Refrigerator manuals


