Fiammetta MOMENTUM HS-18MA9401 Quick reference guide

1
ASSEMBLY & OPERATING INSTRUCTIONS
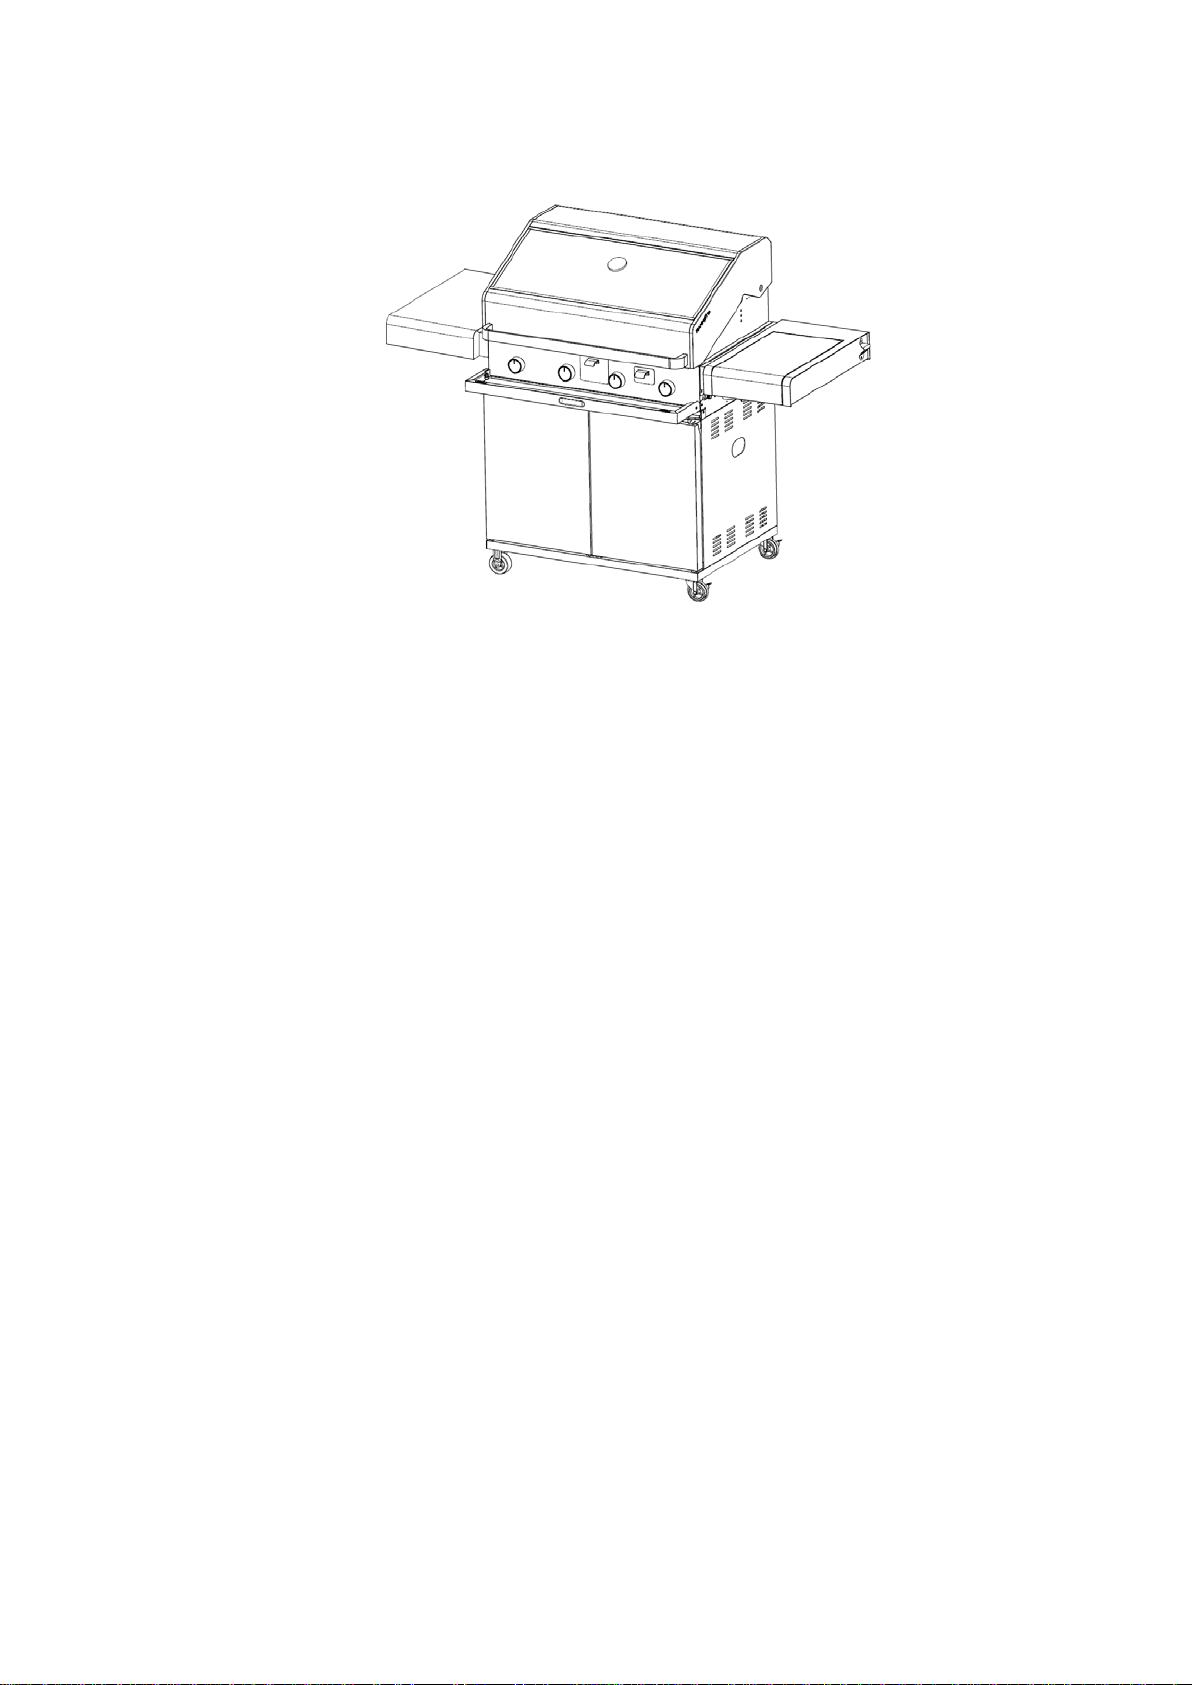
MOMENTUM 4 BURNER WITH WOK SIDE BURNER
Model: HS-18MA9401
Handy Hints
•Ensure your BBQ is level before use so excess fat and oil can
freely flow to the oil cup in the front of the BBQ.
•If food debris falls into the valleys of the cooking grill and prevents
flow to the oil cup, use the supplied Scraper Tool to quickly clear
the valleys.
•Preheat the grill before cooking for perfect sear marks every time.
•Always keep a spare LPG cylinder filled and ready to go.
•Use BBQ wipes to wipe down the shiny black ceramic coated
panels inside the BBQ before cooking. The flat black panels inside
the BBQ are Pyrolytic self-cleaning panels and they don’t require
wiping.
•Always keep the solid plate on the right, directly above the
smoker/flavor tray to ensure the smoker/flavor tray is always free of
fat and grease residue.

2
IMPORTANT SAFETY WARNINGS
FOR OUTDOOR USE ONLY
1. DO NOT OPERATE THIS APPLIANCE BEFORE READING THE INSTRUCTION
BOOKLET.
2. DO NOT PLACE ARTICLES ON OR AGAINST THIS APPLIANCE.
3. DO NOT STORE CHEMICALS OR FLAMMABLE MATERIALS OR SPRAYAEROSOLS
NEAR THIS APPLIANCE.
4. DO NOT OPERATE THIS APPLIANCE INDOORS.
5. DO NOT ENCLOSE THIS APPLIANCE.
6. DO NOT LIGHT OR OPERATE WITH COVER ON.
7. Servicing can only be carried out by authorised technicians or licensed gas fitters.
8. Conduct a thorough gas leak check every time the cylinder is replaced or reconnected.
9. Do not store chemicals or flammable materials near this appliance.
10. Children must be supervised at all times while they are in the vicinity of this BBQ to prevent
burn injuries and to ensure they do not attempt to use the BBQ.
11. In case of a fat fire, immediately isolate the gas supply - turn the LPG cylinder valve off.
12. Allow the BBQ to cool before removing the drip tray. Hot fat can cause serious injury.
13. This BBQ should not be located under overhead combustible construction.
14. Maintain the following minimum clearances to combustibles at all times:
From Sides 200 mm
From Back 500 mm
Overhead 1000 mm
15. Turn all gas valves off including the LPG cylinder valve after use.
16. Never leave burners on high for more than 10 minutes unless actually cooking. If the burner
makes a loud roaring sound when lit, it may be burning inside. If this occurs, turn the burner
off, allow it to cool and light it again.
17. Do not delay ignition and allow a buildup of unburned gas.
18. Remove stickers (where fitted) from hood before use.
19. Do not store a spare LPG cylinder in the cabinet or in the vicinity of the BBQ.
A strong gas smell or the hissing sound of gas indicates a serious problem with your
BBQ or the LPG gas cylinder. Failure to immediately follow the steps listed below could
cause serious bodily injury, death, or property damage.
Shut off the LPG cylinder valve.
Turn the control knobs to OFF position.
Put out any flame with a class B fire extinguisher and clear the area of people.
Move away from the LPG gas cylinder.
Do not try to fix the problem yourself.
If odour continues or you have a fire you cannot extinguish, call the fire department immediately.
3

4
General Information
Improper installation, adjustment, alteration, service or maintenance can cause property
damage, injury or death. Read the installation, operating and maintenance instructions
thoroughly before installing or servicing this equipment
Strong winds and low temperatures can affect the heating and performance of your BBQ so
factor in these elements when positioning your BBQ outdoors for cooking.
Never use your BBQ in a garage, porch, shed, breezeway or any other enclosed area. Your
BBQ is to be used outdoors only,. Do not obstruct the flow of ventilation air around the BBQ.
This BBQ is not intended to be installed in or on recreational vehicles and/or boats..
Warning: accessible parts may be very hot. Keep young children away.
Do not move the appliance during use.
Any modification of the appliance may be dangerous.
Do not replace the grill with an extra hotplate. The warranty will become null and void.
NOTE: The normal flow of gas through the Regulator and Hose Assembly can create a
humming sound. A low volume of sound is perfectly normal and will not interfere with
operation of the BBQ. If humming sound is loud and excessive you may need to purge air
from the gas line.
Do not store gas cylinders below ground level. LP gas is heavier than air so if a leak occurs
the gas will collect at a low level and could ignite in the presence of a flame or spark.
You must have the correct gas cylinder, regulator and hose for this BBQ to operate safely
and efficiently. Use of an incorrect gas cylinder, regulator or hose is dangerous and will void
the warranty on this product.

5
Exploded View
5
1
28 4
14
10
18
20
15
2
37
8
26
24
23
17
13
11
22
16
30
21
12
29
6
27
25 9
19
6
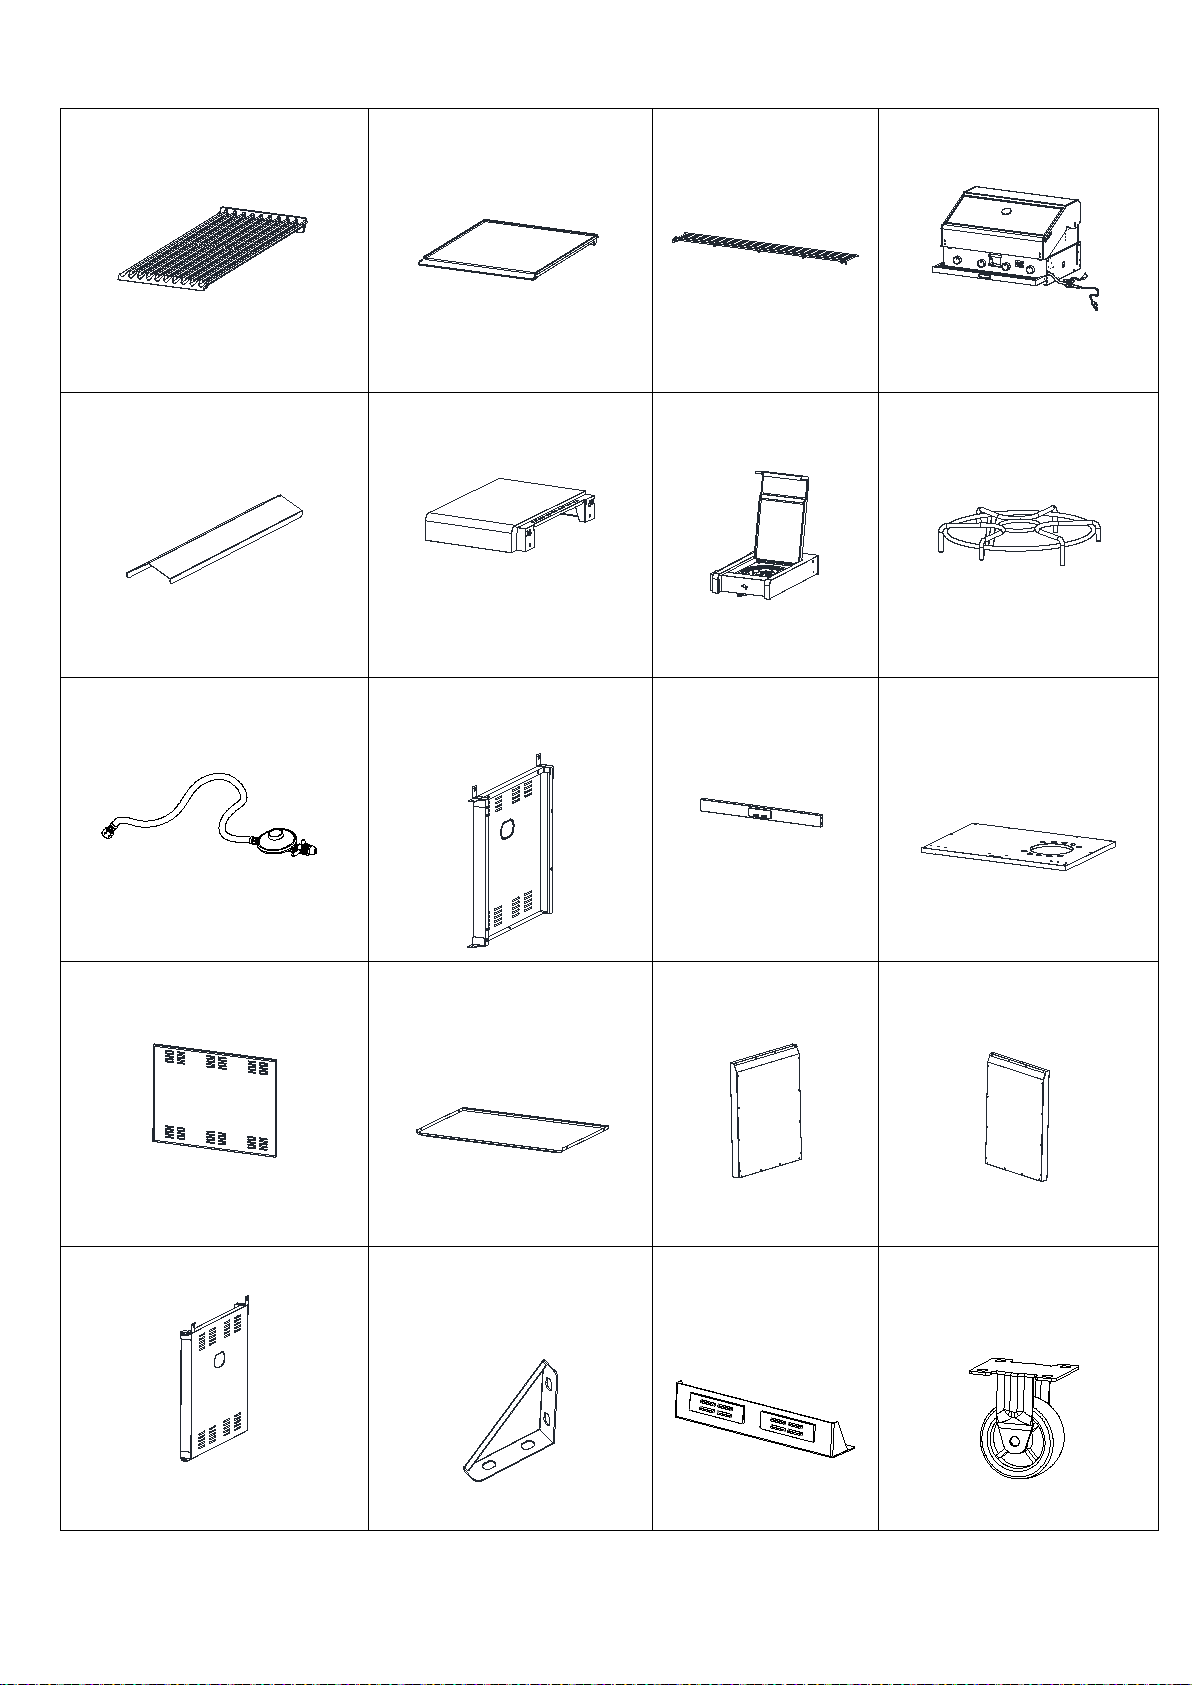
Parts List
1 Cooking grill x 2
2 Hotplate
3 Warming rack
4 Firebox
5 Flame tamer x 2
6 Left side table
7 Right side table
8 Side burner trivet
9 Regulator & hose
10 Left side panel of
cabinet
11 Crossbeam
12 Bottom panel of
cabinet
13 Back panel of cabinet
14 Separation panel of
cabinet
15 Left side door
16 Right side door
17 Right side panel of cabinet
18 Side panel support of
cabinet x2
19 Door magnet
panel
20 Castor without lock x
2
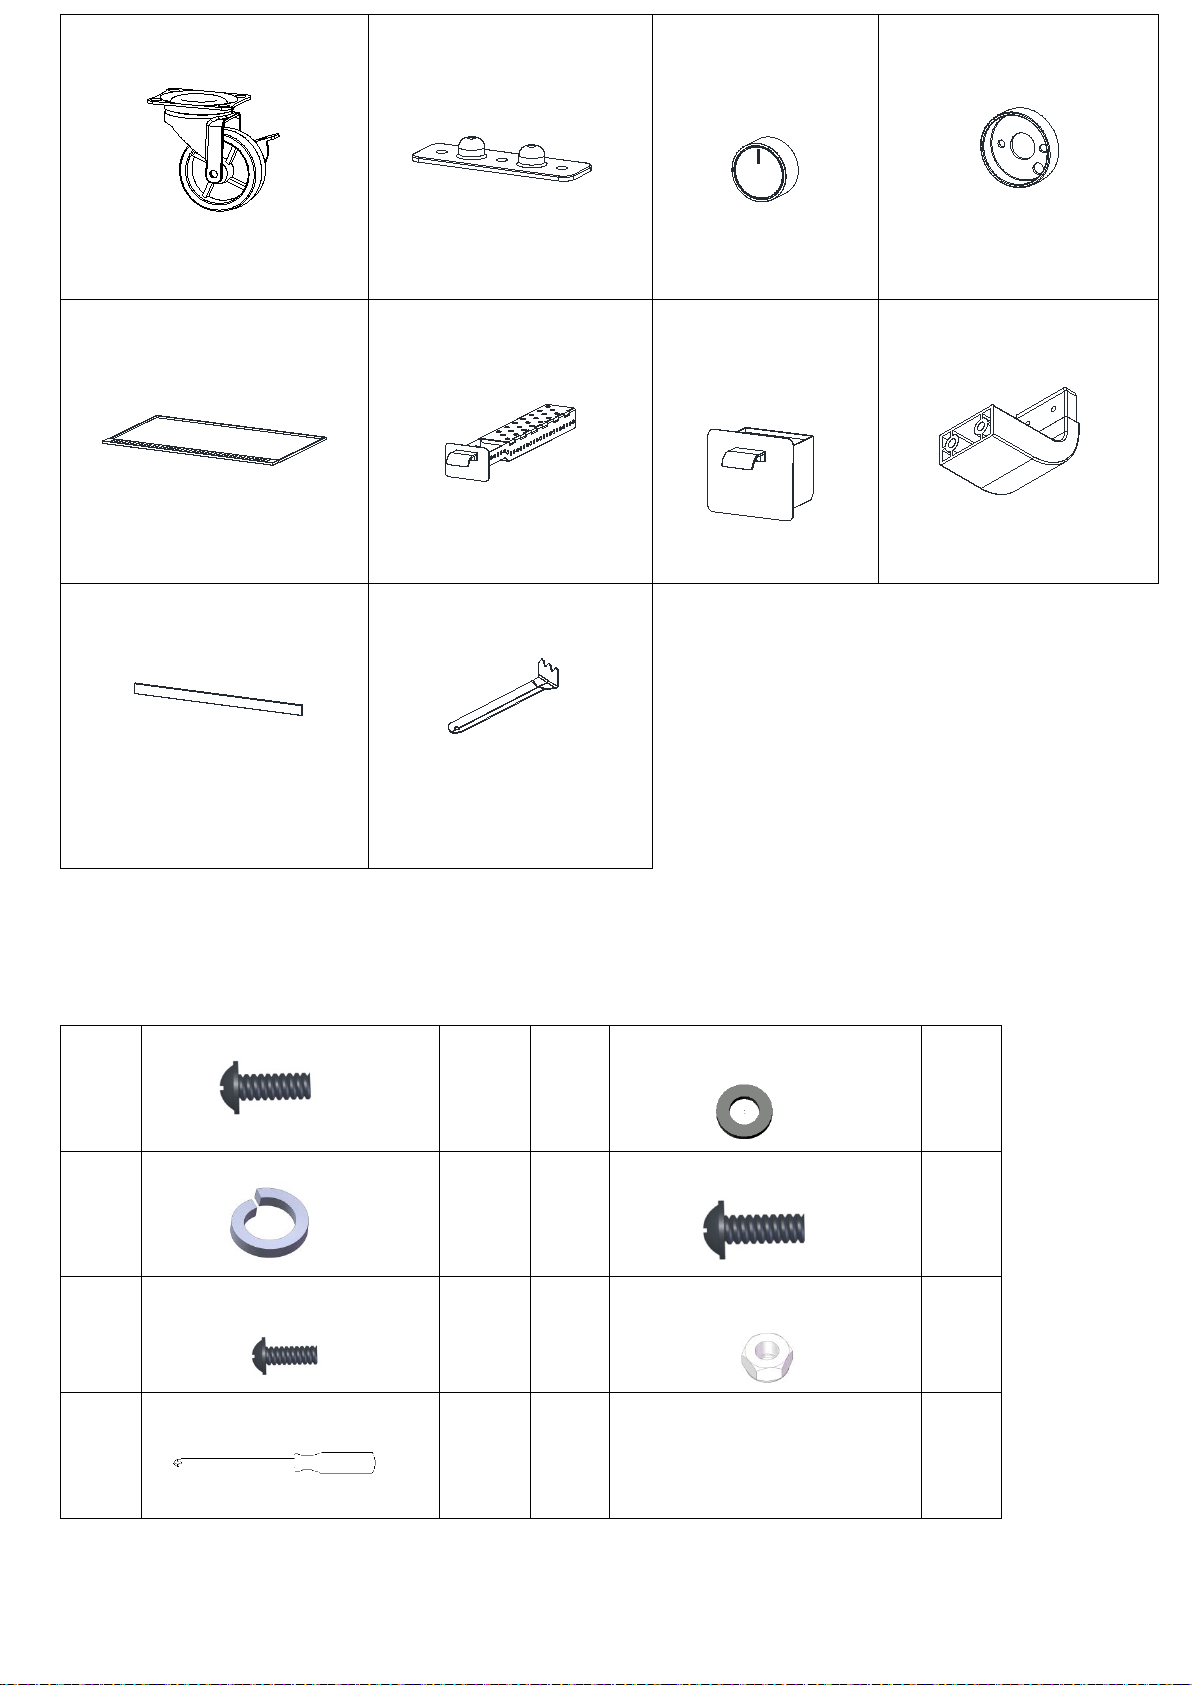
7
21 Castor with lock x2
22
Plastic backing board
23 Control knob
24 Control knob seat
25 Grease tray
26 Smoker Tray
27 Grease Cup
28 Handle seat x 2
29 Handle tube
30 Scraper Tool
Hardware Pack
A
Screw:M6*12
60 B
Washer:M6
16
C
Spring washers:M6
16 D
Screw:M5*10
2
E
Screw:M10*8
5 F M4 Nut
3
G
Screwdriver
1
8
Assembly Steps
Remove all packaging and transit protection materials from parts before assembly.
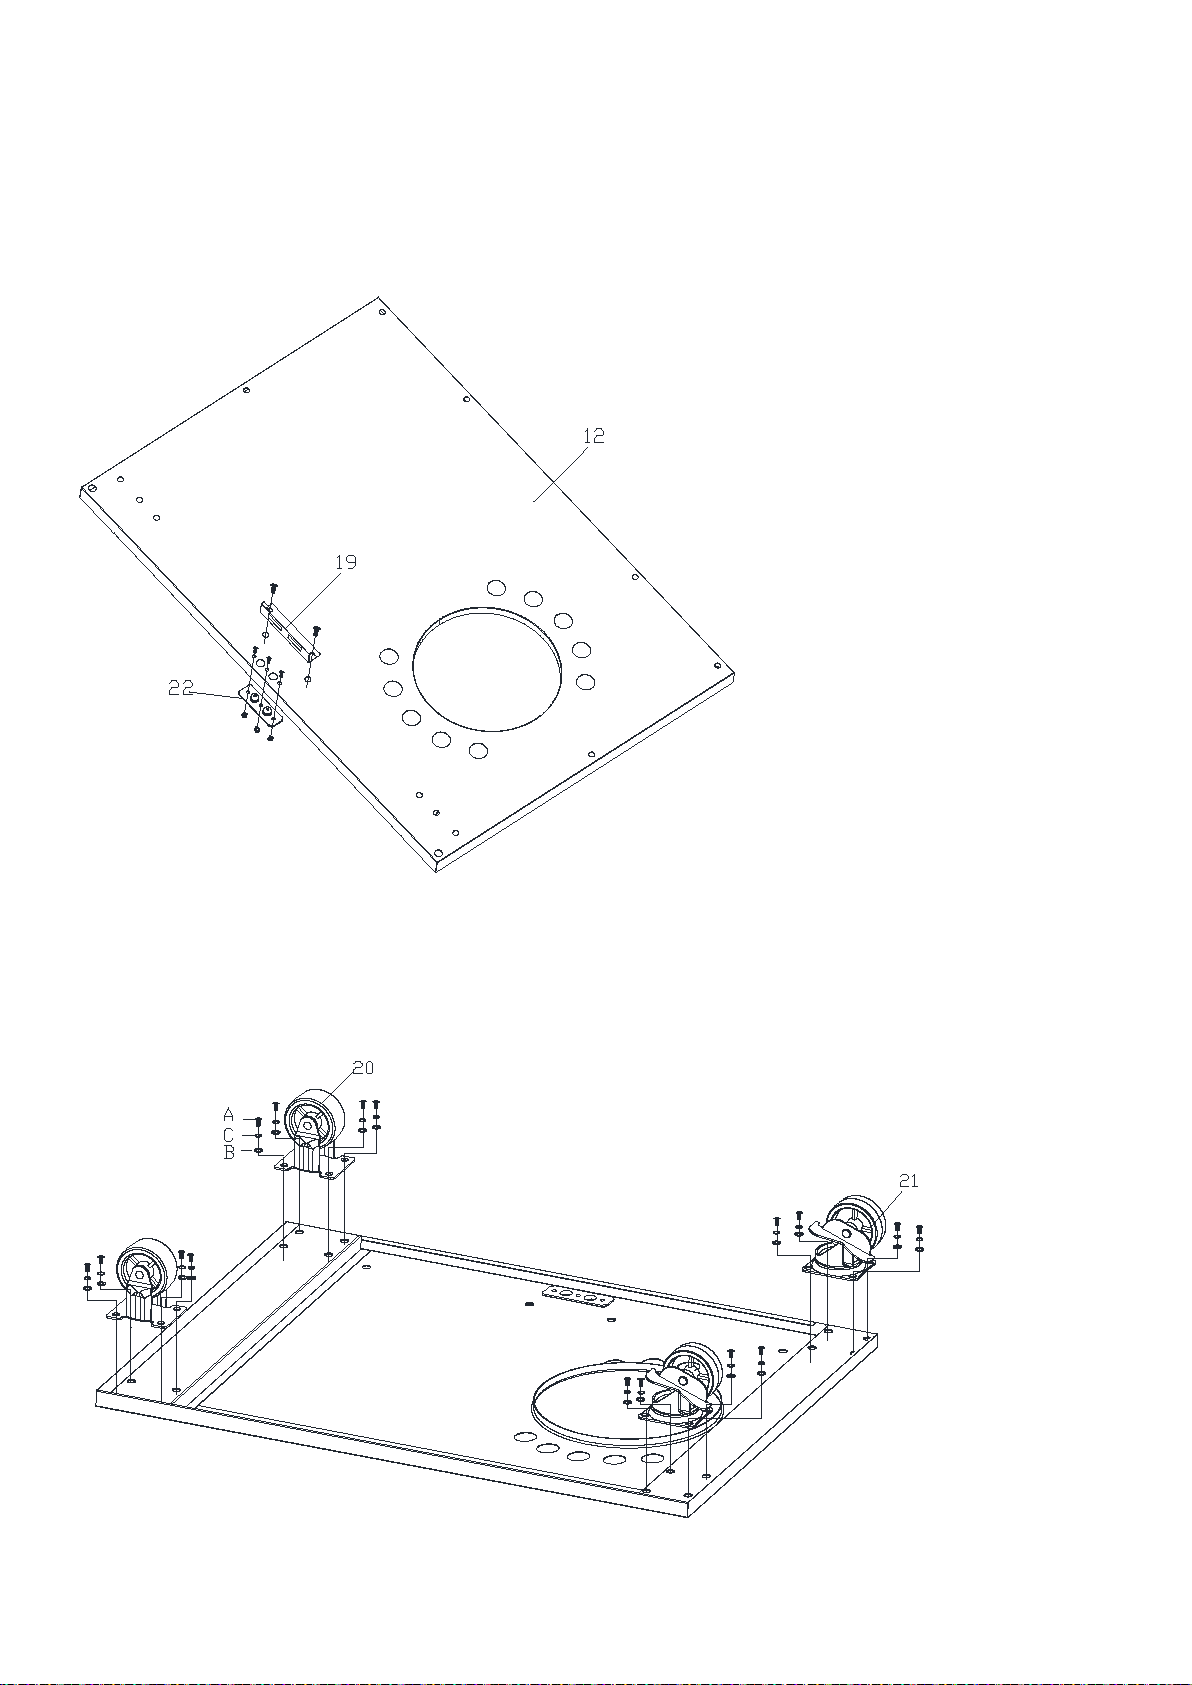
STEP 1
Assemble the door magnet panel (19) on the bottom panel of cabinet (12) by screw(A)2pcs as shown.
Assemble the plastic backing board (22) on the bottom panel of cabinet (12) by screw (E) 3pcs and Nut (F) 3pcs as
shown.
STEP 2
Assemble the castor without lock (20) and castor with lock (21) on the bottom panel of cabinet (12) by screw(A),
spring washer (C), washer (B) each 16pcs as shown.
9
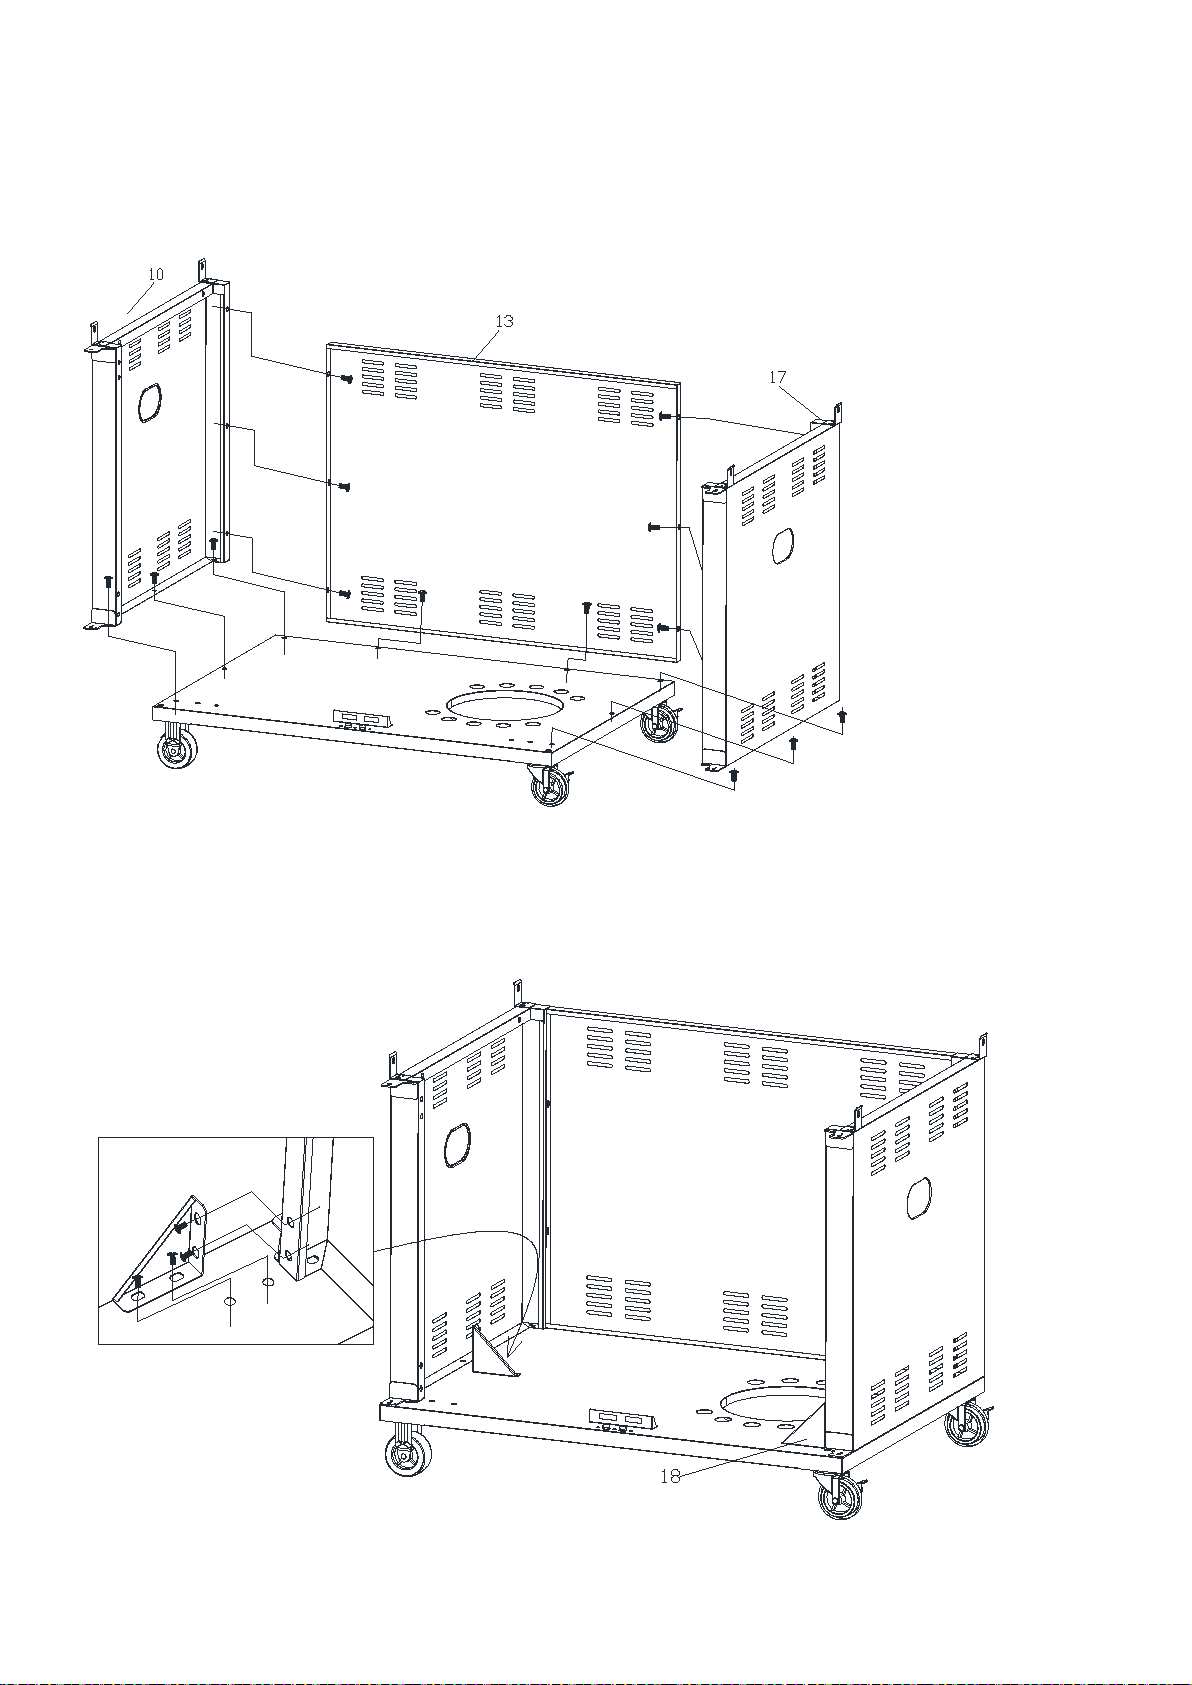
STEP 3
Assemble left side panel of cabinet (10), back panel of cabinet (13) and right side panel of cabinet (17) on the bottom
panel of cabinet (12) by screw (A) 14pcs as shown.
STEP 4
Assemble the side panel support of cabinet (18) on the bottom panel of cabinet (12) by screw (A) 8pcs as shown.
10
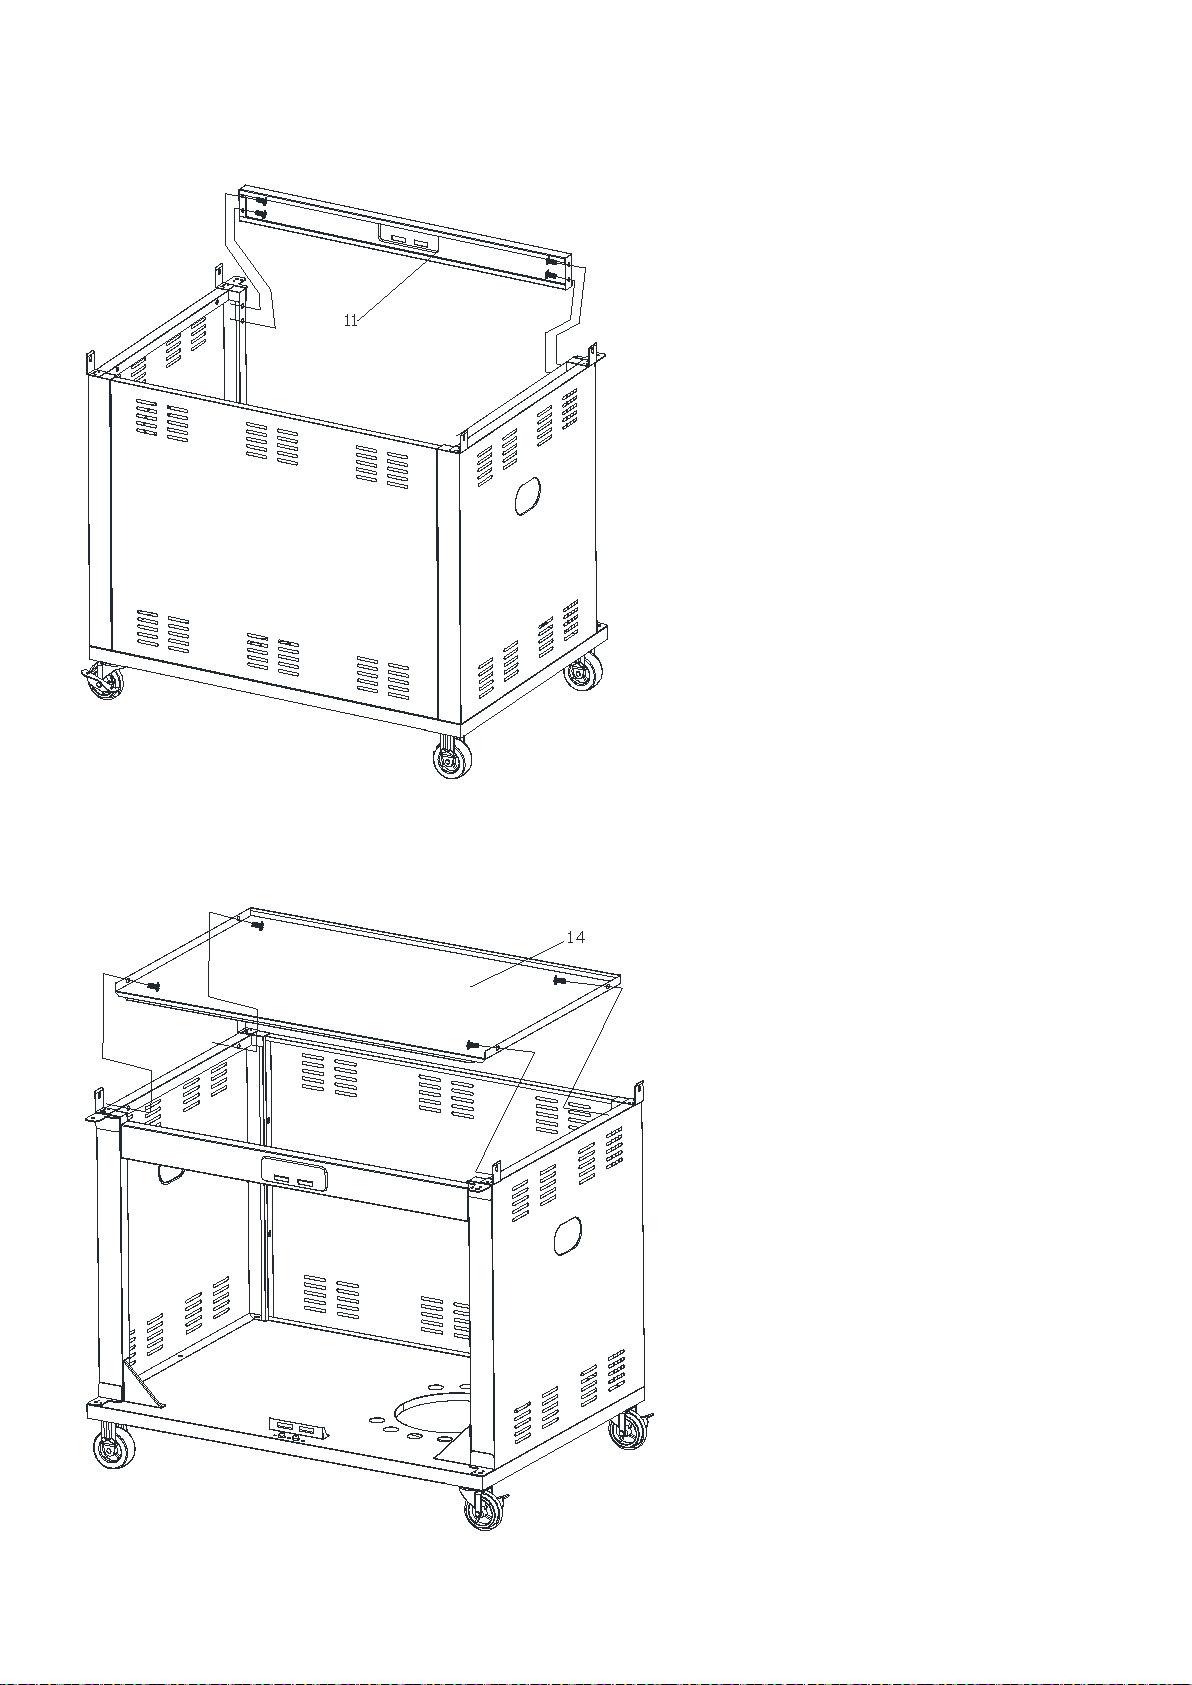
STEP 5
Assemble crossbeam (11) on the cabinet by screw(A)4pcs as shown.
STEP 6
Assemble separation panel of cabinet (14) on the cabinet by screw (A) 4pcs as shown.
11
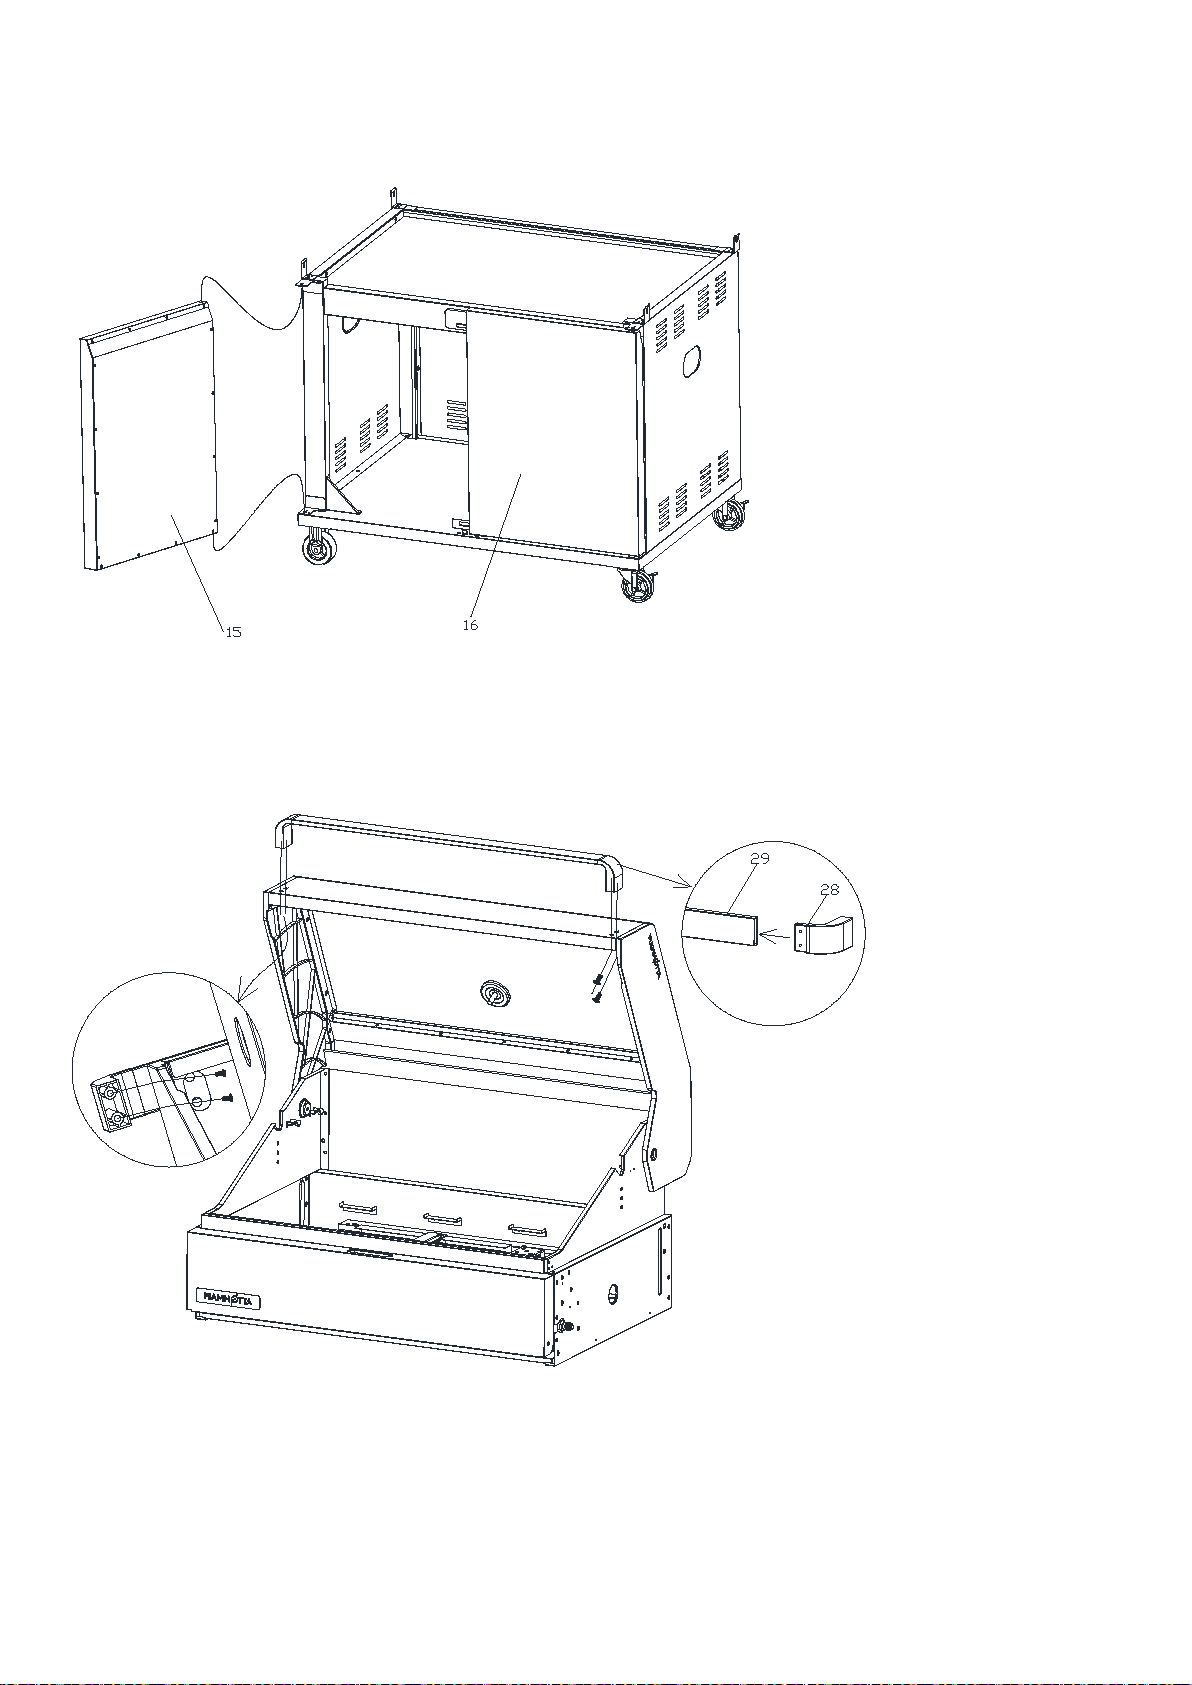
STEP 7
Assemble the left side door (15) and right side door (16) on the cabinet as shown.
STEP 8
Assemble the handle tube (29) and handle seat (28) as shown in photo A. Assemble the complete handle on the
hood by screw (A) 4pcs as shown in photo B.
A
B

12
STEP 9
Assemble the firebox (4) on the cabinet by screw (A) 4pcs as shown.
STEP 10
Assemble the left side table (6) and the right side table (7) on the firebox by screw (A) 8pcs as shown.
Note: 8pcs screws already in position on firebox sides.

13
STEP 11
Assemble control knob seat (24) on the side valve by screw (E) 2pcs as shown, put the control knob (23) on the
valve bar as shown.

14
STEP 12
Assemble the injector bracket by screw (D) 2pcs as photo A and B shown.
A
B
15
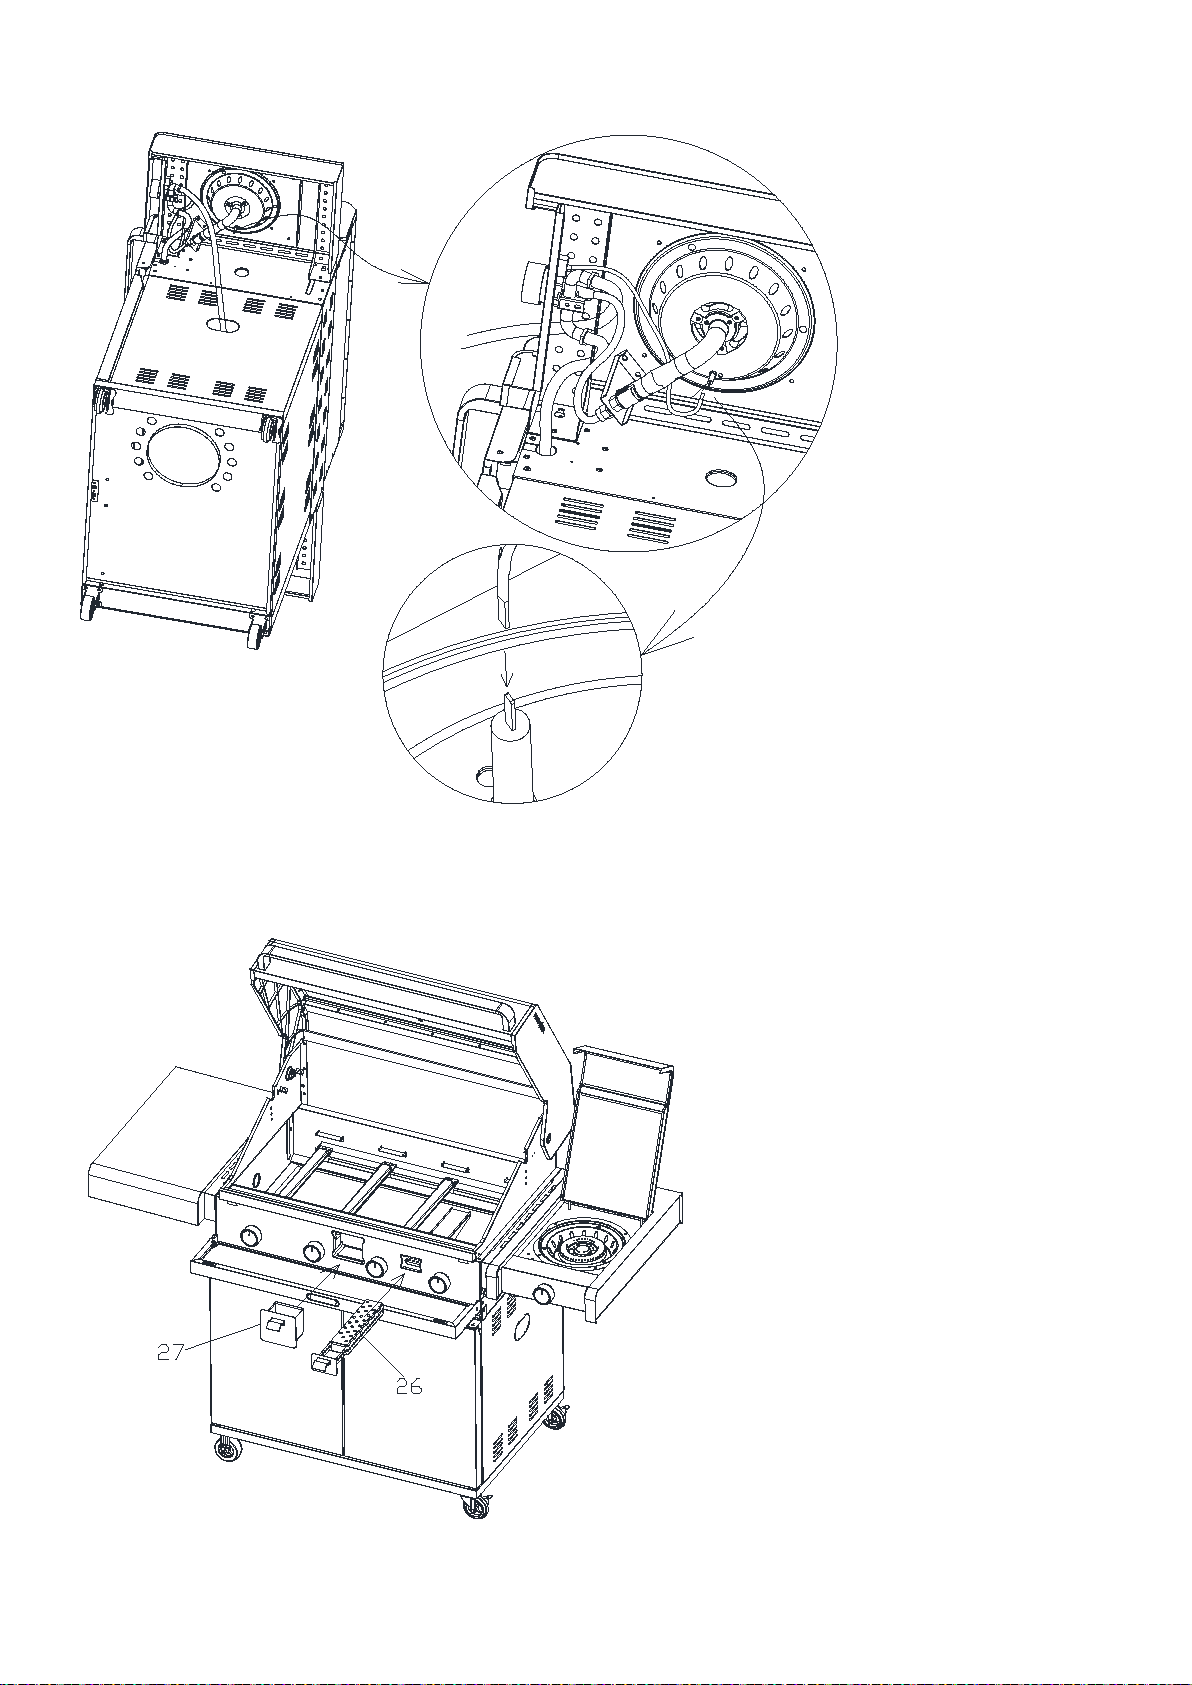
STEP 13
Insert the ignition wire as shown.
STEP 14
Insert grease cup (27) and smoker tray (26) on the control panel as shown.

16
STEP 15
Insert the flame tamer (5) on the firebox as shown.
Step16
Insert the cooking grill (1) and hotplate (2) on the firebox as shown.
17
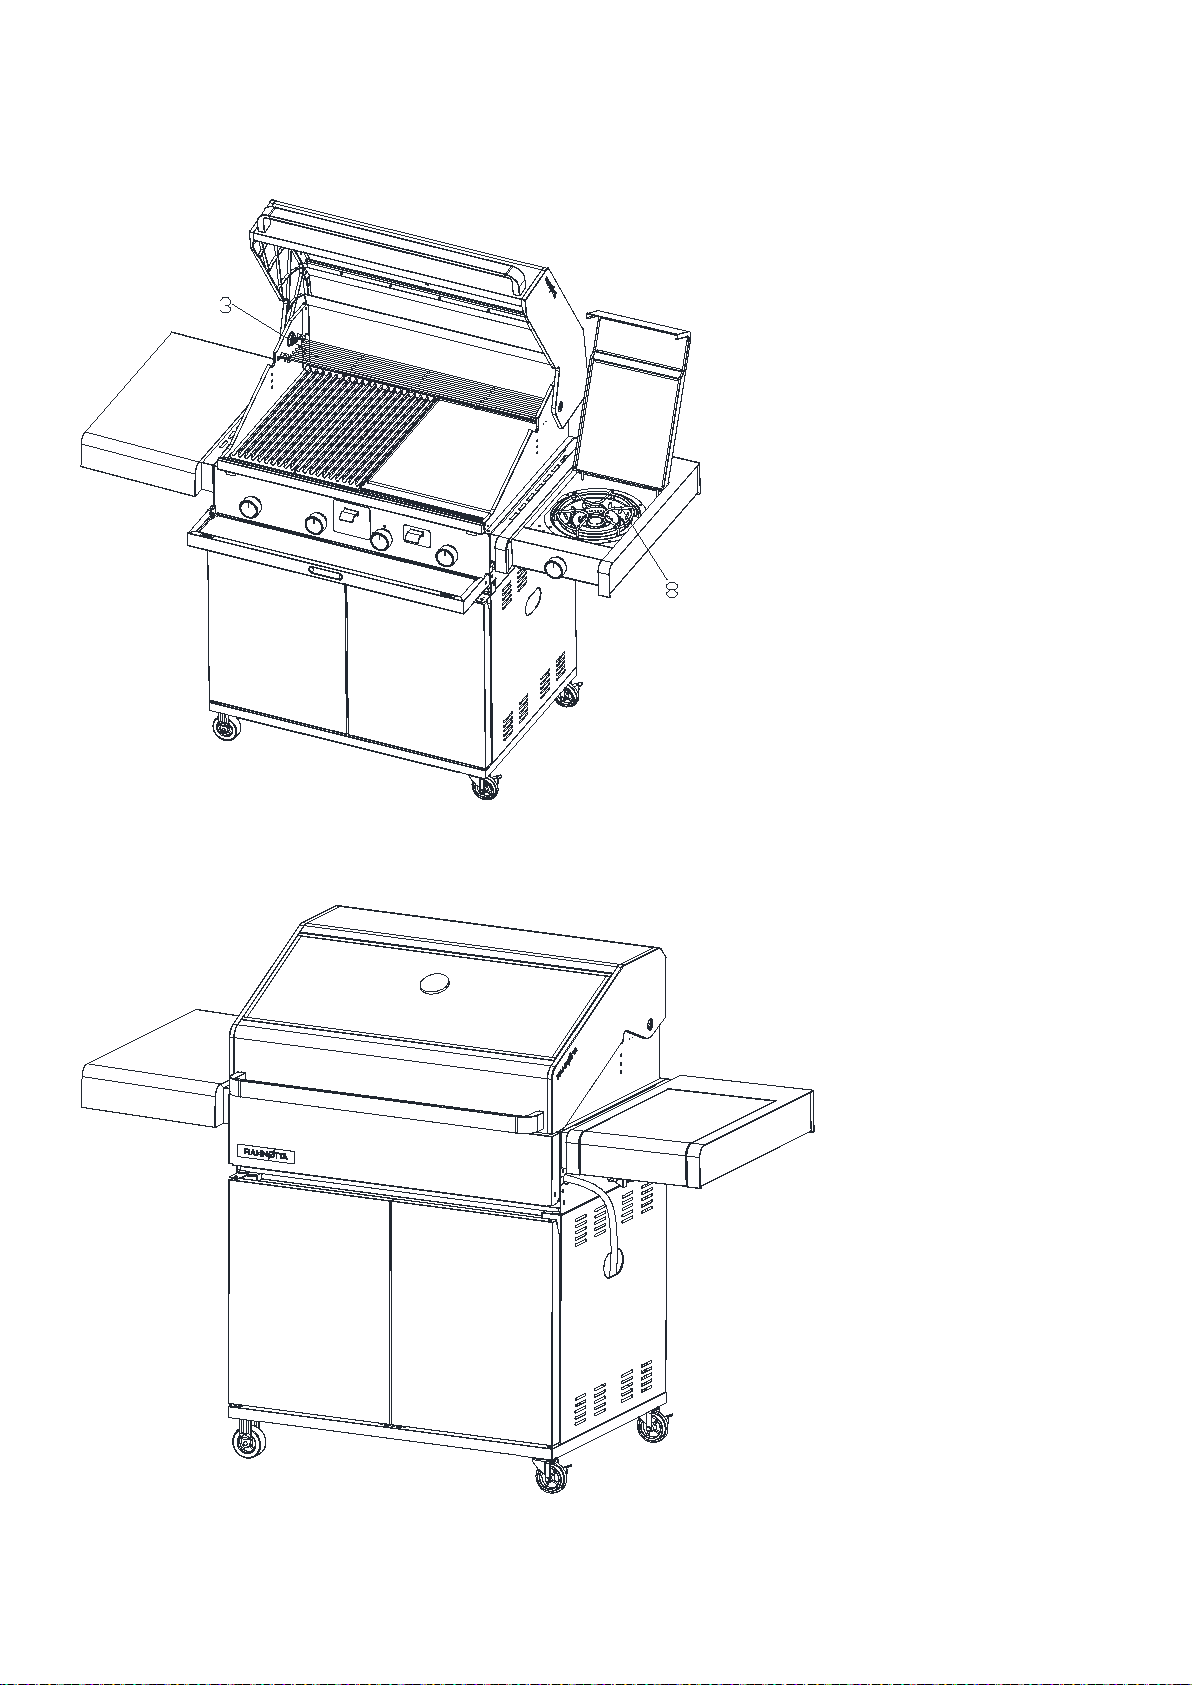
Step17
Insert the warming rack (3) on the firebox and side burner trivet (8) on the side burner as shown.
Fully assembled BBQ
18
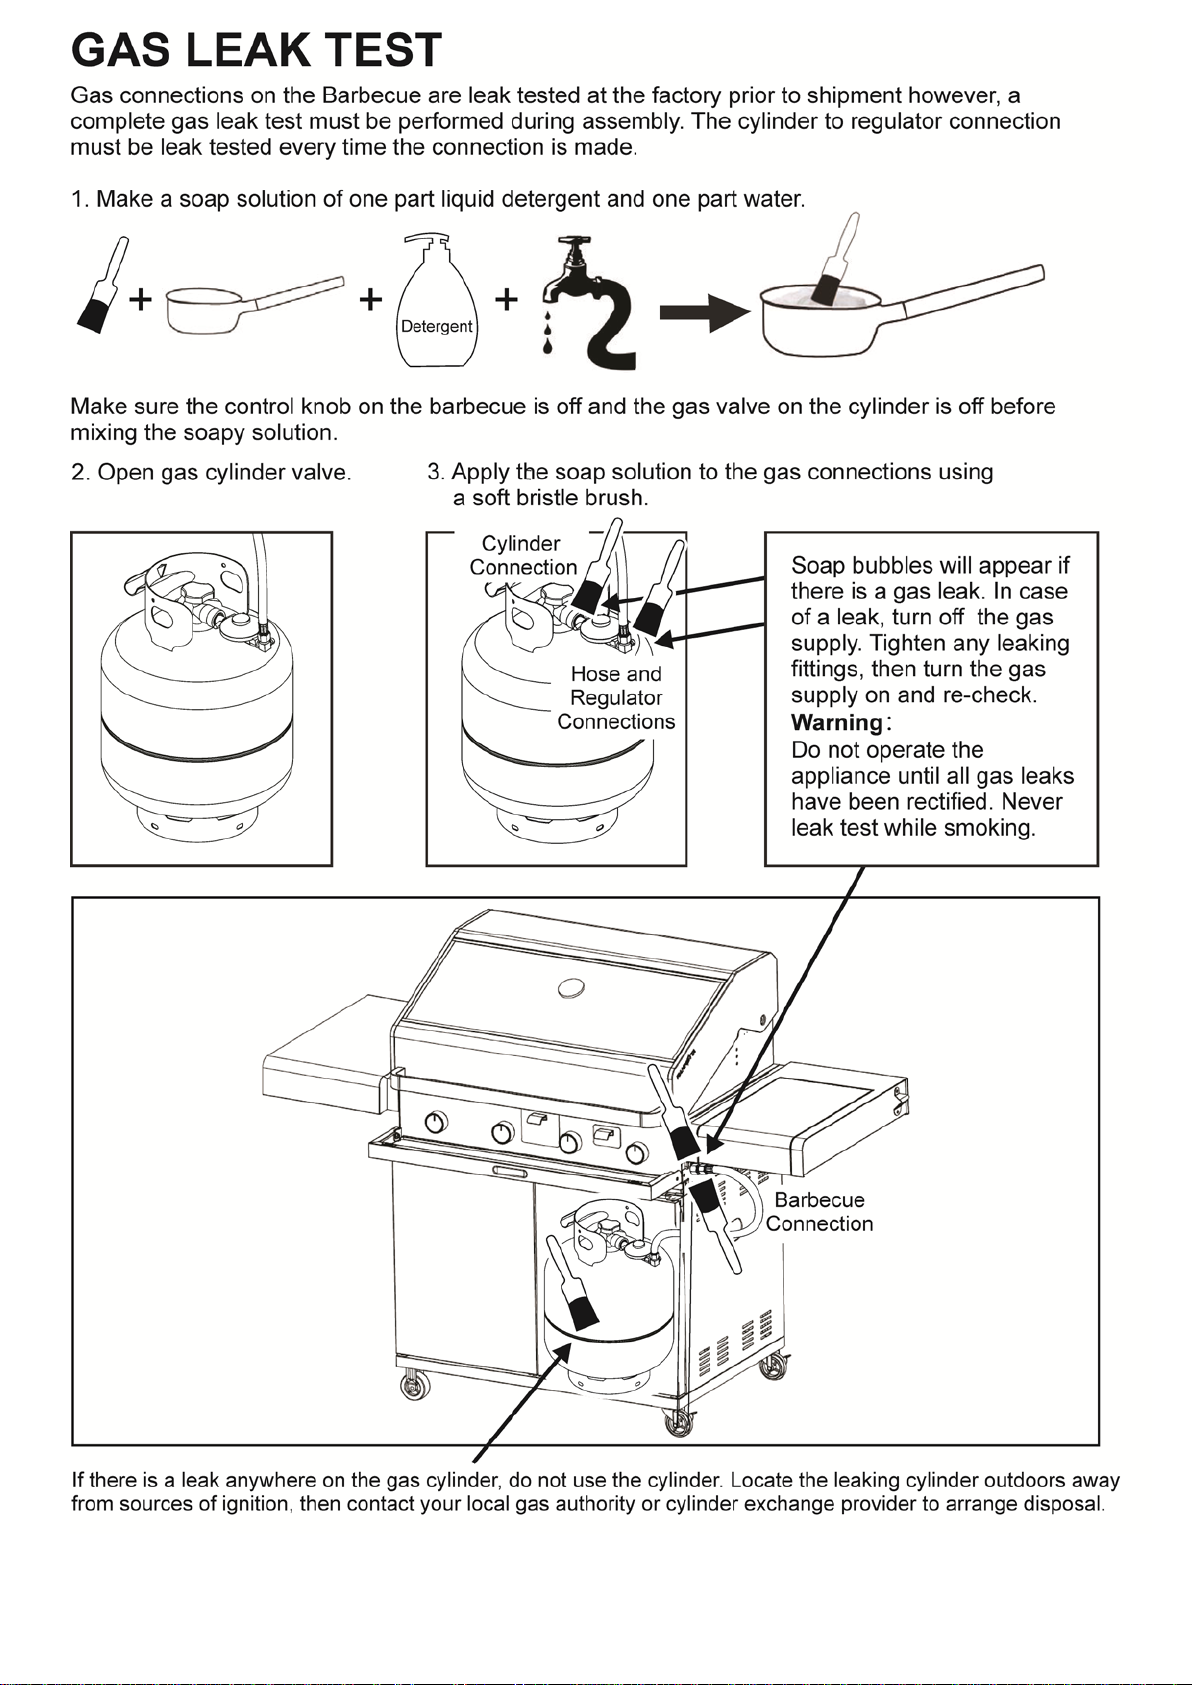
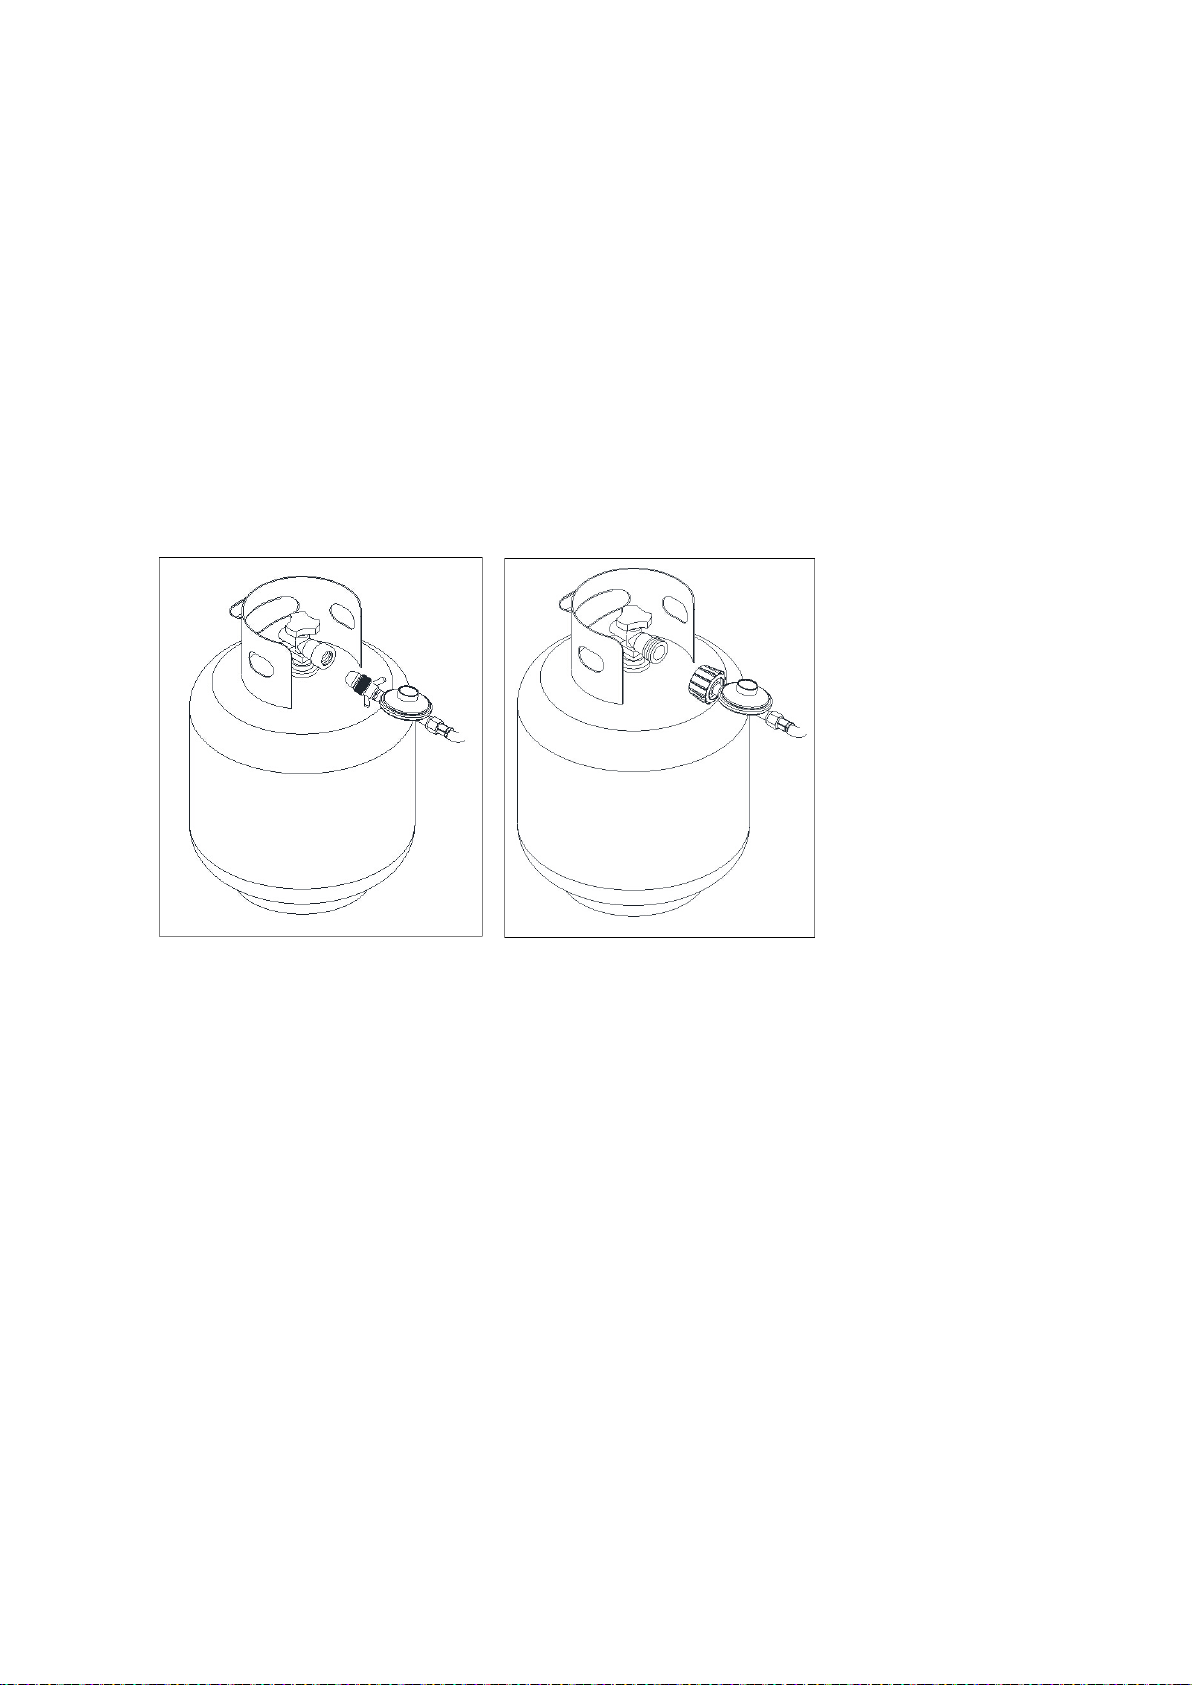
CONNECTION TO LPG CYLINDER
LEAK TESTING
Leak testing must be done the first time you connect up the BBQ, and whenever the LPG
cylinder is re-connected to the BBQ. Always inspect the hose at regular intervals to check for
cracks or abrasion.
Connect the regulator to the LPG cylinder and tighten the connection.
Turn the gas on at the cylinder, or make sure gas is available to the BBQ, but do not turn the
burners on. This fills the gas lines with gas. Now brush or pour some soapy water onto all
connections. If there is a leak, bubbles should appear within about 20 seconds. If you find
any leaks, tighten the connection and repeat the leak test. If the leaks persist, contact your
place of purchase.
POL QCC
DO NOT USE NAKED FLAME FOR LOCATING GAS LEAKS
IF A LEAK PERSISTS, CALL AN AUTHORISED PERSON
DO NOT USE THIS BBQ UNLESS ALL CONNECTIONS ARE GASTIGHT
In the case of a problem arising with the hose and regulator please contact your BBQ
supplier for a list of approved replacement parts.

19
LIGHTING PROCEDURE
Lighting the BBQ is easy, but must be done with due care.
Make sure the LPG cylinder is filled.
Make sure that gas is turned on at the cylinder, or that gas is available to the BBQ.
Check that the end of each burner tube is properly located over each valve orifice.
Make sure all gas connections are securely tightened.
Open the hood or side burner lid
MANUAL IGNITION (in case of lighting failure from BBQ ignition)
With the hood or side burner lid open, place a lit match or long stem gas lighter close to the
burner you wish to light. Be cautious of the position of your hand and ensure it remains a
reasonable distance from the burner. Turn the control to the “High” position. The burner should
light. If it fails to light, return the control to the “OFF” position and try again in five minutes.
FLAME THROWER IGNITION OF BBQ BURNERS
The BBQ burners are equipped with automatic ignition. It works by throwing a flame to the side
of the burner to light.Push the knob in and turn anticlockwise to the high position. You should
hear and feel a click from the knob. Hold the knob in and observe the flame extend towards
the side of the burner. When the burner ignites, release the control knob. If the burner doesn’t
light on the first attempt, return the knob to the “OFF” position and try several more times. If
the burner still does not light, wait a few minutes to allow the gas to disperse before trying
again.
SIDE BURNER IGNITION
The side burner incorporates an electrode next to the side burner. To light the side burner,
simply push the side burner knob in and turn anticlockwise to the high position. You should
hear and feel a click from the knob. When the burner ignites, release the control knob. If the
burner doesn’t light on the first attempt, return the knob to the “OFF” position and try several
more times. If the burner still does not light, wait a few minutes to allow the gas to disperse
before trying again.
Table of contents
Popular Grill manuals by other brands


Nexgrill
Nexgrill XH-300A-3310 Assembly and operating instructions

MaxxGarden
MaxxGarden 20732 Manual instruction

Jenn-Air
Jenn-Air 720-0720 Installation Instructions and Use & Care Guide

Meco
Meco SIZZLER 3335 owner's manual

Weber
Weber PLATINUM 2200 NG operating guide

KitchenAid
KitchenAid ARCHITECT KFGR271SSS Installation instructions and use and care guide


