Fidata HFAS1-S10U User manual

Read this guide before using the unit.In addition, keep this guide together with the "Conformity Information and Warranty" for future reference.
Lesen Sie diese Anleitung, bevor Sie die Einheit benutzen. Bewahren Sie diese Anleitung zusammen mit den „Informationen über Konformität
und Gewährleistung“ auf, um später darin nachschlagen zu können.
Lisez ce guide avant d'utiliser l'unité. Veuillez également conserver ce guide avec les « Informations de conformité et garantie » pour vous y référer ultérieurement.
EnglishDeutschFrançais
HFAS1-S10U
Quick Guide
Kurzanleitung
Guide rapide
Network Audio Server
Netzwerk-Audio - Server
Serveur Audio Réseau

1
Table of Contents
1.Overview of the Unit ............................ 2
2.
Composition of the Instruction Manual
... 3
3.For Safe Use ....................................... 4
4.Contents ............................................ 10
5.Names and Functions of Each Part....11
6.Install this Unit ................................... 13
7.Switching the Power On and Off ....... 15
8.Saving Audio Files............................. 16
8.1.
Saving Audio Files from a Windows computer ...
17
8.2. Saving Audio Files from a Mac...........20
9.Using as a Network Audio Server...... 21
9.1. Connecting .........................................21
9.2. Playing Music .....................................22
10.Using as a Network Audio Player
(USB-DAC connection)......................... 23
10.1. Connecting .......................................23
10.2. Playing Music ...................................25
11.Troubleshooting ............................... 27
12.Operating Environment.................... 29
13.Specications .................................. 32
Please also see the "Setup Guide" on the Internet.
It contains more detailed descriptions.
Main descriptions:
• Opening the settings screen • Saving audio les from a USB HDD
• Backing up music • Switching the mode of the built-in disk (RAID)
•
Keeping the rmware/software of this unit up to date
• Troubleshooting (FAQ)
http://www.iodata.jp/data/en/support/#download

2
Intended use
Target users
Service life
This unit is a network audio server that streams music to a network audio
device through a home network.
You can save audio les from the Internet or locally-stored audio les on this
unit, and enjoy the music on a network audio device.
In addition, you can use this unit as a network audio player by connecting a
USB-DAC* to it.
This unit has been designed and manufactured for individuals to enjoy
music. Please do not use it for business use.
Please only use this unit indoors; it is not for outdoor use.
* USB-DAC: Digital-to-analogue converter that is connected by USB. It
converts a digital audio signal so that it can be used on a conventional
analogue audio device. This unit is equipped with a USB port so a USB-
DAC can be connected to it.
Those who have knowledge about connecting and setting network audio.
About ve years. However, this applies only if this unit has been put to the
normal use (when used approximately four hours per day) described in this
document after its manufacture and shipment.
1.Overview of the Unit
Connecting a network audio server Connecting a network audio player
Amp /
Speakers
Network audio player
Wi-Fi router Computer
Smart device
Wi-Fi router Computer
Smart device
USB-DAC

3
The instruction manual of this unit includes the following.
• Quick Guide (this document):
Describes the basic way to use this unit.
• Conformity Information and Warranty:
Provides guidance on the warranty and standards of this unit and contact information.
• Setup Guide (Web):
Please see the "Setup Guide" on the Internet when you want a more detailed description.
Main descriptions:
• Opening the settings screen • Saving music from a USB HDD
• Backing up audio les • Switching the mode of the built-in disk (RAID)
•
Keeping the rmware/software of this unit up to date
• Troubleshooting (FAQ)
• Twonky Server Reference (Web):
Describes the Twonky Server that is employed in this unit.
2.
Composition of the Instruction Manual
You can download these instruction manuals from the following website.
http://www.iodata.jp/data/en/support/#download
4
3.1. Explanation of Symbols
WARNING This symbol indicates matters that may lead to risk of death or serious
injury if ignored and the unit is incorrectly handled.
CAUTION This symbol indicates matters that may lead to risk of minor injury if
ignored and the unit is incorrectly handled.
NOTICE This symbol indicates matters that may lead to risk of property damage
if ignored and the unit is incorrectly handled.
The caution signs shown here are intended to ensure safe and correct use of this elec-
trical product, and to prevent harm to you and other people and damage to property.
The important points to note are classified into “ WARNING,” “ CAUTION,” and
“NOTICE”. Please be sure to follow them when using this unit.
The symbol informs you that there are matters requiring “ CAUTION" (including a
“WARNING").
The symbol informs you of actions that must not be performed.
The symbol informs you of mandatory actions.
3.For Safe Use

5
3.For Safe Use
3.2. Caution in Use
3.3. Caution on Installation
WARNING
WARNING
Do not repair, take apart or remodel this unit.
It could cause a fire or electric shock, burn,
injury, or failure.
Keep small parts of this unit (such as
screws) out of the reach of children.
If they are swallowed accidentally, they could
cause suffocation or block the stomach etc. In
the unlikely event that they seem to have been
swallowed, please consult a physician immediately.
When one of the following abnormalities
occurs, unplug the power plug from the
electrical socket.
• If water or foreign matter gets inside this unit.
• If this unit emits a bad smell, abnormal noise,
or smoke.
If you continue to use this unit as it is, it could
cause a fire or electric shock.
When you hear thunder, do not touch this
unit or its power cord.
You could get an electric shock.
Do not put something containing water (a
cup, vase, etc.) on or near this unit.
If water gets inside this unit, it could cause a fire
or electric shock.
Do not use this unit if it has a failure or is
damaged.
If you use it as it is, it could cause a fire or electric shock.
Please turn off the power, and remove all connections.
When you want to move this unit, turn off the
power to it and to any peripheral devices,
and remove all connections.
The peripheral devices could fall down or fall
over and cause an injury or damage.
Do not install this unit in the following places.
• Places where water could splash, such as a
bathroom or kitchen.
• Places with high humidity.
• Places where there is rain or snow.
If water or detergent is applied to this unit, it
could enter the inside through gaps and cause a
fire or electric shock.
Do not install this unit in unstable places or
places subject to vibration.
This unit could fall down or fall over and cause
an injury or damage.

6
3.For Safe Use
CAUTION
Do not install this unit in a place where there
are large temperature changes.
Condensation could occur.
When the unit does not work properly, please
leave it for a while with the power switched off.
Do not put this unit in an area where the wires
go through a place that people pass through.
If someone trips on a wire it could cause an injury.
Ensure that you can see the power plug and
can reach the electrical socket.
In the unlikely event of a problem, you will then
be able to easily pull out the power plug.
Do not do the following as they could prevent
heat from dissipating.
• Do not cover this unit with a cloth or tablecloth.
• Do not install this unit directly on top of a rug or carpet.
• Do not install this unit in a narrow space that is not airy.
Otherwise, heat could build up and cause a failure.
Do not install this unit in places that are
extremely hot or extremely cold (places
outside the range of 5°C to 35°C).
Otherwise, the temperature could have an
adverse effect on the internal components and
cause a failure.
3.4. CAUTION on Power and Power cord
WARNING
Use the supplied power cord.
Using a cord other than the supplied one could
cause smoke or a fire.
Use a power supply with a voltage of 100 V –
240 V.
If you use a power supply with a voltage outside
that range, it could cause a build-up of heat, fire
or electric shock.
Do not do anything that could damage the
power cord.
• Do not put this unit under something or place a
heavy object on it.
• Do not damage or process this unit.
• Do not forcibly bend, twist, or pull this unit.
• Do not put this unit close to heating equipment
or heat it.
If the core wire (part where the electricity flows) is
exposed or broken, it could cause a fire or electric shock.
NOTICE

7
3.For Safe Use
3.5. Caution when Cleaning this Unit
3.6. Caution on Protection of Data
WARNING
NOTICE
When cleaning this unit, turn off the power
and always unplug the power plug from the
electrical socket.
You could get an electric shock.
Use a dry cloth when wiping this unit.
If water gets inside this unit, it could cause a fire
or electric shock.
Use this unit on a local network.
It is extremely dangerous to assign a global IP
address to this unit and directly make that publicly
known on the Internet.
If you want to make this unit’s IP address publicly
known, please ensure security so that this unit is
not subject to an attack via the Internet.
Do not disconnect the power cord or turn
off the power to this unit when the front
indicator is blinking.
It could cause a failure or loss of data.
Do not use an electrical socket that is loose
when you plug in the power plug.
It could cause an electric shock, heat build-up or fire.
Ensure the power plug is firmly inserted all
the way into the electrical socket.
Using this unit with the power plug not fully inserted
could cause an electric shock, heat build-up or fire.
When disconnecting the power plug, do not
pull while holding the cord — always pull
while holding the power plug.
The power cord could be damaged, causing a
fire or electric shock.
Regularly clean off any dust attached to the
power plug.
Remove the power plug and wipe it with a dry
cloth. Leaving the dust on the plug could cause a
fire.
Do not use the supplied power cord for other
products
It could cause a fire or electric shock.

8
3.For Safe Use
For your safety, please read the following text carefully.
This appliance is supplied with a moulded three pin mains plug for your safety and convenience. A 10 amp
fuse is tted in this plug. Should the fuse need to be replaced, please ensure that the replacement fuse has
a rating of 10 amps and that it is approved by ASTA or BSI to BS1362.
Check for the ASTA mark or the BSI mark on the body of the fuse.
If the plug contains a removable fuse cover, you must ensure that it is retted when the fuse is replaced.
If the tted moulded plug is unsuitable for your socket outlet, then the fuse shall be removed and
the plug cut off and disposed of safely. There is a danger of severe electrical shock if the cut off
plug is inserted into any 13 amp socket.
If a new plug is to be tted, please observe the wiring code as shown below. If in any doubt, please consult
a qualied electrician.
WARNING: THIS APPLIANCE MUST BE EARTHED.
• IMPORTANT
The wires in this mains lead are coloured in accordance with the following code:
Green - and - Yellow: Earth Blue : Neutral Brown : Live
As the colours of the wires in the mains lead of this appliance may not correspond with the coloured
markings identifying the terminals in your plug, proceed as follows;
The wire which is coloured GREEN - AND - YELLOW must be connected to the terminal in the plug which
is marked with the letter E or by the Earth symbol or coloured GREEN or GREEN - AND - YELLOW.
• The wire which is coloured BLUE must be connected to the terminal in the plug which is marked with
the letter N or coloured BLACK.
• The wire which is coloured BROWN must be connected to the terminal in the plug which is marked
with the letter L or coloured RED.
Regularly back up data.
An unexpected accident could corrupt data and
lead to a loss of data.
As a precaution, please back up data regularly.
3.7. Power cords for the United Kingdom, Hong
Kong and Singapore

9
3.For Safe Use
• How to replace the fuse:
1 Open the fuse compartment with a screwdriver.
2 Replace the fuse.
Fuse

10
4.Contents
This product’s package contains the following items. Please conrm the contents.
• Unit
• Power cord (3 types)
• Conformity Information and Warranty• Quick Guide (this document)
Read this guide before using the unit.In addition, keep this guide together with the "Conformity Information and Warranty" for future reference.
Lesen Sie diese Anleitung, bevor Sie die Einheit benutzen. Bewahren Sie diese Anleitung zusammen mit den „Informationen über Konformität
und Gewährleistung“ auf, um später darin nachschlagen zu können.
Lisez ce guide avant d'utiliser l'unité. Veuillez également conserver ce guide avec les « Informations de conformité et garantie » pour vous y référer ultérieurement.
EnglishDeutschFrançais
HFAS1-S10U
Quick Guide
Kurzanleitung
Guide rapide
Network Audio Server
Netzwerk-Audio - Server
Serveur Audio Réseau
Type-C Type-BF Type-A
11
1 2
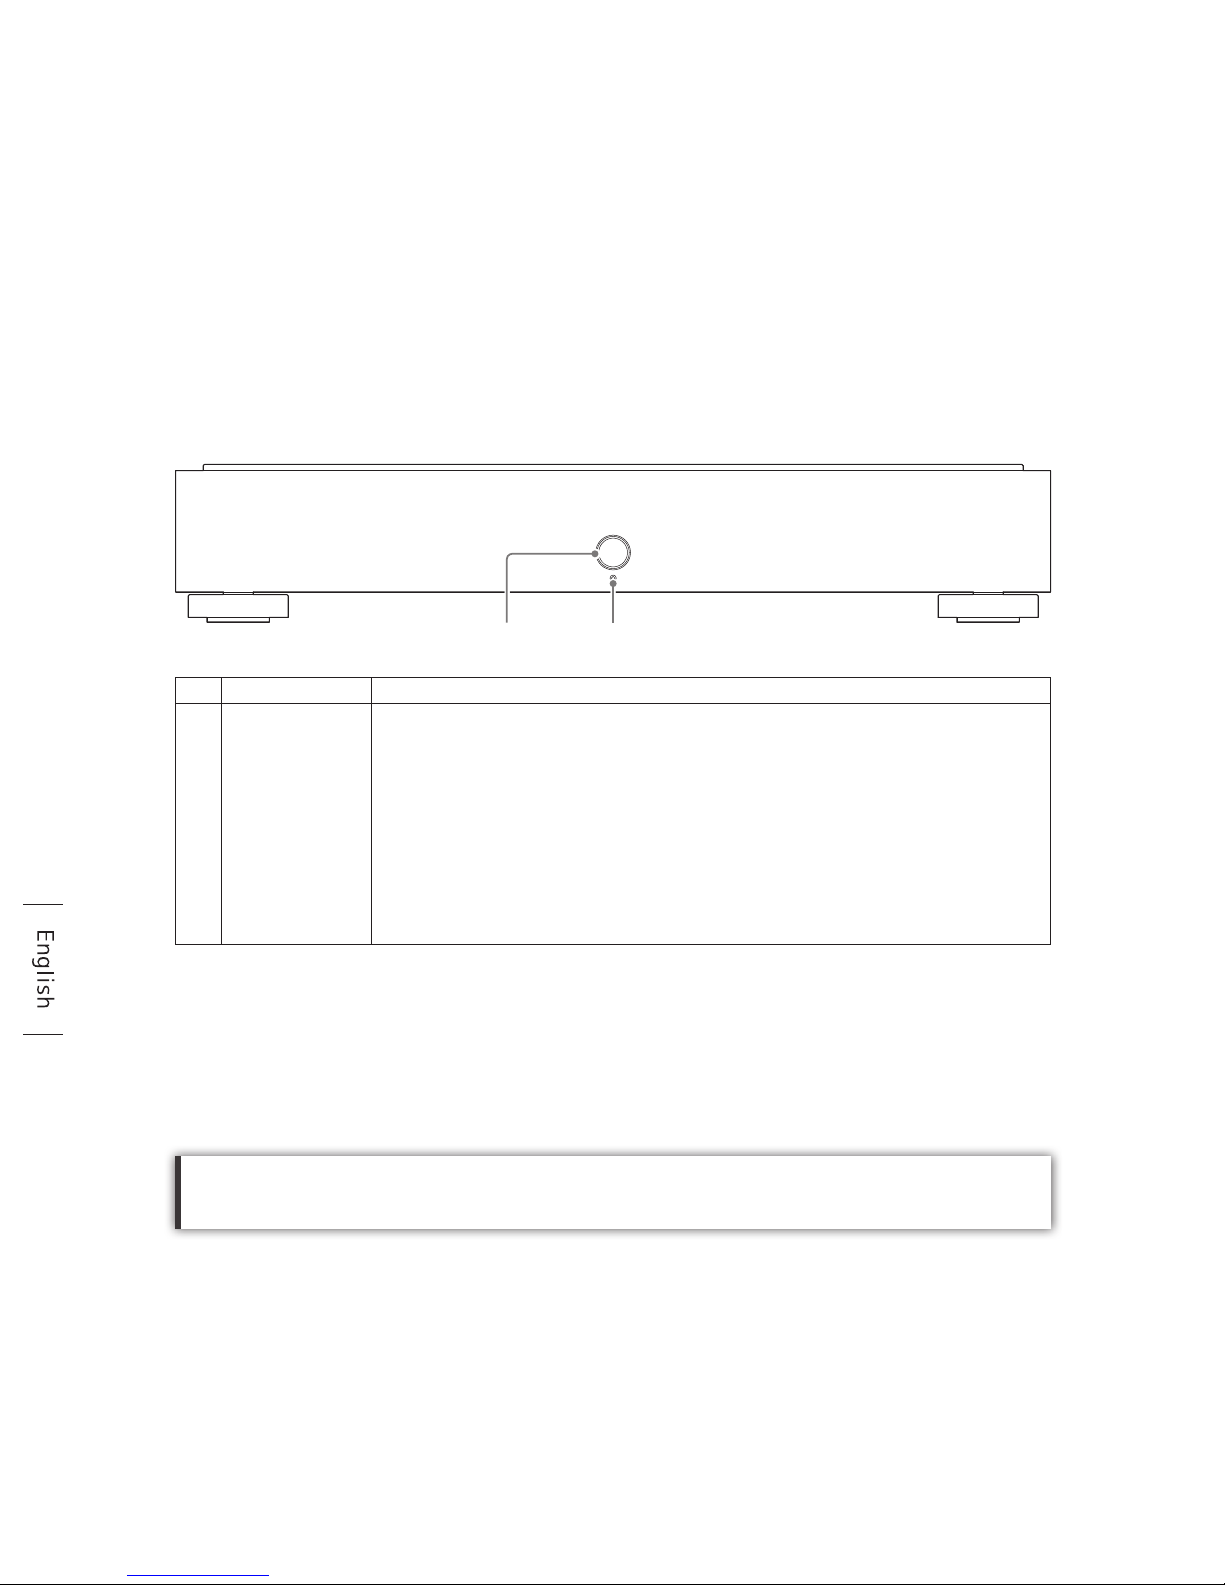
You can switch off the front indicator or LAN port LED.
For more information, please see the "Setup Guide" (page 1).
5.
Names and Functions of Each Part
1Power button Power on/off (page 15).
2Indicator Displays the status of this unit.
White light ................ Power is on
White blinking light... Starting up and stopping
Green light ............... Playing music on a USB-DAC device
Orange light ............. The internal software can be updated (turn off the power,
and then turn it on again)
Unlit.......................... Power is off
Red light................... Error (internal disk abnormality, USB HDD recognition
error, lack of space on a USB HDD)

12
5.Names and Functions of Each Part
3Reset button Initialises this unit, putting back into the state it was at the time of
purchase. When the power is on, push it for 1 second with a long, thin
item such as a pin.
4USB port Used to connect a USB HDD or USB-DAC.
5LAN port
(for Audio)
Used for connecting a network audio player with a LAN cable.
6LAN port
(for Network)
Used for connecting a Wi-Fi router with a LAN cable.
The lamp display is the same as for 5LAN port (for Audio).
7Power connector Used to connect the power cord.
3 4 5 6 7
Speed indicator (yellow)
Lit.......1000BASE-T
Unlit ...100BASE-TX
10BASE-T
Unconnected
Lit.............Connected
Blinking....Connecting
Unlit .........Unconnected
Transmission indicator
(green)

13
Wi-Fi router
Back of the unit
Computer (for administation)
LAN cable
(purchased separately)
Power cord
Select the power cord
according to your electrical socket.
1 2
Use an feet with 3-point mounting.
An engraved arrow shows the locations where
the feet can be attached.
6.Install this Unit
4-point mounting 3-point mounting
Bottom view
Connect the unit to a electrical socket and a Wi-Fi router.

14
6.Install this Unit
Wi-Fi router
Back of the unit
Computer (for administation)
LAN cable
(purchased separately)
Power cord
Select the power cord
according to your electrical socket.
1 2

15
7.
Switching the Power On and Off
7.1. Switching the Power On
7.2. Turning off the Power
1.
Push
2.
White ashing light →
White light
1.
Push (1 second)
2.
White ashing light →
Light goes off

16
8.1. Saving Audio Files from a Windows computer ......... 17
Access this unit from a personal computer running Windows, and copy
audio les to this unit.
8.2. Saving Audio Files from a Mac................................. 20
Access this unit from a personal computer running a Mac OS, and copy
audio les to this unit.
Saving audio les from a USB HDD.
By connecting a USB HDD that contains audio les, you can copy them to this unit.
Please see the "Setup Guide" (page 1).
8.Saving Audio Files

17
8.Saving Audio Files > 8.1. Saving Audio Files from a Windows computer
8.1.
Saving Audio Files from a Windows computer
3
Note
IP address device name
HFAS-
2 Start "Magical Finder".
* Connect the personal computer on which settings are to be made to the same router
as the one used by this unit.
1 Install the settings tool "Magical Finder".
http://www.iodata.jp/data/en/support/#download
8.1.1. Conrming the Device Name
* String after the @ is not required.
Take a note of the IP
address and device
name.
Close "Magical Finder".

18
8.Saving Audio Files > 8.1. Saving Audio Files from a Windows computer
8.1.2. Saving audio les
1
2
Click .
Enter “\\” (device name)
and press [Enter].
The [contents] folder of
this unit will be shown.
* See note
(page 17)
If the [contents] folder is not shown.
Please enter the IP address instead of the device name.

19
8.Saving Audio Files > 8.1. Saving Audio Files from a Windows computer
3
Save audio les in the
[contents] folder.
Otherwise, a sudden failure could corrupt data and lead to a loss of data.
For details of this unit’s backup function, please see the "Setup Guide" (page 1).
[Important] As a precaution, please back up data regularly.
Get audio les ready.
You can get audio les by downloading from a music distribution site or ripping them
from a music CD. For details of the le formats of music data that this unit supports,
please see [Supported le formats (extensions)] (on pages 30, 31).
Table of contents
Languages:
Other Fidata Server manuals


