Fieldmaster DOMINATOR GMF Owner's manual

Page 1
DOMINATOR GMF
FOLDING MOWER
OWNERS/OPERATORS MANUAL
AND SPARE PARTS LIST

Page 2
SAFETY & PRECAUTIONARY ADVICE
Remember that your safety and the safety of others is at risk! Read these Mower Operator
Instructions before using the mower for the first time.
Ensure that all shielding is in place before operating. If maintenance work is required and
the guards are removed, always replace them immediately afterwards. Repair or replace
any damaged CAUTION, WARNING or INSTRUCTION decals.
Check area for debris that may be picked up and thrown by the mower causing injury or
damage.
Do not allow people to stand directly behind the mower, or direct the discharge towards
people, animals, buildings or vehicles.
After striking an obstacle, stop the mower and inspect it for damage. Repair as necessary
before continuing.
If working on the mower whilst it is raised on the tractor’s three-point linkage, ensure
that it is properly supported by the parking stands. DO NOT rely on the tractor’s hydraulic
system alone.
Never touch the blades while the tractor engine is running.
Maintain the mower in accordance with the given schedule. Particular attention should
be given to blades and securing hardware due to the hazard they present should any part
of them break loose during operation.
Familiarise yourself with your tractor’s controls. Know how to stop the tractor and
mower quickly.
Do not operate unless seated in the driver’s seat.
Take all possible precautions when leaving the tractor, such as disengaging the PTO drive,
lowering the three-point linkage, engaging the tractor parking brake, stopping the tractor
engine, and removing the key.
Do not allow passengers on machinery.
Ensure that only responsible, properly instructed people operate the machinery.
Inexperienced operators will require careful supervision.
Wear protective footwear and keep hands, feet, hair and loose clothing away from all
moving parts.

Page 3
SPECIFICATIONS of GMF350
Dimensions
Cut Widths:
Full width - 3.55m
One wing up - _._m
Both wings up - _._m
Overall Width - 3.54m
Transport Width - 2.41 m
Length - 1.45m
Number of Rotors - 5
Number of Gearboxes - 5
Cut Height - 10-120mm
Weight - 1360kg
Power Requirements to ‘drive and carry’ the Mower
Minimum PTO Power - 55kw (75hp)
Maximum PTO Power - 90kw (120hp)
SERIAL NUMBER
A Serial Number plate is fixed to the mower body. Quoting the serial number when ordering
parts is very important. For future reference, record the Serial Number and purchase details
here:
Serial Number: _______________________________________
Purchased From: _______________________________________
_______________________________________
Purchase Date: _______________________________________
BEFORE OPERATION
Read this manual thoroughly and familiarise yourself with the machine set-up,
adjustments and maintenance.
Carry out “Before Use Maintenance” as detailed in the Maintenance Schedule.

Page 4
SETTING UP THE MOWER FOR USE
i. Attachment to Tractor
Attach the GMF Fieldmaster mower to the tractor’s three-point linkage
a) GMF350 mower is supplied with dual-category lower linkage pins. They are fitted
from the inside of the clevis and secured with a lynch pin on the outside.
b) The top link has two positions, a slot and a hole. For normal mowing, use the slot.
This allows the mower to sit on its rollers and follow the ground contours.
Adjust the top link so that the pin is between 25 and 50mm from the front of the slot
when the mower and the tractor are on level ground. NOTE that the washers
supplied with the top link pin must be fitted on the outside of the slots to prevent the
head of the pin or the lynch pin from getting caught in the slots.
NOTE: For transport, use the hole. This takes the slack out of the linkage and can
prevent serious structural damage caused as the tractor bounces over bumps.
c) If the mower has not previously been attached to the tractor being used, refer to
“Driveshaft Initial Fitting” section.
d) Attach the driveshaft safety chain to prevent the covers rotating. Leave plenty of
slack in the chain so that it is not broken when the mower is raised on the three-point
linkage.
e) Level the tractor’s lower link arms so that both sides of the mower touch the ground
simultaneously as the three-point linkage is lowered.
f) Tension the sway chains or fit stabiliser bars to limit lateral movement.
g) Raise the three-point linkage slowly to check:
-Mower does not touch tractor tyres.
-Driveshaft does not touch any part of the tractor or mower.
-Driveshaft angles do not become excessive (above 35 degrees).
-Mower gearbox input shaft remains approximately parallel to the tractor PTO
output shaft (within 5 degrees is satisfactory).
-Driveshaft halves do not separate.
If any of these are not correct it may be necessary to limit the maximum lift on the
tractor lift lever quadrant and/or relocate the top link arm.

Page 5
ii. Connecting the Hydraulics
The hydraulic wing operation is supplied with a set of hoses for both wings, allowing both
wings to be raised and lowered simultaneously.
The hydraulic valve needs to be of the double acting type with locked neutral position.
The male quick-release couplings supplied are half inch and should suit most tractors,
though some have unique fittings. Consult your tractor dealer or hydraulic specialist if the
fittings are not compatible.
a) Before connecting the hydraulics, carefully wipe the quick-release couplings to avoid
contamination and possible damage to the system.
b) Check that the hoses are connected so that the hydraulic valve levers operate the
wing in the desired direction. Swap the hose connections if necessary.
c) Operate the hydraulic valves to lift and lower the wings through their full cycles
several times to clear any air out of the system.
DRIVESHAFT (INITIAL FITTING)
If the tractor and mower have never been used together before, proceed as follows:
Separate the inner and outer halves of the driveshaft.
Attach one half to the tractor PTO output shaft and the other half to the mower
gearbox input shaft.
Hold the two sections of the driveshaft parallel to each other and lift the mower
slowly on the three-point linkage.
Throughout the lifting arc, check that the two sections do not close right up or
extend so far that there is less than 100mm of inner shaft engaged.
If the shaft is too long, cut equal amounts off both inner and outer shafts (including
guards) using a hacksaw. De-burr and thoroughly clean the cut areas and apply a
liberal amount of multi-purpose grease to the contacting steel parts.
If the driveshaft is too short, contact your dealer as it will be necessary to replace some
driveshaft componentry with suitably longer parts.

Page 6
OPERATION AND ADJUSTMENTS
Blade types
Several blade options are available for GMF Gear drive Wingmower.
–Standard equipment is a flail carrier bar fitted with the swinging flail tip “Gold tips” (Part
No 2365.01 LH cutting top and 2365.02 –RH cutting tip). This offers excellent performance,
lifting the grass to give a clean cut and evenly spread clippings.
–Heavy duty slasher type flails and also mulching type blades are available.
Cutting Height
Cutting height is governed by setting the positions of the rollers and skids. Lowering the
Rollers raises the cutting height and vice versa. The Rollers govern the cutting height of the
whole mower. The wings are able to lift and lower with the undulation of the ground whilst
the PTO is engaged thus providing a float to follow the ground contours. When unfolding
the wings with the hydraulic rams, fully extend the hydraulic rams to their full extent –at
this position, it will allow the wi9ngs to float 100mm below and above the level point in the
float slot located at the end of the hydraulic ram
To adjust the cutting height:
a) Raise the mower on the tractor three-point linkage.
b) Set down the 2 x parking stands ensuring the foot is located on firm ground –engage
the height selector in a hole as required and fasten the lynch pin. Lower the machines
onto the parking stands gently, and ensure the machine is stable.
c) Start with one roller only. –Loosen the bolts that hold the adjusting quadrant on the
roller and Lift or lower the roller to the required position.
d) Check that both sides of the roller are set to the same height.
e) Tighten all the bolts.
f) Set the other rollers the same as the first one.
g) Replace and tighten all bolts.
Lifting and Lowering the Wings
The wings are designed to float only during operation once the ram has been fully extended
and opened to it extent (giving approx. 100mm of upward and downward float) however
the wings can only be lifted / raised on the hydraulic rams ONLY when the PTO is
disengaged.

Page 7
DO NOT ATTEMPT TO FOLD OR LIFT
THE WINGS IF THE PTO IS ENGAGED
The PTO MUST be disengaged and the blades allowed to stop completely before lifting or
lowering the wings with the hydraulic rams commences. Lifting, lowering or engaging the
PTO drive whilst the wings are lifted will cause SERIOUS damage to the machine and is also
unsafe.
CAUTION!
a) Be aware that if the wings are raised while the blades are operating, the blade on the
raised wing will continue to turn. Keep all spectators clear, - Disengage the PTO first!
b) Take care when lowering the wings that spectators are clear and that the wing will
not hit anything as it approaches the ground.
c) It is important that wing rams are fully extended when the wing decks are lowered
and in cutting position so that ram pin locates into slot that enables independent
wing floatation of 10 degrees up and down.
d) To Lift and secure the wings:
-Disengage the PTO FIRST!
-Fully raise the wings with the hydraulic rams. - Ensure the wings latch onto the auto
hold latches (you can test these are located correctly by gently trying to unfold
the mower with the hydraulic rams, however after testing this, close the rams
again as if folding the mower up)
-Ensure hydraulic controls remain in neutral position
Transport
Before travelling any distance with the mower fitted to the tractor:
a) Disengage the PTO.
b) Fit the top link pin to the hold instead of the slot on the mower.
c) Ensure the wings are raised and firmly latched into folded / transport position.
d) Lock the wings in the raised position.
e) Raise the mower on the three-point linkage.
Page 8
MAINTENANCE
Maintenance requirements for the Fieldmaster GMF have been kept to the minimum
without sacrificing long life, and reliable operation. The wing hinges and lift rams are on
‘greasable pins’. (4 x grease points)
Items which do require maintenance or adjustment are designed or chosen to be the best
available –blade rotors and gearboxes for instance feature sealed high tensile shafts, and
tough steel housings with labyrinth protectors to discourage stringy material wrapping into
the bearings.
ii. Changing Blades
a) Raise the mower on the tractor hydraulics.
b) Lower the parking stands onto firm ground beneath to prevent accidental lowering.
c) Fling-tip flails (‘Gold-tips’): use a 17mm spanner to undo the self-locking nut which
secures the blade bolt. It is preferable to fit new bolts and nuts when changing
blades.
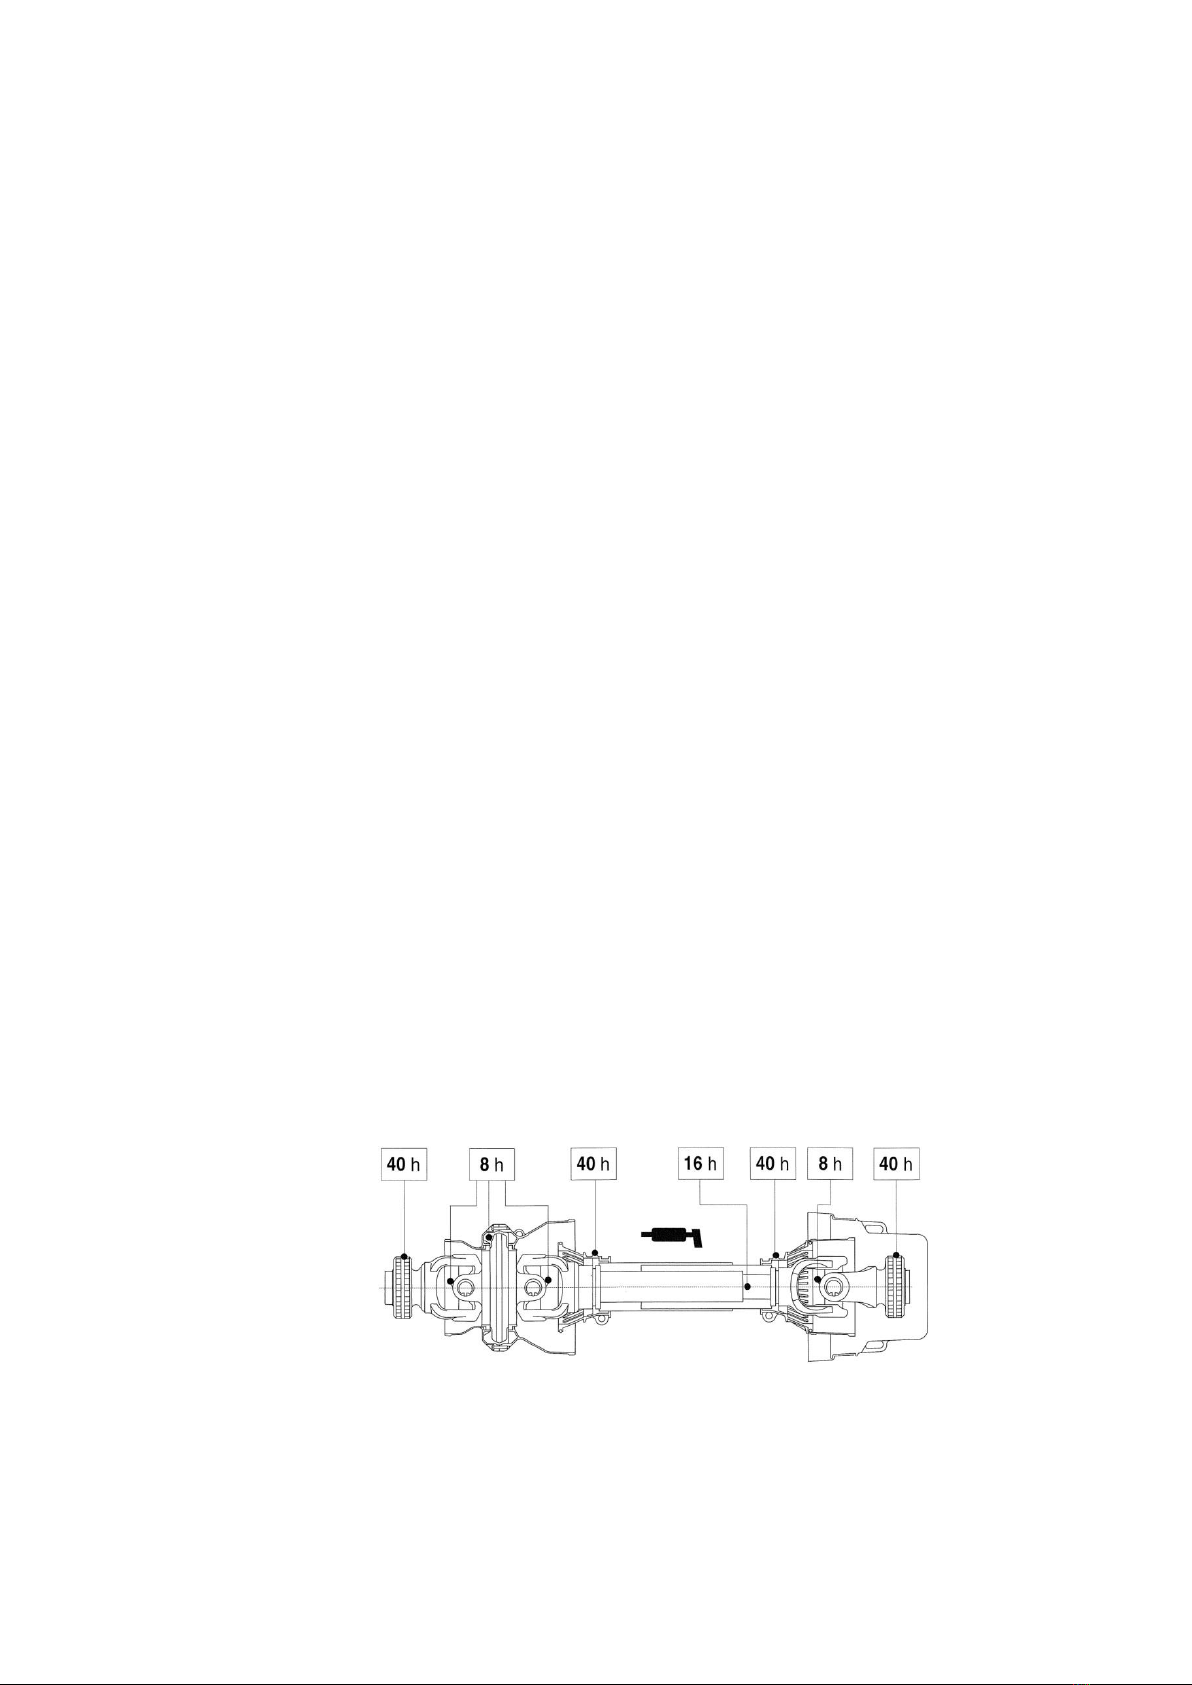
iii. Lubrication
Grease GMF after use, preferably while the moving parts are still warm. When the bearings
are warm the grease flows around them and expels used grease and dirt more readily.
a) ROLLER BEARINGS:
Grease nipples are fitted to each roller bearing housing. Apply three pumps (2g) of
multi-purpose grease per bearing at the end of a day’s work
b) DRIVESHAFT:
To grease the driveshaft it should be disconnected from the tractor end and
separated. Clean the sliding tubes and apply a liberal amount of multi-purpose
grease. Grease nipples are fitted to the cross of each universal joint and should
receive three pumps (2g) of multi-purpose grease.
Washing
Always grease the bearings before washing and avoid directing hoses at bearing housings,
especially if they are still warm after use. A housing will suck water into the bearings as it
cools and may severely shorten their life.

Page 9
Regular Checks
PROBLEM SOLVING
Mower Vibrates Excessively
a) Incorrect PTO speed: Check that 540 rpm PTO gear has been engaged. NOT 1000
rpm. Ensure that PTO does not exceed 600 rpm.
b) Blades missing or badly damaged: Fit replacement blades of the same type (ensure
that even sets are replaced).
c) Excessive driveshaft angles: Three-point linkage lifting too high. Limit the amount of
lift
d) Driveshaft universal joint badly worn: Inspect and repair as required.
Mower scalping severely: Raise the cutting height.
Oil or Grease on Drive decks
a) Gearbox output seal leaking: Consult your dealer about repair.
b) Gearbox over full: Gearbox casing should not be filled above oil level plug. Drain if
necessary.
c) Wing hinge pins over-greased: Clean off excess grease.
MAINTENANCE SCHEDULE
BEFORE USE
/ EVERY 8
HOURS
FIRST 50
HOURS
EVERY 50
HOURS
EVERY 800
HOURS
a) BOLTS
Check fasteners for tightness
b) BLADES
Check condition and bolt tightness
c) DRIVESHAFT
Clean and re grease sliding tubes
Grease universal joints (2 points)
Grease guard bearings (2 points)
Oil quick release pins (2 points)
Check for excessive wear
e) GEARBOX
Check oil level –case should be half full
Change oil (1 litre EP90 oil)
f) WING HINGE PINS
Grease (4 points)
g) ROLLER BEARINGS
Grease (2 x points per roller)

Page 10
Excessive Horsepower Required to Power Mower
a) Rotating parts not turning freely: Check that foreign material is not jamming spindles
and that all bearings are in good condition.
b) PTO speed too fast: Check that the PTO is in the correct gear (540 rpm).
c) Excessive ground speed: Select a lower gear on the tractor.
Excessive Wheel Marks or Poor Cutting Finish
a) PTO Speed too slow: Increase up to 600 rpm.
b) PTO speed too fast. Check that PTO is in the correct gear (540 rpm). Also try running
the tractor at lower revs and selecting a higher gear to keep ground speed up.
c) Cutting height too high: Lower cutting height.
d) Excessive ground speed: Select a lower gear on the tractor.
e) Not the best blade type for the conditions: Change to a more suitable type.
9. RECOMMENDED TOOLS FOR ADJUSTMENTS
i. Half-inch drive ratchet and extension (optional).
ii. Either two 18mm ring and open ended spanners or one 18mm spanner and one 18mm
socket.
iii. Either a 17mm spanner or a 17mm socket.
iv. Either a 19mm spanner or 19mm socket.
v. One 13mm spanner.
vi. One medium sized adjustable spanner.
vii. Grease gun.
Page 11
10. RECOMMENDED SPARE PARTS TO HAVE AVAILABLE
i. A complete set of spare flail blades and stepped blade holders
ii. A complete set of blade mounting nuts and bolts.
iii. A rubber element or coupling between gear drives and a wing PTO shaft.
iv. One litre of SAE EP90 gearbox oil.
v. One cartridge of multi-purpose grease.
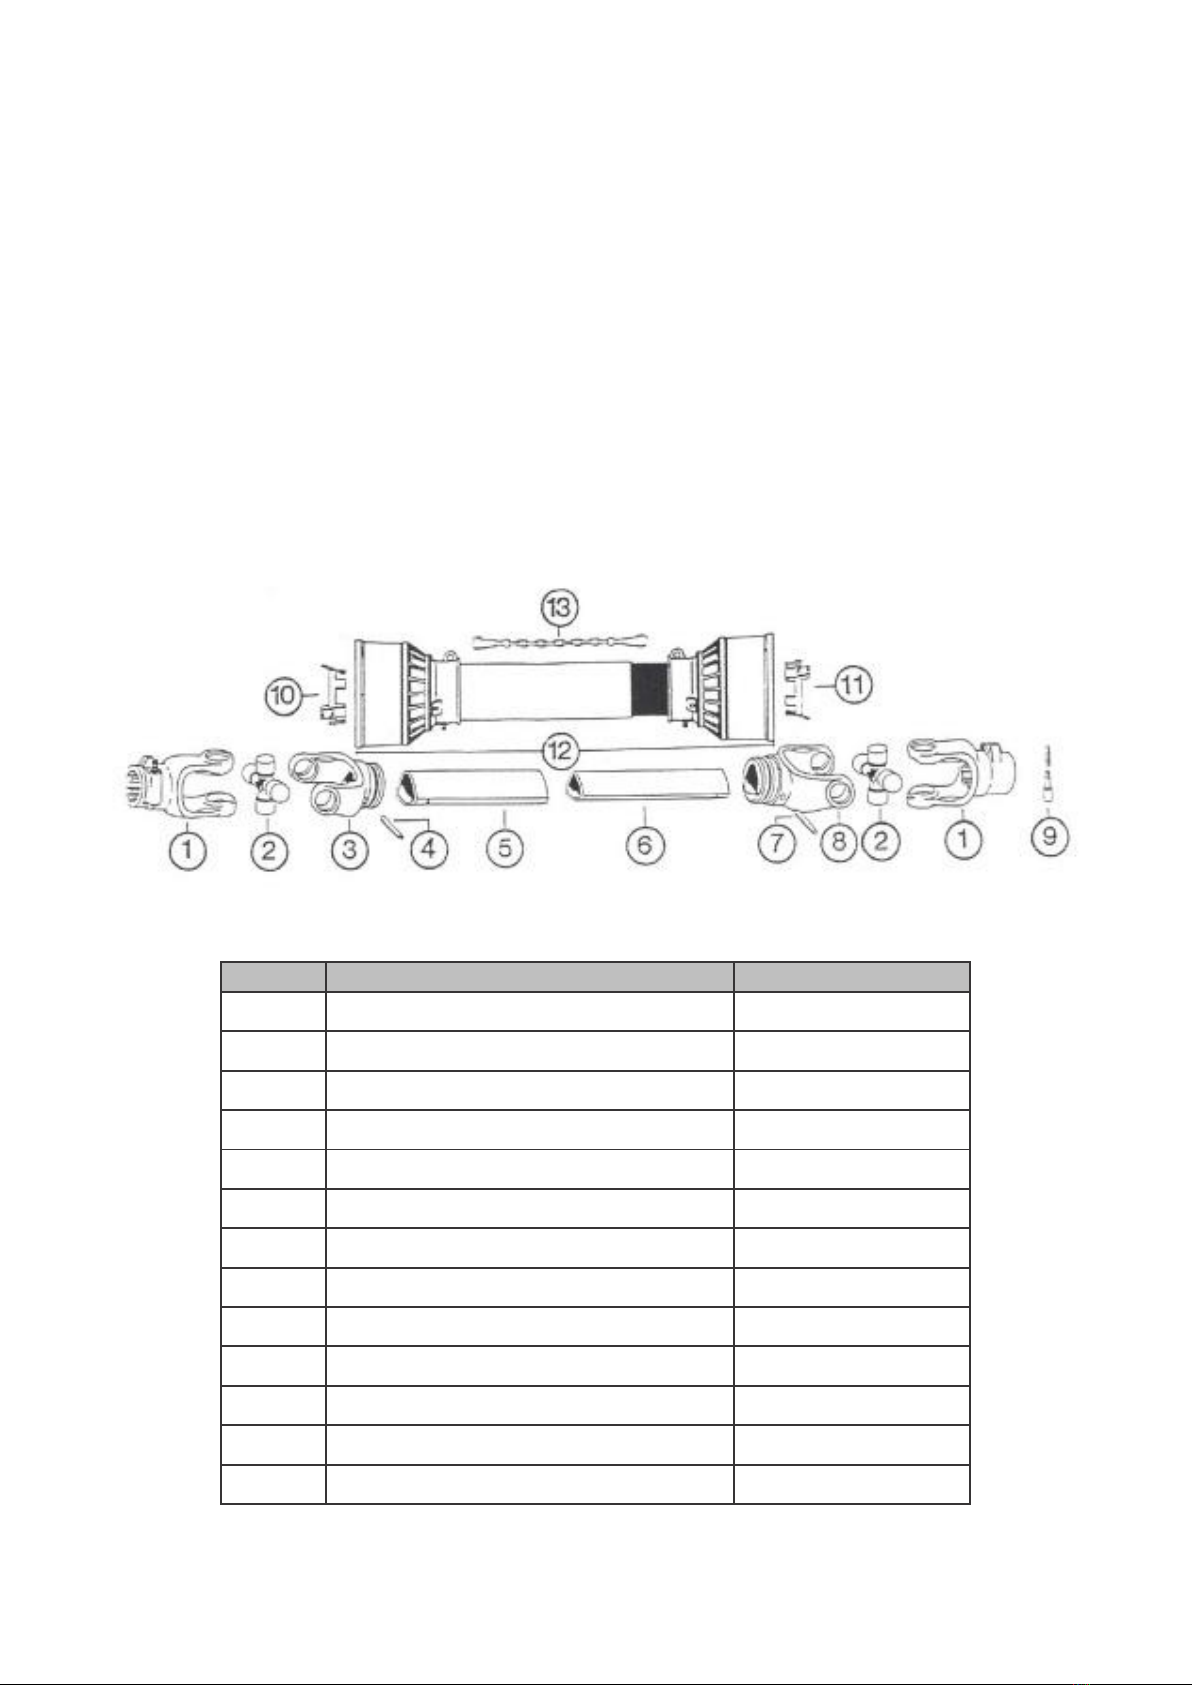
MAIN PTO DRIVESHAFT PARTS
CLUTCH
PARTS
ITEM
DESCRIPTION
Pt No:A6086007
1
Yoke Quick Release
507060351
2
Universal Joint
41206
3
Outer Tube Yoke
204066851
4
Outer Roll Pin
34102000
5
Triangle Tube Outer (per mtr)
12512
6
Triangle Tube Inner (per mtr)
12509
7
Inner Roll Pin
341043000
8
Inner Tube Yoke
204066852
9
Release Pin
403000001
10
Guard Tube BRG Outer
255060005
11
Guard Tube BRG Inner
255060006
12
Guard Assy Complete
5F06086FF
13
Safety Chain
252000001
Page 12
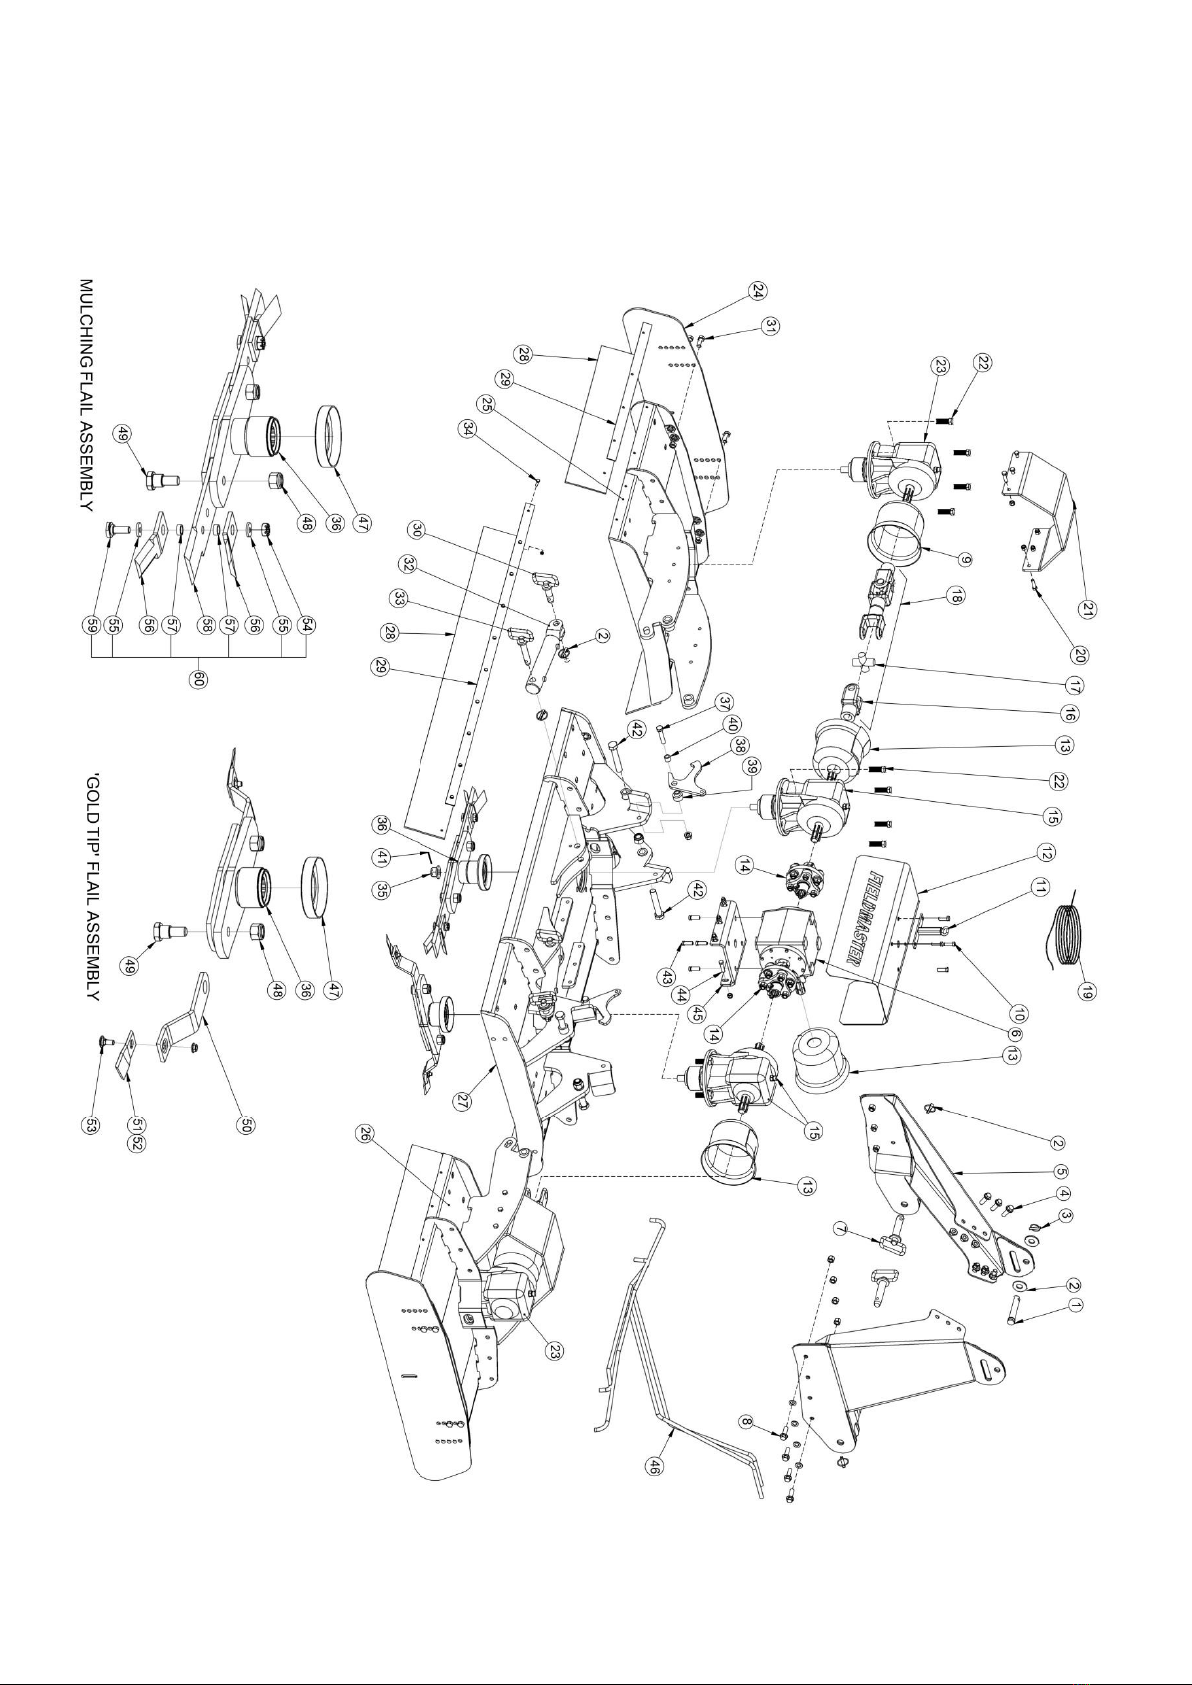
MAIN DECK & WING ASSEMBLY

Page 13
MAIN DECK & WING ASSEMBLY continued
Item
Part
Number
Description
Qty
1
10041
Top Link Pin-GM/TM A-frame
1
2
10.50.109.01
Top link slide pin washer
2
3
5603
Lynch Pin
5
4
BF1635
Flange Head bolt & nut
6
5
1880
A Frame (2 pcs)
1
6
1.126
Centre T Gearbox assembly (1-3/8" x 6Z shafts)
1
7
5050
Bottom Link Pin - A frame
2
8
B1640
A Frame mounting bolt & Nut
8
8
71348
Heavy Galv HT washer
8
9
21901
PTO Cone (outer wing gearboxes)
2
9
PTO Cone mounting bolts (5/16" x 1/2" UNC)
4
10
Cover mounting Bolt (1/2" x 1" UNC)
4
11
46-006-FA01
Wing latch cord guide
1
12
117020
Mretal Coupling Cover
1
13
2190402
PTO Cone (Cutout top section for wing shaft)
3
13
PTO Cone mounting bolts (5/16" x 1/2" UNC)
A/R
13
771300
PTO Cone Rubber flap (per mtr)
A/R
14
35-208/180
Complete coupling assembly (see sep drwg for breakdown)
2
15
9211
Through Shaft Gearbox Ratio 1:1.93
2
16
507060351
Q R Yoke (T60 1-3/8"x6 spline)
4
17
41206
Universal Joint (T60)
4
18
A6086007
Driveshaft complete with cover set (cut to length)
2
19
984222
Wing latch pull cord rope (per mtr)
A/R
20
B1240
Cover mounting bolt & nyloc (M12 x 40)
12
21
46-003-002
GMF360 Drivetrain Cover/ Support Bridge
2
22
B2060
Gearbox mounting bolt & nut (M20 x 60)
16
23
1.265
Outer Gearbox 75hp (1:1.93)
2
24
197015
Bolt on Side Blanking Plate
2
25
360.02LHW
GMF360 Left Hand Wing Deck Assembly
1
26
360.02RHW
GMF360 Right Hand Deck Assembly
1
27
180.02XHD
XHD Gearmower (1.8m) Deck
1
28
771300
Belting 150mm wide (per mtr)
A/R
29
775300
Drilled Rubber Backing Strip (per mtr)
A/R
30
2593
Wing ram (clevis end) pin
2
31
B1645
Side plate mounting bolt & nut
8
32
998535
GMF Wingmower Lift Ram
2
33
10026
Wing Ram Mounting pin (head end)
2
34
B825
Rubber guard mounting bolt & nut (M8 x 25mm)
A/R
35
11.008
Main Flailcarrier / gearbox hub castlenut
4
36
7403218
Flail Carrier Gearmower - For Mulch blades (35 mm extension)
4

Page 14
MAIN DECK & WING ASSEMBLY continued
37
Wing latch pivot bolt & nut (3/4" x 3-1/2" UNF)
2
38
46-005-001
Wing latch hook
2
39
354
Stepped Bush for Wing latch
2
40
Straight Bush for Wing latch (19.5ID x 29OD x 28L)
2
N/S
2848
Wing Latch spring
2
41
Split Pin for Castlenut on hub
4
42
B24150
Main wing hinge / pivot bolt & nut - M24 x 150 (cut to 130mm)
4
43
Centre T Gearbox mounting bolt (1/2" x 1-1/2" UNC)
4
44
B1245
Centre Bridge mount bolt & nut (M12 x 45)
6
45
77040
Centre Gearbox mount bridge plate
1
46
998535HK
GMF360 Main Hydraulic Hose Kit complete
1
47
19.099
Weld on output oil seal protector ring
4
48
377PL
Flail locking nut
8
49
2443
Stepped Flail bolt
8
50
10501310
Gold Tip Flail carrier
8
51
2365.01
Gold tip Flail - LH
4
52
2365.02
Gold-Tip Flail -RH
4
53
2365
Gold-Tip Flail bolt & nut
8
54
368B
Flail Steel locking nut
8
55
M18343
Hardned Flail washer
16
56
1255
Mulch Tip - short
16
57
1778
Hardened Flail Bush
16
58
10501210
Centre Flat mulch Flail
8
59
188
Flailbolt
8
60
189P
Repair kit (Pack of 2 ) Bolts, Bushes, Nuts etc
4
N/S
5039
Storage / parking leg height locator Pin
2
N/S
116028
Storage / parking Leg
2
N/S
5960
Warning Advice label
1
N/S
5965
Transfer 'Warning Keep Clear'
4
N/S
FWGT
Label: "Fitted with Gold-Tips"
1
N/S
SN GMF
Serial number Plate - GMF
1
N/S
5949
GMF360 DOMINATOR Main deck Label
1
N/S
5948
GMF360 Dominator Headstock Label (Pair)
1
N/S
5947
GMF360 Wing Main Decal
2

Page 15
ROLLER ASSEMBLY
Item
Part number
Description
Qty
1
905009SW
GMF360 Wing Rollers Front/ Rear
4
2
905009S
GMF360 Center Roller Front/ Rear
2
3
46-004-004
GMF360 Flat Roller Bearing Mount Plate
12
4
1200A
Roller Bearing Housing Only
12
5
1200X06
Roller Bearing (30mm Shaft Size)
12
6
M16
Roller Bearing Pivot Mounting Bolt & Nut
12
7
M16
Roller Bracket Deck Mount Bolt & Nut
24
8
M16
Roller Bearing Mounting Bolt & Nut
12
2a
46-004-002LH
GMF360 Left Hand Roller Bracket
6
2b
46-004-002RH
GMF360 Right Hand Roller Bracket
6

Page 16
FLAIL BLADE & HUB ASSEMBLY

Page 17
FLAIL BLADE & HUB ASSEMBLY continued
Item
Part number
Description
Qty
1
10501210
Centre Mulchflat flail Blade
8
2
388
Kinked Mulch blade tip - lower
16
N/S
388H
Optional Mulch blade tip - hard face tungsten
A/R
3
388
Kinked Mulch blade tip - upper
16
4
2443
Main Flail bolt with stepped bush
8
5
377PL
ThinFlail Lock nut
8
6
19.099
Weld on output seal protector ring
4
7
7700770
GMF Flail carrier (0 mm Extension)
4
8
188
Flail Bolt
8
9
M18343
Hardened Flail washer
16
10
1778
Hardened Flail bush
16
11
368B
Steel locknut
8
12
189P
Repair kit (Pack of 2 ) Bolts, Bushes, Nuts etc
4
13
10501310
Gold Tip flail carrier
8
14
2365.01
Gold-Tip Flail - LH
4
14
2365.02
Gold-Tip Flail - RH (pictured)
4
15
2365
Gold Tip Flail Bolt and Nut
8
16
1050LH
Slasher Flail Blade - LH (pictured)
4
16
1050RH
Slasher Flail Blade - RH
4
17
377PL
Thin Locking nut for Antiscalp Flail bolt
8
18
196004
Flailbush for Antiscalp Saucer
8
19
194019
Antiscalp saucer dome
4
20
2443.02
Flail bolt for Antiscalp Saucer
8
N/S
=
Not
pictured/shown

Page 18
GEARMOWER FLEX COUPLING ASSEMBLY
Item
Part number
Description
Qty
1
19.075
Rubber flex coupling element
2
2
314003
Clamping clamp flange c/w bolts
4
3
B1660
Coupling bolt & nut (M16 x 60)
12
4
71346
H D Flat washer M12
12
5
07.013
Concave coupling washer
24
6
10.038
Coupling bush
12
7
B1275
Flange Clamp bolt & nut (M12 x 75)
8
8
35-208/180
Complete coupling assembly (17 cm o/a length)
2

Page 19
MAIN DECK CENTRE GEARBOX: 01.126

Page 20
MAIN DECK OUTER GEARBOXES: B9211
Table of contents
Other Fieldmaster Lawn Mower manuals


