Fimei MK-37/C User manual

Before operating this unit, please read the instructions completely
Operating Instructions
Stand Mixer
MK-37/C

English
Dear Users:
Thanks for purchasing and using this product!
This product is an outstanding designed and high-qualified household electric
appliance.For nice operation, please carefully read the instruction and operate
according to the introduction in this manual. We will provide perineum service to
you during its service life. Due to the persistent advancement of this product,
the product you have may not be consistent with the diagrams in the manual.
Please accept our apologies for any inconvenience it may cause.
The MK-37/C Stand Mixer is a multi-functional electric appliance at the kitchen,
which can knead dough, stirring eggs and others in making pastries both in
Chinese style and western style; it can also replace or simulate manual work.
This machine can make foods in an easy, healthy and quick manner so that it is
a food cooking product at the kitchen with favorable experiences.
◇Bionic design of the dough hook with excellent kneading effect.
◇The feedback circuit is designed to produce an evenly stirring effect, safe
and practicable.
◇The over-heat protective device makes the product safe and reliable.
◇The stainless steel bowl is healthy, endurable and easy to be cleaned.
◇The disassemble components are easy to clean.
◇Full metal core can resist high-intensity operation and ensure a long service
life.
Introduction to Product Characteristics:
Technical Information:
Model: MK-37/C
Rated voltage: 220-240V
Rated frequency: 50/60Hz
Rated power: 1000W
Capacity of bowl: 5 Liter
Material of bowl: Food-grade stainless steel
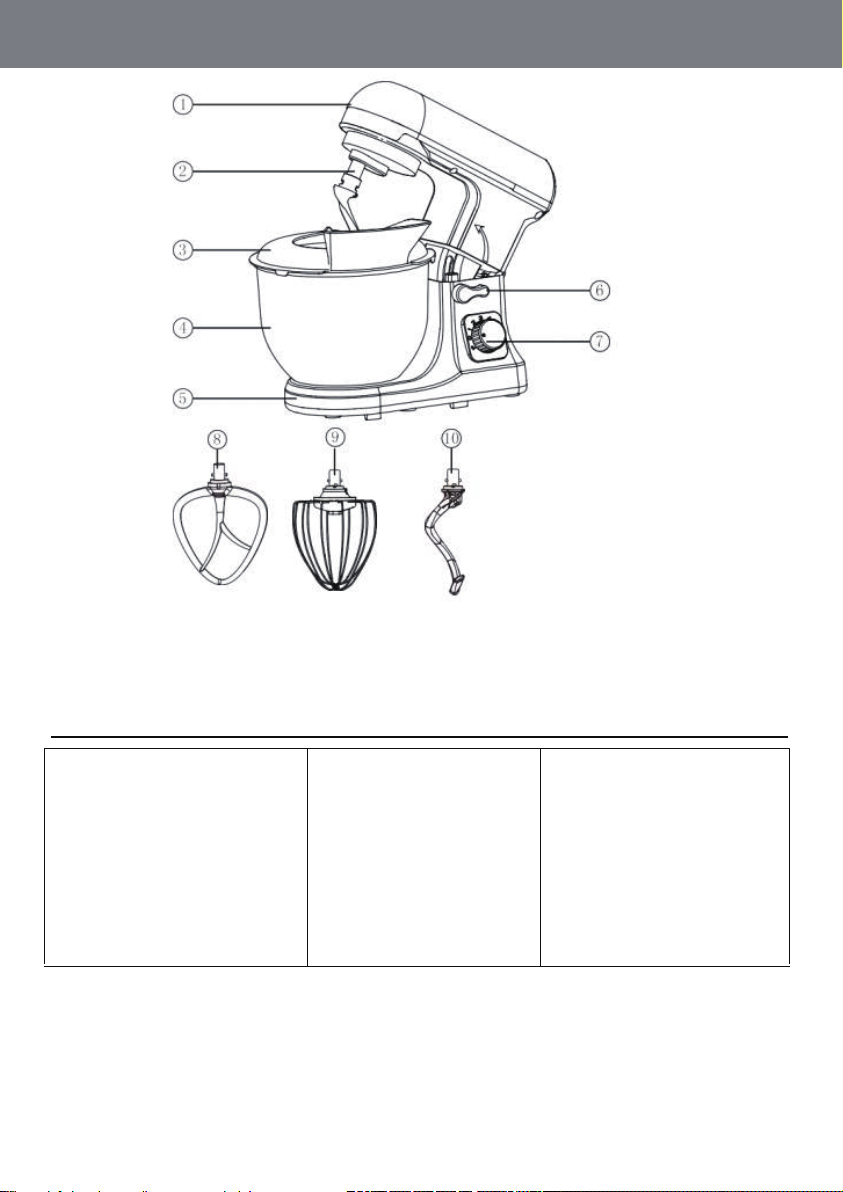
Configuration
(Fig1)
①Motor Head
②Attachments
Connector
③Pouring Shield
④Bowl
⑤Base
⑥Raising Knob
⑦Gear Knob
⑧ Flat Beater
⑨ Wire Whisk
⑩ Dough Hook
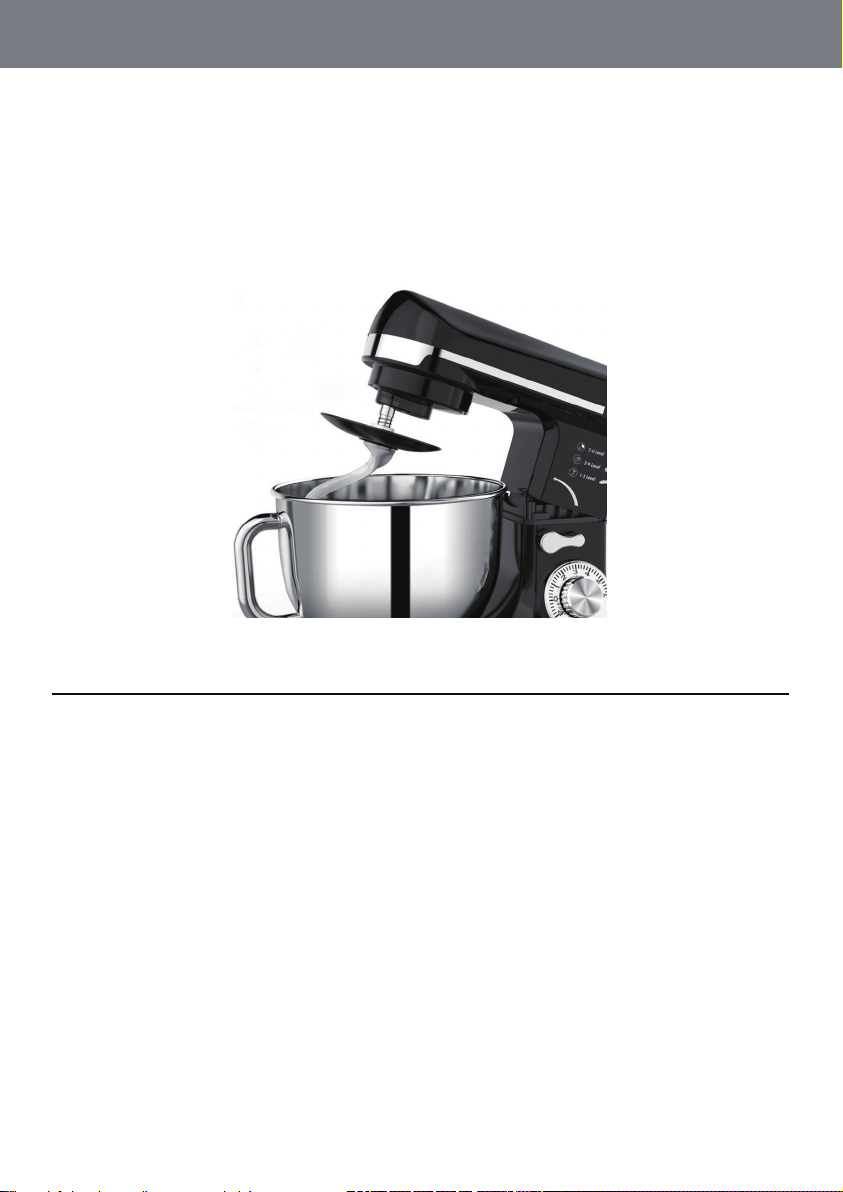
(Fig2)
English

Important Safety Advice
1. To avoid electric shocks, do not use this device in the vicinity of water. Do
not immerse the mains lead in water or other liquid.
2. Please read through the information and safety advice contained in these
operating instructions carefully and thoroughly before you use the stand
mixer for the first time.
3. Do not kink or clamp the mains lead. To avoid any risk of stumbling, do not
allow the mains lead to hang over the edge of a table or a counter.
4. Make sure that the voltage shown on the rating plate corresponds with that
of the mains supply. The rating plate can be found on the bottom of the
motor block. The stand mixer is only to be connected to an AC supply (~).
The motor must always be switching off before the stand mixer is
connected with the mains supply. (Switch (7) in the “0” setting).
5. Do not use outdoors. Only suitable for using indoors.
6. This device should not be set up in close proximity to a naked flame, easily
flammable materials (curtains, textiles, etc. ), a radiator, an oven or some
other heat source.
7. Before use, place the device on a horizontal and flat surface.
8. Place this device as close as possible to the power source so that you can
disconnect the plug quickly and easily.
9. The device must be operated with the type of power specified on the rating
plate. If you are unsure about the details of the available power supply, ask
your dealer or the local power supply company.
10. Do not attempt to repair the device yourself, since you will be exposed to
hazardous live components or other hazards by opening and removing the
covers.
11. Repairs should only be carried out in a qualified workshop.
12. This is not a toy! Keep away from children. The device should be used and
stored out of the reach of children.
13. Careful supervision is required when the device is used by or in the vicinity
of children.
14. The device should only be used for its intended purpose.
15. Never operate empty and without supervision.
English

Figure 1 Figure 2
16. During use, do not touch moving parts with your fingers.
17. Please note that when passing the device on to a third party, the operating
instructions must be included.
18. No liability is accepted for damage due to improper use or the failure to
observe our operating instructions / safety notes.
19. Unplug the appliance when not in use or before cleaning.
20. If the supply cord is damaged, it must be replaced by the manufacturer or
its service agent or a similarly qualified person in order to avoid a hazard.
21. Switch off the appliance before changing accessories or approaching parts
which move in use。
22. This appliance is not intended for use by persons (including children) with
reduced physical, sensory, or mental capacities, or lack of experience and
knowledge, unless they have been given supervision or instruction
concerning use of the appliance by a person responsible for their safety.
Machine Test
1. Anti-clockwise 90°to raise the raising button and then the machine head will
be raised (figure1 and 2).
English

Figure 3
2. Lock the dough hook on the connector (figure 3).
Note: Three staples on the shaft must be inserted into the detent on the dough
hook; the rotate clockwise to lock in place. If the staple is not aligned with the
detent, the machine will not be installed.
3. Place the bowl into the base as the figure 5 and lock it in the direction
Indicated on the machine.
4. Slightly fiddle the raising button downward, the machine head will sink. And
then, press the machine head with hands and lock it stably in up/down
direction. After the raising knob is fiddled to be level, it can be locked (shown
in the figure 5 and 6 ).
English

5. Turn on the power, toggle the gear knob to ”P” gear, and let it operate for a
short time, or toggle to the gear 1-6 for a long-time operation.
6. After testing, toggle the gear knob“0”gear to stop it.
7. Toggle the start button in anti-clockwise direction, hold the machine head,
and raise the machine head.
8. Take out the bowl from the base.
Before First Use
How to Use
Application
◇All parts of the stand mixer are to be thoroughly cleaned before being used
for the first time. (read section: Cleaning)
◇Take out the required length of cable from the base and connect the device
to the mains supply.
1. First mix up the food as what the manufacturer indicates, then rise knob (5) in
anti-clockwise direction to open the motor head.
2. Assemble the agitator bowl (4) filled with ingredients, then twist it on in
clockwise direction.
3. Insert the dough hook (11) or the eggs whisk (13) or the flat beater (12) into
the attachments connector then twist it on in clockwise direction.
4. Press the motor head (1) down by turning the rise knob (5) in clockwise
direction.
To mix or knead dough:
1. Suggestion flour and water at a ratio of 5:3.
2. First speed 1 to mix 10 seconds, then speed 2 to mix 10 seconds,
afterwards speed 3 for about 3-5 minutes.
3. When filling the agitator bowl, please ensure that the maximum quantity is
not exceeded.
English

Cleaning
Install Instructions
4. Maximum quantity of flour is 1500g.
5. The dough blade or mixing beater should be used.
Whipping egg whites or cream:
1. Switch on speed 4 to speed 6, whip the egg whites without stopping for
about 5 minutes, according to the size of the eggs, until stiff.
2. Maximum quantity is 24 eggs.
3. For whipped cream, whip 250ml fresh cream at speed 4 to 6 for about 5
minutes.
4. When filling the agitator bowl with fresh milk, cream or other ingredients,
please ensure that the maximum quality is not exceeded.
5. The egg whisk should be used.
Mixing shakes, cocktails or other liquids:
1. Mix the ingredients according to the available recipe, from speed 1 to 6 for
about 5 minutes.
2. Do not exceed the maximum quantity for the agitator bowl.
3. The mixing beater should be used.
1. Before cleaning, please ensure that the switch knob is at the “0” position
and that the plug has been disconnected from the socket.
2. After use, allow the device to cool down before you start to clean it.
3. To clean the exterior of the device, use a moist cloth and a mild detergent.
4. To clean the device, never submerge it in water.
5. The agitator bowl is dishwasher safe. The bowl can also be cleaned with
warm water and washing-up liquid. Do not use any abrasive detergents.
Assembly of dough hook ,mixing beater or egg whisk
1. Before attaching the dough hooks, mixing beater and egg whisk, make sure
English
Notices
the both safety covers of mixer and grinder are placed on and the power
cord is disconnected.
2. Lift the rise knob up so as to move the swiveling arm upwards.
3. Attach the dusty cover (Fig.1, No.14).
4. Insert the dough hooks, mixing beater and egg whisk on the driving shaft
and lock clockwise to the limit stop.
English
1. The instructions on the Operation Manual must be strictly observed.
2. Prior to operation, please lock the machine head. Otherwise, the
machine will not start for the purpose of safety safeguarding.
3. Knead dough at the gear 1 or gear 2. Do not knead dough at a higher
gear or gear “P”. Otherwise, the machine will be over-loaded, and
damage may be caused. Such kind of damage will be beyond the scope
of guarantee.
4. For safety, make sure the pouring shield properly before operating the
machine. Do not close to the beater during the operation time.
5. Be carefully to open or close the up and down body. Please do not
directly press or raise the machine head abruptly. Otherwise, damaged
may be caused and such damage is beyond the scope of guarantee.
6. Place the machine on the smooth and flat table to ensure the stability of the
operation.

English
7. Upon removing the egg whisk, just operate the plastic connector. Do
not hold the steel wire abruptly. Otherwise, the whisk may be damaged.
8. Prior to turning on the power, please make sure that the gear knob is located
at the “0” gear. After turning on, the gear can be adjusted.
9. At the connection part of the up and down body, a “Safety Switch” has been
designed. Three states need to be watched during operation:
A. When the machine head is raised, do not turn on the power or operate
the machine. After closing the up and down part of the machine head,
turn on the power and toggle the gear, then the machine will operate
accordingly.
B. Press the raising button during operation, the machine head will raise
and the operation will instantly stop.
C. Turn on the power, the machine head will raise. Please do not close the
machine head when the gear button is at any location from 1 to 6.
Otherwise, the machine will abruptly and quickly operate for a while,
which will against the safety and damage may be caused herein.
Please be careful.
10. The power feedback device is imbedded in this machine. The output
power and rotation speed can be automatically adjusted according to the
loading situation. Short delay may occur in booting and gear switching.
Operation will not be in constant rate under different conditions. Be easy
when using it.
11.Notices to ventilation and heat dissipation. Keep the machine away from
the heat sources (e.g. gas burner, icebox, electric bowl, etc.). The mesh
heat dissipation outlet is located at the bottom and rear part of the machine.
The placement table should be smooth and flat. Do not make the air
outlet be obstructed (e.g. obstructed by wall) since it will block heat
dissipation.
12.The bowl can stir continuously for 10 min and then stop it for 3-5 min.
Continuous operation time should reduce in summer to ensure that the
machine head will not scald hands. Otherwise, please instantly stop the
machine and cool it down.
13.To extend service life of this machine, please pay special attention to
the continuous operation time of this machine.

Important Statement
English
1. Dear users, thanks for purchasing our products. Please carefully read this
manual prior to operation. We will deem that you have a thoroughly
understanding of this manual, when you use this product.
2. We are dedicated to providing updated and perfect products, experiences
and services and reserve the rights to update the product software and
hardware. For any alternation or supple-ment of the package, manual or
this product, no notification will to be sent to you. The product is subject
to the material product and images are only for reference. Appearance
of actual products and components may be different from the description
of images, text or packages.
3. Accessories are beyond the standard configuration. The purchased product
may not include additional accessories.
4. Please strictly observe the notices and warnings referred in the manual.
Otherwise, product failure and damage may be caused and damages will
not be in the scope of guarantee.
5. This product provides function services, e.g. stirring and egg breaking. This
manual provides the function introduction and basic tips for operation. The
finished piece will be affected by the food property, stirring ratio, operator
method, operator’s proficiency, operation skills and environmental factors,
so a user need to know more techniques and skills to fully exert the function
of the machine. The supplier is not liable to ensure a perfect finished piece
produced by this machine.
English
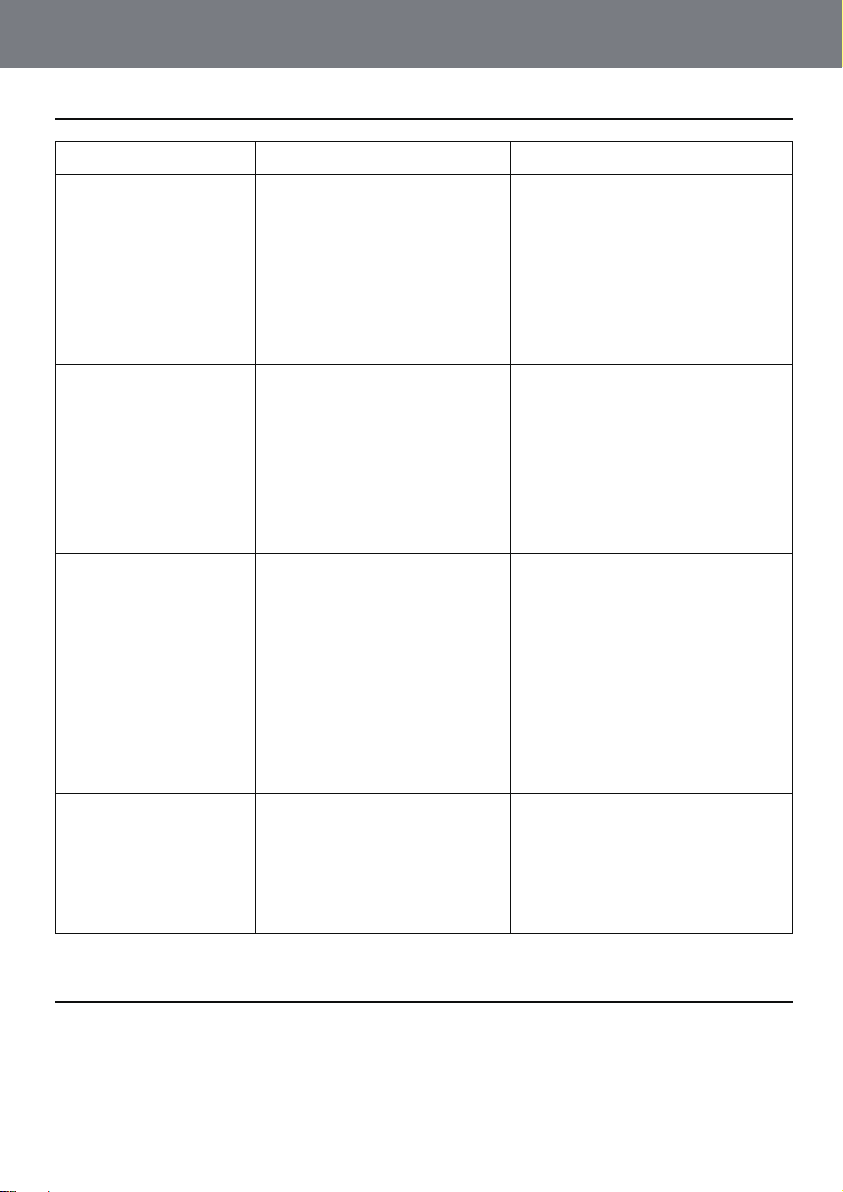
Common Failures and Solutions
Packing List
Troubles Causes Troubleshooting
The machine does
not work
When the machine
operates, the bowl
will give out sound
(the machine
scrapes the bowl)
To rotate gear
knob, a gear does
not work
The machine swings
during operation.
1.The power cable does
not connect the socket
well.
2.The raising switch
does not rebound
inplace.
1. The bowl is not
installed in place.
2. The attachment
beater is
Not locked.
The switch rotation force
is too strong.
The base mat is not
installed in place.
- Check if the plug has
been plugged into the
socket thoroughly.
- Check if the start
button fully rebounds in
place.
- Check if the bowl is
correctly installed in
place.
- Check if the attachment
beater is reliably
connected.
- Check if the knob silk
screen of the gear knob
corresponds to the silk
screen of the body. The
rotation force may be too
strong.
- Restart the gear and
Check if it can work.
- Check if the cushion
Falls off on the base.
- Check if the machine is
used on the smooth and
flat table.
Main Machine 1 set
Mixing bowl 1 pc
Flat beater 1 set
Dough hook 1 set
Wire whisk 1 set
Instruction manual 1 pc
DEUTSCH
Bedienungsanleitung
Küchenmaschine
MK-37/C
Bevor Sie dieses Gerät in Betrieb nehmen, lesen Sie bitte die
Anweisungen vollständig.

Sehr geehrte Benutzer:
vielen Dank, dass Sie dieses Produkt gekauft und verwendet haben!
Bei diesem Produkt handelt es sich um ein hochwertiges Haushaltsgerät mit
hervorragendem Design. Bitte lesen Sie die Anleitung sorgfältig durch und
beachten Sie die Anweisungen in diesem Handbuch.
Wir werden Ihnen während seiner Nutzungsdauer hochwertigen Service
anbieten. Aufgrund der ständigen Weiterentwicklung dieses Produkts stimmt
das von Ihnen verwendete Produkt möglicherweise nicht mit den Abbildungen
im Handbuch überein. Bitte entschuldigen Sie uns für etwaige
Unannehmlichkeiten.
Die Küchenmaschine MK-37/C ist ein multifunktionales Elektrogerät in der Küche,
das Teig knetet, Eier rührt und andere zum Backen sowohl im chinesischen als
auch im westlichen Stil verwendet. Es kann auch manuelle Arbeit ersetzen oder
simulieren. Die Maschine kann Lebensmittel bequem, gesund und schnell
zubereiten und macht sie zu einem kulinarischen Produkt mit guter Erfahrung.
◇Bionisches Design des Knethakens mit ausgezeichneter Knetwirkung.
◇Die Rückkopplungsschaltung ist entworfen, um eine gleichmäßige
Rührwirkung, sicher und praktisch zu machen.
◇Die Überhitzungsschutzvorrichtung macht das Produkt sicher und zuverlässig.
◇Die Edelstahlschüssel ist gesund, haltbar und leicht zu reinigen.
◇Die abnehmbare Komponenten sind leicht zu reinigen und montieren.
◇Der Vollmetallkern kann eine hohe Betriebsfestigkeit standhalten und eine
lange Lebensdauer gewährleisten.
Einführung in die Produktmerkmale:
Technische Information:
Modell: MK-37/C
Nennspannung: 220-240V
Nennfrequenz: 50/60Hz
Nennleistung: 1000W
Kapazität der Schüssel: 5 Liter
Schüsselmaterial: Edelstahl mit Lebensmittelqualität
DEUTSCH

Aufbau
(Abb1)
(Abb2)
①Motorkopf
②Teilverbinder
③Spritzschutz
④Schüssel
⑤ Basis
⑥Anhebeknopf
⑦Schaltknopf
⑧Rührhaken
⑨Schneebesen
⑩Knethaken
DEUTSCH

Wichtiger Sicherheitshinweis
1. Verwenden Sie dieses Gerät nicht in der Nähe von Wasser, um
Stromschläge zu vermeiden. Tauchen Sie das Netzkabel nicht in Wasser
oder andere Flüssigkeiten.
2. Bitte lesen Sie die Informationen und Sicherheitshinweise in Handbuch
sorgfältig durch, bevor Sie die Machine zum ersten Mal verwenden.
3. Knicken oder klemmen Sie das Netzkabel nicht. Lassen Sie das Netzkabel
nicht über die Kante eines Tisches oder einer Theke hängen, um Stolpern
zu vermeiden.
4. Stellen Sie bitte sicher, dass die auf dem Typenschild angegebene
Spannung mit der Netzspannung übereinstimmt. Das Typenschild befindet
sich an der Unterseite des Motorblocks. Die Maschine darf nur an eine
Wechselstromversorgung (~) angeschlossen werden. Der Motor muss
immer ausgeschaltet sein, bevor die Maschine an das Stromnetz
angeschlossen wird. (Schalter (7) in der Einstellung "0").
5. Verwenden Sie die Maschine nicht im Freien.
6. Das Gerät darf nicht in der Nähe von offenem Feuer, leicht entzündlichen
Materialien (Vorhänge, Textilien usw.), einem Heizkörper, einem Ofen oder
einer anderen Wärmequelle aufgestellt werden.
7. Stellen Sie das Gerät vor dem Einsatz auf einer horizontalen und ebenen
Fläche auf.
8. Stellen Sie das Gerät so nahe wie möglich an der Stromquelle auf, damit Sie
den Stecker schnell und einfach abziehen können.
9. Das Gerät muss mit der auf dem Typenschild angegebenen Leistung
betrieben werden. Wenn Sie sich nicht sicher sind, welche Details zur
verfügbaren Stromversorgung zur Verfügung stehen, wenden Sie sich an
Ihren Händler oder das örtliche Energieversorgungsunternehmen.
10. Versuchen Sie nicht, das Gerät selbst zu reparieren, da Sie durch Öffnen
und Entfernen der Abdeckungen gefährlichen stromführenden Bauteilen oder
anderen Gefahren ausgesetzt sind.
11. Reparaturen dürfen nur in einer qualifizierten Werkstatt ausgeführt werden
12. Das ist kein Spielzeug! Von Kindern fernhalten. Das Gerät sollte außerhalb
der Reichweite von Kindern verwendet und aufbewahrt werden.
DEUTSCH

Figure 1 Figure 2
13. Wenn das Gerät von Kindern oder in deren Nähe verwendet wird, ist
sorgfältige Überwachung erforderlich.
14. Das Gerät darf nur für den vorgesehenen Zweck verwendet werden.
15. Niemals leer und ohne Aufsicht betreiben.
16. Berühren Sie während der Arbeit keine beweglichen Teile mit den Fingern.
17. Bitte beachten Sie, dass bei der Weitergabe des Geräts an Dritte die
Bedienungsanleitung beiliegen muss
18. Es wird keine Haftung für Schäden übernommen, die durch nicht
bestimmungsgemäße Verwendung oder Nichtbeachtung unserer
Bedienungsanleitung / Sicherheitshinweise entstehen.
19. Ziehen Sie den Stecker aus der Steckdose, wenn Sie das Gerät nicht
benutzen oder vor dem Reinigen.
20. Wenn das Netzkabel beschädigt ist, muss es vom Hersteller oder seinem
Kundendienst oder einer ähnlich qualifizierten Person ersetzt werden, um
eine Gefahr zu vermeiden.
21. Schalten Sie das Gerät aus, bevor Sie Zubehörteile wechseln oder sich
bewegenden Teilen nähern.
22. Dieses Gerät darf nicht von Personen (einschließlich Kindern) mit
eingeschränkter körperlicher, sensorischer oder geistiger Leistungsfähigkeit
oder mangelnder Erfahrung und Kenntnissen verwendet werden, es sei
denn, sie wurden von einer für dieses Gerät verantwortlichen Person
beaufsichtigt oder instruiert Sicherheit.
Maschinentest
1. Um 90 ° gegen den Uhrzeigersinn anzuheben, wird der Anhebeknopf
angehoben, und der Maschinenkopf wird angehoben (Abbildung 1 und 2).
DEUTSCH

2. Schließen Sie den Teighaken am Stecker an (Abbildung 3).
Hinweis: Drei Klammern am Schaft müssen in den Rast am Knethaken
eingeführt werden. Drehen Sie die im Uhrzeigersinn, bis sie einrastet.
Wenn die Klammer nicht mit der Rastnase ausgerichtet ist, funktioniert die
Maschine nicht richtig.
3. Setzen Sie die Schüssel wie in Abbildung 5 gezeigt in die Basis ein und
verriegeln Sie sie in der auf der Maschine angegebenen Richtung.
4. Drücken Sie den Anhebeknopf leicht nach unten , der Maschinenkopf sinkt.
Drücken Sie dann den Maschinenkopf mit den Händen und verriegeln Sie ihn
stabil nach oben / unten. Sobald Sie den Knopf in die horizontale Position
bewegen, können Sie ihn verriegeln (siehe Abbildung 5 und Abbildung 6).
5. Schalten Sie den Strom ein, stellen Sie den Schaltknopf auf „P“ und lassen
Sie ihn kurz laufen, oder schalten Sie den Gang 1-6 um, um eine längere
Zeit zu arbeiten.
6. Wenn der Test abgeschlossen ist, drehen Sie "0" Taste, um ihn zu stoppen..
7. Drücken Sie den Startknopf gegen den Uhrzeigersinn, halten Sie den
Maschinenkopf und heben Sie den Maschinenkopf an.
8. Nehmen Sie die Schüssel von der Basis.
DEUTSCH
Figure 3

Vor dem ersten Gebrauch
Wie benutzt man die Maschine
Anwendung
◇Alle Teile der Küchenmaschine sollen vor dem ersten Nutzung gründlich
gereinigt werden. (Lesen Sie bitte Abschnitt: Reinigung).
◇Nehmen Sie das Kabel von der Basis ab und verbinden Sie das Gerät mit
dem Stromnetz.
1. Mischen Sie zuerst die Lebensmittel entsprechend den Angaben des
Herstellers. Heben Sie dann den Knopf (6) gegen den Uhrzeigersinn an, um
den Motorkopf zu öffnen.
2. Montieren Sie die mit Zutaten gefüllte Rührschüssel (4) und drehen Sie sie im
Uhrzeigersinn auf.
3. Setzen Sie den Knethaken (10) oder den Schneebesen (9) oder den
Rührhaken (8) in den Anschluss für die Aufsätze und drehen Sie ihn im
Uhrzeigersinn auf.
4. Drücken Sie den Motorkopf (1) nach unten, indem Sie den Einstellknopf (6)
im Uhrzeigersinn drehen.
Teig mischen oder kneten:
1. Mehl und Wasser im Verhältnis 5: 3.
2. Zuerst Geschwindigkeit 1, um 10 Sekunden zu mischen, dann
Geschwindigkeit 2, um 10 Sekunden zu mischen, danach Geschwindigkeit
3 für etwa 3-5 Minuten.
3. Achten Sie beim Füllen der Rührschüssel darauf, dass die Maximalmenge
nicht überschritten wird.
4. Maximale Mehlmenge beträgt 1500g.
5. Die Teigklinge oder der Mischklopfer sollten verwendet werden.
Eiweiß oder Sahne schlagen:
1. Schalten Sie die Geschwindigkeit 4 bis 6 ein, schlagen Sie das Eiweiß ohne
Unterbrechung für etwa 5 Minuten vor, je nach Größe der Eier, bis es steif ist.
2. Maximale Menge beträgt 24 Eier.
DEUTSCH

Reinigung
Installationsanweisungen
1. Stellen Sie vor dem Reinigen sicher, dass sich der Schalter auf „0“ befindet
und der Stecker aus der Steckdose gezogen wurde.
2. Lassen Sie das Gerät nach dem Gebrauch abkühlen, bevor Sie mit der
Reinigung beginnen.
3. Verwenden Sie zum Reinigen der Außenseite des Geräts ein feuchtes Tuch
und ein mildes Reinigungsmittel.
4. Tauchen Sie das Gerät niemals in Wasser, um es zu reinigen.
5. Die Rührschüssel ist spülmaschinenfest. Die Schüssel kann auch mit
warmem Wasser und Spülmittel gereinigt werden. Verwenden Sie keine
scheuernden Reinigungsmittel.
Montage des Knethakens, Rührbesen oder Schneebesen
1. Vergewissern Sie sich vor dem Anbringen der Knethaken, des Rührwerks
und des Schneebesenes, dass die beiden Sicherheitsabdeckungen des
Mischers und der Mühle angebracht sind und das Netzkabel abgezogen ist.
2. Heben Sie den Steigungsknopf an, um den Schwenkarm nach oben zu
bewegen.
3. Bringen Sie die Spritzschutz an (Abb. 1, Nr. 14).
4. Setzen Sie die Knethaken, den Rührbesen und das Schneebesen auf die
Antriebswelle und verriegeln Sie sie bis zum Anschlag im Uhrzeigersinn.
3. Schlagen Sie 250 ml frische Sahne bei einer Geschwindigkeit von 4 bis 6
Minuten für etwa 5 Minuten.
4. Wenn Sie die Rührschüssel mit frischer Milch, Sahne oder anderen Zutaten
befüllen, stellen Sie sicher, dass die maximale Qualität nicht überschritten wird.
5. Der Schneebesen sollte verwendet werden.
Mischen von Shakes, Cocktails oder anderen Flüssigkeiten:
1. Mischen Sie die Zutaten gemäß dem verfügbaren Rezept für etwa 5 Minuten
von Stufe 1 bis 6.
2. Überschreiten Sie nicht die maximale Menge für die Rührschüssel.
Der Mixer sollte verwendet werden
DEUTSCH
Table of contents
Languages:


