Fine offset WH0250 User manual

-1-
WIRELESS SOLAR POWER WEATHER STATION
INSTRUCTION MANUAL
MODEL NO.: WH0250/ WH0251
Page
1. Introduction.......................................................................................- 2 -
1.1 Package Contents.................................................................- 2 -
1.2 Feature......................................................................................- 2 -
2. Installation.........................................................................................- 2 -
2.1 Installing the Batteries.........................................................- 2 -
2.2 Reception of outdoor temperature and RCC time.......- 3 -
2.3 Additional transmitters........................................................- 4 -
2.4 Mounting..................................................................................- 4 -
2.4.1 Base Station................................................................ - 4 -
2.4.2 Remote Sensor...........................................................- 4 -
3. Overview............................................................................................ - 5 -
4. Program Mode............................................................................... - 6 -
4.1 Setting Modes........................................................................ - 6 -
4.2 MIN/MAX Mode.......................................................................- 7 -
4.3 Time Alarm Mode...................................................................- 7 -
5. Battery replacement........................................................................- 8 -
6. Troubleshooting...............................................................................- 8 -
7. Specifications...................................................................................- 8 -

-2-
This Operation Manual is part of this product and should be kept in a safe place
fo
r
future reference. It contains important notes on setup and operation.
*NOTE: This is a combined operation manual for WH0250 and WH0251. WH0250 can
receive and display the radio controlled time and date (RCC function). WH0251 maintain
all the functions of WH0250 but without RCC function.
1. Introduction
Thank you fo
r
purchasing this Wireless Weathe
r
Station. Designed fo
r
everyday
use, the weather station will prove to be an asset of great value fo
r
your
personal use in the home or office. Please read this instruction manual
thoroughly to fully understand the correct operation of your weather station and
benefit from its unique feature.
1.1 Package Contents
z1x Weathe
r
station base unit
z1x remote Sensor with mounting bracket
zMounting Screws
zInstruction manual
1.2 Feature
1) Wireless outdoor and indoor temperature (°F or °C)
2) Records min. and max. temperature
3) Receive and displays the Radio controlled time (DCF, WWVB) and date with
manual setting option (WH0250)
4)Timeanddatewithmanualsetting(WH0251)
5) Time Alarm and Zone Setting
6) 12 or 24-hour time display
7) 100 yea
r
calenda
r
with week (2000-2099)
8) Can receive up to 3 senso
r
s
2. Installation
2.1 Installing the Batteries
Temperature sensor
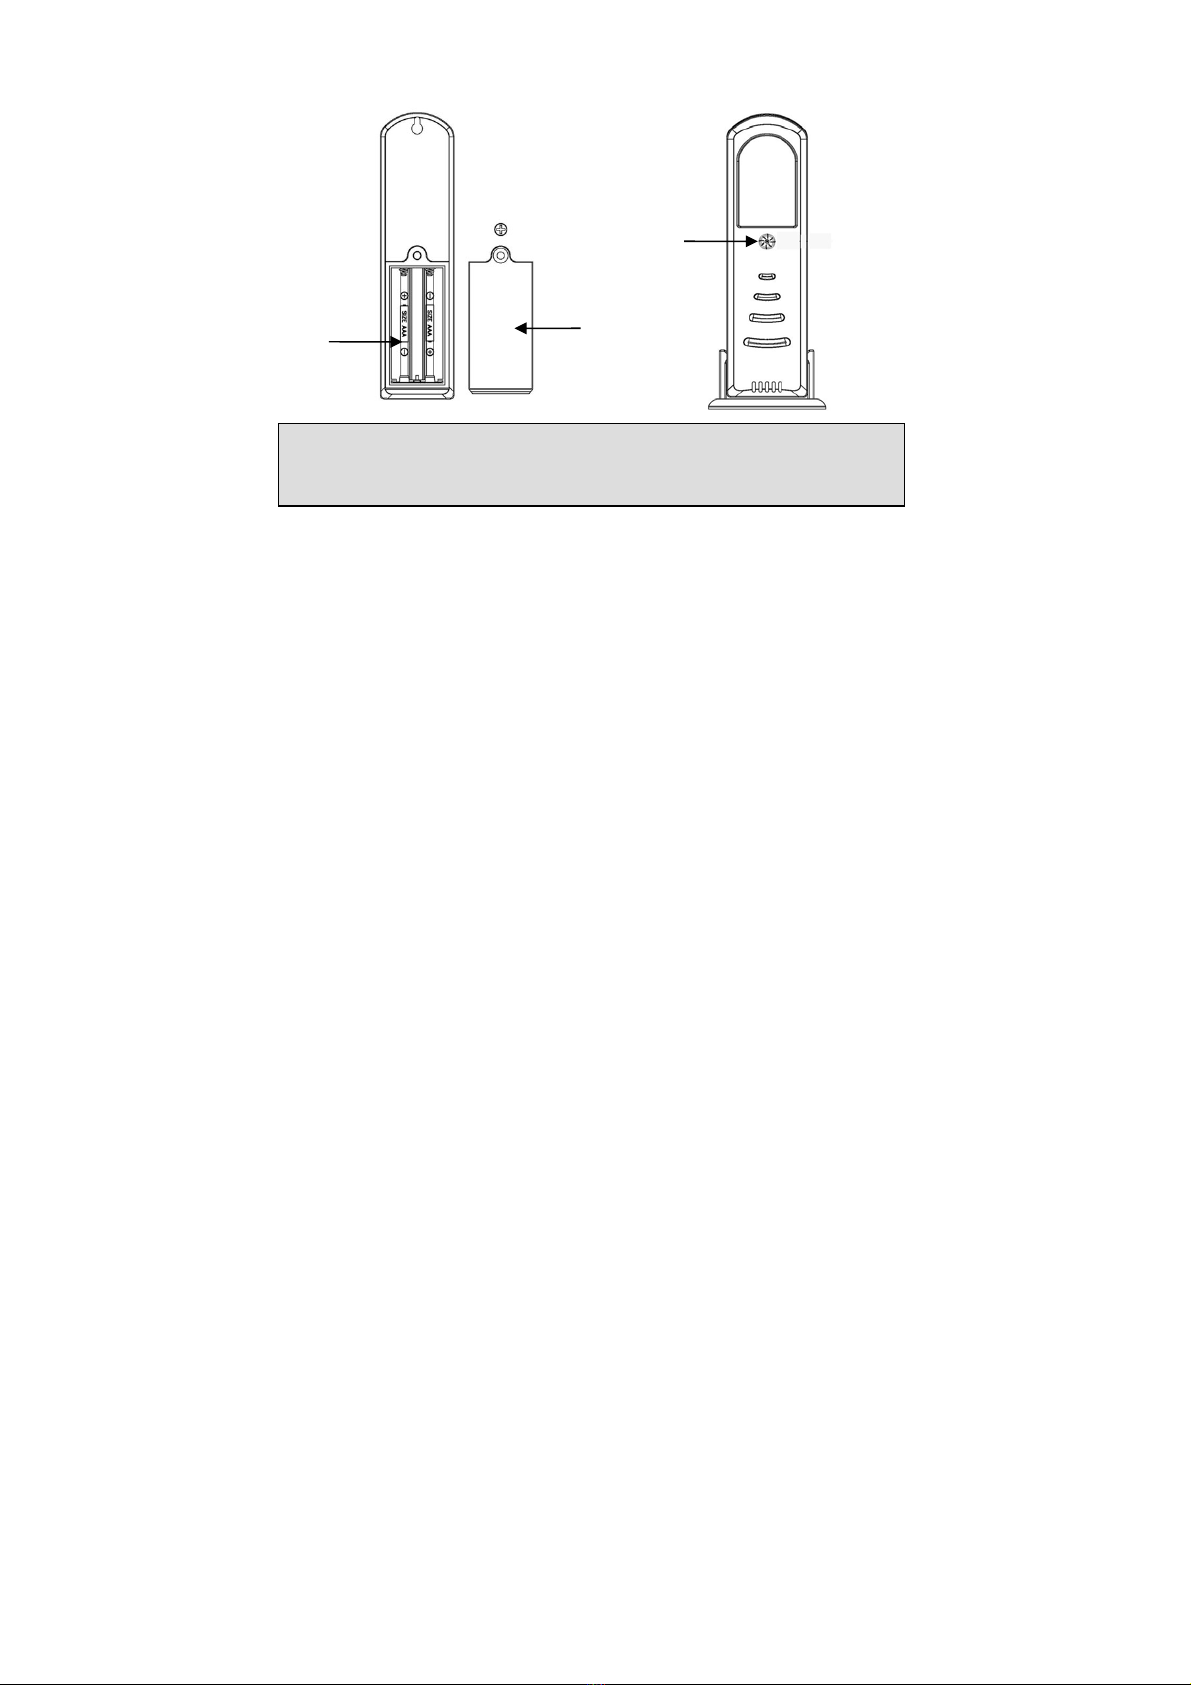
-3-
Note: Please note the polarity when inserting
/
replacing batte
r
ies in the unit,
failure to do so may result in permanent damage. Use good qualityAlkaline
Batteries and avoid rechargeable batteries.
1) Open the battery compartment of the display unit and the transmitter and
place both instruments on a desk with a distance of approximately 1.5
meter. Check that no othe
r
electronic devices are close.
2) Insert 2XAAA 1,5V Alkaline batteries first into the battery compartment of
the transmitter and immediately afterwards 2XAA 1,5 V in the display unit,
observing the correct polarity. When battery is first inserted, the red LED
light will be light up fo
r
3-4 seconds. (If no LED light up or is lighted
permanently, make sure the battery is inserted the correct way or a proper
reset is happened)
2.
2
Reception o
f
outdoor temperature and RC
C
time
RF (Radio Frequency) Receiving mode
1. When the base station is powered up, all LCD segments will light up fo
r
about 4 seconds afte
r
the “beep”. The weather station begins to registe
r
the
outdoor transmitter, enter RF receiving state fo
r
3mininutes
2. Base station receive the outdoor temperature each 48s. If there is no new
effective signal from the senso
r
in constancy reception failure 6 times, the
outdoor temperature will displays “--.-“
3. Do not press any key before outdoor senso
r
data received, otherwise the
outdoor senso
r
learning mode will be terminated.
4. If the outdoor weathe
r
data is not displayed o
r
if any key is pressed before
the weathe
r
station receives the signal, or when changing batteries you will
need to follo
w
the battery installation procedure again. Please wait 10
seconds before re-insert the battery again to make a prope
r
reset for both
transmitte
r
and receiver.
Battery
compartment
LED
light
Batter
y
cove
r

-4-
RCC (Radio Controlled Clock) Receiving Mode
1. During the RF receiving mode, if any key is pressed or time out (3minute), the
unit will ente
r
the RCC receiving mode(maximum 8 minutes). Press any key to
exit the RCC receiving mode.
2. If no RCC signal is detected, the base station will try once every hour to get
an RCC signal until a signal is received. Once the base station receives the
RCC signal it will overwrite the manually set time and date, on the base station
the RCC towe
r
icon will be display.
3. If RCC signal is detected successfully, the base station will continue to scan
fo
r
the RCC signal each day at 2:00, 8:00, 14:00 and 20:00, despite if you
manually set the date and time.
4. The best condition fo
r
reception is at night, between midnight and 6:00am
–
when there is less atmospheric interference.
Afte
r
both outdoo
r
temperature and radio controlled time are displa
y
ed
y
ou can
place
y
ou
r
remote senso
r
outdoors at the final destination.
Note fo
r
Radio Controlled Time:
The DCF WWVB or MSF time signal is an AM modulated time-of-day signal
broadcasted by the Federal Government of Germany, NIST from USA or
National Physical Laboratory. The time base is generated from an atomic
time generator which is accurate to 10 billions of one second.
Please take note o
f
the following fo
r
RCC time reception:
zRecommended distance to any interfering sources like compute
r
monitors
or TV sets is a minimum of 1.5-2 meters.
zWithin ferro-concrete rooms (basements, superstructures), the received
signal is naturally weakened. In extreme cases, please place the unit close
toawindowand/o
r
point its front or back towards the Frankfurt transmitter.
2.
3
Additiona
l
transmitters
The wireless weather station can receive up to 3 temperature sensors. If you
have purchased additional remote sensors, repeat step 1) fo
r
all extra sensors.
However, ensure that you leave 10 seconds in between the reception o
f
the
last sensor and the set-up o
f
the following sensor. The wireless weather
station will numbe
r
thesensorsintheorde
r
of set-up automatically, i.e. the first
temperature sensor will have the temperature displayed with 1. If only have one
sensor, 1won’t be display.
2.4 Mounting
2.4.1 Base Station
With one foldable leg at the back of the unit, the base station can be placed onto
any flat surface or wall mounted at the desired location by the hanging holes at
the back of the unit. It is important to check that the radio signal can be received
before permanently mounting any of the units
2.4.2 Remote Sensor
Note: To achieve a true temperature reading, avoid mounting remote senso
r
in

-5-
direct sunlight. We recommend that you mount the remote sensor on an outside
North-facing wall; obstacles such as walls, concrete, and large metal objects will
reduce the range.
The outdoor temperature senso
r
bracket can be affixed by screws in 2 ways:
①②
3. Overview
Base unit-LCD
The following illustration shows the full segments of the LCD for description
purposes only and will not appear like this during normal operation.
This end u
p
to
p
revent water
dama
g
e

-6-
1. Number showing sensor unit
2. Outdoor sensor low battery indicator
3. MAX MIN information
4. Temperature display unit
5. Indoor temperature display
6. Time display
7. Day of week
8. Calendar / alarm time
9. Alarm icon
10. Second display
11. RCC Tower icon
12. Outdoor temperature display
13. Outdoor reception signal
4. Program Mode
The base station has fou
r
keys fo
r
easy operation: SET key, CH/+ key,
MIN/MAX key and ALARM key.
Press CH/+ key to toggle between the outdoor senso
r
CH1, CH2, and CH3 (If
more than 1 senso
r
is used)
4.1 Setting Modes
- While in the normal mode, press the SET key shortly to select ALARM TIME o
r
calenda
r
displa
y
.
- While in the normal mode, press the SET key fo
r
2 seconds to ente
r
the setting
modes. Temperature display unit ℃or ℉digits will start flashing. Press the
MIN/MAX or C/H+key to select the temperature unit.
- Press the SET key to select the following setting:
zRCC on/off
zTime Zone Setting
At Europe, 0 for GMT+1 time zone, 1 for GMT+2 time zone, -1 for GMT time

-7-
zone.
At America, -4 for Atlantic time zone, -5 for Eastern Time zone, -6 for
Central Time Zone, -7 for Mountain Time zone, -8 for Pacific time zone, -9
for Alaska time zone, -10 for Hawaii time zone.
z12/24 hou
r
format
zManual time setting (hours/minutes)
zDate display format DM or MD (default DM format fo
r
DCF and MSF
version, default MD format fo
r
WWVB and JJY version)
zCalenda
r
setting(in the orde
r
of yea
r
/
month
/
date)
Press MIN/MAX o
r
CH/+ key to select the units or scrolls the value. Holding the
keys will increase/ decrease digits in great steps. Press the SET key to accept
the change and advance to the next setting mode. Continue to press the SET
key to toggle through the setting mode until return to the normal Mode
- The setting mode will return to normal display mode while key idle 20s.
4.2 MIN/MAX Mode
- While in the normal mode, press MIN/MAX key to display the following values
in sequence:
zmaximum indoor temperature
zminimum indoor temperature
zmaximum CH1 outdoor temperature
zminimum CH1 outdoor temperature
zmaximum CH2 outdoor temperature (If 2 sensors are used)
zminimum CH2 outdoor temperature (If 2 sensors are used)
zmaximum CH3 outdoor temperature (If 3 sensors are used)
zminimum CH3 outdoor temperature (If 3 sensors are used)
Hold the MIN/MAX key fo
r
2 seconds, the above individual minimum o
r
maximum record will be reset to current temperature.
- The MIN/MAX mode will return to normal display mode while key idle 5s.
4.3 Time Alarm Mode
- While in normal mode, press and hold the
A
LARM key fo
r
2 seconds to ente
r
time alarm mode. The alarm hou
r
will start flashing, press MIN/MAX o
r
CH/+ key
to adjust the alarm hou
r
up or down. Confirm with
A
LARM key and skip to alarm
minutes, press MIN/MAX or CH/+ key to adjust the alarm minute. Press ALARM
key again to confirm and exit the setting.
- While in normal mode, press the
A
LARM key to activate or de-active the alarm.
If the alarm is active, the alarm icon will be displayed.
Cancelling the alarm
When an alarm has been triggered, the alarm will sound and the alarm icon will

-8-
flash for 120secondss. Press any of the SET, MIN/MAX/- key or CH/+ keys to
silence the alarm. Press ALARM key to enter the SNOOZE mode, will
start flashing indicating that the alarm is active but in snooze mode.
T
he alarm
will sound a
g
ain in 5 minutes.
If longer than 20s no key operation, the unit will switch itself to normal display
mode automatically.
5. Batter
y
replacement
zWhen the batteries of the outdoor senso
r
are used up, the low battery
indicator appears on the display
zIf battery change happened on remote senso
r
side, then the base station
must be powered up again to re-learn the transmitter.
zPlease use Alkaline Batteries, do not use rechargeable batteries. Please
take note of correct battery polarity.
Note:
Please participate in the preservation of the environment by properly disposing
of all used-up batteries and accumulators at designated disposal points. Never
dispose of batteries in a fire as this may cause explosion, risk of fire or leakage
of dangerous chemicals and fumes
6. Troubleshooting
Q 1. No signal from remote sensor
A There can be many reasons for this, the following steps should help you
troubleshoot this problem.
1.1 Make sure that the batteries in the remote sensor are not depleted.
1.2 Reduce the distance between transmitter and receiver
1.3 Remove the batteries from the base station and the remote sensor
and reset the weather station in the right order as described in section 2
of this manual.
1.4 This problem could also be a result of radio interference in your
neighborhood, try relocating the sensor and the base station
Q 2 Remote sensor drops off intermittently
A Possible interference from other sources, try relocating the sensor or the
base station. Radio device operation on the same frequency can also cause
interference.
Q 3 Temperature,is incorrect.
A Check/ Replace the batteries. Also make sure that the remote sensor is
not place near objects that can act as sources of heat or cold.
7. Specifications

-9-
Outdoor data
Transmission distance in open field : 100meter max.
Frequency : 433MHz
Temperature range : -40℃to +65℃(sho
w
OFL if outside
range)
Resolution : 0.1℃
Measuring interval remote senso
r
:48sec
Water proof level : IPX3
Indoo
r
data
Temperature : 30 sec
Indoo
r
temperature range : -9.9℃to +60℃
Resolution : 0.1℃
Alarm duration : 120 sec
Powe
r
consumption
Base station batteries : 2XAAA 1.5V LR03 Alkaline
Remote senso
r
batteries : 2xAAA 1.5V LR03 Alkaline
Battery life
Minimum 12 months fo
r
base station
Minimum 12 months fo
r
remote senso
r
This manual suits for next models
1
Table of contents
Other Fine offset Weather Station manuals


