Fireplace K1266 User manual

1.
Dear Customer,
Thank you for your decision to buy a FIREPLACE hearth.
The crackling, visible flames give you the sense of comfort and security.
The combination of hot-air heating and heat radiation provides a pleasant and
healthy climate in the room.
The combined use of modern heating technology, excellent quality of materi-
als and effective heat exchange, results in high efficiency and economical
operation. Different fuels such as dry wood, brown coal briquette, or wooden
briquette can be burned without unwanted emissions if used as directed..
Furthermore, the fire flaming in your FIREPLACE hearth creates an intimate
atmosphere for your family and friends.
Use of excellent raw materials assures you will have a long-lasting pleasant
experience.
But it is important that you contribute to the care of your new FIREPLACE
hearth by carefully reading this manual and following the instructions.
In spite of the finest quality materials and workmanship, false fitting or con-
necting, overloading of the appliance or use of an unsuitable fuel can cause
damage to the appliance itself or to the connecting pipe and the chimney.
Wishing you a lot of pleasure and pleasantly spent hours while using
your fireplace.
Fireplace Kft

2.
1. Fire Plus System
The Fire Plus System of your FIREPLACE provides optimal, environmentally
friendly burning and - combined with an effective heat exchange system - high
efficiency.
After loading and lighting the fuel, the first phase of the combustion process
starts by proceeding to burn the gases leaving the fuel. This is the time of, "high
flames". After the flames reduce, the rest of the coal burns up in the second
phase of the combustion process. This process is characterized by strongly
glowing embers with no or only smaller, temporary flames.
Optimal and environmental friendly burning with high efficiency can only be
achieved if we provide the necessary quantity of air at the appropriate places
in all phases of the combustion process. Both the longer time spent in the com-
bustion chamber by gases mixed with air and the hot combustion chamber
have a positive effect on the combustion process.
This effective burning can be achieved by the Fire Plus System. The primary air
flow through the openings of the grate is completed by the secondary air flow
through the glass front and tertiary air entering at different heights of the com-
bustion chamber.
Wood, wooden briquettes and brown coal briquettes are fuels of "high flame".
At this height and later above the glowing embers secondary and tertiary air get
inside in such way that mixing of the air and gases and the time that gases
spend in the combustion chamber (depending on their structure) results in good
burning. The excellent quality lining (chamotte, vermiculite) of the combustion
chamber, provides high temperature, helping the process.
After, that gases are lead through one or more dead-plates in the upper part of
the stove, namely through a heat exchange system, that consist of a pipe sys-
tem where heat is transmitted again.
Gases finally leave the stove through the flue outlet and then enter the chimney
at a temperature of 230-300°C through the connecting pipe. The remaining
energy content of the gases provides the necessary feed pressure in the chim-
ney, "motor of the stove".
This is the operating principle of FIREPLACE stoves.
Fireplaces are structurally not suitable for non-stop use.. Only a relatively small
amount of fuel can be loaded in the combustion chamber at any time. More
information about quantities of fuels loadable for one occasion is given on the
attached technical data sheet.

3.
2. Stove - cross section drawing
1. Primary air
2. Secondary air
3. "Cold" air of room
4. Warm air
5. Escaping gases
6. Hot gases
7. Grate
8. Chamotte or vermiculite lining
9./10. Tertiary air
11. Charcoal pan
5
4
6
9
8
1
3
2
71
1
1
0

4.
3. Heating capacity
The heating capacity according to DIN 18893 standard is in m3, referring to
buildings that do not comply with the Heat Insulation Regulation. For buildings
complying with the mentioned regulation other values are valid (DIN 18893-1).
Make inquires about further details at a specialized dealer or a responsible
chimney sweep.
4. Installation guide
All national, regional and local laws, orders and regulations must be
taken into consideration.
This might mean that depending on the location, installation may have to be
done by an expert, a specialist company and additional fire fighting measures
need to be taken into consideration.
Regarding this matter, ask a responsible chimney sweep or other competent
expert before installing and operating the appliance. (You can also get help
from DIN 18896: 2005-06 standard that contains the technical rules of installa-
tion of solid fuel stoves and the requirements of their users' instructions.)
Examination of chimneys takes place according to DIN EN 13384 standard.
The necessary data for examination and the safety distances from combustible
and heat sensitive materials are contained in the attached technical data sheet.

5.
Attention!
The necessary feed pressure for chimney examination given on the technical
data sheet is the necessary minimum value at the flue outlet of the stove. This
is necessary for safe operation of the stove. Practice shows that higher, some-
times too high feed pressure exists in chimneys. Such high feed pressure (more
than 20 Pa) can lead to uncontrollable combustion process that can damage
the appliance itself, the connecting pipe and the chimney as well. If this prob-
lem exists in your chimney, please consult a chimney sweep or a competent
expert about finding a solution.
In such cases, we recommend the use of a feed pressure regulator (flow con-
trol valve in the flue or providing secondary air inside the chimney).
FIREPLACE stoves comply with DIN 18891 (building category 1) and DIN EN
13240 standards. These fireplaces are fitted with automatically closing doors so
they can be connected to chimneys serving another stove as well, in case the
chimney is suitable otherwise (excluding chimneys built and used for gas and
oil heating).
Fireplace stoves are freestanding fireplaces that cannot be equipped with an
individual cover or be built in as a fire chamber insert/cassette.
You must not make any modifications influencing the operation of the stove.
Remove all packaging and supporting materials from the fire chamber and all
accessories from the ash drawer and the wood case. Make sure that the lining
of the fire chamber and all pieces of the dead plates are in the right place. Don't
use the fireplace without these components.
Take care as the packaging material can contain nails and other pointy, sharp
pieces of metal.
Causing danger of injury!
Take special care that the nylon and other wrapping materials do not get into
children's hands. They may cause suffocation!
Carefully collect the packing materials mentioned above, keep them away from
children and take them to the local waste disposal site.
The fireplace is painted with high quality heat resistant lacquer that gains its
final stability when heating up for the first time. The smell at the first heating up
derives from the evaporation of the protecting lacquer in the paint. So the heat-
ed room must be carefully ventilated from time to time (every 1-2 hours). This
will stop later on.
Do not put anything on the fireplace before the first heating up and don't touch
its surface to prevent damage of lacquering. Use protective gloves for your own
protection and for the sake of intactness of lacquering.
The doors of the fireplace should be kept slightly open during the first heating
up so the insulation cord doesn't stick to the front of the fireplace.

6.
5. Pay attention to the following before and during installation:
In the first step, the location and the way of connection of the purchased appli-
ance has to be chosen with consideration of the safety instructions.
The chimney must be suitable for operating the fireplace.
Installation and usage of fireplaces must be reported to a competent chimney
sweep or another competent expert. Applying the local regulations a chimney
sweep/competent expert has to issue a written authorization to use the stove.
Make sure you get a record of the receipt.
Examination of the chimney happens according to the local rules which are
usually national or European standards.
The local rules should be taken into consideration during the installation of the
connecting pipe as well. These are usually national or European standards.
Necessary air supply for proper burning has to be ensured. In hermetically insu-
lated rooms a separate air inlet pipe is needed to guarantee a sufficient supply
of air for the operation of the fireplace. It is also necessary in the case of rooms
with forced aeration system (e.g. an extractor fan)
If it is possible, a solution must be found for turning off these appliances. Some
FIREPLACE stoves have an optional connection for an outside air inlet.
Use of fireplace stoves in buildings with hermetic insulation and mechanical air-
ing systems is only allowed under certain conditions. Authorization of the stove
as "independent of the air in the room" and insulated air inlet from outside are
among these conditions. It is important to consult a competent chimney sweep
/ expert regarding this matter.
Choose a location for the fireplace close to the chimney to prevent the use of a
long horizontal connecting pipe.
The location of installation has to be flat and level.
Make sure that the floor has the necessary load-bearing capacity. The weight
of the appliance can be found on the attached technical data sheet. In case the
load-bearing capacity of the floor is too low, usage of a plate for better load dis-
tribution might help. If the problem exists you should seek professional help.
7.
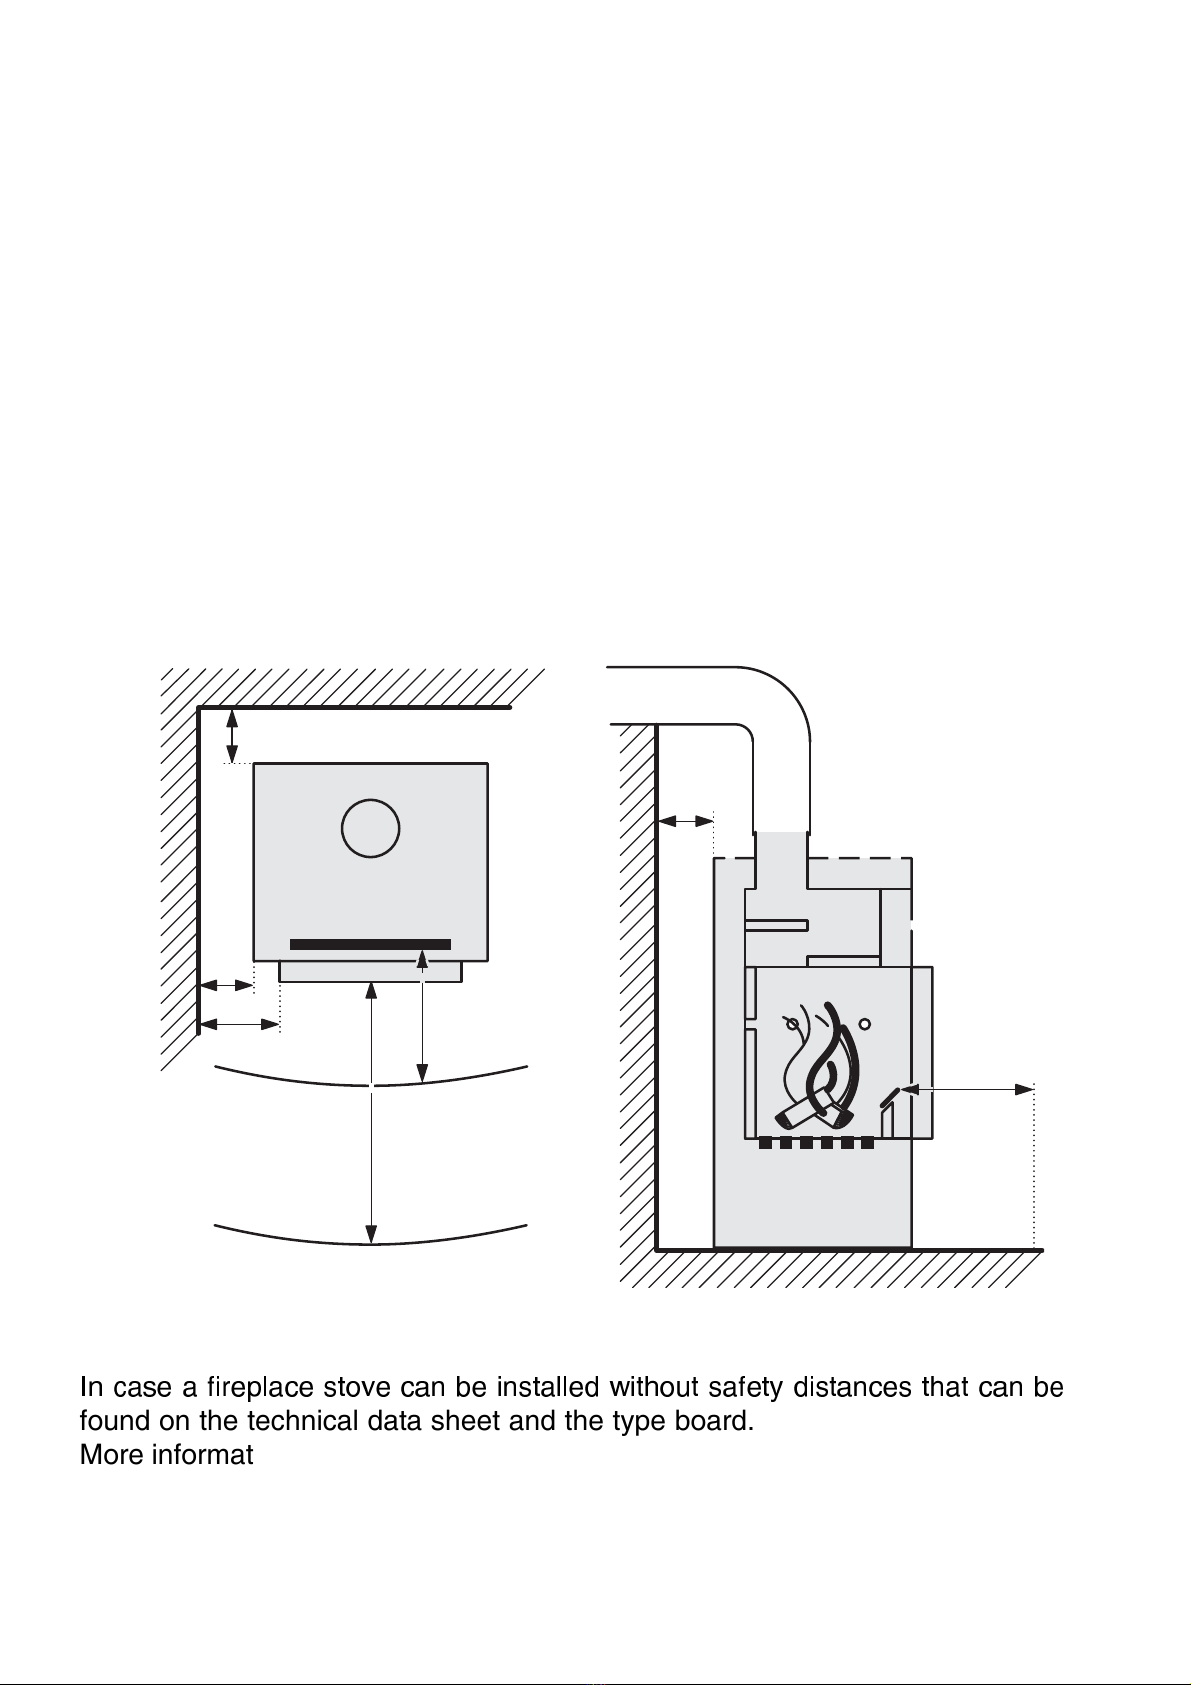
6. Minimum distances from combustible or heat sensitive
materials:
The technical data sheet and the type board on the stove contain the data refer-
ring to the stove that might differ from these standard regulations.
In case of combustible floors, being sensitive to a rise in temperature, non-com-
bustible floor protector must be used. This floor protector must reach 50 cm
beyond the front (from the charcoal pan), 30 cm beyond the side (from the inner
wall of the combustion chamber) of the fireplace. The floor protector can be
made of metal or glass which can be chosen from the product list of FIRE-
PLACE accessories.
The given minimum safety distances from combustible or heat sensitive mate-
rials have to be kept by all means at the back, the front and sideways.
100 cm
20 cm
30 cm
20 cm
50 cm
20 cm
50 cm
I
found on the technical data sheet and the type board.
More information about safety distances from the connecting pipe can be found
at the description of connecting.

8.
7. Preparing the appliance for connection:
Let's choose the way of connection (top or rear).
Diameter of flue outlet is 150 mm.
Appliances are sold equipped with a top outlet. We recommend this connection
mode because of combustion technological reasons. In case you would like to
connect the stove at the back (technical data sheet contains the connection
height), remove the flue outlet from the top and the closing lid from the back.
Put the flue at the back, and close the top outlet with the closing lid. Carefully
insulate the outlets.
Readjusting the flue outlet from the back to the top:
Remove the flue outlet from the back and the closing lid from the top. Put the
flue outlet on the top and the closing lid on the rear outlet.
Cover the rear outlet with a heat protecting plate as well.
Carefully insulate the outlets.
In case of top connection:
The height of connection can be chosen without any restriction but it cannot
exceed 1 meter above the upper edge of the stove. The horizontal part of the
connecting pipe must be at least 40 cm from the ceiling. Be certain that there
is a hermetically closable cleaning slot at the elbow of the vertical and horizon-
tal connecting pipes.
In case of stoves with a capacity of 6kW the minimum length of the vertical con-
necting pipe is 50 cm.
8. Connecting to the chimney:
We recommend the use of an insert with a double wall for connecting to the
chimney. The insert has to be installed into the chimney. Then you can connect
the connecting pipe of the stove to it. All combustible materials have to be
removed within a 20 cm radius of the insert and have to be replaced by heat
resistant/non-combustible material. Install the insert carefully and insulate.
If there is wallpaper it is recommended to remove from behind the stove and in
case of a corner model from the side as well.

9.
For fixing the ceramic or soapstone tiles of FIREPLACE stoves with ceramic or
soapstone cover, please read the appropriate section of the users' manual.
(Instructions for fixing the elements of stoves with ceramic or soapstone tiles.)
Installation of the connecting pipe: connect the pipe to the flue outlet of the
FIREPLACE appliance. Push the fireplace stove to the chosen location with
consideration of the specified safety distances and install it in such way that the
connecting pipe fits into the prepared chimney insert. The safety distance from
combustible or heat sensitive materials is contained in the attached technical
data sheet.
Attention!
All connections must be exact and insulated. The connecting pipe must not
reach the free surface of the chimney. Connections are recommended to be
sealed with heat resistant glue.
Warning, before using your new FIREPLACE for the first time, please refer to
the users' manual.
9. Instructions for fixing the elements of stoves with ceramic
or soapstone tiles
Most FIREPLACE models are completely assembled and they only need to be
professionally connected to the chimney. Some models are packed as a kit that
needs assembling. Take into consideration the separately attached assembling
guide with these models.
If by any reason it becomes necessary to remove and refit the quality cover
(ceramic, soapstone) of the assembled models, please contact us by phone or
mail, or have it done by a professional.
In both cases, we can send you an additional user's instruction manual for
removing and refitting the cover.
Before connecting the stove, please take off all accessories that are not
attached, such as top soapstone/ceramic tile or the soapstone /ceramic tiles
placed in the warming plate. This way you can prevent these parts from falling
while moving the stove.

10.
10. Handling guide
Attention!
All national, regional, local laws, orders and regulations must be kept.
Therefore, depending on the location of installation, special operating condi-
tions and restrictions can be enforced regarding the period of use and fuels
used. It is important to consult a chimney sweep or other competent expert
before installing and using the appliance.
11. Suitable fuels
Use the following fuels only:
- Dry wooden log (beech, oak,...)
- Wooden briquette
- Brown coal briquette
You can find the exact information on the technical data sheet and the type
board. You can only use these specific fuels. Usage of other fuels is not
allowed.
Depending on your choice of the fuels listed above, be sure that you use fuels
of good quality.
Wooden logs reach 15-20% humidity which is the most appropriate for heating
if they are stored outside for 1to 2 years (if they are covered and protected
from rain). Recently cut wood has a high moisture content and burns poorly
and causes soot. Apart from its very low heating value it is also a pollutant to
the environment. High condensation and tar can lead to blockage in the stove
and especially in the chimney. In all cases it causes deposit on the glass front
and emissions that need to be avoided.
Burning wood is recommended for operating the stove at its nominal capacity.
Watch the heating value of the fuel you use. You can get the exact data at a
fuel supplier. Load the fireplace with fuel according to heat demand. The heat-
ing value of 1 kg of dry wood is 4 - 4,5 kW/h. So you can place about 2,5 kg
of wood into a stove of 8 kW capacity every hour.
When burning wood, if you would like to reach a lower capacity, do not
restrain the fire. Put less wood in at one time instead.
Don't throw the fuel in the combustion chamber, because it can damage or
break the chamotte or vermiculite tiles. Be aware that the volume of some
types of wooden briquettes increases during burning. Choose the wooden bri-
quette that has the appropriate size to the measurements of the combustion
chamber and does not increase in size while burning.

11.
You can use brown coal briquette for burning at nominal capacity just as wood
or wooden briquette.
Apart from that, it is also excellent for keeping the embers glowing during the
night (about 10 hours). In the case of brown coal briquettes, wait until the fuel
is completely burned through and close the primary air regulator to keep the
embers burning only after that.
The types of fuels that can be used, the maximum quantities that can be loaded
at one time and the description of settings for the air regulators, can be found
in the attached technical chart.
12. Reducing emissions
You can only avoid unwanted emissions by the use of the specified fuels. Put
only the amount of fuel in the fireplace that is appropriate for necessary heat
transmission. Burning more fuel is unnecessary and leads to unwanted emis-
sions. Don't burn waste in the stove!
The use of other fuels than the ones listed above is not allowed.
You MUST NOT burn the following materials in the fireplace:
- Wet or treated wood,
- Wood-shavings, sawdust,
- Inner bark, bark, shavings panel,
- Coal dust,
- Waste, scrap, plastic, rubble
- Paper and cardboard (apart from lighting the fire)
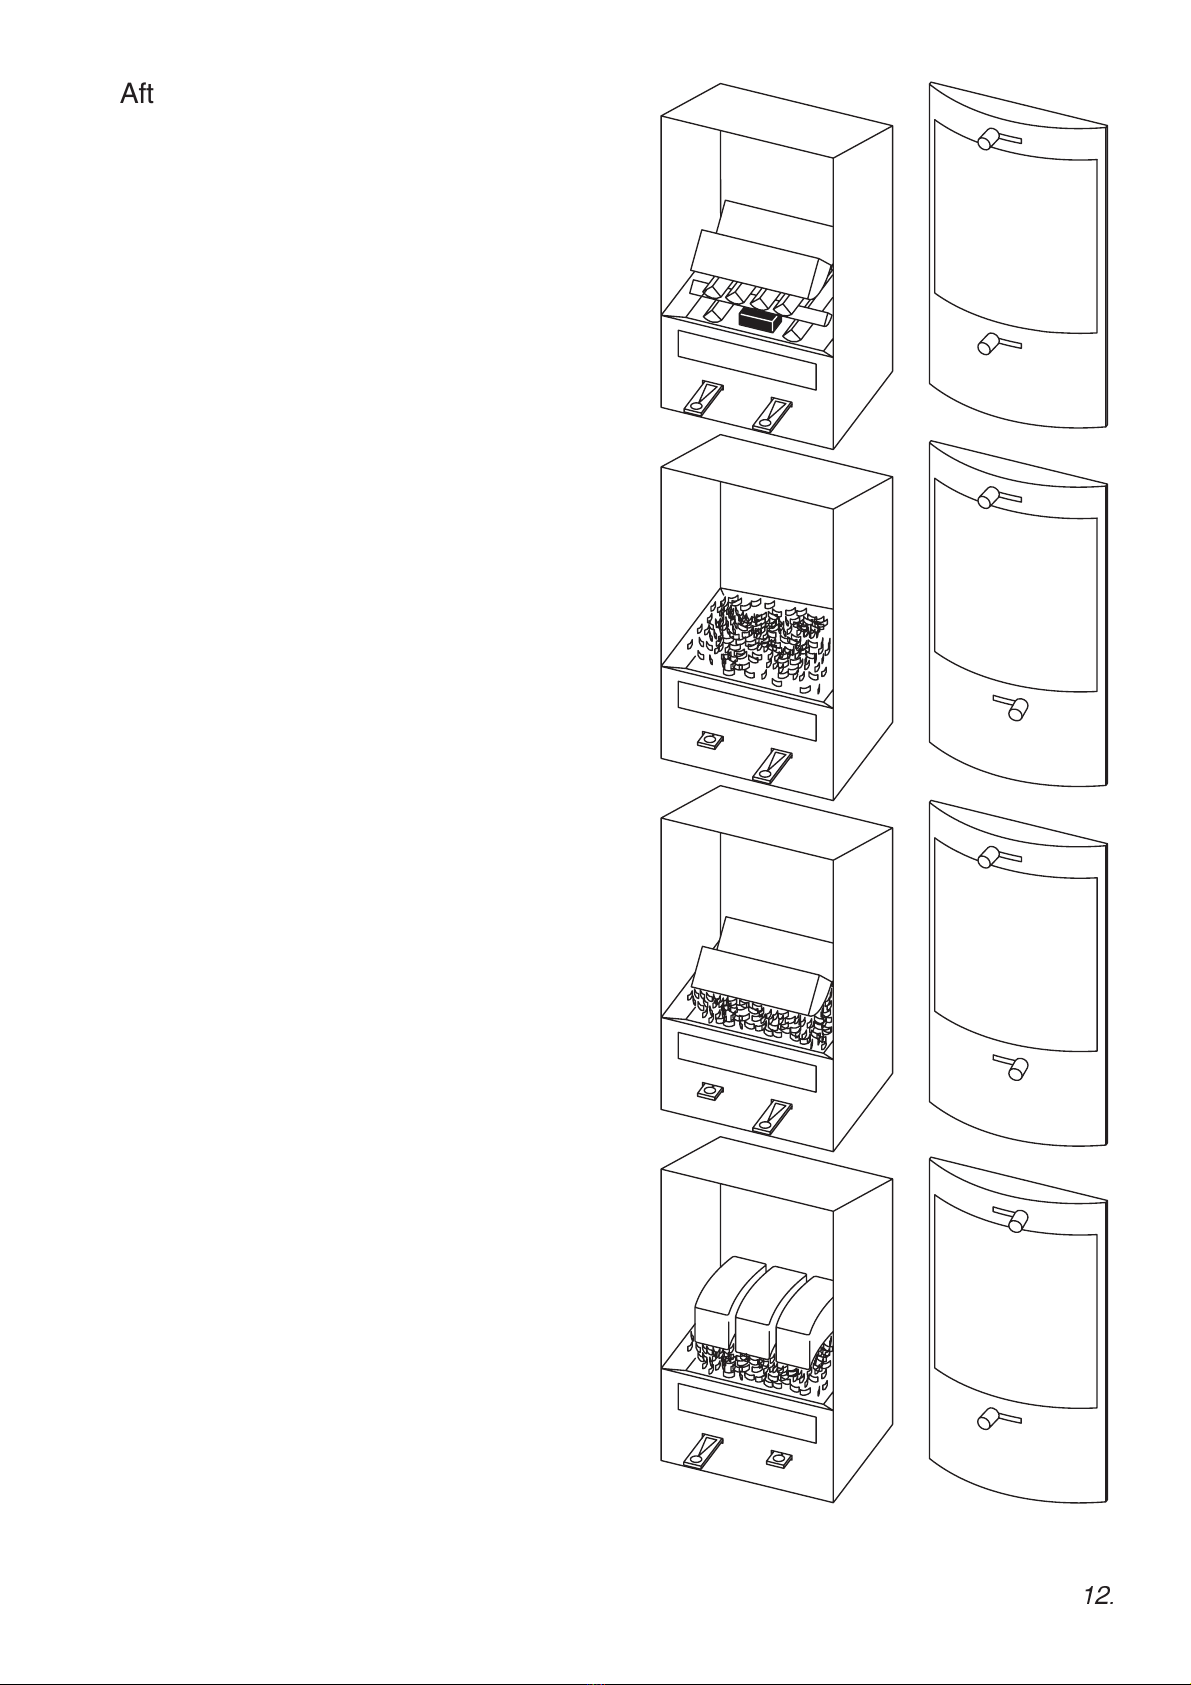
13. Lighting the fire for the first time
Follow the directions below when you light the fire for the first time.
High burning temperature is necessary for the fuel to catch fire quickly, so put
enough fire-starter on the grate at the lower part of the combustion chamber.
Put 2 or 3 smaller pieces of wood or a similar quantity of wooden briquettes, or
3 to 4 pieces of brown coal briquettes on the grate. (See Picture A)
After lighting the fire, shut the door leaving it ajar (only leave the door ajar, do
not close it, when you light the fire for the first time, after the first time you will
shut the door completely) and completely open all air regulators. After the wood
or briquette has caught fire you can reduce the amount of air flowing in.
(Settings of nominal capacity can be found in the technical chart.)
A
B
C
1
C
2
P
S
P
S
P
S
P
S
P
S
P
S
P
S
P
S
1
After a layer of glowing embers has
been formed and you can't see any
flames, you can place more fuel on it
again and set the desired capacity
with the aid of the air regulators.
(See Picture B and C 1/2)
Always maintain optimal burning.
If you use too much fuel or let too
much air flow into the combustion
chamber, you might overload the
appliance. Attention! This leads to
high temperature and emission that
can be avoided. On the other hand,
too little air results in imperfect burn-
ing and high emission.
The fireplace is painted with a high
quality heat resistant lacquer that
gains its final stability during the first
heating. The smell during the first
heating derives from the evaporation
of the protecting lacquer in the paint.
So the heated room must be careful-
ly ventilated from time to time (every
1-2 hours).
Do not put anything on the fireplace
before the first use and do not touch
its surface as it will cause damage to
the lacquering. Use protective gloves
for your own protection and for the
sake of intactness of lacquering.
The doors of the fireplace should be
kept slightly open during the first use
so the insulation cord doesn't stick to
the front of the fireplace.

14. Further use:
If you have already used the stove, remove the ash from the combustion cham-
ber before lighting another fire.
Always empty the ash drawer before each use, while the unit and the ashes are
cold, because a full ash drawer can
- obstruct air supply
- damage the grate
After emptying the ash drawer, replace it immediately.
Continue the lighting procedure according to the section "Lighting the fire for
the first time".
Load more fuel only if the current fuel is only glowing and flames are not visi-
ble any more. When loading more fuel, open the door of the combustion cham-
ber slowly so that the smoke gases cannot flow out through the door. Level the
glowing embers. Put the amount of fuel necessary for the desired heating
capacity on the embers, leaving an inch of space between each piece. Close
the door immediately after loading the fuel and keep it closed during use.
Set the air regulators according to the nominal capacity, or in case of brown
coal briquettes as desired after it has burned down to embers. Always maintain
optimal burning!
Repeat the procedure after the fuel has burned down.
Never put more fuel in the stove at one time than is specified. (See Technical
data sheet)
Only one portion of fuel can be burned at the same time. Load more fuel, only
the fuel in the unit already, has burned down.
Always check that there are not too many glowing embers piling up in the com-
bustion chamber.
Do not restrain the fire, load less fuel instead, and never close the primary air
regulator completely.
Your stove is equipped with an automatically closing door. It can be operated
only with a closed door.
Open the door only if you want to load more fuel and only if the previous amount
has burned down to embers.

R ! "#$ !" % & '%()* %"+ ,& - (.') ! )' ' ("!.' &#/
ple away from the appliance while operating.
Maintain the settings of the air that is necessary for the burning capacity of the
stove and keep in mind that the settings of the air depend considerably on the
actual chimney draught. Set the amount of air according to your experience.
Bad air settings can lead to blackening of the glass front or damage to the appli-
ance, the connecting pipe and the chimney.
The lining of the combustion chamber (chamotte or vermiculite) can turn black
when you light the fire. This blackening disappears when the stove reaches its
operating temperature.
Always empty the ash drawer before each use, while the unit and the ashes are
cold, because a full ash drawer can
- obstruct air supply
- damage the grate
After emptying the ash drawer, replace it immediately.
Always store the ash in a fire-proof container. Do not put the container close to
combustible materials or place it on a combustible surface. Use a protective
plate if necessary. Pour the ash into a waste receptacle only after you make
sure that it has completely cooled down.
The condition of proper operation of the fireplace is the appropriate chimney
draught (feed pressure). This is considerably dependent on the temperature of
the outer environment. In case of a higher outer temperature (above 15°C) feed
pressure can considerably fall and it can disturb proper operation. Do not use
the appliance in such cases.
Attention!
Combustible remains are deposited in the appliance, the connecting pipe and
the chimney during use. This happens increasingly if you use wet or treated
wood or fuel that is not allowed. The possible overload of the stove or restrain
of the fire can contribute to this also. It is rare that the deposits catch fire due
to the lack of regular cleaning. However, this can be noticed from the black
smoke flowing out of the chimney, the rise of the temperature of the chimney
wall and the increased draught that can result in a whistling sound.
In case of such a fire in the chimney, call the fire-fighters and close all air
regulators and outlets. Inform the chimney sweep. Do not spray or pour
water in the chimney in any case because it can lead to gas explosion.
Remove all combustible, heat sensitive materials from the environment of
the chimney, even in the attic.

15.
15. Trouble Shooting
The condition of proper operation of the fireplace is the appropriate chimney
draught (feed pressure). This is considerably dependent on the temperature of
the outer environment. In case of higher outer temperature (above 15oC) feed
pressure can considerably fall and it can disturb proper operation.
What can you do?
- Open the primary air regulator a bit more, and fully open the secondary
air regulator.
- Use only a small amount of fuel at first.
- Use only a small amount of fuel when reloading.
- Shake off the ash more often.
Do not restrain the fire.
- Burn through the brown coal briquettes very well and close the primary
air regulator for keeping embers glowing only after that.
- As a last resort, do not use the stove in a transition period.
What are the causes?
…there is no proper draught at heating up?
- Chimney or stove pipe is not closed properly.
- Measurements of the chimney are not appropriate.
- The door of the stove/supplementary air regulator or the door of another
stove connected to the same chimney is open.
…the space is not heating up?
- Is the appliance disproportionately small?
- Is there too much ash in the combustion chamber?
- Is the smoke outlet blocked?
- Is the air regulator closed?
…the fireplace gives off too much heat?
- Is the air regulator opened too far?
- Is the chimney draught (feed pressure) too high?
- Did you load too much fuel at once?
…there is scarification, the grate is damaged?
- The fireplace has been overloaded.
- You didn't empty the ash drawer in time.
- Chimney draught (feed pressure) is too high.

16.
16. Special notes
- Your guarantee expires immediately in case of extreme or long-lasting
overload above nominal capacity or the use of fuel not specified.
- Always keep the ash in a fire-proof container. Do not put the container
close to combustible materials or place it on a combustible surface.
Use a protective plate if necessary. Pour the ash into a waste
receptacle only after you make sure that it has completely cooled down.
Caution!
- Surfaces are hot. When you operate the appliance wear gloves and use
the operating handles of the stove. The glass is hot.Keep children away.
- Never use spirits, petrol or any other flammable and explosive substance
for lighting the fire.
- Don't place combustible objects inside the radiation area of the fireplace,
within 100 cm from the door of the combustion chamber.
Follow the instructions in the section entitled "Minimum safety distances".
17. Cleaning Schedule (to be performed only when the stove
is cold)
17.
023 456789:;7 86<=>;? @>:95?A
These fireplaces were designed with knowledge of the latest
technical developments and are made of materials of
excellent quality. There's continuous control through
the manufacturing procedures and the finished
fireplace is subjected to stringent quality control.
19. General terms of warranty
1. Fireplace Kft as warrantor guarantees the following:
2. Warranty contains the repair of components under guarantee according to
the judgement of the warrantor. This can be exchange (delivery of an
equivalent component) or repair by customer service of warrantor.
Customer service has the right to pass work onto a third party. In the case
that an equivalent component is delivered, warrantor has the right to
demand compensation for the use of the component taken back.
3. Warranty starts on the date of purchase.
4. Warranty is granted to the customer if the following documents/data are
presented:
A) Invoice/Receipt as proof of purchase with the date of purchase on it
B) Serial number of the product (see type board, warranty)
C) Record/bill made out by the responsible chimney sweep or record of
chimney examination complying with DIN 4705 standard.
A) 2 year guarantee for the stove body, its material, workmanship and
operation according to DIN 18891 standard (when used properly). This
guarantee is only valid if the unit is used as directed in the Assembling
and Handling Guide and the capacity written on the type board.
B) Warrantor will replace or repair damaged, interchangeable components
for a period of one year from date of purchase.

BCD
5. The warrantor, or the authorized dealer, has to be informed about cases of
warranty immediately within 2 weeks of the assessment.
6. Buyer is obliged to give all possible information for assessment of the dam-
age and ensure the examination of the damaged components. The ex-
changed components have to be made available to warrantor upon request.
7. If warrantor request, the buyer is obliged to present the record of all repairs
and maintenance performed on the product.
8. Warrantor cannot grant a warranty for the following cases and/or components:
A) Quickly wearing out components
These components, especially those exposed to fire are: seals, coating of
the surface / lacquering, chamotte / vermiculite tiles, glasses and moving
metal components.
Attention! Smaller cracks in the chamotte / vermiculite tiles do not create
grounds for complaints or for exchange of these parts.
B) Damages resulting from delivery
C) Inexpert installation, use or repairing
D) Damages caused by outer impact
E) Irregularities, depending on the material, of ceramics, soapstone or other
rubble stone
F) Neglecting to present, not completely presenting or forging of documents
described in point 4
9. Warrantor doesn't assume any responsibility for direct or indirect damage
caused by fault or possible deficiency of the product to the customer or any
possible damages happening during repairs under warranty.
10.The period of guarantee is not extended or restarted by the exchange of a
component or repair work done within the warranty period.
11. Warrantor grants the warranty as the manufacturer of the product. Terms of
the warranty of Fireplace Ltd. do not replace or restrict any other legal
warranty or responsibility claims, not even the ones against the dealer from
whom the product was bought.
The customer service of Fireplace Ltd. is at its customers' disposal after the
expiration of the warranty (on payment of costs)
12.Fireplace Ltd. reserves the rights to make technical changes and does not
assume the responsibility for any possible misprints.

EFG
Content
2. - Fire Plus System
3. - Stove - cross section drawing
4. - Heating capacity
- Heating capacity in kW categories
- Installation guide
6. - Safety instructions and measurements
- Safety distances from combustible/heat sensitive materials
9. - Fixing ways of ceramic/soapstone tiles
10. - Handling of stove
- Suitable fuels
11. - Reducing emission
- Lighting the fire for the first time
13. - Further Use
- Installation of air regulators
- Heating
15. - Troubleshooting
16. - Special notes
- Cleaning
17. - Fireplace product quality
- General terms of warranty
Table of contents
Popular Stove manuals by other brands


Heta
Heta SCAN-LINE 40 operating instructions

Crown Royal Stoves
Crown Royal Stoves RS7200 owner's manual

Jocel
Jocel JA003 instruction manual

Sportsman
Sportsman SSBGS instruction manual

Sierra Products
Sierra Products EASYFIRE EF5001U Installation and operating instructions

Desa
Desa GXSVYD18NRA OWNER'S OPERATION AND INSTALLATION MANUAL

Vogelzang International
Vogelzang International BK150E owner's manual

Brunner
Brunner IRON DOG 07 user guide

Last Calor
Last Calor EVA-2016 Instructions for installation, use and maintenance manual

Hi-Flame
Hi-Flame Horse Flame HF905-SE Precision I instruction manual

Bronpi
Bronpi SYDNEY instruction manual

RAIS/attika
RAIS/attika 2:1 user manual