FIRST AUSTRIA FA-5618-5 User manual

FA-5618-5
INSTRUCTION MANUAL
STEAM IRON
PRAVILA QKSPLUATACII
PAROVOJ UTŒG
ENGLISH.................. PAGE 2
РУССКИЙ .................. СТР. 7
Класс защиты I
Safety class I

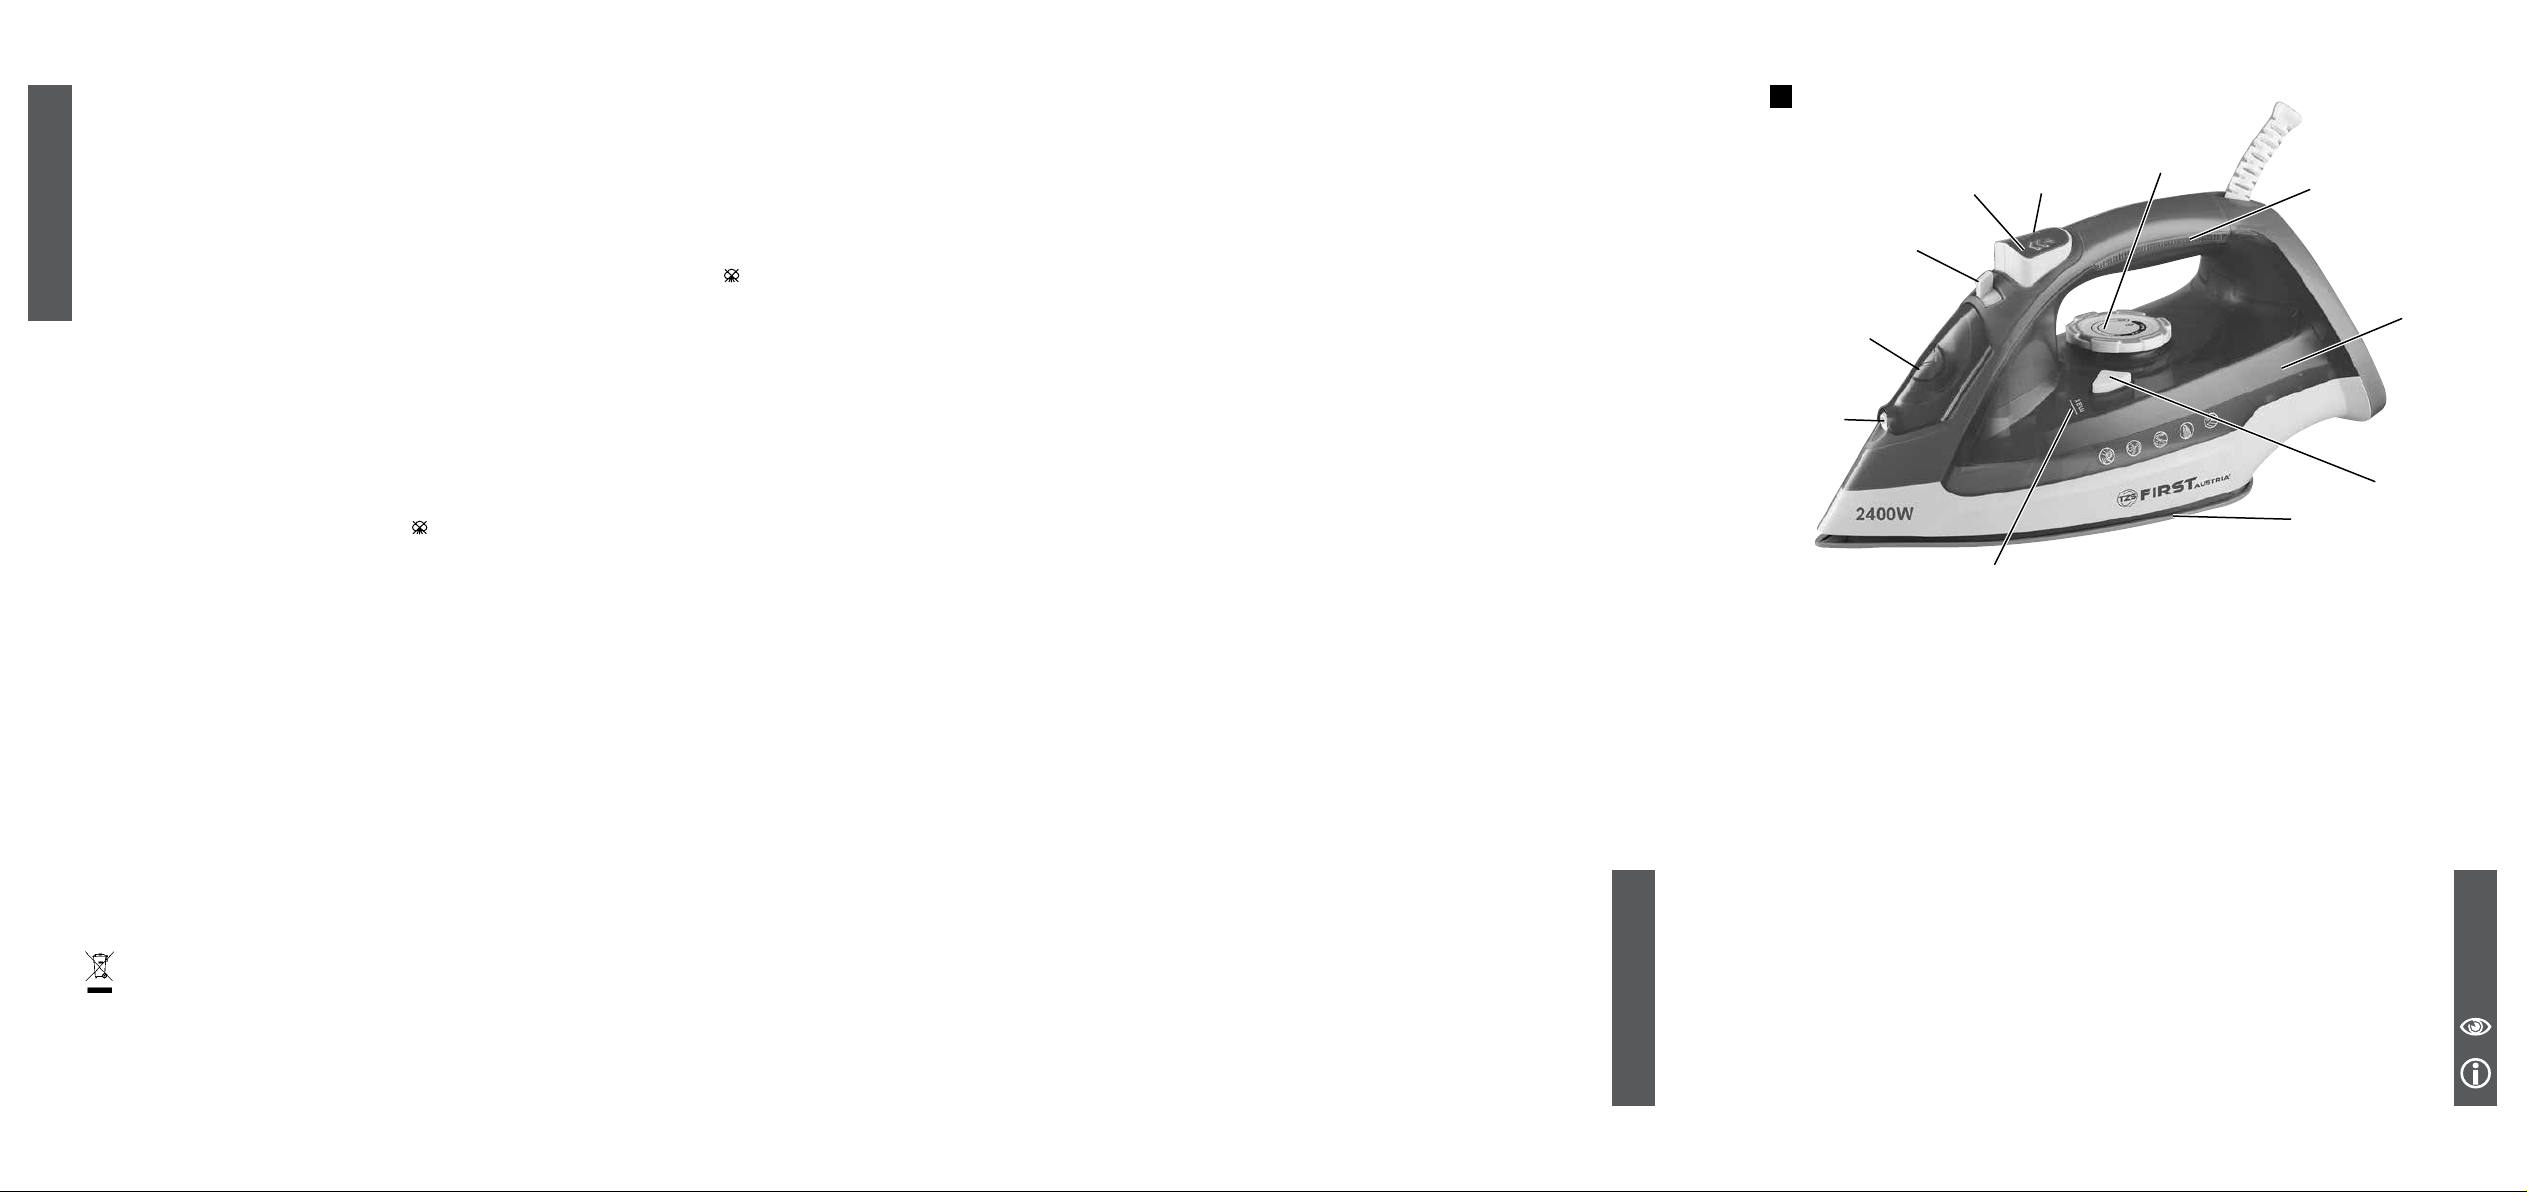
DESCRIPTION OF PARTS (see fig. 1)
Notes:
• Some parts of the iron have been slightly greased and as result the iron may smoke
slightly when switched on for the first time. It will not happen again after a few uses.
• Before using for the first time, remove any protective films or stickers from the sole plate
and the cabinet. Then clean the sole plate with a soft cloth.
• When using the iron for the first time, test it on an old piece of fabric to ensure that the
sole plate and water tank are completely clean.
3
ENGLISH
2
ENGLISH
INSTRUCTION MANUAL
IMPORTANT SAFEGUARDS
• Disconnect the iron from the wall outlet for
filling in water or when you remove the water
after use.
• The iron must be used and resetted on a
stable surface.
• When placing the iron on its stand, ensure
that the surface on which the stand is placed
is stable.
• The iron can not be used if it has been
dropped, causing visible signs of damage
and leaking.
• This appliance is not intended for use by
persons (including children) with reduced
physical, sensory or mental capabilities,
or lack of experience and knowledge,
unless they have been given supervision or
instruction concerning use of the appliance
by a person responsible for their safety.
• This appliance can be used by children aged
from 8 years and persons with reduced
physical, sensory or mental capabilities, or
lack of experience and knowledge, if they
have been given supervision or instruction
concerning use of the appliance in a safe
way and understand the hazards involved.
Children should not play with the appliance.
Cleaning and user maintenance shall not be
made by children without supervision.
• Keep the iron and its cord out of the reach of
children less than 8 years of age when it is
energized or cooling down.
• The iron must not be left unattended while it
is connected to the supply mains.
CAUTION: the surface is liable to get
hot during use!
• Please read all instructions carefully before using the appliance for the first time.
• Before connecting the appliance, check if the voltage indicated on the rating plate
corresponds with the mains voltage in your home.
• Do not use appliance for other than intended use.
• The iron should always be switched off before connecting or disconnecting from the power
supply. Do not pull on the cord to disconnect the plug from the wall socket.
• Do not use the iron when it is damaged in any way. Do not operate the iron with a
damaged cord or plug. Do not replace the power cord or any other parts by yourself. Bring
the iron to the nearest authorized service facility or to the shop where you bought it, as
special tools are required for repair.
• When you have finished ironing or when you only leave it for a short while:
- turn the steam control knob to position “ ”,
- stand the iron upright,
- disconnect the iron from the wall outlet.
• Do not allow children to touch the iron or the power cord when ironing.
• Do not immerse the iron or the cord into water or any other liquid.
• Do not touch hot metal parts, hot water or steam. These parts become hot and may cause
burns. Take care if you turn the iron upside down: there may be hot water in the tank.
• The plug and cord should not be allowed to touch the hot sole plate. Let the iron cool down
completely before taking it away. Roll the power cord around the iron for storage
• To avoid an overloaded circuit, do not operate another high voltage appliance in the same
electric circuit.
• Never use an extension power cord set that is not approved by a competent authority. The
cord should be rated for 10A (Europe) or 15A (America), cords rated for less amperage
may overheat. The cord should be arranged in a way that it cannot be pulled or tripped
over.
• The iron is for household use only.
SAVE THE INSTRUCTION MANUAL FOR FUTURE REFERENCE.
1. Spray Button
2. Burst of Steam Button
3. Steam Control Knob
4. Water Fill Opening
5. Spray Nozzle
6. Max. Water Level
7. Soleplate
8. Temperature Dial
9. Water Tank
10.Ready Light
11.Self Cleaning Button
4 5
ENGLISH
ENGLISH
IRONING
Important: Have you read the section “Important Safeguards”?
CHOICE OF WATER
If the water in your area is particularly hard, it is advisable to use distilled or demineralized
water. Do not use chemically descaled water or any other liquids for refilling.
Do not use chemical additives, scented substances or decalcifiers. Failure to comply with the
above-mentioned regulations leads to the loss of guarantee.
HOW TO FILL IN WATER
• Turn the steam control knob to the “ ” position.
• Fill in water through the inlet.
• Fill up to the maximum level “MAX” of the water tank.
Important: Empty the watertank after use.
TEMPERATURE CONTROL SETTING
• Always check first to see whether a label with ironing instructions is attached to the article
to be ironed. Follow these instruction in all cases.
• If the ironing instruction are missing, then the table below may help you.
• First you should sort the laundry: Wool with wool, Cotton with cotton etc. Start ironing the
fabrics requiring the lowest temperature and progress to the higher ones because the iron
heats up quicker than it cools down.
• If the fabric consist of various kinds of fibres (e.g. cotton with polyester) you must always
select the lowest ironing temperature of the composition of those fibres.
SETTING THE TEMPERATURE
• Insert the plug in the wall socket and stand the iron upright.
• Turn the temperature control knob to the correct temperature.
• The correct temperature will be reached when the pilot light has turned off. The pilot
light will be on and off from time to time indicating that the selected temperature is being
maintained.
SPRAYING
This function can be used any time and it does not affect the ironing temperature.
• Fill water into the iron as described above.
• Aim the nozzle to the garment.
• Press the spray knob.
STEAM IRONING
This function can be used only at higher ironing temperature.
• Fill water into the iron as described above.
• Stand the iron on its rear side.
• Connect the iron to a suitable mains supply outlet.
• Turn the temperature control to appropriate fabric setting.
• The pilot light turns off when the required temperature is reached. The iron is ready for
use.
• Turn the steam knob to the required position, steam starts coming out from the holes in the
sole plate.
Notice: With conventional steam ironing, water may leak from the sole plate if a too low
temperature has been select. If this happens, turn the temperature control to the advise
position. Steam will recommence as soon as the appropriate temperature has been reached.
BURST OF STEAM
This function provides an extra amount of steam to remove stubborn wrinkles.
• Fill the iron with water as described above.
• Turn the temperature control to the position for steam ironing.
• The pilot light turns off when the required temperature is reached.
• The iron is ready for use.
• Press the steam control knob once.
• Steam will penetrate into the garment removing the wrinkles.
• Wait a few seconds before pressing the steam control knob again when there are
stubborn wrinkles.
Usually all wrinkles can be removed within three pressings.
By pressing the shot-steam button at intervals you can also iron vertically (curtains, hung
garments, etc.)
DRY IRONING
• Connect the iron to a suitable mains supply outlet.
• Ensure that the steam control knob is in position “ ”.
• Select the setting on the temperature control.
• When the pilot light turns off, the required temperature is reached. The iron is ready for
use.
CARE AND CLEANING
1. Disconnect the iron from the wall outlet and let it cool down completely.
2. Deposits and other residues on the sole plate can be removed with a rough cloth soaked
in a vinegar/water solution.
3. The casting may be wiped with a damp cloth and then polished with a dry one.
4. Never use any abrasives to clean the sole plate.
5. Keep the sole plate smooth: avoid hard contact with metal objects.
STORAGE
• Turn the temperature control to “MIN” and set the steam control knob to position “ ” (=
no steam)
• Disconnect the iron from the wall outlet.
• Pour any remaining water out of the water tank.
• Stand the iron upright and let it cool down completely.
• The power cord can be wound around the iron.
• Always store the iron in an upright position.
5
ENGLISH
4
ENGLISH
•Acetete/Nylon Dry iron on reverse side
SETTING FABRIC RECOMMENDATION
•• Silk/Nylon Dry iron on reverse side
min Rayon Check garment label and follow
manufacturer’s instructions
•• Wool/Polyester Steam iron on wrong side or use
pressing cloth
••• Cottons Steam iron or dry iron while fabric is
damp until dry. Iron dark fabrics on
wrong side to avoid shine
••• Linen Steam iron or dry iron while fabric is
damp until dry. Iron dark fabrics on wrong
side to avoid shine. Iron table
linens on right side

6 7
ENGLISH
РУССКИЙ
SELF CLEANING
You can use the self-clean function to remove scale and impurities.
Use the self-clean function once every two weeks. If the water in your area is very hard, the
self-clean function should be used more frequently.
• Make sure the appliance is unplugged.
• Set the steam control knob to position “ ”.
• Fill the water tank to maximum level.
• Select the maximum ironing temperature.
• Put the plug in the wall socket.
• Unplug the iron when the amber temperature pilot light has gone out.
• Hold the iron over the sink, press and hold the self-clean button and gently shake the iron
and fro. (Steam and boiling water will come out of the soleplate. Impurities and flakes (if
any) will be flushed out.)
• Release the self-clean button as soon as all water in the tank has been used up.
Repeat the self-clean process if the iron still contains a lot of impurities.
ANTI-DRIP:
This iron is equipped with a drip stop function: the iron automatically stops steaming when
the temperature is too low to prevent water from dripping out of the soleplate.
ANTI-CALC:
The Anti-calc function filtrate the minerals from the water to prevent mineral residue build up
at the steam chamber.
SPECIFICATIONS
Power: 220-240V • 50-60Hz • 2000-2400W
Environment friendly disposal
You can help protect the environment! Please remember to respect the local regulations:
hand in the non-working electrical equipments to an appropriate waste disposal center.
ИНСТРУКЦИЯ ПО ЭКСПЛУАТАЦИИ
ПРЕДНАЗНАЧЕНИЕ
Для разглаживания складок и заминов на одежде.
Не для коммерческого и промышленного использования.
МЕРЫ БЕЗОПАСНОСТИ
• Перед началом эксплуатации прибора внимательно прочитайте настоящее
руководство и сохраните его для использования в качестве справочного материала.
• Используйте утюг только по его прямому назначению.
• Перед включением убедитесь, что напряжение в сети соответствует рабочему
напряжению прибора.
• Подключайте прибор к электрической розетке имеющей надежный контакт и
заземление.
• Во избежание возникновения пожара не используйте переходники при подключении
прибора к электрической розетке.
• Во избежание перегрузки электросети не включайте одновременно с прибором
несколько устройств с большой потребляемой мощностью.
• Для залива воды отключите прибор от электросети.
• Запрещается заливать в резервуар для воды ароматизирующие жидкости, уксус,
раствор крахмала, реагенты для удаления накипи, химические вещества.
• Устанавливайте прибор на ровную поверхность, исключающую возможность падения
и опрокидывания.
• Не используйте прибор если он имеет механические повреждения, а так же
нарушения целостности сетевого шнура и вилки.
• Не оставляйте работающий прибор без присмотра.
• Запрещается использование прибора детьми, а так же лицами с ограниченными
физическими, сенсорными или умственными возможностями.
• В случае неисправности ремонт прибора должен осуществляться только
авторизованными сервисными центрами. Самостоятельный ремонт запрещен.
• Во время работы прибора происходит высокотемпературный нагрев подошвы. Во
избежание ожогов запрещается до полного охлаждения подошвы прикасаться к ней
руками и другими частями тела.
• По окончании использования прибора отключите его от электросети, дайте
полностью остыть, слейте воду из резервуара
• Храните устройство в месте, недоступном для детей и людей с ограниченными
возможностями.
• Изделием разрешается пользоваться детям от 8 лет, а равно взрослым людям со
сниженными физическими, сенсорными или умственными способностями, а также
людям, не имеющим знаний и опыта работы с подобными устройствами, только под
присмотром ответственных лиц и только после инструктажа относительно безопасной
эксплуатации изделия и связанных с этим рисков. Не разрешайте детям играть с
изделием. Не разрешайте детям чистить или другим образом обслуживать изделие
без присмотра.
• Когда утюг подключен к сети или остывает, держите его и шнур питания вне
досягаемости детей младше 8 лет.
ВНИМАНИЕ! Во время эксплуатации поверхность сильно нагревается!
SOXRANITE QTI UKAZANIÄ DLÄ BUDUWEJ KONSULÆTACII.

8 9
ОПИСАНИЕ ПРИБОРА (рис. 1)
PRIMEHANIÄ:
• NekotoryehastiutügalegkosmazanyΩirom,ikakrezulætatutügmoΩet
dymitæså,kogdaegovklühaütpervyjraz.Posleneskolækixrazqtoprekratitså.
• Peredpervonahalænymispolæzovaniem,uberitevsenaklejkiiqtiketkis
fundamentalænojplatyistenok.Posleqtogoprotriteplatumågkojtkanæü.
• Pripervihnomispolæzovaniiutüga,proveræteegonastaromkusohkemateriala
dlåproverki,htoniΩnååplataivodånojtank-absolütnohistye.
VYBOR VODY
Eslivodavva‚emrajoneohenæΩestkaå,rekomenduetsåpolæzovatæså
distillirovannojilidiminerallizovannojvodoj.Neupotreblåjtevodu,
ximiheskimobrazomohiwennuüotnakipi,ilidrugieΩidkosti,dlåzapolneniå.
Не используйте химически действующие присадки, ароматизированные вещества
или декальцификаторы. Не соблюдение вышеупомянутых правил приводит к потере
гарантии.
PRAVILA ZAPOLNENIÄ VODY
• Otklühiteutügotstennojrozetki.
• PostavæteknopkuregulåciiparavpoloΩenie“ ”.
• Zapolnitevodojherezotverstie.
-Napolnitedourovnåmaksimuma“MAX”vodånogotanka.
VaΩno:Vylejtevoduposleupotrebleniå.
ТЕМПЕРАТУРА ГЛАЖЕНИЯ
• VsegdasnahalaproveræteårlyksinstrukciåmipoglaΩkenapredmeteodeΩdy.
• Esliukazanijtakixneimeetså,togdasleduüwaåtablicamoΩetVampomohæ.
• Snahalarazberitestirku:‚erstæidets‚erstæü,xlopok-sxlopkom,it.d.
NahniteglaΩkuspredmetov,nuΩdaüwixsåvsamyxnizkixtemperaturax
iprogressirujtenaboleevysokie,t.k.utügnagrevaetsåbystree,hemon
oxlaΩdaetså.
• Eslimaterialsostoitizrazlihnyxvidovvolokna(naprimer,xlopoks
poliesterom),vsegdavyberiteniΩnüütemperaturudlåglaΩkiizsohetaniåqtix
volokon.
НАСТРОЙКА ТЕМПЕРАТУРЫ
• Установите прибор в вертикальное положение
• Подключите прибор к электросети
• Поворотом регулятора 8 установите требуемую температуру глажения, при этом
загорится индикатор 10
• Когда подошва утюга 7 нагреется до установленной температуры, индикатор 10
погаснет, можно приступать к глажению
RAZBRYZGIVANIE
QtojfunkciejmoΩnopolæzovatæsåvlüboevremåiqtonevliåetnatemperaturuglaΩki.
• Zapolniteutügvodoj,kakukazanovy‚e.
• NapravætenosiknaodeΩdu.
• NaΩmitenaknopkuregulirovkirazbryzgivaniå.
ПАРОВАЯ ГЛАЖКА
Внимание: Данную функцию можно использовать только при максимальной
температуре нагрева. При меньшей температуре вода может протекать через подошву.
• Заполните водой резервуар 9
• Установите прибор в вертикальное положение
• Подключите прибор к электросети с соблюдением правил безопасности
• Установите регулятором 8 максимальную температуру нагрева (позиция ●●●), при
этом загорится индикатор 10
• Когда подошва 7 нагреется до установленной температуры индикатор 10 погаснет,
прибор готов к использованию
• Регулятор 3 переведите в положение постоянной подачи пара, пар начнет выходить
из отверстий подошвы, можно приступать к глажке
ДОПОЛНИТЕЛЬНАЯ ПОДАЧА ПАРА
Внимание: Функция дополнительной подачи пара полезна при разглаживании складок
и заминов, позволяет выполнять вертикальное отпаривание. Использование возможно
только при максимальном нагреве прибора.
• Заполните водой резервуар 9
• Установите прибор в вертикальное положение
• Подключите прибор к электросети с соблюдением правил безопасности
• Установите регулятором 8 максимальную температуру нагрева (позиция ●●●), при
этом загорится индикатор 10
• Когда прибор нагреется до установленной температуры индикатор 10 погаснет,
можно приступать к глажке
• Во время глажки нажмите один раз на кнопку 2, дополнительный пар интенсивно
начнет поступать через отверстия в подошве.
• Во избежание вытекания воды через паровые отверстия нажимайте кнопку 2 для
интенсивной подачи пара с интервалом не менее 5 сек.
СУХАЯ ГЛАЖКА
• Подключите прибор к электросети с соблюдением правил безопасности
• Отключите регулятором 3 подачу пара
• Выберите регулятором 8 температуру нагрева подошвы 7
• При достижении установленной температуры индикатор 10 погаснет, прибор готов к
использованию
Внимание: При использовании прибора индикатор 10 время от времени будет
включаться и отключаться. Это означает, что происходит нагрев подошвы до
установленной температуры, после остывания во время глажки
РУССКИЙ
РУССКИЙ
1. Кнопка распыления воды
2. Кнопка подачи пара
3. Регулятор постоянной
подачи пара
4. Крышка заливочного
отверстия
5. Разбрызгиватель воды
6. Уровень максимального
заполнения резервуара
водой
7. Подошва
8. Регулятор температуры
9. Резервуар для воды
10
.
Индикатор вкл./выкл.
элекропитания
11. Кнопка самоочистки
QTIKETKA MATERIAL VOLOKNA
Sintetika Akrilik; Modakril; Polipropilen; Poliuretan
Sintetika Acetat; Triacetat
Kupro;Poliamid(nejlon);Poliester; Modalæl; Viskoza
(iskustvennyj‚ölk)
∏ölk ∏ölk
∏erstæ ∏erstæ
Xlopok Xlopok
Lön Lön
l
ll
lll
10
4
5
1
3
2
6
11
8
10
РУССКИЙ
1
7
РУССКИЙ
11
УХОД И ЧИСТКА
• Отключите прибор от электросети и дайте ему охладиться
• OstatkigråziiotloΩeniånaniΩnejplatemoΩnoudalitæspomowæüΩöstkoj
tkani,namohennojvrastvoreizvodysuksusom.
• MoΩnovyteretæotloΩeniåvlaΩnojtråpkojiotpolirovatæsuxoj.
• Nikogdanepolæzujtesæabrazivamidlåhistkifundamentalænojplaty.
• SoderΩiteplatuvgladkomsostoånii;izbegajtekontaktasmetalliheskimi
predmetami.
ХРАНЕНИЕ
• Postavæteregulåtortemperaturyna“MIN”inastrojteknopkuparanapoziciü“ ”.
(=netpara).
• Отключите прибор от электросети
• Vylejteostav‚uüsåvoduizvodånogotanka.
• Поставьте утюг в вертикальное положение и дайте ему полностью охладиться
• MoΩetezavernutæ‚nurvokrugutüga.
• VsegdaxraniteutügvstoåhempoloΩenii.
ФУНКЦИЯ САМООЧИСТКИ:
Вы можете воспользоваться функцией самоочищения для удаления накипи и
загрязнений.
Используйте эту функцию один раз в две недели. Если у вас очень жесткая вода,
функцию самоочистки надо использовать более часто.
•Удостоверьтесь, что устройство отключено от сети.
•Установите рукоятку пара в положение “ ”
•Заполните водяной бак до максимального уровня.
•Установите максимальную температуру глажки.
• Подключите прибор к электросети
• Отключите прибор от электросети когда погаснет индикатор 10
•Держите утюг над раковиной, держа нажатой кнопку самоочищения и слегка
покачивая утюгом. Пар и кипящая вода выйдут из подошвы. Загрязнения (если они
есть) будут удалены.
•Отпустите кнопку самоочищения сразу после выхода всей воды.
Повторите процедуру самоочищения, если утюг еще содержит загрязнения.
ФУНКЦИЯ ПРЕДОТВРАЩЕНИЯ ВЫТЕКАНИЯ ВОДЫ:
Этот утюг оснащен функцией предотвращения вытекания воды: утюг автоматически
прекращает подачу пара, если температура слишком низкая для предотвращения
вытекания воды с гладящей поверхности.
ФУНКЦИЯ ПРЕДОТВРАЩЕНИЯ ОТЛОЖЕНИЯ ИЗВЕСТИ:
Функция предотвращения отложения извести очищает воду от минералов для
предотвращения отложения минералов в паровой камере.
ТЕХНИЧЕСКИЕ ХАРАКТЕРИСТИКИ
Мощность: 2000-2400 Вт
Электропитание: 220-240В, 50-60Гц
Экологическая утилизация: Вы можете помочь защитить окружающую среду!
Помните о соблюдении местных правил: Отправьте неработающее
электрооборудование в соответствующие центры утилизации.
Хранение:
Рекомендуется хранить в закрытом сухом помещении при температуре окружающего
воздуха не выше плюс 40ºС с относительной влажностью не выше 70% и отсутствии в
окружающей среде пыли, кислотных и других паров.
Транспортировка:
К данному прибору специальные правила перевозки не применяются. При перевозке
прибора используйте оригинальную заводскую упаковку. При перевозке следует
избегать падений, ударов и иных механических воздействий на прибор, а также прямого
воздействия атмосферных осадков и агрессивных сред.
Производитель сохраняет за собой право изменять дизайн и технические
характеристики устройства без предварительного уведомления.
Срок службы прибора – 3 года
Данное изделие соответствует всем требуемым европейским и российским стандартам
безопасности и гигиены.
Изготовитель:
Компания Тиметрон Австрия (Timetron GesmbH)
Адрес:
Раймундгассе 1/8, 1020, Вена, Австрия (Raimundgasse 1/8, 1020 Vienna, Austria)
Сделано в Китае
Дата производства указана на упаковке
Импортеры:
ООО «Грантэл»
143912, Московская область, г.Балашиха, Западная коммунальная зона, ул. Шоссе
Энтузиастов, вл.1а, тел. +7 (495) 788 35 28
В случае неисправности изделия необходимо обратиться в ближайший авторизованный
сервисный центр.
За информацией о ближайшем сервисном центре обращайтесь к продавцу.
9
ФУНКЦИЯ САМООЧИСТКИ
● Подключите прибор к электросети
● Отключите прибор от электросети когда погаснет
индикатор 10
Table of contents
Languages:
Other FIRST AUSTRIA Iron manuals


