Fisher ICR-B35 User manual

ICR-B35
INSTRUCTION
MANUAL
Digital Voice Recorder
SANYO'S HELP-LINE
Call the toll-free number below if you have any
difficulties operating this product.
1-877-999-1840 (Weekdays8:00AM- 5:00PM
Pacific time)
LlNEA DE CONSULTA SANYO
Llamegratis alnúmero indicado acontinuación
si tiene dificultades al utilizar este producto.
1-877-999-1840 (Días laborables de 8:00 AM
a 5:00 PM hora del Pacífico)
ENGLISH
ESPAÑOL
1AD6P1P1314--A ICR-B35
Issue Number 2, Printed in China

-1-
CONTENTS
PRECAUTIONS ..............................................2
CONTROLS ....................................................3
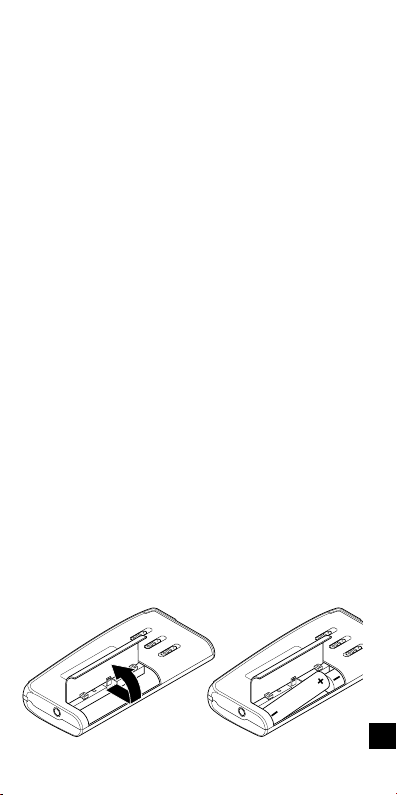
POWER SUPPLY ........................................... 4
BEFORE OPERATION ...................................6
SELECTING THE MENU MODE ....................8
RECORDING .................................................11
PLAYBACK ....................................................14
ERASING ......................................................17
VOICE ALARM TIMER ................................. 20
CLEANING THE CABINET .......................... 21
TROUBLESHOOTING GUIDE .....................22
FCC INFORMATION .................................... 23
SPECIFICATIONS ........................................24
WARRANTY (For USA) .............................. 25
WARRANTY (For Canada) ...........................29
Important Information:
Notes on clock setting
Be sure to set the date and time of the unit’s
clock before you start using it. (See “Adjusting
the date and time”in “BEFORE OPERATION”
section.)
Backup recommendation
To avoid potential risk of data loss caused by
accidental operation or malfunction of the unit,
we recommend that you save a backup copy of
yourrecordedmassages onatape recorder,etc.
ENGLISH

-2-
PRECAUTIONS
•If the line of rectangles in the battery indica-
tor ( ) disappear during recording, stop
the recording immediately and replace the
batteries.
•Do not disconnect theAC adaptor or remove
the batteries while operating the unit.
•Before erasing, make sure that the battery
indicator is full.
•The apparatus shall not be exposed to drip-
ping or splashing.
•Do not insert pins, etc., inside the unit.
•Do not drop the unit or subject it to strong
shocks.
•Do not use where there are extremes of tem-
perature(below5°C(35°F)or exceeding 35°C
(95°F)).
WHAT TO DO IF...
If the operation of the
unitordisplay isnotnor-
mal,
1. Open the battery
compartment lid.
2. Remove the batteries. Wait 2 minutes, then
reinstall the batteries.
3. Press the reset switch (back of the unit) us-
ing a small ball-point pen, etc.
4. Resume operation.

-3-

-4-
1. Earphone jack (EAR)
2. External microphone jack (MIC)
3. Built-in microphone (MIC)
4. Record button (m)/Pause
5. Repeat button (REPEAT)
6. Stop button (n)/On, Off select button
7. Play button (a)/Pause
8. Cue index button (CUE INDEX)
9. Fast forward/Fast backward buttons
(d, c)
10. Volume buttons (VOLUME)
11. Speaker
12. Erase button (ERASE)
13. Time/Set button (TIME/SET)
14. Menu button (MENU)
15. Display
16. Play speed switch (PLAY SPEED)
17. Record mode switch (REC MODE)
18. Hold switch (HOLD)
19. Battery compartment
20. External DC jack
(EXT DC 3V, bottom of the unit)
POWER SUPPLY
Batteries
1. Open the battery compartment lid.
2.
Install two “AAA”batteries (not supplied). Ob-
serve proper polarity.
12

-5-
Battery indicator ( )
The line of rectangles is the battery gauge. Black
rectangles show the battery condition.
: Full, good condition
or (“LOW BATT”appears.): Weak or
exhausted battery, must be replaced.
CAUTION:
Remove the batteries if the unit will not be used
for a month or longer.
IMPORTANT NOTE FOR AMERICAN USERS:
SPENT OR DISCHARGED BATTERIES MUST
BE RECYCLED OR DISPOSED OF PROP-
ERLY IN COMPLIANCE WITHALLAPPLICA-
BLE LAWS.
FOR DETAILED INFORMATION, CONTACT
YOUR LOCAL COUNTY SOLID WASTE AU-
THORITY.
IMPORTANT NOTE FOR CANADIAN USERS:
Whenthe batteries have becomedischarged,
they must be disposed of in a safe manner
that complies with all applicable laws.
AC adaptor
ConnecttheAC adaptor(SANYO Model No.3CV-
120US,not supplied)tothe EXTDC 3Vjack.(The
batteries are automatically disconnected.)
•The center pin of the EXT DC 3V jack is posi-
tive (+).

-6-
BEFORE OPERATION
Earphone
Connect an earphone (8 ohms, cord length less
than 2 meters (6 feet 6 inches), not supplied) to
the EAR jack. (The speaker is automatically dis-
connected.)
Note: Be sure to reduce the volume before con-
necting or disconnecting the earphone.
External microphone
Connect an external microphone (not supplied)
to the MIC jack. (The built-in microphone is auto-
matically disconnected.)
Turning the power on and off
Press the nbutton to turn on the
power. The display appears as
shown right for example and the
unit is in the standby mode.
To turn off the power, press the
nbutton for at least 1 second in
the stop mode.
Auto power off function
The power turns off automatically when 5 min-
utes have elapsed after entering the stop, play-
back pause or recording pause mode.
Hold function
The HOLD switch (back of the unit) disables the
buttons (m, n, a, cor d) from operating, to
prevent playback or recording due to accidental
operation.

-7-
Setthe HOLD switch to ON.“HOLD ON”appears
briefly on the display.
For normal use, set the switch to OFF. “HOLD
OFF”appears briefly on the display.
Adjusting the date and time
1. Press the MENU button re-
peatedly until the date and
time display appears.
2. Press the TIME/SET button.
The year display blinks.
3. Press the cor dbutton
repeatedlyto selectthe year.
4. Press the TIME/SET button. The month dis-
play blinks.
5. Set the month, day, hour and minute by fol-
lowing steps 3 - 4 above.
•The time can be set accurately by press-
ingtheTIME/SETbuttonwhen atime sig-
nal is heard.
6. Press the nbutton to return the original dis-
play.
Changing the clock to the 12-hour (or 24-hour)
display
1. Press the MENU button repeatedly until “12/
24”appears.
2. Press the TIME/SETbutton. “24H”(or “12H”)
blinks.
3. Press the cor dbutton once. “12H”(or
“24H”) blinks.
4. Press the TIME/SET button.

-8-
SELECTING THE MENU MODE
1. Press the MENU button re-
peatedlytoselect thedesired
menu mode. Each time the
buttonis pressed, thedisplay
changes as follows:
FOLDE (Folder)
v
EDIT
v
AUTO PAUSE
v
Date and time
v
VAS
v
REC
v
BEEP
v
ERASE GUARD
v
12/24
v
Original
display returns
2. To change the setting of a sub-menu in the
selected menu mode, press the TIME/SET
button so that the display blinks.
3. Press the cor dbutton
to select a new sub-menu.
(See “Various menu modes”
below.)
4. Press the TIME/SET button to set it.
5. Repeatsteps aboveto changeother settings.
6. Press the nbutton to return to the original
display.
Various menu modes
FOLDE (Folder): Selecting folder mode
PERS
wv
BUSI
wv
LECT
wv
OTHER
wv
ALARM
PERS: Personal
BUSI: Business
LECT: Lecture
OTHER: Others
ALARM: Voice alarm

-9-
EDIT: Selecting edit mode
OVER WRITE
wv
INSER (Insert)
OVER WRITE: Overwrite recording
INSER: Insertion recording (“INSERT”ap-
pears on the display.)
AUTO PAUSE: Selecting auto pause time mode
PAUSE 03SEC
wv
PAUSE 04SEC
w
...
v
PAUSE 10SEC
wv
PAUSE OFF
wv
PAUSE 01SEC
wv
PAUSE 02SEC
wv
...
Note: The initial setting of the auto pause
function is ON (3 seconds).
Dateand time (See“Adjustingthe dateandtime”.)
VAS (Voice activated system): Selecting VAS
mode
VAS OFF
wv
VAS ON
VAS OFF: To manually start and stop record-
ing
VAS ON: Recording begins when the unit
picks up sound, and stops after the sound
stops. Press the + or –VOLUME button to
setthe microphone’ssensitivity when record-
ing begins. The VAS sensing level appears
on the display (“VAS 01”~ “VAS 10”). “VAS”
appears.

-10-
REC: Selecting recording time mode
REC STAND (Standard)
wv
REC LONG
REC STAND: For better sound quality (The
unit can record for up to approx. 33 minutes.)
REC LONG: For longer recording (The unit
can record for up to approx. 197 minutes.)
BEEP: Selecting beep mode
BEEP ON
wv
BEEP OFF
BEEP ON: Every time the operation buttons
are pressed, a beep sound will be heard.
BEEP OFF: No beep sound
ERASE GUARD: Selecting erasing guard mode
(See “Erasing guard”.)
GUARD OFF
wv
GUARD ON
GUARD OFF: You may erase the data.
GUARD ON: You cannot erase the data.
“”appears on the display.
12/24: (See “Changing the clock to the 12-hour
(or 24-hour) display”.)
Original display returns

-11-
RECORDING
1. Press the n button to turn the power on.
2. Set the REC MODE switch (back of the unit)
to select the desired recording mode.
DIC (Dictating): “”appears.
CONF (Conference): “”appears.
LECT (Lecture): “”appears.
Note:
If an external microphone (not supplied) is
connected, the recording mode cannot be
changed. “”appears.
3. Select the desired folder name, VAS and re-
cordingtime modes.(See “SELECTINGTHE
MENU MODE”.)
4. Press the mbutton (red).
Recordingstartswith newfile
number.
Example: The display appears as shown be-
low.
Folder name
Current file
number Total file
number
Elapsed recording time
5. Press the nbutton to stop the recording at
any time.
(Red)

-12-
Note:
•The unit can record up to file number 99 for
each folder (except ALARM folder).
•When the recording time is full, “MEMOR
FULL”appears briefly. In this case, erase the
unnecessary file.
•If the CUE INDEX button is
pressedduring recording,an
index mark is made (INDEX
number appears briefly) and
recording continues. (Up to
10index marks,for each file,
can be made. But, Index
marks cannot be deleted in-
dividually.)
File number
Each time a recording is made, a file number is
automatically placed in the memory at the begin-
ning of the recording.
Temporarily stopping recording (Recording
pause)
Press the mbutton. The elapsed recording time
blinks on the display. To resume recording, press
the button again.

-13-
EDIT THE RECORDED DATA
Overwrite recording
Tooverwriterecordedmaterial (Previousrecorded
material will be erased.)
1. Select the “OVER WRITE”edit mode.
(See “SELECTING THE MENU MODE”.)
2. Locatethe desiredpointduringplayback, then
press the abutton to pause.
•Elapsed playing time blinks.
3. Press the mbutton. Over writing recording
starts from the paused position. (The CUE
INDEX button will not function during over
writing recording.)
4. Press the nbutton to stop the recording.
Insertion recording
To insert into a file (Previous recorded material
will remain.)
1. Selectthe “INSER(Insert)”editmode. “INSERT”
appears on the display.
(See “SELECTING THE MENU MODE”.)
2. Locatethe desiredpointduringplayback, then
press the abutton to pause.
3. Press the mbutton. Insertion recording starts
from the paused position. (The CUE INDEX
button will not function during insertion
recording.)
4. Press the nbutton to stop the recording.
Notes:
•The edit mode (OVER WRITE
wv
INSER)
can be changed by pressing the CUE INDEX
button during play back paused.
•In case of paused recording, the mode can
be changed to play back. Press the abut-
ton.

-14-

-15-
Auto pause
When the end of the file is reached during play-
back, “AUTO”and “PAUSE”appear in turn. The
unit pauses automatically for the preset auto
pause time. After the set time elapses, the next
file playback begins.
Press the abutton during auto pause to return to
the normal pause mode.
File skip
Press the cordbutton to skip to the desired
file.
In case the auto pause is set, if the cbutton is
pressed during playback, the unit enters the auto
pause mode at the end of the file. Press the c
button again to play back the next file.
File search
If the cor dbutton is pressed during play-
back, the unit will search at high speed in the for-
ward or reverse direction while the button is be-
ing pressed. When the button is released, nor-
mal playback will continue.
Index search
If an index mark was made in the file, press the
CUE INDEX button during playback. The unit will
searchfor the nextindex point andplayback starts
from this point.

-16-
Repeat
1. Press the REPEAT button during
playback. “ ”appears.
Theunit plays back repeatedly thelast 5sec-
onds of recorded content in the selected file.
(If the recorded times are shorter than 5 sec-
onds, repeat playback starts from the begin-
ning of the current file.)
2. Press the REPEAT button again to return to
normal playback.
Time display
Press the TIME/SET button repeatedly during
recording, playback and stop mode. The display
changes as follows.
In recording mode
Recording time mode, Current file number/
Total file number, Remaining recording time
v
Current time
v
Original display returns.
Example of remaining recording time:
In playback mode
Recorded date/time
v
Current time
v
Re-
cording time mode, Current file number/Total
filenumber, Remainingplaying time
v
Origi-
nal display returns
In stop mode
Recording time mode, Remaining recording
time
v
Current time
v
Original display
returns
Recording
time mode Remaining
recording time

-17-
ERASING
Important Note:
Before erasing, make sure that the battery indi-
cator is full.
Preparations
1. Press the MENU button to select “FOLDE”.
2. PresstheTIME/SETbutton. The folder name
blinks.
3. Pressthecor dbutton toselectthefolder
to be erased, then press the TIME/SET but-
ton.
4. Press the nbutton to return to the original
display.
Erasing one file in memory
1. Press the cor dbutton to select the file
number to be erased.
2. Press the ERASE button
once. The file number and
“ERASE”blink.
3. While the display is blinking, press the TIME/
SET button. “ERASE”appears briefly.
The file memory in the selected folder is
erased. All the file numbers after the file that
was erased are reduced by one.
To secure the unit
In case the unit is used by unauthorised persons,
you can set the security mode.
To switch security mode on/off during power off,
press the TIME/SET and MENU buttons simulta-
neously. The buttons must be pressed for 4 sec-
onds long. The display shows “SECUR ON”/
“SECUR OFF”.

-18-
Erasing one folder memory
1. Press the ERASE button twice. The folder
name, file numbers and “ERASE”blink.
2. While the display is blinking, press the TIME/
SET button. “ERASE”appears briefly. All
memories in the selected folder are erased.
Erasing all memories
1. Pressthe ERASEbutton threetimes. “MEMOR
ALL ERASE”blinks.
2. While “MEMOR ALL ERASE”is blinking,
press the TIME/SET button. “ERASE”ap-
pears briefly. All memories in all folders are
erased.
Partial erasing (A-B erasing)
1. Press the cor dbutton to select the file
number.
2. Press the abutton to start playback.
3. Pressthe abuttonagain to pauseat the start-
ing point you want to erase (point A).
4. Press the ERASE button. “ERASE START”
blinks.
5. While “ERASE START”is blinking, press the
TIME/SET button. “ERASE”remains. Play-
back starts.
6. Press the ERASE button at the ending point
you want to erase (point B). “ERASE END”
blinks.
7. While “ERASE END”is blinking, press the
TIME/SET button. “ERASE”appears briefly.
The section between points A and B in the
selected file is erased. Playback pause is is-
sued.

-19-
Notes:
•TheERASE buttonwill notfunction duringre-
cording and playback.
•Erase all function can only be operated if in
theactual selectedfolder there is at leastone
file.
Erasing guard
Erasing guard functions to prevent accidental
erasure.
1. Press the MENU button repeatedly to select
“ERASE GUARD”.
2. Press the TIME/SET button.
3. Pressthe cor dbuttontoselect “GUARD
ON”. “”appears.
4. Press the TIME/SET button.
In the erasing guard mode, the ERASE but-
ton will not function.
Table of contents
Other Fisher Voice Recorder manuals