Fishman AURA SIXTEEN User manual

USER GUIDE
AURA®SIXTEEN
www.fishman.com

2
Welcome
Thank you for making Fishman a part of your acoustic experience. We are
proud to offer you the finest acoustic amplification products available;
high-quality professional-grade tools to empower you to sound your very
best. We are confident Aura Sixteen will both enhance and inspire your
music making.

3
Quick Start
Power – Install a 9V alkaline or lithium battery (not included).
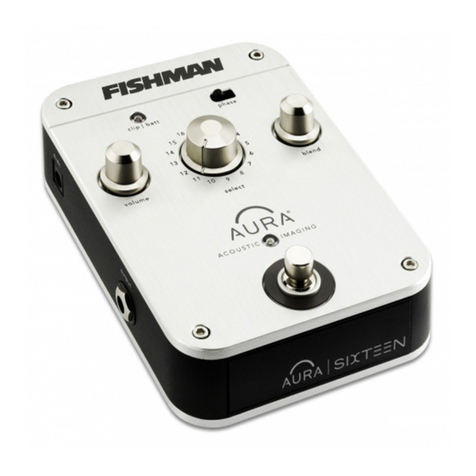
Set the controls – Volume at minimum, select at #1 and blend at
its mid-point.
Plug in – Use standard ¼-inch shielded instrument cables. Place any
other pedals after Aura Sixteen.
Set trim – Play hard and adjust input trim (right side) so clip/batt LED
flashes occasionally.
Select an Image – Raise the volume and audition the 16 Images with
the select knob. Since Aura Sixteen ships with dreadnought Images, it’s
important to use a dreadnought style guitar or see page 12 on
downloading Images for your instrument.
Blend to taste – turn left for more pickup and right for more Image.
Kill feedback – If feedback starts, change the position of the phase
switch.
Bypass – Step on the foot switch to alternate between blended Image
sound and dry pickup (this is the default setting).
Mute – To alternate between blended Image sound and mute, hold the
foot switch down until the LED flashes. Repeat to return to bypass.

4
What is Aura?
Aura Acoustic Imaging Technology uses digital algorithms developed in
Fishman’s audio laboratories to restore a studio-miked sound to an
acoustic instrument. To achieve this, we record instruments using world-
class microphones and techniques to capture an “Image” of the natural
sound that your acoustic instrument emits when miked in a professional
studio. This Image, when recorded direct or played through an amp,
mixer or PA, blends with your instrument’s pickup to produce an
incredibly accurate recreation of the original recording.
Aura Acoustic Imaging processors sound best when used with Fishman
undersaddle pickups and magnetic soundhole pickups. When we record
each instrument, we use our Acoustic Matrix undersaddle pickup. So,
when you play through an Aura processor, you’ll get the best results using
our Acoustic Matrix pickup. We do not recommend soundboard-mounted
pickups, bridge-plate pickups, multi-sensor pickups or microphones for
Aura products since they include unnecessary resonances that can
interfere with the Aura processing.
Choosing an Image
To get the most realistic tone from Aura Acoustic Imaging, you should
always match your Images with the instrument type you’re playing. For
example, choose dreadnought Images when plugging in a dreadnought
body style guitar; choose mandolin Images if you’re playing a mandolin.
Don’t hope to derive a mandolin sound from a dreadnought or try to turn
your orchestra body style guitar into a 12-string. If you are not sure which
body type your guitar falls into, we suggest you audition several Images
from using the search tools in the Aura Image Gallery and let your ears
decide. See page 12 for details on Downloading Images.

5
Aura Custom Shop
For the ultimate in Aura Imaging, be sure to check out the Aura Custom
Shop at fishman.com. For a modest fee, you send us your instrument and
we’ll create a set of Images using our best microphones, custom
recorded for you.
Aura Image Gallery
The Aura Image Gallery software manages a vast library of Images
created from an ever-expanding list of instruments, and provides tools to
search and store sets of Images. Browse the Image Library to find your
instrument, then drag and drop an Image into an Image Set for download
into Aura Sixteen.
Making Connections
Playing live
For the best sound reproduction when performing live, connect your Aura
Sixteen to an acoustic instrument amp, PA system, powered monitor or
other full-range system.
Going direct
For direct recording, there is no better solution than using Aura Sixteen.
In fact, an acoustic track recorded with just a pickup can be re-recorded
using Aura to restore the miked sound.

6
About the Images
Dreadnought
Aura Sixteen comes pre-loaded with 16 Images recorded using the most
popular dreadnought guitars.
Be sure to check out the section on Downloading Images (pg. 12) from
the Aura Image Gallery if you’re not playing a dreadnought style guitar.
Image # Top Wood Back and Sides Microphone Type
1 Spruce Rosewood DPA®4011
2 Spruce Mahogany Soundelux®E47
3 Spruce Rosewood Soundelux®E47
4 Spruce Rosewood Neumann®KM84
5 Spruce Rosewood Schoeps®CMC64
6 Spruce Rosewood Schoeps®CMC64
7 Spruce Rosewood Shure®KSM141
8 Spruce Rosewood Neumann®M147
9 Spruce Rosewood Neumann®M147
10 Spruce Rosewood Schoeps®CMC64
11 Spruce Mahogany AKG®C414
12 Spruce Rosewood Neumann® U87
13 Spruce Rosewood Neumann® U87
14 Composite Composite DPA®4011
15 Spruce Rosewood Neumann®M147
16 Spruce Mahogany Shure®SM57
Fishman Transducers, Inc. is not affiliated with any of the forementioned companies or their respective trademarks,
registered trademarks, product models or copyrights.

7
Using effects
When using your Aura Sixteen with other effects devices, place the Aura
Sixteen first in the chain after your guitar.

8
Left Side Panel
Output
Use a standard ¼-inch instrument cable to connect the output to your
amplifier, mixer or effects devices. You can also connect this output to
an unbalanced input on a recording system.
9VDC
Power may be supplied by either a 9V battery (battery compartment
underneath the pedal)or the Fishman 910-R (for 110V). Insert a plug into
the input jack, and Aura Sixteen powers up. To conserve the battery,
remove the plug from the input when not in use.
The clip/batt indicator will light steadily when it is time to change the
battery. When the clip/batt LED comes on you have approximately one
hour of remaining battery life.
For AC power, use the Fishman 910-R (for 110V)or other suitable 9V
adapter (see Specifications).

9
Right Side Panel
Input
Plug in your instrument here with a standard ¼-inch instrument cable. If
you have a passive undersaddle pickup (no battery onboard), always plug
into Aura Sixteen first, even if you use a pedal tuner.
Insert a plug into the input jack, and Aura Sixteen powers up. To
conserve the battery, remove the plug from the input when not in use.
Trim
Raise or lower the trim to optimize the input level for your pickup. Play
hard and adjust trim so clip/batt flashes occasionally. Some pickup
systems may not cause the light to flash at all and other onboard preamps
may require you to turn their output down to achieve an optimum level.

10
Controls
Volume
For the cleanest signal, set the volume as high as possible without
clipping the next device in the signal chain. If you hear distortion and the
clip/batt light is not flashing, reduce the volume.
Select
The 16 Images you can choose with the select knob are hand picked for
a dreadnought body style guitar. Try all 16 and pick the ones that
compliment your playing style and sound good in the room. For example,
dark/deep sounding Images may add impact to a solo performance.
Brighter/lighter Images may compliment an ensemble. There are no rules;
try them all and decide which works best for you.
Blend
Position the blend knob straight-up at 12 o’clock and you’ll hear a 50/50
mix of Image and pickup. Turn the blend
all the way right for just Image; all the way
left for just pickup. Most performers blend in
some pickup with the Image for clarity and
definition.
Suggestions
• For live performance try backing off the
Image by setting blend to about 10 or 11 o’clock or about 65%
pickup. You won’t need too much Image blended in to achieve a
great live sound. If feedback occurs, flip the phase switch.
• For recording, try blending in more Image for a realistic
acoustic sound. Set the blend to taste. Again, you’ll often get
good results with a little bit of pickup blended in with the Image
for clarity and definition.
more
pickup
more
Image

11
Controls (continued)
Phase switch
Use the phase switch to improve bass response at low volume or to
control feedback at high volume. Play your guitar and toggle the phase
switch back and forth until you achieve the desired result.
Foot switch
Step on the foot switch to bypass the Aura effect. When you stomp, you’ll
hear the dramatic difference between the Image blend and the dry
pickup. When the light above the footswitch is on, the Image is active.
Note when the effect is bypassed, your guitar signal remains buffered.
Also, if the blend knob is set to 7 o’clock, you will hear no difference
between active and bypass states.
Mute (optional mode)
You may set up the foot switch to alternate between the Image blend and
muted output. To enable the mute option, hold the foot switch down until
the LED flashes. Repeat to return to bypass.

12
Downloading Images
The Aura Image Gallery software manages a vast library of Images
created from an ever-expanding list of instruments, and provides tools to
search and store sets of Images.
If you can’t find your exact instrument in the list, use the built-in Image
Wizard to find the closest match. For example, if one of our hundreds of
Images doesn’t match your instrument exactly, you can still find a great
sounding Image by matching similar tone woods and body styles.
Experiment with these tools, and use your ears to determine what sounds
best for your playing or musical style.
To access this library of additional instrument Images, install the Aura
Image Gallery on your computer. Then, gently remove the USB cover
from the right side of the unit and connect the included USB cable to the
side of the preamp and your computer. Create a new Image Set and load
your Images into Aura Sixteen
Be sure to install the Aura Image Gallery software prior to connecting
Aura Sixteen for the first time.
USB mini jack

13
Specifications
Input impedance: 10M Ohm
Input trim gain range: -10dB to +2dB
Nominal Output impedance: 3.5k Ohm
Max. Output level (onset of clipping): +2.4dBV
Digital signal path:
A/D, D/A conversion: 24-bit
Signal processing: 32-bit
Baseline noise: -92dBV (A-weighted)
Dynamic range: 94dB (A-weighted)
Power supply: 9V battery or 9VDC adapter
Typical in-use current consumption: 18mA
Typical 9V battery life: 27 hours using alkaline battery
54 hours using lithium battery)
9V adapter (optional): Fishman 910-R (for 110V)
or suitable filtered & regulated,
200mA type, tip=negative
5.5mm O.D., 2mm I.D.
Phase switch: Left position=non-inverting
All specifications subject to change without notice

www.fishman.com
Fishman and Fishman Transducers are trademarks or tradenames of Fishman Transducers Inc. 513-300-162 Rev A, 1-10
Table of contents
Other Fishman Music Pedal manuals

Fishman
Fishman AFX CHORUS User manual

Fishman
Fishman AFX REVERB User manual

Fishman
Fishman AURA PRO User manual

Fishman
Fishman ELLIPSE AURA - User manual

Fishman
Fishman AFX REVERB Setup guide

Fishman
Fishman AURA ACOUSTIC IMAGING PEDAL User manual

Fishman
Fishman AURA ACOUSTIC IMAGING PEDAL User manual

Fishman
Fishman AURA SPECTRUM DI User manual

Fishman
Fishman POWERBLEND User manual

Fishman
Fishman Aura Jerry Douglas Signature Series User manual