FLAVIA KASKATA Series Specification sheet

FLAVIA I DISHWASHERS
FULLY INTEGRATED
DISHWASHER
KASKATA
BI 60 KASKATA Light S
BI 45 KASKATA Light S

Operation and installation manualOperation and installation manual
DISHWASHERS
Dear customer!
Thank you for buying a “FLAVIA” product. We hope, this appliance will meet your expectations
and be a reliable assistant of yours in your kitchen. For correct and safe operation of the
appliance, please carefully read all the chapters in the present manual. Keep your manual for
the entire service life of the product you have purchased.
Reading the rst part of the manual, you will learn some important conditions to ensure safe
operation of the appliance. To keep your appliance in good condition for a long time, we offer
you a lot of helpful advices on the product care and cleaning. In the manual you can nd
some hints on energy saving.
On the last pages of the manual you can also read recommendations which will help you
remove minor failures, if any, during operation of your appliance.
Your new appliance is made of high-quality materials and fully conforms to any standard of
the European Economic Community.
The manufacturer reserves the right to make changes to the product design in order to
improve its performance. Our household appliances are subject to continual improvement,
the performance is enhanced, and their design is updated. Therefore, drawings and symbols
in the manual may differ from those for the model you have purchased.
Serial number explanation:
1406376200013
The manufacturing date is in the serial number of the product. The serial number is on the internal label which is on
the side of the dishwasher door.
manufacturing date manufacturing month model number
TM Flavia
FLAVIA LIMITED, Hong Kong, Admiralty district, 89, Queensway, Lippo Center Tower 2, 2107

Operation and installation manual Operation and installation manual
DISHWASHERS
1
Operation and installation manual
CONTENTS
Safety hints and statements .........................................................................................2
Scope of supply ............................................................................................................3
Technical data...............................................................................................................4
Control panel.................................................................................................................4
Dishwasher design .......................................................................................................5
Table of operating modes .............................................................................................7
Water softener...............................................................................................................8
Water hardness table ...................................................................................................9
Detergent agent ...........................................................................................................9
Rinsing agent .............................................................................................................10
Putting dishes into the dishwasher ............................................................................. 12
Turning on the appliance............................................................................................. 13
Filter system................................................................................................................ 14
Dishwasher care ........................................................................................................ 15
Installation preparation ............................................................................................... 17
Installation procedure ................................................................................................. 17
Decorative panels sizes and mounting.........................................................................8
Door spring tension adjustment .................................................................................20
Drain hose connection ............................................................................................... 21
Electrical connections ................................................................................................21
Universal adapter connection ..................................................................................... 21
Water supply connection.............................................................................................22
Dishwasher installation sequence ..............................................................................22
INSTALLATION INSTRUCTIONS ..............................................................................24
Hints on troubleshooting .............................................................................................24
Codes of errors ..........................................................................................................29
What you may not wash using this dishwasher ..........................................................30
The product has been manufactured in line with European standards and is CE, TŰV,
ISO 9001 certied.
The manufacturer reserves the right to make changes to the product design in order
to improve its performance.

Operation and installation manual
DISHWASHERS
2
Attention!
To avoid failures when connecting the
appliance in cold months, keep it un-
packed at a room temperature within
at least 2 hours.
When using the appliance, observe
safety precautions as follows:
EARTHING
The appliance shall be earthed. In the event
of a failure or breakdown, earthing will re-
duce a risk of electrical shock. The appli-
ance is equipped with a cord with an earth
wire and earth plug. Plug into a correspond-
ing socket, installed and earthed according
to the valid regulations.
Improper connection of the earth wire
may lead to electrical shock. If you
doubt, whether earthing is correct,
please contact a qualied electrician
or representative of the Service Center.
Do not make changes to the design of
the plug supplied with the appliance. If
it doesn’t t for your socket, have the
socket replaced for which a profession-
al electrician must be involved.
ATTENTION!
Do not break the dishwasher door and dish
grid! Do neither sit down nor stand on it!
Do not touch heating elements during heat-
ing and right after use.
Do not wash plastic dishes unless they bear
a special marking to conrm they may be
washed in a dishwasher. If the dishes are
unmarked, refer to the manufacturer’s rec-
ommendations.
Use those washing and rinsing agents spe-
cially developed for automated dishwash-
ers. Never use soap, agents for laundry,
hand cleaners.
Keep children away from washing agents
and the open door of the dishwasher, be-
cause after use the dishwasher may contain
residuals of washing agents.
Do not leave the door open because you
can knock against that. When installing the
dishwasher, do not overbend and atten the
electric wire.
Avoid intervention on the control system.
Little children and physically disabled peo-
ple are not permitted to use the appliance.
All the dishwashing detergents used are
alkali-based and very harmful, if swallowed.
Avoid contact with eyes and skin; keep chil-
dren away from the open door of the dish-
washer.
Do not switch on the dishwasher unless any
protection panel is installed. During use be
careful to open the dishwasher door be-
cause water may spout.
Do not place heavy objects and do not stand
on the door of the dishwasher. The appliance
may tip over in that case.
SAFETY HINTS AND STATEMENTS

Operation and installation manual Operation and installation manual
DISHWASHERS
3
When putting dishes:
1) Be careful with sharp objects – put them
avoiding damage to the door seal;
2) Put sharp knives with the handle upward
to avoid cutting yourself. During use, plastic
objects shall not touch the heating elements.
If an electric wire is found to be damaged, this
is either the manufacturer or a Service Centre
representative to replace it, or any other quali-
ed professional. The measure is to be taken
to avoid hazards of any kind.
Proper disposal of the packaging
Use the dishwasher only according to its in-
tended purpose.
If you are going to remove the dishwasher for
maintenance or repair, take off the door of the
compartment within which the dishwasher is
installed.
Do not leave children unattended, prevent
them from playing with the appliance.
Upon completion of the washing cycle, please
check, whether the detergent agent container
is empty or not.
SCOPE OF SUPPLY
Your dishwasher is classied as a built-in
appliance.
The scope of supply includes as follows:
– dishwasher, 1 piece;
– measuring spoon, 1 piece;
– measuring cup, 1 piece;
– funnel, 1 piece;
– hose holder, 1 piece;
– hardware to fasten the decorative panel
onto the dishwasher door, 1 set;
– transparent adhesive foil, 1 piece;
– manual, 1 piece.
* the scope of supply of the dishwasher is sub-
ject to change without prior notice.

Operation and installation manual
DISHWASHERS
4
TECHNICAL DATA
The manufacturer's plate to identify the dishwasher model is at the top of the dishwasher
door side. Open the door to see that.
Drawing 1 shows the general view of the
dishwasher control panel, where numbered
positions have purposes as follows:
1. Display window: it indicates a program
selected, salt and rinsing agent content,
washing start delay time, service codes,
etc.
2. Button to select the partial load mode. It
is to be used, when you have to wash 6
or less sets of dishes. This is a water and
energy saving function.
3. Washing program delayed start button:
the start delay time may range from 1 to
24 hours.
4. Selection button of the wash program.
5. ON / OFF button.
Pic. 1
Model BI 45 KASKATA Light S BI 60 KASKATA Light S
Overall dimensions, mm:
Width, mm 449 598
Length (depth): 553 (1150 with the
door open)
550 (1150 with the door
open)
Height (min. – max.): 815 – 865
Mains voltage / frequency: 220 – 240 V / 50 Hz
Power consumption, max., Watt 1930
Number of sets of dishes to be put in 10 14
Energy Performance class A++
ATTENTION!
Before using the dishwasher for the rst time, read the manual to nd the best and most suit-
able mode of its operation.
CONTROL PANEL

Operation and installation manual Operation and installation manual
DISHWASHERS
5
DISHWASHER DESIGN
(Picture 2)
1 Upper nozzle
2 Flatware compartment
3 Upper basket
4 Internal pipe
5 Lower basket
6 Salt container
7 Dosing chamber
8 Cups holder
9 Lower nozzle
10 Filtering elements
11 Inlet pipe connecting point
12 Drain pipe
13 Power cable
14 Adjustable rear foot
ATTENTION! IMPORTANT!
During operation, the dishwasher runs
a program selected. The program run
time also includes an inactive period,
within which it may seem that the dish-
washer has completed washing.
Do not open the door of the dishwasher
before the run time of the program selected
is up. It is permitted to open the door, if you
need to put a plate you’ve forgotten to put be-
fore the start, but you may only do this during
injection of the washing (detergent) agent.
The values of various program run times
are in the column “Cycle time” in the “Table
of operating modes”.
A corresponding pictogram is blinking to
signal you that the dishwasher is on and runs
a program you have selected.
1
8
9
10
12
2
3
4
7
11
Pic. 2
5
6
13
14

Operation and installation manual
DISHWASHERS
6
The pictogram is on Display 1, Picture 1,
and it blinks during the entire washing cycle.
A sound signal informs you of the program
run completion; the signal is given within ap-
proximately 8 seconds. The pictogram of the
program selected is off (Display 1, Picture 1).
Should you, for some reason or another,
have missed the sound signal to inform you
of the program run completion, before open-
ing the door, make sure that the program run
has been completed. Look at the pictogram:
it must not be blinking, but be off (Picture 1,
Position 1). Press Button 5 on the control
panel to switch off the appliance, open the
door and take out the clean dishes.
Should you have accidentally opened
the door prior to the program run com-
pletion, close it at once without pressing
any buttons and wait till the program run
time is over.
IMPORTANT RECOMMENDATION!
To avoid unforeseen events upon wash-
ing cycle completion, shut off the water
cock to supply water to the dishwasher.

Operation and installation manual Operation and installation manual
DISHWASHERS
7
Program Type of dishes Informaon for mode selecon Mode descripon
Detergent
agent
consumpon:
prewashing /
washing, g
Washing
cycle me,
min.
Power
consumpon
for washing
cycle, kW/h
Water
consump-
on, L
Rinsing
agent
Automac
Automac
washing
Dishware, atware,
big dishes, pots, stew-
pots, frying pans
To be used both for moderately
and heavily contaminated dishes.
Washing and rinsing intensity to be
adjusted and controlled automa-
cally
the selecon is opmized
automacally, for which
sensors are used, to
measure a contamina-
on level
5/30 120 – 180 0.8 – 1.2 9.2 – 12.4 «
Power
Intensive
washing
Dishware, atware,
big dishes, pots, stew-
pots, frying pans
The program is meant for heavily
contaminated dishes. The dish-
washer eecvely removes burnt
or dried food residues to contain
starch, proteins and fats
prewashing 50ºC
washing 65ºC
rinsing
rinsing
rinsing 55ºC
drying
3 / 22
(3 in 1)
130 1.2 16.0 «
Easy
Standard
washing
Dishware, atware,
big dishes, pots, stew-
pots, frying pans
The program is meant for moder-
ately contaminated dishes, with
no burnt and dried food residues.
Opmum program for everyday use
prewashing 45ºC
washing 55ºC
rinsing
rinsing 60ºC
drying
3 / 22
(3 in 1)
155 1.0 13.0 «
Economy
ECO Dishware and
atware
To be used for slightly contaminated
dishes. Minimum water and energy
consumpon within opmum me
prewashing
washing 50ºC
rinsing 60ºC
drying
25
(3 in 1)
165 0.83 9.2 «
Gentle
Glass
Glassware (jars, shot
and wine glasses,
chinaware dishes)
To be used for slightly contami-
nated dishes, with no food residues.
2-hour-mode to include the full
washing cycle
prewashing
washing 40ºC
rinsing 60ºC
drying
5/30
(3 in 1)
110 0.85 15.0 «
Speed
Quick
Dishware and
atware
To be used for slightly contaminated
dishes, this is a program to speed
up washing by 4 mes (with Energy
Eciency Class
A+”). Designed for dishes that need
no drying
washing 40ºC
rinsing
rinsing 45ºC
20 40 0.45 10.0
Table of operating modes*
«use of a rinsing agent is obligatory with these modes selected.
* The table shows calculated values of water temperature. Actual temperatures may differ from calculated ones.
** after the slash: prewashing / washing. The modes are to be selected pressing the PROGRAM SELECTION button. Pressing the button
each time you switch to the next program in an order as follows: automatic – intensive – standards – ECO – glass – quick

Operation and installation manual
DISHWASHERS
8
WATER SOFTENER
There are two methods to soften water: ei-
ther with a softener, or a washing agent.
Water hardness values may vary from place
to place. If your dishwasher uses hard water,
this may lead to formation of scale and de-
posits on dishes.
The appliance is equipped with a special
softener to use salt, specially developed for
removal of lime and minerals from water.
HOW TO CHARGE SALT
INTO THE SOFTENER
Make sure to always use salts meant for
dishwashers only.
The salt container is beneath the lower grid.
The way to ll it in is as follows:
1. Remove the lower basket, unscrew the
salt container cover to remove that.
2. If you ll in the container for the rst time,
ll it with water (2/3 of the vol.).
3. Insert the funnel end (included), charge
approximately 1.5 kg of salt. It is normal, if
some water ows out of the container.
4. Carefully screw in the cover.
NOTE:
1. The salt container should be relled,
when the “S” pictogram (upper left
corner of the display) starts to illumi-
nate. Even if the container is properly
lled, the pictogram may still illumi-
nate until salt is dissolved complete-
ly.
2. If you have spilled the salt, you can
wash it out, using the “Quick” pro-
gram
SALT CONSUMPTION CONTROL
The list of the dishwasher functions also in-
cludes the salt consumption control, depending
upon water hardness. This is to optimize salt con-
sumption, and you can control it in the following
way:
1. Press the ON / OFF button.
2. Press and hold (60 sec) the program selec-
tion button. Wait for the sign H1 (or H2, H3 or H4)
to be displayed. At that, salt and rinsing agent in-
dicators will blink.
3. Pressing the program selection button, se-
lect desired salt dosage, depending upon water
hardness (see the “Water hardness table”). With
each touch of the button you switch to the next
mode: Н1-Н2-Н3-Н4-Н5-Н6.
4. To complete selection, press the ON/OFF
button.
These settings are required each time you dis-
connect the dishwasher from the mains.
You may be informed of water hardness in
your location at local authorities or upon a lab re-
search of a water sample.

Operation and installation manual Operation and installation manual
DISHWASHERS
9
DETERGENT AGENT
ATTENTION!
Detergent agents are very caustic!
Keep them away from children!
The dosing chamber must be lled in be-
fore start of each washing cycle, according
to instructions from the “Table of operation
modes”. Your dishwasher consumes less
washing and rinsing agents, as opposed
to conventional appliances of that kind.
For a normal (standard) washing cycle,
a table spoon of the detergent agent is
enough. For heavily contaminated dishes
you should use a larger quantity of the de-
tergent agent. Always add the detergent
agent right before washing, otherwise it
may get soaked, without dissolving com-
pletely.
Proper use of detergent agents
Use special detergent agents only. Keep
them in a dry place. Charge the detergent
powder into the dosing chamber right before
you start washing.
Tableted detergent agents
Tableted detergent agents of different
manufacturers have different dissolution
rates. Due to this, during short programs,
tablets may not dissolve completely. As
a consequence, this would reduce their
cleaning ability. Tableted detergent agents
are better used in “intensive” modes,
and that is to ensure their complete dissolu-
tion.
Water hardness Settings Display indication
odH 1) mmol/l 2)
0 – 5 0 – 0.09 1 H1
6 – 11 1.0 – 2.0 2 H2
12 – 17 2.1 – 3.0 3 H3
18 – 22 3.1 – 4.0 4* H4
23 – 34 4.1 – 6.1 5 H5
35 – 45 6.2 – 8.0 6 H6
1) Water hardness MU in Germany
2) Internationally accepted MU of water hardness
* factory setting

Operation and installation manual
DISHWASHERS
10
Detergent agent consumption
IF WATER USED IS TOO HARD, YOU
MAY AVOID FORMATION OF SCALES
AND DEPOSITS, ADDING A WASHING
AGENT!
An amount of the detergent agent used
may vary, depending upon water hard-
ness.
To be informed of this value, please contact
the local department of water resources. For
harder water you will need a larger amount
of the detergent agent. Keep in mind that you
should select an appropriate amount, slightly
changing it with small portions, until you nd
a proper dosage according to water hard-
ness in your location.
Descaling
To remove scales, do the following:
• Wash the dishes using a standard (“nor-
mal”) program.
• Take any metal dishes, atware, spots,
etc. out of the dishwasher.
• Do not add any detergent agent any
more.
• Fill in 2 table spoons of vinegar into a
little bowl and place it upon the lower
grid within the dishwasher.
• Run “Standard” program.
If this doesn’t work, repeat the same, us-
ing ¼ glass of сіtric acid crystals instead of
vinegar.
RINSING AGENT
This is to be used at the last stage to prevent
drop marks on dishes. This also improves dry-
ing, enabling water to “run off” the surface of
dishes.
Your dishwasher uses liquid rinsing agents.
The rinsing agents doser is inside, close to the
dosage chamber of the detergent agent. To ll
in the doser, open the cover and ll in water, till
the level indicator turns black.
• To open the doser cover, turn it to the left
(“Open” position) and remove it.
• Fill in the doser with you rinsing agent.
Do not overll!
• Close the cover, turning it to the right.
Do not overll the doser, for it may result in
excessive soaping. If you spill some, wipe it with
a soft cloth. Prior to opening the door, do not
forget to screw the cover.

Operation and installation manual Operation and installation manual
DISHWASHERS
11
Rinsing agent doser control
Within the last rinsing cycle, a certain
amount of the rinsing agent is used. Similar
to use of the detergent agent, the quantity of
the rinsing agent depends upon water hard-
ness. If you use too much rinsing agent, this
may lead to excessive foaming and occur-
rence of stains on your dishes. If water in
your location is soft, you will need no rinsing
agent. But if you still need that, dilute it with a
corresponding amount of water.
The doser has 6 positions. Always start
with Position 2. If the dishes dry out badly, if
there are drop marks on them, increase the
amount of the rinsing agent, switching to Po-
sition 3. Continue to increase the amount, till
there are no drop marks on your dishes. We
recommend using Position 4.
How to ll in the doser
with the rinsing agent
If the control panel does not include an
agent level control lamp, you can calculate
a required amount of the rinsing agent in the
following way. The black spot decreases in
size with the liquid volume decrease. The
level below ¼ is not permitted.
Depending upon consumption of the rins-
ing agent, the size of the black spot decreas-
es in size (see the gure):
Full
3/4
1/2
1/4 - relling required
Empty
Operation and installation manual
DISHWASHERS
12
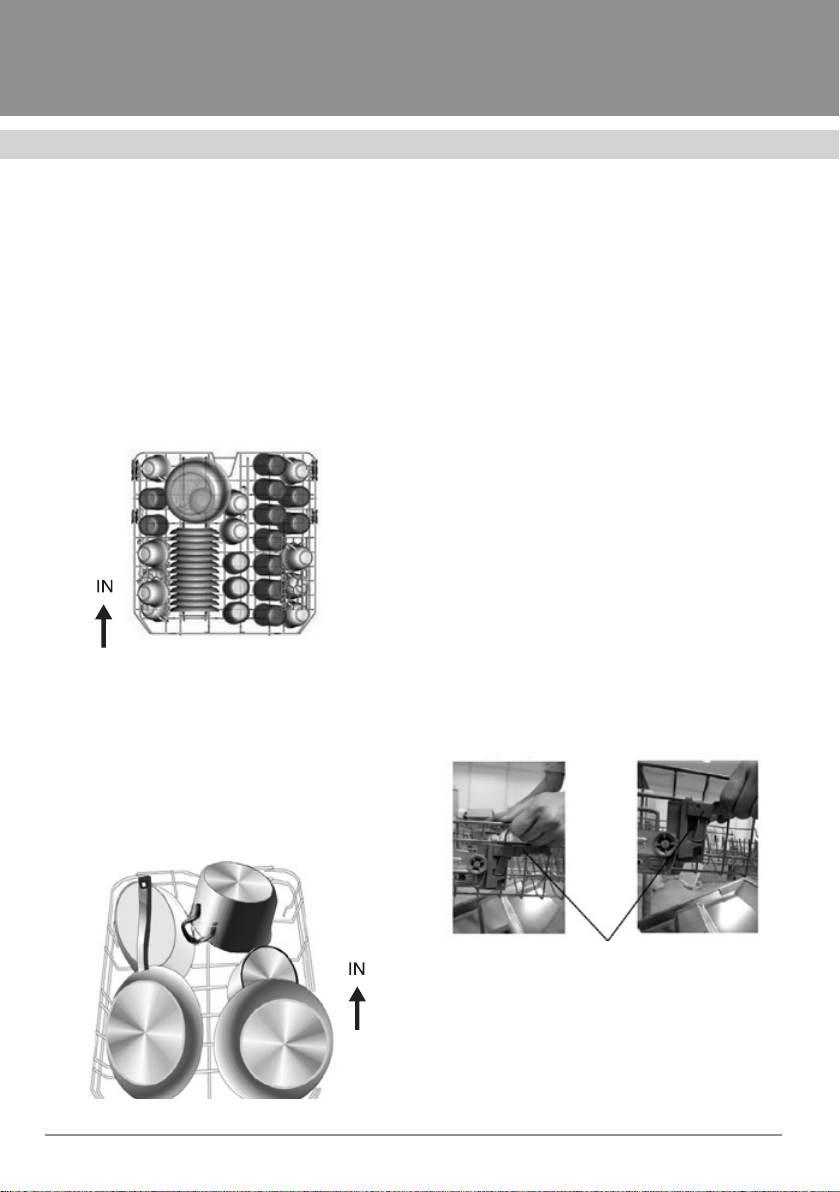
PUTTING IN DISHES
Loading the upper basket
The upper basket is meant for fragile and
light dishware, such as glasses, tea and cof-
fee cups, saucers, as well as plates, small
salad bowls, at baking pans (not heavily
contaminated).
Place the dishes and kitchenware in such
a way so that water jets cannot move then.
Loading the lower basket
We recommend you to put larger dishware
items, as well as those heavily contaminat-
ed, into the lower basket of the dishwasher.
These would include as follows: spots, pans,
covers, serving dishes and plates, as shown
in the gure below.
It is preferred to place serving dishes and
plates on the edges of the basket not to
cause interference with free rotation of the
upper water sprayer.
Please, keep in mind:
• Spots and serving dishes and plates
must be put bottom up.
• Deep spots must be put inclined, so that
water can run off.
• The lower basket features drop walls and
enables to put larger spots and pans.
Upper basket adjustment
The upper basket height may be adjusted
to provide more space for larger dishware
items both in the upper and lower baskets.
To adjust the height of the upper basket, lift
it to the upper position, and pull the handle
upwards to release the basket (see the g-
ures below):
lift the basket
to the upper position
pull the handle upwards to
release the basket
adjust the handle

Operation and installation manual Operation and installation manual
DISHWASHERS
13
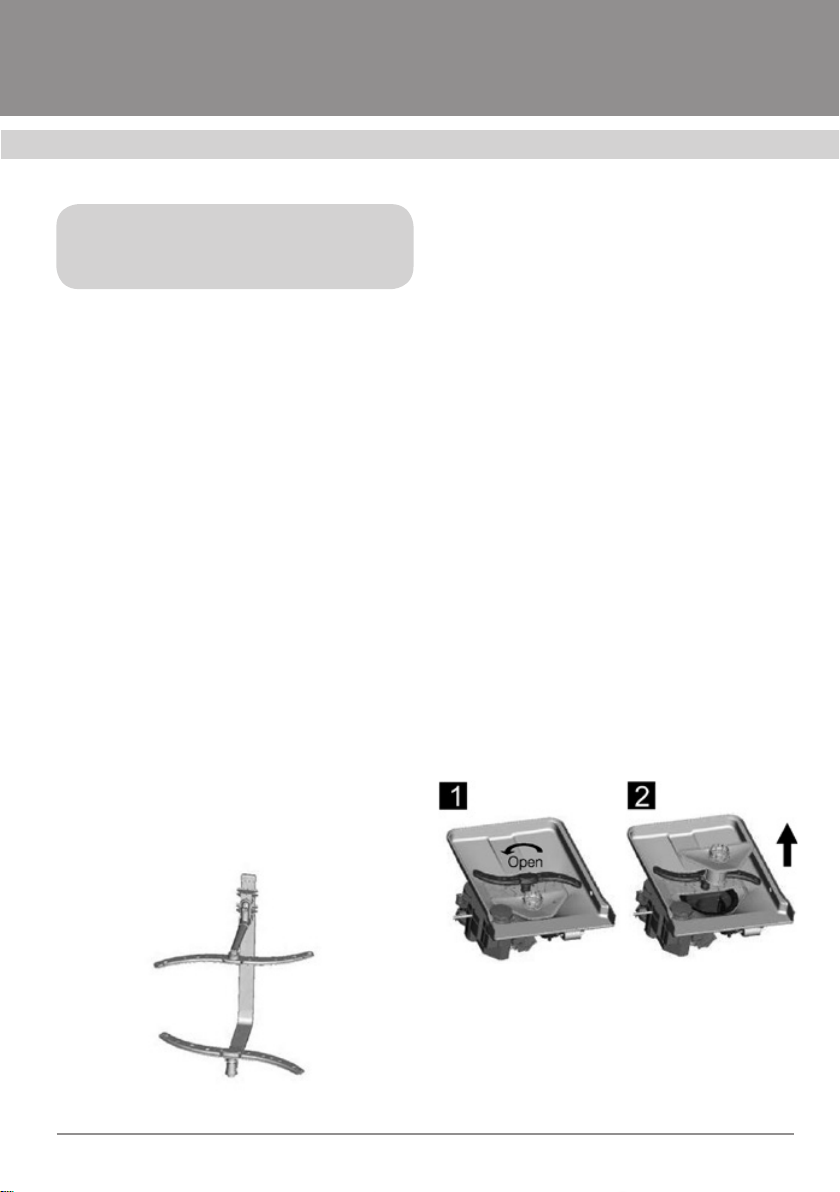
Hinged cups holders
To optimally place spots and pans you can
fold teeth, as shown in the gure on your
right.
Basket for table-ware
The table-ware shall be placed into the
basket with handles downwards. If there are
side baskets, spoons shall be placed sepa-
rately, into special slots. Longer kitchenware
items shall be laid horizontally, at the front of
the basket, as shown in the gure.
To ensure high quality washing, prior to
placing the silverware make sure as fol-
lows:
• All items are separate (not put one into
another).
• Silverware items are placed with handles
upwards.
• Longer items of the kitchenware are in the
middle.
SWITCHING
ON THE APPLIANCE
Starting a washing cycle
1. Make sure the dishwasher is connected
to the mains.
2. Make sure the water cock is opened all
the way.
3. Put your dishes (See “Putting the dish-
es”).
4. Fill in rinsing and detergent agents
(See “Detergent agents” and “Rinsing
agents”).
5. Open the door, press ON / OFF button.
6. Press the program selection button, se-
lect a washing cycle desired (See “Table
of operating modes”).
7. Shut the door. Washing begins in 10
sec.
Visual control
of washing modes*
While the dishwasher is in operation, it
is possible to visually control the washing
mode switching on / off. This function can
be implemented by means of a luminous
point on the floor, beneath the dishwasher
door. In the beginning of a washing cycle
the point starts to illuminate, and upon
completion of the cycle it starts to go
down. It is very convenient because us-
ers do not have to wait for sound signals
to inform them of completion of the cycle,
as the signal time is limited. If you see no
luminous point on the floor, this means,
washing is complete and you can take out
clean dishes.
*depending upon a model

Operation and installation manual
DISHWASHERS
14
ATTENTION:
If you open the door of the dishwasher
with a program running, the program
execution may be interrupted and
stopped. The visual control function
will, correspondingly, turn off. Upon
closing the door, when the program
will continue, the luminous point will
appear on the oor again.
Program
changes or cancellation
Note: a started cycle may only be changed,
if the dishwasher operates for a very short
time. Otherwise, the detergent agent may al-
ready be released, and the dishwasher has
started supplying water. If that has already
happened, please rell the detergent agent
doser (See “Detergent agents”).
Open the door, press and hold the pro-
gram selection mode 3 sec at least. After
that you can switch to any program desired.
Close the door.
Upon completion
of the washing cycle
Upon completion of washing, a sound sig-
nal will be given within 8 sec. Switch off the
appliance, pressing the ON / OFF button.
Open the door. Wait several minutes to let
the dishes cool down. After that take them all
out of the dishwasher.
Forgot to put a plate?
You may put a forgotten plate prior to injec-
tion of the detergent agent..
1. Slightly open the door to stop the wash-
ing cycle.
2. After water nozzles have stopped oper-
ating, open the door all the way.
3. Put the forgotten plate.
4. Shut the door. The dishwasher will re-
start in 10 sec.
ATTENTION!
It is dangerous to open the door of the
dishwasher in operation due to a pos-
sible contact with hot water!
FILTER SYSTEM
The lter is within convenient reach. The l-
ter system includes three components: main
lter, coarse lter and ne lter.
1. Main lter.
Food and dirt residues, screened with this
lter, are washed down by means of water jet
from the lower nozzle.
2. Coarse lter.
Bigger particles, such as bones and pieces
of broken glass, that may clog discharge pipes,
are screened with the coarse lter. To remove
particles, screened with it, carefully squeeze
the upper tags and take out the lter.
3. Fine lter.
This is designed to screen dirt and food resi-
dues and prevent their contact with dishes dur-
ing the washing cycle.
Operation and installation manual Operation and installation manual
DISHWASHERS
15
ATTENTION!
Do not turn the ne lter upside down!
DISHWASHER CARE
To clean the control panel, use a slightly
wet cloth. Then wipe the surface dry. To
clean other surfaces use light polishing.
Never use sharp objects or hard sponges
to clean the dishwasher surfaces.
Protection against freezing
If you are going to keep your dishwasher in
a cold room during winter, ask service engi-
neers to do the following:
1. Disconnect the dishwasher, remove the
fuses.
2. Shut off the water supply cock, discon-
nect the delivery hose and inlet valve.
3. Drain water from the delivery hose and
inlet valve.
4. Connect the hose and valve again.
5. Take out the lter body and remove water
using a sponge.
Cleaning moving nozzles
The moving nozzles must be cleaned on
a regular basis, otherwise scales and hard
water deposits will clog them, as well as
water channels. For that, unscrew the nut,
remove the upper part of the mover. After
that remove the nozzles. Wash the nozzles
in warm soapy water, use a soft brush to
clean their openings.
Filter cleaning
To ensure the best results, you should
clean the lter system on a regular basis.
The lter effectively removes food parti-
cles during a washing cycle, enabling water
to circulate. For this reason, the best thing
is to remove larger particles after each
washing cycle, washing the lter with run-
ning water.
To remove the lter (see the drawing be-
low), turn the upper part of the lter box
counterclockwise. Then, remove the coarse
and ne lters. The lter system is sub-
ject to cleaning on a regular basis, once a
month at least.
1. Turn the lter counterclockwise. 2. Remove
the lter.
The assembly procedure is carried out in
reversed order.

Operation and installation manual
DISHWASHERS
16
Use a brush to clean the coarse and ne
lters. Then, assemble the entire system
and insert that into the dishwasher, to po-
sitions corresponding, slightly pushing the
system.
It is prohibited to use and operate the
dishwasher without the lter. Improper in-
stallation of the lter may result in deterio-
ration of the dishwasher performance and
damage to dishes.
ATTENTION!
Never use the dishwasher without the
lter!
Cleaning the door
To clean the door edges, you should use a
piece of soft and wet cloth.
ATTENTION!
Never use sprays to clean the door
panel! This can damage the lock and
electrical components. It is also not
permitted to use abrasives and some
kinds of paper towels because they
can scratch the surface and leave
marks on it.
Dishwasher care
After each washing cycle shut off the water
supply cock and leave the door a bit open to
remove moisture and odors. Disconnect the
dishwasher. Always unplug the dishwasher
before cleaning and maintenance! Do not
risk! Never use any solvents and abrasives
to clean exterior parts and rubber compo-
nents of the dishwasher. You better use a
piece of cloth and warm soapy water. To re-
move stains on surfaces use a piece of cloth,
water and a small amount of white vinegar,
or a special cleaning agent developed for
dishwashers.
If you go off on holiday
If you are going to be away on holiday,
we recommend you to start a washing cycle
without dishes. After that you have to discon-
nect the appliance, shut off water supply and
leave the door a bit open. This would keep
the seals in proper condition and prevent for-
mation of odors inside the appliance.
Moving the dishwasher
Should you need to move the dishwasher,
try to keep it in a vertical position, or with the
back cover downwards at least.
Operation and installation manual Operation and installation manual
DISHWASHERS
17
PLEASE CAREFULLY READ
THE PRESENT MANUAL.
THIS CONTAINS INFORMATION THAT
WILL HELP YOU UNDERSTAND IN-
STALLATION PROCEDURES AND
FIND THE BEST PLACE TO INSTALL
YOUR DISHWASHER.
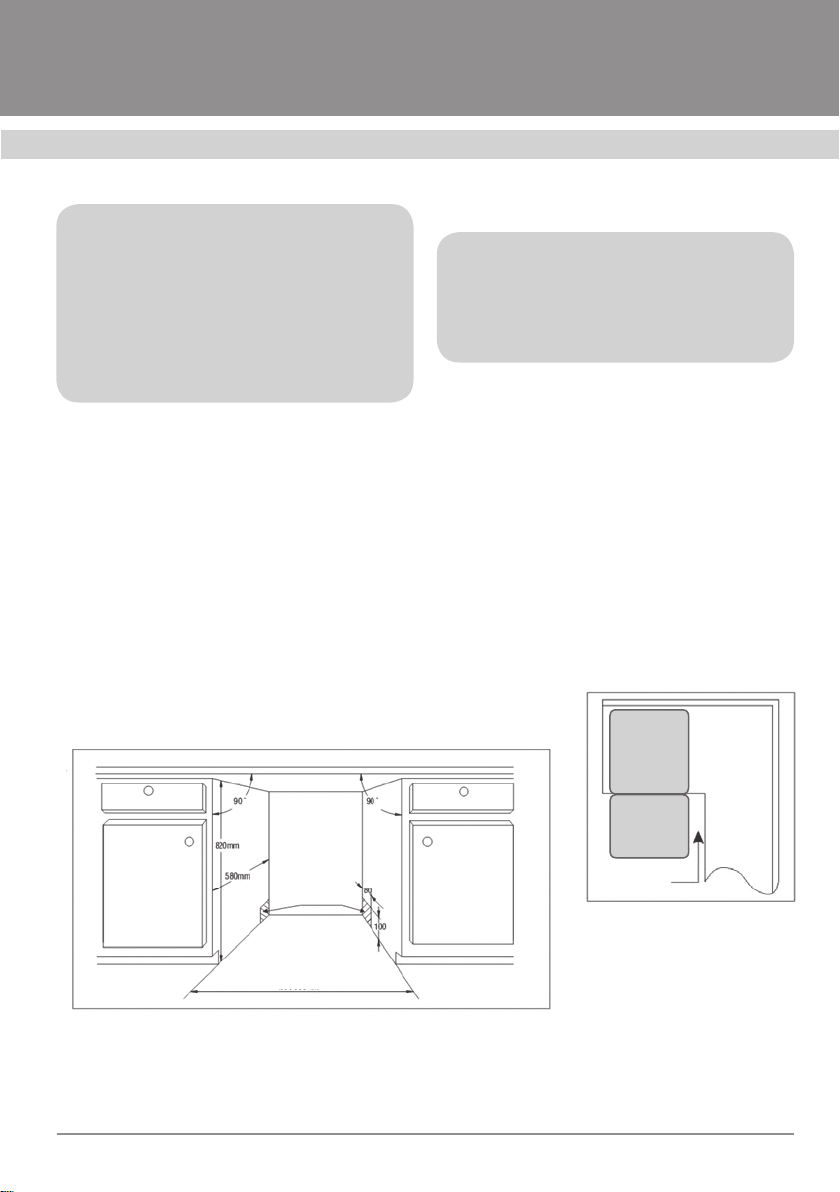
INSTALLATION PREPARATION
The dishwasher must be installed in close
vicinity to available water supply and dis-
charge points, as well as a socket.
One of the walls of pieces of furniture must
be selected for connection of an inlet and
drain hoses of the dishwasher.
INSTALLATION
Note:
check whether all hardware items are
available, required for installation of
a dishwasher (fasteners, screws for a
decorative panel).
1. Choose a convenient place, where
water is supplied and discharged.
Connect the inlet and drain hoses
(Fig. 1).
2. If you place the dishwasher in a corner
piece of furniture, the minimum dis-
tance between the side part of the open
door and kitchen furniture shall be 50
mm (Fig. 2).
50мм
Figure 1. Dimensions and general view of a recess for the
dishwasher installation.
450 / 600 mm
Figure 2. Top view.
Minimum space with
the door open
cable, inlet and
drain hoses outlets
dishwasher
door
50 mm
Operation and installation manual
DISHWASHERS
18
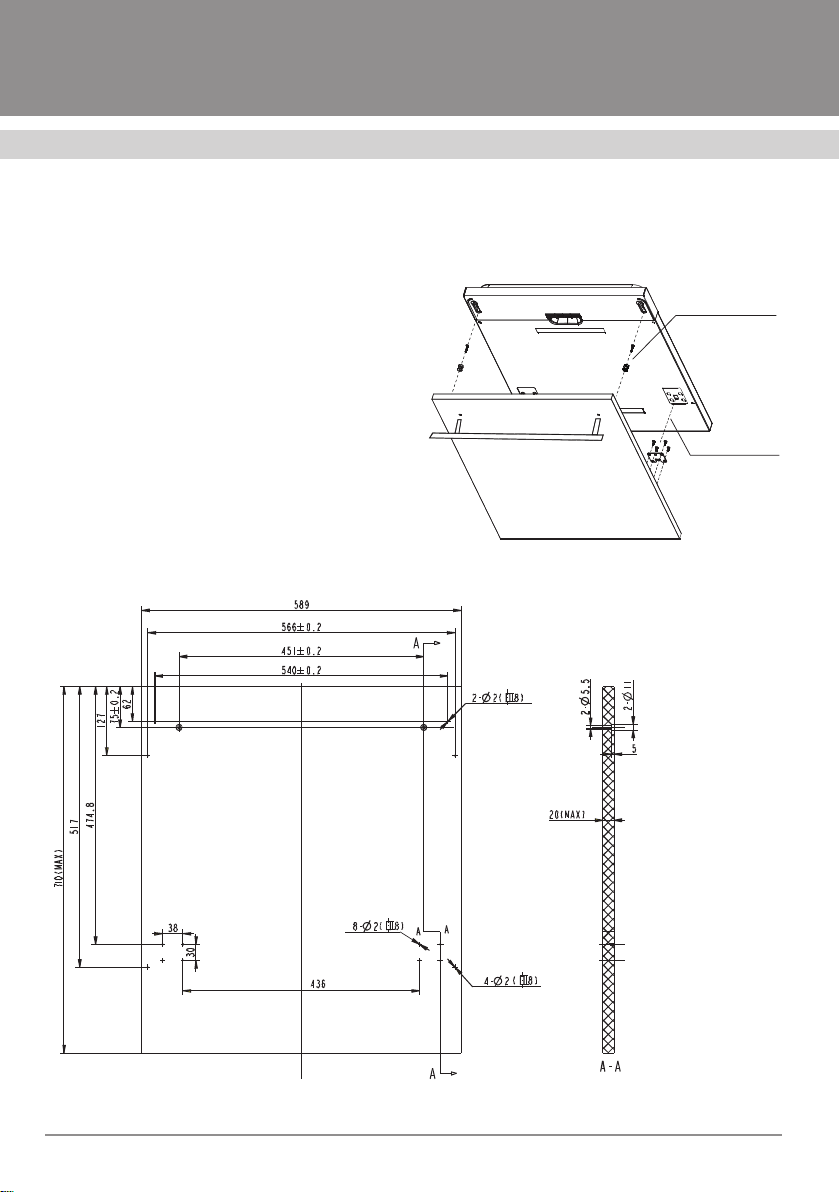
DECORATIVE PANEL DIMENSIONS
AND MOUNTING PROCEDURE
Preparation
1. The decorative wooden panel to be at-
tached to the door of the dishwasher shall be
prepared according to drawings as shown in
Figures 3a and 3b.
2. Place the xtures onto the decorative
panel, fasten the panel to the door using
them (Figure 4a).
Upon mounting the decorative panel, use
the screws to nally x that.
Figure 4a. Mounting the decorative panel
Figure 3a. BI 60 KASKATA Light S.
upper xture
lower xture
4 countersunk head
screws
This manual suits for next models
2
Table of contents
Other FLAVIA Dishwasher manuals


Popular Dishwasher manuals by other brands


Fisher & Paykel
Fisher & Paykel DishDrawer DD60S 7 installation instructions

Smeg
Smeg Dishwasher DI612CAH instruction manual

Whirlpool
Whirlpool ADP 2656 WHM Service manual

Bosch
Bosch SHP65TL5UC Guide manual

Electrolux
Electrolux EDW7505HPS - Semi-Integrated Dishwasher With 5 Wash... care guide

Beko
Beko DUT28430X user manual