FLEETBOARD DispoPilot.Guide Owner's manual

DispoPilot.guide
Supplement

Symbols
GWARNING
Warning notes make you aware of dangers
which could pose a threat to your health or
life, or to the health and life of others.
HEnvironmental note
Environmental notes provide you with infor-
mation on environmentally aware actions or
disposal.
! Notes on material damage alert you to
dangers that could lead to damage to your
vehicle.
iThese symbols indicate useful instruc-
tions or further information that could be
helpful to you.
XThis symbol designates an instruc-
tion you must follow.
XSeveral consecutive symbols indi-
cate an instruction with several
steps.
(Y page) This symbol tells you where you
can find further information on a
topic.
Y YThis symbol indicates a warning or
an instruction that is continued on
the next page.
Display This text indicates a message on
the display.

Index ....................................................... 2
Introduction ........................................... 3
Overview and operation ....................... 5
FleetBoard® Navigation ...................... 17
Practical advice ................................... 25
0105844481 É0105844481oËÍ
Contents 1

B
Battery
Charging ............................................ 7
Inserting ............................................. 6
Replacing ......................................... 26
C
Care ...................................................... 26
D
Declaration of conformity ..................... 3
Destination
Deleting ........................................... 21
Displaying destination informa-
tion .................................................. 22
Ending route guidance ..................... 23
Entering ........................................... 18
Entering a stopover .......................... 20
Last destinations ............................. 19
Storing ............................................. 21
E
Electromagnetic compatibility ............. 3
Entering the home address ................ 22
Equipment .............................................. 3
F
First steps .............................................. 6
I
Information
Displaying ........................................ 15
M
Maintenance ........................................ 26
Map view .............................................. 18
........................................................ 18
Mercedes-Benz Service Centre
see Qualified specialist workshop
N
Navigation
Display ............................................. 23
Ending .............................................. 23
Route options .................................. 19
Starting ............................................ 18
O
Opening/closing a service menu ......... 9
Operating safety .................................... 3
Overview ................................................ 8
P
Point of interest (POI) ......................... 21
Portal ...................................................... 8
Q
Qualified specialist workshop .............. 4
R
Reset button ........................................ 26
Route selection .................................... 19
S
Scope of delivery ................................... 4
Settings
Brightness ........................................ 11
Date ................................................. 11
General ............................................ 10
Language ......................................... 10
Map orientation ............................... 12
Navigation ........................................ 11
Route options .................................. 13
Time zone ........................................ 11
Units ................................................ 11
Vehicle dimensions .......................... 13
Vehicle weight ................................. 14
Volume ............................................ 11
Specialist workshop .............................. 4
Status indicator ................................... 10
V
Vehicle profile ..................................... 13
2Index

Operating safety
Important safety notes
GWARNING
Operating the integrated information systems
and communications equipment in the vehicle
while driving will distract you from traffic con-
ditions. You could then lose control of the
vehicle. There is a risk of an accident.
Only operate these devices if road traffic con-
ditions permit. If you are unsure about the
surrounding conditions, pull over to a safe
location and make entries only while the vehi-
cle is stationary.
Observe the legal requirements for the coun-
try you are currently in.
Bear in mind that, at a speed of only 50 km/h,
your vehicle is covering a distance of nearly
14 m per second.
When using the device please follow:
Rthe safety notes in these operating instruc-
tions
Rtraffic laws and regulations
Rlaws pertaining to motor vehicles and
safety standards
iImproper work on electronic components
or other systems (such as the radio and
disc slot) and their software may result in
malfunction or failure. Even systems that
have not been modified could be affected
because the electronic systems are con-
nected. Malfunctioning electronics can
severely impair the operating safety of the
vehicle.
Therefore, have all work on and modifica-
tions to electronic components carried out
at a qualified specialist workshop.
Equipment
This Supplement describes DispoPilot.guide
with all standard and optional equipment
available at the time of going to print. Coun-
try-specific deviations are possible. Bear in
mind that your DispoPilot.guide may not be
equipped with all of the described features.
This also applies to safety-relevant systems
and functions. The equipment level of your
DispoPilot.guide may therefore differ from
that shown in some descriptions and illustra-
tions.
The scope of services of DispoPilot.guide
depends on the software status and the serv-
ices ordered. If you wish to update your Dis-
poPilot.guide and order additional Fleet-
Board® services, please contact the Fleet-
Board® Hotline or your FleetBoard® sales rep-
resentative.
This Supplement is an integral part of the
vehicle. Keep it in the vehicle along with the
Operating Instructions.
Declaration of conformity
Vehicle components that receive
and/or transmit radio waves
The following note refers to all components of
the vehicle which receive and/or transmit
radio waves and the integrated information
systems and communications equipment in
the vehicle:
iThe components of the vehicle that
receive and/or transmit radio waves are
compliant with the basic requirements and
all other relevant regulations stipulated by
Directive 1999/5/EC. You can obtain fur-
ther information from any Mercedes-Benz
Service Centre.
Electromagnetic compatibility
The electromagnetic compatibility of the vehi-
cle components has been checked and certi-
fied according to the currently valid version of
Directive ECE-R 10.
Introduction 3
Z

Qualified specialist workshop
Therefore, have all work on and modifications
to electronic components carried out at a
qualified workshop. It has the necessary spe-
cialist knowledge and tools for the work
required. In particular, work relevant to safety
or on safety-related systems must be carried
out at a qualified specialist workshop.
A Mercedes-Benz Service Centre is a qualified
specialist workshop.
Scope of delivery
The delivery includes:
RDispoPilot.guide
RCradle for attaching
RRechargeable battery
RCable set
ROperating Instructions
The DispoPilot software is constantly being
improved. All of the functions described in
these Operating Instructions are based on the
most recent edition of the software.
Availability
The device is offered for Mercedes-Benz vehi-
cles in the original equipment and across all
retrofitted models.
4Introduction

Important safety notes ......................... 6
Introduction ........................................... 6
First steps .............................................. 6
Overview ................................................ 8
Portal ...................................................... 8
DispoPilot status displays .................. 10
DispoPilot settings .............................. 10
Information .......................................... 15
5
Overview and operation

Important safety notes
GWARNING
Operating mobile information systems and
communications equipment while driving will
distract you from traffic conditions. You could
then lose control of the vehicle. There is a risk
of an accident.
Only operate these devices when the vehicle
is stationary.
When using DispoPilot, observe the legal
requirements of the country in which you are
currently driving.
Introduction
FleetBoard®
FleetBoard® is an innovative Internet-based
telematics service. It provides constant com-
munication between vehicle and headquar-
ters. It can be used at almost any location and
at any time.
All transport and vehicle management data
can be called up by the user at the push of a
button. This includes, for example, the loca-
tion of the vehicle and the status of an order.
A mobile connection is used to transmit data
between the logistics department and the
vehicle.
The FleetBoard® vehicle hardware consists
of:
RGPS receiver
RGSM modem
RVehicle electronics interface (can be
ordered via vehicle optional extras)
FleetBoard® vehicle management enables
unlimited access to the vehicle's consump-
tion figures and maintenance forecasts.
The FleetBoard® "Logistics Management"
service offers the following modules:
RLogistics, including trip and vehicle logis-
tics
RTrip monitoring
RRecording of the vehicle position on a dig-
ital map of the world
RNavigation
DispoPilot.guide
DispoPilot.guide facilitates communication
between the driver and logistics. Messages
and orders can be transmitted to the driver.
The driver can inform the logistics depart-
ment about the status of trips and orders.
DispoPilot.guide features an integrated navi-
gation system that guides the driver to the
addresses where goods are loaded and unloa-
ded.
The hardware components of DispoPi-
lot.guide are:
Rdevice
Rbracket for attaching
Rcable set for connecting DispoPilot.guide
to the FleetBoard® vehicle computer
FleetBoard® logistics service
The FleetBoard® logistics service can be con-
figured to meet a wide range of customer
needs. Therefore, the operation of this ser-
vice is not described in these Operating
Instructions. If you have any questions on the
operation of this service, please contact the
FleetBoard® hotline or your FleetBoard®
sales representative.
First steps
Inserting the rechargeable battery
DispoPilot.guide is only available with a pre-
installed battery. The battery cannot be
6First steps
Overview and operation

removed. If the battery needs to be replaced,
contact FleetBoard® Support.
Charging the battery
When the ignition is switched on, the Dispo-
Pilot.guide battery will be charged automati-
cally.
First steps 7
Overview and operation
Z
Overview
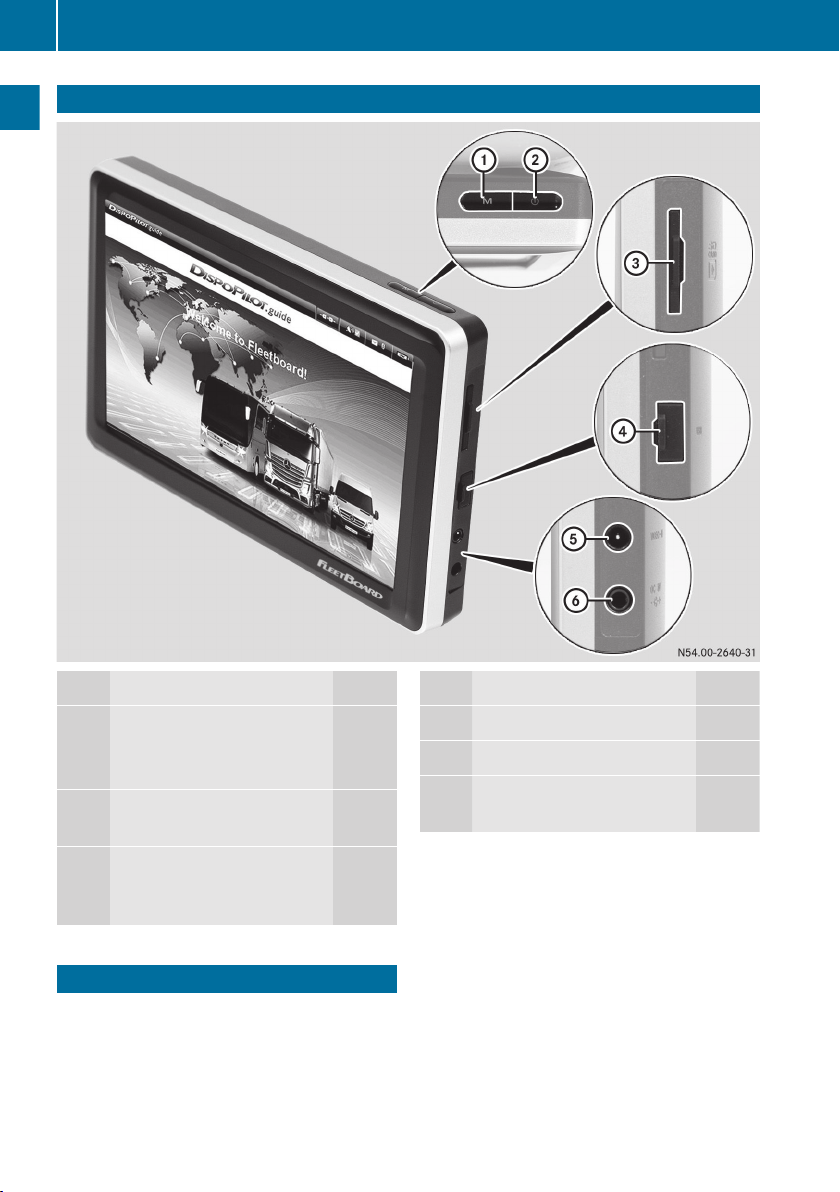
Function Page
1M Calls up the portal page 8
Exits navigation full screen
mode 23
2Ü Switches DispoPilot
on/off 8
3Card slot for the SD card
(for navigation system
updates)
Function Page
4USB port
5Video input (no function)
6External power connection
(no function)
Portal
When DispoPilot is switched on, the portal is
displayed automatically after the device has
booted up.
8Portal
Overview and operation
Example: portal
:LOGISTICS service
;OUTBOX
=Network connection display
?GPS signal
AInbox status indicator
BBattery charge status
CNAVIGATION
DSystem information
ESETTINGS
The number of services displayed by Dispo-
Pilot depends on the service package
ordered.
Switching on DispoPilot
DispoPilot starts automatically when the igni-
tion is switched on.
Switching on the device using the Ü but-
ton is only necessary in exceptional circum-
stances.
XTo switch on DispoPilot manually: press
the Ü (Y page 8) button.
XTo call up the portal from other applica-
tions: press the M button (Y page 8).
Basic functions
You can call up DispoPilot services and
menus from the portal.
Rî LOGISTICS (depending on the frame-
work agreement for the vehicle)
Rí NAVIGATION (Y page 18)
Use the NAVIGATION menu to enter desti-
nations and start route guidance.
Rì SETTINGS (Y page 10)
Use the SETTINGS menu to set the default
settings of DispoPilot.
Rñ INFORMATION (Y page 15)
Selecting menus from within applica-
tions
Example: settings menu
:General
;Navigation
=Logistics
When selecting menus, there are usually two
options:
Rpress the appropriate menu twice.
Rpress the r symbol to the right of the
appropriate menu.
Switching back to the portal
XPress the q symbol at the top left (more
than once if necessary).
or
XPress the M button (Y page 8).
Opening/closing a service menu
If you are already using one of the services or
menus, you can quickly switch to another ser-
vice via the service menu.
Portal 9
Overview and operation
Z
XTo open a service menu: press the ü
symbol.
XTo close a service menu: press the ý
symbol.
DispoPilot status displays
Symbol Meaning
èDispoPilot is connected to the
FleetBoard® Server.
éDispoPilot is not connected to
the FleetBoard® Server.
ò
ó
ô
Battery charge status display.
:Battery charge low.
õThe battery is being charged.
öValid GPS signal available.
ëNo valid or sufficiently strong
GPS signal available.
êUnread messages in the inbox.
å0 No unread messages in the
inbox.
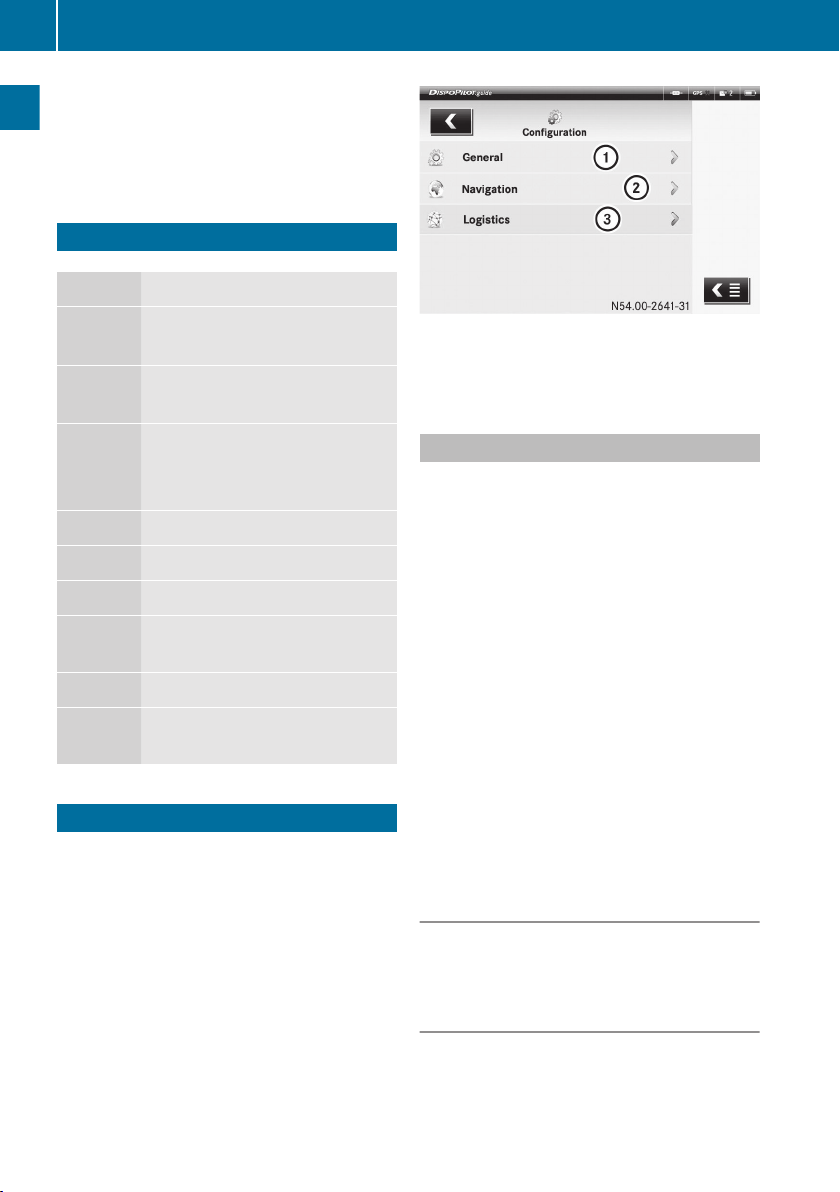
DispoPilot settings
You can alter the settings in the following
areas:
RGeneral
RNavigation
RLogistics
:General
;Navigation
=Logistics
General settings
The following menus are available:
Country settings
RLanguage
RCountry code (time zone)
RDate format
RUnit of length
Display
RBrightness
RScreen saver
RSmooth scrolling
Audio
RVolume
Barcode profile
RFleetBoard® standard
REAN128
Calling up the "General settings" menu
XSelect SETTINGS ì.
XSelect the General menu.
Setting the language
Use this function to set the language used on
the DispoPilot screen.
XSelect the Country settings menu.
XSelect the Language menu.
10 DispoPilot settings
Overview and operation

XSelect the desired language.
XPress the ÷ button to confirm.
The language settings only apply to the
menus displayed. Logistics service status
messages and forms are uploaded to the
equipment by FleetBoard® Support in the cor-
responding language.
Setting the country code (time zone)
Use this function to set the DispoPilot time
display to the time zone in which DispoPilot is
currently operating.
XSelect the Country settings menu.
XSelect the Country code menu.
XSelect the desired country code.
XPress the ÷ button to confirm.
Setting the date format
The date format display can be changed using
this function.
Ralphanumeric format (DD.MM.YYYY
HH:MM)
Rinternational standard format (MM/DD/YY
HH:MM AM/PM)
XSelect the Country settings menu.
XSelect the Date format menu.
XTo select the desired date format: activate
the î selection field next to the desired
setting.
Setting the unit of length
Use this function to determine which unit of
length is used for navigation.
XSelect the Country settings menu.
XSelect the Unit of length menu.
XTo select the desired unit of measurement:
activate the î selection field next to the
desired setting.
Setting the brightness
Use this function to adapt the brightness of
the screen to the ambient light.
XSelect the Display menu.
XSelect the desired screen brightness.
XPress the ÷ button to confirm.
Setting the screen saver
Use this function to select whether the screen
backlighting goes out automatically after a
certain period of time.
XSelect the Display menu.
XTo select the desired setting: tick O the
box.
XPress the ÷ button to confirm.
Setting the volume
Use this function to set the volume for audio
signals (e.g. for unread messages) and for
navigation messages.
XSelect the Audio menu.
XSelect the desired volume.
XPress the ÷ button to confirm.
Setting the barcode profile
Use this function to select one of the different
barcode profiles.
iDispoPilot has a standard profile for bar-
code recognition. Contact FleetBoard®
Support if you wish to enhance the existing
profile.
XSelect the Barcode profile menu.
XTo select the desired barcode profile: tick
O the box next to the desired setting.
XPress the ÷ button to confirm.
Navigation settings
The following menus are available:
DispoPilot settings 11
Overview and operation
Z

General
RVoice output
RMap orientation
RPOI radius
RChecking vehicle settings when navigation
starts
Route profile
RRoute options
RToll roads
RFerries
Vehicle
RVehicle profile
RHeight
RWidth
RLength
RActual gross vehicle weight
RMaximum axle weight
RIgnore limitations
RHazard class
Calling up the "Navigation settings"
menu
XSelect SETTINGS ì.
XSelect the Navigation menu.
Setting the voice output
Use this function to set the language to be
used during navigation for:
Rsystem elements
Rdisplayed messages
Raudible messages
XSelect the General menu.
XSelect the Language menu.
XTo select the desired language: tick O the
box next to the desired setting.
XPress the ÷ button to confirm.
Setting map orientation
Use this function to set whether the map is
oriented to the North or in the direction of
travel.
XSelect the General menu.
XSelect the Map orientation menu.
XTo select the desired setting: activate the
î selection field next to the desired set-
ting.
RNorth orientation: the map is orien-
ted towards the North (North is always at
the top).
RTravel direction: the map is aligned
with the direction of travel (the direction
of travel is always at the top).
XPress the ÷ button to confirm.
Setting the POI radius
Use this function to set the radius around the
vehicle's current position in which POIs are
selected.
XSelect the General menu.
XSelect the Special destination radius
menu.
XSelect the desired radius.
XPress the ÷ button to confirm.
Checking vehicle settings when naviga-
tion starts
Use this function to set whether the following
information should be displayed for checking
before route calculation is started:
RRoute options
RToll roads
RFerries
RTruck height
RTruck width
RTruck length
RActual gross vehicle weight
RMaximum axle weight
12 DispoPilot settings
Overview and operation

RIgnore limitations
RHazard class
XSelect the General menu.
XSelect the Check vehicle settings
when navigation starts. menu.
XTo activate the function: tick O the box.
Press the ÷ button to confirm.
Setting the route options
Use this function to select the route optimi-
sation to be used by FleetBoard® Navigation.
XSelect the Route profile menu.
XSelect the Route options menu.
XTo select the desired setting: activate the
O tick next to the desired setting.
RMost practical route incl. motor‐
way: special truck conditions are inclu-
ded.
RMost practical route & limited
motorway use: the use of routes includ-
ing sections of motorway is avoided
where possible.
RShortest route incl. motorway: the
shortest route is calculated.
RShortest route & avoid motorway:
the shortest route is calculated, while
avoiding routes including sections of
motorway where possible.
Including toll roads
Use this function to determine whether Fleet-
Board® Navigation includes special toll roads
(e.g. tunnels, mountain pass roads, bridges)
in the route calculation.
XSelect the Route profile menu.
XSelect the Toll roads menu.
XTo activate the function: tick O the box
XPress the ÷ button to confirm.
Including ferries
Use this function to determine whether Fleet-
Board® Navigation includes ferries in the
route calculation.
XSelect the Route profile menu.
XSelect the Ferries menu.
XTo activate the function: tick O the box.
XPress the ÷ button to confirm.
Vehicle profile
Use this setting to adjust the navigation cal-
culations to the vehicle type (HGV or van).
This improves the accuracy of the navigation
calculations.
XSelect the Vehicle profile menu.
XTo select the desired setting: activate the
î selection field next to the desired set-
ting.
XPress the ÷ button to confirm.
Entering the vehicle height
Use this function to enter the height of the
vehicle, so that the DispoPilot navigation sys-
tem avoids route sections with low headroom
clearance.
XSelect the Height (truck)/Height
(van) menu.
XEnter the height of the vehicle.
XPress the ÷ button to confirm.
Entering the vehicle width
Use this function to enter the width of the
vehicle, so that the DispoPilot navigation sys-
tem avoids route sections with narrow roads.
XSelect the Width (truck)/Width (van)
menu.
XEnter the width of the vehicle.
XPress the ÷ button to confirm.
DispoPilot settings 13
Overview and operation
Z

Entering the vehicle length
Use this function to enter the length of the
vehicle. The DispoPilot navigation system
then avoids route sections which are not suit-
able for long vehicles.
XSelect the Length (truck)/Length
(van) menu.
XEnter the length of the vehicle.
XPress the ÷ button to confirm.
Entering the actual gross vehicle
weight
Use this function to enter the actual gross
weight of the vehicle. The DispoPilot naviga-
tion system then avoids route sections which
are not suitable for heavy vehicles.
XSelect the Actual total weight
(truck)/Actual total weight (van)
menu.
XEnter the actual gross vehicle weight.
XPress the ÷ button to confirm.
Maximum axle weight
Use this function to enter the maximum axle
weight of the vehicle. The DispoPilot naviga-
tion system avoids route sections which are
not suitable for vehicles with a high axle
weight.
XSelect the Maximum axle weight menu.
XEnter the maximum axle weight.
XPress the ÷ button to confirm.
Ignore limitations
Using this function, you can select whether or
not to ignore limitations which may exist due
to the following vehicle parameters:
Rvehicle length
Rvehicle width
Rvehicle height
Rvehicle weight
Rfurther parameters
Hazard class
Using this function, you can enter the hazard
class of the load. The DispoPilot navigation
system will then avoid route sections on
which the transportation of hazardous mate-
rials is not permitted.
You can select the following hazard classes:
Rnone
Rhazardous materials
Rexplosive materials
Rcombustible materials
Rdetrimental to water quality
XSelect the Hazard class menu.
XTo select the desired setting: tick O the
box next to the desired setting.
XPress the ÷ button to confirm.
Logistics settings
The following menus are available:
RShow outbox
RScreen activation for incoming message
RNo signalisation of new messages
RHide empty fields
Show outbox
You can use this function to show messages
that are in the outbox. If "Show outbox" is not
activated, the outbox is not shown in the por-
tal.
XIn the Show outbox menu, tick O or untick
the box.
XPress the ÷ button to confirm.
Activating the screen when receiving
messages
If the screen is switched on (Y page 11), it
fades out automatically after a certain period
of time. You can adjust the settings so that
the screen switches on again when a mes-
sage is received.
14 DispoPilot settings
Overview and operation

XIn the Screen activation for incom‐
ing message menu, tick O or untick the
box.
XPress the ÷ button to confirm.
No signalisation of new messages
Use this function to switch the audio signal for
incoming messages on or off.
XIn the No signalisation of new mes‐
sages menu, tick O or untick the box.
XPress the ÷ button to confirm.
Hide empty fields
Use this function to set whether DispoPilot
should show empty fields when these are
present in the order form.
XIn the Hide empty fields menu, tick O
or untick the box.
XPress the ÷ button to confirm.
Information
The following information can be shown:
RFleetBoard hotline
RVIN of the vehicle
RDispoPilot ID
RDriver ID
RMap status
RSoftware status
RConfiguration
Calling up information
XSelect Information ñ in the portal
(main menu).
XSelect the desired information.
Information 15
Overview and operation
Z

16

FleetBoard® Navigation ...................... 18
17
FleetBoard® Navigation
FleetBoard® Navigation
GWARNING
Operating mobile information systems and
communications equipment while driving will
distract you from traffic conditions. You could
then lose control of the vehicle. There is a risk
of an accident.
Only operate these devices when the vehicle
is stationary.
The navigation system calculates the route to
the destination without taking into account,
for example:
Rtraffic lights
Rstop signs and right-of-way signs
Rparking and stopping restrictions
Rlane narrowings
Rother road and traffic controls and regula-
tions
The navigation system may give incorrect
driving recommendations if the information
on the digital map is not the same as the
actual surroundings, for example if the rout-
ing or the direction of a one-way street has
been changed.
For this reason, you must always observe
road and traffic rules and regulations during
your journey. Traffic regulations always take
precedence over the navigation system's rec-
ommendations.
You can use the NAVIGATION function to:
Rget guidance to any given address
Rget guidance to a saved destination
Rget guidance to your home address
Rget guidance to POIs
Rdisplay the surroundings for the vehicle's
current position
There are two different navigation display
types:
R2D map display
R3D map display
iFleetBoard® Navigation only works when
a satellite signal is received (Y page 10).
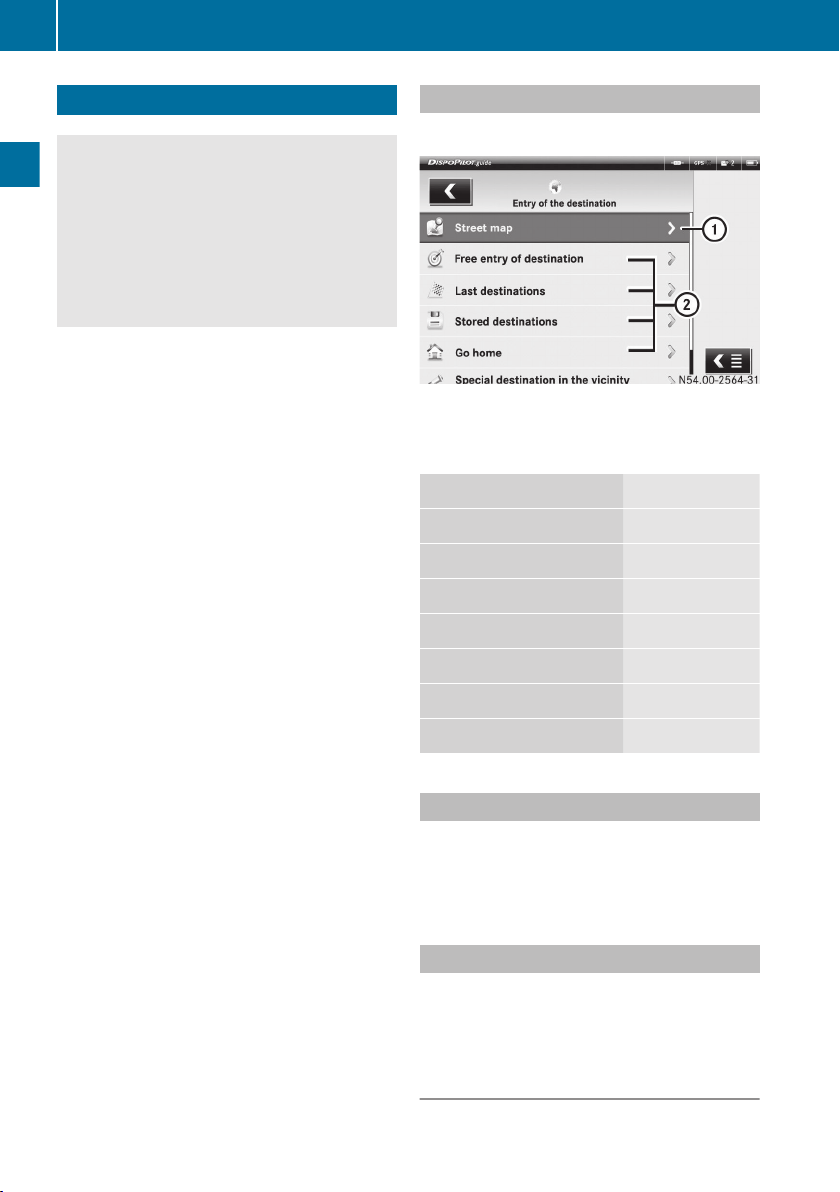
Starting navigation
XSelect NAVIGATION í.
:To display the current position on the map
;Destination entry options
The following menus are available:
Page
Street map (Y page 18)
Entering any destination (Y page 18)
Last destinations (Y page 19)
Stored destinations (Y page 20)
Go home (Y page 21)
POIs in the vicinity (Y page 21)
POIs in a location (Y page 21)
Street map
Use this function to display the map of your
current location.
XSelect the Street map menu.
Entering any destination
XSelect the Free entry of destination
menu.
Entering the town, post code and coun-
try
XSelect the ú symbol.
18 FleetBoard® Navigation
FleetBoard® Navigation
Table of contents


