Florida Probe VoiceWorks User manual

User Manual

Table of Contents
Getting Started ............................................................................................................................................... 1
What’s In the Case ............................................................................................................................................ 1
Matched Pairs: the VoiceWorks Colored Stickers .......................................................................... 1
Charge the VoiceWorks Headset ............................................................................................................. 2
It’s Wireless, So You’re Free to Move .................................................................................................... 3
How to Wear the VoiceWorks Headset ................................................................................................ 3
Proper Placement of the VoiceWorks Headset Boom Mic ........................................................ 5
How to Speak into the VoiceWorks Boom Mic ................................................................................. 6
How to Successfully Communicate with the VoiceWorks System ........................................ 6
Start Using the VoiceWorks System ................................................................................................ 7
Perform Several Practice Exams Using Paper Charts ................................................................... 7
Establish a Connection Between the VoiceWorks Headset & VoiceWorks Key ............ 7
Plug in the FP32 Software Key ............................................................................................................ 8
Launch the FP32 Software ........................................................................................................................... 9
What the Information in the VoiceWorks Dialog Box Means ................................................. 12
Patient Lookup Dialog Box ......................................................................................................................... 14
Creating a New Patient ................................................................................................................................. 14
The Personal Page ........................................................................................................................................... 15
2 Ways to Enter Missing Teeth .................................................................................................................. 15
Enter Missing Teeth & Other Dentition from the Personal Page ........................................... 16
How to Create a Bridge ................................................................................................................................ 16
Start Charting with VoiceWorks ....................................................................................................... 17
Check the Headset and VoiceWorks Key ........................................................................................... 17
Start VoiceWorks Listening Mode .......................................................................................................... 17
Begin Charting a Simple Periodontal Exam ..................................................................................... 18
Visit Settings Dialog Box ............................................................................................................................. 19
Enter Missing Teeth on the Fly ................................................................................................................ 20
Pocket Depth Mode ........................................................................................................................................ 21
Enter Paper Chart Data Into the FP32 Periodontal Page ........................................................ 23
Changing Modes on the Fly ....................................................................................................................... 24
Save & Print ......................................................................................................................................................... 27
Printout Selection ........................................................................................................................................... 28
Moving Mode ..................................................................................................................................................... 28
Periodontal Page Printout ......................................................................................................................... 29
Deleting a Visit ................................................................................................................................................. 30
Closing the Program ....................................................................................................................................... 31
Turn the VoiceWorks Headset Off and Charge It .......................................................................... 31
Integration with Practice Management Software ............................................................... 32
Launching VoiceWorks from your Practice Management Software .................................. 32

Troubleshooting ............................................................................................................................................ 33
Quick Troubleshooting Tips for VoiceWorks ................................................................................... 33
Sound ..................................................................................................................................................................... 34
FP32 Software Key not Recognized ..................................................................................................... 39
Headset Not Working ................................................................................................................................... 39
Headset Too Big .............................................................................................................................................. 40
Certain Commands or Phrases are Scored Low by VoiceWorks or Not at All ............ 40
Adjust the Confidence Level for a Word or Phrase ...................................................................... 41
Reset the Confidence Level for Any Word ....................................................................................... 42
Train Specific Words or Phrases ............................................................................................................. 42
Adjust the Weight of a Word or Phrase ............................................................................................. 43
Reset the Weight of any Word .............................................................................................................. 43
Appendix ........................................................................................................................................................... 44
Paper Perio Charts ......................................................................................................................................... 44
VoiceWorks Headset Reference .......................................................................................................... 45
Core VoiceWorks Commands List.......................................................................................................... 47
How to Search for Patients ........................................................................................................................ 4949
What an Asterisk * in Front of Visit Number Means ................................................................... 50
Deleting a Patient ........................................................................................................................................... 50
Change the Order of Search Results .................................................................................................... 511
Dismiss the Patient Lookup Dialog Box ........................................................................................... 511
How to Change to Quadrant Tooth Numbering Method ...................................................... 522
How to Enter & Edit Medical Alerts .................................................................................................... 53
Create or Edit a Medical Alert ................................................................................................................ 544
Quick Troubleshooting .............................................................................................................................. 48
Headset Lights and How to Dock ....................................................................................................... 46

Getting Started
What’s In the Case
You will find the following items in your VoiceWorks Case: (1) VoiceWorks Wireless Headset
(2) VoiceWorks USB Key (3) FP32 Software Key (4) USB Charging Cable (5) Black USB Wall Plug
Matched Pairs: the VoiceWorks Colored Stickers
Remove your conveniently folded VoiceWorks Wireless Headset from its case. Notice the round,
colored sticker on the right headphone. This sticker may be orange, red, hot pink, purple, yellow,
pink, green, or blue and it will match the color of the sticker on your accompanying VoiceWorks
USB Key.
The colors of these two stickers must be the same because they are a specially matched pair from
the factory. If your office is using multiple headsets, then the headsets should all have different
1
1
3
5
4
VoiceWorks Case
2

colored stickers/matched pairs so that you do not accidentally try to use your headset with a
co-worker’s VoiceWorks USB Key.
2
Charge the VoiceWorks Headset
Next, plug the USB Charging Cable for your Voiceworks
Headset into the small opening located on the bottom
of the right headphone (with the colored sticker). Plug
the other end into the provided Black USB Wall Plug and
then plug into a wall outlet. Alternatively, you can plug
the other end into the provided optional White USB Hub
and then connect the hub to your computer; however, the
headset will not charge if you turn your computer off.
Matched Pair

When not in use, we recommend charging your VoiceWorks Headset. On a full charge (which takes
about 2 hours to accomplish), the headset will work non-stop for about 6 hours. 5 minutes before
your headset is about to lose power, you will hear a “beep-beep” sound from the headset. This
sound will repeat every 30 seconds until the battery is completely drained.
Note: In some earlier models, the headset will automatically turn off after 5 minutes of not using it.
Just press the power button again for 2 seconds to turn it back on.
Get to Know Your VoiceWorks Wireless Headset
It’s Wireless, So You’re Free to Move
Your new VoiceWorks Headset is wireless, meaning it allows convenient, wire-free use around your
operatory by connecting to the VoiceWorks USB Key that you plug into your computer or USB
hub. The wireless connection is good for about 20 ft. in all directions from the VoiceWorks USB
Key (when the key is plugged into your computer or USB hub & it has established a successful
connection with the headset).
How to Wear the VoiceWorks Headset
It is recommended that the right headphone with the sticker and controls is placed so that your
ear is partially exposed in order for you to hear your patient or other office staff.
3

Note: The boom mic can be rotated at its base so that if you are left-handed, you can flip the
microphone around in order for the right headphone (with the sticker and controls) to be worn
over your left ear instead. Rotate the mic clockwise from the base, do NOT pull on the mic itself to
rotate (Fig. 1).
Once you have rotated it 180 degrees, gently bend the mic into place (Fig. 2).
4
Be Careful not to
aggressively bend the mic -
use care.
Fig. 2
Rotate the mic clockwise
from the base, do NOT pull
on the mic itself to rotate.
Fig. 1

Proper Placement of the VoiceWorks Headset Boom Mic
The VoiceWorks Boom Mic has been designed to work with paper face masks that most clinicians
wear during their patient exams. It is most effective when used with such a mask. The VoiceWorks
Boom Mic is located on the left headphone and should be placed about 2 inches away from your
face mask, below your nose. Hold two finger-widths in front of your mask and position the boom
mic after those fingers.
The white dot located directly below the foam head should always be facing you and you should
be able to see it out of the corner of your eye. The other side of the boom mic is designed as a
sort of wind shield that blocks out ambient noise, which is another reason to make sure that the
white dot is facing toward you and not away from you. Please make sure the boom mic is properly
placed for optimum performance by VoiceWorks.
5
IMPORTANT: White dot
should always be facing you
when you are using VoiceWorks.
Boom Mic should be
positioned 2 finger-widths
in front of mask
Boom Mic should
be positioned
below nose

Note: If you feel like the headset is too big for your head, we recommend an alternate way
of wearing it. Please see the “Troubleshooting” section at the end of the user manual for this
information.
How to Speak into the VoiceWorks Boom Mic
The VoiceWorks Boom Mic is designed to be able to receive your voice input in a normal tone
of voice (not your “Radio Announcer” voice). Do not yell or speak more loudly than your normal
speaking voice, or it will not work properly.
In addition to speaking in your normal tone of voice, please: No Eating or Chewing Gum, even if
you are only practicing, as VoiceWorks will mistakenly adapt to how your voice sounds when your
mouth is full or you are chewing.
How to Successfully Communicate with the VoiceWorks System
The VoiceWorks FP32 software is designed to recognize 1-3 word phrases as one word. For
example, the phrase, “Change Mode Pocket Depth” should be spoken as one continuous phrase,
“ChangeModePocketDepth” in order for VoiceWorks to correctly understand the command.
Please refer to the VoiceWorks Commands List in the back of this manual for a complete list of
commands. These commands are being updated all the time, and you can always find a link to the
most up-to-date list in the VoiceWorks Dialog Box within the software (see example on page 13).
6
Please don’t yell and don’t eat or
chew gum while using VoiceWorks,
even if it’s just a practice session.

Start Using the VoiceWorks System
Perform Several Practice Exams Using Paper Charts
It is recommended that you practice using the VoiceWorks system by first entering the exam data
from at least 10 Paper Periodontal Charts (we have provided 5 for you as a start in this manual,
with the first 2 having also been converted to Florida Probe Periodontal Charts, so you can check
your work) before actually performing an exam using a real patient. This will allow you to become
comfortable with speaking exam data into the headset without having the stress of a patient in the
chair. After you are comfortable with entering paper charts, it is recommended that you practice
with several live test patients (office staff, etc.) before you perform an actual patient exam with the
VoiceWorks system. The additional 3 paper perio charts are located in the Apendix on page 43.
Establish a Connection Between the VoiceWorks Headset & VoiceWorks Key
Plug the VoiceWorks Key into an available USB port on the *same* computer that the FP32
Software is installed on.
Next, unplug your VoiceWorks Headset from the USB Charging Cable. Press and hold the power
button on the headset for 2 full seconds. A blue light in the center of the VoiceWorks sticker on
the right headphone will appear. If the blue light turns solid, then it has made a connection to
the VoiceWorks Key, which is the goal. If the blue light is blinking, it has lost connection to the
VoiceWorks Key or the key is not plugged into a working USB port.
7
You should see a blue, steady light in the center of the
VoiceWorks Headset right headphone sticker once you
turn the power on. If it is blinking, it has lost connection
to the VoiceWorks key or the key is not plugged into a
working USB port.
Plug this end into an available USB
port on your computer.*
VoiceWorks Key

You can also look for a red, steady light on the back of the VoiceWorks USB Key after you plug it
into the computer or USB hub. If the red light is blinking, you haven’t yet turned the power on to
your wireless headset OR it has not established a connection with the headset for some reason.
Please refer to the VoiceWorks Wireless Headset Reference in the back of this manual for more
information, including information about the other controls on the right headphone.
Plug in the FP32 Software Key
Next, plug the FP32 Software Key into an available USB port on the same computer that the FP32
Software is installed on .
This will “unlock” the FP32 Software to full functionality, including the ability to perform a new
periodontal exam.
Establishing a connection between the VoiceWorks Headset & VoiceWorks Key allows the software
on the computer to communicate with the headset.
8
FP32 Software Key
VoiceWorks Key

9
Launch the FP32 Software
Launch the FP32 Software from the Windows Start Menu or by double-clicking the FP32 Desktop Icon.
If you are launching from your Practice Management Software, please refer to this section,
Integration with Practice Management Software on page 32, then continue to the next page.

Note: If you have not already plugged the FP32 Software Key into one of the available USB ports
on your computer or into the provided optional White USB Hub (and then plugged this USB hub
into your computer - see page 8), or if the USB connection is not working, you will see the “Mode
Select” dialog box when you launch the software: Plug in the FP32 Software Key and select the
Hardware Key License option. Click “OK.”
When the program opens, you should hear the greeting, “Welcome to the Florida Probe,” – if you
don’t hear this greeting, check to make sure your speakers or sound are working properly,
as sound is an integral part of any VoiceWorks exam experience.
Hint: If you still see this Mode Select dialog message when you try to launch the software, try
removing the FP32 Software Key from the USB port that it is plugged into and move it to another
available USB port. Click “OK.”
Mode Select Dialog
10
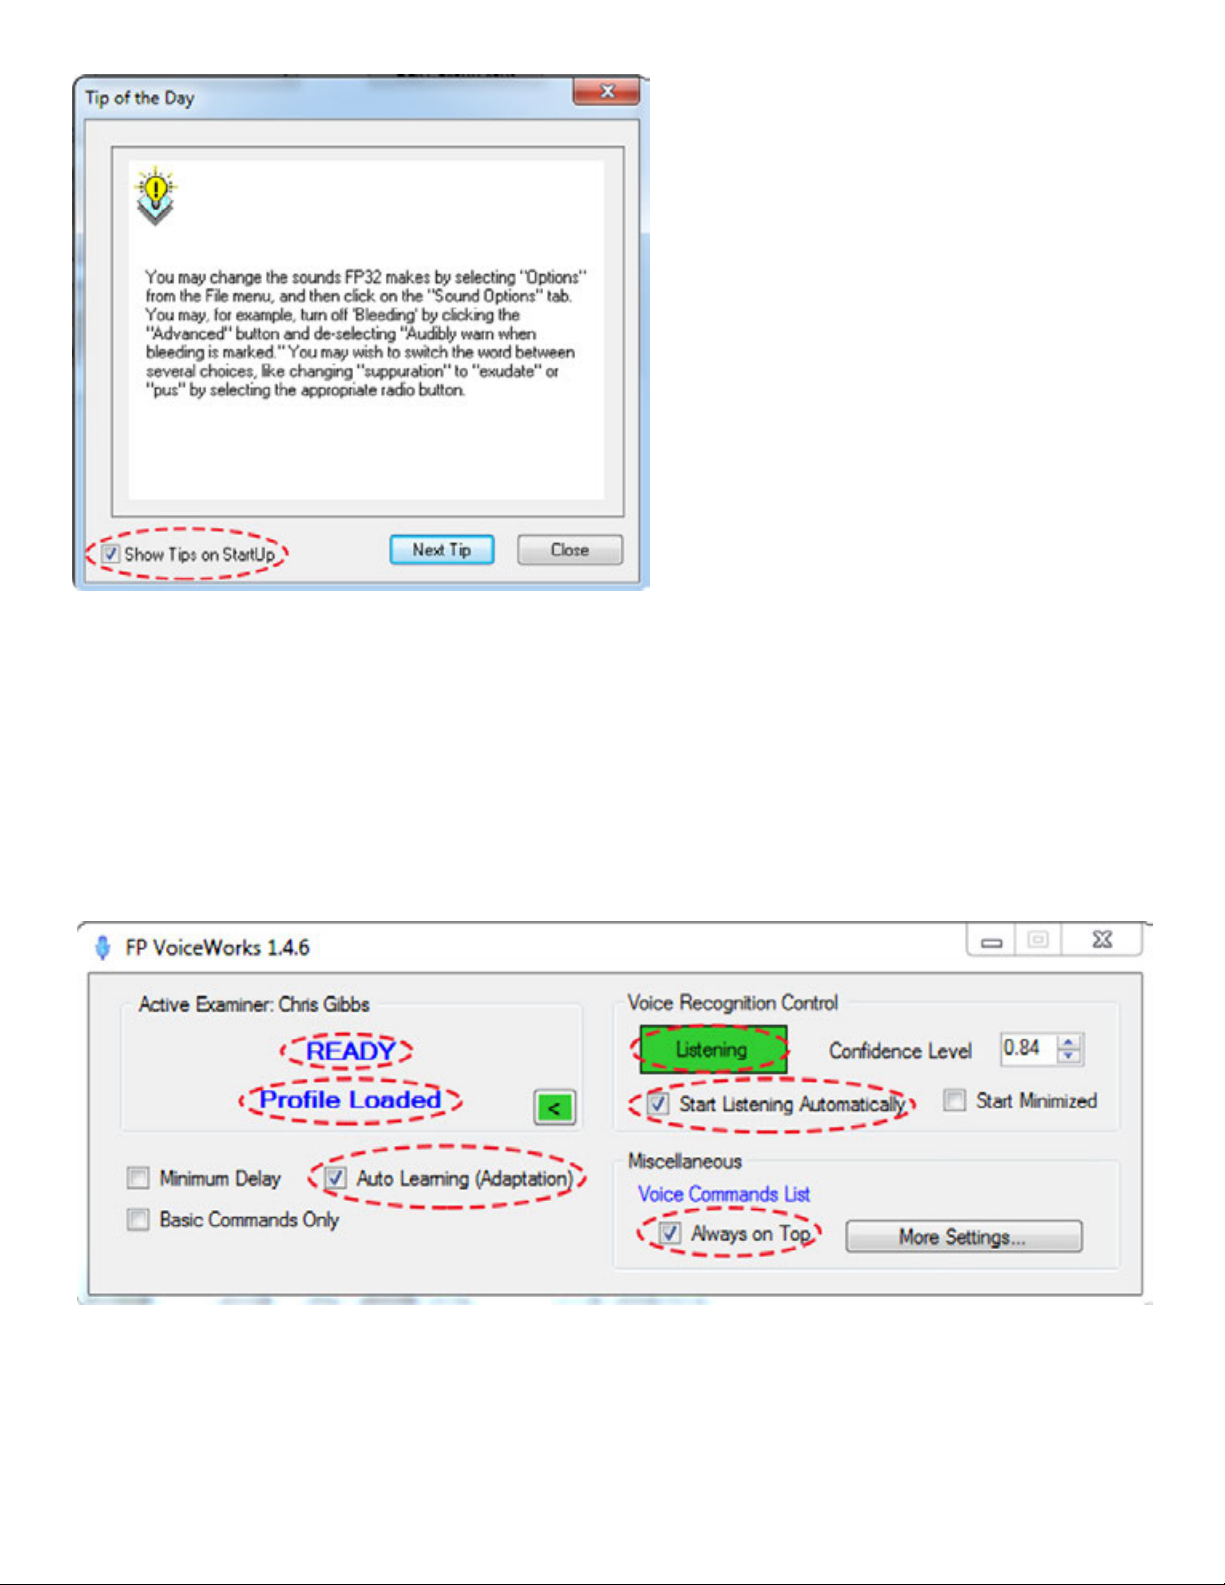
You should also see the VoiceWorks dialog box appear in the upper-right corner of the screen. You
should hear, “Loading [your name] ‘s Profile”, “Profile Loaded” and “Headset Ready.” These words
will also appear in the Voiceworks Dialog Box (see image below). Voice Recognition Control may
be in “Not Listening” Mode (red) if the option, “Start Listening Automatically” in the dialog box has
not been checked. If this is the case, check the box so that the next time you launch the software,
it will start listening automatically. You can say, “StartListening” to change this right away.
Some other options that should be enabled (make sure box is checked) are: “Auto Learning
(Adaptation)” (if you come into the office with a hoarse voice then this feature will adjust to those
changes in your voice and then it will adjust back once your voice is back to normal) and “Always
on Top” (so that you will always be able to see the VoiceWorks dialog). Note: In the figure above,
the Voice Recognition Control small rectangle is green, for “Listening,” which means the software
is ready to receive your voice input.
11
VoiceWorks Dialog Box
Next, you may be presented with the
“Tip of the Day,” dialog box, which
provides helpful information about the
FP32 Software and Hardware, as well as
periodontal exam tips. You can disable
this dialog by unchecking the check box
marked, “Show Tips on Startup”, in the
lower left hand corner of the dialog box.

What the Information in the VoiceWorks Dialog Box Means
The VoiceWorks Dialog Box can be collapsed by clicking the green arrow in the box. Some users
prefer to keep it collapsed once they have performed a few practice exams so that the rest of the
information in the dialog does not distract them from seeing how well their commands are being
recognized.
This VoiceWorks dialog contains a wealth of information: the first number(s) before the slash
under “Active Examiner” show how well the software made a match to what you said (if you
are speaking the pocket depths for the 3 different sites of the facial or lingual side of a tooth, it
will display a number for each site). The second number after the slash is the number that your
“Confidence Level” is set at. The Confidence Level is the level (percent expressed as a decimal) at
which you are confident that what you say will be recognized by VoiceWorks. Anything that you
speak that VoiceWorks scores higher than what your confidence level is set at will be accepted.
Anything that you say that VoiceWorks scores lower than what your confidence level is set at will
be rejected (it will appear in red). VoiceWorks will score up to 3 commands in a row. It will accept
a single (“bleeding”), double (“2, bleeding”) or triple (“2, 1, 2”) command.
We recommend that most offices set their confidence levels between .70-.85 (70-85%). Never set
the confidence level over .90 (90%) unless your VoiceWorks trainer has recommended this.
VoiceWorks dialog Minimized
VoiceWorks dialog Maximized
2nd number = current
confidence level
1st number or group
of numbers = how well
matched
Set the confidence
level here
12

When you check “Minimum Delay,” it allows you to chart as fast as possible. It does this by playing
the sounds faster and getting rid of certain “Warning” sounds, such as the “Danger” sound and
siren. You can also use the voice command, “MinimumDelayOn” or “MiniumumDelayOFF.”
There is a link to the Voice Commands List in the expanded version of the box (see Figure below).
For a more organized list, check the Voice Commands List in the Appendix on page 45.
Hint: If you are experiencing
a lot of background noise,
try setting the confidence
level higher (87%) for
maximum efficiency.
VoiceWorks Dialog Box
13

How to Use the Patient Lookup Dialog
Patient Lookup Dialog Box
The next dialog box to appear will be the Patient Lookup Dialog. If this is the first time you are
using the software, you will have at least one patient in the database – the TEST PATIENT that we
have included.
Creating a New Patient
Click on the ‘New Patient’ button. You will be taken to a blank Personal Page Dialog
(See the Personal Page section). Note: Only select New Patient if this will be the patient’s first visit.
Click on ‘Cancel’ to
dismiss the Patient
Lookup dialog without
opening a patient
record.
Note: If another record
is already open, it will
remain open. Refer to
pages 49-51 for more
information about
how to use the Patient
Lookup Dialog.
14

The Personal Page
Once you click the New Patient button on the Patient Lookup dialog, you will be directed to the
Personal Page. You should enter the patient’s Last Name, First Name and Date of Birth to be able
to easily differentiate them from other patient’s with the same name. We also recommend entering
their chart number. You may also enter any other information that you wish, but most clinicians
choose to enter that other information in their PM software.
Note: If you have selected a current patient from the Patient Lookup dialog, you will be taken to
their specific Personal Page. You may edit any of their information on the page.
2 Ways to Enter Missing Teeth
There are two ways to enter missing teeth and other applicable dentition (crowns, bridges,
implants, missing, and impacted). You should use the one that is fastest for the particular patient.
1. If the patient has simple dentition (for ex., missing their wisdom teeth and maybe they have
a couple of crowns), it’s fastest to enter missing teeth with your voice on the fly. For example,
you’re probing along, you get to a crown - say the word, “Crown” and keep probing.
2. If the dentition is more complex, for example, they have a bridge to build, you can also do that
with your voice, but most find it faster to do it with your mouse on the personal page.
15

Enter Missing Teeth & Other Dentition from the Personal Page
Using the mouse, double-click on any tooth that you need to mark as missing or some other
type of dentition. You will then be presented with the Missing + Tooth Restoration Dialog. Click
on “missing” and the tooth will fade on the chart to indicate its missing status. You can also pick
implants, crowns, impacted teeth, and build bridges. Again, the look of the teeth will update.
Feel free to experiment with inputting these restorations. If you make a mistake, you can easily
correct it. You may change any tooth by double-clicking on it and choosing “re-enter” from the
Missing + Tooth dialog.
How to Create a Bridge
Double-click on the desired tooth.
Choose “bridge” from the Missing + Tooth
Restoration dialog.Choose the appropriate
Abutment type. Abutment 1 represents a
natural tooth. Abutment 2 represents an
implant. Click on pontic as many times
as needed to build the bridge. Click on
Abutment 1 or Abutment 2 to anchor
the bridge. Click “done” to complete the
bridge. Note: If you need to make a change
or correct a mistake, choose the “back”
button to return to the Missing + Tooth
dialog. Double-click on any tooth and
choose“re-enter” to start from scratch.
16

If the patient it is a current patient, then any Medical Alerts for the patient will appear as soon as
the Personal Page appears. More info on how to enter/edit Medical Alerts on page 53.
Start Charting with VoiceWorks
Check the Headset and VoiceWorks Key
*Make sure your VoiceWorks wireless headset is turned on and has a connection with the
VoiceWorks USB Key (make sure the steady, blue light is showing in the center of the VoiceWorks
sticker on the right headphone and you can also check that the red light is showing steady on the
back of VoiceWorks USB Key, if you wish).
Start VoiceWorks Listening Mode
Now that you are ready to begin an exam, tell VoiceWorks to “StartListening.” Remember that
VoiceWorks is designed to correctly respond to 1-3 word phrases that are said as one word. You
should immediately see the red areas in the VoiceWorks dialog box turn green and the message in
the box will be, “Listening.”
17
Table of contents
Popular Dental Equipment manuals by other brands


smartdent
smartdent smartgun PERIO Quick Maintenance Manual

GoodDrs
GoodDrs Dr's Light Clever user manual

Aseptico
Aseptico ADU-17A2 Express Air 2 Operation and maintenance instruction manual

CEFLA
CEFLA VENUS PLUS Operator's manual

Vector
Vector LED-P Instructions for use

Reborn Endo
Reborn Endo Expert instruction manual


