Fluance FiSDK500 User manual

FiSDK500
Thank you for your purchase of this Fluance® product. Please read this instruction manual carefully before using product to
ensure proper use. Keep this manual in a safe place for future reference.
INSTRUCTION MANUAL
HIGH PERFORMANCE MUSIC SYSTEM
www.uance.com
iPod® not included.
®

For more product information visit www.uance.com
NEED
HELP?
DO NOT RETURN THIS
PRODUCT TO THE STORE
Please contact a FLUANCE® customer support representative rst regarding any additional
information on product features, specications or assistance with setup.
Please contact us via one of the methods below:
Toll-free telephone:
1.888.61.SOUND (1.888.617.6863)
Email:
sales@uance.com
Online live web chat:
Visit www.FLUANCE.com
Toll free fax:
1.888.771.1701
®
NEED
HELP?
DO NOT RETURN THIS
PRODUCT TO THE STORE
Please contact a FLUANCE® customer support representative rst regarding any additional
information on product features, specications or assistance with setup.
Please contact us via one of the methods below:
Toll-free telephone:
1.888.61.SOUND (1.888.617.6863)
Email:
sales@uance.com
Online live web chat:
Visit www.FLUANCE.com
Toll free fax:
1.888.771.1701

- 3 -
TABLE OF CONTENTS
NEED HELP?.............................................................................................................. 2
TABLE OF CONTENTS ................................................................................................. 3
WHAT’S INCLUDED ................................................................................................... 3
FEATURES ................................................................................................................ 3
IMPORTANT SAFETY INSTRUCTIONS ........................................................................... 4
BUTTONS AND CONNECTIONS .................................................................................... 6
SETUP ...................................................................................................................... 9
OPERATION .............................................................................................................. 11
SPECIFICATIONS ....................................................................................................... 13
FLUANCE WARRANTY ................................................................................................ 14
WHAT’S INCLUDED
• High Performance Music System for iPod/iPhone®
• Remote Control (Battery included)
• 6 iPod/iPhone Dock Adaptors
• 4.5ft RCA Audio Composite Connection Cable
• 4.5ft RCA Video Composite Connection Cable
• 2 Year Parts and Labour Warranty
• Lifetime Live Customer Support
FEATURES
• High delity sound quality.
• Experience room lling music that you can feel.
• Premium components ensure serious performance.
• Audiophile grade wood construction.
• Innovative design and high gloss nish.
• Allows you to recharge your iPod/iPhone.
• Full function of iPod/iPhone with remote control.
• Separate treble and bass adjustment controls.
• LED display.
- 4 -
1. Read all instructions.
2. Keep these instructions.
3. Heed all warnings.
4. Follow all instructions.
5. Do not use this apparatus near water.
6. Clean only with a dry cloth.
7. Do not block any ventilation openings. Install in accordance with the manufacturer’s instructions.
8. Do not install near any heat sources such as radiators, heat registers, stoves, or other apparatus (including ampliers)
that produce heat.
9. Do not defeat the safety purpose of the polarized or grounding-type plug. A polarized plug has two blades with one
wider than the other. A grounding type plug has two blades and a third grounding prong. The wide blade or the third
prong are provided for your safety. If the provided plug does not t into your outlet, consult an electrician for replacement
of the obsolete outlet.
10. Protect the power cord from being walked on or pinched particularily at plugs, convenience receptacles, and the point
where they exit from the apparatus.
11. Only use attachments/accessories specied by the manufacturer.
12. Use only with cart, stand, tripod, bracket, or table specied by the manufacturer, or sold with the
apparatus. When a cart is used, use caution when moving the cart/apparatus combination to avoid
injury from tip-over.
13. Unplug this apparatus during lightning storms or when unused for long periods of time.
14. Refer all servicing to qualied service personnel. Servicing is required when the apparatus has been damaged in any
way, such as power-supply cord or plug is damaged. Liquid has been spilled or objects have fallen into the apparatus, the
apparatus has been exposed to rain or moisture, does not operate normally, or has been dropped.
15. Apparatus shall not be exposed to dripping or splashing, and that not objects lled with liquids, such as vases,
shall be placed on the apparatus.
16. The battery shall not be exposed to excessive heat such as sunshine, re or the like.
17. The MAINS plug is used as the disconnect device, which shall remain readily operable.
18. The apparatus shall be connected to a MAINS socket outlet with a protective earthing connection.
19. WARNING: To reduce the risk of re or electric shock, do not expose this apparatus to rain or moisture.
This class[B] digital apparatus complies with Canadian ICES-003.
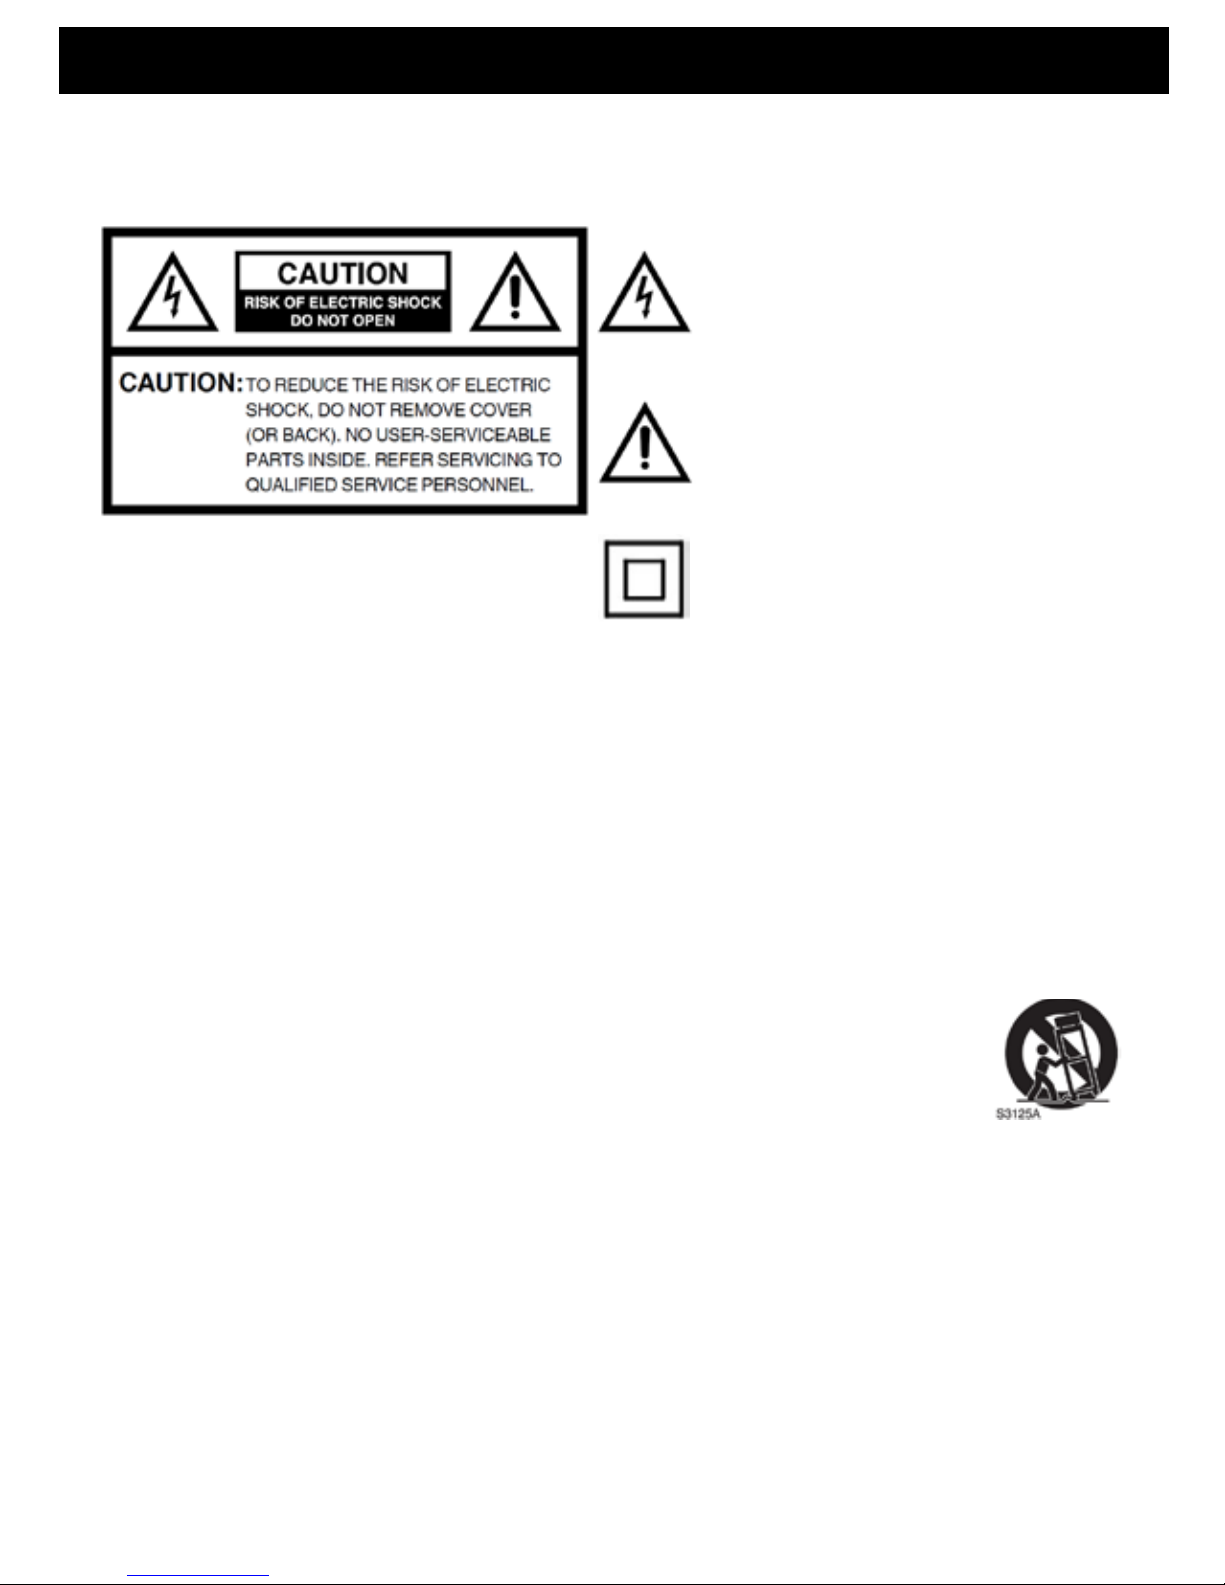
The lightning ash with arrowhead symbol, within an
equilateral triangle is intended to alert the user to the
presence of uninsulated dangerous voltage within the
product’s enclosure that may be of sucient magnitude
to constitute a risk of electric shock.
The exclamation point within an equilateral triangle is
intended to alert the user to the presence of important
operating and maintenance (servicing) instructions in
the literature accompanying the appliance.
This symbol means that this unit is double insulated. An
earth or ground connection is not required.
WARNING: To reduce the risk of re or shock hazard, do not
expose this product to rain or moisture.
CAUTION: Danger of explosion if battery is incorrectly replaced.
Replace only with the same or equivalent type.
The CAUTION marking is located on the bottom panel.
IMPORTANT SAFETY INSTRUCTIONS

- 5 -
IMPORTANT SAFETY INSTRUCTIONS
FCC statement on regulation
This device complies with part 15 of the FCC Rules. Operation is subject to the following two conditions:
(1) This device may not cause harmful interference.
(2) This device must accept any interference received, including interference that may cause undesired operation.
Any changes or modications not expressly approved by the party responsible for compliance could void the user’s authority
to operate the equipment.
NOTE: This equipment has been tested and found to comply with the limits for a Class B digital device, pursuant to Part 15 of the
FCC Rules. These limits are designed to provide reasonable protection against harmful interference in a residential installation.
This equipment generates, uses, and can radiate radio frequency energy and, if not installed and sued in accordance with the
instructions, may cause harmful interference to radio communications. However, there is no guarantee
that interference will not occur in a particular installation. If this equipment does cause harmful interference to radio or
television reception, which can be determined by turning the equipment o and on,the user is encouraged to try to correct the
interference by one or more of the following measures:
· Reorient or relocate the receiving antenna.
· Increase the separation between the equipment and receiver.
· Connect the equipment into an outlet on a circuit dierent from that to which the
receiver is connected.
· Consult the dealer or an experienced radio TV technician for help.
iPod® and iPhone® are trademarks of Apple Computer, Inc., registered in the U.S. and other countries.
- 6 -
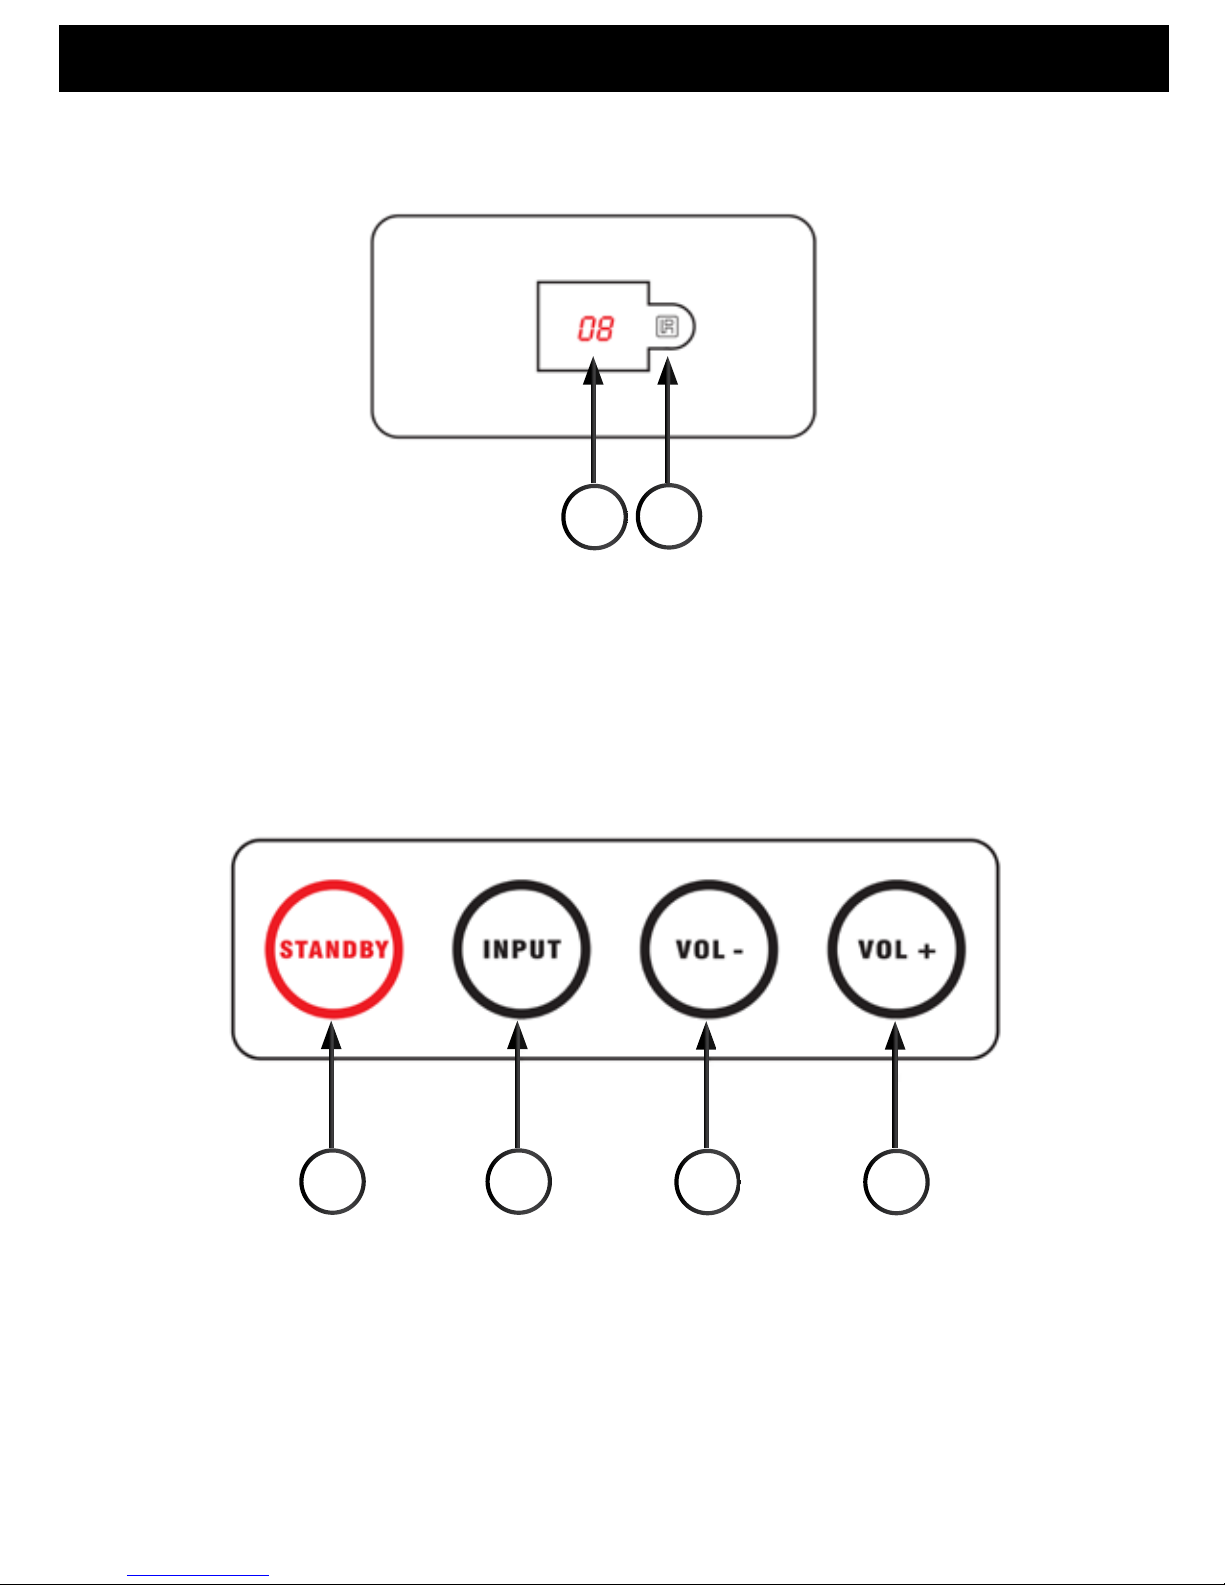
BUTTONS AND CONNECTIONS
MUSIC SYSTEM − FRONT
MUSIC SYSTEM − TOP
1 2
1 2 3 4
1. INPUT/VOLUME INFORMATION DISPLAY
2. IR RECEIVER
1. STANDBY BUTTON
2. INPUT SELECTION
3. VOLUME − DECREASE
4. VOLUME + INCREASE

- 7 -
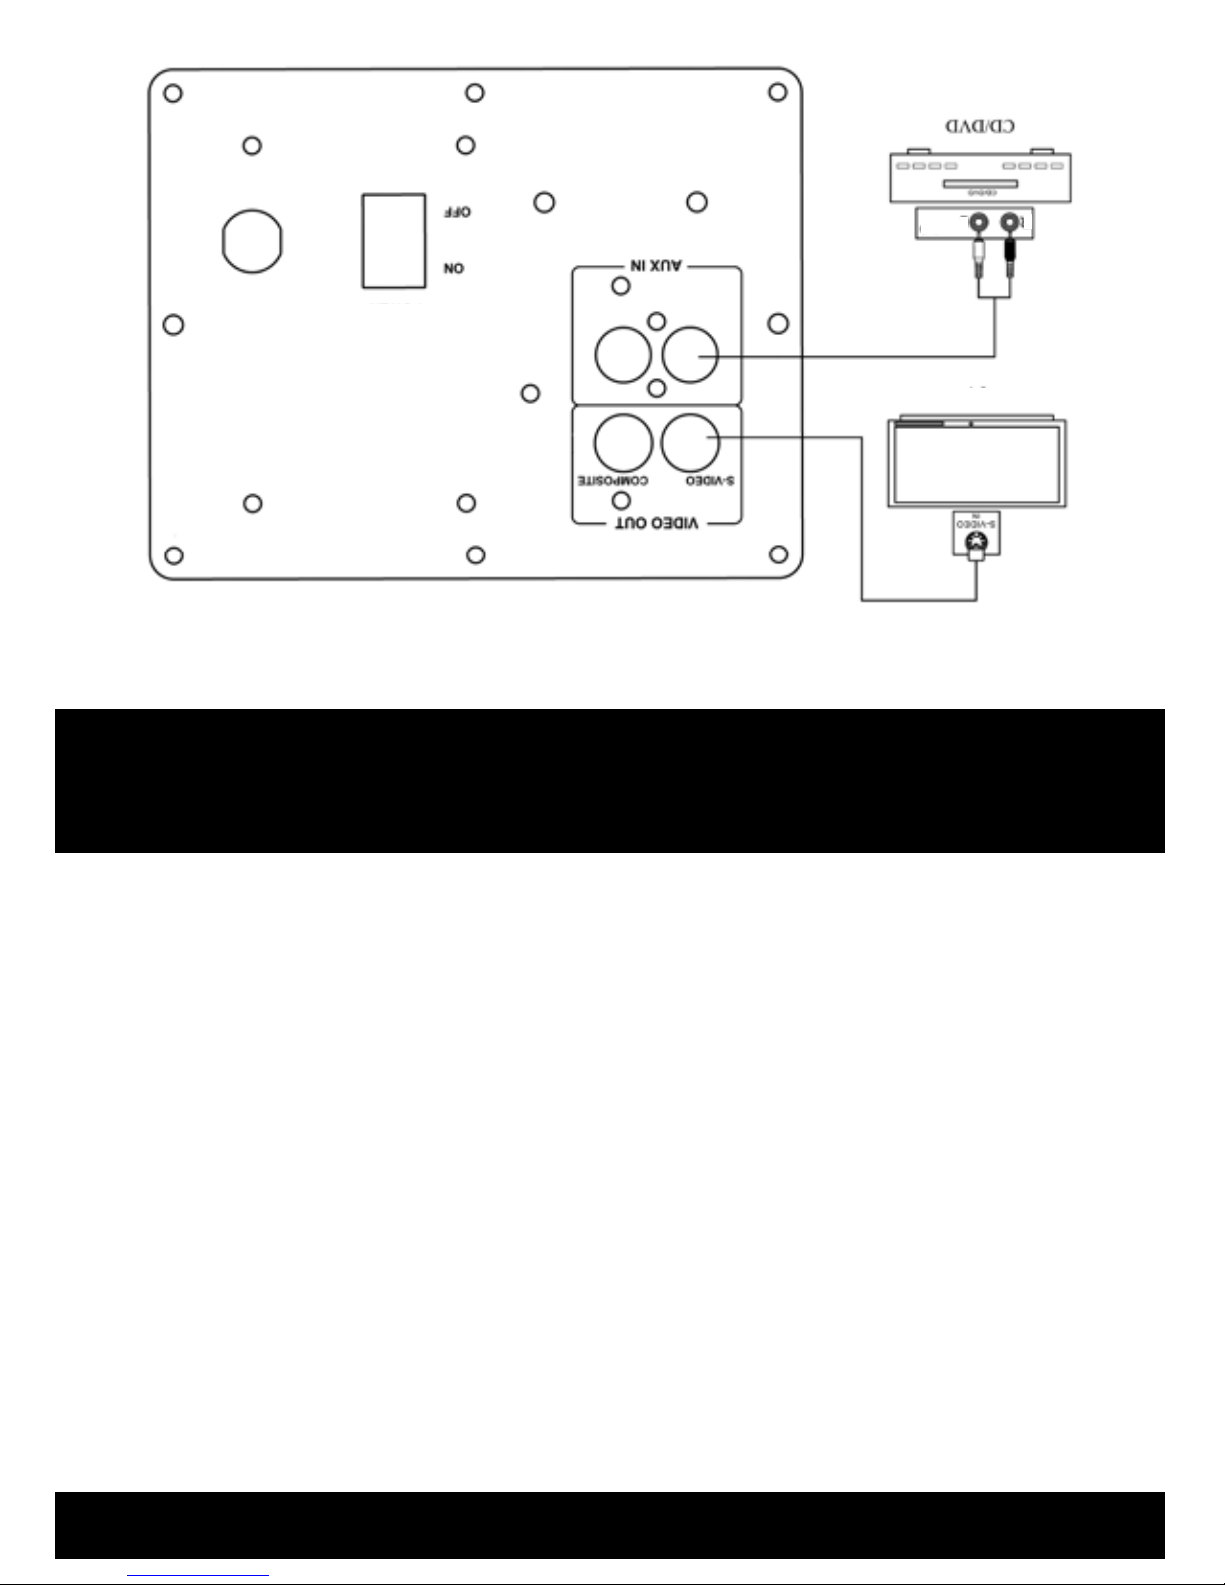
MUSIC SYSTEM − BACK
1. VIDEO OUTPUT
2. AUXILIARY AUDIO INPUT
3. POWER ON/OFF SWITCH
4. AC POWER CORD
REMOTE CONTROL− BACK
1. BATTERY COMPARTMENT 1
3 4
2
1
BUTTONS AND CONNECTIONS

- 8 -
1
2
3
4
5
6
8
10
7
9
11
13
12
14
1. STANDBY
2. MENU
3. iPod/iPhone MENU DOWN
4. ENTER/AUTO
5. PREVIOUS TRACK/REWIND
6. iPod/iPhone PLAY/PAUSE
7. iPod/iPhone INPUT
8. TREBLE +/−
9. BASS +/−
10. RESET
11. iPod/iPhone MENU UP
12. NEXT TRACK/FAST FORWARD
13. AUXILIARY AUDIO INPUT
14. MASTER VOLUME +/−
REMOTE CONTROL− FRONT
BUTTONS AND CONNECTIONS

- 9 -
SETUP
Setting up the remote control:
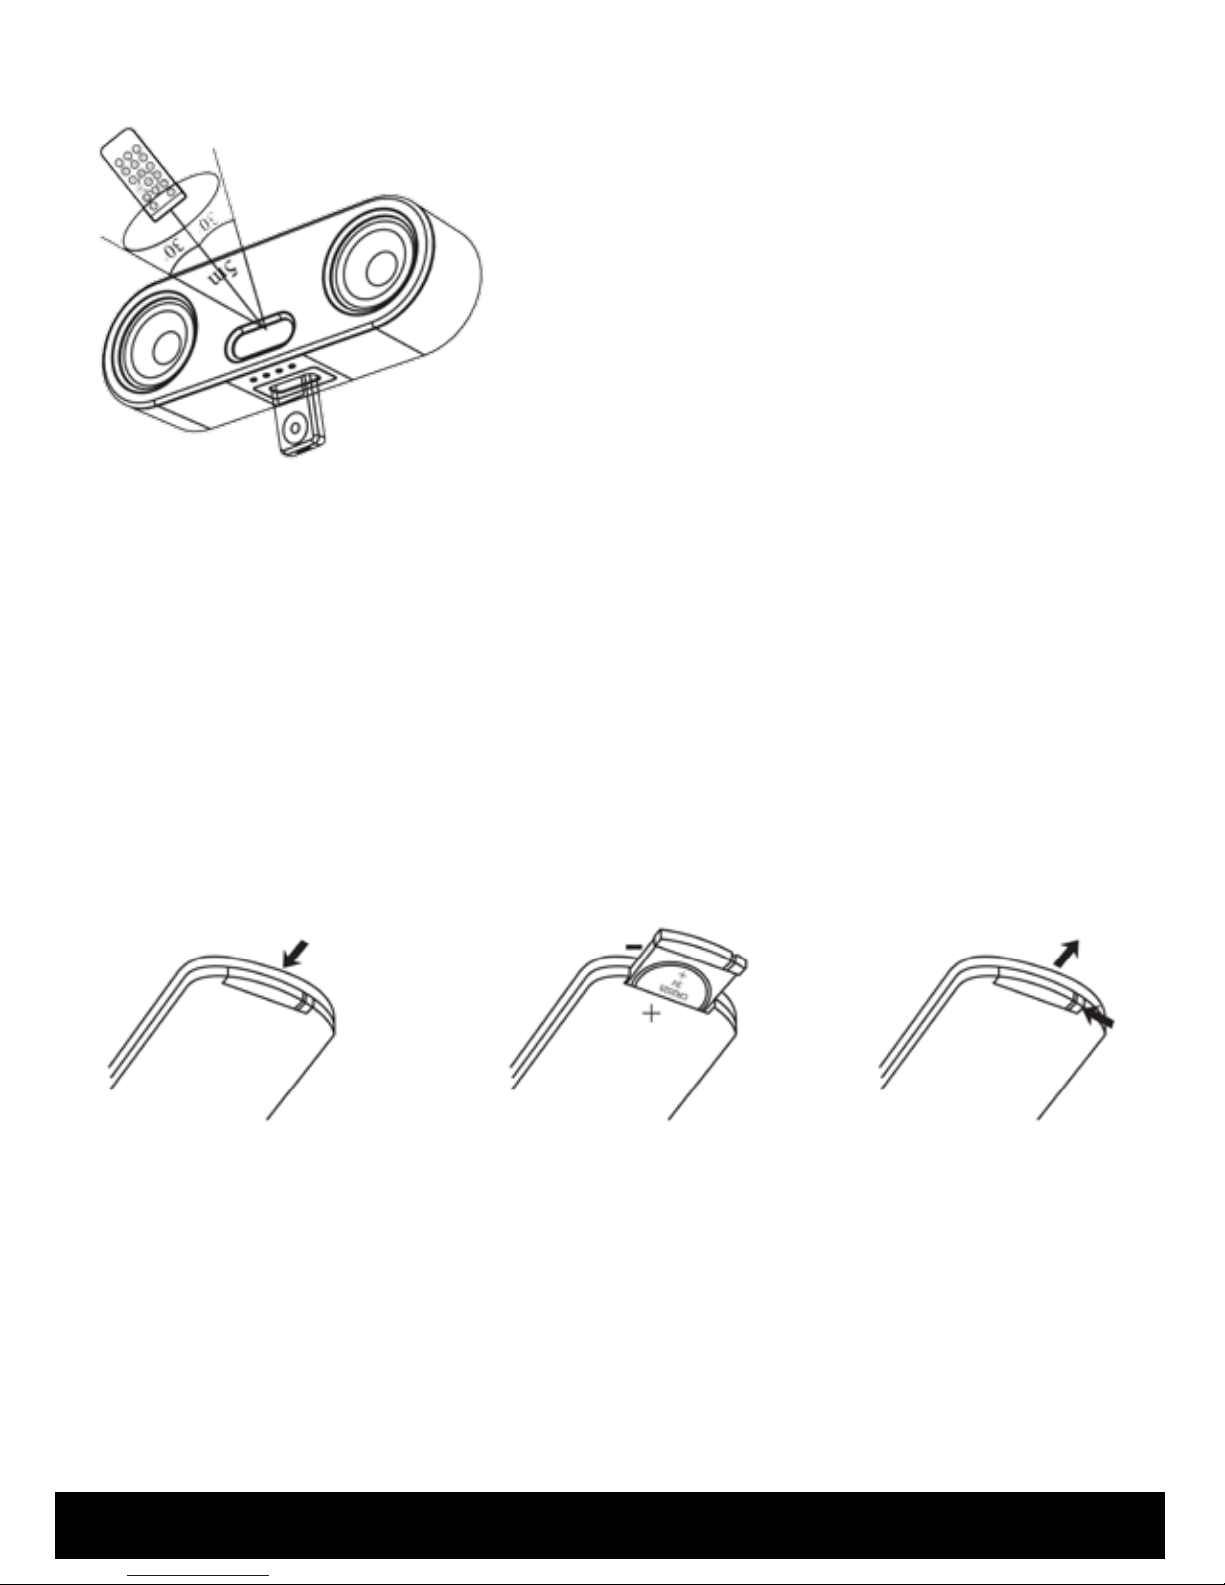
Battery installation:
1. Release the slide latch of the battery compartment on the back of the remote control.
2. Pull out the battery holder.
3. Install only a 3V CR2025 battery and ensure that the battery polarity "+" corresponds to the
"+" sign on the battery holder.
4. Replace the battery holder.
Please note:
• Use only the recommended size and type of battery specied.
• Please be sure to follow the correct polarity when installing the battery in the battery
compartment. A reversed battery may cause damage to the remote control.
• Do not drop or bump the remote control as this may damage the internal components of
the remote.
• When not using the unit for a prolonged period of time, please remove the battery to avoid
possible damage caused by a leaking battery.
Optimal range for the remote control:
1. When pressing the buttons on the remote control,
aim it at the IR receiver on the Music System.
2. The distance between the Music System and the
remote should be no more than 16.5 feet (5 meters)
and within 30° with an unobstructed view.

- 10 -
NOTE: To prevent any damages to the base connector, do not shake or bump the iPod/iPhone
during playback.
The remote control may be less eective if:
1. A strong light is placed near the IR receiver.
2. There are obstacles between the remote control and the IR receiver.
3. Other remote controls are being used in the area at the same time.
4. The remote control has a low battery.
Connecting your iPod/iPhone to your Music System:
1. Ensure that the iPod/iPhone and the Music System are turned o before docking your
iPod/iPhone.
2. Select the correct docking bracket that corresponds to the size of your iPod/iPhone. You can also
use the original universal bracket that came with your iPod/iPhone.
3. Insert the correct docking bracket into the iPod/iPhone connection area located on the top of
the Music System.
4. Ensure that the iPod/iPhone is securely connected to the Music System.
Connecting your Music System to a TV or CD/DVD/RECEIVER:
TV
CD/DVD/RECEIVER
SETUP

- 11 -
OPERATION
Turning on the Music System:
• Ensure that the AC power cord is plugged in and the ON/OFF switch at the back of the Music System
is in the ON position. The VOL information will then be displayed in the LED window.
STANDBY MODE:
1. Press this button to enter into STANDBY mode.
2. While in STANDBY mode, no information will be displayed in the LED window.
3. Press the STANDBY button again to quit the STANDBY mode.
4. The VOL information will appear in the LED window and power will be restored.
INPUT MODE:
1. Press the INPUT button to choose dierent input signals. Pressing this button allows you to toggle
between Auxiliary Audio Input and iPod/iPhone. AUX and IP will appear in the LED window to
display your selection.
2. Press the AUX button on the remote control to switch the input signal to Auxiliary Audio Input, AU
will appear in the LED window.
3. Press the iPod/iPhone button on the remote control to switch the input signal to iPod/iPhone, IP
will appear in the LED window.
VOLUME:
1. Press the VOL + button on the remote control or on top of the Music System to increase the volume.
2. Press the VOL - button on the remote control or on top of the Music System to decrease the volume.
3. The LED window will display the volume level you have selected.
NOTE: The maximum volume is 40dB and the minimum volume is 0dB. The Music System is set
to 20dB by default when turning on the system.

- 12 -
TREBLE:
1. Press the TREBLE + button on the remote control to increase the treble.
2. Press the TREBLE - button on the remote control to decrease the treble.
3. The LED window will display the TREBLE level you have selected.
4. If the TREBLE levels are not adjusted within 5 seconds, the display will revert to the main level.
BASS:
1. Press the BASS+ button on the remote control to increase the bass.
2. Press the BASS - button on the remote control to decrease the bass.
3. The LED window will display the BASS level you have selected.
4. If the BASS levels are not adjusted within 5 seconds, the display will revert to the main level.
iPod/iPhone CONTROL:
• The iPod/iPhone control buttons on the remote control work similarly to the iPod/iPhone’s menu
system. For more information, please refer to the iPod or iPhone instruction manual.
NOTE: The TREBLE adjustment range is ± 10dB and increases/decreases in increments of 2.
NOTE: The BASS adjustment range is ± 10dB and increases/decreases in increments of 2.
OPERATION
- 13 -
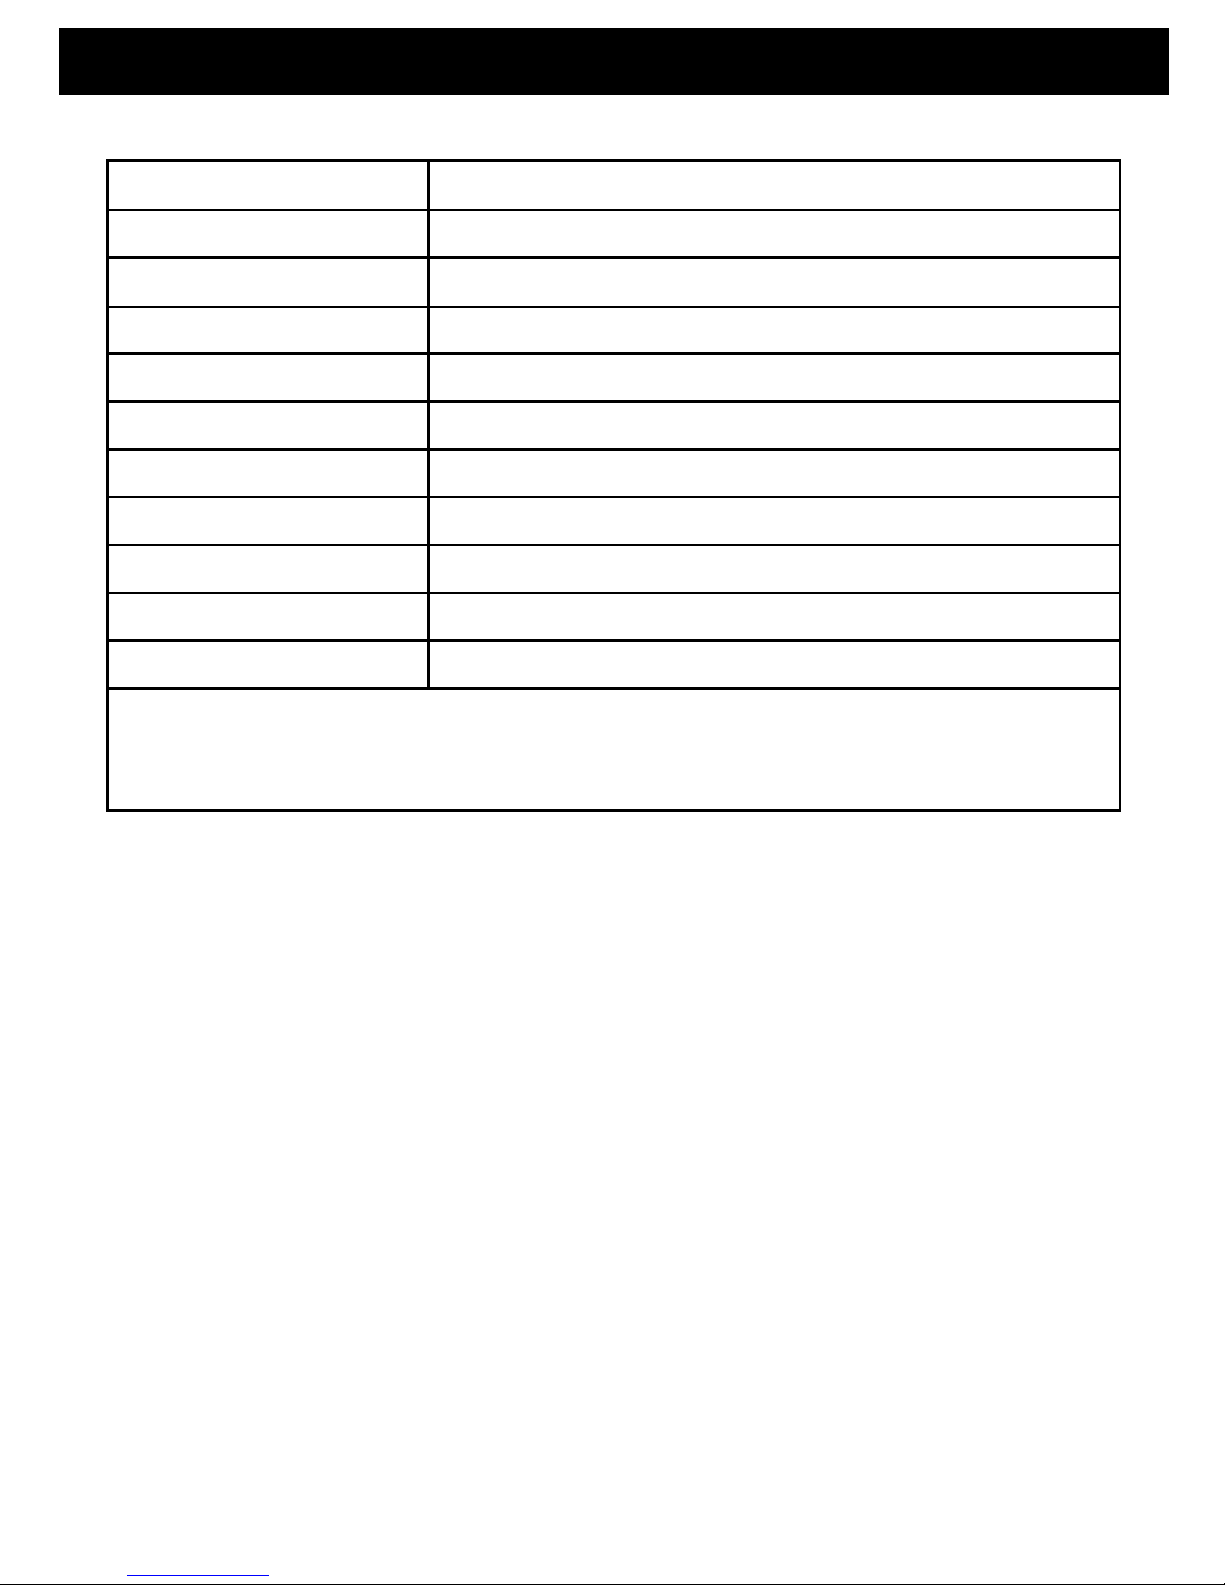
SPECIFICATIONS
Tweeter 2 x 3/5” Coaxial Mounted Titanium Soft Dome Ferrouid Cooled
Woofer 2 x 5” Woven Fiberglass Drivers with Butyl Rubber Surrounds
Input iPod/iPhone , Auxiliary Audio Input
Volume 40dB
Frequency Response 40Hz-20KHz /±2dB
Crossover Frequency 3500 Hz PCB Mounted Circuitry
Amplier Power (RMS) 20 Watts Continuous Average Output
System Type 2 Way 4 Driver with Integrated Amplier
Enclosure/Cabinet Bass Reect Design/Precision Crafted MDF Internally Braced
Dimensions 20.4 × 5.8 × 7.1 inches (51.8 × 14.7 × 18 cm)
Weight 13.4 lbs (6.1 kg)
Specications are subject to change without notice. Measurements and weights may vary slightly.

- 14 -
FLUANCE® WARRANTY
Thank you for choosing FLUANCE® Consumer Electronics Products!
FLUANCE® GIVES THE FOLLOWING WARRANTY TO THE ORIGINAL CUSTOMER OF EACH NEW FLUANCE® PRODUCT PURCHASED FROM A
DEALER AUTHORIZED BY FLUANCE®. FLUANCE® WARRANTS THAT EACH NEW PRODUCT, UNDER NORMAL USE, IS FREE FROM DEFECTS,
SUBJECT TO THE TERMS AND CONDITIONS SET FORTH. IF A DEFECT SHOULD OCCUR WITHIN THE WARRANTY PERIOD, REPAIRS WILL
BE MADE FREE OF CHARGE FOR PARTS AND LABOR WHEN SUCH DEFECTS ARE DETERMINED BY US TO BE ATTRIBUTABLE TO FAULTY
MATERIALS OR WORKMANSHIP AT TIME OF MANUFACTURE.
WARRANTY PERIOD: THE FLUANCE® PRODUCTS LISTED BELOW ARE WARRANTED FOR PARTS AND LABOR FOR THE STATED PERIOD
FROM THE DATE OF ORIGINAL PURCHASE AND ARE SUBJECT TO THE TERMS AND CONDITIONS OF THE WARRANTY.
HOME AUDIO PASSIVE SPEAKERS: LIFETIME WARRANTY
ACTIVE/POWERED SPEAKERS: 2 YEAR WARRANTY
WARRANTY EXCLUSIONS: PRODUCTS PURCHASED FROM A DEALER NOT AUTHORIZED BY FLUANCE®. PRODUCTS WITH THE SERIAL
NUMBER DEFACED, ALTERED OR MISSING. DEFECTS RESULTING FROM DISASTER, ACCIDENT, ABUSE, MISUSE, LIGHTNING, POWER
SURGES, NEGLECT, UNAUTHORIZED MODIFICATION OR WATER DAMAGE. DEFECTS OR DAMAGE AS A RESULT OF REPAIRS PERFORMED BY
A PERSON OR PARTY NOT AUTHORIZED BY FLUANCE®. DEFECTS OR DAMAGE OCCURRING DURING SHIPPING CLAIMS SHOULD BE MADE
WITH THE SHIPPING COMPANY.
TO OBTAIN WARRANTY SERVICE: SHOULD YOUR FLUANCE® PRODUCT NEED WARRANTY SERVICE, PLEASE CONTACT YOUR FLUANCE®
AUTHORIZED DEALER AND SEND YOUR PRODUCT, FULLY INSURED AND FREIGHT PREPAID TO THE NEAREST FLUANCE® AUTHORIZED
SERVICE CENTER. BEFORE SENDING TO FLUANCE®, YOU WILL BE REQUIRED TO GET A RETURN AUTHORIZATION NUMBER FROM YOUR
DEALER. PRODUCTS SHIPPED WITHOUT A VALID RETURN AUTHORIZATION NUMBER WILL BE REFUSED. TO AVOID POSSIBLE SHIPPING
DAMAGE, MAKE SURE THE PRODUCT IS PROPERLY PACKAGED AND WELL PROTECTED. INCLUDE A COPY OF YOUR ORIGINAL BILL OF
SALE INCLUDING DATE OF PURCHASE AND INVOICE NUMBER, SERIAL NUMBER, YOUR NAME, EMAIL ADDRESS, HOME AND/OR WORK
TELEPHONE NUMBERS, A COMPLETE RETURN ADDRESS AND A DETAILED DESCRIPTION OF THE FAULTS. PRODUCTS REPAIRED WITHIN
WARRANTY WILL BE RETURNED FREIGHT PREPAID. WHEN APPLYING FOR WARRANTY REPAIRS, YOU MUST PRESENT THE ORIGINAL
COPY OF YOUR BILL OF SALE.
TO OBTAIN THE NAME AND ADDRESS OF THE NEAREST AUTHORIZED FLUANCE® SERVICE CENTRE OR FOR MORE INFORMATION ON THIS
WARRANTY
• Contact FLUANCE® Support by Email: sales@uance.com
• Visit www.FLUANCE.com
• Mail your inquiry to:
FLUANCE® Customer Service, 4080 Montrose Road, Niagara Falls, ON L2H 1J9
• Call toll free 1.888.61.SOUND (1.888.617.6863)
FLUANCE® is a registered trademark.
07.2011
FLUANCE® WARRANTY

- 15 -
GARANTIE FLUANCE®
Merci d’avoir choisi un produit électronique grand public FLUANCE®!
FLUANCE® ACCORDE LA GARANTIE SUIVANTE À L’ACHETEUR INITIAL DE CHAQUE NOUVEAU PRODUIT FLUANCE® AUPRÈS D’UN
REVENDEUR AUTORISÉ PAR FLUANCE®. FLUANCE® GARANTIT QUE CHAQUE NOUVEAU PRODUIT, SOUS UNE UTILISATION NORMALE,
EST EXEMPT DE DÉFAUTS, SOUS RÉSERVE DES MODALITÉS ET CONDITIONS ÉNONCÉES. SI UN DÉFAUT SURVIENT DANS LA PÉRIODE DE
GARANTIE, LES RÉPARATIONS SERONT EFFECTUÉES SANS FRAIS POUR LES PIÈCES ET LA MAIND’ŒUVRE LORSQUE DE TELS DÉFAUTS
SONT DÉTERMINÉS PAR NOUS D’ÊTRE IMPUTABLE AUX MATÉRIAUX OU À LA FABRICATION.
PÉRIODE DE GARANTIE: LES PRODUITS FLUANCE® ÉNUMÉRÉS CIDESSOUS SONT GARANTIS, PIÈCES ET MAIND’ŒUVRE, POUR LA
PÉRIODE INDIQUÉE À PARTIR DE LA DATE D’ACHAT ORIGINALE ET SONT SOUMIS AUX TERMES ET CONDITIONS DE LA GARANTIE.
HAUTPARLEURS PASSIF AUDIO MAISON: GARANTIE POUR LA VIE
HAUTPARLEURS ACTIF ALIMENTÉ: GARANTIE DEUX ANS
EXCLUSIONS DE GARANTIE: LES PRODUITS ACHETÉS AUPRÈS D’UN REVENDEUR NON AGRÉE PAR FLUANCE®. LES PRODUITS AVEC
LE NUMÉRO DE SÉRIE DÉGRADÉ, ALTÉRÉ OU MANQUANT. DÉFAUTS RÉSULTANT D’UNE CATASTROPHE, D’UN ACCIDENT, D’ABUS,
DE MAUVAIS USAGE, PAR LA FOUDRE, LES SURTENSIONS, LA NÉGLIGENCE, LES MODIFICATIONS NON AUTORISÉES OU LES DÉGÂTS
DES EAUX. LES DÉFAUTS OU DOMMAGES EN CONSÉQUENCE DE RÉPARATIONS EFFECTUÉES PAR UNE PERSONNE OU UN PARTI NON
AUTORISÉ PAR FLUANCE®. LES DÉFAUTS OU DOMMAGES SURVENUS PENDANT L’EXPÉDITION LES RÉCLAMATIONS DOIVENT ÊTRE
FAITES AVEC L’EXPÉDITEUR.
POUR OBTENIR LE SERVICE DE GARANTIE: SI VOTRE APPAREIL FLUANCE® A BESOIN DE SERVICE DE GARANTIE, S’IL VOUS PLAÎT
CONTACTEZ VOTRE REVENDEUR AGRÉE FLUANCE® ET ENVOYEZ VOTRE PRODUIT ENTIÈREMENT ASSURÉ ET FRAIS DE TRANSPORT
PAYÉS AU CENTRE DE SERVICE AGRÉE FLUANCE® LE PLUS PROCHE. AVANT DE L’ENVOYER CHEZ FLUANCE®, VOUS DEVEZ OBTENIR UN
NUMÉRO D’AUTORISATION DE RETOUR AUPRÈS DE VOTRE REVENDEUR. LES PRODUITS EXPÉDIÉS SANS UN NUMÉRO D’AUTORISATION
VALIDE SERONT REFUSÉS. POUR ÉVITER DES DOMMAGES POSSIBLES DURANT LE TRANSPORT, ASSUREZVOUS DE BIEN EMBALLER
ET PROTÉGER VOTRE PRODUIT. INCLURE UNE COPIE DE VOTRE FACTURE ORIGINALE QUI INDIQUE LA DATE D’ACHAT ET LE NUMÉRO
DE FACTURE, LE NUMÉRO DE SÉRIE, VOTRE NOM, VOTRE ADRESSE COURRIEL, NUMÉRO S DE TÉLÉPHONE S À DOMICILE ET/OU AU
TRAVAIL, UNE ADRESSE DE RETOUR COMPLÈTE ET UNE DESCRIPTION DÉTAILLÉE DE LA PANNE. LES PRODUITS RÉPARÉS PENDANT LA
GARANTIE DU PRODUIT SERONT RETOURNÉS PORT PAYÉ. EN FAISANT UNE DEMANDE DES RÉPARATIONS PENDANT LA GARANTIE,
VOUS DEVEZ PRÉSENTER LA COPIE ORIGINALE DE VOTRE PREUVE D’ACHAT. POUR OBTENIR LE NOM ET L’ADRESSE DU CENTRE DE
SERVICE FLUANCE® AUTORISÉ LE PLUS PRÈS DE CHEZ VOUS OU POUR PLUS DE RENSEIGNEMENTS SUR CETTE GARANTIE :
• Contactez le service de soutient FLUANCE® par courriel: sales@uance.com
• Visitez www.FLUANCE.com
• Postez votre demande à:
FLUANCE® -service à la clientèle, 4080 Montrose Road, Niagara Falls, ON L2H 1J9
• Composez le numéro sans frais : 1.888.61.SOUND (1.888.617.6863)
FLUANCE® est une marque déposée.
07.2011
GARANTIE FLUANCE®
- 14 -

- 16 -
SPÉCIFICATIONS
Haut-parleur d’aigus Coaxial 2 x 3/5po monté en titane à dôme souple refroidis
au ferro-liquide
Haut-parleur de graves 2 x 5” Amplicateur 2 x 5po en bres de verre avec bordure en
caoutchouc butyle
Entrée iPod/iPhone , Entrée auxiliaire audio
Volume 40dB
Réponse en fréquence 40Hz-20KHz /±2dB
Fréquence de transition 3500 Hz Circuits montés PCB
Amplicateur de puissance (RMS) 20 Watts de sortie moyenne en continue
Type de système 4 amplicateurs à 2 voies intégrés
Enceinte Graves reètent la conception/Construit avec precision de
MDF renforcé intérieurement
Dimensions 20,4 × 5,8 × 7,1 pouces (51,8 × 14,7 × 18 cm)
Poids 13,4 lbs (6,1 kg)
Les spécications sont sujettes aux changements sans préavis. Les dimensions et poids peuvent
varier légèrement.
- 13 -

- 17 -
AIGUS:
1. Appuyez la touche TREBLE + (aigus) sur la télécommande pour augmenter les aigus.
2. Appuyez la touche TREBLE - (aigus)sur la télécommande pour diminuer les aigus.
3. L’achange DEL indiquera le niveau des aigus que vous avez sélectionné.
4. Si le niveau des aigus n’est pas ajusté dans les 5 secondes, l’achage revient au niveau principal.
GRAVES:
1. Appuyez la touche BASS+ (graves) sur la télécommande pour augmenter les graves.
2. Appuyez la touche BASS - (graves) sur la télécommande pour diminuer les graves.
3. L’achange DEL indiquera le niveau des graves que vous avez sélectionné.
4. Si le niveau des graves n’est pas ajusté dans les 5 secondes, l’achage revient au niveau principal.
CONTRÔLE iPod/iPhone:
• Les touches de contrôle pour l’iPod/iPhone sur la télécommande fonctionnent de façon sem-
blable à ceux dans le menu de l’iPod/iPhone. Pour plus d’informations, référez-vous au manuel
d’instructions pour iPod ou iPhone.
REMARQUE: La gamme de réglage des aigus est de ± 10dB et augmente / diminue en
incréments de 2.
REMARQUE: La gamme de réglage des graves est de ± 10dB et augmente / diminue en
incréments de 2.
OPÉRATION
- 12 -

- 18 -
OPÉRATION
Alimenter le système de musique:
• Assurez-vous que le cordon d’alimentation est branché et l’interrupteur ON/OFF (marche/arrêt) à
l’arrière du système est dans la position ON. L’ achage d’informations du volume DEL indiquera les
informations du volume.
MODE STANDBY (MISE EN VEILLE):
1. Appuyez sur ce bouton pour entrer en mode STANDBY (mise en veille).
2. En mode STANDBY (mise en veille) aucune information ne sera achée à l’écran DEL.
3. Appuyez sur la touche STANDBY encore une fois pour quitter le mode STANDBY (mise en veille).
4. Les informations du volume apparaîtront à l’écran DEL et le courant sera rétabli.
MODE INPUT (SÉLECTION D’ENTRÉE):
1. Appuyez sur la touche INPUT (sélection d’entrée) pour choisir entre deux signaux d’entrée. Cette
touche vous permet de choisir entre l’entrée auxiliaire audio et l’entrée iPod/iPhone.
2. Appuyez sur la touche AUX de la télécommande pour changer le signal d’entrée à l’entrée audio
auxiliaire, AU apparaîtra à l’écran DEL.
3. Appuyez sur la touche iPod/iPhone de la télécommande pour changer le signal d’entrée à l’entrée
iPod/iPhone, IP apparaîtra à l’écran DEL.
VOLUME:
1. Appuyez la touche VOL + sur la télécommande ou sur le dessus du système de musique pour
augmenter le volume.
2. Appuyez la touche VOL - sur la télécommande ou sur le dessus du système de musique pour
diminuer le volume.
3. L’écran DEL achera le niveau du volume que vous avez sélectionné.
REMARQUE: Le volume maximum est de 40dB et le volume minimum est de 0dB. Le système
de musique est xé à 20dB par défaut lorsque vous alimentez le système.
- 11 -
- 19 -- 9-- 10 -
REMARQUE: Pour éviter tout dommage au connecteur de base, évitez de secouer ou de
cogner l’iPod/iPhone pendant la lecture.
CD/DVD/RÉCEPTEUR
SORTIE VIDÉO
La télécommande peut être moins ecace si:
1. Une forte lumière est placée à proximité du récepteur IR.
2. Il y a des obstacles entre la télécommande et le récepteur IR.
3. D’autres télécommandes sont en marche au même moment.
4. La télécommande a une pile faible.
Connecter votre iPod/iPhone à votre système de musique:
1. Assurez-vous que l’iPod/iPhone et le système de musique sont éteints avant de connecter votre
iPod/iPhone.
2. Choisissez le support correct qui correspond à la taille de votre iPod/iPhone. Vous pouvez
également utiliser le support d’origine universel qui est venu avec votre iPod/iPhone.
3. Insérez le support correct dans la connexion iPod/iPhone situé sur le dessus du système
de musique.
4. Assurez-vous que l’iPod/iPhone est correctement connecté au système de musique.
Connecter votre système de musique à un téléviseur ou un CD/DVD/RÉCEPTEUR:
Téléviseur
D G
(ENTRÉE AUXILIAIRE)
ALIMENTATION
(MARCHE)
(ARRÊT)
D
G SORTIE
AUDIO
CONFIGURATION
- 20 -
CONFIGURATION
Mise en place de la télécommande:
Installation de la pile:
1. À l’arrière de la télécommande, relâchez le loquet et glissez le compartiment à pile.
2. Retirez le support de la pile.
3. Installez seulement une pile 3V CR2025 et assurez que la polarité "+" correspond au signe
"+" sur le support de la pile.
4. Mettez le support de la pile en place.
S’il vous plaît noter:
Utilisez uniquement la taille recommandée et le type de pile spécié.
• Assurez-vous de respecter la polarité lors de l’installation de la pile dans le compartiment à
pile. Une pile inversée peut causer des dommages à la télécommande.
• Évitez d’échapper ou de cogner la télécommande car ceci pourrait endommager les
composants internes de la télécommande
• Lorsque vous n’utilisez pas l’appareil pendant une période de temps prolongée, s’il vous
plaît retirer la pile pour éviter des dommages possibles causés par une pile qui fuit.
Portée optimale pour la télécommande:
1. Lorsque vous appuyez sur les touches de la
télécommande, visez la télécommande vers le
récepteur IR du système de musique.
2. La distance entre le système de musique et la
télécommande ne doivent pas être plus que 16,5 pieds
(5 mètres) et à l’intérieur de 30 ° avec une vue dégagée.
- 9 -
Other manuals for FiSDK500
1
Table of contents
Other Fluance Docking Station manuals


