FMI OUTLAND LIVING FM2BS-210 User manual

FMI BRANDS INC.
101 - 3570 194 Street | Surrey, B.C. Canada V3Z 1A5 | Toll Free 1-888-514-1663 | Fax 1-888-797-9931
D.210.000.V1
LP Cylinder
not included
Owner’s
Manual
Model number FM2BS-210
® is a registered trademark of FMI Brands Inc.
The OUTLAND flame is a registered trademark of FMI Brands Inc.
PRINCETON
2 BURNER GAS STOVE

D.210.000.V1
En-1 OUTLAND LIVING - PRINCETON 2-BURNER STOVE OWNER & SAFETY MANUAL
SUMMERLAND
Owner & Safety Manual
PRINCETON
2 BURNER GAS STOVE
DANGER:
If you smell gas:
• Shut off gas to the appliance.
• Extinguish any open flame.
• Open lid.
• If odor continues, keep away from the appliance and immediately call your
gas supplier or fire department.
Failure to follow these instructions could result in fire or explosion, which
could cause property damage, personal injury or death.
Model number FM2BS-210 - Tested by CSA International
ANS Z21.89-2017/CSA 1.18-2017 Outdoor Cooking Specialty Gas Appliances
CALIFORNIA PROPOSITION 65
WARNING: This product can expose you to chemicals including carbon monoxide (CO), soot and other gas-fuel combustion
by-products, which are known to the State of California to cause cancer, birth defects or other reproductive harm. For more
information go to Cancer and Reproductive Harm - www.P65Warnings.ca.gov.
WARNING! HOT SURFACE!
The top grill area, the side walls, the
bottom and wind break may become
extremely hot during operation!
CAUTION: HEAV Y OB JEC T.
TWO PERSON LIFT REQUIRED.
This instruction manual contains important information necessary for the proper assembly and safe
use of this product. Read and follow all warnings and instructions before assembling and using the
appliance. Follow all warnings and instructions when using the appliance. Keep this manual for future
reference.
DANGER:
• Never operate this appliance unattended.
• Never operate this appliance within 10 ft (3.0 m) of any structure,
combustible material or other gas cylinder.
• Never operate this appliance within 25 ft (7.5 m) of any flammable liquid.
• Do not fill cooking vessel beyond maximum fill line.
• If a fire should occur, keep away from appliance and immediately call your
fire department. Do not attempt to extinguish an oil or grease fire with
water.
Failure to follow these instructions could result in fire, explosion or burn
hazard, which could cause property damage, personal injury or death.

En-2
1-888-514-1663 | WWW.OUTLANDLIVING.COM
WARNING:
Do not store or use gasoline or other
flammable vapors and liquids in the vicinity
of this or any other appliance.
An LP-cylinder not connected for use shall not
be stored in the vicinity of this or any other
appliance.
WARNING:
For outdoor use only.
CAUTION:
For residential and recreational use only.
Do not use for commercial purposes.
This appliance is not for frying.
CAUTION:
Watch for sharp edges, especially as noted in the manual.
Wear protective gloves if necessary.
WARNING:
Improper installation, adjustment, alteration, service or
maintenance can cause injury or property damage. Read the
installation, operating and maintenance instructions thoroughly
before installing or servicing this equipment.
WARNING:
If the information in this manual is not followed exactly, a fire
or explosion may result causing property damage, personal
injury or loss of life.
Installation and service must be performed by a qualified
installer, service agency or the gas supplier.
DANGER :
Do not store grill until cool to touch. Failure to do so could result
in fire resulting in property damage, personal injury or death.
Carry
Handle
SECTION 1: ASSEMBLY
This appliance may be used on a table top, or deployed for
standing operation. For Installation on (or over) a level, stable, non-
combustible surface only.
CARRY MODE
CARBON MONOXIDE HAZARD
This appliance can produce carbon monoxide which has no odor.
Using it in an enclosed space can kill you.
Never use this appliance in an enclosed space such as a camper,
tent, car, or home.

D.210.000.V1
En-3 OUTLAND LIVING - PRINCETON 2-BURNER STOVE OWNER & SAFETY MANUAL
SUMMERLAND
Owner & Safety Manual
PRINCETON
2 BURNER GAS STOVE
SETUP: STANDING OPERATION
STEP 1: TAKE OUT WINDBREAK AND LEG EXTENSIONS
a) Release the 2x lid locks of the right lid
|and deploy the right lid then
the left lid.
IMPORTANT:
Ensure all 4x leg extensions are fully seated. The thumb screw
washer should be on top of the U slot. The thumb screws
should be fully tightened before turning the stove over.
Lid Lock
(2x)
Grill
Locking
Pin
Grill Locking Pin
U Slot
Leg Locking Thumb Screw
Stowed Windbreak
Leg
Extension
(4x)
SECTION 1: ASSEMBLY (continued) d) Close the grill and set the 2x grill locking pins. Ensure both 2x
pin ball bearings are fully through the holes and the ball bearing
engagement should be visible on the other side.
e) Close both lids and latch the 2x lid locks.
STEP 2: INSTALL LEG EXTENSIONS
a) Lay the appliance on its back. NOTE: To avoid scratching or
denting choose a flat non-marking surface.
b) Insert the legs into the ends of the leg extensions. The side with
the leg locking thumb screw should engage with the U slot of the
leg extension.
c) Ensure the legs are fully seated before tightening the leg locking
thumb screws.
d) Turn stove over and stand on legs.
b) Release the 2x grill locking pins.
c) Lift the grill to take out the windbreak and leg extensions.

En-4
1-888-514-1663 | WWW.OUTLANDLIVING.COM
STEP 3: STANDING DEPLOYMENT
a) Place appliance on a level, stable, non-combustible surface.
b) Unlatch the lid locks.
c) Deploy left and right lid.
d) Deploy wind break.
e) Ensure the gas knobs on the appliance are set to OFF.
f) Connect LP cylinder (see section labelled “Connection”).
g) Your OUTLAND appliance is assembled and ready for use.
LP Cylinder
not included.
STEP 4 : ENSURE THE STOVE IS LEVEL AND STABLE
Most ground terrain is uneven. The stove should be level and stable
prior to operation. If the stove is not level, or does not make solid
contact with the ground on all four legs follow these tips:
LOCATION ADJUSTMENT
Reposition the standing location of the stove. Often, moving a few
inches in one direction, or another, will firmly ground and level the
stove. If not successful the first time, try a few more locations.
LEG HEIGHT ADJUSTMENT
If repositioning the stove is not successful, adjust the leg height.
Typically, one leg adjustment is all it takes.
1. Assess which leg requires height adjustment.
2. Loosen the leg locking thumbscrew.
3. Slide the leg extension down just
far enough to make contact with the
ground and level the stove.
4. Tighten the leg locking thubscrew.
Ensure it is firmly set.
5. Check the stove is level. Readjust the
leg height(s) as necessary.
OFF
SECTION 1: ASSEMBLY (continued)
IMPORTANT:
• Ensure the gas hose is not contacting the appliance enclosure
and the LP cylinder is stabilized.
• Perform LEAK TEST PRIOR TO IGNITION. Leak test all gas
coupling connections. (see section labelled “Leak Test”).
• Use caution, the hose is a potential trip hazard.
WARNING:
Ensure the appliance is level and stable on a non-combustible
surface. DO NOT OPERATE APPLIANCE ON A SLOPE. It is
recommended to use large flat rocks to level the appliance if
the ground is very uneven.

D.210.000.V1
En-5 OUTLAND LIVING - PRINCETON 2-BURNER STOVE OWNER & SAFETY MANUAL
SUMMERLAND
Owner & Safety Manual
PRINCETON
2 BURNER GAS STOVE
SECTION 2: IGNITION
STEP 1
Ensure that each appliance valve dial is
in the “OFF” position by pushing and
turning clockwise until the dial stops.
STEP 2
Connect the LP gas cylinder. See section labeled “Connection”.
STEP 3
Extend hose to full length and ensure that the propane tank is as
far as safely possible from the appliance and place the tank in the
included stabilizer ring.
STEP 5
Leak Test all connections. See section labeled “Leak Test”.
STEP 4
***SLOWLY*** turn cylinder valve to the open position to avoid
tripping the excess flow safety device in the gas regulator. For more
information about the excess flow safety device see SECTION 5
(page 7).
SETUP: TABLE TOP DEPLOYMENT
1. Place appliance on a level, stable, non-combustible surface.
2. Release the 2x lid locks of the right lid and deploy the right lid
then the left lid.
3. Release the 2x grill locking pins and lift the grill to take out the
windbreak and leg extensions.
SECTION 1: ASSEMBLY (continued)
NOTE TO USER: Before igniting the unit for the first time, follow steps one through 5 in the below Ignition section.
IMPORTANT:
• Ensure the gas hose is not contacting the appliance enclosure
and the LP cylinder is stabilized.
• Perform LEAK TEST PRIOR TO IGNITION. Leak test all gas
coupling connections. (see section labelled “Leak Test”).
• Use caution, the hose is a potential trip hazard.
Ensure the gas hose is not contacting the appliance enclosure and
the LP cylinder is stabilized.
Caution: Always ensure the gas valve orifice and burner tube
venturi is clear of all debris including spider webs.
4. Store the legs safely away from appliance.
5. Close the grill and set the 2x grill locking pins. Ensure both 2x
pin ball bearings are fully through the holes and the ball bearing
engagement should be visible on the other side.
6. Deploy wind break.
7. Ensure the gas knobs on the appliance are set to OFF.
8. Connect LP cylinder (see section labelled “Connection”).
9. Your OUTLAND appliance is assembled and ready for use.

En-6
1-888-514-1663 | WWW.OUTLANDLIVING.COM
Upon igniting the appliance, visually
verify that the burner is indeed burning as
demonstrated in the image to the left.
The presence of flames will confirm that the
burner is burning.
Periodically check that the burner flame
is present during operation by visually
inspecting the burner to ensure the presence of flames.
SECTION 3: PERIODIC INSPECTION OF BURNER FLAMES
If there are no flames present, as
demonstrated in the image to the left, the
appliance is likely not burning.
If this is the case, IMMEDIATELY turn the
valve to the “off” position if it is not already
and repeat the ignition procedure as outlined
in Section 2.
STEP 7
Once the unit is burning normally set
the dial to desired flame height.
TO ADJUST FLAME COLOUR MOVE
THE AIR-FUEL ADJUSTMENT LEVER
FOUND UNDER THE STOVE GAS
VALVE. ADJUST THE LEVER TO
MAXIMIZE THE BLUE FLAME. A
FLAME WITH MORE BLUE COLOUR IS
BURNING HOTTER, MORE CLEANLY
AND MORE EFFICIENTLY THAN A
YELLOW FLAME.
STEP 6
Using a lighter or match, ignite lighter and hold flame slightly above the burner, then open the valve on the appliance slowly by turning
(counter-clockwise) until the unit ignites.
Should the appliance fail to ignite on the first try, promptly repeat the ignition attempt within 5 seconds. If a third attempt fails to ignite the
appliance then rotate the knob to the “off” position and wait 5 minutes before attempting to ignite again.
SECTION 2: IGNITION (continued)
Air-Fuel
Adjustment
Lever (2X)
SECTION 4: EXTINGUISHING THE APPLIANCE
STEP 1
1. Turn valve on propane cylinder to “CLOSE” position.
2. Wait for flame to visibly extinguish.
3. Turn valve on unit to “OFF” position.
STEP 2
Allow unit to cool for at least five (5) minutes before relighting.

D.210.000.V1
En-7 OUTLAND LIVING - PRINCETON 2-BURNER STOVE OWNER & SAFETY MANUAL
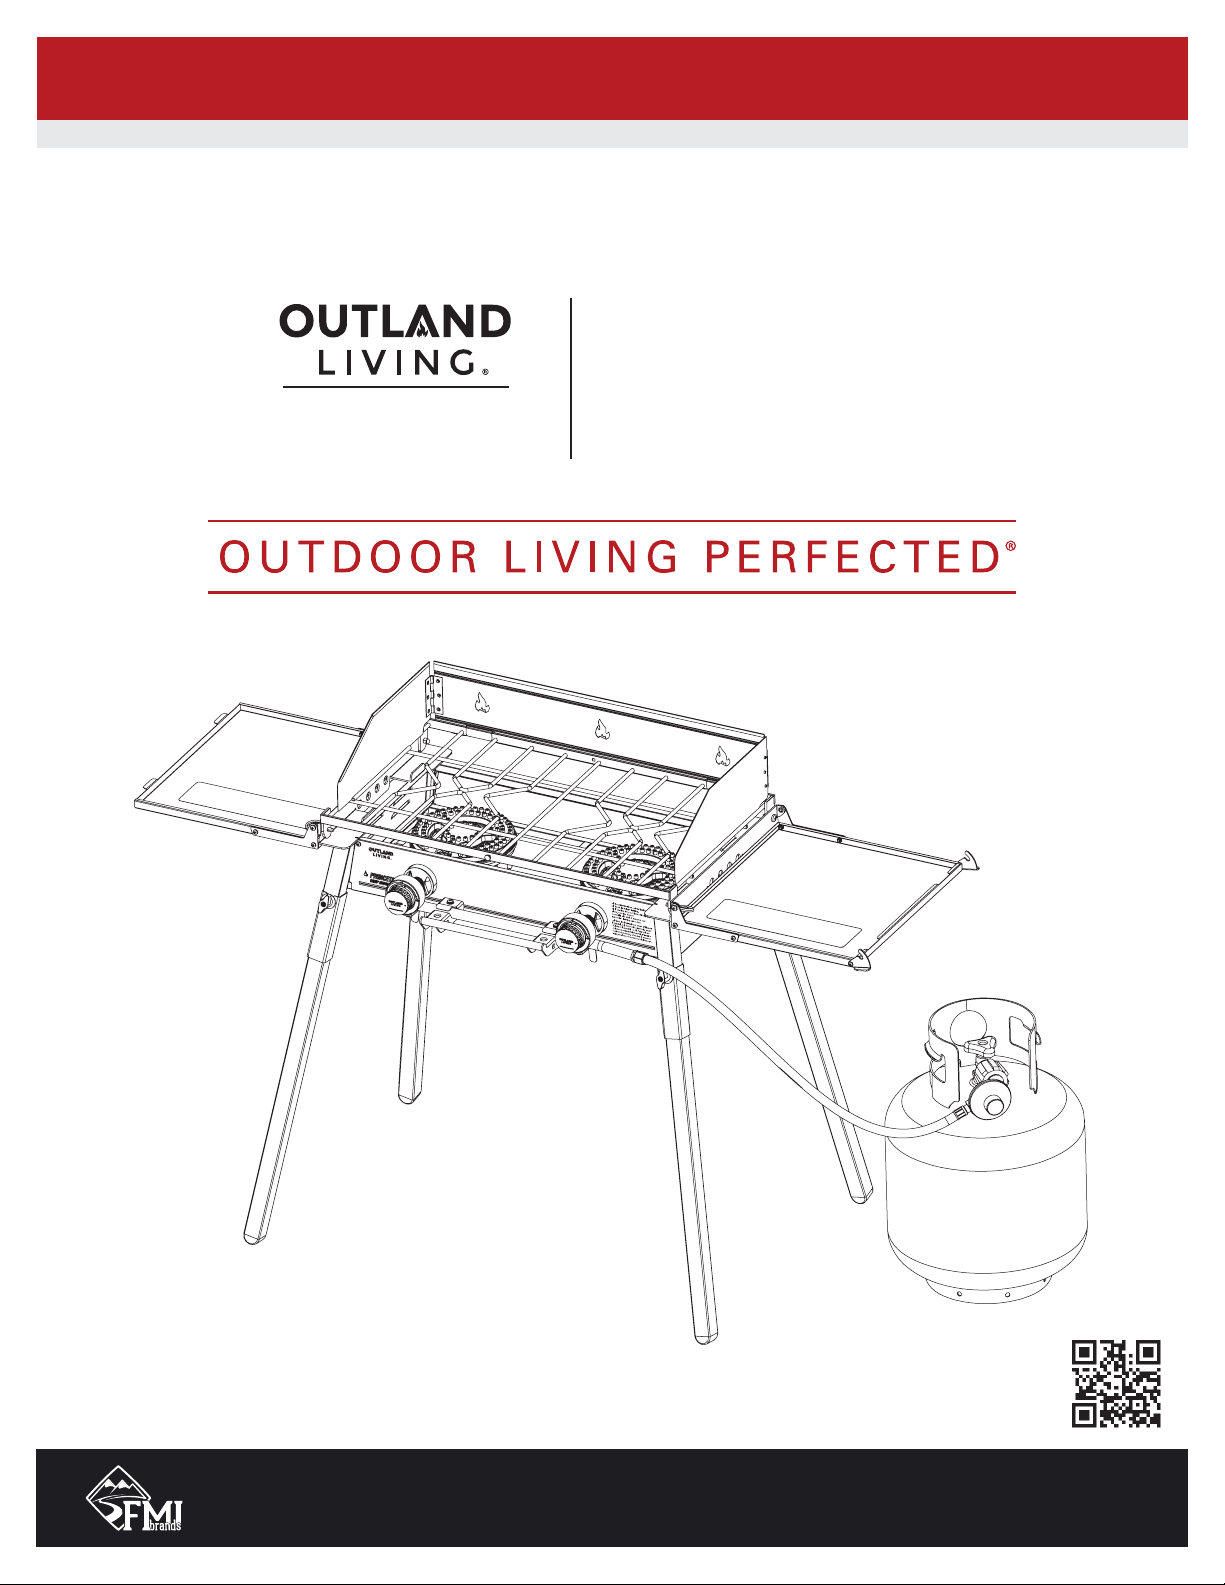
SUMMERLAND
Owner & Safety Manual
PRINCETON
2 BURNER GAS STOVE
GOT A LOW FLAME? OR FLAME HEIGHT DOES NOT APPEAR TO
BE NORMALLY ADJUSTED BY THE GAS KNOB?
If your OUTLAND appliance experiences low flame, or flame height
does not appear to be normally adjusted by the gas knob, it is likely
that the gas cylinder is low in fuel, or the excess flow safety device
has been tripped in the gas regulator.
NOTE: Elevation and temperature affect the cylinder gas pressure
and performance (flame height) of gas appliances. Your geographic
location or local weather may be at fault.
HOW TO PREVENT LOW FLAME OR EFV TRIPS
1. Always check that your Outland appliance gas valve/gas
knob is closed before opening tank valve.
2. Always open propane tank valve **SLOWLY**.
If you experience any signs of your propane cylinder ‘freezing
off’ or start to experience lower flames than usual, please
simply turn the burner control setting to low for 5–10 minutes,
or replace the cylinder with a full one. A humming or whistling
noise coming from the regulator during operation of this
appliance is normal and does not affect operation.
PLEASE DO NOT RETURN TO STORE – IT’S NOT BROKEN
Questions? Outland support team: 1.888.514.1663
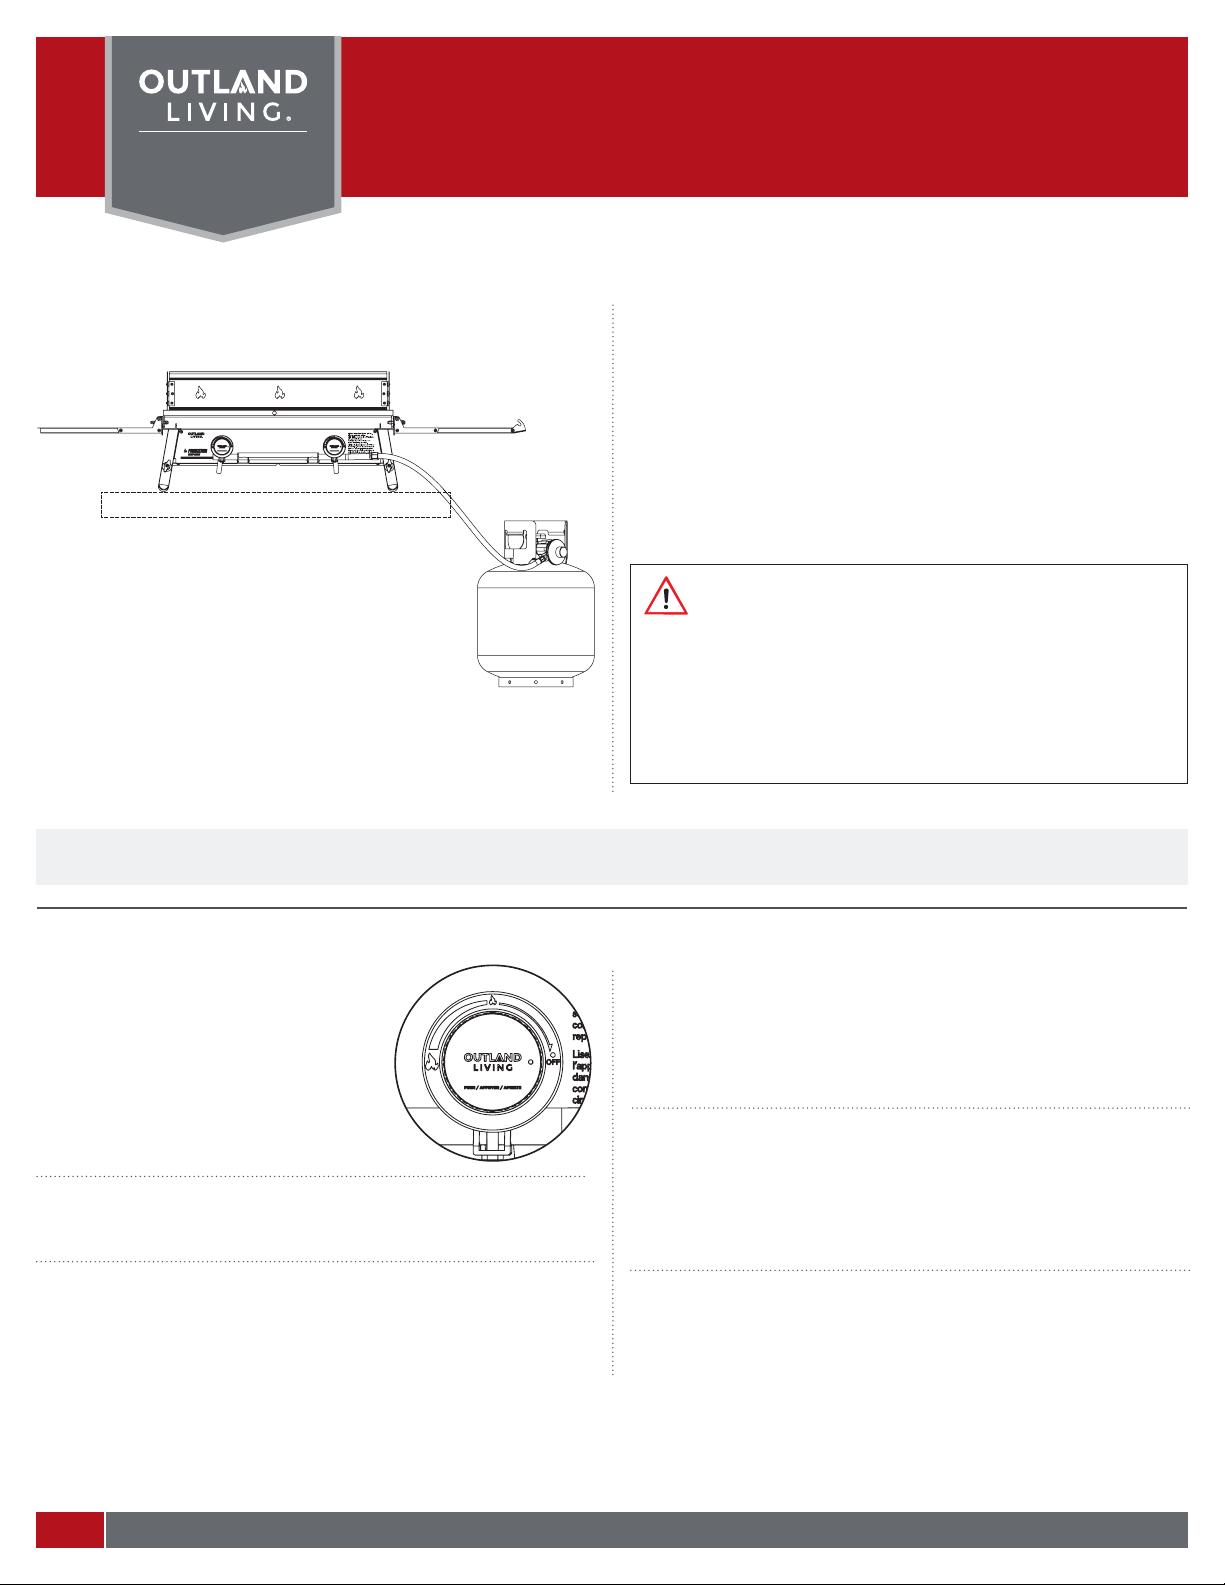
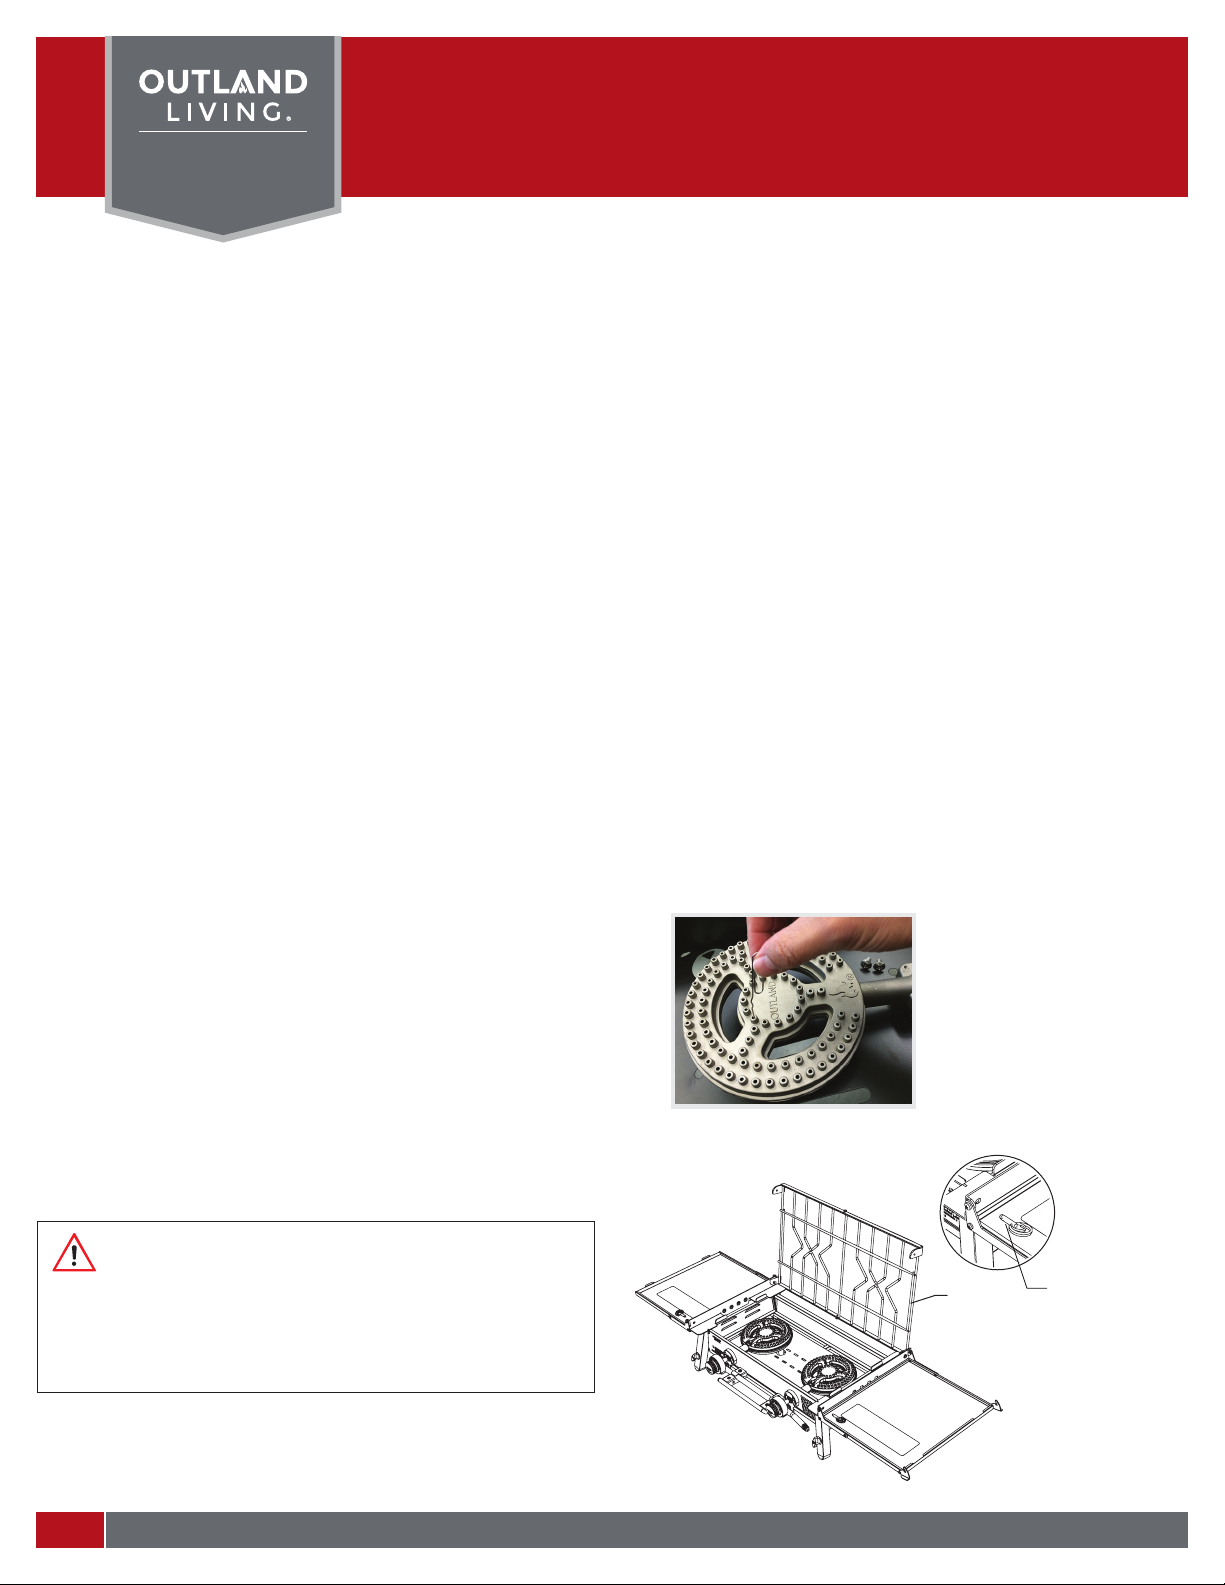
WHAT IS AN EXCESS FLOW VALVE? (EFV)
The EFV is a safety mechanism contained within every propane
gas regulator. The purpose of the EFV is to restrict the gas
supply if too much gas is flowing too quickly through the gas
hose. For example this
could happen if the gas hose
was severed. It is normal
that your EFV trips if you
open the propane tank valve
too quickly or if you leave
the gas knob open before
lighting, or both.
GAS
REGULATOR
NIPPLE WITH EXCESS
FLOW LIMITING
DEVICE (EFV)
GAS HOSE
SECTION 5: IGNITION TROUBLESHOOTING
APPLIANCE WON’T LIGHT? IGNITION PROBLEM?
IGNITION TROUBLESHOOTING
1. Ensure all appliance valve(s) are OFF and the cylinder valve is
closed.
2. Disconnect LP cylinder.
3. Remove the Grill.
4. Inspect the burners for dirt and debris. Ensure the burners and
ignition ports are dry. The appliance will be hard to start if the
burners and/or ignition ports are wet.
5. Wait 5 minutes for any gas to dissipate.
6. Using a lighter or match, ignite lighter and hold flame slightly
above the burner, then open the valve on the appliance slowly by
turning (counter-clockwise) until the unit ignites.
7. If the problem persists, please call the customer service line at the
back of this manual.
DANGER:
Keep hair tied back and keep head and face away from the
appliance during ignition!
WARNING:
Ensure that no parts of your body, clothing, or any other
combustible material are above the burner before, during and
after ignition.
CORRECTIVE ACTION:
a. Confirm your gas cylinder is NOT empty.
b. Close the propane cylinder valve.
c. Open and then close the appliance gas knob valve to release
pressure.
d. Be sure the appliance valve is OFF.
e. Disconnect the gas hose from the propane cylinder.
f. Gently tap the gas regulator housing on the ground once or
twice.
g. Reconnect the gas hose to the propane cylinder.
h. Slowly and fully open the propane cylinder valve.
i. Perform a Leak Test and follow the Ignition sequence.
TIP: Try tapping the regulator on the ground or hard surface 3
times. Sometimes, this will reset the safety device in the regulator.

En-8
1-888-514-1663 | WWW.OUTLANDLIVING.COM
Top
TABLE TOP DEPLOYMENT - Top
FOOT PRINT DEPTH
567 mm [22.3”]
STANDING GRILL HEIGHT
751 mm [29.5”]
438 mm [17.2”]
WIDTH
235 mm [9.25”]
HEIGHT
366 mm [14.4”]
GRILL AREA DEPTH
221 mm [8.7”]
GRILL HEIGHT
STOVE WIDTH (LIDS DEPLOYED)
1290 mm [50.8”]
GRILL AREA LENGTH
624 mm [24.5”]
660 mm [26”]
LENGTH
APPLIANCE DIMENSIONS
(COMPACT TRANSPORT/STORAGE)
Front
TABLE TOP DEPLOYMENT - Front
LP Cylinder
not included
LP Cylinder
not included
SECTION 6:
APPLIANCE
DIMENSIONS
(Approximate)

D.210.000.V1
En-9 OUTLAND LIVING - PRINCETON 2-BURNER STOVE OWNER & SAFETY MANUAL
SUMMERLAND
Owner & Safety Manual
PRINCETON
2 BURNER GAS STOVE
Keep the appliance area clear and free from combustible materials,
gasoline and other flammable vapors and liquids.
Keep the fuel supply hose away from any heated surface(s).
• Use appliance as purchased; use only with LP (propane) gas
and the regulator/valve assembly supplied.
• Installation must conform with local codes, or in the absence
of local codes, with either the National Fuel Gas Code, ANSI
Z223.1/ NFPA 54, Storage and Handling of Liquefied Petroleum
Gases, ANSI/NFPA 58; or Natural Gas and Propane Installation
Code, CSA B149.1; or Propane Storage and Handling Code,
B149.2; or the Standard for Recreational Vehicles, ANSI A 119.2/
NFPA 1192; and CSA Z240 RV Series, Recreational Vehicle
Code, as applicable.
• Appliance is not for use in or on recreational vehicles and/or
boats.
• This appliance is safety certified for use in the United States
and/or Canada only. Do not modify for use in any other
location. Modification will result in a safety hazard.
• Read and follow all of the messages found throughout the
manual.
LP SAFETY
MINIMUM CLEARANCES:
Maintain proper clearances from any structure or combustible
construction. The specific minimum clearances from any structure
or combustible materials to the sides and back of the appliance is
10 ft (3.0 m).
Input: 60,000 BTU/h
Burner Input: 30,000 BTU/h each (2x)
Manifold pressure: 11 inches of water column (wc)
Max Gas Supply Pressure: 250 PSI
Injector Size* 1.63 mm
* Injector size marked clearly on the gas valve orifice.
SECTION 7:
OPERATIONAL SAFETY
DANGER:
1) Never leave the appliance unattended while in use. The user
must have a clear line of sight to the appliance at all times.
2) Keep children and pets away from appliance at all times.
3) The use of alcohol, prescription or non-prescription drugs may
impair the your ability to properly assemble or safely operate
the appliance.
4) When cooking, the appliance must be on a level, stable non-
combustible surface in an area clear of combustible material.
An asphalt surface (blacktop) may not be acceptable for this
purpose.
5) Do not leave the appliance unattended. Keep children and pets
away from the appliance at all times.
6) Do not place empty cooking vessel on the appliance while
in operation. Use caution when placing anything in cooking
vessel while the appliance is in operation.
7) Do not move the appliance when in use. Allow the cooking
vessel to cool to 115°F (45 °C) before moving or storing.
8) This appliance is not intended for and should never be used as
a heater.
9) This appliance will be hot during and after use. Use insulated
oven mitts or gloves for protection from hot surfaces or splatter
from cooking liquids.
10) Never use a cooking vessel larger than the capacity and
diameter recommended by the manufacturer (24cm).
11) This appliance is not for frying.
WARNING:
a. Do not store a spare LP-gas cylinder under or near this
appliance.
b. Never fill the cylinder beyond 80 percent full.
c. If the information in “(a)” and “(b)” is not followed exactly,
a fire causing death or serious injury may occur.

En-10
1-888-514-1663 | WWW.OUTLANDLIVING.COM
WARNING:
i. Do not use this appliance under overhead combustible
surfaces.
ii. For installation on (or over) a level, stable, non-combustible
surface only.
iii. Do not use this appliance on a slope ground.
iv. Do not use appliance on or under any apartment or
condominium balcony or deck.
v. This appliance shall be used only outdoors in a well-ventilated
space and shall not be used in a building, garage or any other
enclosed area.
vi. Never use this appliance as a heater.
vii. If this appliance is not in use, the gas must be turned off at the
supply cylinder.
viii. Always allow the appliance to cool down before covering with
an appliance cover.
ix. Indoor storage of this appliance is permissible only if the
cylinder is disconnected and removed from the appliance.
x. Cylinders must be stored outdoors in a well-ventilated area out
of the reach of children.
xi. Disconnected cylinders must have threaded valve plugs tightly
installed and must not be stored in a building, garage or any
other enclosed area.
xii. The gas pressure regulator provided with this appliance must
be used, and must be the same model as supplied with the unit.
xiii. Replacement parts and a list of such parts are available from
FMI Brands Inc. through the contact information provided on
the last page of this Manual.
WARNING:
Please ensure that all adults and children which use or are
near a unit in use are aware of the hazard of high-surface
temperatures present on the unit during use and should
use caution and stay away to avoid burns or clothing
ignition.
Carefully supervise young children in the area of this
appliance. Clothing or other flammable materials should
not be hung from the appliance or placed on or near the
appliance. Any guard or other protective device removed
for servicing the appliance must be replaced prior to
operating the appliance.
Installation and repair should be done by a qualified
service person. The appliance should be inspected before
use and at least annually by a qualified service person.
More frequent cleaning may be required as necessary.
It is imperative that control compartment, burners and
circulating air passageways of the appliance be kept clean.
LP CYLINDER
All LP cylinders to be used with this appliance must be:
a. Constructed and marked in accordance with the specifications
for LP-gas cylinders of the U.S. Department of Transportation
(DOT) or for Canada, Standard, CAN/CSA B339, Cylinders,
Spheres and Tubes for the Transportation of Dangerous
Goods.
b. Provided with a UL listed Overfill Protection Device (OPD).
This OPD safety feature is identified by a unique triangular
hand wheel. Use only LP Tanks equipped with this type of
valve.
c. Provided with a cylinder connection device compatible with
the connection for outdoor cooking appliances.
d. Only a 20 lb. (9 kg) LP gas cylinder is to be used for this
appliance, approximately 18” (46 cm) high & 12” (30 cm)
diameter.
e. LP cylinder must be arranged for vapour withdrawal and
include a collar to protect the LP cylinder valve. Always keep
LP cylinders in upright position during use, transit or storage.
SECTION 7:
OPERATIONAL SAFETY (continued)

D.210.000.V1
E n -11 OUTLAND LIVING - PRINCETON 2-BURNER STOVE OWNER & SAFETY MANUAL
SUMMERLAND
Owner & Safety Manual
PRINCETON
2 BURNER GAS STOVE
LEAK TEST
IMPORTANT: Leak testing should be done once per year or
whenever the LP gas cylinder or any other gas system part is taken
apart, serviced or replaced, whichever is more frequent.
WARNING:
DO NOT USE OR PERMIT SOURCES OF IGNITION IN THE
AREA WHILE DOING THE LEAK TEST.
THIS INCLUDES SMOKING.
LP Cylinder
Shut Off Valve
Nipple with
Excess Flow
Limiting Device
(EFV)
Cylinder Check
Valve with overfill
protection device
(OPD)
Regulator
Connection
Hand Wheel
Gas Hose
Gas Regulator
LP CYLINDER REMOVAL, TRANSPORT
AND STORAGE
• Turn OFF all control knobs and LP cylinder valve. Disconnect gas
regulator from cylinder. Install safety cap onto LP tank valve.
Always use cap and strap supplied with LP cylinder valve.
• A disconnected LP cylinder in storage or being transported
must have a safety cap installed. Failure to use safety cap as
directed may result in serious personal injury and/or property
damage.
• Place dust cap on cylinder valve outlet whenever the cylinder is
not in use. Only install the type of dust cap on the cylinder valve
outlet that is provided with the cylinder valve. Other types of
caps or plugs may result in leakage of propane.
• Do not store an LP tank in enclosed spaces such as a carport,
garage, porch, covered patio or other building. Never leave an
LP tank inside a vehicle which may become overheated by the
sun. Do not store an LP tank in an area where children play.
CONNECTION
1. Ensure the LP cylinder valve is CLOSED and the appliance gas
valve is “off”.
2. Securely attach regulator (large end of hose) to your propane
cylinder. Extend hose to full length and ensure that the propane
tank is as far as safely possible from the appliance.
a) Do not use tools. Hand tighten only.
b) Center the nipple in the cylinder valve and hold in place.
c) Using the other hand, turn the hand wheel clockwise until
there is a positive stop.
3. Leak Test all connections. See section labelled “Leak Test”.
WARNING:
The LP Hose is a trip hazard! Ensure that gas hose is placed in
an area where it is unlikely to be tripped over (such as pathways
or trails) or subject to other accidental damage.
GAS HOSE INSPECTION
Clean and inspect the hose before each use of the appliance.
Attention: If there is evidence of abrasion, wear, cuts or leaks,
the hose must be replaced prior to the appliance being put into
operation.
Only use a replacement hose by OUTLAND Living.
CAUTION:
When making the connection, hold the regulator in a straight
line with the cylinder valve, so as not to cross thread the
connection.
SECTION 7:
OPERATIONAL SAFETY (continued)

En-12
1-888-514-1663 | WWW.OUTLANDLIVING.COM
1. Ensure the LP cylinder valve is CLOSED and the appliance gas
valves are “OFF”.
2. Ensure all gas system coupling joints are tight and properly
attached.
3. Prepare a leak testing solution of half liquid detergent and half
water.
4. CAUTION: ***SLOWLY*** turn cylinder valve to the open
position to avoid tripping the excess flow safety device in the
gas regulator. For more information about the excess flow
safety device see SECTION 5 (page 7) (What is an Excess Flow
Safety Valve? (EFV).
5. Apply the solution to the LP gas delivery system at points as
shown in illustration:
a) If parts of the fitting begin to produce bubbles, spray liquid,
or if you smell liquid propane gas, immediately close the
valve on the tank.
b) Wait 5 minutes for any gas to dissipate.
c) After waiting for 5 minutes, the leak(s) must be stopped
by tightening the loose joints, if possible, or by replacing
the faulty parts(s) with the part(s) recommended by the
appliance manufacturer.
WARNING:
If the information in this manual is not followed exactly, a fire
or explosion may result causing property damage, personal
injury or loss of life.
SECTION 7:
OPERATIONAL SAFETY (continued)
Appliance
Valve
Coupling
Gas
Regulator
LP Cylinder
Coupling
d) If no adverse reaction is observed and the connections all
seem fine then move to the ignition sequence.
6. If the leak persists, ensure the cylinder valve is closed,
disconnect the regulator hose and take the unit to a certified
propane technician for consultation.
IMPORTANT: Call OUTLAND for quick delivery of replacement
parts. DO NOT RETURN THE APPLIANCE TO THE RETAILER.
THE APPLIANCE IS NOT TO BE USED UNTIL ANY LEAK IS
CORRECTED.
A gas appliance repairman or LP gas dealer should be called if
attempts to stop the leak(s) are unsuccessful and, in such case, the
LP gas supply must be shut off at the cylinder valve or the cylinder
must be removed from the appliance until the leak(s) is corrected.
LEAK TEST: Apply the solution
to the LP gas delivery system at
points:
1. Appliance Valve Coupling
2. Gas Regulator
3. LP Cylinder Coupling

D.210.000.V1
En-13 OUTLAND LIVING - PRINCETON 2-BURNER STOVE OWNER & SAFETY MANUAL
SUMMERLAND
Owner & Safety Manual
PRINCETON
2 BURNER GAS STOVE
WARNING:
Never perform inspections, cleaning or maintenance when
the appliance is hot! The stove must be cool and the LP
cylinder disconnected BEFORE any cleaning or inspection and
maintenance is performed.
SECTION 8: APPLIANCE MAINTENANCE
Your Outland appliance requires periodic maintenance to keep it in good running order. Follow the steps below to ensure your appliance
will provide you with the best possible performance:
1. Keep your appliance out of the rain and store it in a dry place.
2. If the appliance has been left out in the rain uncovered tilt the appliance to drain any water accumulated in the burners and/or burner
compartment prior to ignition.
3. Should any part of this appliance (including the burner) become soiled or dirty, wipe lightly with a damp cloth.
4. Ensure that you clean the top of your Outland appliance after every use to keep it looking GREAT.
5. Simply use warm soap water to wipe down your appliance to keep it clean.
6. Do not use flammable or corrosive cleaning products on or near this unit.
7. Do not use abrasive cleaners.
GUIDELINES
• Keep appliance area clear and free from combustible materials, gasoline and other flammable vapors and liquids.
• Do not obstruct the flow of combustion and ventilation air.
• Keep the ventilation opening(s) of the cylinder enclosure free and clear from debris.
• The stove must be cool and the LP cylinder disconnected BEFORE cleaning or inspection and maintenance is performed.
BURNER & ORIFICE INSPECTION
Visually inspect the cast aluminum burners prior to each use.
The burners are located in the stove inner compartment.
TO ACCESS AND CLEAN THE INTERIOR STOVE COMPARTMENT
1. Allow stove to cool.
2. Ensure all appliance valve(s) are off and the cylinder valve is closed.
3. Disconnect the gas cylinder.
4. Remove grill locking pins.
5. Lift grill.
6. Clean the stove inner compartment area.
7. Clean any plugged gas jet orifices with a small pin or paperclip.
8. Close the grill. Ensure the (2x) grill locking pins are fully seated.
WHEN CLOSING GRILL ENSURE BOTH 2X GRILL LOCKING PINS ARE FULLY SEATED.
THE BALL BEARING ENGAGEMENT SHOULD BE VISIBLE ON THE OTHER SIDE.
Locking Pin
Grill

En-14
1-888-514-1663 | WWW.OUTLANDLIVING.COM
1. Allow stove to cool.
2. Ensure all appliance valve(s) are OFF and the cylinder valve is closed.
3. Disconnect LP cylinder.
4. Remove grill locking pins.
5. Lift grill.
6. Locate and remove the burner mounting screws under stove (2x per burner).
7. Lift the burner(s) out.
8. Note the position of the air-fuel damper and spring position for reassembly when lifting
out the burner.
9. Use a flashlight to look inside the venturi tube. Use a long flexible pipe cleaner, or long
small utensil to clean out any debris or nest material. An air tool to blow out the burner
is helpful.
10. When the venturi is determined to be clear reassemble the burner, with the air-fuel
damper and spring in place. Note the brass gas valve orifice is to be aligned with
the round centre hole in the cast aluminum burner venturi port. Ensure the burner
mounting screws under the stove are firmly tightened.
11. Close the grill. Ensure both (2x) grill locking pins are fully seated.
SECTION 8: APPLIANCE MAINTENANCE (continued)
BURNER VENTURI INSPECTION
Inspect and clean the cast aluminum burner venturi tubes often and especially if the stove
has been sitting unused for a period of time.
To inspect and clean the burner venturi you must remove each cast aluminum burner
separately.
Damper Spring
Brass Gas
Valve Orifice
Air-Fuel
Damper
Adjust
Burner Orifices
Burner Venturi Tube
Burner (2x)
Burner mounting screws
(2x per burner)
WARNING: Small critters like spiders
and earwigs can quickly build nests
inside the burner venturi tube which
can obstruct gas flow and impact the
flame height and heat performance
of your appliance. More seriously, a
nest or blockage of the venturi tube
can cause a back flame event, damage
to your appliance, or even extreme
operator injuries!

D.210.000.V1
En-15 OUTLAND LIVING - PRINCETON 2-BURNER STOVE OWNER & SAFETY MANUAL
SUMMERLAND
Owner & Safety Manual
PRINCETON
2 BURNER GAS STOVE
FOR REPLACEMENT PARTS AND ACCESSORIES PLEASE VISIT
WWW.OUTLANDLIVING.COM
The owner’s manual is available as a free download from www.outlandliving.com
Should you have any questions or comments regarding this appliance, please do not hesitate to contact FMI Brands Inc. at (888) 514-1663 or
STOP:
Do not return this product to the store.
If you need help or parts, call the Outland Hotline: 1-888-514-1663
Get help for:
Missing/damaged parts • Assembly • Troubleshooting • Warranty Assistance • Product Information
1 YEAR LIMITED WARRANTY
Customers in Canada and USA
All components are warranted by the manufacturer for a period of 1 year after date of purchase by the original owner against defects
in materials and workmanship under normal use.
This warranty does NOT cover normal wear and weathering, assembly and/or maintenance OR use in a commercial application.
At FMI Brands’ sole discretion, products under warranty will be repaired and/or replaced at no charge to the customer.
Any returns sent back to FMI Brands must be sent via prepaid freight and in the original retail packaging.
Please register your OUTLAND Living product for proof of purchase and warranty at
https://outlandliving.com/register-products/
For more warranty information and details please contact FMI Brands Inc. at info@outlandliving.com
WARNING NOTES:
• Attention! The lids are not load bearing surfaces. Do not place
heavy objects! The lids may be damaged, or the stove may tip,
causing harm.
• NEVER SIT ON SIDE TABLES.
• The formulae for calculating fuel consumption (gas cooking
time) is as follows:
• Each burner is rated to a maximum of 30,000 BTU/h
• A full 20lb (9 kg) LP cylinder has approximately 430,000 BTU
capacity
• Y = QTY of burners in operation
• 430,000 BTU / Y(30,000 BTU/h) = gas cooking time (hrs)/
cylinder
e.g. If all (2x) burners are in continuous operation at
maximum output we would expect 7.16 hrs of cooking time.
Calculate: [430,000BTU/(2x30,000BTU/h) = 7.16hrs/20lb LP
cylinder]
• Note that fuel consumption (gas cooking time) can be extended
by operating fewer valves and/or operating the valves at lower
than maximum output.
• This appliance is NOT a toy.
• Children should be supervised at all times when using this unit
without exception.
• Do not place any objects inside the burner component.
• Remove any debris and leaves which may have accumulated in
your appliance before igniting.
• Solid fuels shall not be burned in this appliance. Do not add
wood or any other materials to the fire. It is designed to safely
combust propane only.
• Do not connect to a remote gas supply. Consult a certified gas
technician.
• Do not use this appliance if any part has been under water.
Immediately call a qualified service technician to inspect the
appliance and to replace any part of the control system and any
gas control which has been under water.
• Do not leave this appliance in the rain.
• Always inspect and clear all valve and gas orifices of any foreign
debris including spider webs prior to lighting.
Table of contents
Other FMI Stove manuals
Popular Stove manuals by other brands

United States Stove Company
United States Stove Company Logwood 1261 owner's manual

Blaze King
Blaze King PE1006 Operation & installation manual

Nordpeis
Nordpeis Q-24UL user manual

Zanussi
Zanussi ZEFSTV2001B user guide

MSR
MSR WINDBOILER instruction manual

HOMCOM
HOMCOM 820-193V70 Assembly & instruction manual

Timberwolf
Timberwolf TDS28 Installation and operation manual

Napoleon
Napoleon GS3500 - N Installation and operation instructions

Palazzetti
Palazzetti ECOFIRE MALU DESCRIPTION / CLEANING / TECHNICAL DATA

WANDERS
WANDERS WAN-2060F User guide and installation manual

Amerec
Amerec PKLE 181 Instructions for installation and use

Cadel
Cadel VEGA AIRTIGHT user manual