Focal Point VT-25UG16-1 User manual
©2013 Focal Point Fires plc.
All instructions must be handed to the user for
safekeeping.
Please note: Except where otherwise stated, all rights,
including copyright in the text, images and layout of this
booklet is owned by Focal Point Fires plc. You are not
permitted to copy or adapt any of the content without
the prior written permission of Focal Point Fires plc.
1
Revision A - 02/13
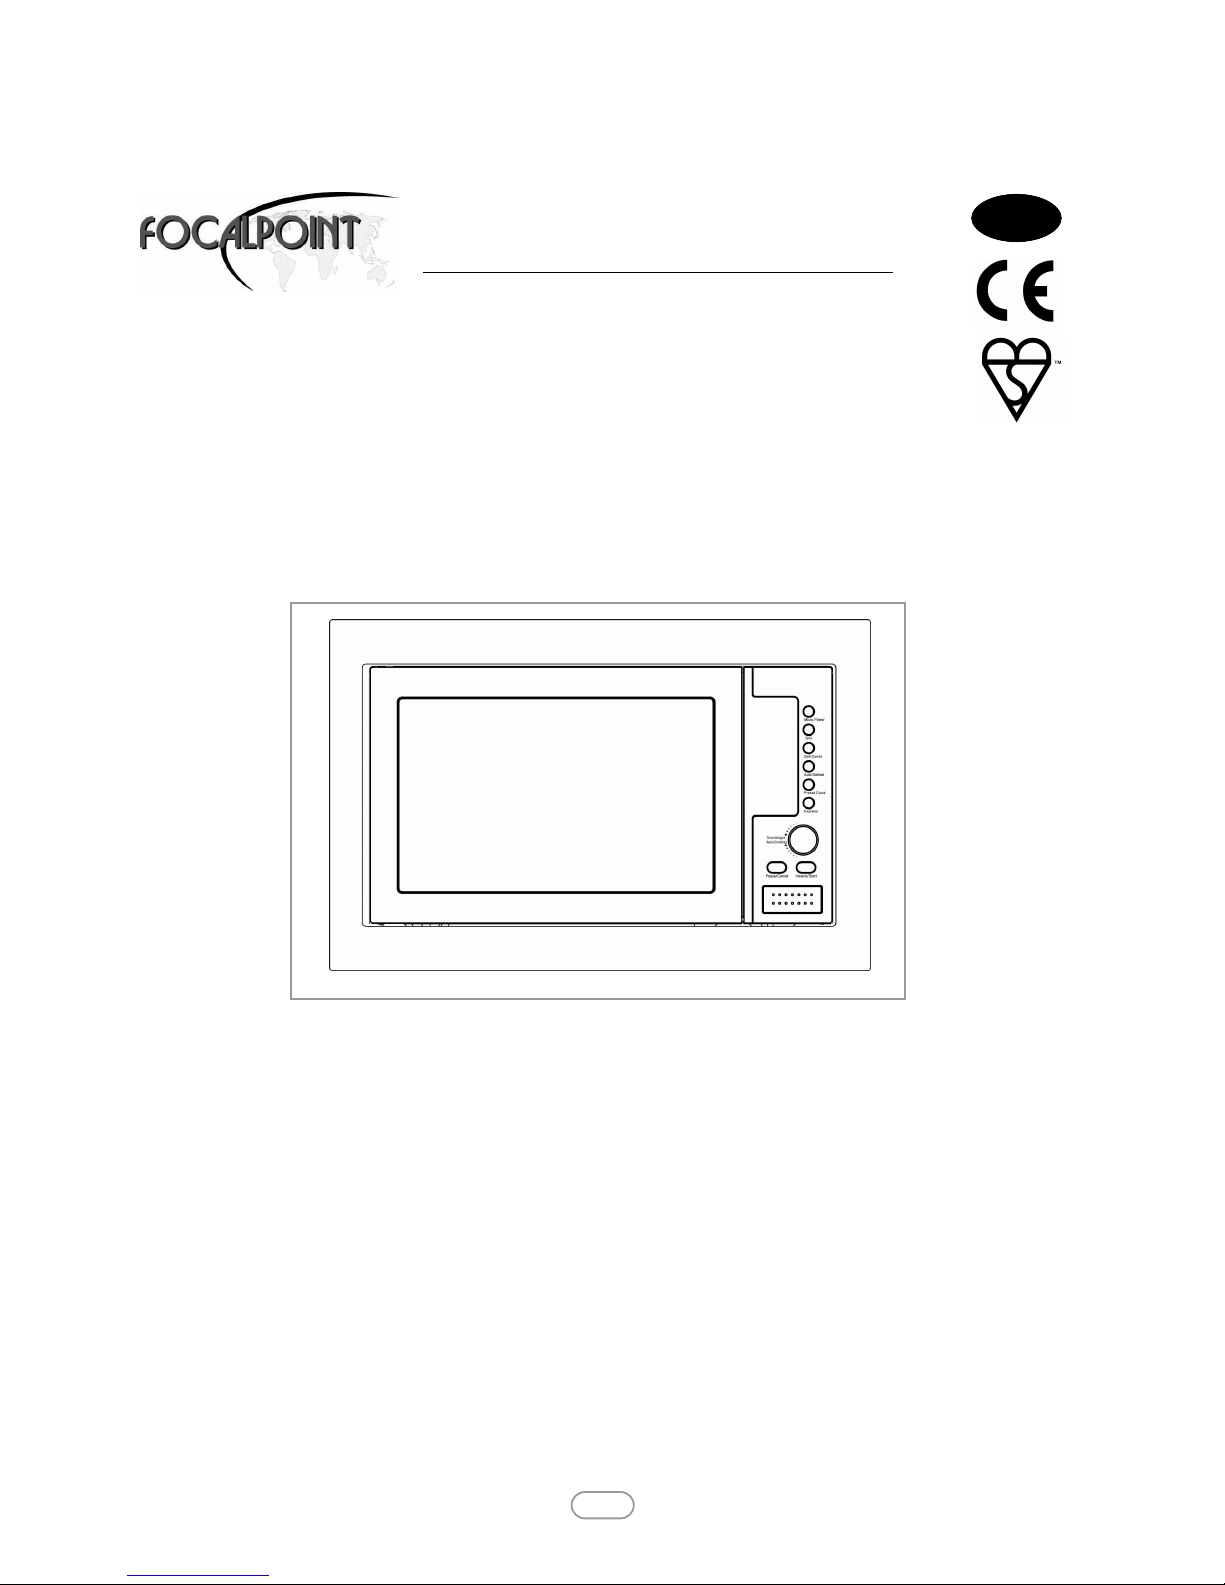
VT-25UG16-1
MICROWAVE OVE
Owner’s Instructions GB IE
BS7977-1 : 2009
KM579168
Focal Point Fires plc.
Christchurch, Dorset BH23 2BT
Tel: 01202 499330
Fax: 01202 499326
www.focalpointfires.co.uk
e : sales@focalpointfires.co.uk
MODELS COVERED BY THESE I STRUCTIO S
VT-25UG16-1 MICROWAVE OVE

Section Contents Page o.
1.0 Technical Information 2
2.0 Oven 3
2.1 Accessories 3
3.0 Control Panel 4
4.0 Safety Precautions 6
5.0 Installing Your Microwave 7
6.0 Troubleshooting 9
7.0 Cookware Guide 10
8.0 Cleaning Your Microwave 10
9.0 Wiring Information 10
I S T A L L A T I O I S T R U C T I O S
1.0 TECH ICAL I FORMATIO
Model VT-25UG1G-1
Power Source 220-240V/50Hz
Input Power
Microwave
Grill
1350W
1000W
Output Power 800W
Dimensions (WxHxD)
Outside
Oven cavity 509 x 320 x 385
348 x 222 x 336.5
Volume 25 litre
Weight
Net 15.2 g approx
©2013 Focal Point Fires plc.
2

otes:
1. Door interlock system ensures the oven can only be activated
when the door is properly closed.
2. Do not remove the wave guide cover during cleaning (see
fig.2).
3. Glass turntable turns to make sure food is heated evenly.
4. Grill rack is used to grill food.
5. LED will show the clock
time, cooking mode and left
operation time, which depends
on the set mode.
Depending on the model that you have purchased, you are supplied with several accessories that can be used in a variety of ways.
1. Coupler, already placed over the motor shaft in the base of the oven.
Purpose: The coupler rotates the turntable.
2. Roller ring, to be placed in the centre of the oven.
Purpose: The roller ring supports the turntable
3. Turntable, to be placed on the roller ring with the centre fitting to the coupler.
Purpose: The turntable serves as the main cooking surface; it can be easily removed for cleaning.
4. Grill rack, to be placed on the turntable.
Purpose: The grill rack serves as the grilling surface; it can be easily removed for cleaning.
2.0 OVE
©2013 Focal Point Fires plc.
3
GB IE
2.1 ACCESSORIES
WaveGuidecover(inside)Housing
Ovendoor
DoorinterlockOvencavityGlass
T
urntable
Grill Rack
Rotating AxisRotating Ring
LED Display
Control Panel
Wave Guide
Cover
Figure 1
Figure 2
Figure 3
Figure 4
Figure 4
Figure 5

1. Before cooking
The LED panel flashes 3 times when plugged into a power supply. You will then see a “ : “
flashing, prompting you to input the cooking menu and time.
2. Time. Weight/Auto Cooking Knob
You can select auto cooking menu, increase or decrease cooking time and weight during
operation by turning Time. Weight/Auto Cooking knob.
3. Pause/Cancel
At the initial stage: press Pause/Cancel button once to cancel input programmes and
resume initial stage. During cooking: press Pause/Cancel button once to stop oven
operation and twice to cancel cooking programmes.
4. Clock setting (24 hours)
5. Auto reminder
When your preset cooking procedure has finished, the LED display will show “End” and then
three beeps sound to prompt you to take out the food. If you do not press Pause/Cancel
or open the door then the three beeps will sound at an interval of 3 minutes.
6. Child lock function
Use this feature to lock the control panel when you are cleaning or so that children cannot
use the microwave unsupervised. You will not be able to use the buttons in this
mode. To set the child lock, press and hold Pause/Cancel button for about 3 seconds until
the LED display shows a key symbol. To cancel the child lock, press and hold Pause/Cancel
button for about 3 seconds until the key symbol disappears.
7. Microwave cooking
Press Micro Power button, LED display shows P100-P80-P60-P40-P20
P100-- High power, 100% microwave power. For quick
and thorough cooking, such as meat and vegetables.
P80-- Medium High power, 80% microwave power. For
medium express cooking, such as eggs, fish, rice and
soup.
P60-- Medium power, 60% microwave power. For
steaming foods.
P40-- Medium low power, 40% microwave power. For
defrosting foods.
P20-- low power, 40% microwave power. For keeping
foods warm.
Please note:
1) The max time which can be set is 60 minutes.
2) Never use the grill rack during microwave cooking.
3) Never operate the oven empty.
4) If you turn the food during operation, press the Instant/Start button once and the preset cooking procedure will continue.
5) If you intend to remove the food before the preset time, you must press Press/Cancel button once to clear the preset procedure to avoid
unintended operation of the next time use.
3.0 CO TROL PA EL GB IE
Figure 6
©2013 Focal Point Fires plc.
4

8. Express
Press Express button, the LED display to shows 0:30--1:00--1:30.
This function will allow you to heat liquids easily. Choose the proper time
depending the volume of the liquid.
0:30 --- default 30 seconds
1:00 --- defualt 1 minute operation time
1:30 --- default time is 1 and 30 seconds.
9. Grill
Press Grill button to select the light grill mode, which is for grilling meat
such as sausages, steak & chicken.
Please note: It is not necessary to preheat when using the grill function.
10. Grill combi
Press Grill combi button to select either the Grill combi 1 - Grill
combi 2 or Grill combi 3
Grill combi 1---30% microwave cooking time while 70% grilling time.
Grill combi 2---55% microwave cooking time while 45% grilling time.
Grill combi 3---70% microwave cooking time while 30% grilling time.
Warning
In the Grill combi mode, the microwave as well as the grill rack and
cooking containers will become very hot. Caution when removing any item
from the microwave oven. Use pot holders or oven mitts to prevent burns.
11. Auto Defrost
Press Auto defrost button, the LED display shows D.1-D.2-D.3
D.1 For defrosting poultry between 0.2 g to 3.0 g.
D.2 For defrosting meat between 0.1 g to 2.0 g.
D.3 For defrosting seafood between 0.1 g to 0.9 g.
1. It is necessary to turn over the food during defrosting, to ensure it
defrosts evenly.
2. Defrosting food usually takes longer the cooking foods.
©2013 Focal Point Fires plc.
5
3.0 CO TROL PA EL - CO TI UED GB IE
12. Auto cooking
The oven has a default cooking menu for simple operation. When the LED
display flashes with a colon turn the Time.Weight/Auto Cooking
knob, LED cycles to show AC-1, AC-2, AC-3...AC-8. Choose the menu
according to the food type and weight of food.
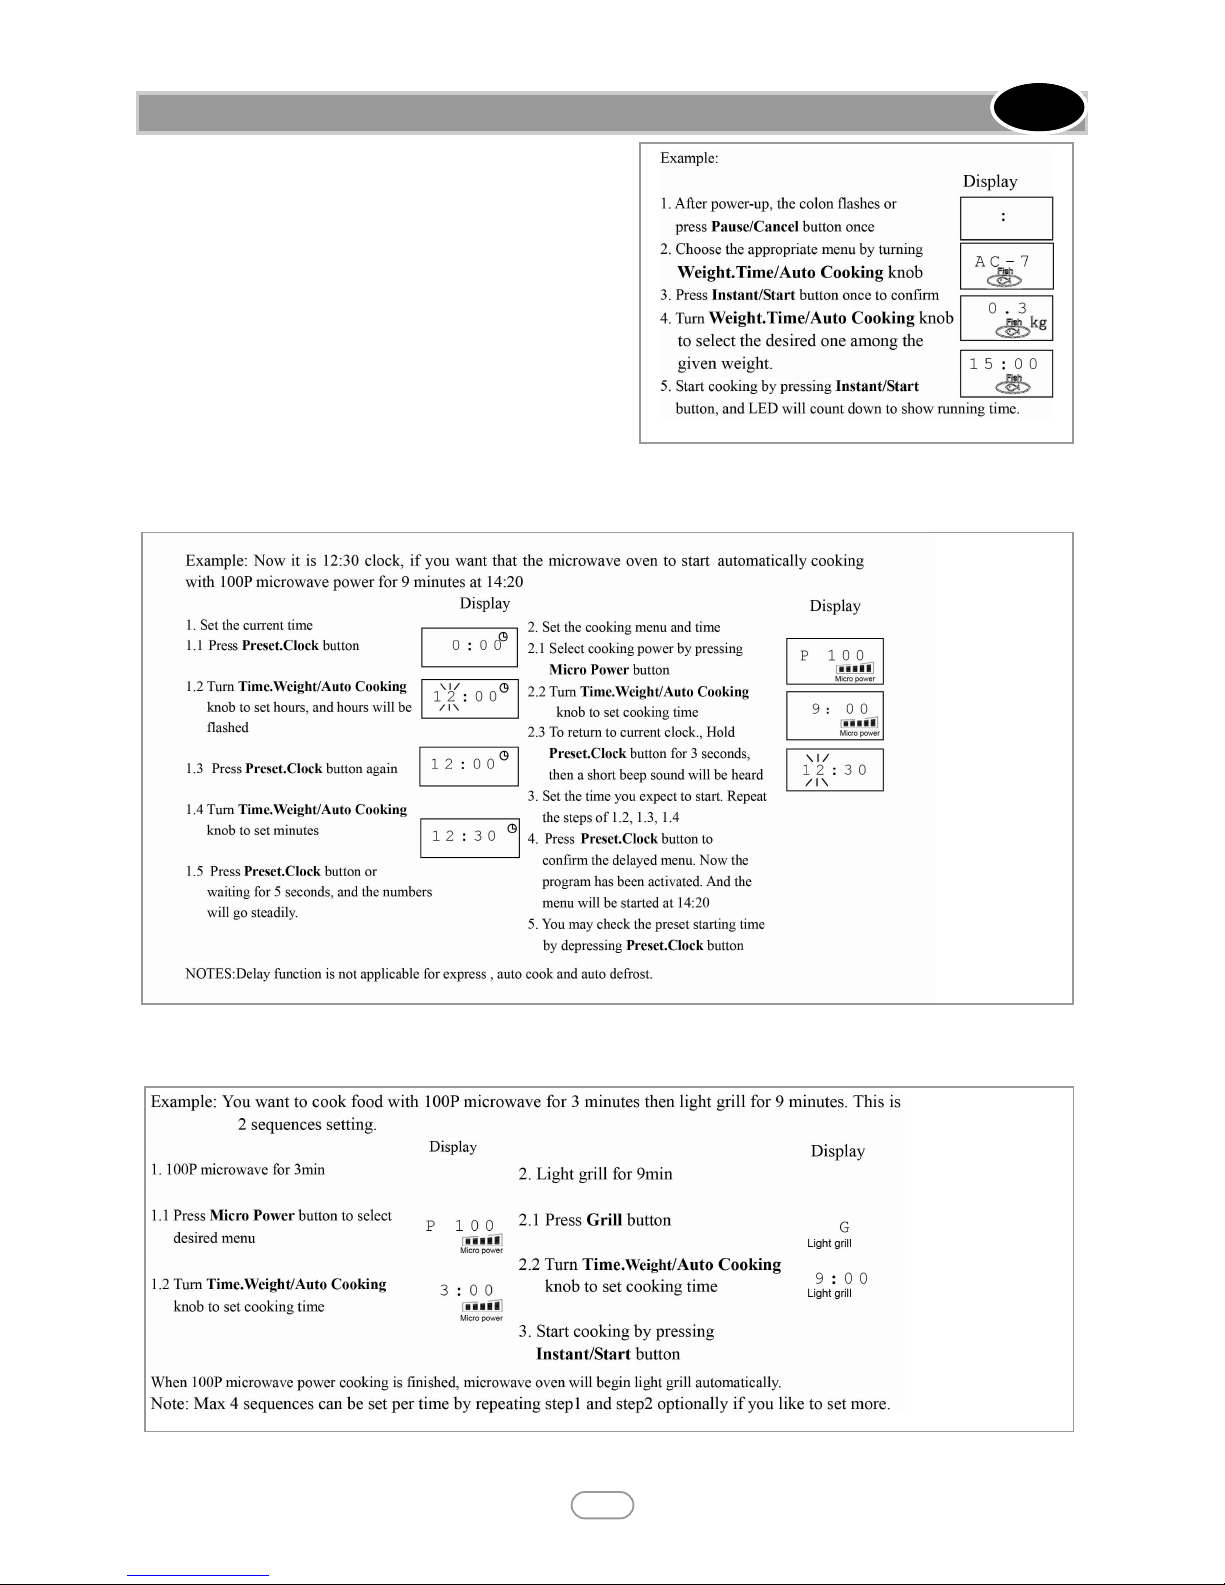
13. Automatic starting (delay function)
If you do not want the menu be started immediately, you can preset the cooking menu and time and the preset menu will be automatically
started at your set time.
14. Multi-sequence cooking
To obtain best cooking result, some recipes need to different amounts of time to cook.
©2013 Focal Point Fires plc.
6
3.0 CO TROL PA EL - CO TI UED GB IE

Important Safety Instructions.
Please read carefully and keep for future reference.
Before cooking food or liquids in your microwave oven, please check that the following safety precautions are taken.
1. DO NOT use any metallic cookware in the microwave oven:
Metallic containers•
Dinnerware with gold or silver trimmings•
Skewers, forks, etc•
Reason: Electric arcing or sparking may occur and may damage the oven.
2. DO NOT heat:
Airtight or vacuum-sealed bottles, jars, containers, excludes baby food jars•
Airtight food, excludes eggs, nuts in shells and tomatoes•
Reason: The increase in the pressure may cause them to explode
Tips: Remove lids and pierce skins, bags etc.
3. DO NOT operate the microwave oven when its empty.
Reason: The walls may be damaged
Tips: Leave a glass of water inside the oven at all times. The water will absorb the microwaves if you accidentally set the oven going when it is
empty.
4. DO NOT cover the rear ventilation slots with cloth or paper.
Reason: The cloth or paper may catch fire as hot air is evacuated from the oven.
5. ALWAYS use oven gloves when removing a dish from the oven.
Reason: Some dishes absorb microwaves and heat is always transferred from the food to the dish. The dishes are therfore hot.
6. DO NOT touch heating elements or interior oven walls.
Reason: These walls may be hot enough to burn even after cooking has finished, even though they do not appear to be so. Do not allow
inflammable materials to come into contact with any interior area of the oven. Let the oven cool down first.
7. To reduce the risk of the fire in the oven cavity.
Do not store flammable materials in the oven.•
Remove wire twist ties from paper or plastic bags•
Do not use your microwave oven to dry newspapers•
If smoke is observed, keep the oven door closed and switch off or disconnect the oven from the power supply.•
8. Take particular care when heating liquids and baby foods.
ALWAYS allow a standing time of at least 20 seconds after the oven has been switched off so that the temperature can equalize.•
Stir during heating, if necessary, and ALWAYS stir after heating.•
Take care when handling the container after heating. You may burn yourself if the container is too hot. •
A risk of delayed eruptive boiling exists.•
To prevent delayed boiling and possible scalding, you should put a plastic spoon or glass stick into the beverages and stir before, during•
and after heating.
Reason: During the heating of liquids the boiling point can be delayed; this means that eruptive boiling can start after the container is
removed from the oven. You may scald yourself.
* Immerse the scalded area in cold water for at least 10 minutes
* Cover with a clean, dry dressing
* Do not apply any creams, oils or lotions.
NEVER fill the container to the top and choose a container that is wider at the top than at the bottom to prevent the liquid from boiling
over. Bottles with narrow necks may also explode if overheated.
ALWAYS check the temperature of the baby foods or milk before giving it to a baby.
4.0 SAFETY PRECAUTIO S GB IE
©2013 Focal Point Fires plc.
6

9. Be careful not to damage the power cable.
Do not immerse the power cable or plug in water and keep the power cable away from heated surfaces.•
Do not operate this appliance if it has a damaged power cable or plug.•
10. Stand at arm’s length from the oven when opening the door.
Reason: The hot air or steam released may cause scalding.
11. eep the inside of the oven clean.
Reason: Food particles or spattered oils stuck to the oven walls or floor can cause paint damage and reduce the efficiency of the oven.
Important Safety Instructions
During cooking, you should look into the oven from time to time when food is being heated or cooked in disposable containers of plastic,
paper or other combustible materials.
Important
Young children should NEVER be allowed to use or play with the microwave oven. Nor should they be left unattended near the microwave
oven when it is in use. Items of interest to children should not be stored or hidden just above the oven.
1) The position of the oven shall be such that it is far from the TV, Radio or arial as picture disturbance or noise may occur.
2) The appliance must be positioned so that the plug is accessible.
3) This appliance is designed to be integrated into a ventilated cabinet to the following specification.
Minimum cabinet depth of 550mm•
Cabinet microwave shelf be between 18 and 20mm.•
Installation
a) Fix top air guide onto outer microwave housing and secure outer baffle with
self locking screws. As shown in figure 7.
b) Secure fixing brackets onto each side of the microwave housing. As shown in
figure 8.
4.0 SAFETY PRECAUTIO S - CO TI UED GB IE
5.0 I STALLI G YOUR MICROWAVE
Top air guide
Outer-back baffle
Self-lock screw M4X10(6PCS)
Self locking screws
M4X10 (12PCS)
Fixing bracket
Figure 7
Figure 8
©2013 Focal Point Fires plc.
7

c) Place the microwave into the cabinet cavity and secure the microwave in
place with wood screws. As shown in figure 9.
d) Secure the decorative frame into the fixing brackets, which have already been
fixed in place on the microwave. As shown in figure 10.
e) Integrated microwave installation completed.
©2013 Focal Point Fires plc.
8
5.0 I STALLI G YOUR MICROWAVE - CO TI UED GB IE
Cabinet
Exhaust Port
Wood screws
ST4X12
(8PCS)
Intake
Figure 9
The side with gap should be
installed at the bottom of
the microwave
Decrorative frame
Figure 10
Figure 11

c) Cabinet airflow chart. As shown in figure 12.
If you have any of the problems listed below try the solutions given
This is normal.
Condensation inside the oven•
Light reflection around the door and outer casting•
Steam escaping from around the door or vents.•
The food is not cooked at all.
Have you set the timer correctly?•
Is the door closed?•
Have you overloaded the electric circuit and caused a fuse to blow or a breaker to be triggered?•
The food is either overcooked or undercooked.
Was the appropriate cooking length set for the type of food?•
Was an appropriate power level chosen?•
Sparking and cracking occur inside the oven (arcing).
Have you used a dish with metal trimmings?•
Have you left a fork or other metal utensils inside the oven?•
Is aluminium foil too close to the inside walls?•
The oven causes interference with radios or televisions.
Slight interference may be observed on televisions or radios when the oven is operating. This is normal. To solve this problem, install the•
microwave away from televisions, radios and aerials.
©2013 Focal Point Fires plc.
9
5.0 I STALLI G YOUR MICROWAVE - CO TI UED GB IE
Net DepthıPP
Exhaust port
Intake
Figure 12
6.0 TROUBLESHOOTI G
It is strongly recommended to use containers which are suitable and safe for use in microwaves. Containers which are made of heat-resistant
ceramic, glass or plastic and are suitable for microwave cooking. Never use metal containers as this can cause arcing and sparking.
Cleaning the microwave
The following parts of your microwave oven should be cleaned regularly to prevent grease and food particles from building
up:
Inside and outside surfaces•
Door and door seals •
Turntable and roller rings•
Always ensure that the door seals are clean and the door closes properly.
1. Clean the outside surfaces with a soft cloth and warm, soapy water. Rinse and dry.
2. Remove any splashes or stains on the inside surfaces or on the roller ring with a soapy cloth. Rinse and dry.
3. To loosen hardened food particles and remove smells, place a cup of diluted lemon juice on the glass turntable and heat for ten minutes at
maximum power.
DO OT spill water in the vents. EVER use any abrasive products or chemical solvents. Take particular care when cleaning the door seals
to ensure that no particles:
Accumulate•
Prevent the door from closing correctly•
IMPORTA T OTE:
The mains lead on this equipment is supplied with a moulded plug incorporating a fuse.
The value of the fuse is indicated on the pin face of the plug and, if it requires replacing, a fuse approved to BS1363 of the same rating must
be used. Never use the plug with the fuse cover omitted if the cover is detachable. If a replacement fuse cover is required, it must be of the
same colour as the pin face of the plug.
Warning this appliance must be earthed:
This appliance must be earthed. In event of an electrical short circuit, earthing reduces the risk of the an electric shock providing an escape
wire for the electrical current.
©2013 Focal Point Fires plc.
10
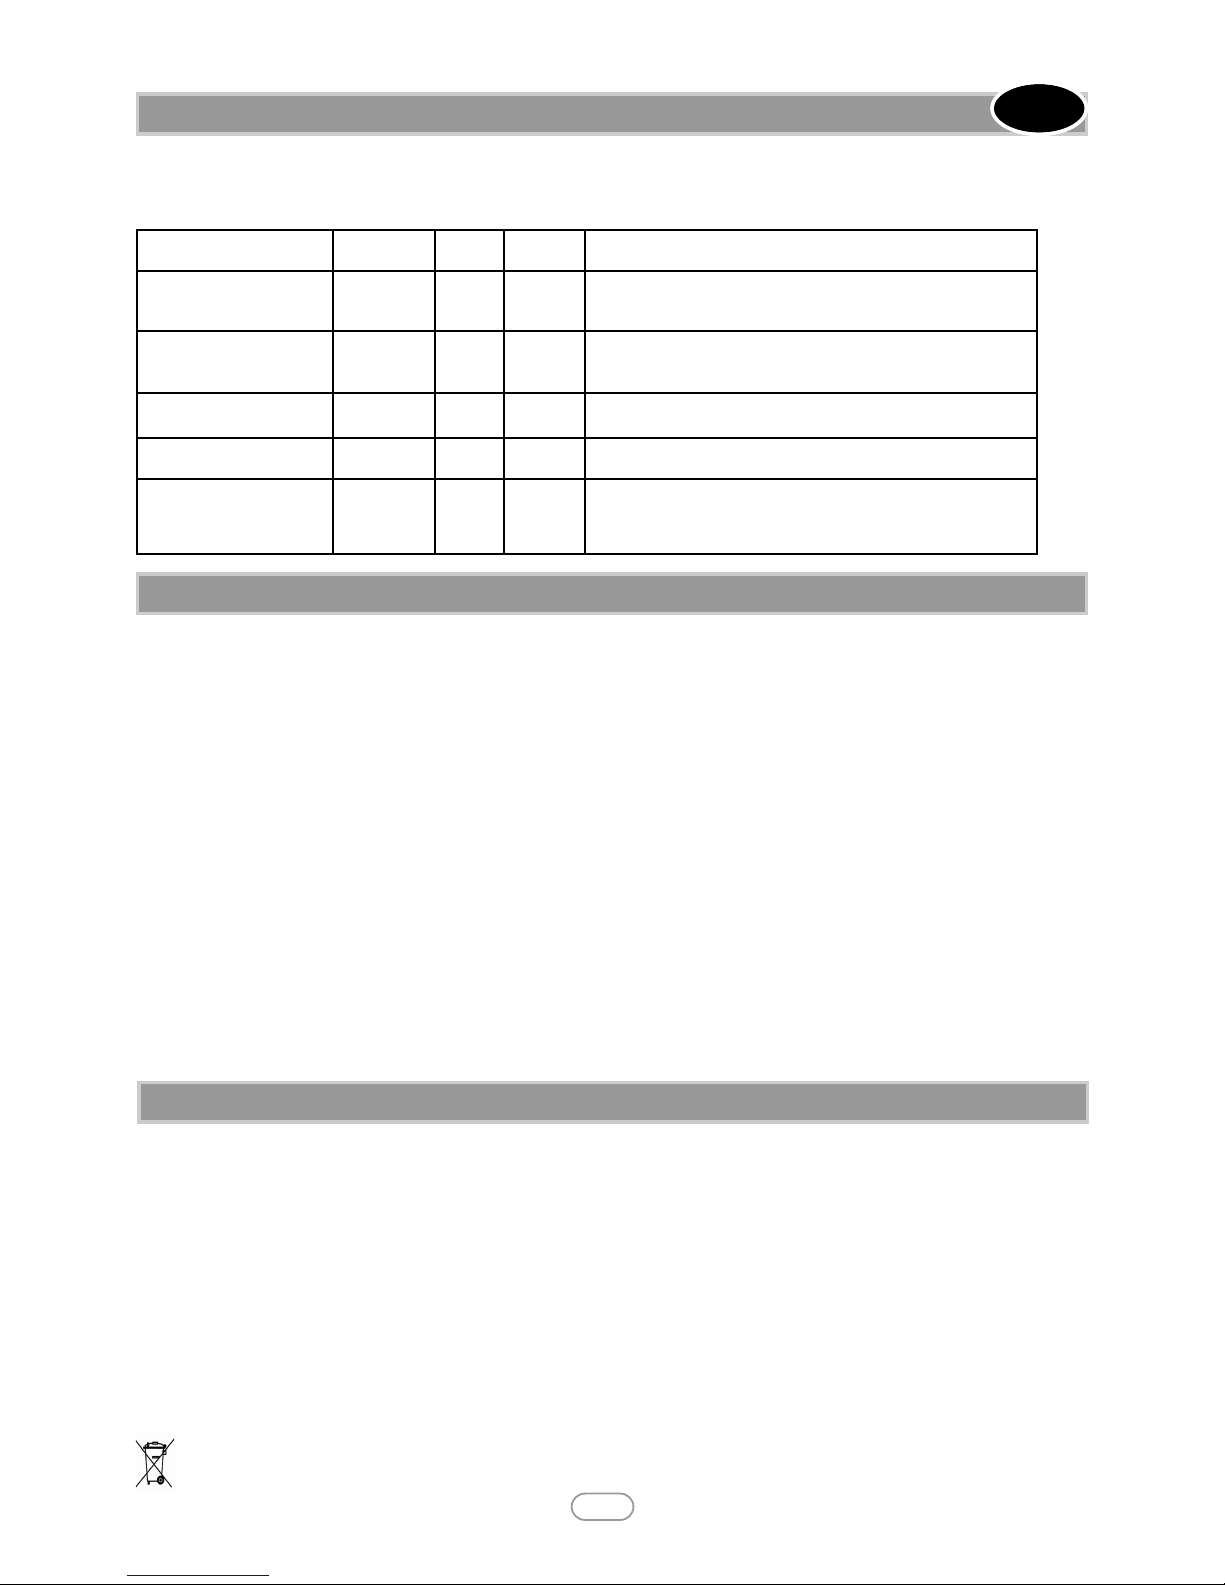
7.0 COOKWARE GUIDE GB IE
Material of container Microwave Grill Combi otes
Heat-resistant ceramic Yes No No Never use the ceramics which are decorated with a metal
rim or glaze
Heat-resistant plastic Yes No No Can not be used in the microwave for long periods of
cooking time
Heat-resistant glass No Yes Yes
Grill rack No Yes Yes
Plastic film Yes No No It should not be used when cooking meat as the
temperature may cause damage to the film
8.0 CLEA I G YOUR MICROWAVE
9.0 WIRI G I FORMATIO
Waste electrical products should not be disposed of with household waste. Please recycle where facilities exist. Check with your local authority or retailer for recycling advice.
As our policy is one of continuous improvement and development, we therefore hope that you will understand we must retain the right to amend details and/or specifications without prior notice.
Table of contents
Other Focal Point Microwave Oven manuals


