Focusrite Audio Engineering Novation Launchkey Mini User manual

1
2
Novation
A division of Focusrite Audio Engineering Ltd.
Windsor House
Turnpike Road
Cressex Business Park
High Wycombe
Buckinghamshire
HP12 3FX
United Kingdom
Tel: +44 1494 462246
Fax: +44 1494 459920
Web: http://www.novationmusic.com
Trade marks
The Novation trade mark is owned by Focusrite Audio Engineering Ltd. All other brand,product and company names
and any other registered names or trade marks mentioned in this manual belong to their respective owners.
Disclaimer
Novation has taken all possible steps to ensure that the information given here is both correct and complete. In no
event can Novation accept any liability or responsibility for any loss or damage to the owner of the equipment, any
third party, or any equipment which may result from use of this manual or the equipment which it describes. The infor-
mation provided in this document may be modified at any time without prior warning. Specifications and appearance
may differ from those listed and illustrated.
COPYRIGHT AND LEGAL NOTICES
Novation is a registered trade mark of Focusrite Audio Engineering Limited. Launchkey Mini is a trade mark of Focus-
rite Audio Engineering Plc.
2019 © Focusrite Audio Engineering Limited. All rights reserved.

32
Contents
Introduction Page 4
●Key Features
●What’s in the box
●Getting started with your Launchkey Mini [MK3]
●Getting Connected
●Launchkey Mini Setup examples
●Hardware Overview
●Rear view
●Top Panel
Using the Launchkey Mini [MK3] Page 10
Working with Ableton Live
●Installation
●Setup
●Session Mode
●Launching Clips
●Launching Scenes
●Stop, Solo, Mute
●Record/Capture MIDI
●Playing and recording drums
●Using Ableton Live’s Mixer
●Volume and Pan
●Sends
●Device
Arp Page 21
●Arpeggiator Rotary Knobs
●Tempo
●Swing
●Gate
●Mutate
●Deviate
●Arp Modes
●Arp Rates
●Arp Octaves
●Arp Rhythms
●Arp Latch
●Arp Pads
Fixed Chord Page 25
Custom Modes and Components Page 26
●Setting up Custom Modes
Working with Apple Logic Pro X Page 27
Working with Reason 10 Page 31
Working with HUI Page 32
(Pro Tools, Cubase)
Vegas mode Page 35

4
Introduction
The Launchkey Mini [MK3] is Novation’s most portable MIDI keyboard controller. Though compact
in size, Launchkey Mini is packed with powerful features and a streamlined workflow that will
elevate your music production and performance.
Launchkey Mini integrates perfectly with Ableton Live (and other DAWs) for both production and
performance. You can navigate and control Live’s Session View, play and record clips, adjust
effects and much more without ever looking at your computer. Additionally, we provide you with a
license for Ableton Live Lite should you need one.
Launchkey Mini features a creative arpeggiator (‘Arp’), as well as ‘Fixed Chord’ mode – both of
which make finding new musical ideas easier. Launchkey Mini’s pads bring your Ableton Session
to your fingertips in full RGB colour, so you know exactly which clips you’re launching. Finally, you
can make Launchkey Mini the perfect controller for your studio or on the go with Custom modes,
where you can customise knobs and pads using Novation Components.
The Launchkey Mini also features a standard TRS MIDI Out 3.5mm jack for connecting to your
hardware synths and drum machines. This means you can use many of the Launchkey Mini’s
functions without a computer!
If you need any support please contact us at support.novationmusic.com.
Key Features
● Ableton Live integration – Launch clips and scenes, control Live’s mixer, play instruments
and Drum Racks, capture MIDI, and more
● Integration with other DAWs (Apple Logic Pro X, Propellerhead’s Reason, etc. and HUI)
● Connect to your hardware with a standard TRS MIDI Out 3.5mm jack
● 25 velocity-sensitive mini-keys
● 16 velocity-sensitive RGB pads
● 8 rotary knobs
● Powerful and creative Arpeggiator for generating ideas quickly
● Fixed Chord mode
● Play and Record transport control
● Custom modes for user-defined mappings of knobs and pads
What’s in the box
● Launchkey Mini
● USB Type-A to B cable (1.5 meters)
● Safety Instructions
* TRS MIDI Out 3.5mm to MIDI DIN converters are available for purchase at
https://novationmusic.com.
54
Getting started with your Launchkey Mini [MK3]
We’ve made getting up and running with Launchkey Mini as easy as possible, whether you’re a
brand new beatmaker or a seasoned producer. Our ‘Easy Start Tool’ provides a step-by-step guide
on getting set up that is tailored to your needs.
We’ll give you exactly what you need, whether you’ve never made music before, or if you just want
to download your included software.
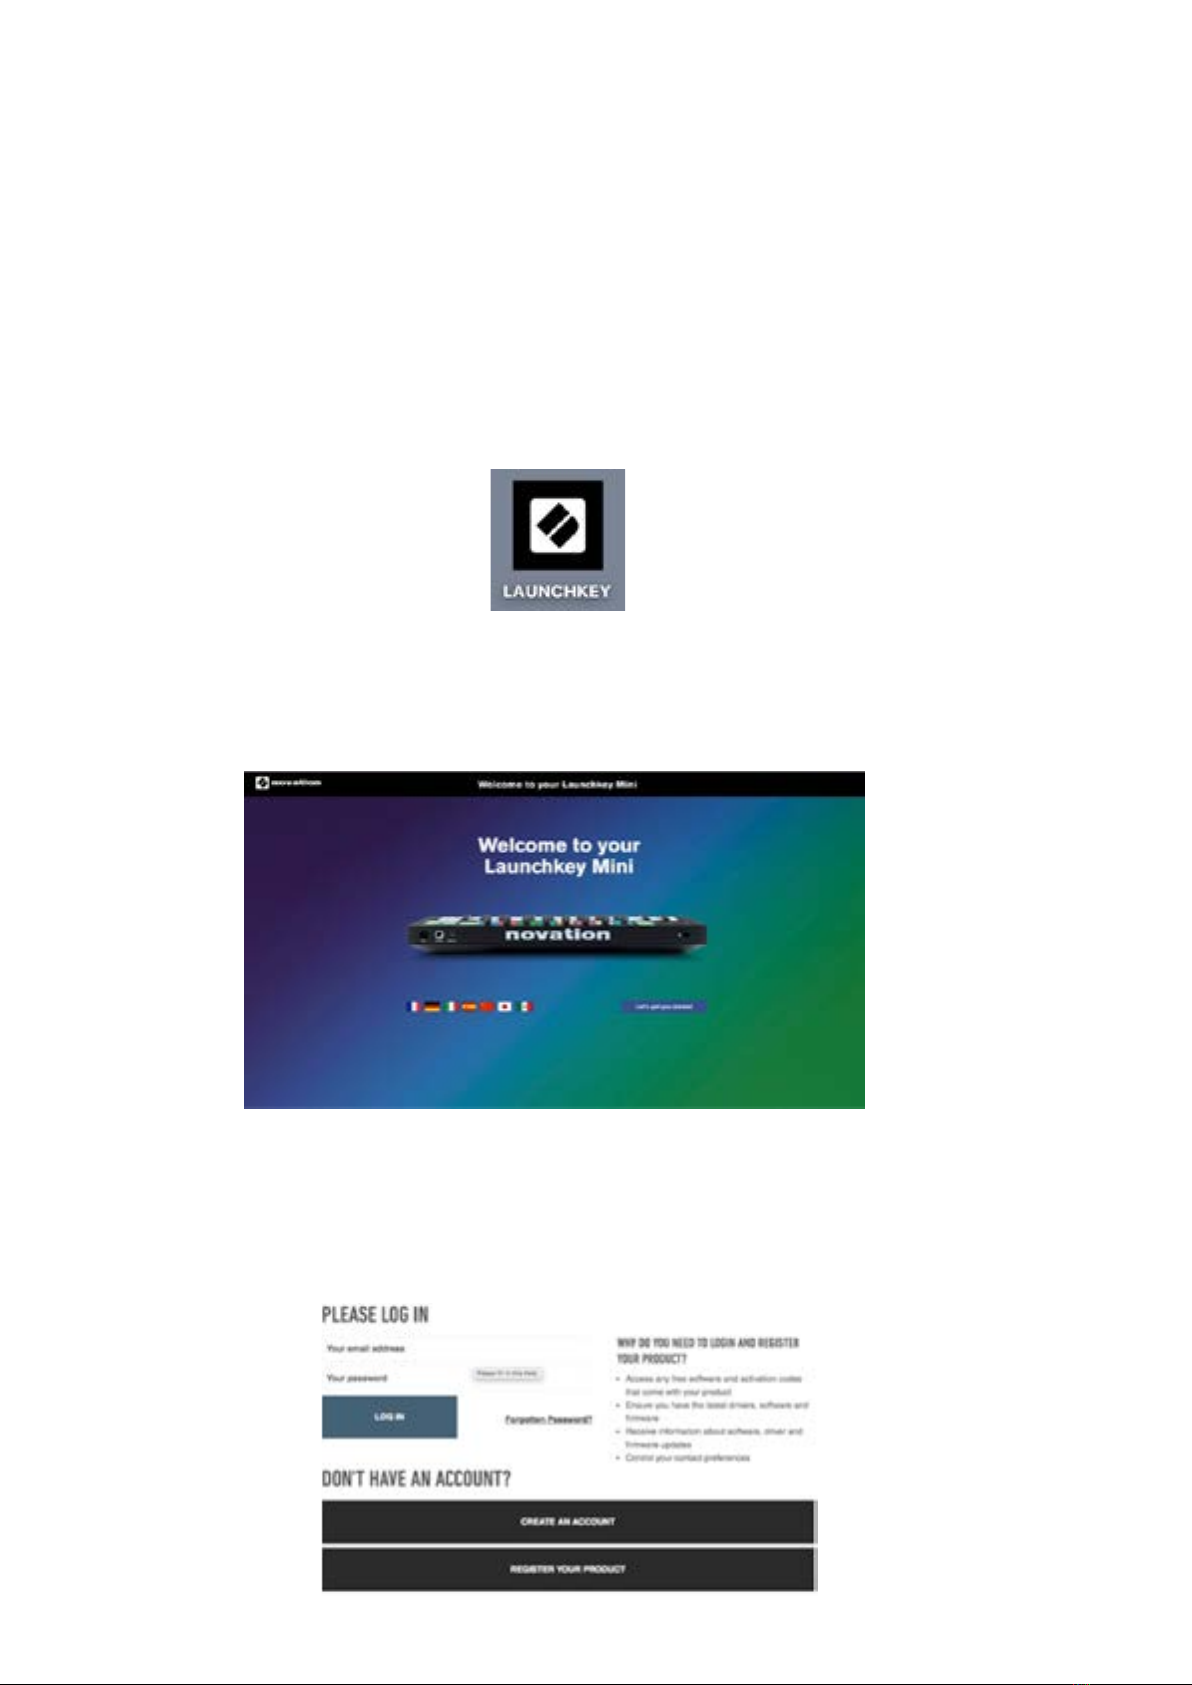
When connecting Launchkey Mini to your computer, it will appear as a ‘Mass Storage Device’, just
like a USB drive. Open this up and click the link ‘Click Here to Get Started.url’.
This will open our online Easy Start Tool, which will get you up and running, or take you straight to
your included software – you choose!
Mass Storage Device icon
As part of this process, you may register your Launchkey Mini [MK3] to get access to your
included software. We give you everything you need to start making tracks.
Easy to Start Tool Welcome page
Alternatively, you can also register your Launchkey Mini by going to
https://customer.novationmusic.com/register (pictured below). You'll then need to make an account
and enter the serial of your Launchkey, which will give you access to the bundled software.

6
Getting Connected
Connecting to a Computer
The Launchkey Mini is bus-powered, meaning it turns on as soon as you connect it to your
computer with a USB cable.
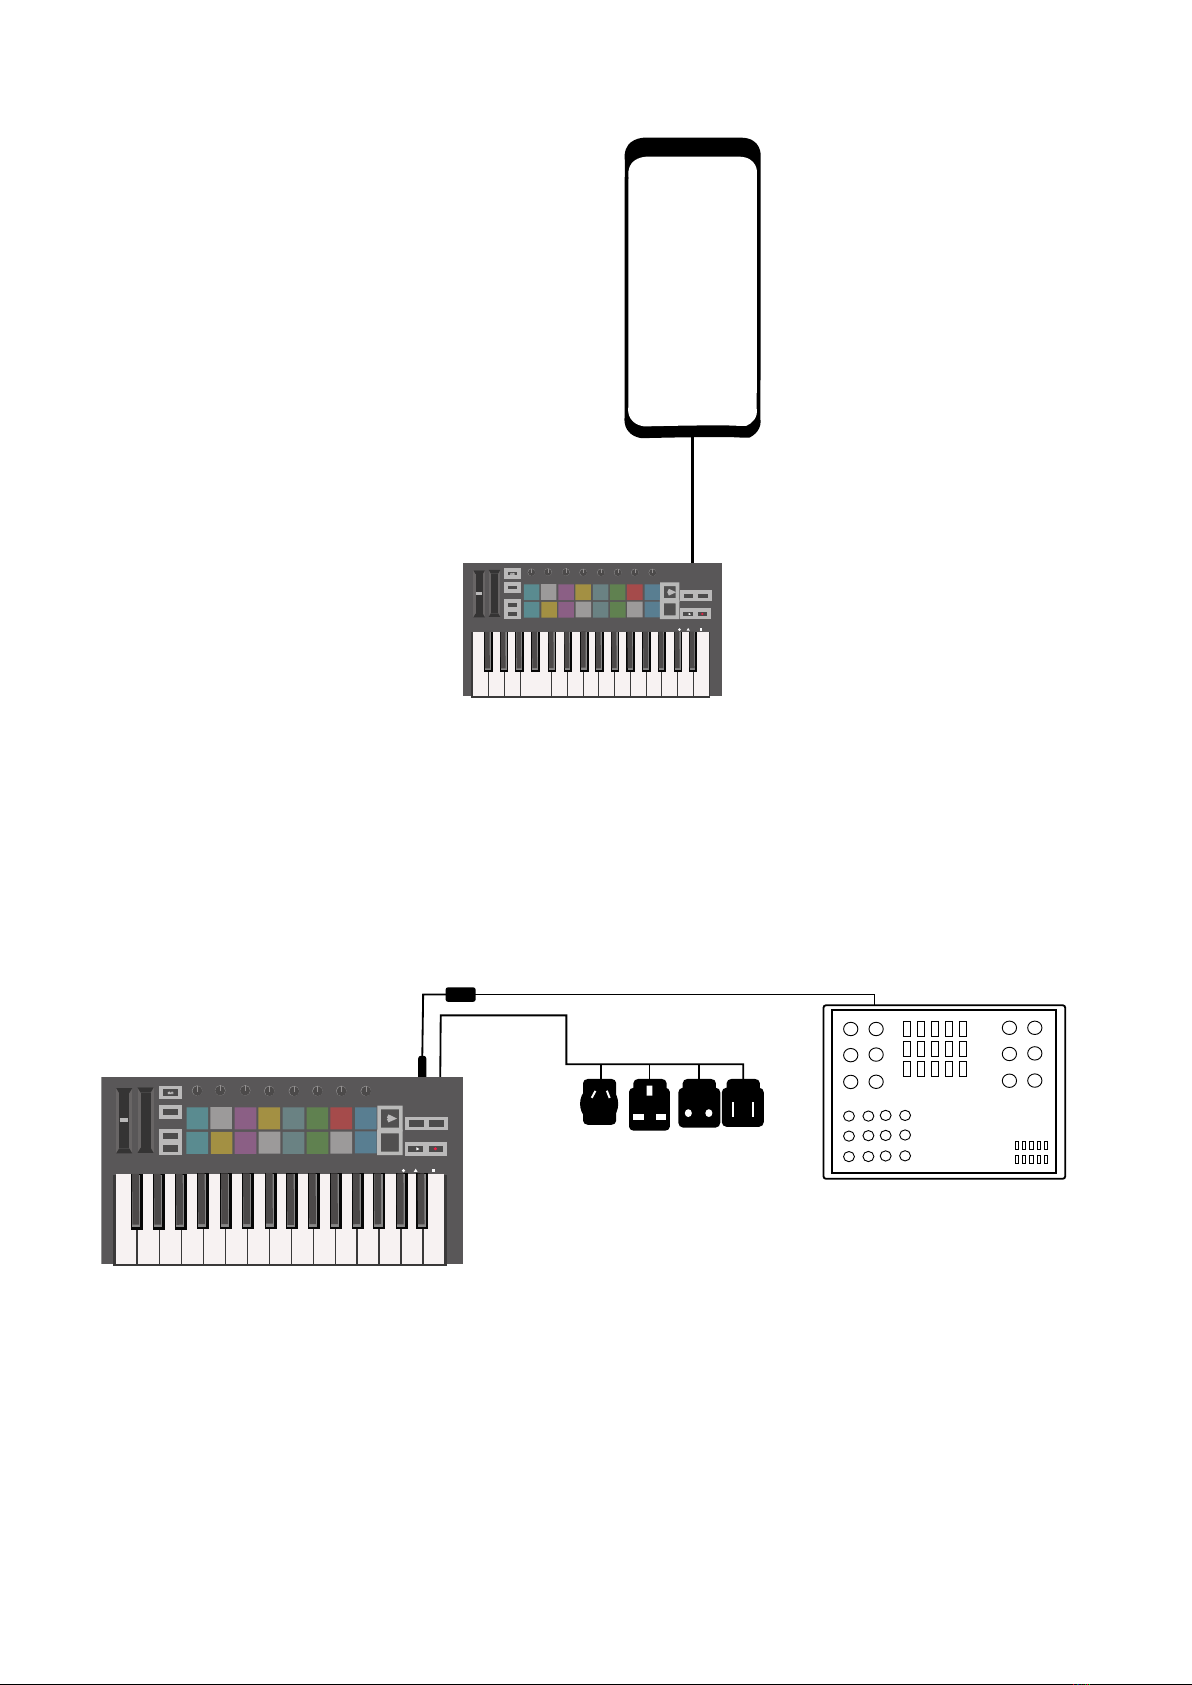
Connecting to Mobile devices
iOS
To operate the Launchkey Mini with an iOS device, use Apple’s Lightning to USB 3 Camera
Adapter with a separate Lightning charger.
Stop
Solo
Mute
Arp Fixed
Chord
Transpose
Shift
Pitch Modulation
Arp
Tempo Swing Gate Mutate
Channel
Octave
ProgramChange
Session Drum Custom Device
Arp Mode
Up Down Up/Down Played Random Chord Mutate
Rate Octave
1/4 1/8 1/16 1/32 Triplet 1 2 3 4 o oxo oxxo
Rhythm Latch
Deviate
Volume Pan Sends Custom
Random Deviate On/Off
Track
CaptureMIDI
+
-
ios
Stop
Solo
Mute
Arp Fixed
Chord
Transpose
Shift
Pitch
Modulation
Arp
Tempo
Swing
Gate Mutate
Channel
Octave
ProgramChange
Session
Drum
Custom Device
Arp Mode
Up Down
Up/Down Played Random Chord
Mutate
Rate
Octave
1/4 1/8
1/16 1/32
Triplet 1 2 3 4 o oxo oxxo
Rhythm Latch
Deviate
Volume Pan Sends Custom
Random Deviate On/Off
Track
CaptureMIDI
+
-
76
Android
To operate the Launchkey Mini with an Android device we recommend a USB OTG
to USB adapter.
Using as a standalone MIDI controller
If you want to use the 3.5mm MIDI output on the Launchkey Mini without a computer, you can
power the unit with a standard USB power supply (5V DC, minimum 500mA).
Note that the Launchkey Mini is only compatible with Circuit using TRS MIDI Type A adapters.
Many other Novation products (such as Launchpad Pro) will also require a Type A adapter to
properly communicate with the Launchkey Mini.
Stop
Solo
Mute
Arp Fixed
Chord
Transpose
Shift
Pitch Modulation
Arp
Tempo Swing Gate Mutate
Channel
Octave
ProgramChange
Session Drum Custom Device
Arp Mode
Up Down Up/Down Played Random Chord Mutate
Rate Octave
1/4 1/8 1/16 1/32 Triplet 1 2 3 4 o oxo oxxo
Rhythm Latch
Deviate
Volume Pan Sends Custom
Random Deviate On/Off
Track
CaptureMIDI
+
-
Android
Android
Stop
Solo
Mute
Arp Fixed
Chord
Transpose
Shift
Pitch Modulation
Arp
Tempo Swing Gate Mutate
Channel
Octave
Program Change
Session Drum Custom Device
Arp Mode
Up Down Up/Down Played Random Chord Mutate
Rate Octave
1/4 1/8 1/16 1/32 Triplet 1 2 3 4 o oxo oxxo
Rhythm Latch
Deviate
Volume Pan Sends Custom
Random Deviate On/Off
Track
Capture MIDI
+
-

8
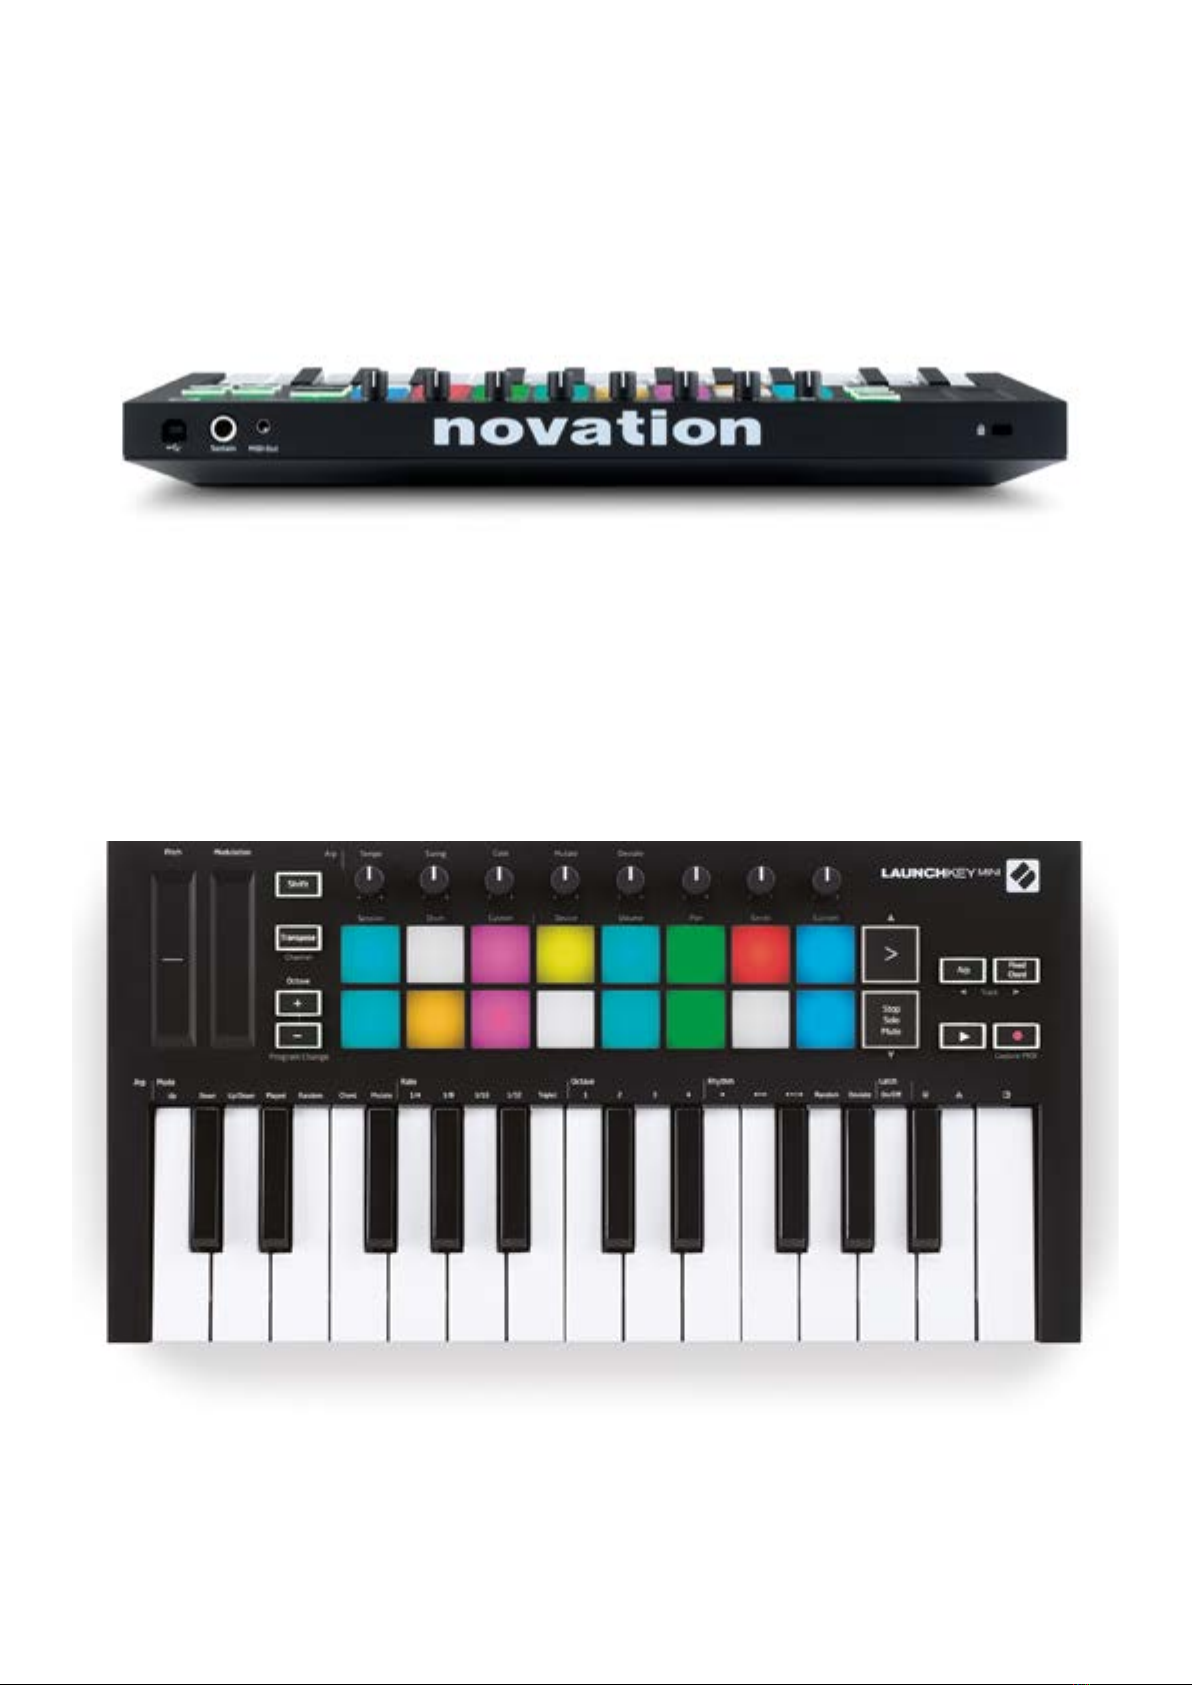
Hardware Overview
1. Pitch and Modulation touch strips for bending pitch or adding modulation.
2. Press Shift and other buttons to access secondary functions (in grey).
3. Transpose lets you transpose your keyboard plus or minus 11 semitones. Press Shift and
Transpose to select MIDI Channel output for the keyboard.
4. Octave + and - buttons move the keyboard up or down across 7 octaves (C-1 to C5).
5. Rotary knobs control hardware, software parameters, or settings on the Launchkey itself.
6. Pads are great for triggering clips in Ableton Live’s Session View and playing drums.
Holding Shift lights up the top row of pads, with the current pad mode lit the brightest. You
can then switch between the 3 pad modes:
● Session – For triggering clips and navigating Live’s Session View.
● Drum – For playing drums with the velocity-sensitive pads.
● Custom – For playing a custom selection of notes with personalised colours.
Edit custom modes on https://components.novationmusic.com/launchkey-mini-mk3
7. Press the Arp button to enable the Arpeggiator.
8. While holding the Fixed Chord button, press and release the keys that you wish to be
part of the stored, ‘fixed’ chord.
9. This button controls your DAW’s playback.
10. The Record button starts the recording process in your DAW.
Stop
Solo
Mute
Arp Fixed
Chord
Transpose
Shift
Pitch
Modulation
Arp
Tempo
Swing
Gate Mutate
Channel
Octave
Program Change
Session
Drum Custom Device
Deviate
Volume Pan Sends Custom
Track
Capture MIDI
+
-
12
3
4
5
678
910
Arp Mode
Up Down
Up/Down Played Random Chord
Mutate
Rate Octave
1/4 1/8
1/16 1/32 Triplet 1 2 3 4 o oxo oxxo
Rhythm Latch
Random Deviate On/Off
98
Rear view
Top Panel
10
Using the Launchkey Mini [MK3]
The Launchkey Mini is designed to work seamlessly with Ableton Live, offering deep integration
through powerful production and performance controls. Launchkey Mini also boasts a powerful
arpeggiator (‘Arp’) and a ‘Fixed Chord’ mode – both of which can be used with Live, other DAWs,
or standalone with your outboard gear. In addition, you can modify the Launchkey Mini to suit your
needs with Custom Modes. Continue reading for explanations of all of Launchkey Mini’s functionality.
Working with Ableton Live 10
Installation
If you don’t yet own Ableton Live 10, register your Launchkey Mini at novationmusic.com/register
to download and install your included copy of Ableton Live 10 Lite. If you’ve never used Ableton
Live before, we recommend visiting our Easy Start Tool (see ‘Getting Started with your Launchkey
Mini [MK3]’). There you’ll find videos covering installation, the software’s basic features, and how
to get started making music with your Launchkey Mini.
Setup
With Ableton Live installed, get your Launchkey Mini up and running by plugging it into your Mac or
PC’s USB port. When you open Live your Launchkey Mini will be automatically detected and enter
Session mode.
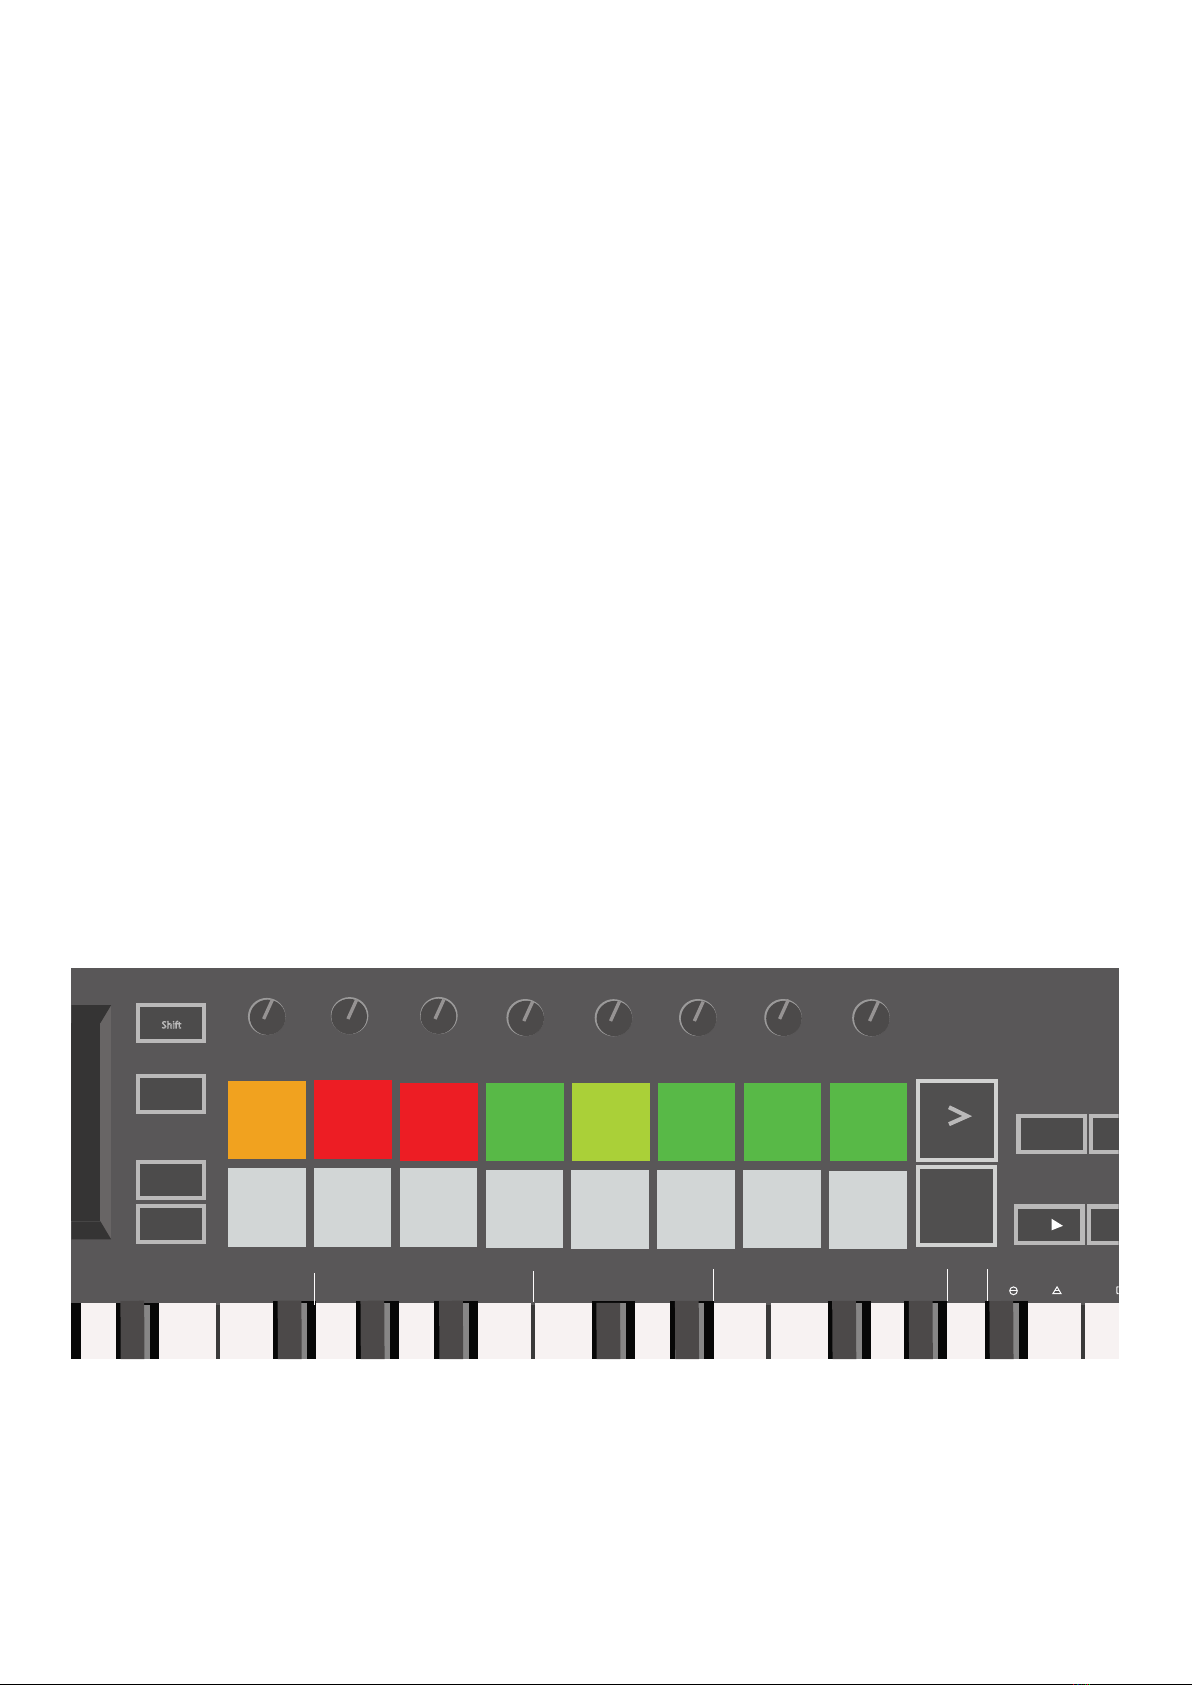
If you press Shift on the Launchkey your pad lights should look like the image below. The first 3
pads (orange) select pad behaviour, while the 5 pads to the right (green) select knob behaviour.
Hold Shift to see these default pad colours
If your pads do not resemble the image above you’ll need to configure Live’s Control Surface
Preferences. To do this, find the ‘Link/MIDI’ Preferences menu in Ableton Live:
Windows: Options > Preferences > Link/MIDI
Mac: Live > Preferences > Link/MIDI
Stop
Solo
Mute
Arp Fixed
Chord
Transpose
Shift
Pitch Modulation
Arp
Tempo Swing Gate Mutate
Channel
Octave
Program Change
Session Drum Custom Device
Deviate
Volume Pan Sends Custom
Track
Capture MIDI
+
-
Arp Mode
Up Down
Up/Down Played Random Chord Mutate
Rate Octave
1/4 1/8 1/16 1/32 Triplet 1 2 3 4 o oxo oxxo
Rhythm Latch
Random Deviate On/Off

1110
In the Link/MIDI tab you’ll need to copy the settings shown above. First, select the Launchkey
Mini [MK3] from the Control Surface menu. Then, under Input and Output select Launchkey Mini
(Launchkey Mini InControl) or Launchkey Mini MIDI IN2 (Windows). Finally, match the Track, Sync
and Remote settings.
If you’re having trouble getting your Launchkey Mini working with Ableton Live, be sure to visit our
Easy Start Tool for video explanations.
Session Mode
To access Session mode on the Launchkey Mini hold Shift and press the Session pad
(the top left pad).
Stop
Solo
Mute
Arp Fixed
Chord
Transpose
Shift
Pitch Modulation
Arp
Tempo Swing Gate Mutate
Channel
Octave
Program Change
Session Drum Custom Device
Deviate
Volume Pan Sends Custom
Track
Capture MIDI
+
-
Arp Mode
Up Down Up/Down Played Random Chord Mutate
Rate Octave
1/4 1/8 1/16 1/32 Triplet 1 2 3 4 o oxo oxxo
Rhythm Latch
Random Deviate On/Off

12
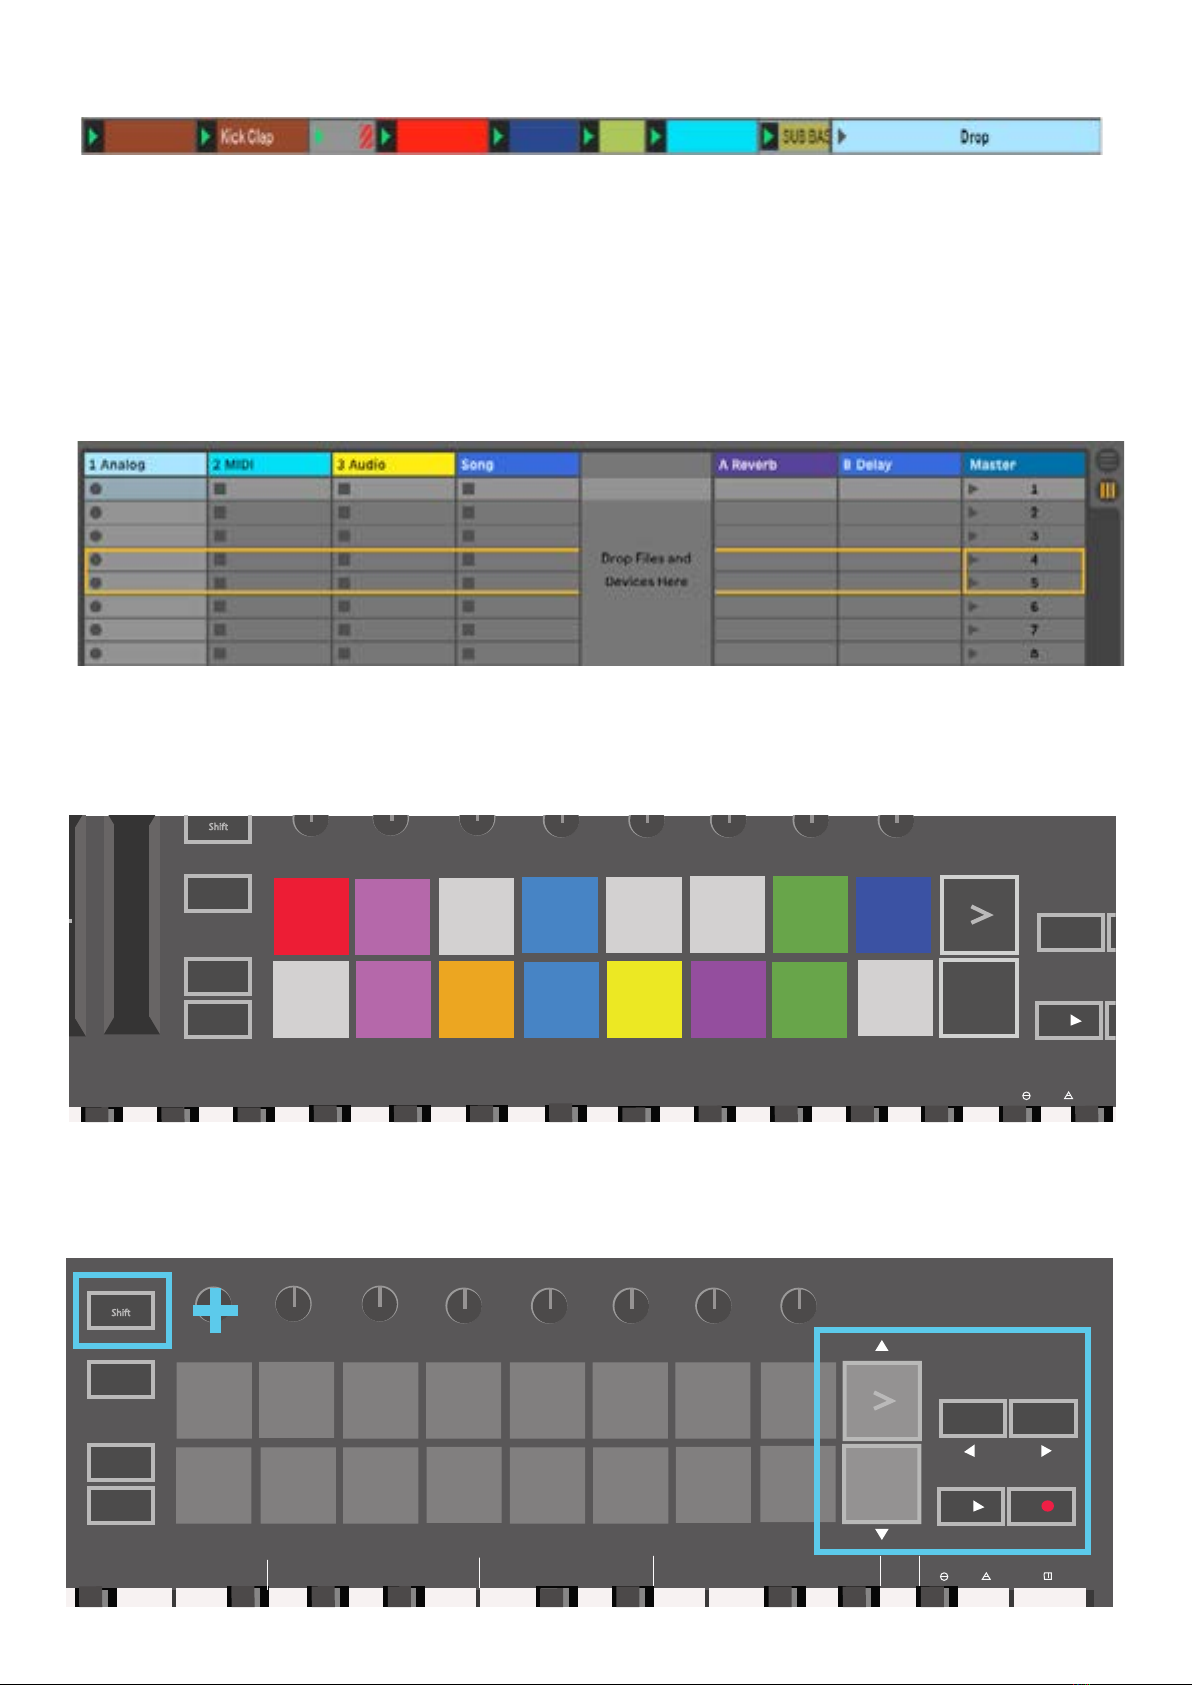
Session mode is designed to control Ableton Live’s Session view, seen below. Session View is a
grid that consists of clips, tracks and scenes.
Ableton Live’s Session View
Launchkey Mini’s Session mode provides an 8x2 view of the clips in your Session View.
Example of Launchkey Mini’s pads in Session mode:
Clips are typically loops that contain MIDI notes or audio.
Tracks represent virtual instruments or audio tracks. MIDI clips placed on instrument tracks will
play back on the instrument that is assigned to that track.
Stop
Solo
Mute
Arp Fixed
Chord
Transpose
Shift
Pitch Modulation
Arp
Tempo Swing Gate Mutate
Channel
Octave
Program Change
Session Drum Custom Device
Arp Mode
Up Down Up/Down Played Random Chord Mutate
Rate Octave
1/4 1/8 1/16 1/32 Triplet 1 2 3 4 o oxo oxxo
Rhythm Latch
Deviate
Volume Pan Sends Custom
Random Deviate On/Off
Track
Capture MIDI
+
-
Scenes are rows of clips. Launching a scene will launch all clips in that row. This means that you
can arrange clips into horizontal groups (across tracks) to form a song structure, launching scene
after scene to progress through a song.
1312
Again, access Session mode on the Launchkey Mini by holding Shift and pressing the Session
pad (the top left pad).
In Session mode, the pads represent the grid of clips found inside the coloured rectangle in
Ableton Live’s Session View. The image below shows such a rectangle (yellow) extending from the
left-most track to the Master track:
Any changes you make to clip position or colour within Ableton Live will be represented in the
Session mode of Launchkey Mini. Unlit (dark) pads indicate empty clip slots.
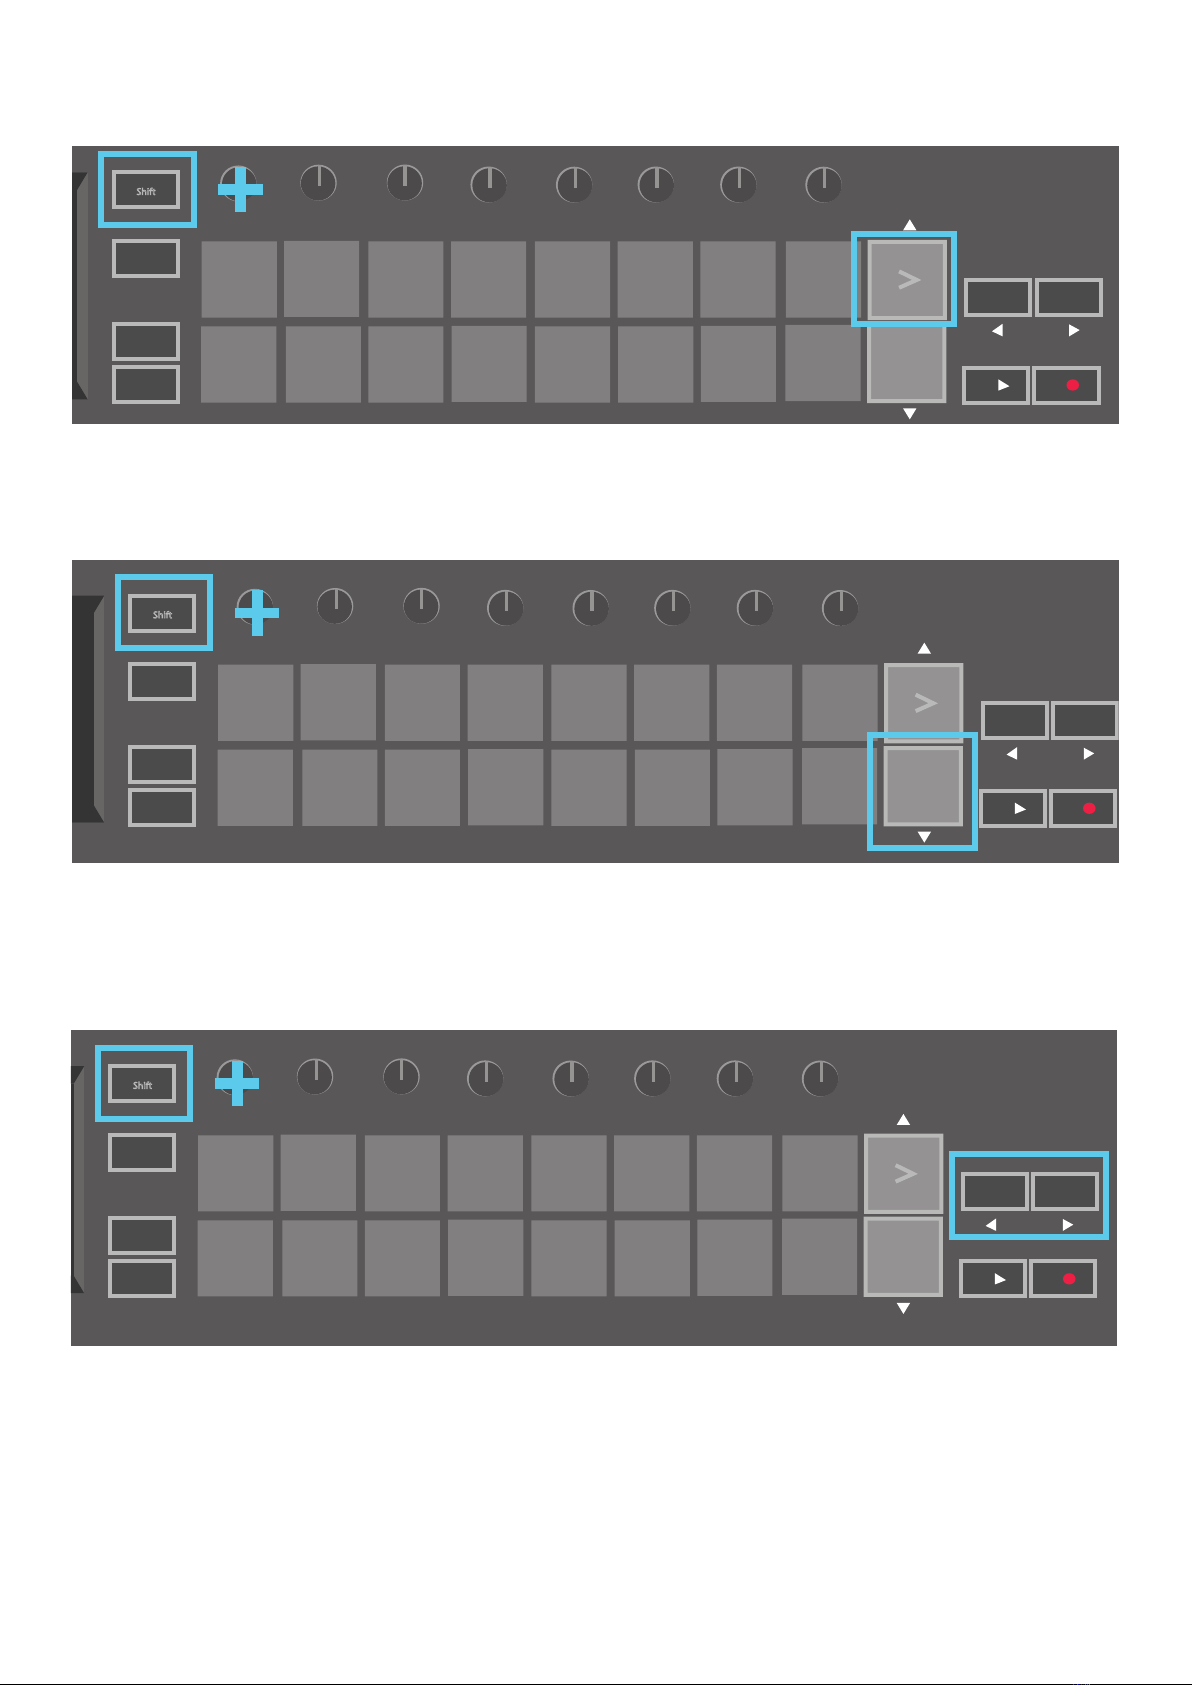
You can navigate around Session View by holding Shift and pressing the 4 buttons with arrows as
their secondary functions: >, Stop Solo Mute, Arp, and Fixed Chord.
Stop
Solo
Mute
Arp Fixed
Chord
Transpose
Shift
Pitch Modulation
Arp
Tempo Swing Gate Mutate
Channel
Octave
Program Change
Session Drum Custom Device
Arp Mode
Up Down
Up/Down Played Random Chord Mutate
Rate Octave
1/4 1/8 1/16 1/32 Triplet 1 2 3 4 o oxo oxxo
Rhythm Latch
Deviate
Volume Pan Sends Custom
Random Deviate On/Off
Track
Capture MIDI
+
-
Stop
Solo
Mute
Arp Fixed
Chord
Transpose
Shift
Pitch Modulation
Arp
Tempo Swing Gate Mutate
Channel
Octave
Program Change
Session Drum Custom Device
Deviate
Volume Pan Sends Custom
Track
Capture MIDI
+
-
Arp Mode
Up Down Up/Down Played Random Chord
Mutate
Rate Octave
1/4 1/8 1/16 1/32 Triplet 1 2 3 4 o oxo oxxo
Rhythm Latch
Random Deviate On/Off
14
More specifically, you can move the currently selected grid of clips (inside theAbleton Live’s
coloured rectangle) up or down by holding Shift and pressing the following buttons:
Stop
Solo
Mute
Arp Fixed
Chord
Transpose
Shift
Pitch Modulation
Arp
Tempo Swing Gate Mutate
Channel
Octave
Program Change
Session Drum Custom Device
Arp Mode
Up Down Up/Down Played Random Chord Mutate
Rate Octave
1/4 1/8 1/16 1/32 Triplet 1 2 3 4 o oxo oxxo
Rhythm Latch
Deviate
Volume Pan Sends Custom
Random Deviate On/Off
Track
Capture MIDI
+
-
Shift + Scene Launch (>) – This moves the grid of clips up one row.
Shift + Stop, Solo, Mute – This moves the grid of clips down one row.
Holding Shift and pressing Arp (left) or Fixed Chord (right) will select the adjacent left or right track.
This will automatically arm the track so it is ready to receive MIDI.
Stop
Solo
Mute
Arp Fixed
Chord
Transpose
Shift
Pitch Modulation
Arp
Tempo Swing Gate Mutate
Channel
Octave
Program Change
Session Drum Custom Device
Arp Mode
Up Down Up/Down Played Random Chord Mutate
Rate Octave
1/4 1/8 1/16 1/32 Triplet 1 2 3 4 o oxo oxxo
Rhythm Latch
Deviate
Volume Pan Sends Custom
Random Deviate On/Off
Track
Capture MIDI
+
-

1514
Launching Clips
Pressing pads will launch clips in the corresponding location in your Session View. Pads will pulse
green to indicate that a clip is playing. Pressing the pad again will relaunch the clip, and pressing
an empty pad will stop playback on that track.
Live’s Global Quantization chooser
How fast clips stop or relaunch is set by Ableton Live’s Global Quantisation chooser, located at the
top of the Live screen. By default, this is set to 1 bar, but can go as fast as 1/32 notes, or as slow
as 8 bars. It can also be set to ‘None’ so clips react immediately.
Launching Scenes
Pressing the Scene Launch button (>) launches scenes in Ableton Live. This means that all of the
clips in a row can either start, stop, record or relaunch together.
Stop
Solo
Mute
Arp Fixed
Chord
Transpose
Shift
Pitch Modulation
Arp
Tempo Swing Gate Mutate
Channel
Octave
Program Change
Session Drum Custom Device
Deviate
Volume Pan Sends Custom
Track
Capture MIDI
+
-
Arp Mode
Up Down Up/Down Played Random Chord
Mutate
Rate Octave
1/4 1/8 1/16 1/32 Triplet 1 2 3 4 o oxo oxxo
Rhythm Latch
Random Deviate On/Off

16
Stop, Solo, Mute
While in Session mode, it is possible to switch the functionality of the bottom 8 pads so that they
no longer launch clips. This is done with the Stop, Solo, Mute button.
The Stop, Solo, Mute button toggles between four different states which affect tracks in the
following ways:
● Stop (Red) – In this state, pressing pads will stop any clip on the corresponding track.
● The red pads will dimly glow if tracks are not playing.
● Solo (Blue) - Pressing the pads will solo the corresponding tracks, meaning only tracks with
Solo on will be heard.
● The pads will dimly glow if tracks are not soloed (ie they are silent) and if soloed they will be
a steady bright blue.
Stop
Solo
Mute
Arp Fixed
Chord
Transpose
Shift
Pitch Modulation
Arp
Tempo Swing Gate Mutate
Channel
Octave
Program Change
Session Drum Custom Device
Deviate
Volume Pan Sends Custom
Track
Capture MIDI
+
-
Arp Mode
Up Down
Up/Down Played Random Chord Mutate
Rate Octave
1/4 1/8 1/16 1/32 Triplet 1 2 3 4 o oxo oxxo
Rhythm Latch
Random Deviate On/Off

1716
● Mute (Yellow) – Pressing pads will Mute the corresponding tracks.
● The pads will dimly glow for muted tracks, leaving pads for unmuted tracks at their
original brightness and colour.
● Clips (White) – the fourth press (after toggling through Stop, Solo and Mute) changes the
function of bottom pads back to the default Session mode, where the bottom row of pads
will again represent clips.
Stop
Solo
Mute
Arp Fixed
Chord
Transpose
Shift
Pitch Modulation
Arp
Tempo Swing Gate Mutate
Channel
Octave
Program Change
Session Drum Custom Device
Deviate
Volume Pan Sends Custom
Track
Capture MIDI
+
-
Arp Mode
Up Down
Up/Down Played Random Chord Mutate
Rate Octave
1/4 1/8 1/16 1/32 Triplet 1 2 3 4 o oxo oxxo
Rhythm Latch
Random Deviate On/Off
Record / Capture MIDI
Pressing this button triggers Session Record. This will allow you to record what you’re playing to
new clips as well as overdub existing ones.
Holding Shift and pressing Record triggers the Capture MIDI function. This allows you to retro-
spectively capture any recently played MIDI notes in the record-armed track. This means that if
you are not recording, but you play something that sounds great, you can use Capture MIDI to
send it straight into a clip.
Stop
Solo
Mute
Arp Fixed
Chord
Transpose
Shift
Pitch Modulation
Arp
Tempo Swing Gate Mutate
Channel
Octave
Program Change
Session Drum Custom Device
Arp Mode
Up Down Up/Down Played Random Chord Mutate
Rate
Octave
1/4 1/8 1/16 1/32 Triplet 1 2 3 4 o oxo oxxo
Rhythm Latch
Deviate
Volume Pan Sends Custom
Random Deviate On/Off
Track
Capture MIDI
+
-

18
Playing and recording Drums
Drum mode transforms the Launchkey Mini’s pads into velocity-sensitive drum pads.
Hold Shift and press the Drum pad (2nd from the top left) to enter this mode.
If a Drum Rack (an Ableton MIDI instrument) is loaded onto the selected Live track, and the
Launchkey Mini is in Drum mode, the pads light up the colour of the track. These pads will play
whatever Drum Rack pads are visible on your computer screen, turning green when played, and
red if the track is recording.
Stop
Solo
Mute
Arp Fixed
Chord
Transpose
Shift
Pitch Modulation
Arp
Tempo Swing Gate Mutate
Channel
Octave
Program Change
Session Drum Custom Device
Arp Mode
Up Down Up/Down Played Random Chord Mutate
Rate Octave
1/4 1/8 1/16 1/32 Triplet 1 2 3 4 o oxo oxxo
Rhythm Latch
Deviate
Volume Pan Sends Custom
Random Deviate On/Off
Track
Capture MIDI
+
-
Hold Shift and press either the > or Stop, Solo, Mute buttons to scroll up/down a Drum Rack’s
bank of 128 pads.
When using Ableton’s Drum Racks, Drum mode will – apart from triggering sounds – select the
associated Drum Rack pad within a Drum Rack. This means that on release, the last played Drum
Rack pad becomes grey and Ableton Live shows the selected Drum Rack pad on the screen.
Stop
Solo
Mute
Arp Fixed
Chord
Transpose
Shift
Pitch Modulation
Arp
Tempo Swing Gate Mutate
Channel
Octave
Program Change
Session Drum Custom Device
Arp Mode
Up Down Up/Down Played Random Chord Mutate
Rate Octave
1/4 1/8 1/16 1/32 Triplet 1 2 3 4 o oxo oxxo
Rhythm Latch
Deviate
Volume Pan Sends Custom
Random Deviate On/Off
Track
Capture MIDI
+
-
1918
Using Ableton Live Devices
Device mode allows you to control the selected ‘device’ (Ableton or 3rd-party Instruments and Ef-
fects) on a Live track. Hold the Shift button and press the Device pad (4th from top left) to
use this mode.
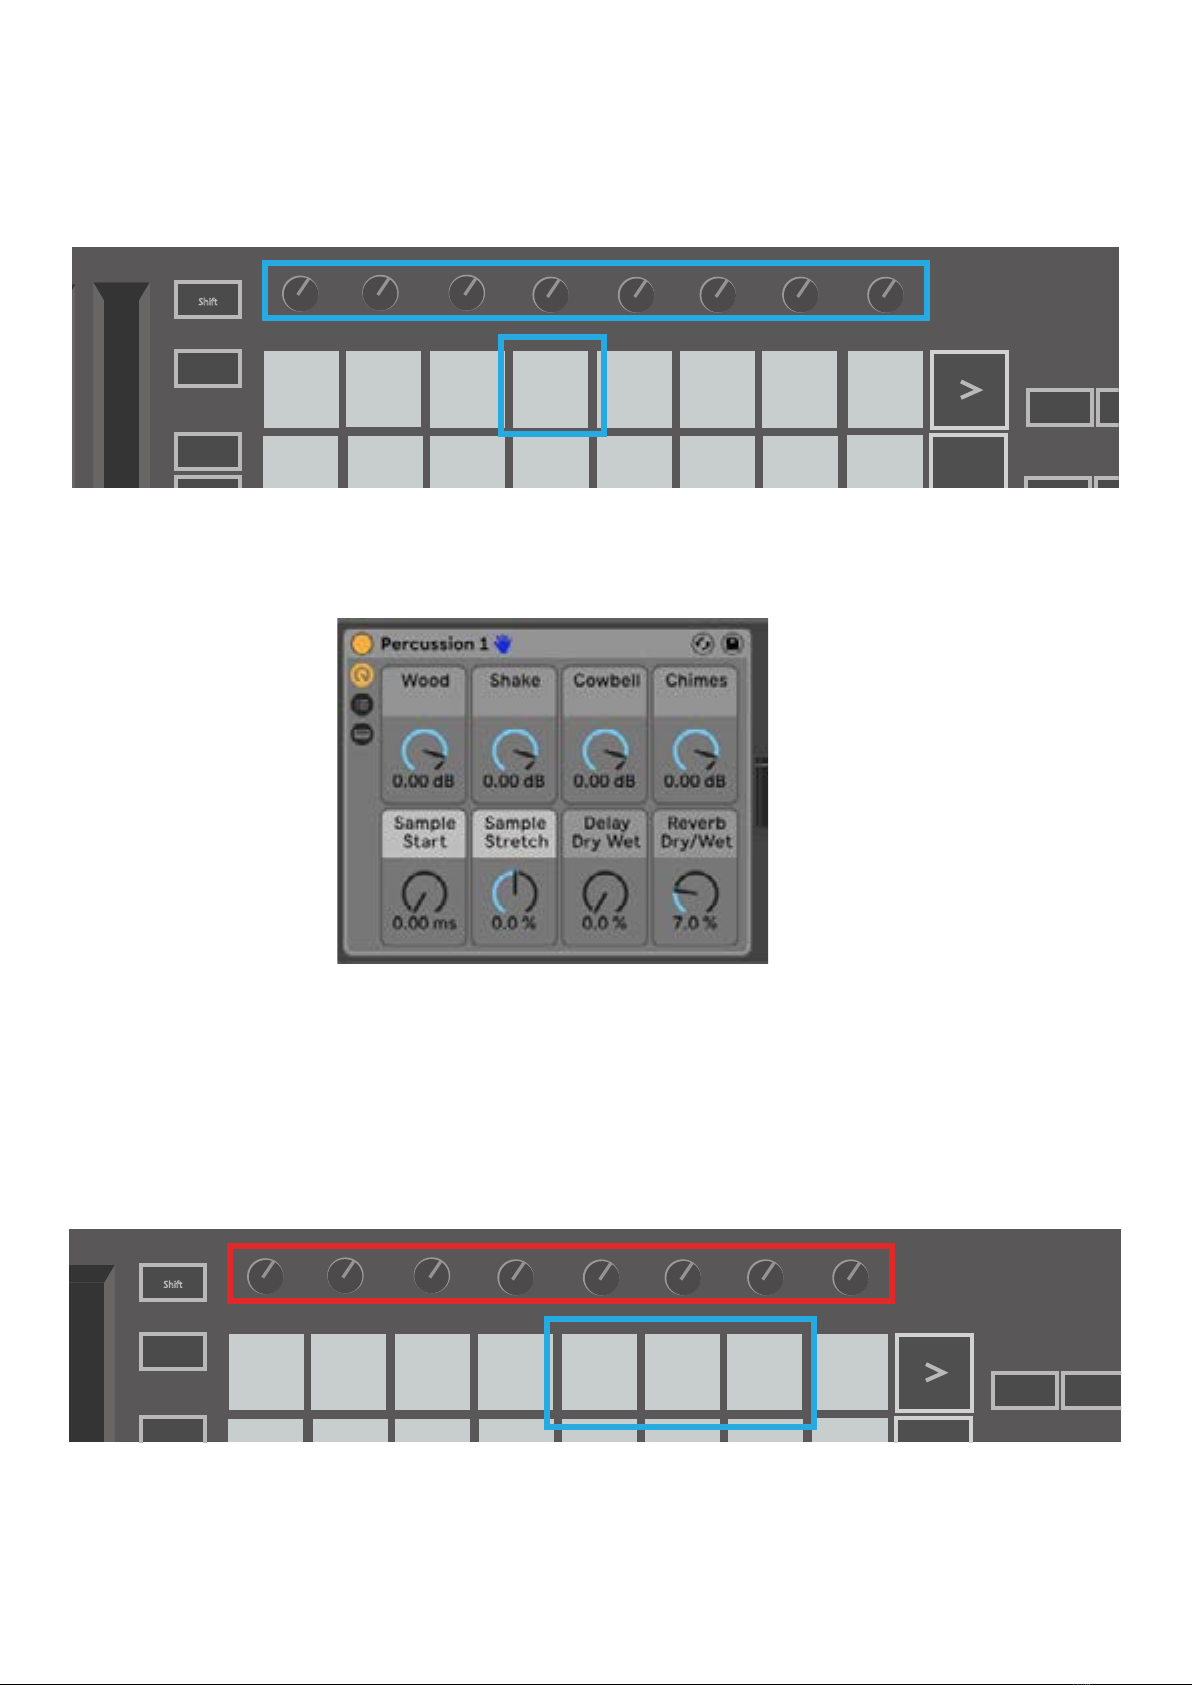
In this mode, knobs control the first 8 parameters of the selected device. This is especially useful
for controlling Live’s 8 ‘macro’ knobs, available on Instrument and Effect Racks.
Macro controls for an Ableton device
The above picture shows an Impulse preset called ‘Percussion 1’. Here, the Launchkey Mini’s
knobs control sample volumes, sample start and ‘stretch’, as well as delay and reverb amounts.
Using Ableton Live’s Mixer
The Launchkey Mini’s 8 knobs (in the red box above) give you hands-on control of Live’s mixer.
Hold Shift, then press either the Volume, Pan or Sends pads (in thee blue box above) to control
those respective parameters with the knobs.
Stop
Solo
Mute
Arp Fixed
Chord
Transpose
Shift
Pitch
Modulation
Arp
Tempo Swing Gate Mutate
Channel
Octave
Program Change
Session Drum Custom Device
Arp Mode
Up Down Up/Down Played Random Chord Mutate
Rate Octave
1/4 1/8 1/16 1/32 Triplet 1 2 3 4 o oxo oxxo
Rhythm Latch
Deviate
Volume Pan Sends Custom
Random Deviate On/Off
Track
Capture MIDI
+
-
Stop
Solo
Mute
Arp Fixed
Chord
Transpose
Shift
Pitch Modulation
Arp
Tempo Swing Gate Mutate
Channel
Octave
Program Change
Session Drum Custom Device
Arp Mode
Up Down Up/Down Played Random Chord Mutate
Rate Octave
1/4 1/8 1/16 1/32 Triplet 1 2 3 4 o oxo oxxo
Rhythm Latch
Deviate
Volume Pan Sends Custom
Random Deviate On/Off
Track
Capture MIDI
+
-

20
● Volume - This mode allows for volume control over the 8 selected tracks currently inside
Live’s coloured rectangle. Holding the Shift button and pressing the Volume pad (the 4th
from the top right) selects this mode.
● Pan - This mode allows you to pan the 8 selected tracks currently inside Live’s coloured
rectangle. Holding the Shift button and pressing the Pan pad (the 3rd from the top right)
selects this mode.
● Sends - This mode allows you to control the send levels of tracks in Ableton Live. Hold Shift
and press the Sends pad (2nd from the top right) to enter this mode.
Stop
Solo
Mute
Arp Fixed
Chord
Transpose
Shift
Pitch Modulation
Arp
Tempo Swing Gate Mutate
Channel
Octave
Program Change
Session Drum Custom Device
Arp Mode
Up Down Up/Down Played Random Chord Mutate
Rate Octave
1/4 1/8 1/16 1/32 Triplet 1 2 3 4 o oxo oxxo
Rhythm Latch
Deviate
Volume Pan Sends Custom
Random Deviate On/Off
Track
Capture MIDI
+
-
When in Sends mode two purple pads on the bottom row will switch between Send A or Send B.
The left purple pad chooses Send A, and the right purple pad selects Send B.
Sending audio to return tracks is a great way to use fewer audio effects. For example, instead of
putting the same reverb on many tracks, you can put one reverb on a return track and send
multiple tracks to it.
Table of contents
Other Focusrite Audio Engineering Recording Equipment manuals


