weintek cMT3000X Series User guide

Table of Contents
1. Network Wiring Diagram…………………………………………………………………………………………………………… 3
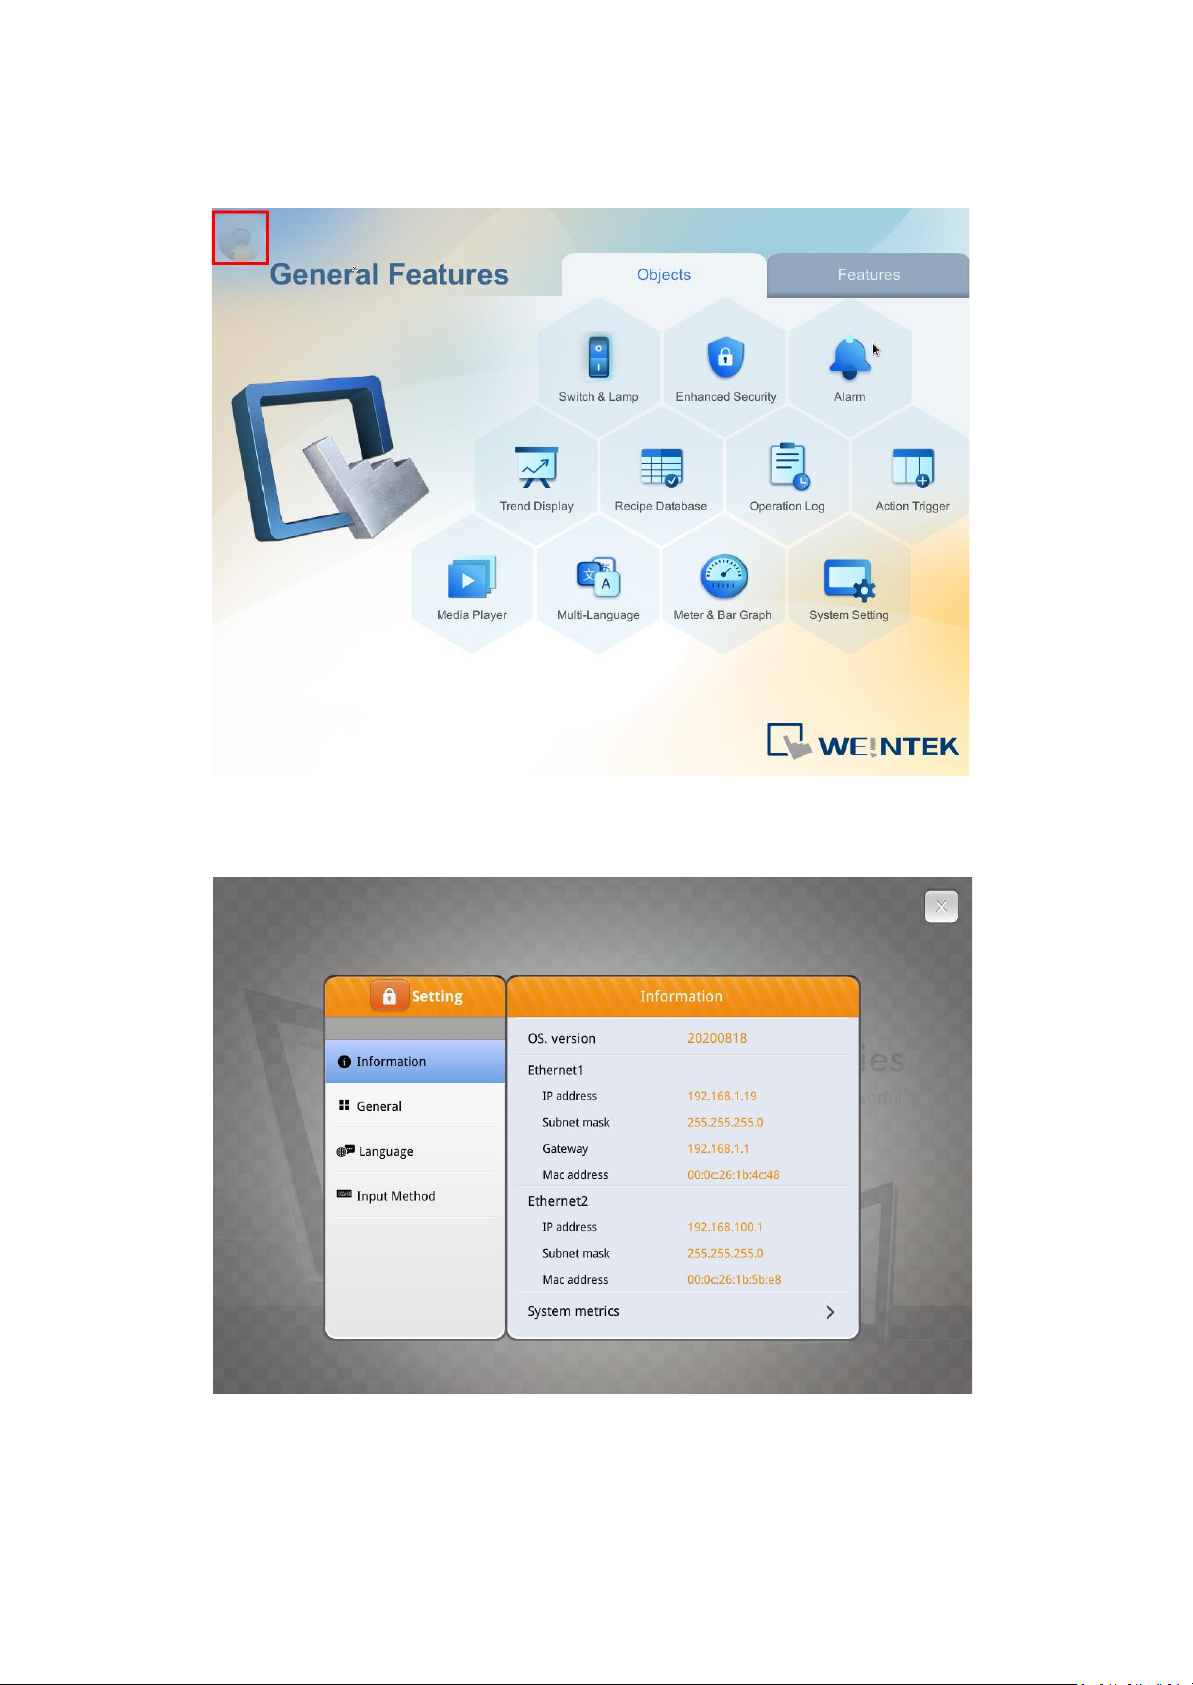
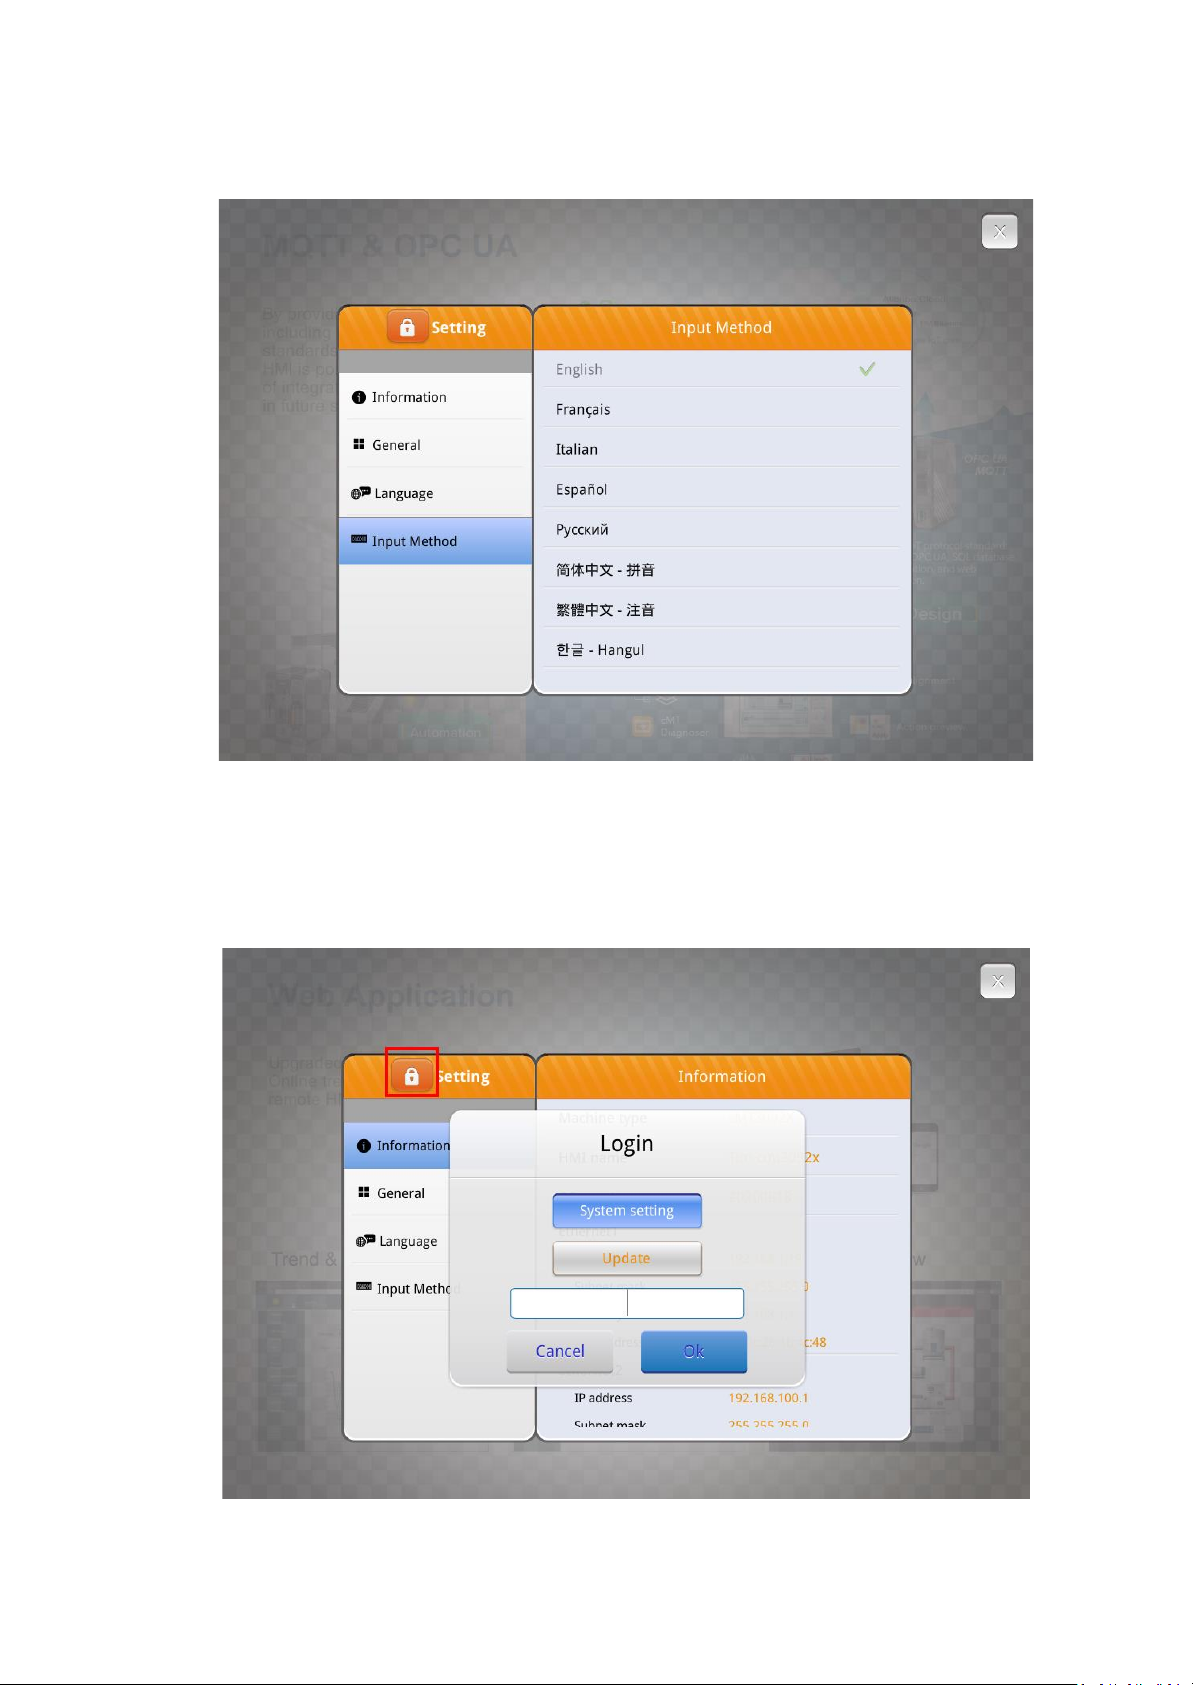
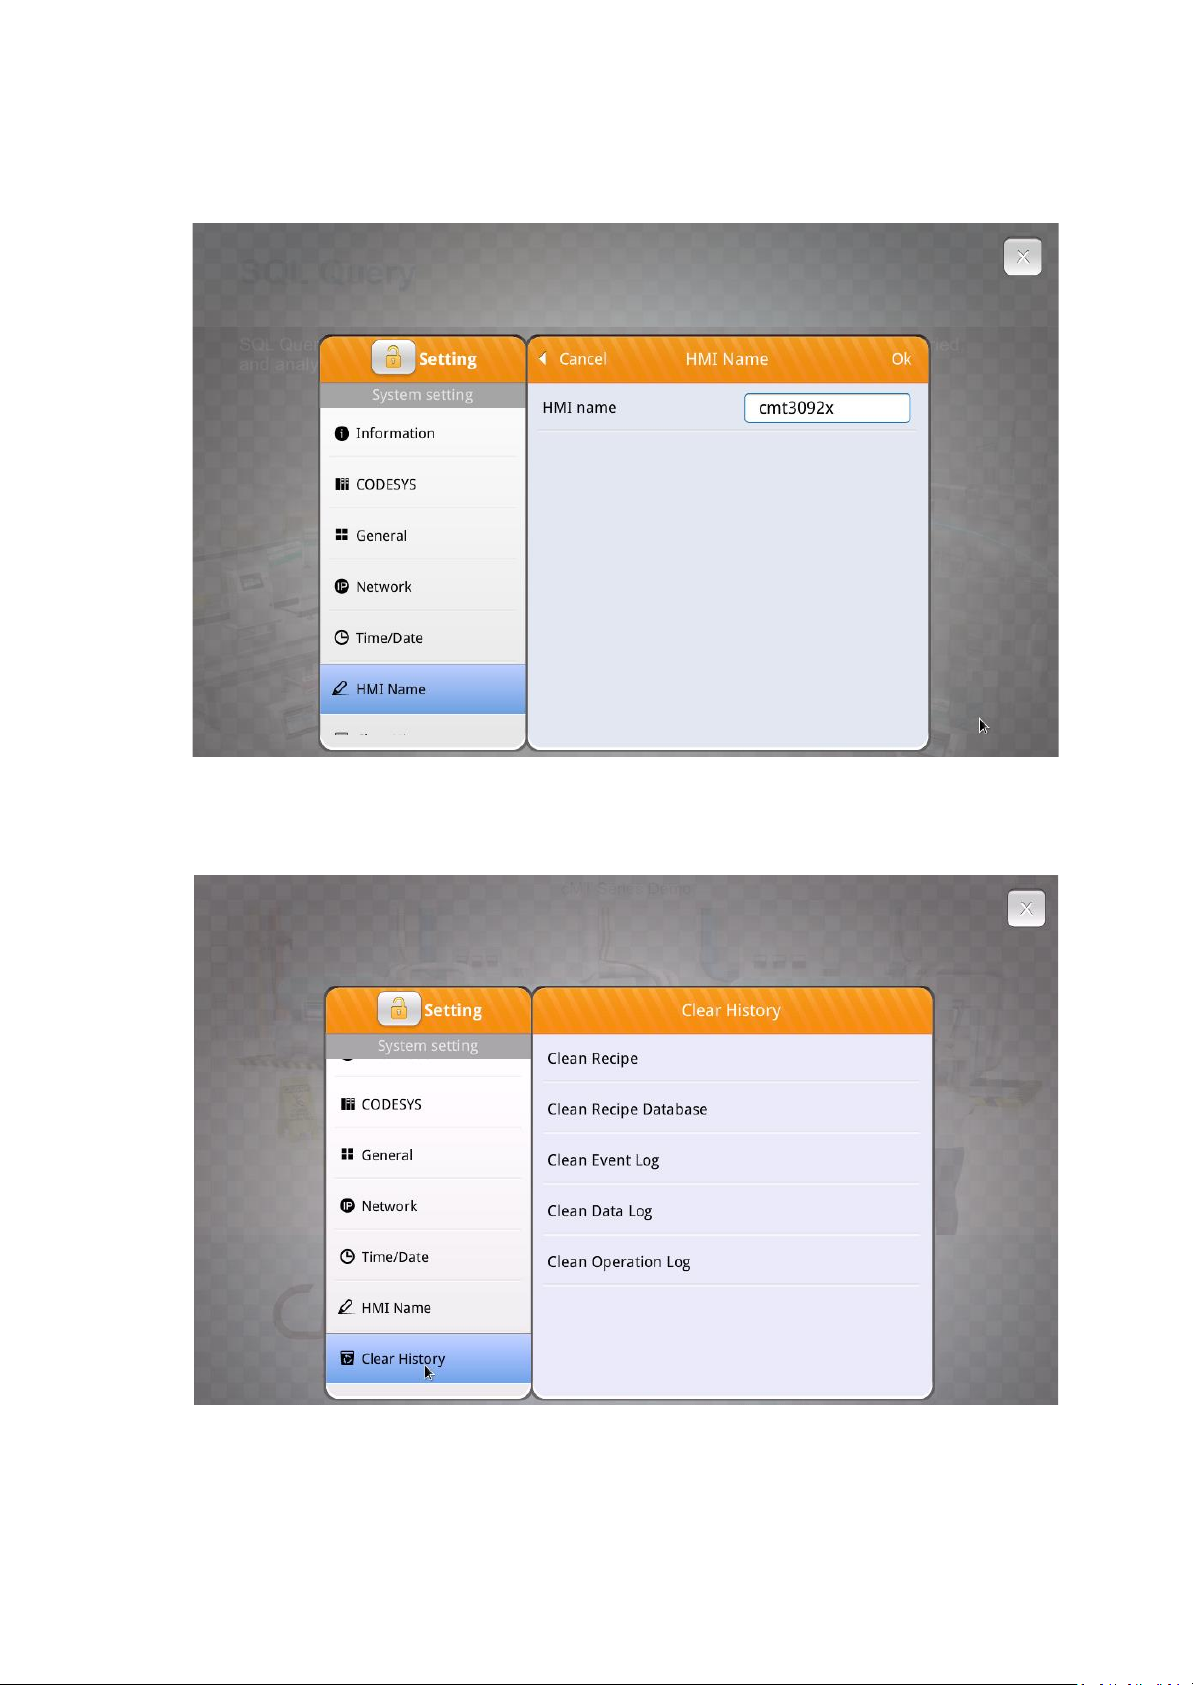
2. Setup……………................................................................................................................................ 4
3. Web Interface....................................................................................................………………………… 16
4. How to Use WebView………………………………………………………………………………………………………………. 23
5. How to Load a Project via USB Drive/SD Card .............................................................................. 25
6. How to Retrieve Historical Data via USB Drive/SD Card................................................................ 26
7. How to Delete All Historical Data.................................................................................................. 27
8. OS Upgrade................................................................................................................................... 28
9. cMT-Viewer.…………………………………………………………………………………………………………………………….. 30
10. Monitor Mode………………………………………………………………………………………………………………………….. 38
11. cMT-Viewer Limitations…………………………………………………………………………………………………………… 42
12. cMT3000X HMI Gestures Operation…………………………………………………………………………………. 44

1. Network Wiring Diagram
Connect a cMT3000X HMI to a router by an Ethernet cable as the diagram shows below.
The default IP address of LAN 1 is DHCP. The default IP address of LAN 2 is static IP 192.168.100.1. The
IP addresses of LAN 1 and LAN 2 must be configured to different subnets, except for certain
cMT3000X HMIs which have been activated with a Codesys license.
cMT3000X LAN ports:
cMT3092X HMI is equipped with two independent Ethernet ports which isolate the device network
from the company/factory network. LAN1 is a WAN (Wide Area Network) port which is allowed to
connect to a public network or another network via a gateway. LAN2 is a LAN (Local Area Network)
port.

4
2. Setup
Press the system toolbar button in the top left corner to open the setup menu.
Information
This page shows general information about cMT3000X HMI and network information.

5
General
Adjust the brightness of the screen and audio volume.
Language
Select a language for the system settings menu. The language selected on the project of the
cMT3000X HMI won’t be changed by this setting.

6
Input Method
Select languages for system keyboard input use.
Advanced Settings
To access more system settings, click on the lock icon in the top left corner. There are two different levels of
password protection. Select [System Setting] and enter System Setting password. The default password of
System Setting is 111111. The Codesys tab, OS Upgrade tab, and Reset Option tab will be accessible to
System Setting.

7
After clicking on [OK], the icon will become unlocked.
Codesys (If available)
This is a page used to activate Codesys functionality when the HMI supports Codesys. To activate this
feature on a cMT3000X HMI, a Codesys activation card is required and must be purchased separately.
[Codesys Activation Code]- Enter the codes displayed on a Codesys activation card. Click [Active] to activate
Codesys.
Note: Once Codesys is activated, there is no way to remove Codesys from the cMT3000X HMI.
[Restore Codesys License]- The Codesys functionality will be restored if it is enabled. Contact Weintek USA
before using this.

8
General
[Direction]- Click on the button to change the direction of the screen display.
[Popup download window]- If enabled, after inserting a USB disk or SD card to the slots of the cMT3000X
HMI, the Upload/Download dialog window will pop up.
[FTP Port]- Click the “>”button to change FTP port number.
[FTP client can modify USB/SD data]- If enabled, historical data stored in USB drive/SD card can be modified
via FTP(File Transfer Protocol).
Network
Set the IP addresses of Ethernet 1 and Ethernet 2. The default IP address of Ethernet 1 is DHCP. The default
IP address of Ethernet 2 is 192.168.100.1. The IP addresses of Ethernet 1 and Ethernet 2 must be on
separate subnets, except for cMT3000X HMIs with activated Codesys.

9
Click on a “>”button. Enable [Obtain an IP address automatically] (DHCP) or set the IP address manually
(Static IP).
Time/Date
Adjust cMT3000X HMI RTC manually.

10
HMI Name
Change the name of cMT3000X HMI to identify this HMI when retrieving historical data or loading a project
on a PC. This saves time remembering the IP address of each cMT3000X HMI.
Clear History
This page is used to clear historical data, recipe, and database information stored in the internal memory of
a cMT3000X HMI.

11
Project Management
Restarts the project of the cMT3000X HMI and restores it to its initial state without cycling power.
System Password
There are three different levels of password protection, User, Update Project, and System Setting.
This page is used to change the passwords for operating a project via cMT viewer, loading a project to the
HMI, accessing FTP server and so on. The default passwords of the three levels are 111111.
[User]- This level can operate cMT projects via cMT viewer.
[Update project]- This level can load and retrieve the HMI project, as well as retrieve historical data, such as
data sampling and event log data. In addition, it can operate cMT projects via cMT viewer.
[System Setting]- This level has access to all system settings, load and retrieve the project, retrieve historical
data, and operate cMT projects via cMT viewer. It is the highest security level.
[History]- FTP server access. The default password is 111111.
Password hierarchy -
System
setting -for
administrator
Update project-
for supervisors
User- for operators

12
Enhanced Security (Objects authorized to operators in HMI project)
This function provides user passwords and security classes to prevent unauthorized operators from
accessing objects that have the potential to cause damage or injury within your cMT3000X HMI project. For
more information, refer to section 5.6.2 Enhanced Security Mode in the Easybuilder pro user manual.

13
VNC Setting
The VNC server provides remote HMI monitoring and controlling via Ethernet connection.
[Start VNC]- Allows VNC connection with only one VNC client.
[VNC multi connection]- Allows connection with multiple VNC clients. Connecting the VNC server to too
many VNC clients may slow down the communication speed and HMI performance.
[VNC login password]- Specify a password. Logging into a VNC server will require the password.
EasyAccess2.0
EasyAccess 2.0 is a tool that allows users to access and control a cMT3000X HMI remotely from anywhere in
the world.
SomecMT3000XHMIs are pre-licensed EasyAccess2.0. For more information, refer to EasyAccess2.0 user
manual.

14
OS Upgrade
This page is used to upgrade the OS version of cMT3000XHMI.
Reset Options
This page is used to reset a cMT3000X HMI to its factory default settings. Press [Start] to reset if needed.

15
Enter “yes”into the box and click on [OK] to start reset process.

16
3. Web Interface
A cMT3000X HMI’s setting can also be accessed via a web browser. Before configuration, connect
cMT3000X HMI (LAN1) to a router via an Ethernet cable. Open a web browser (Edge, Chrome, or Firefox)
and enter the IP address of the cMT3000X HMI. For example, enter 192.168.1.15.
Select an identity and enter its password.
The tabs of the web interface are displayed as shown. They are System, Network, Project, Data, Features,
and Account.

17
Feature Introduction
Info
[Now] - Synchronizes the HMI RTC with the PC RTC.
Project Management
[Restart Project] - Restarts cMT3000X HMI and restores it to its initial state.
[Update Project]- Loads a project and recipes from the PC to cMT3000X HMI.
[Backup Project]- Uploads a project from cMT3000X HMI to the PC.
[USB/SD Update]- Loads a project via a USB drive/SD card plugged into the slots of cMT3000X HMI. Select
the *.cxob file and click [Update].

18
Email
This page provides setup of the SMTP server and email contact lists. For more information, refer to section
5.11 e-Mail in the Easybuilder pro user manual.
Recipe
[Update]- Select a button to transfer recipe files from the PC to the cMT3000X HMI.
[Backup] - Select a button to transfer recipe files from the cMT3000X HMI to the PC.
[Clear]- It is used to clear recipe and database information stored in cMT3000X HMI.

19
Data Log & Trend Display
This page displays data log information via a data spreadsheet or a trend chart. Data within each
spreadsheet can be backed up individually by clicking [Export to Spreadsheet] or [Backup database].
[Export to Spreadsheet]- This function generates a CSV file.
[Backup database]- This function generates a compressed file of the .db files.

20
Event Log
This page displays a data table in which operators can easily see important event information recorded on
the HMI.
Operation Log
This page allows you to back up operation log information recorded on the HMI.
Table of contents
Other weintek Recording Equipment manuals

weintek
weintek MT8000iE Series User manual

weintek
weintek cMT-iPC15 User manual

weintek
weintek cMT-SVR User guide

weintek
weintek cMT2158X Series User manual

weintek
weintek cMT-SVR-200 series User manual

weintek
weintek cMT-SVRX Series User manual

weintek
weintek cMT3152X Series User manual

weintek
weintek cMT3072XP Series User manual

weintek
weintek MT8070iER1 Series User manual

weintek
weintek cMT2078X Series User manual