Fogo & Chama SCORPION 6.1 User manual
Instruction Manual
SCORPION 6.1
6 BURNER GAS BARBECUE
INSTRUCTION MANUAL |

- 1 -
Instruction Manual
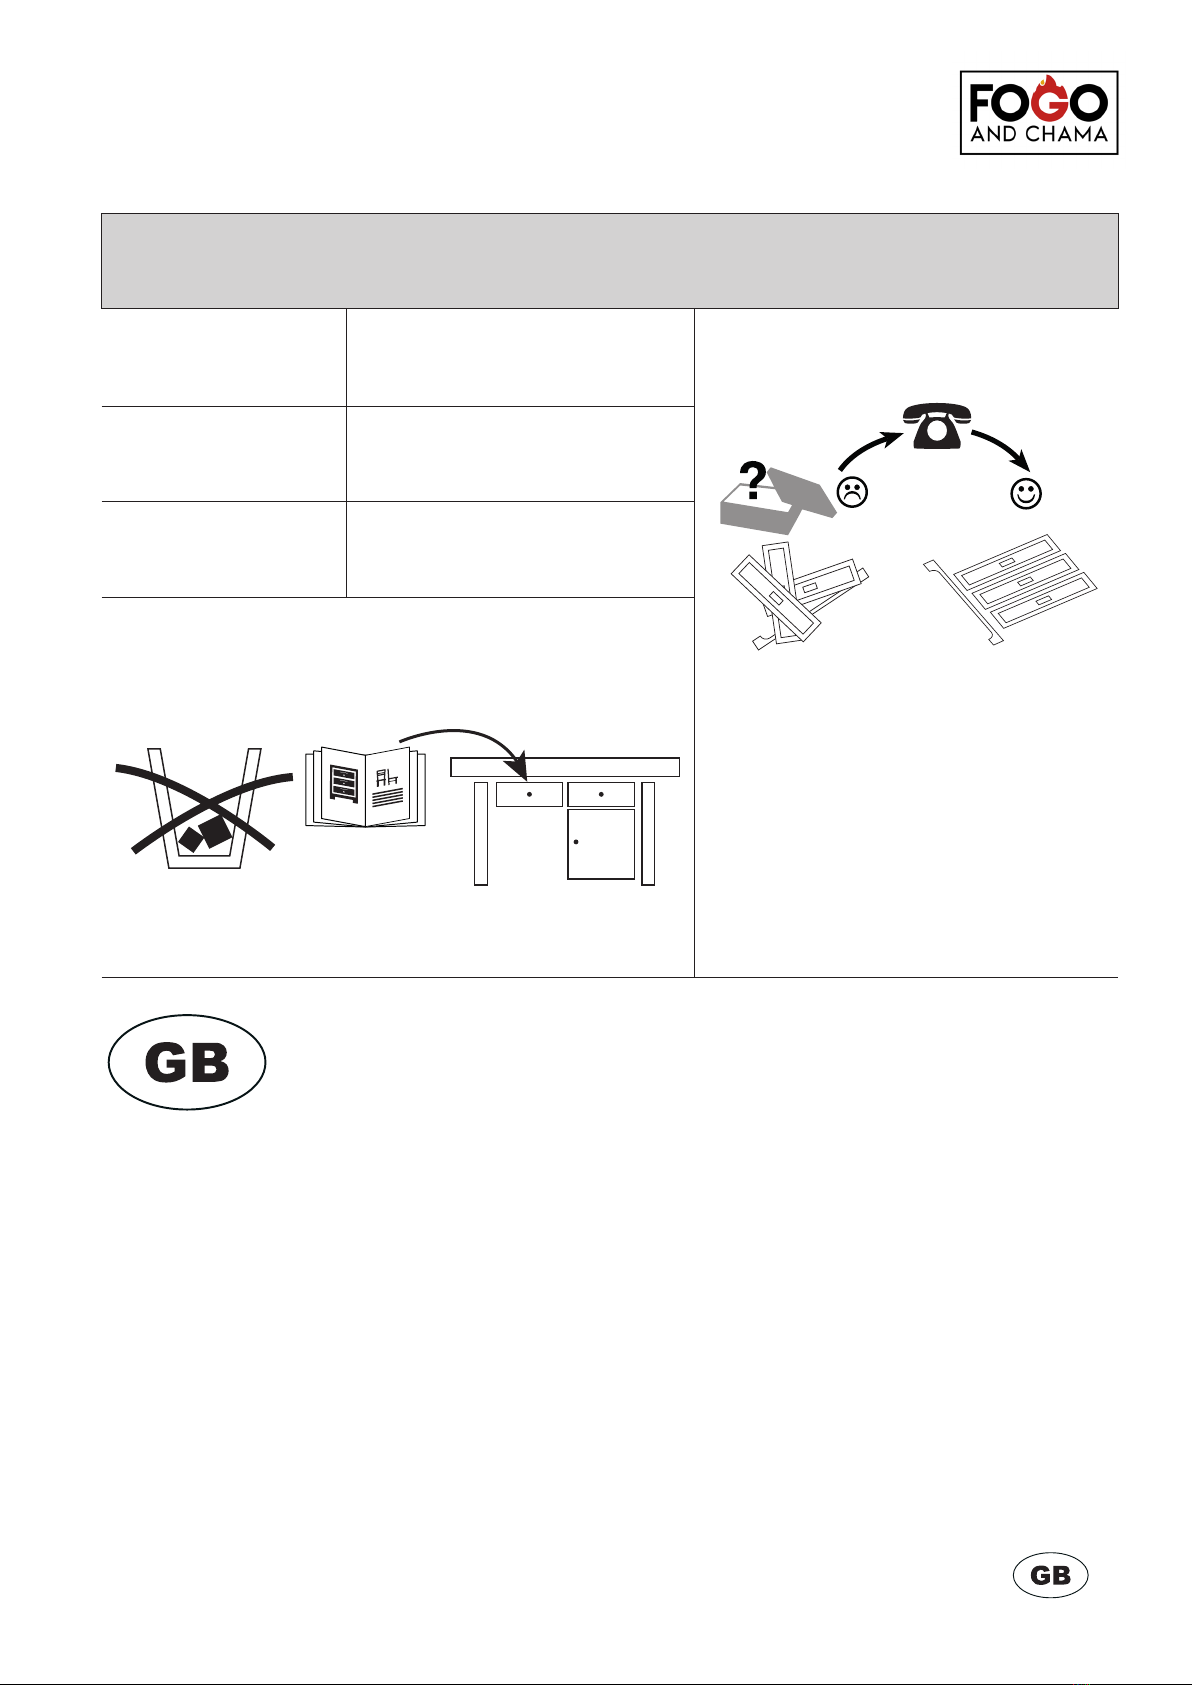
TECHNICAL SPECIFICATIONS
Brand Fogo & Chama
Model
Heat Input (Hs) (kW)
Equipment Category
Gas Reference
Main Burner
Ignition
Destination Countries
GR
SK
For outdoor use only.
Please read the instructions before using the appliance.
WARNING: There are accessible parts that can become very hot. Keep children away from these while in use.
Turn o the gas supply at the gas cylinder after use.
The appliance must not be modied in any way.
Warning! Do not use petrol to light or re-light the grill.
Made in China
Imported by: Fogo & Chama Ltd, 1386 London Road, Leigh-on-Sea, Essex, SS9 2UJ, UK

- 2 -
Instruction Manual
PARTS LIST
- 19 -
3
English
PARTS LIST
1 Warming rack 1 11 1
Side burner
2 Cooking grid 3 12 Left door
Right panel
1
3 Flame tamer 6 13 Right door 1
4 Grill body 1 14 Magnet 1
5 Left side table 1 15 Bottom shelf 1
6 1 16 Castor (With lock) 2
7 Door cross beam 1 17 Castor (No lock) 2
8 Door handle 2 18 1
9 1 19 1
10 Left panel 1
Back panel
Gas Regulator
Gas hose
19
18
1
2
3
4
5
7
8
10
15
16
17
14
12 13
6
9
11
PARTS LIST
1 Warming rack
2 Cooking grid
3 Flame tamer
4 Grill body
5 Side table (left)
6 Side burner
7 Door cross beam
8 Door handle
9 Back panel
10 Left panel
12 Left door
13 Right door
14 Magnet
15 Bottom shelf
17 Castor (without lock)
18 Gas regulator
19 Gas hose
11 Right panel
16 Castor (with lock)
GB
D_01128_6-Brenner-Gasgrill-GJ601-SB.indd 19D_01128_6-Brenner-Gasgrill-GJ601-SB.indd 19 02.10.20 11:4802.10.20 11:48
2
4
Castor (with lock) (2)
Castor (without lock) (2)
9 Gas hose
18
19
16
17
15
14
11
9
12 13
7
8
10
6
5
4
3
2
1

- 3 -
Instruction Manual
PARTS LIST
A M4 x 8mm
x4
B
M6 x 10mm
x37
C
M6 x 15mm x16
D
Washer
x16
E Spring washer x16
Please make sure that your grill is assembled properly. Detailed assembly instructions are
provided in the packaging of each grill, containing specic assembly procedures for each
model. Follow these instructions carefully to ensure that your grill is assembled correctly
and safely.
CAUTION
While we take every eort to ensure that the assembly process is as easy as
possible, it cannot be avoided that fabricated steel parts may have sharp corners
and edges. These can cause cuts if handled without the appropriate level of
care during assembly. Please be careful when handling any parts. We strongly
recommend wearing protective work gloves.
REQUIRED TOOLS, NOT INCLUDED
- 4 -
Instruction Manual
- 21 -
5
English
ASSAMBLY
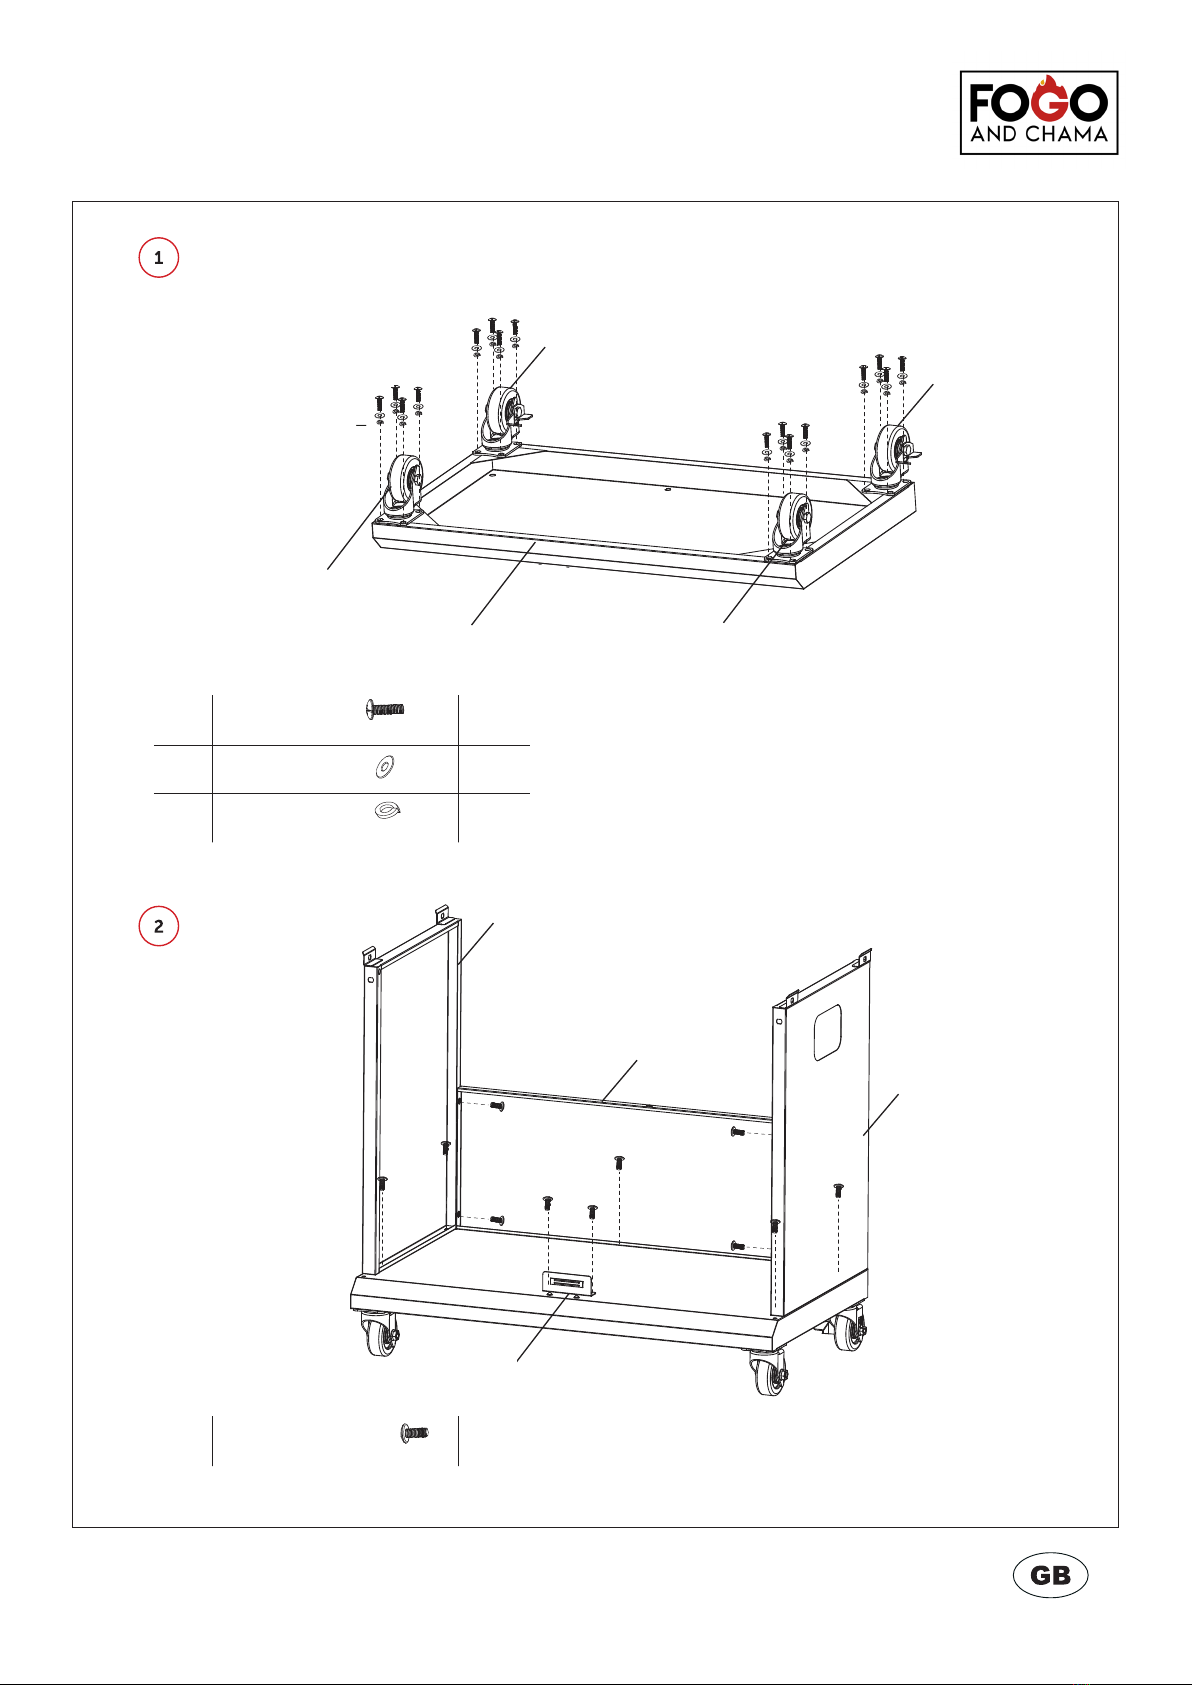
1
16
2
B M6 x 10mm x 11
17
C
D
E
17
15
14
16
10
9
11
Cx 16
D
M6 x 15mm
x 16Washer
Ex 16Spring shim
Assambly
ASSEMBLY
Washer
Spring shim
GB
D_01128_6-Brenner-Gasgrill-GJ601-SB.indd 21D_01128_6-Brenner-Gasgrill-GJ601-SB.indd 21 02.10.20 11:4802.10.20 11:48
ASSEMBLY
17
15 17
16
16C
x 16
x 16
x 16
M6 x 15mm
M6 x 10mm
Washer
Spring shim
C
D
E
10
9
11
14
Bx 11
D
E

- 5 -
Instruction Manual
ASSEMBLY
- 22 -
6
3
4
B
7
8
8
B M6 x 10mm x 4
A
A
M4 x 8mm x 4
Assambly
GB
D_01128_6-Brenner-Gasgrill-GJ601-SB.indd 22D_01128_6-Brenner-Gasgrill-GJ601-SB.indd 22 02.10.20 11:4802.10.20 11:48
B
7
M6 x 10mmBx 4
M4 x 8mmAx 4
8
8
A
- 6 -
Instruction Manual
ASSEMBLY
- 23 -
7
English
Assambly
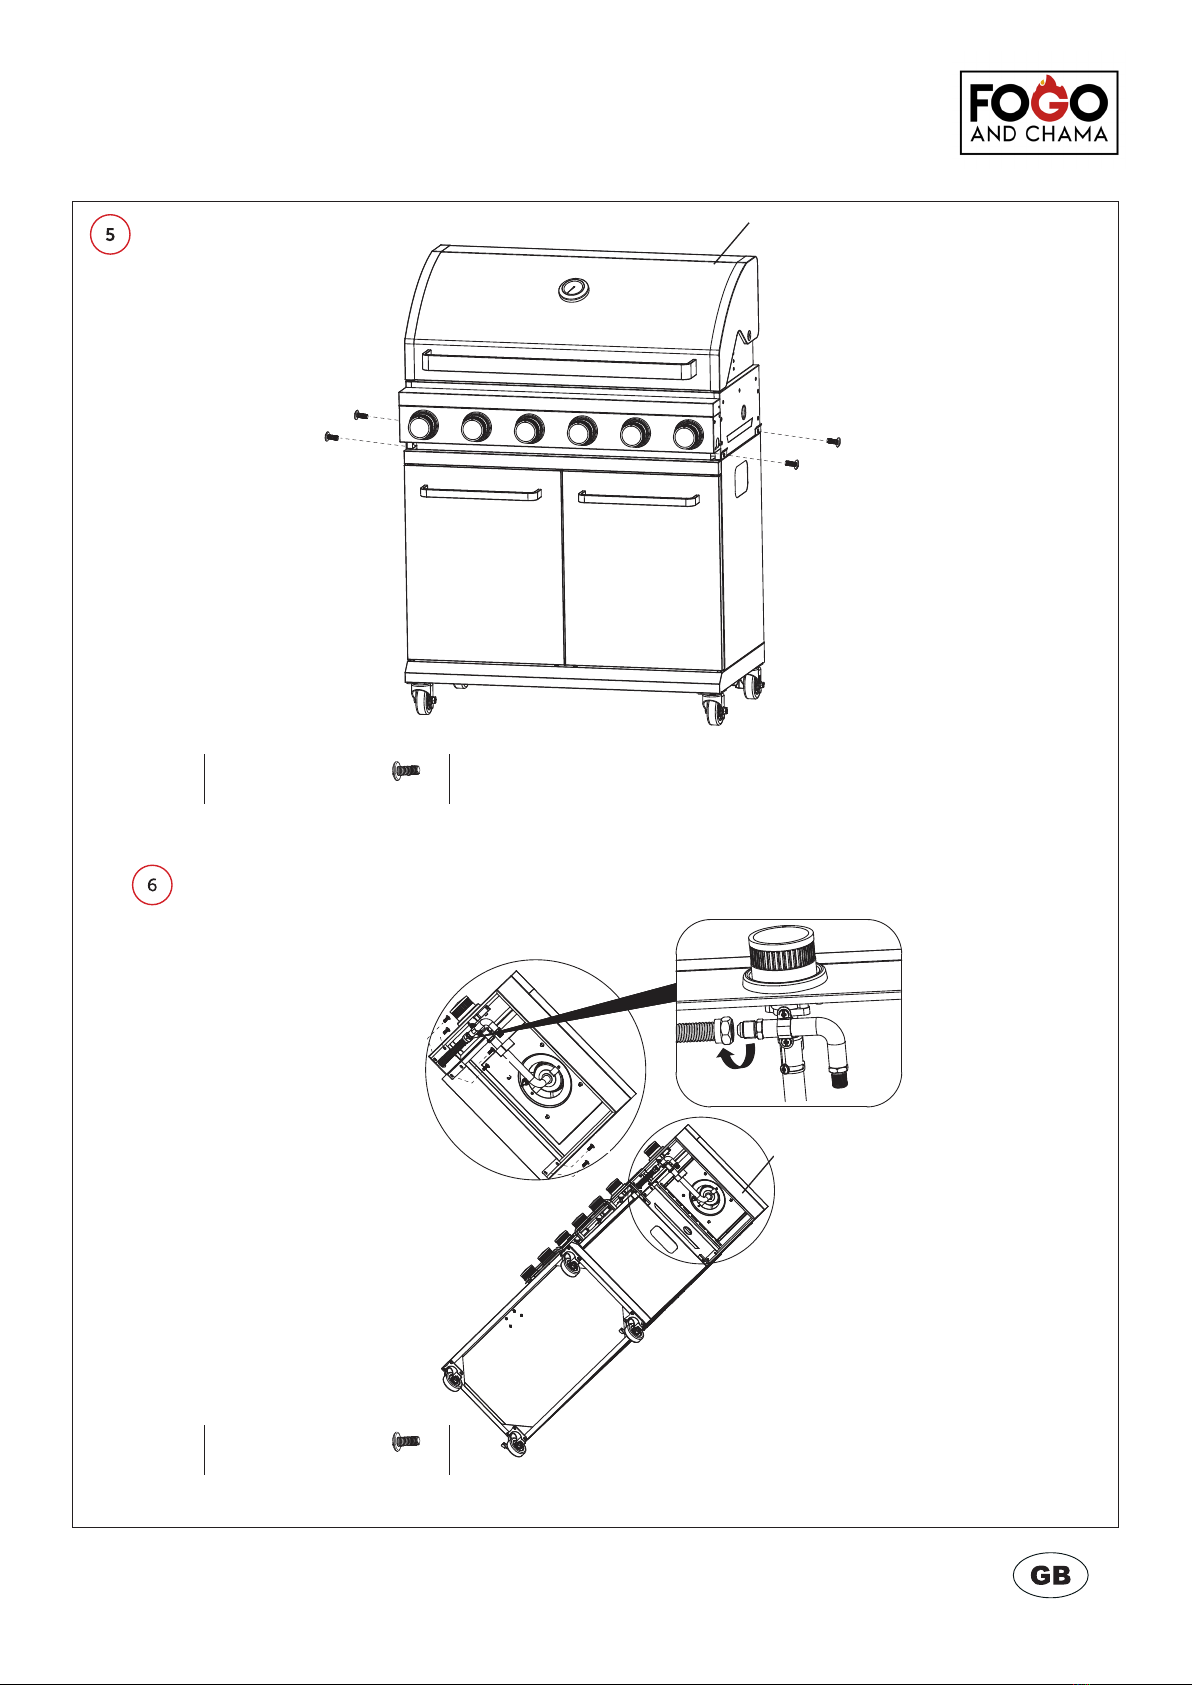
5
6
B
B
B
B
B
4
6
B M6 x 10mm x 4
B M6 x 10mm x 6
GB
D_01128_6-Brenner-Gasgrill-GJ601-SB.indd 23D_01128_6-Brenner-Gasgrill-GJ601-SB.indd 23 02.10.20 11:4802.10.20 11:48
4
B
B
Bx 4M6 x 10mm
B
Bx 6M6 x 10mm
6
B
B

- 7 -
Instruction Manual
ASSEMBLY
- 24 -
7
8
BB
B
5
B M6 x 10mm x 6
B M6 x 10mm x 6
GB
D_01128_6-Brenner-Gasgrill-GJ601-SB.indd 24 02.10.20 11:48
3
3
B
3
B
B
B
5
Bx 6M6 x 10mm
- 24 -
7
8
BB
B
5
B M6 x 10mm x 6
B M6 x 10mm x 6
GB
D_01128_4-Brenner-Gasgrill-GJ401-SB.indd 24 02.10.20 11:33
3
3
B
Bx 6M6 x 10mm
3
B

- 8 -
Instruction Manual
- 25 -
9
English
Assambly
9
10
2
1
GB
D_01128_6-Brenner-Gasgrill-GJ601-SB.indd 25D_01128_6-Brenner-Gasgrill-GJ601-SB.indd 25 02.10.20 11:4802.10.20 11:48
1
2

- 9 -
Instruction Manual
OPERATION
1. PREPARATION
A gas cylinder and suitable gas pressure regulators are required for using the gas grill. The
regulators should comply with the standard EN16129 in its latest version as well as with
national regulations..
ENERGY SAVING TIPS:
a) Keep the time the lid is open to a minimum.
b) Turn o the grill as soon as cooking is completed.
c) Preheat the gas grill for 10 to 15 minutes only (except when using it for the rst time).
d) Do not preheat the grill for longer than recommended.
e) Do not use a higher setting than necessary.
f) Connect the hose and regulator to the gas cylinder on the left side of the gas grill.
Always remember that the gas cylinder must be kept in a safe position and away from heat.
The hose should have a diameter of 8 to 10 mm. We recommend using a hose with a length
of no more than 1.5m.
2. INSTALLATION
After you have bought your gas cylinder, it needs to be set up with your gas grill.
• Check all parts and make sure that no part is missing. Please contact our customer services
if anything is missing.
• A suitable screwdriver and spanner are required for assembly. Make sure to only use tools
that are in good working order and suitable for the job.
Choose a suitable place to set up the appliance. It must be positioned rmly on a at and
suciently sized surface. Make sure that you have the correct inlet and outlet regulators that
match both the cylinder valve and the appliance.
When used outdoors, please ensure that the regulator is protected against weather
inuences. A spanner is required for connecting the gas cylinder.
When connecting the exible tube, please make sure it is not twisted.

- 10 -
Instruction Manual
- 27 -
11
English
HOW TO CONNECT A GAS CYLINDER:
a) When changing the gas cylinder which shall be carried out away from
any source of ignition. Position the gas cylinder at left side of your gas grill,
should not be placed inside BBQ, keeping in mind that the gas cylinder must
be kept away from heat and in a safe position.
b) When ready to use your gas grill insert the regulator into the gas cylinder
WARNING
Before attempting to light your gas grill you must refer to your
lighting instructions and warning / safety precautions.
Check the hose before each use, searching for cracking, cuts or any abrasions. If
the hose is found to be faulty in any way do not attempt to use your gas grill.
When changing your gas cylinder ensures that there are no sources of ignition
close by i.e. cigarettes, naked etc. Make sure that the appliance is
The appliance only can use liquid gas cylinder as per Technical Data Label. The
gas cylinder should meet the national requirement.
Gas Cylinder
Regulator
Hose
Hose
Gas connector
Operation
CONNECTING THE GAS CYLINDER:
Gas connector
Hose
Hose
Regulator
Gas cylinder
a) The gas cylinder must not be exchanged near any source of ignition. Position the gas cylinder
to the left of your gas grill. Do not place the gas cylinder inside the grill. Keep in mind that the
cylinder must always be safely positioned and kept away from heat.
b) When you are ready to use your gas grill, insert the regulator into the gas cylinder valve and
tighten the connection rmly.
WARNING
Please refer to the lighting instructions and warnings / safety precautions before attempting
to light your gas grill.
Before each use, check the hose for any cracks, cuts or abrasions. Do not use your gas
grill, if you nd the hose to be faulty in any way.
When replacing the gas cylinder, make sure that there are no ignition sources (such as re,
cigarettes, open ames, etc.) nearby, and that the appliance is switched off.
Use liquid gas cylinders as specied on the technical data label only. Make sure that the
gas cylinder complies with the applicable national regulations.
4
Make sure your grill is assembled properly. Detailed assembly instructions
are packed with each grill giving ϐ assembly procedures for each model.
Follow these instructions carefully to ensure the correct and safe assembly of the
grill.
CAUTION
lthough we take every effort to ensure that the assembly process is as
easy as possible, it is inherent with fabricated steel parts that corners
and edged can cause cuts if improperly handled during assembly
procedures. Be careful while handling any parts during assembly. It
is strongly recommended that you protect hands with a pair of work
gloves.
TOOLS NEEDED, NOT INCLUDED
A M4 x 8mm x 4
B M6 x 10mm x 31
Cx 16
D
M6 x 15mm
x 16Washer
Ex 16Spring shim
Parts List
GB
D_01128_6-Brenner-Gasgrill-GJ601-SB.indd 27D_01128_6-Brenner-Gasgrill-GJ601-SB.indd 27 02.10.20 11:4802.10.20 11:48
a) The gas cylinder must not be exchanged near any source of ignition. Position the gas
cylinder to the left of your gas grill. Do not place the gas cylinder inside the grill. Keep in
mind that the cylinder must always be safely positioned and kept away from heat.
b) When you are ready to use your gas grill, insert the regulator into the gas cylinder valve
and tighten the connection rmly.
WARNING
Please refer to the lighting instructions and warnings / safety precautions before
attempting to light your gas grill.
Before each use, check the hose for any cracks, cuts or abrasions. Do not use
your gas grill, if you nd the hose to be faulty in any way.
When replacing the gas cylinder, make sure that there are no ignition sources
(such as re, cigarettes, open ames, etc.) nearby, and that the appliance is
switched o.
Use liquid gas cylinders as specied on the technical data label only. Make sure
that the gas cylinder complies with the applicable national regulations.
- 11 -
Instruction Manual
CONNECTING THE GAS CYLINDER
3. SAFETY PRECAUTIONS
a) Use soapy water to check the gas line for leaks, whenever you have created a
new connection.
b) The top lid must always be open when you light the burner.
c) Use oven gloves and sturdy gas grilling utensils when cooking on the grill.
d) Be prepared for accidents and re. Make sure that you know where to nd a rst aid kit
and re extinguisher and how to use these.
e) Keep electrical cables and the fuel supply hose away from any hot surfaces.
f) Work with caution whenever you cook on the grill.
g) Do not heat any closed glass or metal food containers on the grill. Pressure may build up
and cause the container to burst. This can lead to serious personal injury or damage to
the appliance.
We recommend wearing protective gloves when operating the appliance, especially when
handling particularly hot components.
4. LIGHTING INSTRUCTIONS CAUTION
CAUTION
Make sure that the lid is open when you light the burner!
Do not stand with your face directly above the gas grill, when lighting it.
Please observe the following procedure for lighting your gas grill:
Lighting the pilot gas (main burner and side burner):
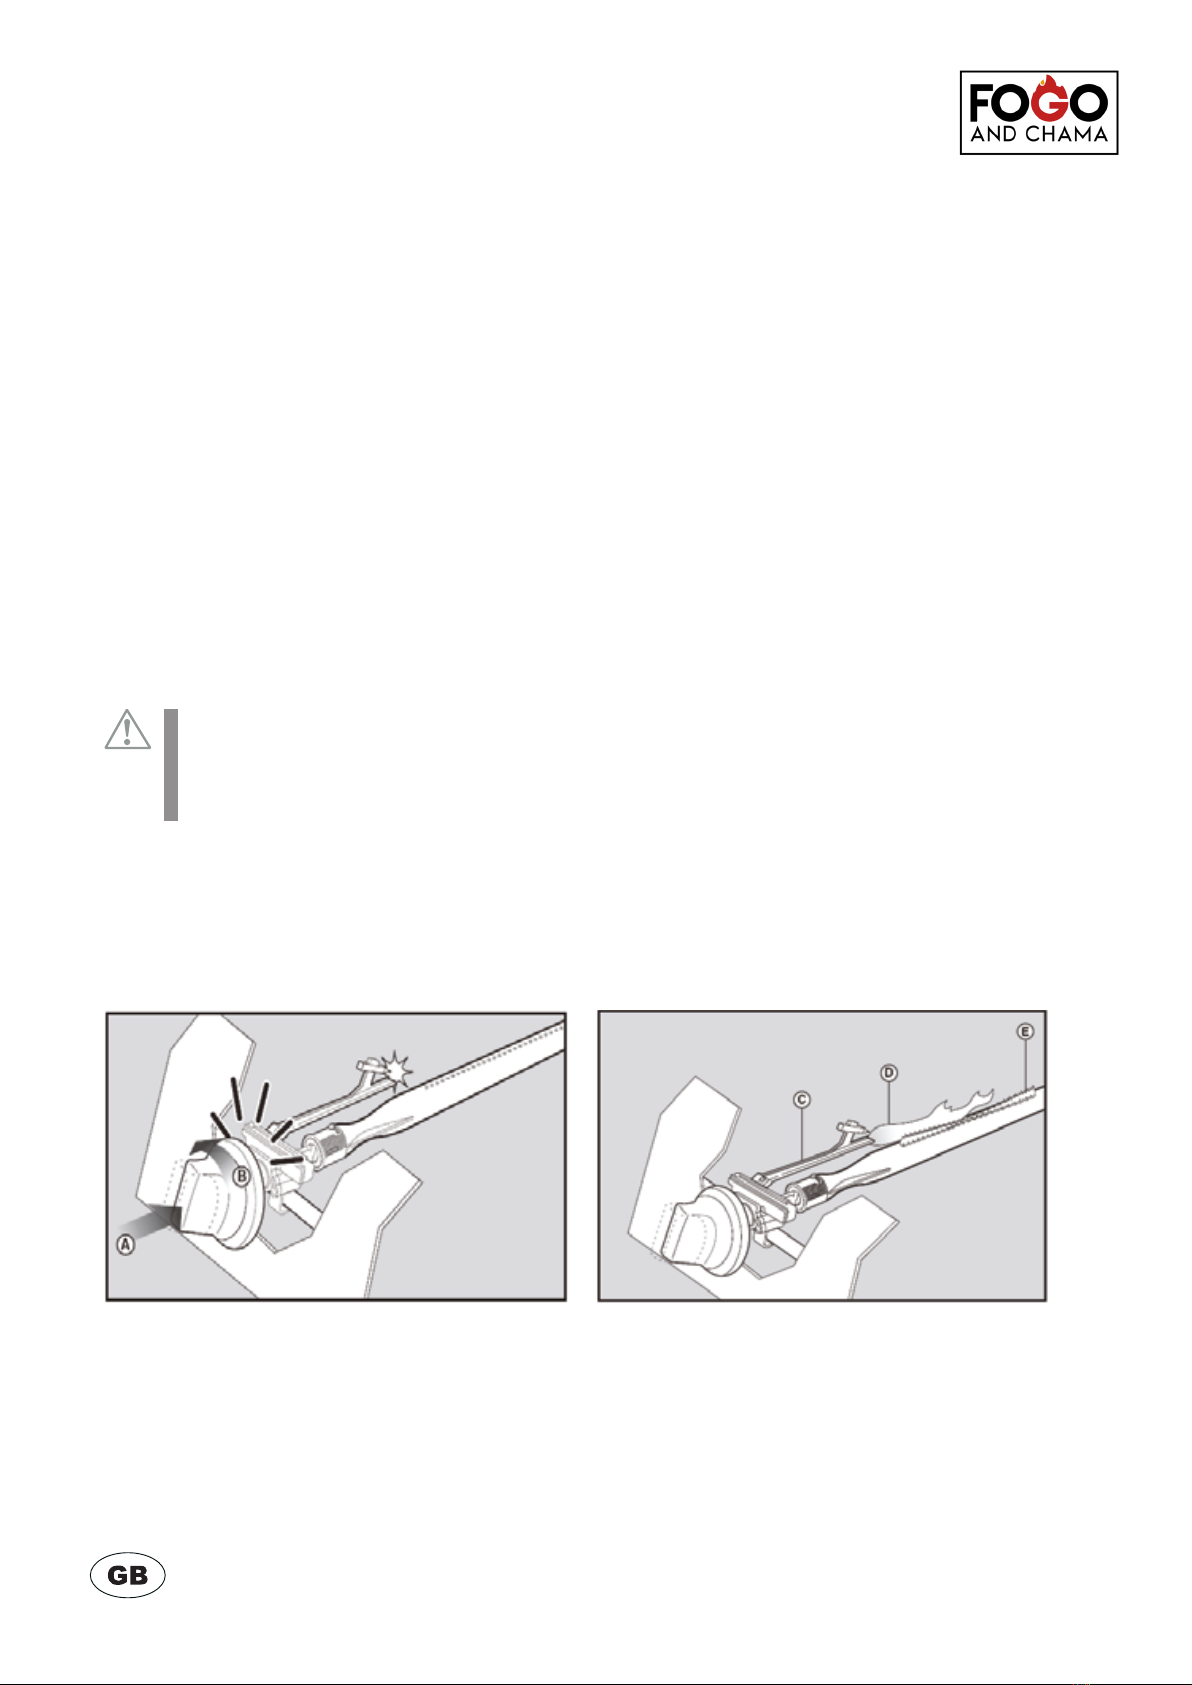
With all gas controls on the gas grill in the “OFF” position, open the gas cylinder valve. To
create a spark, press the control knob (A) and hold it down for 3 to 5 seconds to allow the
gas to ow. Then turn it anticlockwise to “HIGH” (B) to allow it to spark to the burner lighting
tube (C). You will hear a “snap” sound from the igniter and see an orange ame coming from
the burner lighting tube on the left side of the burner
- 28 -
3. SAFETY PRECAUTIONS
a) Use soapy water to check the gas line for leaks, whenever you have created a new connection.
b) The top lid must always be open when you light the burner.
c) Use oven gloves and sturdy gas grilling utensils when cooking on the grill.
d) Be prepared for accidents and re. Make sure that you know where to nd a rst aid kit and re
extinguisher and how to use these.
e) Keep electrical cables and the fuel supply hose away from any hot surfaces.
f) Work with caution whenever you cook on the grill.
g) Do not heat any closed glass or metal food containers on the grill. Pressure may build up and
cause the container to burst. This can lead to serious personal injury or damage to the
appliance.
We recommend wearing protective gloves when operating the appliance, especially when
handling particularly hot components.
4. 4. LIGHTING INSTRUCTIONS
CAUTION
Make sure that the lid is open when you light the burner!
Do not stand with your face directly above the gas grill, when lighting it.
Please observe the following procedure for lighting your gas grill:
Lighting the pilot gas (main burner and side burner):
With all gas controls on the gas grill in the “OFF” position, open the gas cylinder valve. To create a
spark, press the control knob (A) and hold it down for 3 to 5 seconds to allow the gas to ow. Then
turn it anticlockwise to “HIGH” (B) to allow it to spark to the burner lighting tube (C). You will hear a
“snap” sound from the igniter
and see an orange ame coming from the burner lighting tube on the left side of the burner (D).
Continue to hold down the burner control knob for another two seconds after the “snap”, to allow
the gas to ow all the way down the burner tube (E), and to ensure the grill is lit.
When the burner is lit, adjacent burners will also light, when their controls are turned to “HIGH”.
At the “HIGH” setting, the burner ame should be about 12 to 20 mm long with a minimum of
orange ame. Turn the gas control knob all the way anticlockwise for the minimum setting.
Please contact your retailer for advice, if you have any difculties lighting your gas grill following
the procedure described above.
12
3. SAFETY PRECAUTIONS
a) Always test gas line for leaks at connector with soapy water after making
connections.
b) The top lid must always be open when lighting the burner.
c) Use oven gloves and sturdy long handled gas grill tools when cooking on the
grill.
d)
e) Keep any electrical supply cord and the fuel supply hose away from any
heated surfaces.
f) Always cook with great care.
g) Do not heat any unopened glass or metal container of food on the grill.
Pressure may build up and cause the container to burst, possibly resulting in
serious personal injury or damage to the grill.
It is recommended to use protective gloves when operating the appliance,
especially handling particularly hot components.
4. LIGHTING INSTRUCTIONS
CAUTION
The lid must be open when lighting the burner!
Do not stand with your face directly over the gas grill when lighting
it. Your gas grill will have following method of ignition:
Pilot Gas Control Ignition (Main burner and side burner):
With all gas controls on the gas grill in the “OFF” position, turn on the gas
cylinder valve. To create a sparkyou must press the control knob A and hold in
this position for 3-5 seconds to allow gas ϐ and then turn anticlockwise to
“HIGH” B. It can spark to the burner lighting tube C. You will hear a “snap” from
the igniter and you will also see a orange coming from the burner lighting
tube at the left side of the burner D.
Continue to hold the burnercontrol knob in for two seconds after the “snap”, this
When the burner is alight, adjacent burners will cross light when their controls
are turned to “HIGH”.
At “HIGH” setting the burner ϐ
ϐǤ
should be approximately 12-20mm long
with a minimum of orange Turn the gas control fully anticlockwise for
minimum setting.
Should you have any ϐ lighting your gas grill following the above steps,
contact your dealer for advice.
ϐǤ
ϐǤϐ
ϐǤ
Operation
4
Make sure your grill is assembled properly. Detailed assembly instructions
are packed with each grill giving ϐ assembly procedures for each model.
Follow these instructions carefully to ensure the correct and safe assembly of the
grill.
CAUTION
lthough we take every effort to ensure that the assembly process is as
easy as possible, it is inherent with fabricated steel parts that corners
and edged can cause cuts if improperly handled during assembly
procedures. Be careful while handling any parts during assembly. It
is strongly recommended that you protect hands with a pair of work
gloves.
TOOLS NEEDED, NOT INCLUDED
A M4 x 8mm x 2
Bx 54
C
M6 x 10mm
x 2Washer
Dx 2R pin
Parts List
GB
D_01561_GJD301-01.indd 28D_01561_GJD301-01.indd 28 07.10.20 20:0507.10.20 20:05
D). Continue to hold down the burner control knob for another two seconds after the “snap”,
to allow the gas to ow all the way down the burner tube (E), and to ensure the grill is lit.
When the burner is lit, adjacent burners will also light, when their controls are turned to
“HIGH”. At the “HIGH” setting, the burner ame should be about 12 to 20 mm long with
a minimum of orange ame. Turn the gas control knob all the way anticlockwise for the
minimum setting. Please contact your retailer for advice, if you have any diculties lighting
your gas grill following the procedure described above.

- 12 -
Instruction Manual
If you cannot use automatic ignition, please remove the cooking grill and heat diuser
(hotplate). Then turn the valve anticlockwise to 90° to light the ame using a barbecue
lighter held to the burner re hole at a distance of 5 mm. Now replace the cooking grill and
heat diuser (hotplate). Please wear reproof and heat resistant gloves.
WARNING
If the burner still does not light, turn the burner control knob to “OFF” and wait for 5 minutes
to let the gas clear, before you make another attempt to light the gas grill.
STORAGE
Store your gas cylinder in a well-ventilated outdoor area, and disconnect the cylinder from
the gas grill whenever it is not in use. Ensure that you are outdoors and that there are no
sources of ignition nearby, before attempting to disconnect your gas cylinder from the grill.
Before using your gas grill after a period of storage, please make sure to check for any gas
leaks or any obstructions in the burner etc. Always follow the cleaning instructions to ensure
that your gas grill is safe to use.
If the gas grill is stored outdoors, please ensure that the area under the front panel is free
from any obstructions (dirt, insects, etc.) as this may aect the ow of gas.
• Store your grill in a cool and dry place. You may need to dry the gas grill and the inside of
the cover before use.
• Chrome plated warming racks etc. should be coated with cooking oil. Wrap the burners in
aluminium foil to help prevent insects or other debris from obstructing the burners.
CLEANING
We recommend that you service your gas grill every 90 days, however, it is absolutely
necessary that maintenance work is carried out at least once a year. By doing so, you will
extend the service life of your gas grill.
Your gas grill is very easy and convenient to clean, if you follow these useful hints.
a) Turn on the burner for 15 to 20 minutes. Any grease drippings on the grill and the hot
stone are burned o. Make sure that the appliance has cooled down before you continue.
b) The grids should be cleaned regularly by soaking and washing them in soapy water.
c) The inside surfaces of the grill body cover should also be washed with hot, soapy water.
Use a wire brush, steel wool, or a scouring pad to remove any stubborn dirt.
d) Check the burner regularly to ensure that it is free from insects or spiders that might clog
the gas system and obstruct the gas ow. Make sure to clean the venturi pipes of the
burner very carefully, ensuring that there are no blockages. We recommend using a pipe
cleaner for cleaning the venturi pipe area.
e) Any modications of this appliance may be dangerous and are not permitted.
CONNECTING THE GAS CYLINDER
Maintenance

- 13 -
Instruction Manual
TROUBLESHOOTING
PROBLEM POSSIBLE CAUSE
SOLUTION
Gas leaking from cracked/cut/
burned hose
Damaged hose Turn o the gas at the
cylinder, replace the hose if
it is cut or cracked.
Gas leaking from gas cylinder Mechanical failure due to
material fatigue or incorrect
use
Close the gas cylinder valve.
Gas leaking from gas cylinder
valve
Failure of gas cylinder valve
due to incorrect use or
mechanical failure
Close the gas cylinder valve
Return the gas cylinder to
your gas supplier.
Burners will not light using the
ignition system
Empty gas cylinder. Faulty
regulator.
Obstructions in the burners.
Obstructions of the gas jets
or hose.
Replace with a full gas
cylinder.
Have the regulator checked
or replaced.
Clean the burners.
Clean the jets and hose.
Low ame or ashback (re in
the burner tube – a hissing or
roaring noise may be heard)
Obstructions in the burners.
Obstructions of the gas jets
or hose.
Windy conditions.
Clean the burners. Clean
the jets and hose. Use the
grill in a more sheltered
spot.
Gas valve knob dicult to turn Gas valve jammed. Replace the gas valve.
- 14 -
Instruction Manual
Customer Service
Style 6 Burner Gas Barbecue
Name
Scorpion 6.1
Code
FC-SCORP6.1
CUSTOMER SERVICE
- 31 -
Name • Nome • Nom • Naam
Nr. • No. • n°
Typ • Type • Tipo
Service • Servizio
Imported by baumarkt direkt GmbH & Co KG
Alter Teichweg 25, 22081 Hamburg, Germany
Produktberatung: 01806/ 63 06 30 Festnetz 20 Cent/Anruf, Mobilfunk max. 60 Cent/Anruf
Quelle D Fachberatung: 01806/111 100 Festnetz 20 Cent/Anruf, Mobilfunk max. 60 Cent/Anruf
D
CH
F
I
A
Bei Problemen oder Fragen wenden Sie sich bitte an unsere Servicehotline!
Quelle CH: 0848 85 85 00 Ackermann CH: 0848 85 85 11, Jelmoli Technik: 0848 858 530
Si vous avez des problèmes ou des ques
Se ha problemi o domande si rivolge al nostro servizio di assistenza!
Quelle CH: 0848 85 85 02 Ackermann CH: 0848 85 85 31, Jelmoli Technik: 0848 858 530
tions, contactez notre service en ligne!
Quelle CH: 0848 85 85 01 Ackermann CH: 0848 85 85 21, Jelmoli Technik: 0848 858 530
Universal: 0043/662/4485 59 Fachberatung Heimwerken (zum Festnetztarif – je nach Betreiber)
Otto: 0043/316/606 159 Beratung Heimwerken (zum Festnetztarif – je nach Betreiber)
Quelle: 0043/662/9005 59 Fachberatung Heimwerken (zum Festnetztarif – je nach Betreiber)
NL
call center telefoonnummer 0900-1901 15 ct/min
XXX
XXX
Service
3 Burner Gas
Barbecue
GJD301-01
Imported by baumarkt direkt GmbH & Co KG
Alter Teichweg 25, D-22081 Hamburg, Germany
Call
D_01561_GJD301-01.indd 31D_01561_GJD301-01.indd 31 07.10.20 20:0507.10.20 20:05
- 31 -
Name • Nome • Nom • Naam
Nr. • No. • n°
Typ • Type • Tipo
Service • Servizio
Imported by baumarkt direkt GmbH & Co KG
Alter Teichweg 25, 22081 Hamburg, Germany
Produktberatung: 01806/ 63 06 30 Festnetz 20 Cent/Anruf, Mobilfunk max. 60 Cent/Anruf
Quelle D Fachberatung: 01806/111 100 Festnetz 20 Cent/Anruf, Mobilfunk max. 60 Cent/Anruf
D
CH
F
I
A
Bei Problemen oder Fragen wenden Sie sich bitte an unsere Servicehotline!
Quelle CH: 0848 85 85 00 Ackermann CH: 0848 85 85 11, Jelmoli Technik: 0848 858 530
Si vous avez des problèmes ou des ques
Se ha problemi o domande si rivolge al nostro servizio di assistenza!
Quelle CH: 0848 85 85 02 Ackermann CH: 0848 85 85 31, Jelmoli Technik: 0848 858 530
tions, contactez notre service en ligne!
Quelle CH: 0848 85 85 01 Ackermann CH: 0848 85 85 21, Jelmoli Technik: 0848 858 530
Universal: 0043/662/4485 59 Fachberatung Heimwerken (zum Festnetztarif – je nach Betreiber)
Otto: 0043/316/606 159 Beratung Heimwerken (zum Festnetztarif – je nach Betreiber)
Quelle: 0043/662/9005 59 Fachberatung Heimwerken (zum Festnetztarif – je nach Betreiber)
NL call center telefoonnummer 0900-1901 15 ct/min
XXX
XXX
Service
3 Burner Gas
Barbecue
GJD301-01
Imported by baumarkt direkt GmbH & Co KG
Alter Teichweg 25, D-22081 Hamburg, Germany
Call
D_01561_GJD301-01.indd 31D_01561_GJD301-01.indd 31 07.10.20 20:0507.10.20 20:05
If you have any problems or questions please call : 0800 999 1375
Imported by Fogo & Chama Ltd, 1386 London Rd, Leigh-on-Sea,
Essex, SS9 2UJ, UK

- 15 -
Instruction Manual
If you have any problems or questions please call : 0800 999 1375
Imported by Fogo & Chama Ltd, 1386 London Rd, Leigh-on-Sea,
Essex, SS9 2UJ, UK
This manual suits for next models
1
Table of contents
Other Fogo & Chama Grill manuals


