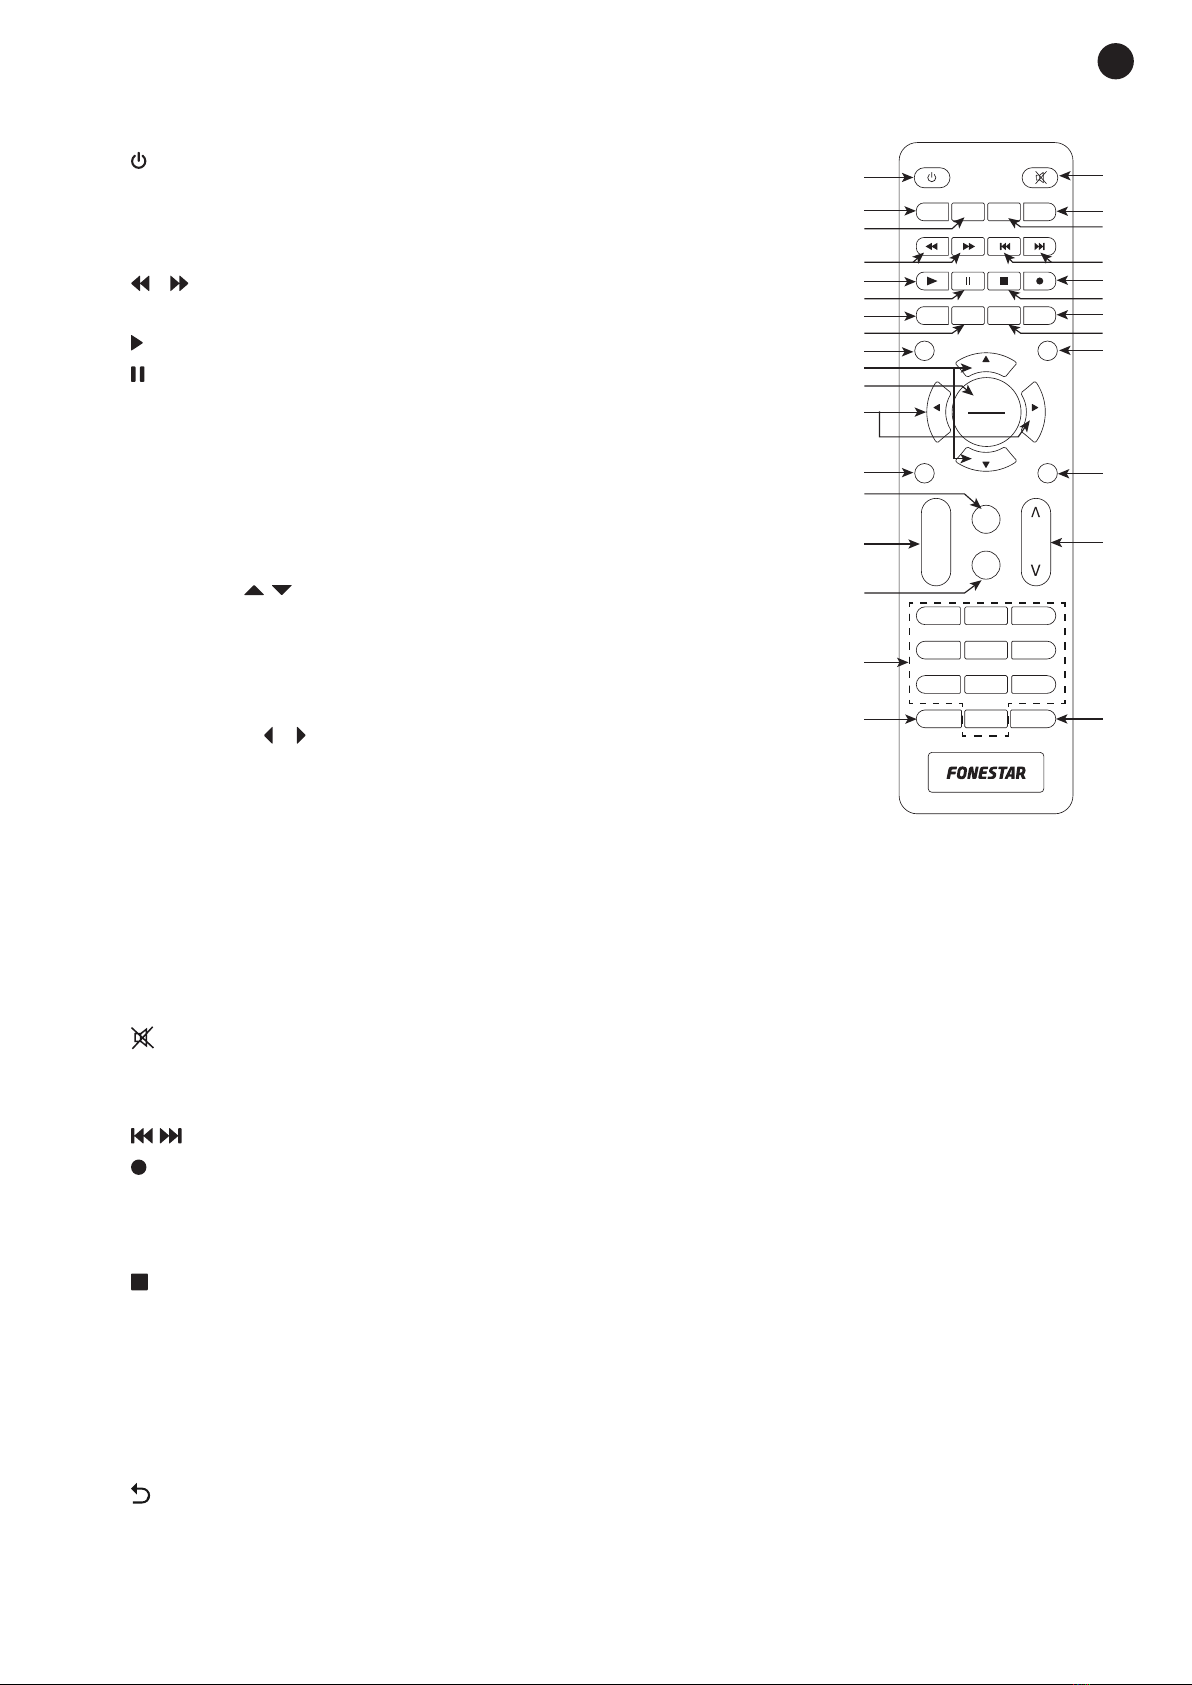
FONESTAR RDT-762HD User manual

INSTRUCTION MANUAL/MANUAL DE USUARIO/
MODE D’EMPLOI/MANUAL DE INSTRUÇÕES
RDT-762HD
DVB-T2 HD RECEIVER
RECEPTOR DVB-T2 HD
RÉCEPTEUR DVB-T2 HD
RECETOR DVB-T2 HD

EN
- 2 -
DESCRIPTION
- DVB-T2 and DVB-C2 HD receiver with HDMI output and PVR function with time shift: records TV
programmes and plays back video, audio and picture files.
- It supports high-efficiency video encoding (H.265 HEVC).
CONTROLS AND FUNCTIONS
FRONT PANEL
RDT-762HD
HD DVB-T2 RECEIVER 0022
RDT-762HD
DVB-T2 AND DVB-C2 HD RECEIVER
RF IN RF OUT COAXIAL HDMI TV
100-240 V AC, 50/60 Hz
POWER CONSUPTION: 7.5 W MAX.
CAUTION:SHOCK HAZARD-DO NOT OPEN
RISK OF FIRE-REPLACE FUSE AS MARKED
CAUTION
RISK OF ELECTRIC
SHOCK DO NOT OPEN
1 32 4 5 6 87 9
1 32 4 5 6
®
1.- USB storage device connection port.
2.- IR receiver for remote control.
3.- LED power indicator. Green when on and red when off.
4.- Information display.
5.- +/-: buttons to change channels and navigate menu up/down.
6.- M: button to display the main menu on the screen. It also allows you to go back in the menu.
7.- </>: buttons for volume adjustment and left/right menu navigation.
8.- OK: button to validate the selected menu item.
9.- : device on/off switch.
REAR PANEL
RDT-762HD
HD DVB-T2 RECEIVER 0022
RDT-762HD
DVB-T2 AND DVB-C2 HD RECEIVER
RF IN RF OUT COAXIAL HDMI TV
100-240 V AC, 50/60 Hz
POWER CONSUPTION: 7.5 W MAX.
CAUTION:SHOCK HAZARD-DO NOT OPEN
RISK OF FIRE-REPLACE FUSE AS MARKED
CAUTION
RISK OF ELECTRIC
SHOCK DO NOT OPEN
1 32 4 5 6 87 9
1 32 4 5 6
®
1.- RF IN: input from the tuner's antenna.
2.- RF OUT: output from the tuner's antenna to provide another antenna socket.
3.- COAXIAL: digital audio output.
4.- HDMI: high definition (HD) audio and video output to connect to a TV with a digital input.
5.- TV: standard definition (SD) audio and video output to connect to the TV input.
6.- Power supply input.

EN
- 3 -
MANDO A DISTANCIA
1
3
2
4
5
6
8
7
10
11
12
13
14
15
16
17
18 30
29
28
19
25
26
27
9
24
23
21
22
20
OK
1 2 3
4 5 6
7 8 9
TV/RADIO 0FAV
CH+
CH-
VOL+ VOL-
MENU
LIST
EXIT
VOL
EPG
TXT
CH
+
-
i
REPEAT
ASPECT TIMER
GOTO
PVR
SUBTITLE
V-FORMAT
AUDIO
1.- : on/StandBy button on the receiver.
2.- GOTO: opens options in the PVR recording player.
3.- REPEAT: in the USB file playback allows the repeat setting to be made:
REPEAT ONE, SEQUENCE, OR ONLY ONCE.
4.- / : enables you to reverse/fast forward playback. Press repeatedly
to increase the setting speed.
5.- : starts the image reproduction.
6.- : pauses the image reproduction.
7.- PVR: displays the recorded PVR files and allows viewing.
- In teletext and menu, red function key.
8.- V.FORMAT: allows you select the screen resolution.
- In teletext and menu, green function key.
9.- MENU: displays the main menu on the screen and allows you to go
back to the menu.
10.- CH+/CH- ( / ): these buttons allow you to change channels and
navigate through menus.
11.- OK/LIST : displays the channel information being viewed. A second
press shows the technical characteristics of the signal.
- In the menu, confirms the selected option.
12.- VOL+/VOL- ( / ): volume adjustment and navigation buttons for the
menus.
13.- i: displays current channel information. A second press shows the
technical characteristics of the signal.
- In the menu, confirms the selected option
14.- EPG: displays the channel programming guide.
15.- VOL+/VOL-: adjusts the volume.
16.- TXT: displays the teletext on the screen. Press EXIT to exit.
17.- 0-9: number buttons.
18.- TV/RADIO: select among the available TV channels or the radio stations.
19.- : turns the audio output on/off.
20.- AUDIO: audio language setting, displays the list of available audio.
21.- SUBTITLE: settings, displays the list of available subtitles.
22.- / : buttons to play previous/next file.
23.- : record button. Press once to start recording the channel being viewed. Press a second time to set
the recording duration (hours:minutes) (optional); at the end of this time, the recording will be stored
automatically and the player will switch to StandBy if it is not stopped by the warning message on the
screen. You can change the channel after recording is started.
24.- : stops the current recording or playback.
25.- TIMER: direct access to the list and configuration of scheduled events. For more information, please
refer to the section OPERATION / MENU / MENU / TIME.
- In teletext and menu, blue function key.
26.- ASPECT: allows the aspect ratio to be changed.
- In teletext and menu, yellow function key.
27.- EXIT: allows you to exit or go back in the menu.
28.- : button to go back to the previous channel.
29.- CH+/CH-: these buttons allow you to change the channel. In the channel list allows to go to the
previous/next page.
30.- FAV: displays favourite channel list.

EN
- 4 -
OPERATION
INSTALLATION (FIRST USE)
If you are using the tuner for the first time or have restored it to its factory settings, the following menu will
be displayed. Select the menu language (OSD), the country in which it is installed and then select CHANNEL
SEARCH to start the search.
MENU
Press the MENU button to access the main menu. Use the /buttons to navigate through the menu options
and the /buttons to navigate through the submenus of each menu. Finally, use the /buttons to modify
their values.
To go back to the previous menu from a sub-menu, press the MENU button; and to exit, press the EXIT
button.
CHANNEL MENU
- CHANNEL EDIT: allows different actions to be performed on the tuned channels:
- Green button: change the name.
- Button 1: delete channel.
- Button 2: move channel.
- Button 3: skip channel.
- Button 4: lock channel.
- Button 5: add channel to favourites list.
NOTE: for the functions associated with the number buttons, you must press the button to apply the
action or press the corresponding number button again to exit the function.
- PROGRAM GUIDE: displays the channel programming guide.
- SORT: allows you to sort the channels when searching: BY SERVICE ID, BY SERVICE NAME, BY LCN,
BY ONID or BY TP.
- LCN: enables/disables the LCN function. When the LCN (Logical Channel Number) option is on, the
numbers assigned to each channel cannot be changed during tuning.
NOTE: disable this option if you want to sort channels according to your preferences.
- VOLUME SCOPE: the volume adjustment made on a channel will affect all channels equally (GLOBAL)
or each channel independently (CHANNEL).

EN
- 5 -
IMAGE MENU
- ASPECT RATIO: allows the aspect ratio to be changed.
- RESOLUTION: allows you select the screen resolution
- TV FORMAT: change the signal type between PAL or NTSC.
- TV-SCART: Colour adjustment for TV video output: RGB or CVBS.
- HDMI-CEC: allows you to activate the CEC signal on the HDMI connector.
- OSD SETTING: OSD graphics settings: TRANSPARENCY, BRIGHTNESS, COLOUR, CONTRAST and
OSD TIMEOUT.
- PANEL SETTING: setting of front panel LEDs:
- LED BRIGHTNESS: display brightness.
- INFO TO DISPLAY (ON): adjuts what the display will show when the receiver is on: CH NO (channel)
or TIME.
- DISPLAY TIME (STANDBY): turns on/off the option to display the time on screen with the receiver
in StandBy mode: ON or OFF.
SEARCH MENU
- SEARCH MODE: DVB-T2 or DVB-C2.
- FTA ONLY: type of channels to search for: ALL or TLC (The Learning Channel).
- AUTO SEARCH: performs an automatic search of channels according to the settings configured in this
SEARCH menu.
- MANUAL SEARCH: performs a manual search of the configured channel, frequency and bandwidth.
- COUNTRY: country of the place where the receiver is installed.
- ANTENNA POWER: adjust to power the antenna if necessary. By default, this value will be OFF.

EN
- 6 -
TIME MENU
- REGION AND TIME: setting for the time setting on the receiver.
- SLEEP: time for automatic shut-down. This value will remain active in the receiver every time you switch
it on, i.e. if you set a 2, the receiver will always switch off 2 hours after it has been switched on.
- TIMER SETTING: list of scheduled events. Using the colour buttons, you can delete, add or edit new
events. The created events are of 2 types: PVR (record) or PLAY (switch to a specific channel). For both
you must configure the following settings:
- MODE: PVR (recording) or PLAY (switching to a specific channel)
- TYPE: repetition of this action: ONCE, DAILY, or a specific day of the week.
- START DATE: day/month/year in which you want to start the event.
- START TIME: hours:minutes in which you want to start the event.
- DURATION: (for PVR mode only) duration of recording.
- CHANNEL: channel that you want to record or play in this event.
- POWER ON/OFF: programmer for automatic on and off of the receiver. You will need to enter the
hours:minutes of the day you want it to turn on or off.
SETTINGS MENU
- OSD LANGUAGE: language of all system menus and information blocks.
- EPG LANGUAGE: language of the program guide.
- SUBTITLE LANGUAGE: activation and desired language of the subtitles.
- AD SUBTITLES: enable/disable audio description in subtitles for people with hearing problems.
- TXT LANGUAGE: teletext language.
- FIRST AUDIO LANGUAGE: setting of the desired default language for the audio.
- SECOND AUDIO LANGUAGE: setting of the desired second default language for the audio.
- DIGITAL AUDIO: audio type: PCM or BYPASS.

EN
- 7 -
SYSTEM MENU
NOTE: the default password is 000000.
- PARENTAL CONTROL: allows you to lock the display of programs according to their minimum age
category. When there is a programme of an age greater than the indicated age, you will be asked for the
password to be able to reproduce it. In this setting, select the minimum age between 4 and 18 years old
or off.
- LOCK CONTROL:
- MENU LOCK: activate/deactivate the menu lock. Requires entering the password to access or
modify menu options.
- CHANNEL LOCK: enable/disable channel lock. Requires password input to view channels marked
as locked. To lock a channel you must do this in the CHANNEL > EDIT CHANNEL menu by pressing
the 4 (LOCK) and selecting the channels to lock.
- CHANGE PASSWORD: allows you to change the password.
- FACTORY RESET: resets the receiver settings to factory settings.
- SYSTEM INFORMATION: displays system information (software and hardware versions, model, etc.).
- SOFTWARE UPGRADE: option for system upgrade.
- NETWORK SETTING: internetnetwork configuration. A RT5370 Wi-Fi adapter must be connected.
- POWER ON CONTROL: setting of the operating status when the receiver is connected to the mains:
POWER ON, STANDBY (will turn on and display a warning before StandBy is started) or LAST STATE.
USB MENU
- MEDIA CENTER: allows you to browse the files included in the connected USB device by file type: files,
videos, music or image.
NOTE: supports MP3, AAC, M4A, JPEG, BMP and PNG files.
- PVR FILES: allows you to browse the recorded files using PVR included in the connected USB device.
- PVR MANAGEMENT:
- TIMESHIFT: activates/deactivates the timeshift function. This function allows you to stop playback
of the receiver signal at a desired instant and store it in a temporary buffer, so that you don't miss a
second of your favourite programme and can return to the current instant at any time you wish. To
start the function, display the corresponding channel and press the button on the remote control
and then press . This function will only be activated if ti is connected to a USB storage device.
NOTE: before starting this function set the following values RECORD DURATION and RECORD
TIMESHIFT.

EN
- 8 -
- RECORD DURATION: maximum time of use of the timeshift function.
- RECORD TIMESHIFT: activate/deactivate the recording of the timeshift function.
- DISK INFORMATION: displays the information of the connected USB device: total, used and free
capacity, unit name and file system.
- INTERNET: additional functionalities if you have internet access via Wi-Fi adapter RT5370.
NOTE: the SUPERCAST function allows you to send the screen of your mobile device (smartphone or
tablet) using its own application.
CONNECTION
Make the connections with all equipment disconnected from the mains.
- Connect the antenna to the ANT IN tuner input.
- Connect the audio and video output signal to the TV, via the SCART output or via the HDMI output, with
the appropriate cable in each instance.
NOTE: connect the receiver to the TV set using only one type of connection (HDMI or SCART).
- Once the connections have been made in accordance with your needs, connect the devices to the mains
and switch them on.
RDT-762HD
DVB-T2 AND DVB-C2 HD RECEIVER
RF IN RF OUT COAXIAL HDMI TV
100-240 V AC, 50/60 Hz
POWER CONSUPTION: 7.5 W MAX.
CAUTION:SHOCK HAZARD-DO NOT OPEN
RISK OF FIRE-REPLACE FUSE AS MARKED
CAUTION
RISK OF ELECTRIC
SHOCK DO NOT OPEN
HDMI
HDMI
TV
Scart
HDMI cable
RF cable
Antenna
-

EN
- 9 -
TECHNICAL SPECIFICATIONS
RDT-762HD
CHARACTERISTICS DVB-T2 and DVB-C2 HD receiver.
Compatible with DVB-T, HD DVB-T and HD cable TV.
Video recorder (PVR with time shift): records and plays TV programs.
USB port.
Multimedia player for video, audio and image files.
It supports high-efficiency video encoding (H.265 HEVC).
HD output formats: 1080p, 1080i, 720p, 576p, 576i, 480p and 480i.
HD output up to 1080p over HDMI and SD standard definition over europlug.
Dolby D+, Dolby Digital.
Subtitles, multi-audio channel language selection and teletext.
Allows saving/exporting channels and editing (favourites, moving, parental lock, deleting
and sorting).
Web menu options compatible with the RT5370 and MT7601 USB WiFi adapter.
Remote control.
Easy to use multi-language menu.
High reception sensitivity.
Electronic Program Guide (EPG).
OUTPUTS Audio/Video:
HDMI
SCART
Digital coaxial audio, RCA
RF antenna
POWER SUPPLY 110-240 V AC, 50/60 Hz, 7.5 W maximum.
Standby: 0.2 W
DIMENSIONS 168 x 36 x 94 mm depth
SIMPLIFIED EU DECLARATION OF CONFORMITY
FONESTAR SISTEMAS S.A. hereby declares that the DVB-T2 and DVB-C2 HD receiver RDT-762HD complies with the Directive
2014/53/EU.
The complete text of the EU Declaration of Conformity is available at the following internet address:
fonestar.com/RDT-762HD

EN
- 10 -
ES
DESCRIPCIÓN
- Receptor DVB-T2 y DVB-C2 HD con salida HDMI y función PVR con time shift: graba programas de TV
y reproduce ficheros de vídeo, audio e imágenes.
- Compatible con codificación de vídeo de alta eficiencia (H.265 HEVC).
CONTROLES Y FUNCIONES
PANEL FRONTAL
RDT-762HD
HD DVB-T2 RECEIVER 0022
RDT-762HD
DVB-T2 AND DVB-C2 HD RECEIVER
RF IN RF OUT COAXIAL HDMI TV
100-240 V AC, 50/60 Hz
POWER CONSUPTION: 7.5 W MAX.
CAUTION:SHOCK HAZARD-DO NOT OPEN
RISK OF FIRE-REPLACE FUSE AS MARKED
CAUTION
RISK OF ELECTRIC
SHOCK DO NOT OPEN
1 32 4 5 6 87 9
1 32 4 5 6
®
1.- Puerto de conexión para dispositivos de almacenamiento USB.
2.- Receptor IR para mando a distancia.
3.- Indicador luminoso de encendido. Verde cuando está encendido y rojo cuando está apagado.
4.- Pantalla de información.
5.- +/-: botones para cambiar de canal y navegar por menú arriba/abajo.
6.- M: botón para mostrar en pantalla el menú principal. Además, permite ir atrás en el menú.
7.- </>: botones para el ajuste de volumen y navegar por menú izquierda/derecha.
8.- OK: botón para validar la opción de menú seleccionada.
9.- : botón de encendido/apagado del equipo.
PANEL TRASERO
RDT-762HD
HD DVB-T2 RECEIVER 0022
RDT-762HD
DVB-T2 AND DVB-C2 HD RECEIVER
RF IN RF OUT COAXIAL HDMI TV
100-240 V AC, 50/60 Hz
POWER CONSUPTION: 7.5 W MAX.
CAUTION:SHOCK HAZARD-DO NOT OPEN
RISK OF FIRE-REPLACE FUSE AS MARKED
CAUTION
RISK OF ELECTRIC
SHOCK DO NOT OPEN
1 32 4 5 6 87 9
1 32 4 5 6
®
1.- RF IN: entrada de antena del sintonizador.
2.- RF OUT: salida de antena del sintonizador para disponer de otra toma de antena.
3.- COAXIAL: salida de audio digital.
4.- HDMI: salida de audio y vídeo de alta definición (HD) para conectar a un televisor con entrada digital.
5.- TV: salida de audio y vídeo de definición estándar (SD) para conectar a la entrada del televisor.
6.- Entrada de alimentación.

EN
- 11 -
ES
MANDO A DISTANCIA
1
3
2
4
5
6
8
7
10
11
12
13
14
15
16
17
18 30
29
28
19
25
26
27
9
24
23
21
22
20
OK
1 2 3
4 5 6
7 8 9
TV/RADIO 0FAV
CH+
CH-
VOL+ VOL-
MENU
LIST
EXIT
VOL
EPG
TXT
CH
+
-
i
REPEAT
ASPECT TIMER
GOTO
PVR
SUBTITLE
V-FORMAT
AUDIO
1.- : botón de encendido/StandBy del receptor.
2.- GOTO: abre opciones en el reproductor de grabaciones PVR.
3.- REPEAT: en la reproducción de archivos del USB permite realizar el
ajuste de la repetición: REPETIR UNO, SECUENCIA o SÓLO UNA VEZ.
4.- / : permite realizar retroceso/avance rápido de la reproducción.
Pulse repetidas veces para aumentar la velocidad del ajuste.
5.- : inicia la reproducción de la imagen.
6.- : pausa la reproducción de la imagen.
7.- PVR: muestra los archivos grabados PVR y permite su visualización.
- En teletexto y menú, botón de función rojo.
8.- V-FORMAT: permite seleccionar la resolución de la pantalla.
- En teletexto y menú, botón de función verde.
9.- MENU: muestra en pantalla el menú principal y permite ir atrás en el
menú.
10.- CH+/CH- ( / ): estos botones permiten cambiar de canal y navegar
por los menús.
11.- OK/LIST : muestra la información de canal que se está visionando. Si
se pulsa una segunda vez muestra las características técnicas de la
señal.
- En el menú, valida la opción seleccionada.
12.- VOL+/VOL- ( / ): ajuste del volumen y botones de navegación para
los menús.
13.- i: muestra información del canal actual. Si se pulsa una segunda vez
muestra las características técnicas de la señal.
- En el menú, valida la opción seleccionada
14.- EPG: muestra la guía de programación de los canales.
15.- VOL+/VOL-: ajuste del volumen.
16.- TXT: muestra en pantalla el teletexto. Pulse EXIT para salir.
17.- 0-9: botones numéricos.
18.- TV/RADIO: selecciona entre los canales de TV o radio sintonizados.
19.- : activa/desactiva la salida de audio.
20.- AUDIO: configuración del idioma del audio, muestra el listado de audios disponibles.
21.- SUBTITLE: configuración de los subtítulos, muestra el listado de subtítulos disponibles.
22.- / : botones para reproducir anterior/siguiente archivo.
23.- : botón de grabación. Pulse una vez para iniciar la grabación del canal que se está visualizando. Pulse
una segunda vez para configurar la duración de la grabación (horas:minutos) (opcional); al finalizar
este tiempo, la grabación se almacenará automáticamente y el reproductor pasará a StandBy si no se
detiene mediante el mensaje de aviso que aparecerá en la pantalla. Puede cambiar el canal una vez
iniciada la grabación.
24.- : detiene la grabación o la reproducción en curso.
25.- TIMER: acceso directo al listado y configuración de eventos programados. Para más información vaya
al apartado FUNCIONAMIENTO / MENÚ / MENÚ HORA.
- En teletexto y menú, botón de función azul.
26.- ASPECT: permite cambiar la relación de aspecto de la imagen.
- En teletexto y menú, botón de función amarillo.
27.- EXIT: permite salir o ir atrás en el menú.
28.- : botón para volver al canal anterior.
29.- CH+ / CH-: estos botones permiten cambiar de canal. En el listado de canales permite pasar a la
anterior/siguiente página.
30.- FAV: muestra la lista de canales favoritos.

EN
- 12 -
ES
FUNCIONAMIENTO
INSTALACIÓN (PRIMER USO)
Si está usando por primera vez el sintonizador o si ha restaurado la configuración a valores de fábrica, en la
pantalla se mostrará el siguiente menú. Seleccione el idioma del menú (OSD), el país en la que está instalado
y comience seleccione BÚSQUEDA DE CANALES para iniciar la búsqueda.
MENÚ
Pulse el botón MENÚ para acceder al menú principal. Utilice los botones /para navegar por las opciones
del menú y los botones /navegar por los submenús de cada uno de ellos. Por último, utilice los botones
/ para modificar los valores de las mismas.
Para retroceder de un submenú al menú anterior pulse el botón MENU y para salir pulse el botón EXIT.
MENÚ CANALES
- EDICIÓN DE CANAL: permite realizar distintas acciones sobre los canales sintonizados:
- Botón verde: cambiar el nombre.
- Botón 1: eliminar canal.
- Botón 2: mover canal.
- Botón 3: saltar canal.
- Botón 4: bloquear canal.
- Botón 5: agregar canal a la lista de favoritos.
NOTA: para las funciones asociadas a los botones numéricos deberá pulsar el botón para aplicar la
acción o volver a pulsar el botón del número correspondiente para salir de la función.
- GUÍA DE PROGRAMA: muestra la guía de programación de los canales.
- ORDENAR: permite ordenar los canales al hacer la búsqueda: POR ID DE SERVICIO, POR NOMBRE DE
SERVICIO, POR LCN, POR ONID o POR TP.
- LCN: permite activar/desactivar la función LCN. Cuando la opción LCN (Logical Channel Number) está
activada, no se pueden modificar los números asignados a cada canal durante la sintonización.
NOTA: desactive esta opción si quiere ordenar canales según sus preferencias.
- ÁMBITO DE VOLUMEN: el ajuste de volumen que se haga sobre un canal afectará a todos los canales
por igual (GLOBAL) o cada canal de forma independiente (CANAL).

EN
- 13 -
ES
MENÚ IMAGEN
- RELACIÓN DE ASPECTO: permite cambiar la relación de aspecto de la imagen.
- RESOLUCIÓN: permite seleccionar la resolución de la pantalla
- FORMATO TV: permite cambiar el tipo de señal entre PAL o NTSC.
- TV-SCART: ajuste de color para la salida de vídeo TV: RGB o CVBS.
- HDMI-CEC: permite activar la señala CEC en el conector HDMI.
- CONFIGURACIÓN DE OSD: configuraciones de los gráficos OSD: TRANSPARENCIA, BRILLO, COLOR,
CONTRASTE y DURACIÓN DE OSD.
- CONFIGURACIÓN DEL PANEL: configuraciones de los leds del panel frontal:
- BRILLO LED: brillo de la pantalla.
- INFO A MOSTRAR (ENCENDIDO): ajuste de lo que mostrará la pantalla cuando el receptor esté
encendido: CANAL o HORA.
- MOSTRAR HORA (STANDBY): activa/desactiva mostrar la hora en la pantalla cuando el receptor
esté en StandBy: ENCENDIDO o APAGADO.
MENÚ BUSQUEDA
- MODO DE BÚSQUEDA: DVB-T2 o DVB-C2.
- SOLO FTA: tipo de canales a buscar: TODAS o TLC (The Learning Channel).
- BÚSQUEDA AUTOMÁTICA: realiza una búsqueda automática de canales según los ajustes configurados
en este menú BÚSQUEDA.
- BÚSQUEDA MANUAL: realiza una búsqueda manual del canal, frecuencia y ancho de banda
configurados.
- PAÍS: país del lugar donde está instalado el receptor.
- ALIMENTACIÓN DE ANTENA: ajuste para alimentar la antena en el caso de ser necesario. Por defecto,
este valor será APAGADO.

EN
- 14 -
ES
MENÚ HORA
- REGIÓN Y HORA: ajuste para la configuración de la hora en el receptor.
- SLEEP: tiempo para apagado automático. Este valor permanecerá activo en el receptor cada vez que le
encienda, es decir, si configura un 2, el receptor se apagará siempre a las 2 horas de haberlo encendido.
- AJUSTE DEL TEMPORIZADOR: listado de eventos programados. Mediante los botones de colores
podrá eliminar, añadir o editar eventos nuevos. Los eventos creados son de 2 tipos: PVR (grabación)
o REPRODUCIR (cambiar a un canal concreto). Para ambos deberá configurar los siguientes valores:
- MODO: PVR (grabación) o REPRODUCIR (cambiar a un canal concreto)
- TIPO: repetición de esta acción: UNA VEZ, DIARIO o un día de la semana concreto.
- FECHA DE INICIO: día/mes/año en el que se quiere iniciar el evento.
- HORA DE INICIO: horas:minutos en los que se quiere iniciar el evento.
- DURACIÓN: (sólo para modo PVR) duración de la grabación.
- CANAL: canal que se quiere grabar o reproducir en este evento.
- ENCENDER/APAGAR: programador para encendido y apagado automáticos del receptor. Deberá
introducir la horas:minutos del día en el que quiera que se encienda o apague.
MENÚ AJUSTES
- IDIOMA OSD: idioma de los menús y bloques de información.
- IDIOMA EPG: idioma de la guía de programación.
- IDIOMA DE LOS SUBTÍTULOS: activación e idioma deseado de los subtítulos.
- DA SUBTITULOS: activación/desactivación de la descripción del audio en los subtítulos para las
personas con problemas de audición.
- IDIOMA TXT: idioma del teletexto.
- PRIMER IDIOMA DE AUDIO: configuración del idioma deseado por defecto para el audio.
- SEGUNDO IDIOMA DE AUDIO: configuración del segundo idioma deseado por defecto para el audio.
- AUDIO DIGITAL: tipo de audio: PCM o BYPASS.

EN
- 15 -
ES
MENÚ SISTEMA
NOTA: la contraseña por defecto es 000000.
- CONTROL PARENTAL: permite bloquear la visualización de programas según su categoría de edad
mínima. Cuando exista un programa de mayor edad a la indicada se le solicitará la contraseña para
poder reproducirlo. En este ajuste seleccione la edad mínima de entre 4 y 18 años o apagado.
- CONTROL DE BLOQUEO:
- BLOQUEO DE MENÚ: permite activar/desactivar el bloqueo de menú. Requiere introducir la
contraseña para acceder o modificar las opciones del menú.
- BLOQUEO DE CANAL: activar/desactivar el bloqueo de canales. Requiere introducir la contraseña
para visualizar los canales marcados como bloqueados. Para bloquear un canal deberá realizarlo
en el menú CANALES > EDICIÓN DE CANAL pulsando el 4 (LOCK) y seleccionando los canales a
bloquear.
- CAMBIAR CONTRASEÑA: permite cambiar la contraseña establecida.
- REESTABLECER VALORES DE FÁBRICA: restablece los ajustes del receptor a valores de fábrica.
- INFORMACIÓN DEL SISTEMA: muestra la información del sistema (versiones de software y hardware,
modelo, etc.).
- ACTUALIZACIÓN DE SOFTWARE: opción para la actualización del sistema.
- CONFIGURACIÓN DE RED: configuración de red internet. Es necesario conectar un adaptador Wi-Fi
RT5370.
- CONTROL DE ENCENDIDO: configuración del estado de funcionamiento al conectar el receptor a
la corriente: ENCENDER, STANDBY (se encenderá y mostrará un aviso antes de iniciar StandBy) o
ÚLTIMO ESTADO.
MENÚ USB
- CENTRO DE ARCHIVOS: permite explorar los archivos incluidos en el dispositivo USB conectado por
tipo de archivo: archivos, vídeos, música o imagen.
NOTA: soporta archivos MP3, AAC, M4A, JPEG, BMP y PNG.
- ARCHIVOS PVR: permite explorar los archivos grabados mediante PVR incluidos en el dispositivo USB
conectado.

EN
- 16 -
ES
- GESTIÓN DE PVR:
- TIMESHIFT: activa/desactiva la función timeshift (desplazamiento en el tiempo). Esta función
permite detener la reproducción de la señal del receptor en un instante deseado y almacenarla en
un buffer temporal, para no perderse ni un segundo de su programa favorito, pudiendo volver al
instante actual en el momento que desee. Para iniciar la función, visualice el canal correspondiente
y pulse en el mando a distancia el botón y después . Esta función sólo se activará si tiene
conectado un dispositivo USB.
NOTA: antes de iniciar esta función configure los valores siguientes DURACIÓN DE LA GRABACIÓN
y GRAVAR TIMESHIFT.
- DURACIÓN DE LA GRABACIÓN: tiempo máximo de uso de la función timeshift.
- GRABAR TIMESHIFT: activa/desactiva la grabación de la función timeshift.
- INFORMACIÓN DEL DISCO: muestra la información del dispositivo USB conectado: capacidad
total, usada y libre, nombre de la unidad y sistema de archivos.
- INTERNET: funcionalidades adicionales si dispone de acceso a internet mediante adaptador Wi-Fi
RT5370.
NOTA: el función SUPERCAST permite enviar la pantalla del dispositivo móvil (smartphone o tablet) con
ayuda de la aplicación propia.
CONEXIÓN
Realice las conexiones con todos los equipos desconectados de la red eléctrica.
- Conecte la antena a la entrada del sintonizador ANT IN.
- Conecte la señal de salida de audio y vídeo al televisor, mediante la salida de euroconector (SCART) o
mediante la salida HDMI, con el cable adecuado en cada caso.
NOTA: conecte el receptor al televisor mediante un sólo tipo de conexión (HDMI o SCART).
- Una vez realizadas las conexiones según sus necesidades conecte los aparatos a la red eléctrica y
enciéndalos.
RDT-762HD
DVB-T2 AND DVB-C2 HD RECEIVER
RF IN RF OUT COAXIAL HDMI TV
100-240 V AC, 50/60 Hz
POWER CONSUPTION: 7.5 W MAX.
CAUTION:SHOCK HAZARD-DO NOT OPEN
RISK OF FIRE-REPLACE FUSE AS MARKED
CAUTION
RISK OF ELECTRIC
SHOCK DO NOT OPEN
HDMI
HDMI
TV
Euroconector
Cable HDMI
Cable RF
Antena
-

EN
- 17 -
ES
ESPECIFICACIONES TÉCNICAS
RDT-762HD
CARACTERÍSTICAS Receptor DVB-T2 y DVB-C2 HD.
Compatible con TDT, TDT HD y TV por cable HD.
Videograbador (PVR con time shift): graba y reproduce programas de TV.
Puerto USB.
Reproductor multimedia de ficheros de vídeo, audio e imágenes.
Compatible con codificación de vídeo de alta eficiencia (H.265 HEVC).
Formatos de salida HD: 1080p, 1080i, 720p, 576p, 576i, 480p y 480i.
Salida de alta definición HD hasta 1080p por HDMI y definición estándar SD por
euroconector.
Dolby D+, Dolby Digital.
Subtítulos, selección de idiomas en canal multiaudio y teletexto.
Permite guardar/exportar canales y edición (favoritos, mover, bloqueo parental, borrar y
ordenar).
Opciones de menú web compatible con el adaptador USB WiFi RT5370 y MT7601.
Mando a distancia.
Menú multilenguaje de fácil manejo.
Alta sensibilidad de recepción.
Guía electrónica de programas (EPG).
SALIDAS Audio/Vídeo:
HDMI
Euroconector
Audio digital coaxial, RCA
Antena RF
ALIMENTACIÓN 110-240 V CA, 50/60 Hz, 7'5 W máximo.
Standby: 0'2 W
MEDIDAS 168 x 36 x 94 mm fondo
DECLARACIÓN UE DE CONFORMIDAD SIMPLIFICADA
Por la presente, FONESTAR SISTEMAS S.A. declara que el receptor DVB-T2 y DVB-C2 HD RDT-762HD es conforme con la
Directiva 2014/53/UE.
El texto completo de la declaración UE de conformidad está disponible en la dirección internet siguiente:
fonestar.com/RDT-762HD

FR
- 18 -
DESCRIPTION
- Récepteur DVB-T2 et DVB-C2 HD avec sortie HDMI et fonction PVR avec time shift : enregistre les
programmes TV et lit les fichiers vidéo, audio et image.
- Compatible avec le codage vidéo à haut rendement (H.265 HEVC).
- CONTRÔLES ET FONCTIONS
PANNEAU AVANT
RDT-762HD
HD DVB-T2 RECEIVER 0022
RDT-762HD
DVB-T2 AND DVB-C2 HD RECEIVER
RF IN RF OUT COAXIAL HDMI TV
100-240 V AC, 50/60 Hz
POWER CONSUPTION: 7.5 W MAX.
CAUTION:SHOCK HAZARD-DO NOT OPEN
RISK OF FIRE-REPLACE FUSE AS MARKED
CAUTION
RISK OF ELECTRIC
SHOCK DO NOT OPEN
1 32 4 5 6 87 9
1 32 4 5 6
®
1.- Port de connexion pour dispositifs de stockage USB.
2.- Récepteur IR pour la télécommande.
3.- Indicateur lumineux de mise en marche. Vert lorsqu’il est allumé et rouge lorsqu’il est éteint.
4.- Écran d’information.
5.- +/- : boutons pour changer de chaîne et naviguer dans menu haut/bas.
6.- M : bouton pour afficher le menu principal à l’écran. Il permet également de revenir en arrière dans le
menu.
7.- </> : boutons pour le réglage du volume et la navigation dans le menu gauche/droite.
8.- OK : pour valider l’option de menu sélectionnée.
9.- : bouton marche/arrêt de l’appareil.
PANNEAU ARRIÈRE
RDT-762HD
HD DVB-T2 RECEIVER 0022
RDT-762HD
DVB-T2 AND DVB-C2 HD RECEIVER
RF IN RF OUT COAXIAL HDMI TV
100-240 V AC, 50/60 Hz
POWER CONSUPTION: 7.5 W MAX.
CAUTION:SHOCK HAZARD-DO NOT OPEN
RISK OF FIRE-REPLACE FUSE AS MARKED
CAUTION
RISK OF ELECTRIC
SHOCK DO NOT OPEN
1 32 4 5 6 87 9
1 32 4 5 6
®
1.- RF IN : entrée antenne du syntoniseur.
2.- RF OUT : sortie de antenne du syntoniseur pour disposer d’une autre prise d’antenne.
3.- COAXIAL : sortie audio numérique.
4.- HDMI : sortie de l’audio et de vidéo de haute définition (HD) pour la connexion à un téléviseur avec
entrée numérique.
5.- TV : sortie d’audio et vidéo de définition standard (SD) pour connecter à l’entrée d’un téléviseur.
6.- Entrée d’alimentation.

FR
- 19 -
MANDO A DISTANCIA
1
3
2
4
5
6
8
7
10
11
12
13
14
15
16
17
18 30
29
28
19
25
26
27
9
24
23
21
22
20
OK
1 2 3
4 5 6
7 8 9
TV/RADIO 0FAV
CH+
CH-
VOL+ VOL-
MENU
LIST
EXIT
VOL
EPG
TXT
CH
+
-
i
REPEAT
ASPECT TIMER
GOTO
PVR
SUBTITLE
V-FORMAT
AUDIO
1.- : bouton de mise en marche/StandBy du récepteur.
2.- GOTO : ouvre des options dans le lecteur d’enregistrement PVR.
3.- REPEAT : dans la lecture d’un fichier USB permet d’effectuer le réglage
de la répétition : RÉPÉTER UN, SÉQUENCE ou UNE SEULE FOIS.
4.- / : permet le retour/avance rapide de la lecture. Appuyez plusieurs
fois sur cette touche pour augmenter la vitesse de réglage.
5.- : lance la lecture de l’image.
6.- : pause la lecture de l’image.
7.- PVR : affiche les fichiers enregistrés par le PVR et permet de les
visualiser.
- Dans le télétexte et le menu, bouton de fonction rouge.
8.- V.FORMAT : permet de sélectionner la résolution de l’écran.
- Dans le télétexte et le menu, bouton de fonction vert.
9.- MENU : affiche à l’écran le menu principal et permet de revenir en
arrière dans le menu.
10.- CH+/CH- ( / )(w/s) : permettent de changer de chaîne et de naviguer
dans les menus.
11.- OK/LIST : affiche les informations sur la chaîne en cours de visualisation.
Unedeuxièmepressionpermetd’afficherlescaractéristiquestechniques
du signal.
- Dans le menu, permet de valider l’option sélectionnée.
12.- VOL+/VOL- ( / ) : réglage du volume et boutons de navigation pour
les menus.
13.- i : affiche les informations sur le canal an cours. Une deuxième pression
permet d’afficher les caractéristiques techniques du signal.
- Dans le menu, permet de valider l’option sélectionnée
14.- EPG : guide de programmation des chaînes.
15.- VOL+/VOL- : réglage du volume.
16.- TXT : écran du teletexte. Appuyez sur EXIT pour sortir.
17.- 0-9 : touches numériques.
18.- TV/RADIO : sélectionne entre les chaînes de TV ou radio syntonisées.
19.- : active/désactive la sortie audio.
20.- AUDIO : réglage de la langue audio, affiche la liste des audios disponibles.
21.- SUBTITLE : paramètres des sous-titres, affiche la liste des sous-titres disponibles.
22.- / : boutons pour lire le fichier précédent/suivant.
23.- : bouton d’enregistrement. Appuyez une fois sur cette touche pour lancer l’enregistrement de la
chaîne en cours de visionnage. Appuyez une deuxième fois pour régler la durée de l’enregistrement
(heures:minutes) (optionnel) ; à la fin de cette durée, l’enregistrement sera automatiquement mémorisé
et le lecteur passera en mode veille s’il n’est pas arrêté par le message d’avertissement à l’écran. Vous
pouvez changer de chaîne après le début de l’enregistrement.
24.- : arrête l’enregistrement ou la lecture en cours.
25.- TIMER:accèsdirectàla liste etàla configuration desévénementsprogrammés. Pour plusd’informations,
consultez la section FONCTION / MENU/ MENÚ HEURE.
- Dans le télétexte et le menu, bouton de fonction bleu.
26.- ASPECT : permet de modifier le format de l’image.
- Dans le télétexte et le menu, bouton de fonction jaune.
27.- EXIT : permet de sortir ou revenir en arrière dans le menu.
28.- : bouton pour revenir au canal antérieur.
29.- CH+/CH- : ces boutons permettent de changer le canal. Dans la liste des chaînes, il permet d’aller à la
page précédente/suivante.
30.- FAV : affiche la liste des chaînes favories.

FR
- 20 -
FONCTIONNEMENT
INSTALLATION (PREMIER USAGE)
Si vous utilisez pour 1ère fois ou vous avez mis à jour la configuration aux valeurs par défaut, vous verrez
à l’écran le menu suivant. Sélectionnez la langue du menu (OSD), le pays dans lequel il est installé, puis
sélectionnez RECHERCHE DE CHAÎNES pour lancer la recherche.
MENU
Appuyez sur le bouton MENU pour accéder au menu principal. Utilisez les boutons /pour naviguer entre
les options du menu et les boutons /pour naviguer dans les sous-menus de chacun. Enfin, utilisez les
boutons / pour modifier leurs valeurs.
Pour revenir d’un sous-menu au menu précédant appuyez sur le bouton MENU et sur EXIT pour sortir.
MENU CHAÎNES
- MODIFIER LA CHAÎNE : permet d’effectuer différentes actions sur les canaux syntonisés :
- Bouton vert : changer le nom.
- Bouton 1 : éliminer canal.
- Bouton 2 : changer canal.
- Bouton 3 : saut de canal.
- Bouton 4 : verrouiller canal.
- Bouton 5 : ajouter un canal à la liste des favoris.
N.B. : pour les fonctions associées aux touches numériques, vous devez appuyer sur le bouton pour
appliquer l’action ou appuyez à nouveau sur la touche numérique correspondante pour quitter la fonction.
- GUIDE DES PROGRAMMES : guide de programmation des chaînes.
- TRIER : permet de trier les chaînes lors de la recherche : PAR ID DE SERVICE, PAR NOM DE SERVICE,
PAR LCN, PAR ONID ou PAR TP.
- LCN : active/désactive la fonction LCN. Lorsque l’option LCN (Logical Channel Number) est activée,
les numéros attribués à chaque chaîne ne peuvent pas être modifiés pendant la syntonisation.
N.B. : désactivez cette option pour ordonner les chaînes selon vos préférences.
- CHAMP D’APPLICATION DU VOLUME : le réglage du volume effectué sur un canal affecte tous les
canaux de manière égale (GLOBAL) ou chaque canal de manière indépendante (CHANNEL).
Table of contents
Languages:
Other FONESTAR TV Receiver manuals