for Living JS-C140-4A User manual

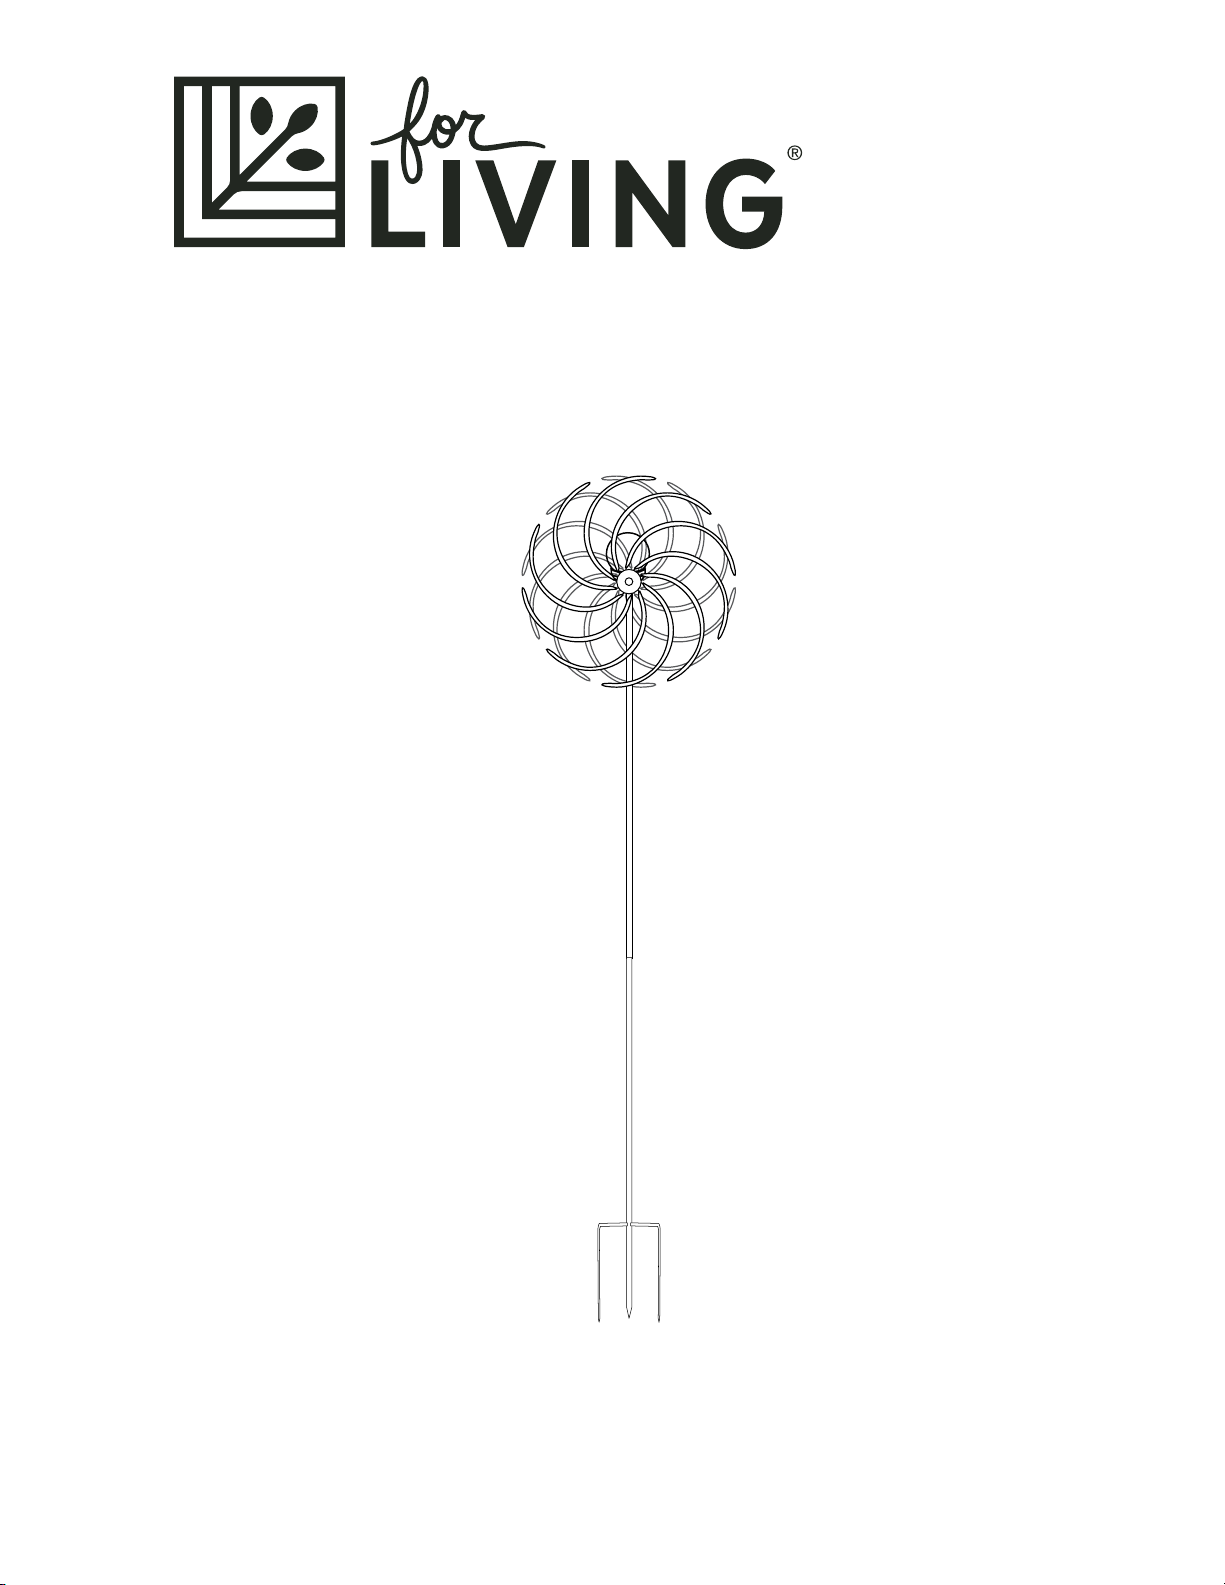
Solar Wind Spinner
Toll-free: 1-877-483-6759
IMPORTANT: Please read this manual carefully before beginning assembly of this product.
Keep this manual for future reference.
Assembly Instructions
Product No. 059-7303-0
Model No. JS-C140-4A
3
Made in China
Imported for Trileaf Distribution Trifeuil Toronto, Canada M4S 2B8
Table of ContentsImportant Safety Instructions
Table of Contents 3
Important Safety Instructions 3
Parts List 4
Assembly 4-6
Cleaning and Maintenance 7
Troubleshooting 7
Technical Data 7
Warranty 7
Caution! Always keep children under close supervision while they are using or around this product.
Never leave children unattended.
IMPORTANT: RETAIN FOR FUTURE REFERENCE, AND READ CAREFULLY
Let us help you!
1-877-483-6759 (toll free)
If you have questions regarding your product, require warranty assistance,
or have damaged or missing parts, please call our customer service toll-free helpline.
Contact us for assistance, we’re here to help.
IMPORTANT: Please read and understand this manual before any assembly. Before beginning assembly of product,
make sure all parts are present. Compare parts with packaging contents list. If any part is missing, or if you have
any questions, contact the service centre at 1-877-483-6759 (toll free).
Place all parts from the box in a cleared area and position them on the floor in front of you. Remove all packing
materials and place them back into the box. Do not dispose of the packing materials until assembly is complete.
Read each step carefully before beginning any assembly and make sure you understand each step. If you are
missing a part, please call our toll-free number for assistance 1-877-483-6759.
4 5
Product No. 059-7303-0 •Model No. JS-C140-4A
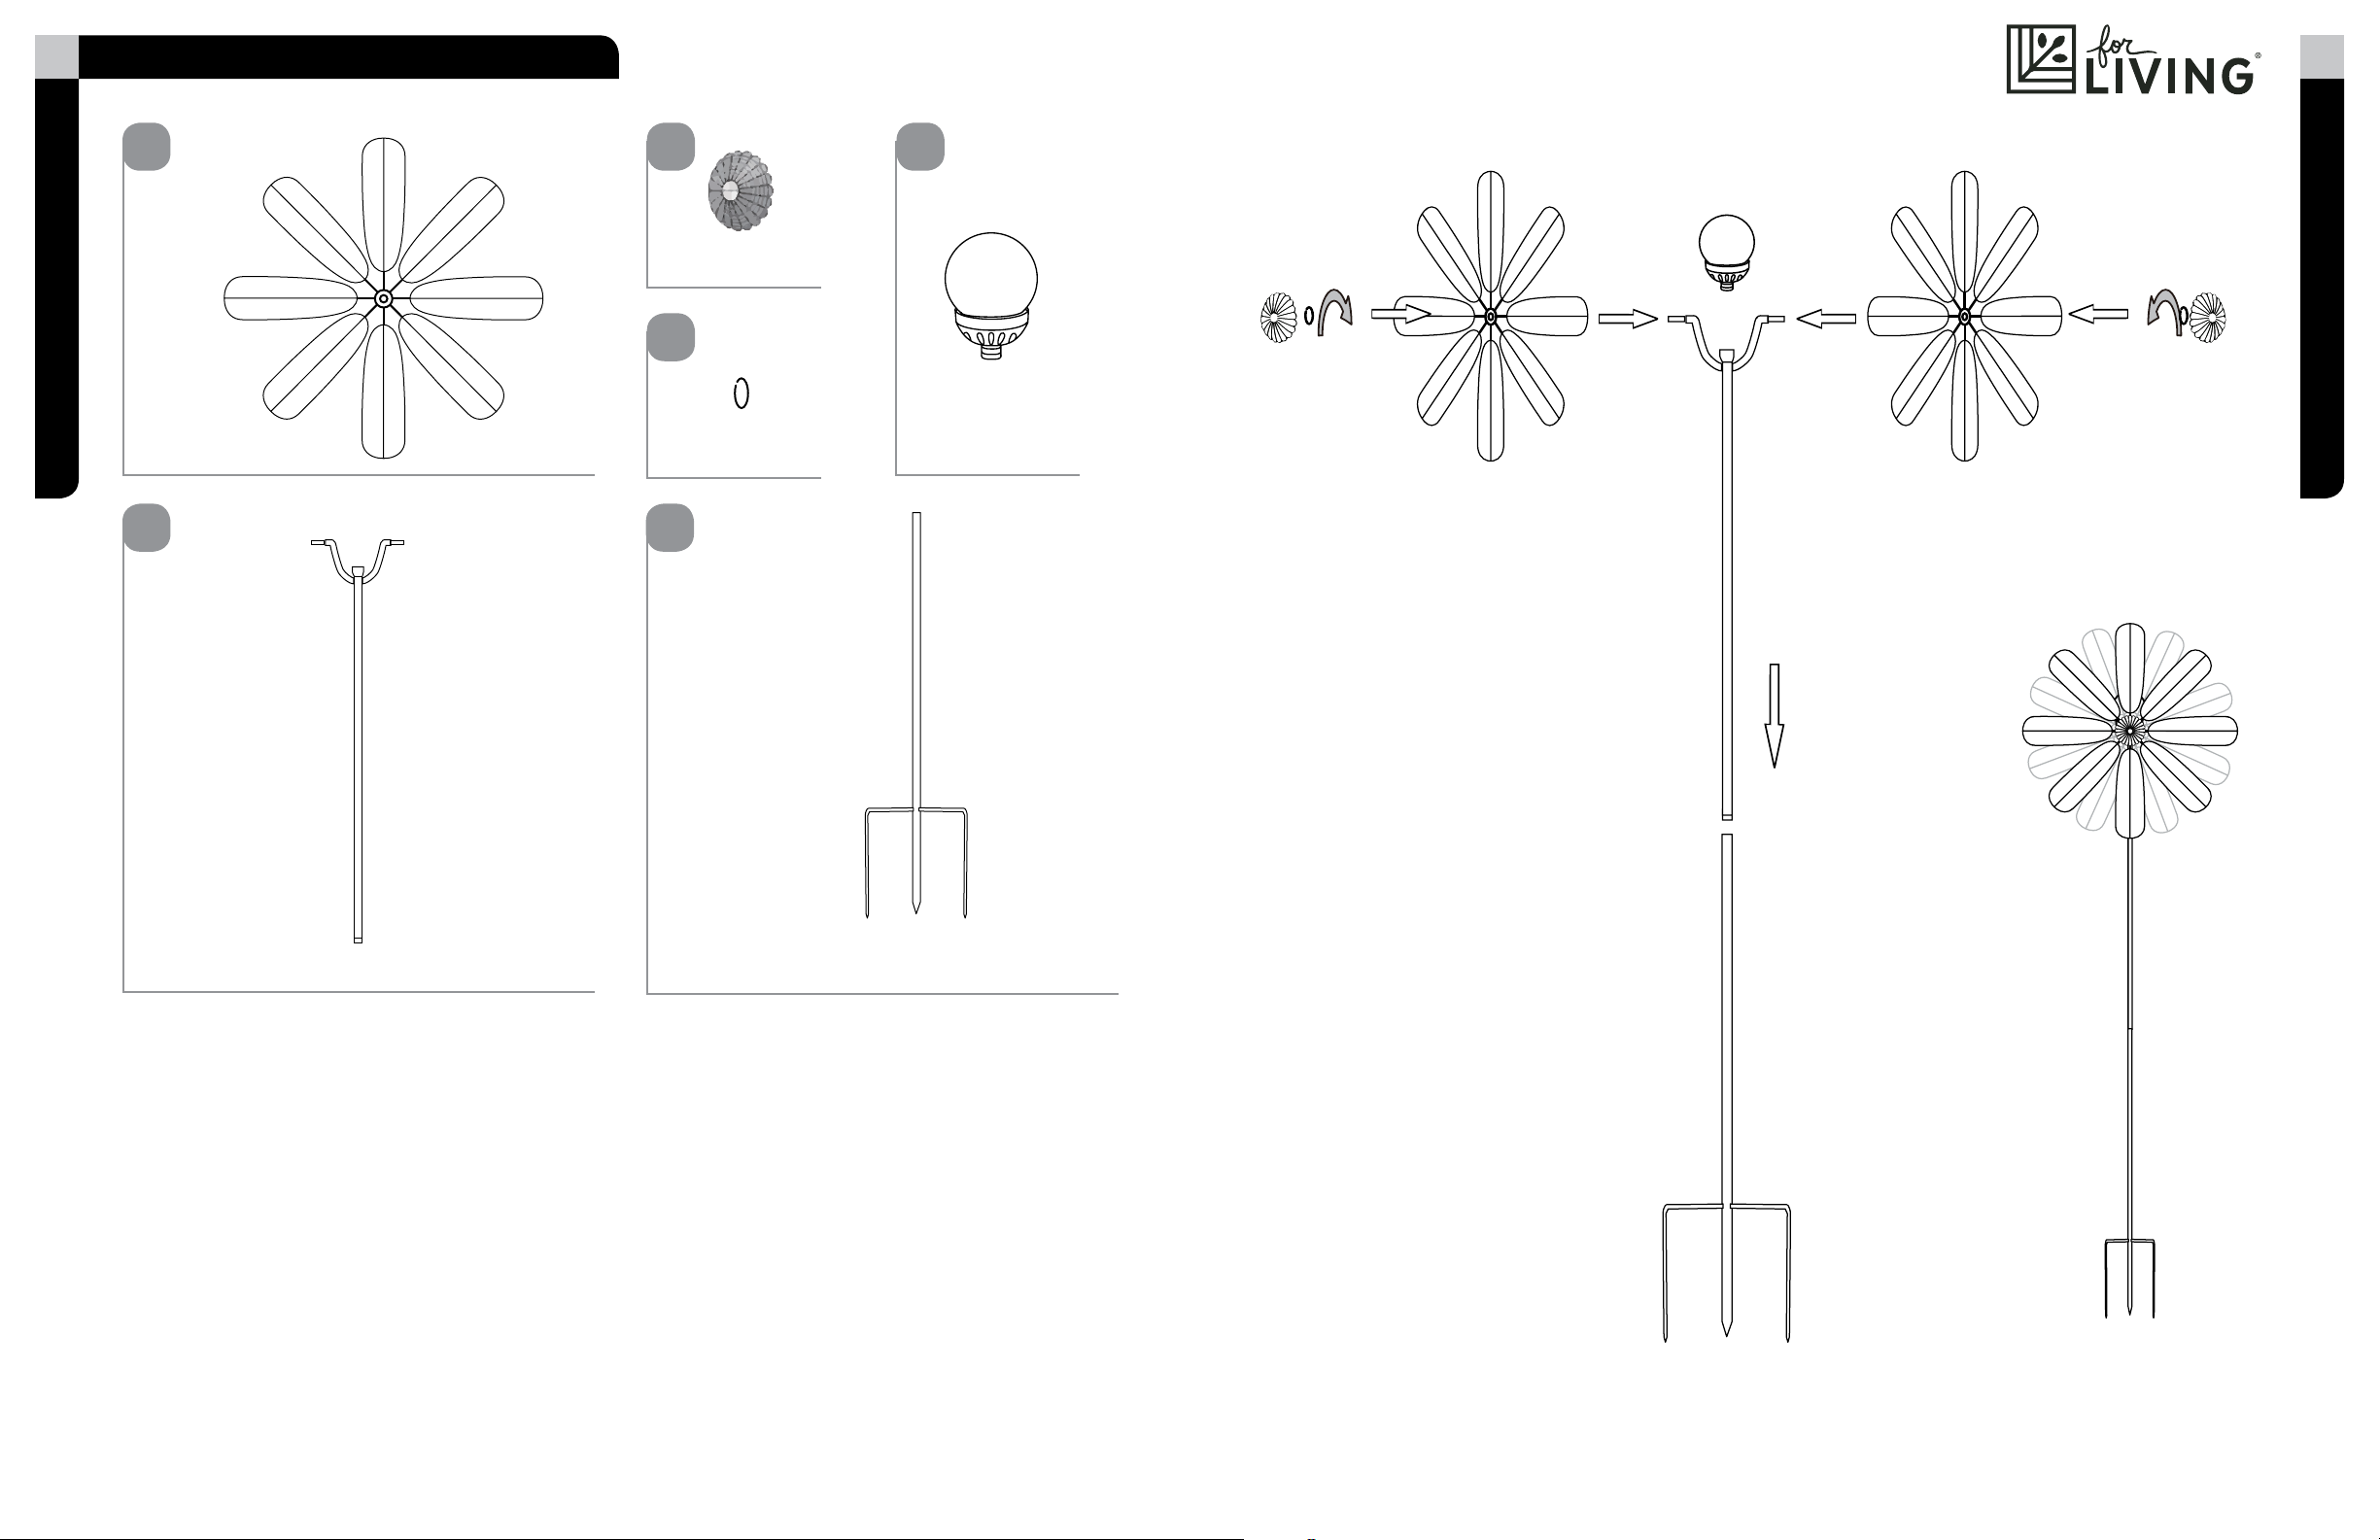
Parts List and assembly
Assembly
Spinner fan 1 - 2
1
Caps 2 - 2
Washer 3 - 2
"U" bar 5 - 1Bottom spike 6 - 1
Light globe 4 - 1
5 6
2
3
4
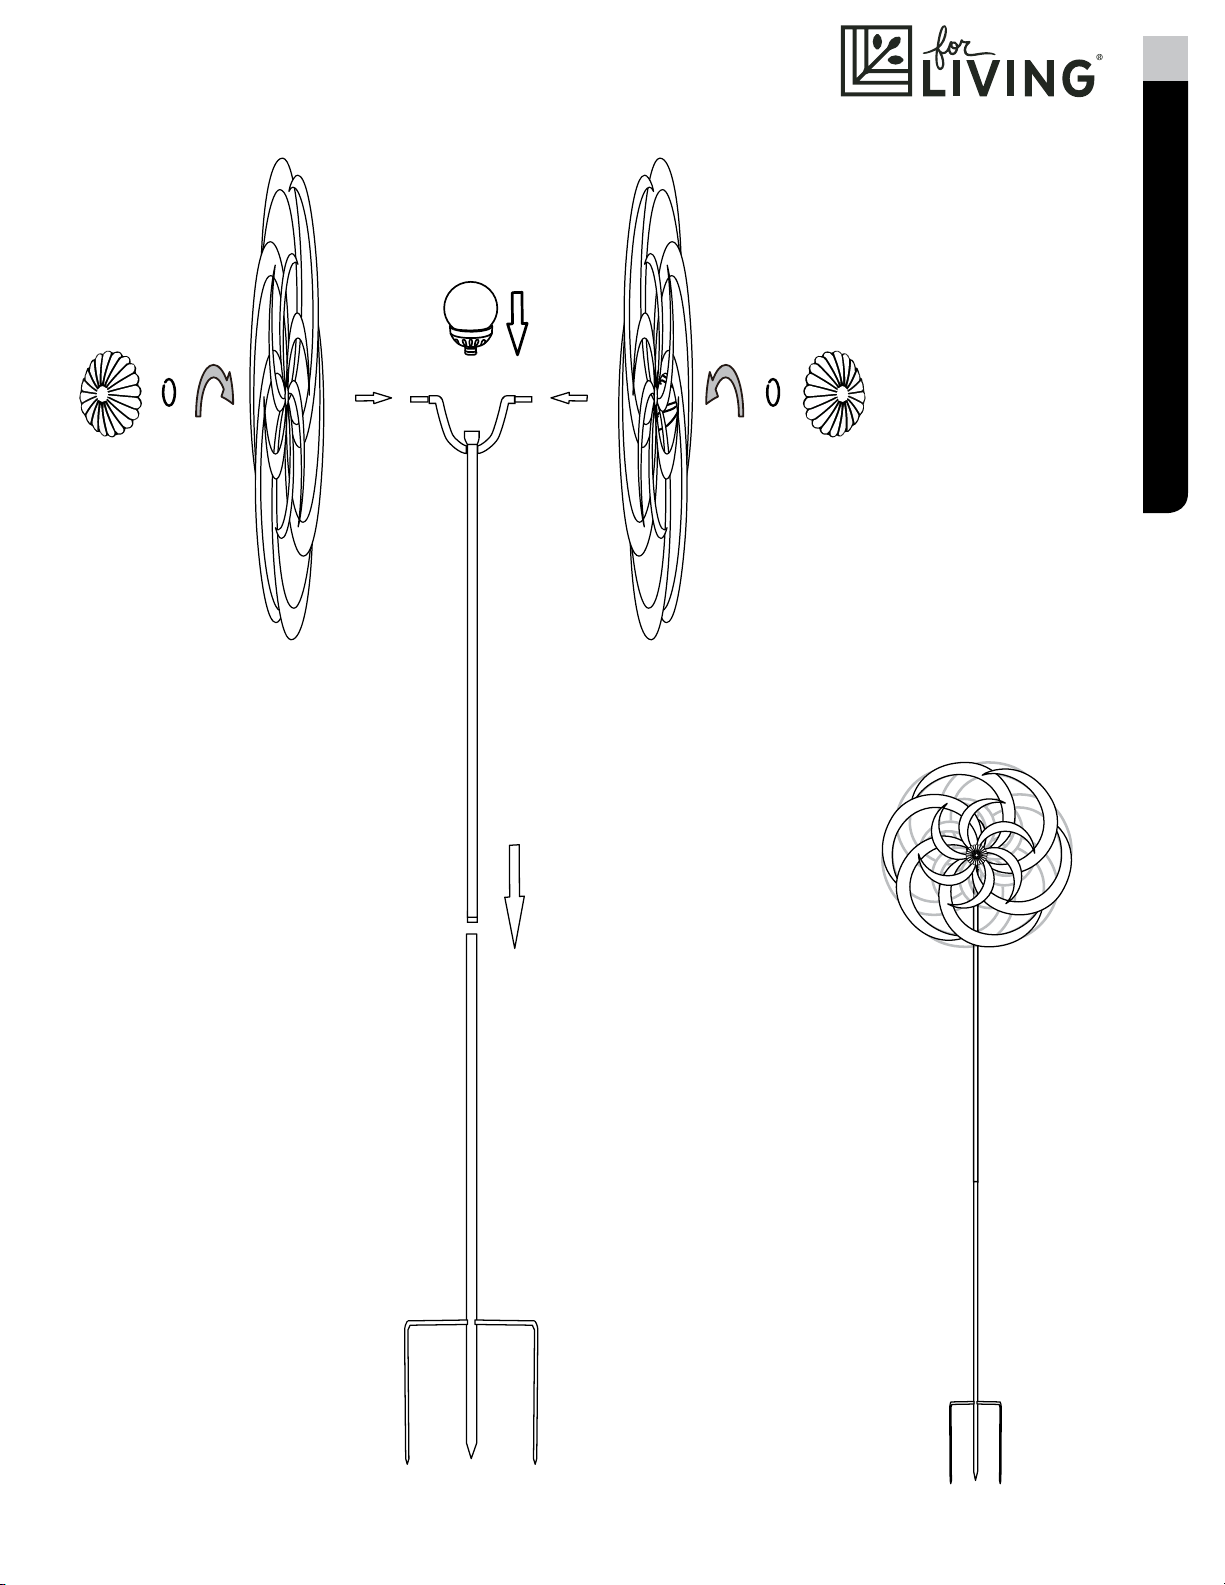
Assembly and Operating Instructions (see figures 1 and 2 on next pages)
1. Gently take all parts out of the package.
2. Mount the wind spinner fans to each side of the stake as shown.
3. Put on the lock washer then screw the cap to the threaded post--tighten by hand.
4. Locate light globe (part 4). Ensure switch is in the “on” position and
then push directly into the top of the U post.
5. Assemble pole by screwing parts 5 and 6 together as shown.
6. Put the stake in the ground.
7. Place the light in direct sunlight to allow the rechargeable battery to reach its maximum capacity (leave in full
sunlight for 8 hours).
8. When battery is fully charged, unit will light up when dark.
Figure 1
6 7
Product No. 059-7303-0 •Model No. JS-C140-4A
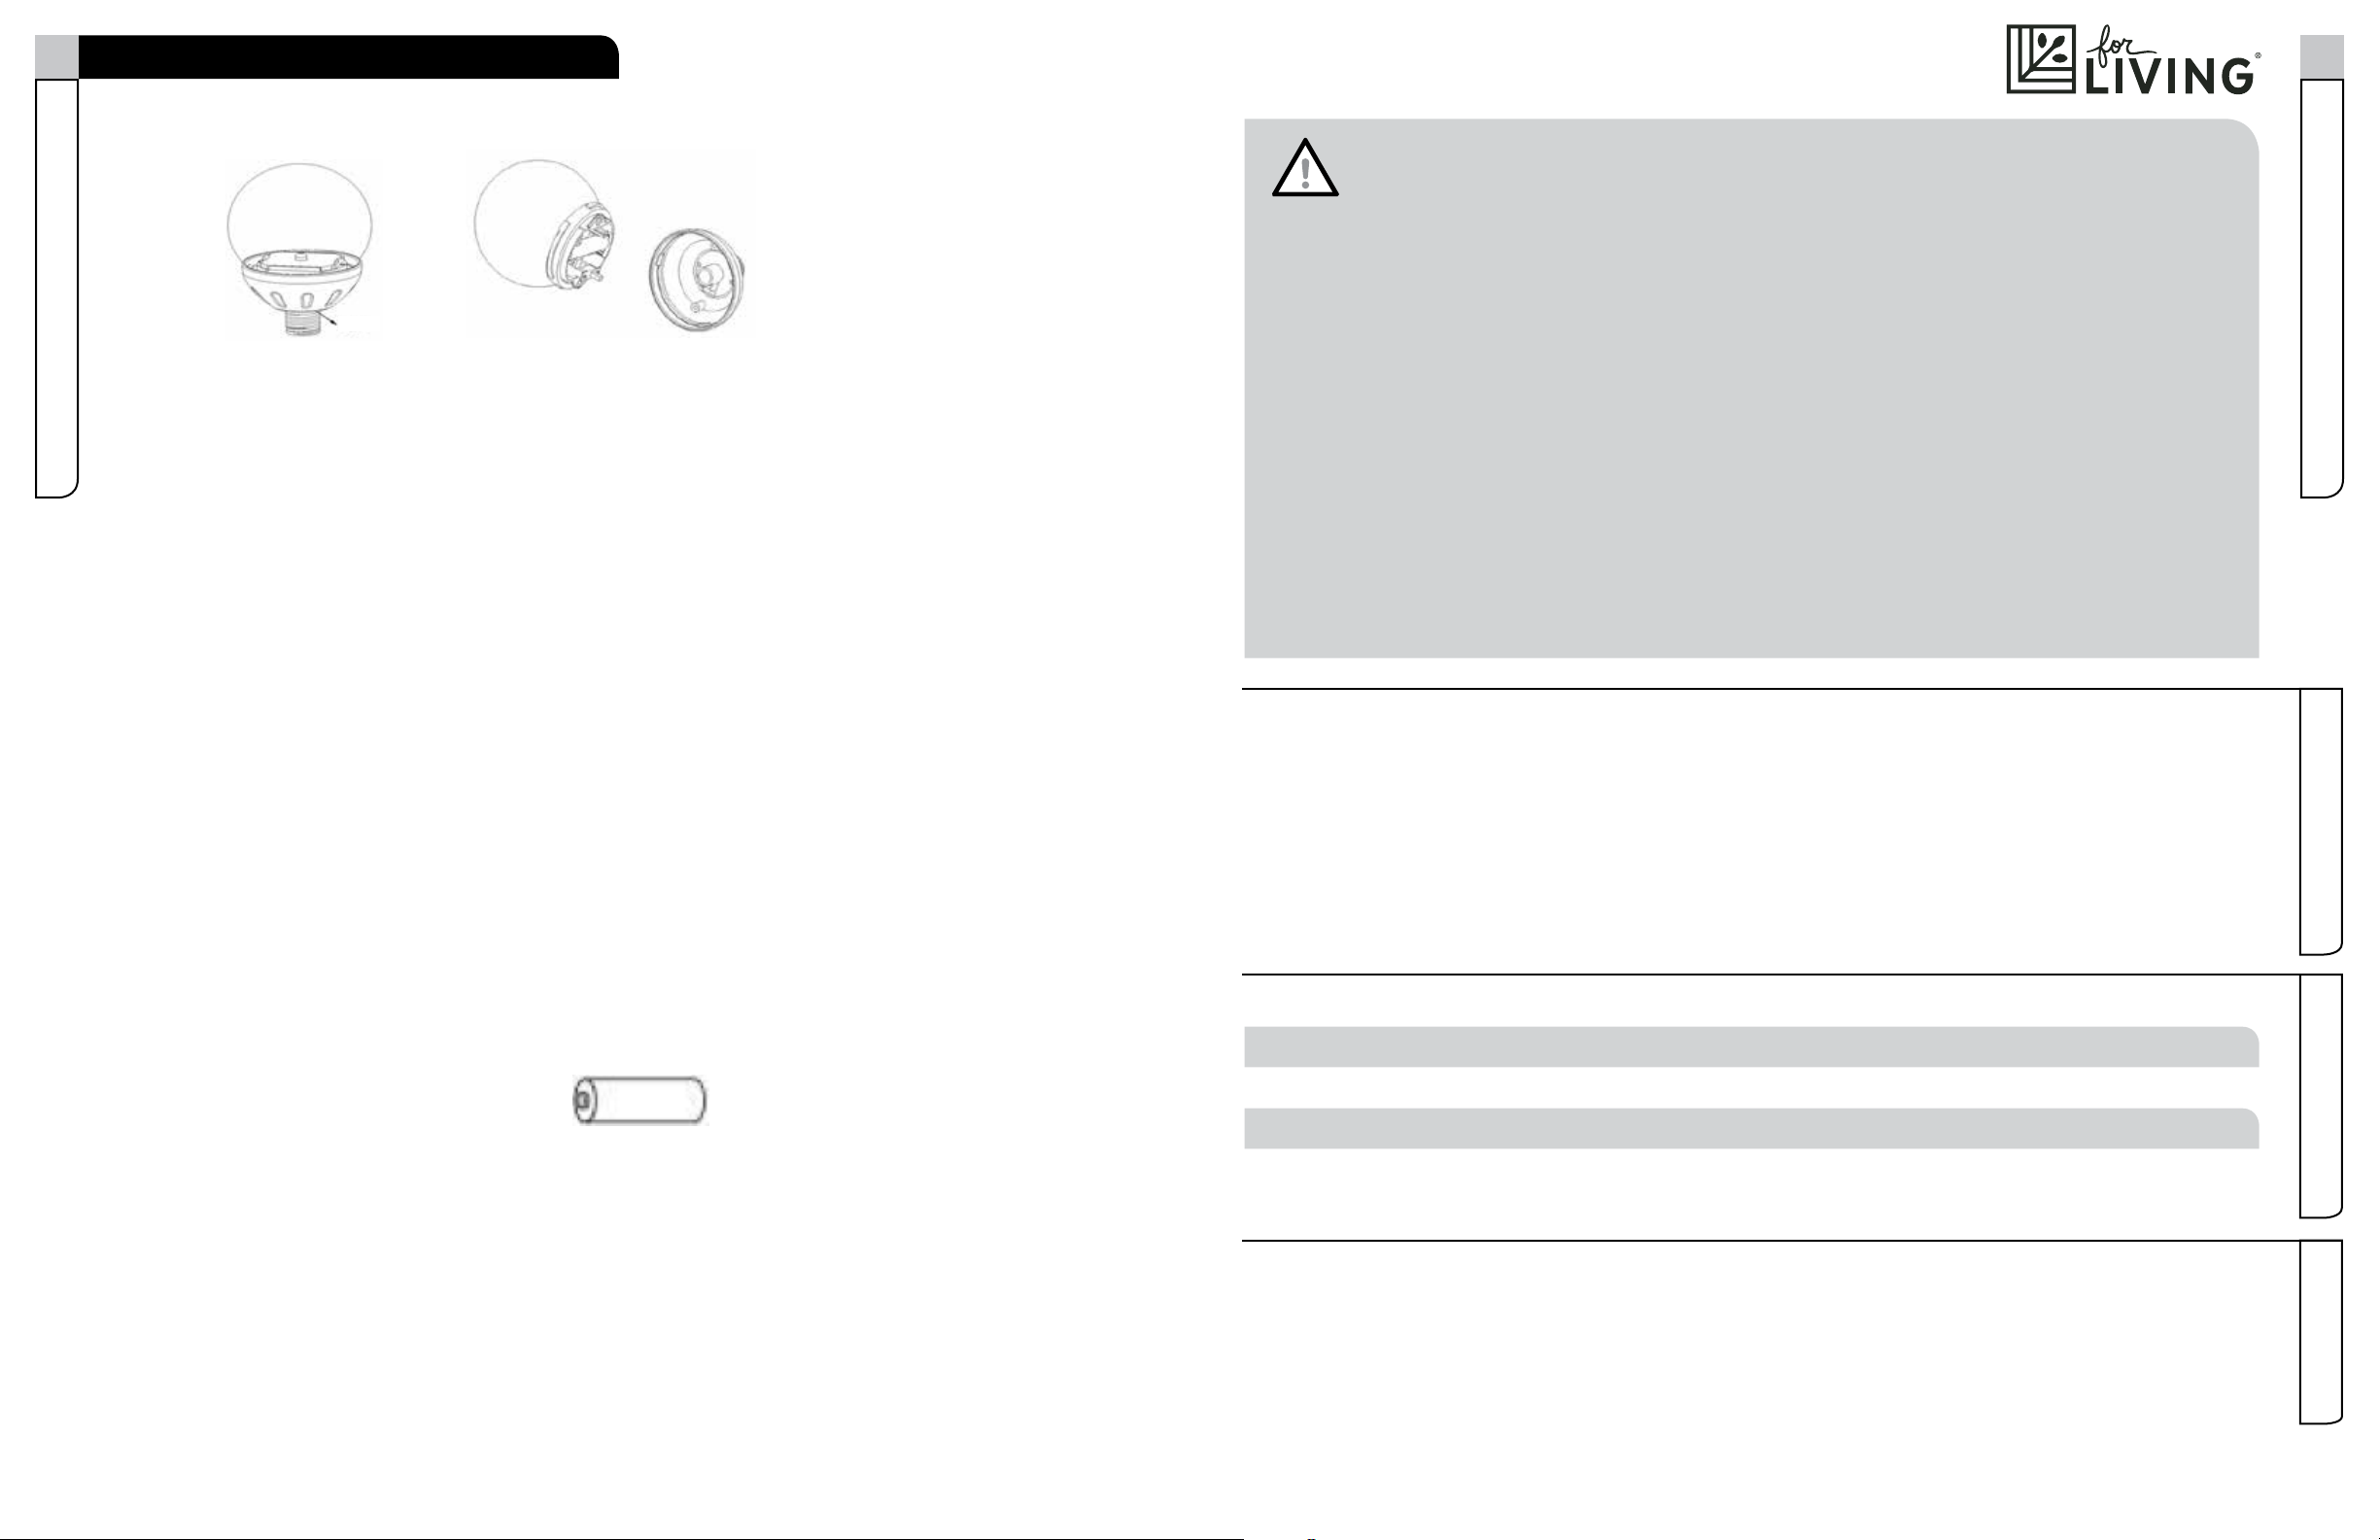
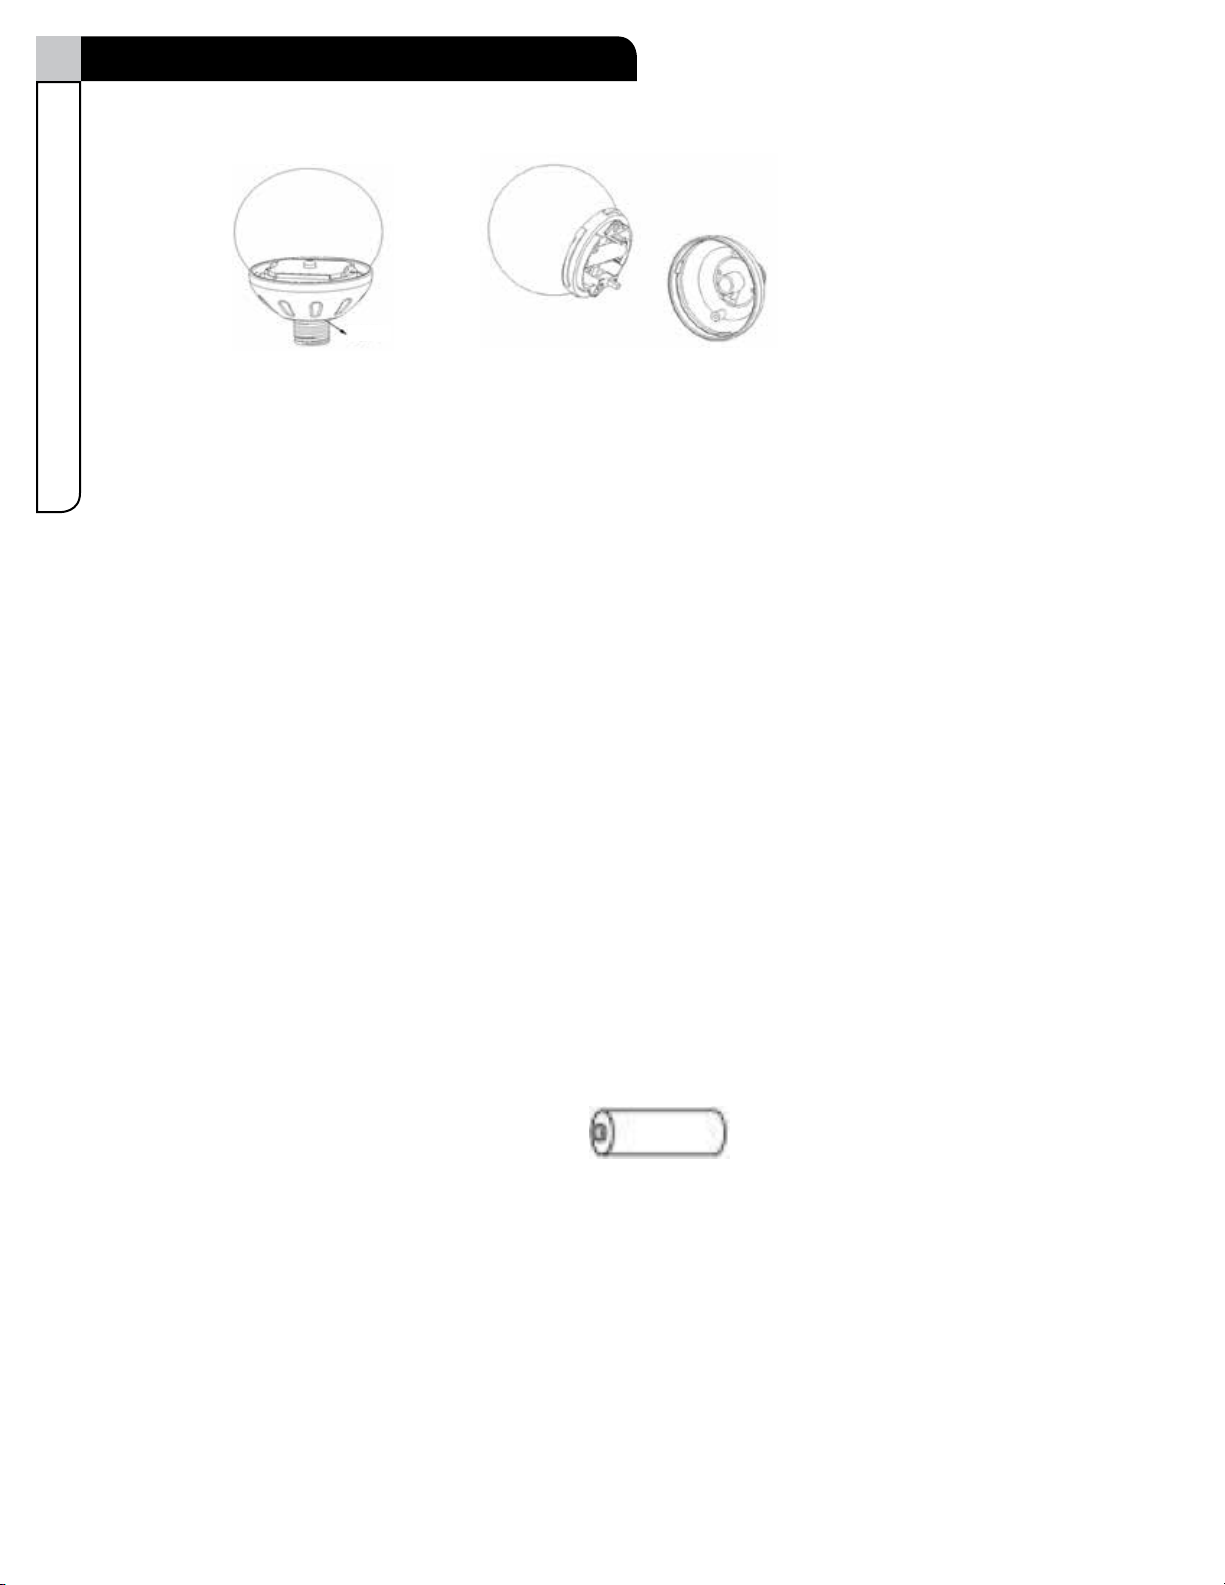
Battery Assembly
Changing Batteries
1. Pull out the light globe from the wind spinner and ensure the switch is in the off position.
2. To open the glass part of the light globe, use a Phillips screwdriver to remove the 2 screws in the
metal cover.
3. Remove the metal cover; then unscrew 2 screws on the plastic enclosure.
4. Remove depleted battery. Clean the contacts on the new battery and in the product before installing battery.
5. Always purchase the correct size and grade of battery.
Insert the new battery correctly with regard to polarity (+ and -).
6. Failure to insert batteries in the correct polarity, as indicated in the battery compartment,
may shorten the life of the batteries and may leak.
7. Do not mix old and new batteries.
8. Remove batteries when not using product for extended period of time.
Remove used batteries promptly.
9. Reassemble by inserting the two screws back into the plastic enclosure and tighten gently, then re-insert
the other two screws back into the metal cover and tighten gently.
Do not over-tighten as this may break the glass.
Rechargeable battery:
This product contains one rechargeable battery. When battery expires, it must be recycled or disposed of properly.
Please contact your local waste disposal authority for correct procedure. Do not incinerate the battery or put it into
fire.
1 x 1.2V AAA Ni-MH Rechargeable Battery (incl.)
Always ensure that the solar light is only used with the specified rated rechargeable battery.
Cleaning and Maintenance
Dimensions (L x W x H) 37 x 17 x 183 cm
15 x 6 3/4 x 72"
Product weight 1.85 kg
4 lb 1 oz
Troubleshooting
Solar light does not light-up in dark places:
a. Check the position of the switch and make sure it is not at the “off” position.
b. Check the rechargeable battery and make sure that it is well connected to the metal plate.
Check the location of the solar light; keep it away from night light sources, such as exterior lights.
Lighting hours are short:
Check the location of the solar light, make sure it is in a sunny area, so the batteries can be fully charged during day
time.
Technical Data Troubleshooting
Warranty
FUNCTION:
• During day time, the solar panel converts solar power into electricity and recharges
the battery; at night, powered by the electricity stored inside the battery, the solar light
turns on automatically.
• The lighting hours of the solar light depends on the geographical location and weather
condition.
LOCATION:
• It is important to select an outdoor location with full, direct sunshine where the solar
panel can receive at least 8 hours of sunlight each day. Shady areas will not enable
batteries to be fully charged, which will reduce the lighting hours at night.
• It is also important to select an outdoor location not near night light sources, such as
street lights, which may cause the solar light to turn off automatically.
• The solar light is designated for outdoor usage, it is ideal for night lighting of garden,
lawn, etc.
CLEANING:
• When the solar panel is covered with dust, please clean it by using a soft moistened
cloth (do not use any chemical or abrasive cleaner).
• It is important to ensure that no moisture enters into the solar light.
This For Living™product has three (3) months Warranty. This warranty is limited to the replacement of defective
parts only. Labour charges and/or damage incurred during installation, repair, replacement as well as incidental and
consequential damages connected with the above are excluded. Any damage to this product as a result of neglect,
misuse, accident, improper installation or use other than the purpose SHALL VOID THIS WARRANTY.
Figure 2
ON/OFF

Solar Wind Spinner
Toll-free: 1-877-483-6759
IMPORTANT: Please read this manual carefully before beginning assembly of this product.
Keep this manual for future reference.
Assembly Instructions
Product No. 059-7303-0
Model No. JS-C140-4A

Made in China
Imported for Trileaf Distribution Trifeuil Toronto, Canada M4S 2B8

3
Table of ContentsImportant Safety Instructions
Table of Contents 3
Important Safety Instructions 3
Parts List 4
Assembly 4-6
Cleaning and Maintenance 7
Troubleshooting 7
Technical Data 7
Warranty 7
Caution! Always keep children under close supervision while they are using or around this product.
Never leave children unattended.
IMPORTANT: RETAIN FOR FUTURE REFERENCE, AND READ CAREFULLY
Let us help you!
1-877-483-6759 (toll free)
If you have questions regarding your product, require warranty assistance,
or have damaged or missing parts, please call our customer service toll-free helpline.
Contact us for assistance, we’re here to help.
IMPORTANT: Please read and understand this manual before any assembly. Before beginning assembly of product,
make sure all parts are present. Compare parts with packaging contents list. If any part is missing, or if you have
any questions, contact the service centre at 1-877-483-6759 (toll free).
Place all parts from the box in a cleared area and position them on the floor in front of you. Remove all packing
materials and place them back into the box. Do not dispose of the packing materials until assembly is complete.
Read each step carefully before beginning any assembly and make sure you understand each step. If you are
missing a part, please call our toll-free number for assistance 1-877-483-6759.

4Product No. 059-7303-0 •Model No. JS-C140-4A
Bottom spike 7 - 1
Washers 4 - 2
Light globe 3 - 1
Parts List and assembly
Spinner fan 1 - 2
Nuts 2 - 2
Wrench 5 - 1
"U" bar 6 - 1
1
6 7
2 3
4 5
Assembly and Operating Instructions (see figures 1 and 2 on next pages)
1. Gently take all parts out of the package.
2. Mount the wind spinner fans to each side of the stake as shown.
3. Put on the lock washer then screw the cap to the threaded post--tighten by hand.
4. Locate light globe (part 4). Ensure switch is in the “on” position and
then push directly into the top of the U post.
5. Assemble pole by screwing parts 5 and 6 together as shown.
6. Put the stake in the ground.
7. Place the light in direct sunlight to allow the rechargeable battery to reach its maximum capacity (leave in full
sunlight for 8 hours).
8. When battery is fully charged, unit will light up when dark.

5
Assembly
Figure 1
6Product No. 059-7303-0 •Model No. JS-C140-4A
Battery Assembly
Changing Batteries
1. Pull out the light globe from the wind spinner and ensure the switch is in the off position.
2. To open the glass part of the light globe, use a Phillips screwdriver to remove the 2 screws in the
metal cover.
3. Remove the metal cover; then unscrew 2 screws on the plastic enclosure.
4. Remove depleted battery. Clean the contacts on the new battery and in the product before installing battery.
5. Always purchase the correct size and grade of battery.
Insert the new battery correctly with regard to polarity (+ and -).
6. Failure to insert batteries in the correct polarity, as indicated in the battery compartment,
may shorten the life of the batteries and may leak.
7. Do not mix old and new batteries.
8. Remove batteries when not using product for extended period of time.
Remove used batteries promptly.
9. Reassemble by inserting the two screws back into the plastic enclosure and tighten gently, then re-insert
the other two screws back into the metal cover and tighten gently.
Do not over-tighten as this may break the glass.
Rechargeable battery:
This product contains one rechargeable battery. When battery expires, it must be recycled or disposed of properly.
Please contact your local waste disposal authority for correct procedure. Do not incinerate the battery or put it into
fire.
1 x 1.2V AAA Ni-MH Rechargeable Battery (incl.)
Always ensure that the solar light is only used with the specified rated rechargeable battery.
Figure 2
ON/OFF

7
Cleaning and Maintenance
Dimensions (L x W x H) 37 x 17 x 183 cm
15 x 6 3/4 x 72"
Product weight 1.85 kg
4 lb 1 oz
Troubleshooting
Solar light does not light-up in dark places:
a. Check the position of the switch and make sure it is not at the “off” position.
b. Check the rechargeable battery and make sure that it is well connected to the metal plate.
Check the location of the solar light; keep it away from night light sources, such as exterior lights.
Lighting hours are short:
Check the location of the solar light, make sure it is in a sunny area, so the batteries can be fully charged during day
time.
Technical Data Troubleshooting
Warranty
FUNCTION:
• During day time, the solar panel converts solar power into electricity and recharges
the battery; at night, powered by the electricity stored inside the battery, the solar light
turns on automatically.
• The lighting hours of the solar light depends on the geographical location and weather
condition.
LOCATION:
• It is important to select an outdoor location with full, direct sunshine where the solar
panel can receive at least 8 hours of sunlight each day. Shady areas will not enable
batteries to be fully charged, which will reduce the lighting hours at night.
• It is also important to select an outdoor location not near night light sources, such as
street lights, which may cause the solar light to turn off automatically.
• The solar light is designated for outdoor usage, it is ideal for night lighting of garden,
lawn, etc.
CLEANING:
• When the solar panel is covered with dust, please clean it by using a soft moistened
cloth (do not use any chemical or abrasive cleaner).
• It is important to ensure that no moisture enters into the solar light.
This For Living™product has three (3) months Warranty. This warranty is limited to the replacement of defective
parts only. Labour charges and/or damage incurred during installation, repair, replacement as well as incidental and
consequential damages connected with the above are excluded. Any damage to this product as a result of neglect,
misuse, accident, improper installation or use other than the purpose SHALL VOID THIS WARRANTY.


Solar Wind Spinner
Product No. 059-7303-0
Model No. JS-C140-4A
Toll-free: 1-877-483-6759
IMPORTANT: Please read this manual carefully before beginning assembly of this product.
Keep this manual for future reference.
Assembly Instructions

Made in China
Imported for Trileaf Distribution Trifeuil Toronto, Canada M4S 2B8
3
Table of ContentsImportant Safety Instructions
Table of Contents 3
Important Safety Instructions 3
Parts List 4
Assembly 4-6
Cleaning and Maintenance 7
Troubleshooting 7
Technical Data 7
Warranty 7
Caution! Always keep children under close supervision while they are using or around this product.
Never leave children unattended.
IMPORTANT: RETAIN FOR FUTURE REFERENCE, AND READ CAREFULLY
Let us help you!
1-877-483-6759 (toll free)
If you have questions regarding your product, require warranty assistance,
or have damaged or missing parts, please call our customer service toll-free helpline.
Contact us for assistance, we’re here to help.
IMPORTANT: Please read and understand this manual before any assembly. Before beginning assembly of product,
make sure all parts are present. Compare parts with packaging contents list. If any part is missing, or if you have
any questions, contact the service centre at 1-877-483-6759 (toll free).
Place all parts from the box in a cleared area and position them on the floor in front of you. Remove all packing
materials and place them back into the box. Do not dispose of the packing materials until assembly is complete.
Read each step carefully before beginning any assembly and make sure you understand each step. If you are
missing a part, please call our toll-free number for assistance 1-877-483-6759.

4Product No. 059-7303-0 •Model No. JS-C140-4A
Parts List
Wind spinners 1 - 2
Caps 2 - 2
Washer 3 - 2
"U" bar 5 - 1Bottom spike 6 - 1
Light globe 4 - 1
1
5 6
2
3
4
Assembly and Operating Instructions (see figures 1 and 2 on next pages)
1. Gently take all parts out of the package.
2. Mount the wind spinner fans to each side of the stake as shown.
3. Put on the lock washer then screw the cap to the threaded post--tighten by hand.
4. Locate light globe (part 4). Ensure switch is in the “on” position and
then push directly into the top of the U post.
5. Assemble pole by screwing parts 5 and 6 together as shown.
6. Put the stake in the ground.
7. Place the light in direct sunlight to allow the rechargeable battery to reach its maximum capacity (leave in full
sunlight for 8 hours).
8. When battery is fully charged, unit will light up when dark.
5
Assembly
Figure 1

6Product No. 059-7303-0 •Model No. JS-C140-4A
Battery Assembly
Changing Batteries
1. Pull out the light globe from the wind spinner and ensure the switch is in the off position.
2. To open the glass part of the light globe, use a Phillips screwdriver to remove the 2 screws in the
metal cover.
3. Remove the metal cover; then unscrew 2 screws on the plastic enclosure.
4. Remove depleted battery. Clean the contacts on the new battery and in the product before installing battery.
5. Always purchase the correct size and grade of battery.
Insert the new battery correctly with regard to polarity (+ and -).
6. Failure to insert batteries in the correct polarity, as indicated in the battery compartment,
may shorten the life of the batteries and may leak.
7. Do not mix old and new batteries.
8. Remove batteries when not using product for extended period of time.
Remove used batteries promptly.
9. Reassemble by inserting the two screws back into the plastic enclosure and tighten gently, then re-insert
the other two screws back into the metal cover and tighten gently.
Do not over-tighten as this may break the glass.
Rechargeable battery:
This product contains one rechargeable battery. When battery expires, it must be recycled or disposed of properly.
Please contact your local waste disposal authority for correct procedure. Do not incinerate the battery or put it into
fire.
1 x 1.2V AAA Ni-MH Rechargeable Battery (incl.)
Always ensure that the solar light is only used with the specified rated rechargeable battery.
Figure 2
ON/OFF

7
Cleaning and Maintenance
Dimensions (L x W x H) 37 x 17 x 183 cm
15 x 6 3/4 x 72"
Product weight 1.85 kg
4 lb 1 oz
Troubleshooting
Solar light does not light-up in dark places:
a. Check the position of the switch and make sure it is not at the “off” position.
b. Check the rechargeable battery and make sure that it is well connected to the metal plate.
Check the location of the solar light; keep it away from night light sources, such as exterior lights.
Lighting hours are short:
Check the location of the solar light, make sure it is in a sunny area, so the batteries can be fully charged during day
time.
Technical Data Troubleshooting
Warranty
FUNCTION:
• During day time, the solar panel converts solar power into electricity and recharges
the battery; at night, powered by the electricity stored inside the battery, the solar light
turns on automatically.
• The lighting hours of the solar light depends on the geographical location and weather
condition.
LOCATION:
• It is important to select an outdoor location with full, direct sunshine where the solar
panel can receive at least 8 hours of sunlight each day. Shady areas will not enable
batteries to be fully charged, which will reduce the lighting hours at night.
• It is also important to select an outdoor location not near night light sources, such as
street lights, which may cause the solar light to turn off automatically.
• The solar light is designated for outdoor usage, it is ideal for night lighting of garden,
lawn, etc.
CLEANING:
• When the solar panel is covered with dust, please clean it by using a soft moistened
cloth (do not use any chemical or abrasive cleaner).
• It is important to ensure that no moisture enters into the solar light.
This For Living™product has three (3) months Warranty. This warranty is limited to the replacement of defective
parts only. Labour charges and/or damage incurred during installation, repair, replacement as well as incidental and
consequential damages connected with the above are excluded. Any damage to this product as a result of neglect,
misuse, accident, improper installation or use other than the purpose SHALL VOID THIS WARRANTY.
This manual suits for next models
1
Table of contents
Popular Lawn And Garden Equipment manuals by other brands

UNITED
UNITED IK-5821 manual

Land Pride
Land Pride Scarifer SF2566 parts manual

Black & Decker
Black & Decker 8273-04 owner's manual

Sunnydaze Decor
Sunnydaze Decor HB-703 quick start guide

Scheppach
Scheppach EB1700 SE Translation of original instruction manual

Castellari
Castellari VERTIGO 12V User manual and maintenance


