Formax AutoSeal FD 2030 User manual

FD 2000 / FD 2030
AutoSeal®
OPERATOR MANUAL
FIFTH EDITION
12/07

TABLE OF CONTENTS
DESCRIPTION 1
SPECIFICATIONS 1
UNPACKING AND SET-UP 1
CONTROLS 2
OPERATION 2
FOLD PLATE ADJUSTMENT 3
Setting Custom Folds 3
DAILY MAINTENANCE 4
TROUBLESHOOTING 5
DETERMINING FOLD TYPE 6
TEST SHEET 7
OPTIONAL CONVEYOR INSTALLATION 8

SPECIFICATIONS
DESCRIPTION
FUNCTION
The FD 2000/2030 folds and seals pressure sensitive forms with pre-applied glue lines into mail ready pieces.
Numerous folds using several different paper sizes can be processed to meet your needs. For confi gurations
and paper sizes see specifi cations.
Maximum foldable paper size 14” length x 8.5” width
Fold styles “C”, “Z”, “V” and custom folds
Paper loading capacity (2000/2030) Up to 200/250 sheets of 24 # pre-glued forms
Speed (2000/2030) Up to 35,000/75,000 per month
Weight 90 lbs.
Power supply FD Model: 120 volts, 60 Hz, 3.5 amps.
FE Model: 240 volts, 50 Hz, 3.5 amps.
UNPACKING AND SETUP
1. Check package for shipping damage. It there is shipping damage do not discard the box.
2. CAUTION: Two people must lift the machine out of the box.
3. Remove the accessory bag which is between the machine and the catch tray.
4. Place the jam clearing handle into the the holder which is mounted to the machine. This is the jam
clearing handle’s proper location (fi gure 1).
1
Paper Side Guides
Lower Fold Plate
Side Cover
Optional 18” Conveyor
Upper Fold Plate
Top Cover
Feed Table
Jam clearing handle location
(Figure 1)

Start ......................... Starts machine.
Stop/ Reset............... Stops machine / clears “fault” condition.
Jog............................ Allows one piece of paper to feed at a time. Used for paper fold settings.
Power........................ Light comes on when power is on.
Cover open............... Light comes on if either top cover or side cover is open.
Paper out.................. Light comes on when infeed paper tray is empty.
Fault detect............... Light comes on if there is a paper jam.
Reset......................... Resets counter.
Counter..................... Shows forms count.
CONTROLS
OPERATION
1. Adjust fold plates to desired fold for length of paper ( see fold plate adjustment on page 3). To do this first
loosen two thumbscrews (figure 1a) on each fold plate. Align center bar (figure 1b) so the marks on each
side match up. For “V” folds remove the lower fold plate, turn around 180O and reinstall
2. Load neatly stacked and squared paper into the hopper. Paper can be stacked up to 200 for the FD 2000
and 250 for the FD 2030. Note: Standard “Z” fold forms can be loaded face up or down with the glue edge
leading. All “C” fold forms must be loaded face up with glue edge leading.
3. Make sure covers are closed properly.
4. Plug in cord and turn power on.
5. Press jog switch to make sure folds are correct, adjust if necessary (see fold plate adjustment pg 3).
6. Press the start button to begin operation.
2

FOLD PLATE ADJUSTMENT
Example 1: Uneven “Z”
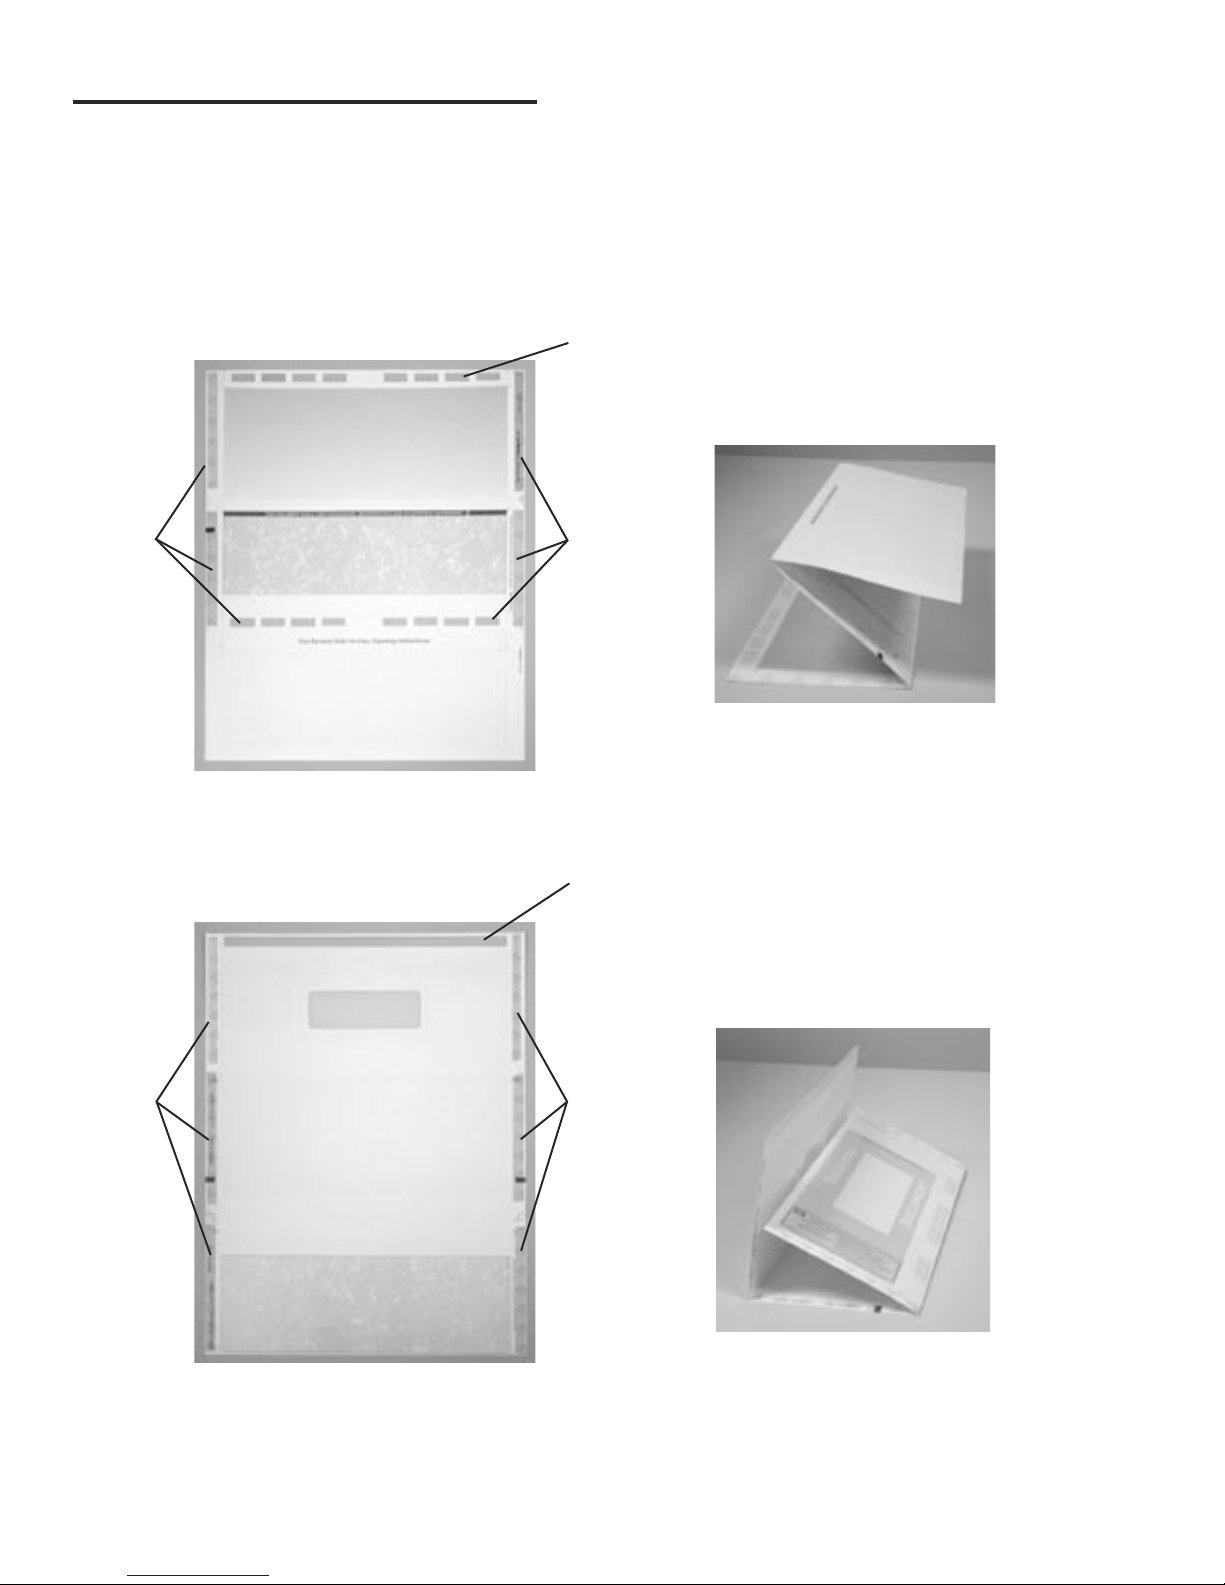
1. Measure the length of panel “A” & “B”
2. Adjust the upper fold plate so that the bar lines up with the measurements of panel “A” &
“B” i.e. if panel “A” & “B” are 10 1/2” long move the bar up or down so that it lines up with
the 10 1/2” mark on the fold plate.
3. Measure the length of panel “B”
4. Adjust the lower fold plate so that the bar lines up with the measurements of panel “B”.
5. Load forms and press start (refer to OPERATION on page 2).
Example 2: Uneven “C”
1. Measure the length of panel “A”
2. Adjust the upper fold plate so that the bar lines up with the measurements of
panel “A” i.e. if panel “A” is 5 1/4” long move the bar up or down so that it lines up
with the 5 1/4” mark on the fold plate.
3. Measure the length of panel “B”
4. Adjust the lower fold plate so that the bar lines up with the measurements of
panel “B”.
5. Load forms and press start (refer to OPERATION on page 2).
Setting Custom Folds
3
1. To adjust the fi rst fold open the top cover to access the top fold plate. If the fi rst fold is too long loosen the
two thumbscrews and slide the bar down. If the fold is too short loosen the thumbscrews and slide the bar up.
NOTE: The bar should be on the same marks on each side.
2. To adjust the second fold remove the lower fold plate. If the second fold is too long loosen the two thumb-
screws and slide the bar up. If the fold is too short loosen the thumbscrews and slide the bar down.
NOTE: The bar should be on the same marks on each side.
3. For quick setup of “C”, “Z” and “V” folds look for the blue lines on the fold plate.
Panel A
Panel B
Panel A
Panel B
Thumbscrews
Bars Lower fold plate
Top fold plate

4
DAILY MAINTENANCE
1. It is recommended to let forms cool for one-half hour, from the laser printer, before folding and sealing. This
allows toner to set on the forms, and static electricity to discharge. A 400 Series Jogger is recommended for
best results. The Jogger squares the forms and dissipates heat and static created by laser printers.
2. If toner builds up on the metal sealer rollers clean the rollers with a lint-free cloth dampened sparingly with a
mild household cleaner.
3. Clean in-feed wheels and fold rollers with Formax recommended roller cleaner & rejuvenator to remove pa-
per dust and toner. A damp cloth with water is the best alternative. CAUTION: Do not use any chemicals other
than the roller cleaner & rejuvenator or water.

5
TROUBLESHOOTING
1. If paper folds left or right adjust the skew adjuster. To adjust the skew, turn it left or right until the paper is
feeding correctly and folds squarely.
B. Paper Pulls Left or Right During Feeding:
WARNING: Turn off machine and unplug cord from its receptacle
1. If a jam occurs in a fold plate, unplug and remove the fold plate and remove paper. Reinstall fold plate and
then press the reset button on the control panel to clear the fault signal.
2. If a jam occurs in between the metal sealing rollers, remove any remaining forms from the hopper. Open
the top cover and remove the upper fold plate. Remove the jam-clearing tool (located under the top fold plate),
apply the tool to the upper metal roller and turn clockwise until the paper jam is clear (Caution: Do not apply
excessive force or rollers may be damaged) . Remove the jammed form and return tool in holder and reinstall
the upper fold plate. Reinstall cover and press the reset button.
Note: Press the black button near the power cord inlet to reset the breaker if necessary.
A. Clearing Paper Jams and Fault Signals on the Display Panel:
1. Adjust the side guides to the edge of the forms.
2. Clean the 3 infeed wheels with a cloth dampened with a mild household cleaner.
C. Skewed Forms
2. Side guides should be adjusted so that the forms do not have free play between the guides.

DETERMINING FOLD TYPE
Two Standard Folds 11” “Z” & 11” “C”
Refer to Operator Manual for custom fold setup.
11” “Z” Fold
11” “C” Fold
Leading glue edge
Leading glue edge
11” “Z” Fold
11” “C” Fold
Glue
Glue
Glue Glue
6

7
Leading Edge
Make copies of this page on copy paper for fine tuning folds
Instruction For Lining Up Folds
Fig. 2 “C” Fold Form
Fold “A” Fold “B” Leading Edge
Fig. 1 “Z” fold Form
Leading Edge
Fold “A” Fold “B”
1. Place a stack of these sheets into the feeder and fold
one (1) or two (2) sheets.
2. Take a folded sheet from the catch tray and lay it on
top of a pressure seal form lining the leading edge of
this sheet up with leading edge of the pressure seal
form.
3.
-
-
If the folds on this test sheet do not line up with the
perforated folds on the form, the fold plates need to
be adjusted up or down to make the folds line up.
Refer to Fig. 1 for a “Z” fold and Fig. 2 for a “C” fold.
If fold “A” on the test form is right of the perforation on
the pressure seal form move the top fold plate
stop up. If fold ”A” is below move the top fold plate
stop fold stop down.
If fold “B” on the test form is right of the perforation
on the pressure seal form move the bottom fold plate
stop down. If fold ”B” is to the left move the bottom
fold plate stop up.

OPTIONAL CONVEYOR INSTALLATION
Mounting Bolts
Stacker Wheels
To install the 18” conveyor you should follow these steps:
1. Unplug the 2000/2030 from the wall outlet.
2. Remove upper fold table
3. Turn the machine on to the non-operator side and remove the catch tray from machine. Return the machine
to its upright position.
4. Plug the power cord into the underside of the conveyor.
5. Install conveyor mounting bolts (figure 5)
6. Attach the conveyor to the 2000/2030.
7. Install the stacker wheel assembly into the holes indicated in figure 6.
8. Adjust the stacker wheels to conveyor decal (figure 6).
9. Plug the conveyor power cord into the power outlet on the 2000/2030.
10. Reinsert the upper fold table.
11. Plug the 2000/2030 into the wall outlet.
Holes for Stacker Wheel
Assembly
8
This manual suits for next models
1
Table of contents
Other Formax Kitchen Appliance manuals
Popular Kitchen Appliance manuals by other brands

GE
GE PXR03FLMFSC owner's manual

Suntec Wellness
Suntec Wellness FDH-8595 Dorthe digital instruction manual

Panasonic
Panasonic EH-SA31VP operating instructions

SMART
SMART SPC810 Instruction Manual and Recipes

Rev-A-Shelf
Rev-A-Shelf MONSTER 51 SERIES installation instructions

Esse
Esse EC Operating & installation instruction

Wolfgang Puck
Wolfgang Puck BDRCRD010 use & care

Aicok
Aicok HB2230B manual

Handpresso
Handpresso Travel Press instruction manual

Black & Decker
Black & Decker JE1500 Series Use and care book

Berlinger Haus
Berlinger Haus BH-9065 user manual

Yes Chef!
Yes Chef! OMELETTE MAKER Instruction manual and recipe guide