Forno DSP-IND-1CG-DCL-30 User manual

User Guide
Four Burner
Model:DSP-IND-1CG-DCL-30

Table of Contents
I. Important Safety Information................................................1-4
II. Control Panel Overview..........................................................5
III. Specifications & How to Use................................................6
• Heating Power for Each Cooking Zone.................................6
• ...............................................................7Operating the keys
IV. Compatible Cookware............................................................10
V. Cleaning and Maintenance..............................................10-11
VI. Counter Installation Instruction.......................................12-15
VII. Troubleshooting...............................................................16-17
• ..............................7Switching on the hob and cooking zones
• ..................................................................7Standby Mode.....
• ................................................................7While in cooking....
• ............................................................7While in stop cooking
• ...................................................................8Lock....................
• .....................................................................8Turn off.............
• Timer ......................................................................9................
VII . FCC STATEMENT...............................................................18 I
Fill out the following information for future reference
Brand
Purchase Date
Model Number
Serial Number
You can download an owner's&installation manual at
www.forno.ca.
Customer service : 1-800-588-7202 ext.: 355
Thank you for purchasing the our Induction four burner unit.
Please read the entire instruction manual prior to using your unit.

.
1
When using electrical appliances,basic safety precautions should always be
followed.For the Induction cooker,even with the built-in safety features,it is
essential to heed all precautons.
I. Important Safety Information
Installation of the appliance into a kitchen countertop and its connection to the
main power and electrical supply may only be performed by a qualified
technician.
While cooking any overflowed fat or oil on the cooktop may ignite. There is a risk
of burning and fire; therefore,control the cooking process at all times.
Never leave the cooktop unatended at High Heat settings or when cooking oil
or fat-boil over causes smoking and greasy spillovers that may ignite.
When the unit is on,do not touch outside the control panel as the surface may
contain residual heat.
To protect against electric shock, do not immerse cord plugs or cooker in water
(or other liquid substances).
When using any electric appliance around children,close supervision is
strongly suggested.
Do not operate any appliance with a damaged cord or plug, after a malfunction
or if it has been damaged in any manner.Read the seller’s guidelines for
warranty repairs and returns.
Do not cook on a broken or damaged cooktop as spillovers may penetrate surface
and create a risk of electric shock.
Do not use outdoors, The Induction cooktops are designed for household use.
To avoid potential injury,do not use accessory attachments which aren’t
recommended by the manufacturer.
Do not let the cord dangle over the edge of a table or counter. Keep the cord away
from hot surfaces.
Do not place cooktop on or near:hot gas, electric burner, or heated oven.
preparing food in aluminum foil or plastic containers over the hot cooking zones.
Avoid
Do not store and temperature-s
underneath the cooktop,such as:detergents,sprays,etc.
ensitve objects, materials, or substances
To prevent accidents and achieve optimal fan ventilation, allow for sufficient space
around the cooking area. Items with a magnetic filed such as:radios,televisions,
credit cards, cassete tapes etc.,can affect the unit.
The marked electrical rating should be at least as great as the electrical rating on
the appliance.
The cord should be arranged so that it will not drape over the countertop or tabletop
where it can be pulled on by children or tripped over.
Do not use cooktop for another use than directed by the manufacturer.
Do not use with empty pans/pots.
Wear proper-
appliance.
loose fitting or hanging garments should never be worn while using the
In case of appliance failure, immediately disconnect the appliance from the main
power source and contact the manufacturer.

2
I. Important Safety Information
Proper Installation-Be sure your appliance is properly installed and grounded
by a qualified technician.
Never Use Your Appliance for Warming or Heating the Room.
Do Not Leave Children Alone-Children should not be left alone or unattended in area
where appliance is in use. They should never be allowed to sit or stand on any part of
the appliance.
Wear Proper Apparel-Loose-fitting or hanging garments should never be worn
while using the appliance.
User Servicing-Do not repair or replace any part of the appliance unless
specifically recommended in the manual. All other servicing should be referred to
a qualified technician.
Storage in or on Appliance-Flammable materials should not be stored in an oven
or near surface units.
Do Not Use Water on Grease Fires-Smother fire or flame or use dry chemical or
foam-type extinguisher.
Use Only Dry Potholders-Moist or damp potholders on hot surfaces may result in
burns from steam. Do not let potholder touch hot heating elements. Do not use a
towel or other bulky cloth.
Use Proper Pan Size-This appliance is equipped with one or more surface units of
different size. Select utensils having flat bottoms large enough to cover the surface
unit heating element. The use of undersized utensils will expose a portion of the
heating element to direct contact and may result in ignition of clothing. Proper
relationship of utensil to burner will also improve efficiency.
Never Leave Surface Units Unattended at High Heat Settings-Boilover causes
smoking and greasy spillovers that may ignite.
Make Sure Reflector Pans or Drip Bowls Are in Place-Absence of these pans or
bowls during cooking may subject wiring or components underneath to damage.
Protective Liners-Do not use aluminum foil to line surface unit drip bowls or oven
bottoms, except as suggested in the manual. Improper installation of these liners
may result in a risk of electric shock, or fire.
Glazed Cooking Utensils-Only certain types of glass, glass/ceramic, ceramic,
earthenware, or other glazed utensils are suitable for range-top service
without breaking due to the sudden change in temperature.
Utensil Handles Should Be Turned Inward and Not Extend Over Adjacent Surface
Units-To reduce the risk of burns, ignition of flammable materials, and spillage
due to unintentional contact with the utensil, the handle of a utensil should be
positioned so that it is turned inward, and does not extend over adjacent surface
units.
Do Not Soak Removable Heating Elements-Heating elements should never be
immersed in water.

Do not place metallic objects such as knives, forks, spoons, lids, cans or
aluminum foil on the cooktop.
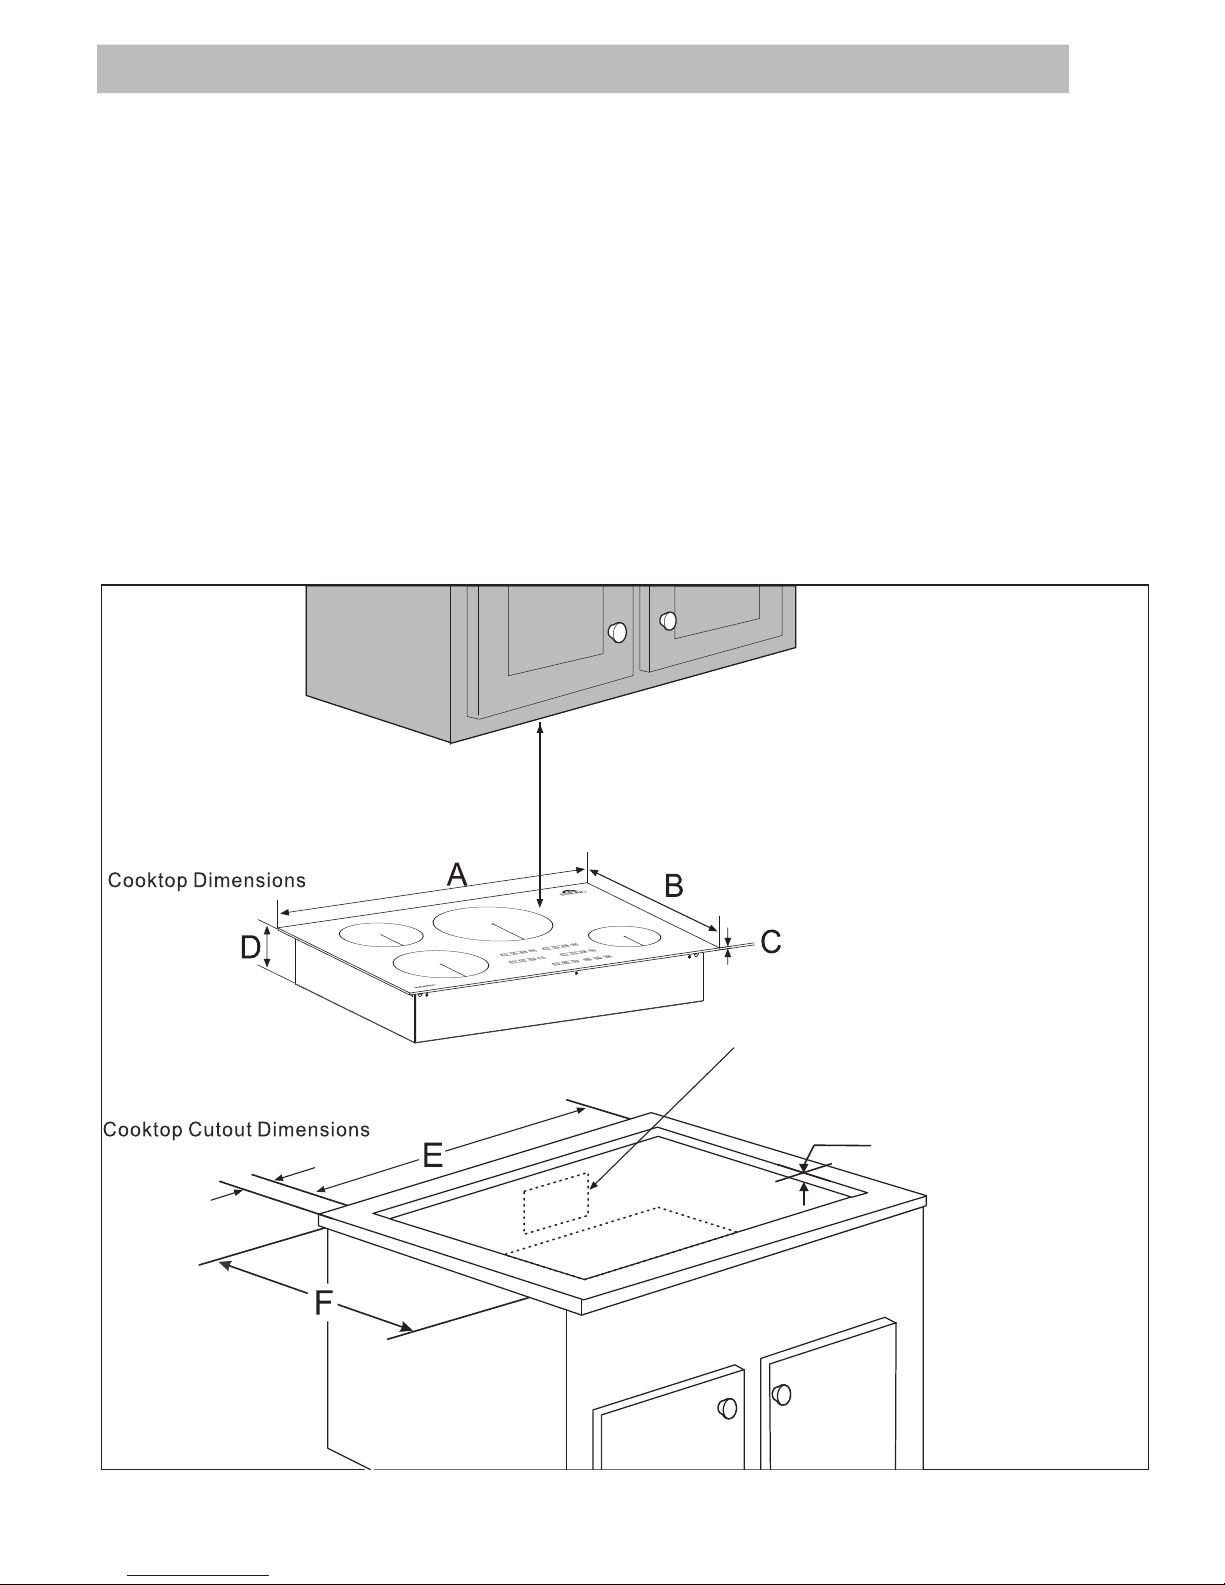
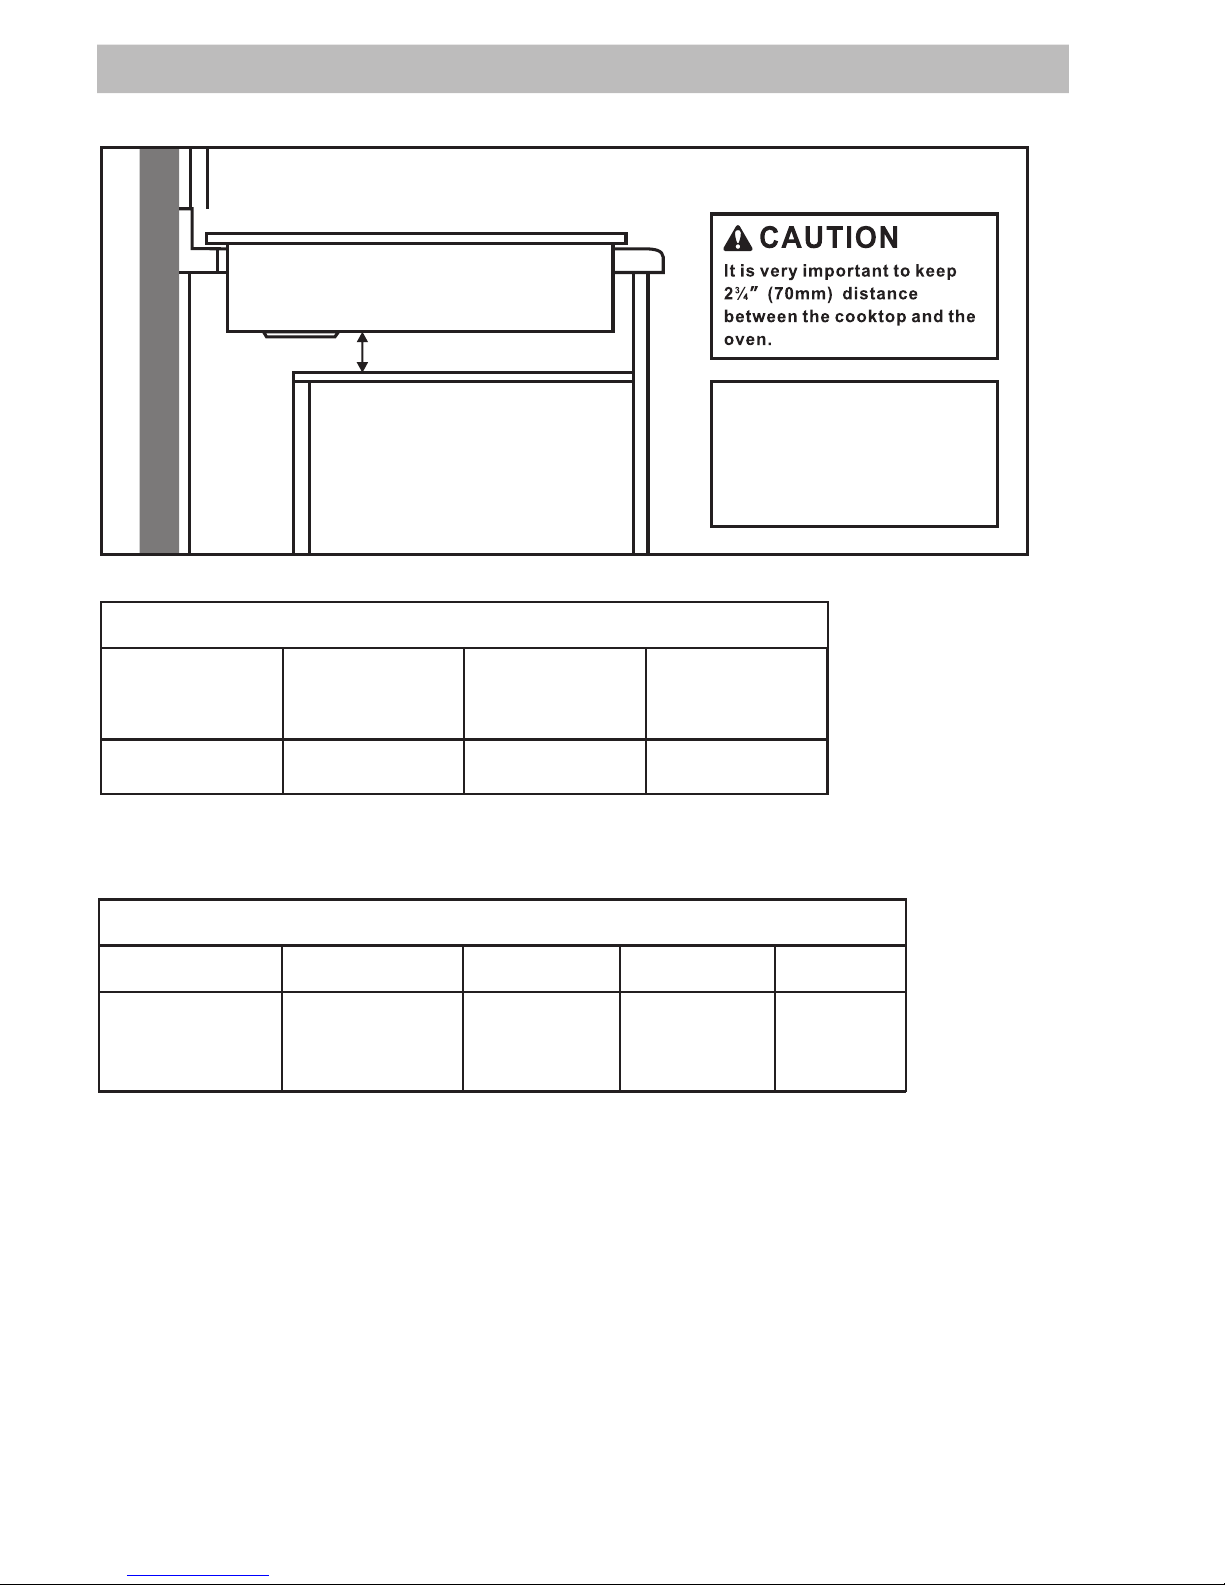
To prevent accidents and achieve optimal ventilation, allow for sufficient space
around the cooking area.
The appliance is manufactured in compliance with the relevant effective safety
standard. Nevertheless, we strongly recommend that a person with physically or
mentally impaired, do not use the appliance unless accompanied by a qualified
person. The same recommendation applies to children.
It is important to be aware that the unit’s surface will remain hot for a short
period of time after use.
Unplug the cooktop from the outlet when not in use and before cleaning.
Allow to cool before performing any maintenance or repairs.
Clean cooktop with caution-do not clean while unit is still hot, some cleaners
product steam or fumes if applied to a heated surface.
Do not store items of interest to children in cabinets above the range or on the
backguard of a range-children climbing on the range to reach items could get
seriously injured.
The power cord has been sized accordingly, however, with caution and care,an
extension cord may be used.
To reduce risk of burns, ignition of flammable materials, and spillage due to
unintentional contact with cookware, the cookware handles should be turned
inward and not extend over adjacent heating surface.
Clean cooktop with caution-If a wet sponge or cloth is used to wipe spills on a hot
cooking area, be careful to avoid steam burn. Some cleaners can product noxious
fumes if applied to a hot surface.
Do not use steam cleaners or high-pressure cleaners to clean the cooktop, as
this may result in electric shock.
3
I. Important Safety Information
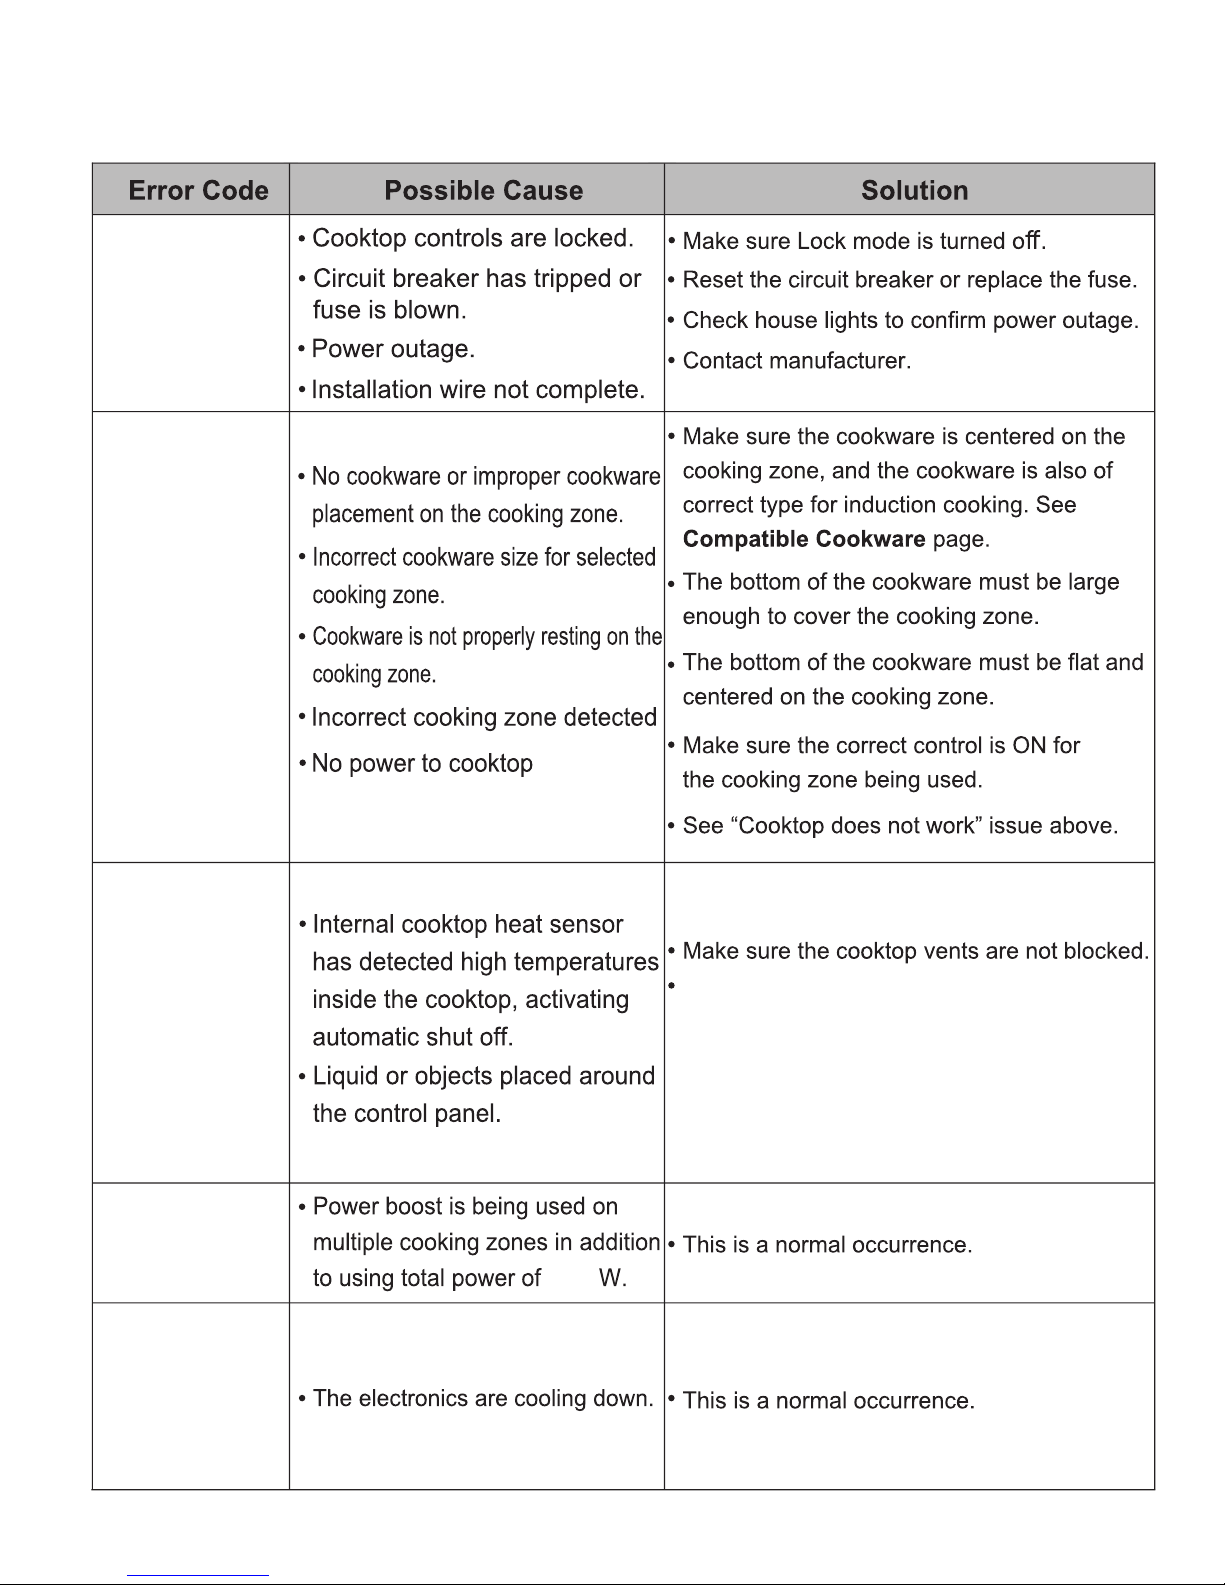
If the malfunction light goes on, or if the audible signal sounds, appliance is
malfunctioning. Turn off or disconnect appliance from power supply and have
serviced by a qualified technician.
DO NOT TOUCH SURFACE UNITS OR AREAS NEAR UNITS-Surface units
may be hot even though they are dark in color. Areas near surface units may
become hot enough to cause
burns. During and after use, do not touch, or let clothing or other flammable
materials contact surface units or areas near units until they have had
sufficient time to cool. Among these areas are Cooking zone
Clean Cook-Top With Caution-If a wet sponge or cloth is used to wipe spills
on a hot cooking area, be careful to avoid steam burn. Some cleaners can
produce noxious fumes if applied to a hot surface. of electric shock. Contact a
qualified technician immediately.
Do Not Cook on Broken Cook-Top-If cook-top should break, cleaning
solutions and spillovers may penetrate the broken cook-top and create a risk
of electric shock. Contact a qualified technician immediately.
Do Not Cook on Broken Cook-Top-If cook-top should break, cleaning
solutions and spillovers may penetrate the broken cook-top and create a risk
of electric shock. Contact a qualified technician immediately.

SAVE THESE WARNINGS
I. Important Safety Information
4
This product should not be thrown away as household waste. Instead it should
be handed over to the applicable collection point for the recycling of electrical
and electronic equipment. By ensuring this product is disposed of correctly,
you will help prevent potential negative consequences to the environment and
human health, which could otherwise be caused by inappropriate waste
handling of this product. For more detailed information about recycling of this
product, please contact your local city office, your household waste disposal
service or the store where you purchased the product.

15
14
13
12
11
10
9
8
7
1.Front left cooking zone
2.Back left cooking zone
3.Back right cooking zone
4.Front right cooking zone
5.Ceramic glass
6.Touch control panel
1
2
3
4
5
6
8.Lower time key
7. Timer Control Keys
5
II. Control Panel Overview
12. Cooking Zone ON/OFF key
13.Power or residual heat display
17. Power button
14. Power boost key
16. Child safety lock
9.Raise time key
15. Pause / resume heating zone
10.Lower power key
11.Raise power key
17
16
Diagram may look different
from actual product.

Heating Power of Each Cooking Zone:
Power 7400 Watts
Voltage
240V / 60Hz
Power Range
100W -37 00W
Level Selection
Select settings 1 through 9
Max Time
Set timer from 1 to 99 minutes
Material Glass Ceramic Top / Metal Body
Unit Measurements
30" width x 21" length x 2-5/32" height
Drop-in
Installs Over Built-in Oven Yes
Installation Dimensions(WxD)
28-3/4" x 19-9/32"
6
Installation Type
III. Specifications & How to Use
We divide the left 2 burners and the Right 2 burners into 2 different groups and among each group
with rated power of 3700W.Left front and Left rear burner stove for a group of the Total power of
3700W.Right front and Right rear burner stove for a group of the total rated power of 3700W.
Level
Rated power
Left
front
Left
rear
Right
rear
Right
front
1
2
3
4
5
6
7
8
9
1000W
1400W
1600W
2000W
2400W
1200W 1400W 1600W 1800W
P
3200W
2600W
100(400W
ON3S 、
OFF7S)
200(400W
ON5S 、
OFF5S) 1000W 1400W 1600W 2000W 2400W 3700W
1000W 1100W 1200W 1400W 1800W
100(1000W
ON1S 、
OFF9S)
200(1000W
ON2S 、
OFF8S)
300(1000W
ON3S 、
OFF7S)
600(1000W
ON6S 、
OFF4S)
800(1000W
ON8S 、
OFF2S)
100(1000W
ON1S 、
OFF9S)
200(1000W
ON2S 、
OFF8S)
300(1000W
ON3S 、
OFF7S)
600(1000W
ON6S 、
OFF4S)
100(400W
ON3S 、
OFF7S)
200(400W
ON5S 、
OFF5S) 400W
600W
1000W
400W
600W
Total Power:7400W

III. How to Use
While on standby mode, press the main key, the
induction hob will make a “beep” sound once
indicating that it is ready to use. If only the indicator
light above the key is lit up, the unit will
automatically return to standby mode if the Cooking
zone ON/OFF key or Lock key are not chosen within
30 seconds.
“ ”
“ ”
Readiness Mode
Suitable for induction cooktop
9
1
7
P
While in cooking
press“ ”key,all cooking zone stop cooking and “ ”
light blink.
Switching on the hob and cooking zones
Place a compatible pot or pan on the cooking zone you
wish to use.
With the hob being ON as mentioned above, press the
desired cooking zone . The display will blink
and show a “0”.
Press either the “+” key, “-” key, to select a
cooking level. The cooking zone will automatically turn
on standby mode if a key is not pressed within 30
seconds.
Press the minus key (-) to lower the cooking level.
Press the Plus key (+) to raise the cooking level.
ON/OFF key
“Boost” key,
Pressing the “Boost” key will show on the display as a
“Boost”, boosting the heating power to the highest level.
While in stop cooking
press“ ”key,all cooking zone being used, and “ ”
light blink.
light turn off, cooking zone will turn on standby mode if
don’t press“ ”within 10 minutes.

III. How to Use
Lock
8
Turn off
a. Press the ON/OFF key of the cooking zone being used. It will
make a “beep” sound once,and it will turn off.
b. Turn off the entire unit by pressing the “ ”key,which will
also make a “beep”sound once,and the indicator light will turn
off.The Unit is now on standby mode.
Note: Please do not pull the power plug until the cooling fan
has stopped.
Activating the Child Safety Lock during cooktop use:
Child Lock prevents activation of any sensor key, except for
the “ ” key and the “Lock” key.
A. Manual: Press the Lock key to activate the function. The
unit will make a “beep” sound and the indicator light will turn
on above the Lock key. The controls are now locked.
B. Automatic: The induction cooktop will automatically enter
into Lock mode if any key is not pressed within 5 minutes. The
unit will make a “beep” sound and the indicator light will turn
on above the “Lock” key when the automatic Lock mode is
activated.
Switch off the lock
While in Lock mode, press the Lock key to deactivate the
function. The indicator light will turn off.

Timer
Setting the Timer to Automatic switch-off:
III. How to Use
9
After using any of the cooking zones, the cooktop will remain
very hot. Even after turning off the entire unit, the surface of the
cooktop will remain hot for some time. The display for the
cooking zones will display an “H” to warn the user that the
surface is hot to the touch. Wait until the “H” is no longer
displayed to clean the unit. You may turn the unit back on even if
the “H” is displayed.
With the desired heating zone Powered ON, press the “Timer”
key. The timer display will blink and show a “00”, Press the “+” or
“-” to increase or decrease to the desired time until the desired
time appears in the display (Choose up to 99 minutes). Once the
Timer is set, if keys haven't been pressed after 5 seconds, it will
begin to countdown, the timer display will remain lit, the
indicator for that particular burner will flash.
If you want to set another burner to switch-off automatically,
repeat the same steps.
If you want to check the remaining time for another zone, press
the “Timer” until the indicator for the desired burner blinks.
If more than one switch-off time is programmed, the shortest
time remaining will show in the display, the indicator for that
particular burner will flash.
Cancelling the timer:
Press the “Timer” until the indicator for the desired burner
blinks, then press the “+” or “-” to set the timer to . The Timer
display will blink for 5 seconds and then turn off, indicating that
the timer of selected heating zone has been cancelled.
When the time is
completed, a “beeping” sound will go off indicating that the time
is up, and selected heating zone shut off automatically.
press “Timer” key to until the desired timer indicator blink,
“00”

Induction requires pots and pans that are
made of ferrous(meaning magnetc)
materials.
Check your cookware’s retail box for the
induction symbol. To tell if your current
cookware is compatible with the induction
technology, grab a magnet and see if it
holds to the bottom of the cookware. If
your magnet stays on then your cookware
is ready to be used on the Induction
four burner induction drop-in cooktop!
10
IV. Compatible Cookware
The following are
heat-resistant glass,ceramic,copper,
aluminum pan/pots,round-bottomed
cookware,or cookware with a base
less than 5 inches.
not compatible:
V. Cleaning and Maintenance
Please follow these directions along with Important Safety steps for cleaning,
advised at the beginning of the manual. Use a ceramic cooktop cleaner on the
glass cooktop.To maintain and protect the surface of your glass cooktop,follow
these steps:
Before using the cooktop for the first time,clean it with ceramic cooktop
cleaner.This helps protect the top and makes cleanup easier.
1. Daily use of ceramic cooktop cleaner will help keep the cooktop looking new.
2. Shake the cleaning solution well. Apply a few drops of ceramic cooktop cleaner
directly to the cooktop.
3. Use a paper towel or a soft cleaning pad for ceramic cooktops to clean the entire
cooktop surface.
4. Use a dry cloth or paper towel to remove all cleaning residue. No need to rinse.
Never run the cooktop under water.
NOTE: It is very important that you DO NOT use the cooktop until it has been
thoroughly cleaned.
CAUTION: Do not store items of interest to children in cabinets above a range or
on the backguard of a range-children climbing on the range to reach items could
be seriously injured.
Optimally the cookware will have
this induction image on the retail
box:

Cleaning Burned on Residue:
1.Allow the cooktop to cool.
2.Spread a few drops of the ceramic cooktop cleaner on the burned residue area.
3.
4.If any residue remains, repeat the steps listed above.
5.
Cleaning heavy burned - on residue:
1.Allow the cooktop to cool.
2.
3.
4.
Metal Marks and Scratches:
.
.
11
V. Cleaning and Maintenance:
NOTE:
will have to be replaced. Contact the manufacturer for assistance.
If cracks or indentations in the glass surface occurs, the cooktop glass
If pots with a thin overlay of aluminum or copper boil dry, the overlay may leave a
black discoloration on the cooktop. This should be removed immediately before
using the cooktop again or the discoloration will become permanent.
Be careful not to slide pots or pans across the cooktop surface. It will leave behind
metal markings. These marks are removable using the ceramic cooktop cleaner
along with the cleaning pad for ceramic cooktops
For additonal protection, after all residue has been removed, polish the entire
surface with the ceramic cooktop cleaner and a paper towel.
After scraping off the residue, apply a few drops of the ceramic cooktop
cleaning solution on the entire burned residue area. Use the cleaning pad to
remove any remaining residue.
Used a single-
against the glass surface, and scrape o the residue.
edge razor blade scraper approximately at a 45 degree angle
ff
For additonal protection, after all residue has been removed,polish the
entire surface with the ceramic cooktop cleaner and a paper towel.
Using the included ceramic cooktop cleaning pad, rub the residue area,
applying pressure as needed.
WARNING:
other type of abrasive cleaning materials.
Damage to the glass surface may occur if you use scrub pads or any

Figure1
12
VI.Counter Installation Instructions:
Warning!
For Your Safety:Do not store or use gasoline or other flammable vapors and
liquids in the vicinity of this or any other appliance.To eliminate the risk of burns
or fire due to overheating,cabinets located above the induction unit should be
avoided.If cabinet space is available, the risk can be reduced by installing a
range hood that protects horizontally at a minimum of 5 inches below the bottom
of the cabinets.
IMPORTANT INSTALLATION INFORMATION
Important-Save for the local electrical inspector’s use.
I
30"(76.2cm)min.for cabinet.
**Do not obstruct these areas.
G
H
Approximate location of junction
box,min 12"(304.8mm)below the
cooktop.
All electric cooktops run off a single phase,three-wire cable,240V/60Hz AC only
electrical supply with ground.Minimum distance between cooktop and overhead
cabinetry is 30".

13
VI.Counter Installation Instructions:
Cooktop Dimensions
A. Width
B. Depth
C. Height
30"
21"
5/32"
2-5/32"
D. Height
E.Depth
G.Depth
Minimum:28-3/4"
Maximum:29-7/32"
F.Depth
Minimum:19-9/32"
Maximum:20-1/4"
Minimum:13/32"
Maximum:25/32"
Cooktop Cutout Dimensions
H. Depth
Minimum:1-31/32"
I. Depth
Minimum:30"
OVEN
70mm(2-3/4")
Note:do not put a
divider between the
oven and cooktop

1.Visually inspect the cooktop for damage.
Also make sure all cooktop screws are on
tight.
2.Place the cooktop into the countertop
cutout.
Model and Serial Number Location:
The serial plate is located under the cooktop.
When ordering parts or making inquiries about
your cooktop, be sure to include the model and
serial numbers.
Connecting to a 3 wire power supply cable electrical system
1. Disconnect the power supply.
2.
Continues on next page
Before installing the cooktop:
14
VI.Counter Installation Instructions:
Cable from Power Supply
Green Wire
(Grounding)
Junction Box
Black Wire
White Wire
Cable from appliance
In the circuit breaker,fuse box,or junction box,connect appliance and power
supply cable wires as shown below.

3. Circuit breaker fuse rating must be above 40 A , and wire should be 2/8 or 3/8 copper.
4.
5. A wire-binding screw or stud used in the wire terminal should be 10 or larger.
1.
2.
Connecting to a 3 wire power supply cable electrical system
Warning!
15
VI.Counter Installation Instructions:
3.
lmportant-Save for the local electrical inspector's use.
To eliminate the risk of bums or fire by reaching over heated surface
units, cabinet storage space located above the surface units should be avoided.
If cabinet storage is to be provided, the risk can be reduced by installing a range
hood that projects horizontally a minimum of 5 inches beyond the bottom of the
cabinets.
An extension cord must not be used with this appliance. Such use may result
in a fire, electrical shock or other personal injury.
The electrical power to the cooktop must be shut off while line connections
are being made. Failure to do so could result in serious injury or death.
Minimum acceptable size of conductors should be no less than 10AWG,copper
only, and no less than167°F .

16
If the display shows an error code,please refer to this sheet for a potential solution.
VII.Troubleshooting Error Codes
The cooktop control panel may read liquids
or objects obstructing the panel, which can
cause the cooktop to shut off. Clean up
spills or remove objects, then restart the
unit.
Cooktop turns off
while cooking
Power boost does
not work
The fans keep
running for one
minute after the
unit has been
switched off
Cooktop does
not heat up
Cooktop does
not work
7400

17
If the display shows an error code,please refer to this sheet for a potential solution.
Error Code
Possible Cause
Solution
appears on the
Power display
See E0,E1,E2,E3,E7,E8,E9,EE
“ ”E0 appears in the
Timer display
IGBT o v e r h e at i n g .
appears in the
Timer display
No cookware found or improper
placement of cookware on the
cooking zone.
Make sure the cookware is centered on the
cooking zone,and that it’s also induction
compatible.See Compatible Cookware.
appears in the
Timer display
This may be caused by reduced voltage being
appears in the
Timer display
appears in the
Timer display
NTC1 break of
appears in the
Timer display
NTC1 short circuit
appears in the
Timer display
NTC2 break of
appears in the
Timer display
NTC2 short circuit
“ ”E1
“ ”E2
“ ”E3
“ ”E7
“ ”E8
“ ”E9
“ ”EE
“ ”E
Turn of unit untl to allow IGBT to
cool.Restart until.
supplied to the house circuit. If the connections
are correct and supplied voltage returns to
normal, the code will disappear.
VII.Troubleshooting Error Codes
This may be caused by increased
voltage being supplied to the house
circuit.If the connections are correct
and the supplied voltage returns to
normal,the code will disappear.
Turn OFF the cooktop;then shut of the
power at the fuse or circuit breaker for
about 30 seconds.Turn the power back
on to the cooktop then press the
POWER button to turn on the unit.If the
error message is still being
displayed,call for service.
If the voltage of the power supply to the
cooktop is too high,it cannot operate
properly and will show this error code.
If the voltage of the power supply to the
cooktop is too low,it cannot operate properly
and will show this error code.
Electronics fault error
message of specific cooking
zone.
Supplied voltage to cooktop
is too high.
Supplied voltage to cooktop
is too low.

VIII.FCC STATEMENT:
This device complies with Part 18 of the FCC Rules.
FCC STATEMENT;
NOTE:
18
1.This equipment has been tested and found to comply with the limits for a
Consumer ISM equipment, pursuant to Part 18 of the FCC Rules. These limits
are designed to provide reasonable protection against harmful interference in a
residential installation. This equipment generates, uses and can radiate radio
frequency energy and, if not installed and used in accordance with the
instructions, may cause harmful interference to radio communications. However,
there is no guarantee that interference will not occur in a particular installation.
2.Please note that changes or modifications of this product is not expressly
approved by the party responsible for compliance could void the user's authority
to operate the equipment.
3.If this equipment does cause harmful interference to radio or television
reception, which can be determined by turning the equipment off and on, the user
is encouraged to try to correct the interference by one or more of the following
measures:
-- Reorient or relocate the receiving antenna.
-- Increase the separation between the equipment and receiver.
-- Connect the equipment into an outlet on a circuit different from that to
which the receiver is connected.
– Consult the dealer or an experienced radio/TV technician for help.
Table of contents
Other Forno Burner manuals
Popular Burner manuals by other brands

Riello
Riello Gulliver RG5S Installation, use and maintenance instructions

Megatherm
Megatherm MPB 90 Pro Installation & user manual

Eclipse
Eclipse TA Series installation guide

Ecoflam
Ecoflam MAX P 15 manual

Cook's Companion
Cook's Companion CCNIB/B414124 Care and use instructions

Riello
Riello 20169021 Installation, use and maintenance instructions

Beckett
Beckett NX manual

Riello
Riello RS 160/M BLU instruction manual

Burnertech
Burnertech INVERTERJET M Series INSTALLATION / SERVICE / USER MANUAL

Bentone
Bentone B45-2 RME Installation and maintenance instruction

Campingaz
Campingaz BLEUET G 206 Instructions for use

Nova Vizantija
Nova Vizantija Bionova Line Burner L Automatic Installation and operation guide