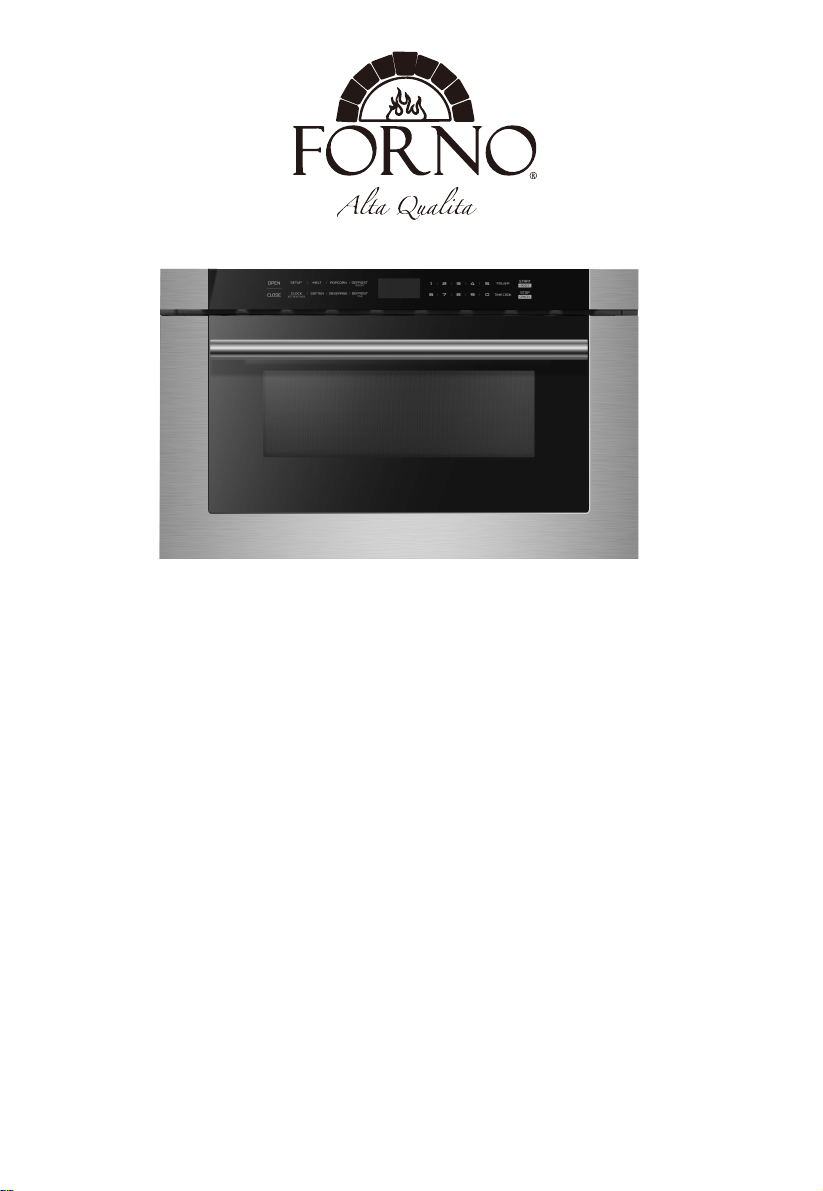
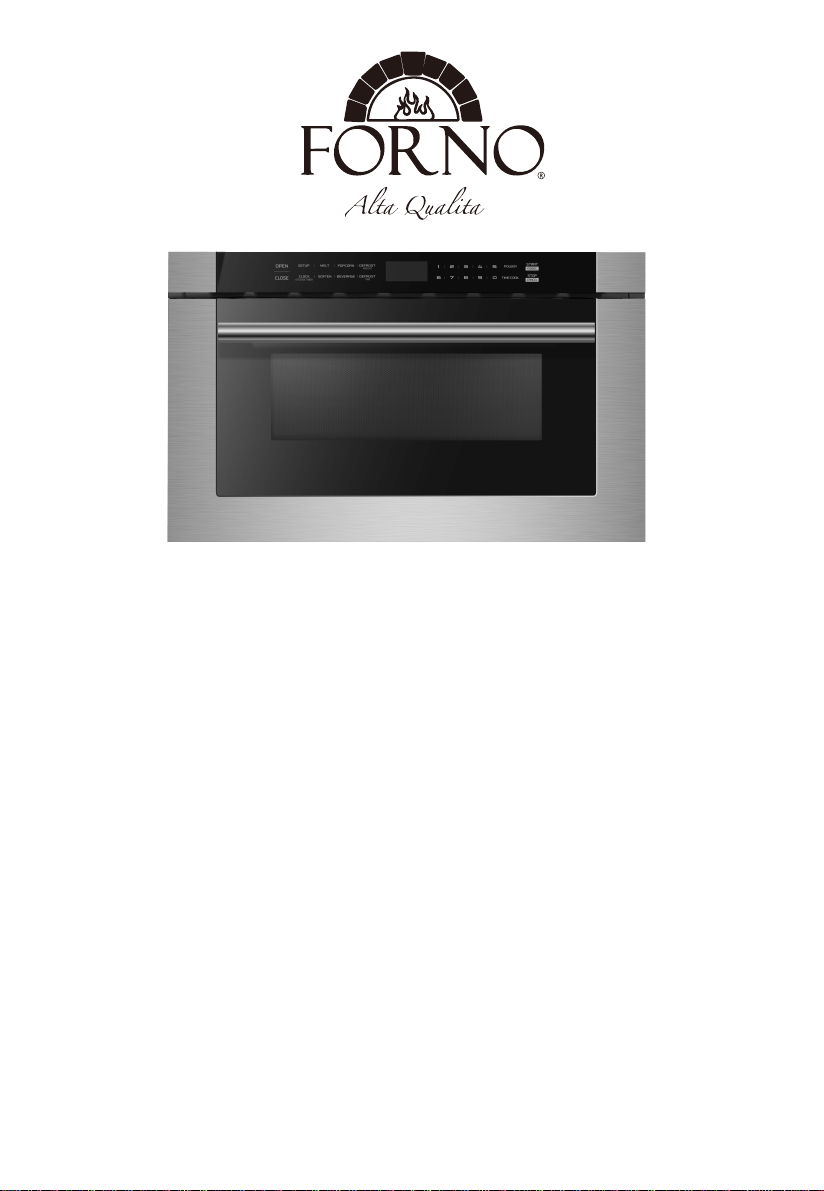
Forno EM034D4NA User manual
SAVE THESE INSTRUCTIONS CAREFULLY
Read these instructions carefully before using your
microwave oven,and keep it carefully.
If you follow the instructions, your oven will provide you with
many years of good service.
INSTRUCTION MANUAL
MODE L:
13/05/21
dd/mm/yy
FMWDR30 0024
EM034D4NA

Customer Care
Thank you for purchasing a FORNO product. Please read the entire instruction manual before operating
your new appliance for the first time. Whether you are an occasional user or an expert , it will be beneficial to
familiarize yourself with the safety practices, features, operation and care recommendations of your
appliance.
Both the model number and serial number are listed on the product. For warranty purposes, you will also
need the date of purchase. Record this information below for future reference.
SERVICE INFORMATION
Model Number:
Serial Number:
Date of Purchase:
Purchase Address & Phone:
Use these numbers in any correspondence or
service calls concerning your appliance.
If you received a damaged appliance,
immediately contact the dealer (or builder) that
sold you the appliance
Save time and money. Before you call for
service, check the Troubleshooting Guide. It lists
the causes of minor operating problems that you
can correct yourself.
SERVICE IN CANADA:
Keep the instruction manual handy to answer your questions. If you don’t understand something or you need
more assistance, please call our Customer Service: 1-800-561-7265
Or email: [email protected]
Or contact : CTM Household Appliances Inc.
11 420 Albert Hudon, Montréal, Québec H1G 3J6, Canada
SERVICE IN THE UNITED STATES:
Keep the instruction manual handy to answer your questions. If you don’t understand something or you need
more assistance, please call our Customer Service: 1-866-231-8893
Or email: [email protected]
The instruction manual can be downloaded from www.forno.ca
If your appliance ever requires servicing, be sure to use a FORNO Factory Certified Service provider
recommended by our customer care center. All Factory Certified Service providers are carefully selected
and thoroughly trained by us.
PRECAUTIONS TO AVOID POSSIBLE
EXPOSURE TO EXCESSIVE MICROWAVE
ENERGY
(a) Do not attempt to operate this oven with the door open since
operation can result in harmful exposure to microwave energy.
It is important not to defeat or tamper with the safety interlocks.
(b) Do not place any object between the oven front face and the door or allows soil or
cleaner residue to accumulate on sealing surfaces.
(c) Do not operate the oven if it is damaged. It is particular important that
the oven door close properly and that there is no damage to the:
(1) DOOR (bent)
(2) HINGES AND LATCHES (broken or loosened)
(3) DOOR SEALS AND SEALING SURFACE
(d) The oven should not be adjusted or repaired by anyone except properly
qualified service personnel.
open door
S
ly
Specifications
120V~ 60Hz
1 0W
Model:
Rated Voltage:
Rated Input Power(Microwave):
Rated Output Power(Microwave):
Oven Capacity:
External Dimensions (WxHxD):
Net Weight:
Approx. 31.96Kg
1000W
50
34L
600x380x640mm
EN-3
FMWDR300024
EM034D4NA

WARNING -
1. Read all instructions before using the
appliance.
2. Read and follow the specific:
EXCESSIVE MICROWAVE ENERGY"
found on page 2.
combustible materials are placed inside the oven to facilitate cooking.
only to properly grounded outlet. See
found on page
accordance with the provided installation
instructions.
To reduce the risk of burns, electric shock, fire, injury to persons or exposure
to excessive microwave energy:
3. This appliance must be grounded. Connect
"PRECAUTIONS TO AVOID POSSIBLE EXPOSURE TO
"GROUNDING INSTRUCTIONS"
4. Install or locate this appliance only in
5. Some products such as whole eggs and sealed containers - for example, closed glass
jars - are able to explode and should not be heated in this oven.
6. Use this appliance only for its intended use as described in the manual. Do not use
corrosive chemicals or vapors in this appliance. This type of oven is specifically
designed to heat, cook or dry food. It is not designed for industrial or laboratory use.
supervision is necessary when used
by children.
7. As with any appliance, close
damaged cord or plug, if it is not
working
properly, or if it has been
damaged or dropped.
8. Do not operate this appliance if it has a
by qualified service personnel.
Contact nearest
authorized service
facility for examination, repair, or
adjustment.
9. This appliance should be serviced only
10. Do not cover or block any openings on the appliance.
11. Do not store this appliance outdoors. Do not use this product near water - for
example,
near a kitchen sink, in a wet
basement, near a swimming pool, or
similar location.
1 . Do not immerse cord or plug in water.2
1 . Keep cord away from heated surface.
14. Do not let cord hang over edge of
table or counter.
3
15. When cleaning surfaces of door and oven that comes together on closing the door,
16. To reduce the risk of fire in the oven cavity:
1). Do not overcook food. Carefully attend appliance when paper, plastic, or other
2). Remove wire twist-ties from paper or plastic bag before placing bag in oven.
3). If material inside of the oven ignite, keep oven door closed, turn oven off, and
disconnect the power cord, shut off power at the fuse or circuit breaker panel.
4). Do not use the cavity for storage purposes. Do not leave paper products, cooking
utensils, or food in the cavity when not in use.
point without appearing to be boiling. Visible bubbling or boiling when the container is
removed from the microwave oven is not always present.
17. Liquids, such as water, coffee, or tea are able to be overheated beyond the boiling
IMPORTANT SAFETY INSTRUCTIONS
precautions should be followed, including
When using electrical appliances basic safety
following:the
use only mild, nonabrasive soaps, or detergent applied with a sponge or soft cloth.
or
.
EN-4
5

stand in the microwave oven for a short time
before removing the container. spoon or other utensil into the container.
This appliance must be grounded. In the event of an electrical short circuit, grounding
of electric shock by providing an escape wire for the
appliance is equipped with a cord having a
plugged into an outlet that is properly installed and grounded.
GROUNDING INSTRUCTIONS
THIS COULD RESULT IN VERY HOT LIQUID SUDDENLY BOILING OVER WHEN
THE CONTAINER IS DISTURBED OR A UTENSIL IS INSERTED INTO THE LIQUID.
To reduce the risk of injury to persons:
1) Do not overheat the liquid.
2) Stir the liquid both before and halfway through heating it.
3) Do not use straight-sided containers with narrow necks.
4) After heating, allow the container to
5) Use extreme care when inserting a
grounding wire with a grounding plug.
reduces the risk electric current. This
The plug
WARNING - Improper use of the grounding can result in a risk of electric shock.
Consult a qualified electrician or serviceman if the grounding instructions are not
completely or if doubt exists as to whether the appliance is properly grounded.
extension cord, use only a 3-wire extension cord that has a
The marked rating of the extension cord shall be equal to or greater than the electrical
appliance.
understood,
If it is necessary to use an
3-blade grounded plug, and 3-slot receptacle that will accept the plug on the appliance.
rating of the
Electric Shock Hazard
Touching some of the internal components can cause serious personal injury or death.
disassemble this appliance.
DANGER -
Do not
Electric Shock Hazard
Improper use of the grounding can result in electric shock. Do not plug into an outlet until
appliance is properly installed and grounded.
WARNING -
SA E THESE INSTRUCTIONS
must be
V
on top of the appliance surface when the appliance is in
20. Do not mount over sink.
21. Do not store anything directly
operation.
operate any heating or cooking appliance beneath the appliance.18. Do not
19. Do not mount unit over or near any portion of heating or cooking appliance.
EN-5

1. A short power supply cord is provided to reduce the risks resulting from becoming
entangled in or tripping over a longer cord.
2. Longer cord sets or extension cords are available and may be used if care is exercised
in their use.
3. If a long cord or extension cord is used:
1) The marked electrical rating of the cord set or extension cord should be at least as
great as the electrical rating of the appliance.
2) The extension cord must be a grounding-type 3-wire cord.
3) The longer cord should be arranged so that it will not drape over the counter top or
tabletop where it can be pulled on by children or tripped over unintentionally.
-
1. Operation of the microwave oven may cause interference to your radio, TV
or similar
2. When there is interference, it may be reduced or eliminated by taking the
following
1) Clean door and sealing surface of the oven
2) Reorient the receiving antenna of radio or television.
3) Relocate the microwave oven with respect to the receiver.
4) Move the microwave oven away from the receiver.
5) Plug the microwave oven into a different outlet so that microwave oven
are on different branch circuits.
RADIO INTERFERENCE
equipment.
measures:
and receiver
EN-6

Personal Injury Hazard
Tightly-closed utensils could explode. Closed containers should be opened and plastic
pierced before cooking.
Utensil Test:
1. Fill a microwave-safe container with 1 cup of cold
water (250ml) along with the
2. Cook on maximum power for 1 minute.
3. Carefully feel the utensil. If the empty utensil is
warm, do not use it for microwave
4. Do not exceed 1 minute cooking time.
UTENSILS
See the instructions on "Materials you can use in microwave oven or to be avoided in
There may be certain non-metallic utensils that are not safe to use for microwaving. If
utensil in question following the procedure below.
CAUTION -
pouches should be
microwave oven."
in doubt, you can test the
utensil in question.
cooking.
Materials you can use in microwave oven
Utensils Remarks
Follow manufacturer* instructions. The bottom of browning dish must be
at least 3/16 inch (5mm) above the turntable. Incorrect usage may cause
the turntable to break.
Microwave-safe only. Follow manufacturer's instructions. Do not use
cracked or chipped dishes.
Always remove lid. Use only to heat food until just warm. Most glass jars
are not heat resistant and may break.
Heat-resistant oven glassware only. Make sure there is no metallic trim.
Do not use cracked or chipped dishes.
Follow manufacturer* instructions. Do not close with metal tie. Make
slits to allow steam to escape.
Use for short*erm cooking/warming only. Do not leave oven unattended
while cooking.
Use to cover food for reheating and absorbing fat. Use with supervision
for a short-term cooking only.
Use as a cover to prevent splattering or a wrap for steaming.
Browning dish
Glass jars
Glassware
Oven cooking
bags
Paper plates
and cups
Paper towels
Parchment
paper
Dinnerware
EN-7

Materials you can use in microwave oven
Utensils Remarks
Microwave-safe only. Follow the manufacturer* instructions. Should be
labeled "Microwave Safe". Some plastic containers soften, as the food
inside gets hot. "Boiling bags" and tightly closed plastic bags should be
slit, pierced or vented as directed by package.
Microwave-safe only. Use to cover food during cooking to retain
moisture. Do not allow plastic wrap to touch food.
Thermometers Microwave-safe only (meat and candy thermometers).
Wax paper Use as a cover to prevent splattering and retain moisture.
Plastic
Plastic wrap
Materials to be avoided in microwave oven
Utensils Remarks
Aluminum tray
Food carton with
metal handle
Metal or metal-
trimmed utensils
Metal twist ties
Paper bags
Plastic foam
Wood
Metal shields the food from microwave energy. Metal trim may
cause arcing.
May cause a fire in the oven.
Plastic foam may melt or contaminate the liquid inside when exposed
to high temperature.
Wood will dry out when used in the microwave oven and may split
or crack.
May cause arcing. Transfer food into microwave-safe dish.
May cause arcing. Transfer food into microwave-safe dish.
May cause arcing and could cause a fire in the oven.
EN-8
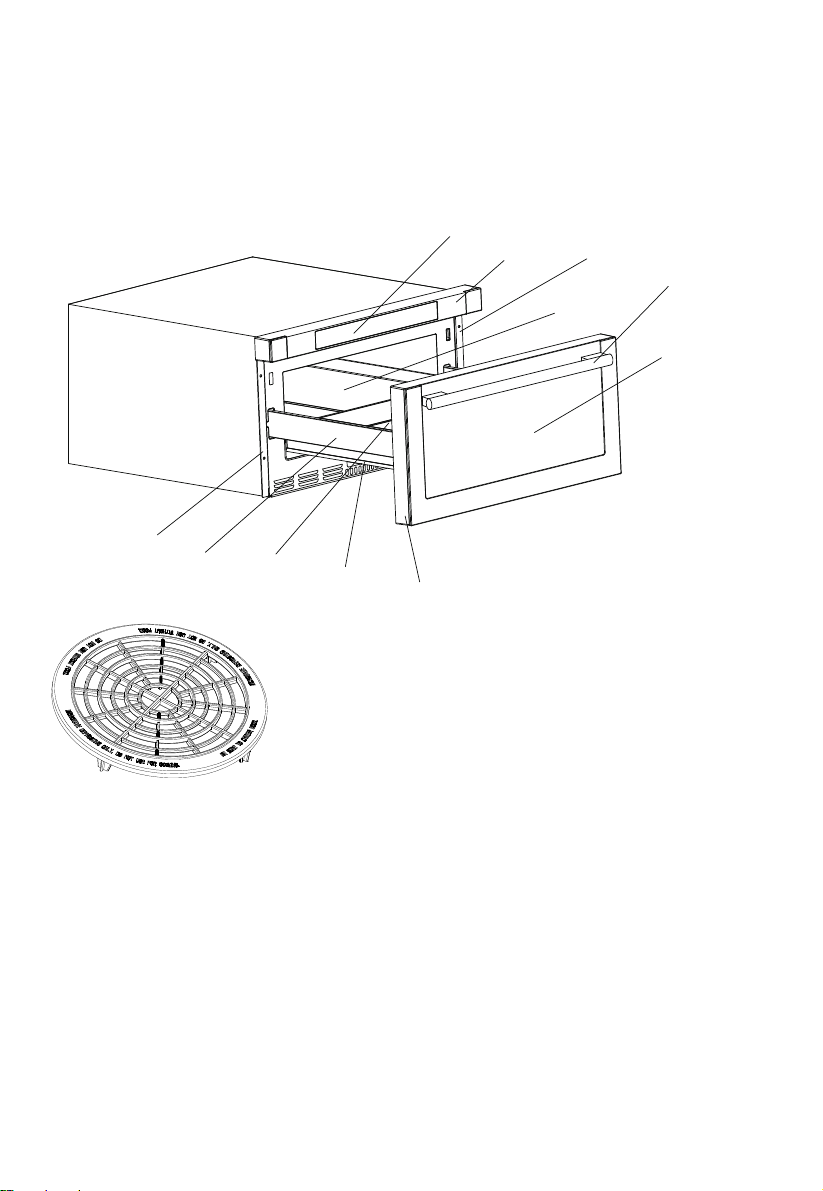
SETTING UP YOUR OVEN
Names of Oven Parts and Accessories
Remove the oven and all materials from the carton and oven cavity.
Your oven comes with the following accessories:
Remove all packing material and accessories.
Examine the oven for any damage such as
dents or broken door. Do not install if oven is
damaged.
CountertopInstallation
Cabinet: Remove any protective film found
on the microwave oven cabinet surface.
Do not remove the light brown Mica cover
that is attached to the oven cavity to
protect the magnetron.
and do not use for cooking. Do not use without food )
Defrosting Rack( Only be used in defrosting function
A) Control an
B) Control Box
C) RightMounting Plate
D) Cavity
E) Windows
F) Door Frame
G) Automatic putter
H) Drawer
I) Hinge Joint Board
J) Left Mounting Plate
P
K) Handle
A
BC
D
E
K
F
G
H
I
J
EN-9
el
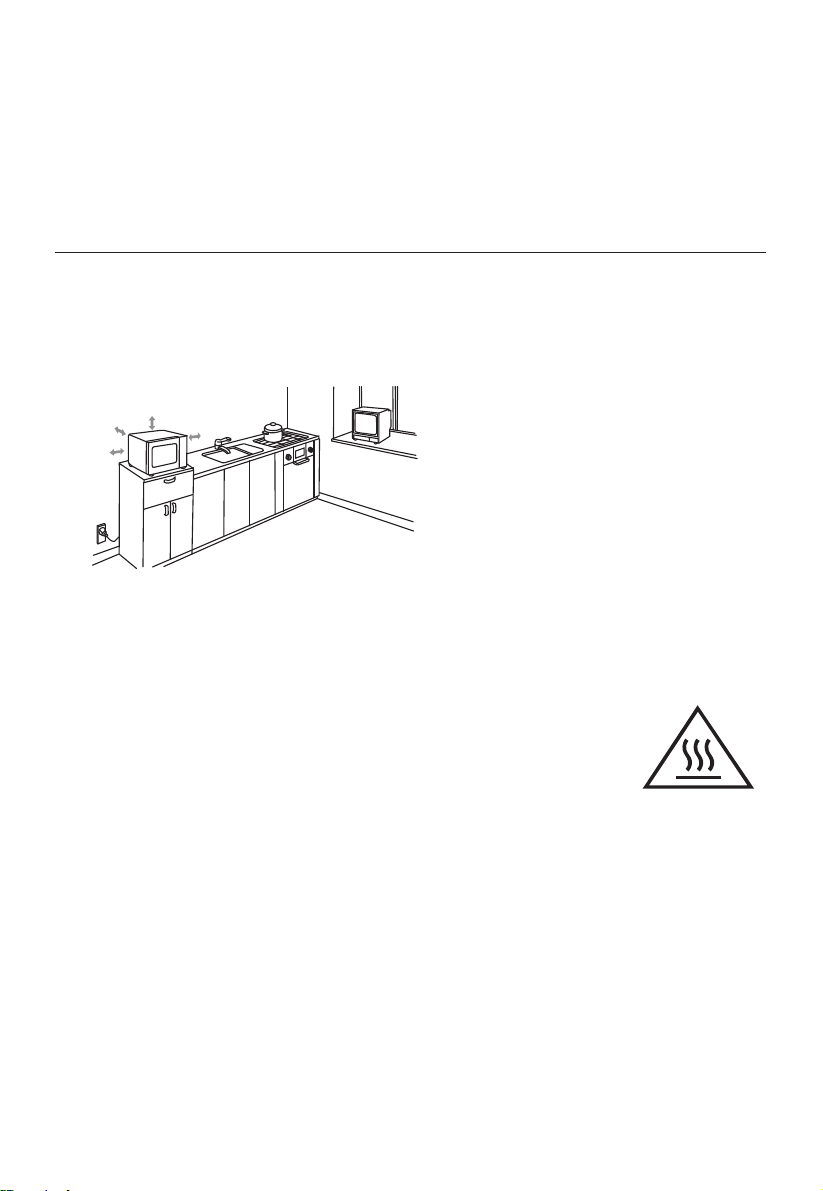
Installation
A minimum clearance of 3.0 inches
(7.5cm) is required between the oven and
any adjacent walls. One side must be open.
(1) Leave a minimum clearance of 12
inches (30cm) above the oven.
(2) Blocking the intake and/or outlet openings
can damage the oven.
( ) Place the oven as far away from
radios and TV as possible.
Operation of microwave oven may
cause interference to your radio or TV
reception.
2. Plug your oven into a standard household
outlet. Be sure the voltage and the
frequency is the same as the voltage
and the frequency on the rating label.
WARNING: Do not install oven over a
range cooktop or other heat-producing
appliance. If installed near or over a heat
source, the oven could be damaged and
the warranty would be void.
3.0 inch(7.5cm)
3.0 inch(7.5cm)
12 inch(30cm)
OPEN
Remove all packing material and accessories.
Examine the oven for any damage such as
dents or broken door. Do not install if oven is
damaged.
Countertop Installation
Cabinet: Remove any protective film found
on the microwave oven cabinet surface.
Do not remove the light brown Mica cover
that is attached to the oven cavity to
protect the magnetron.
1. Select a level surface that provide
enough open space for the intake
and/or outlet vents.
The accessible surface
may be hot during
operation.
EN-10
3
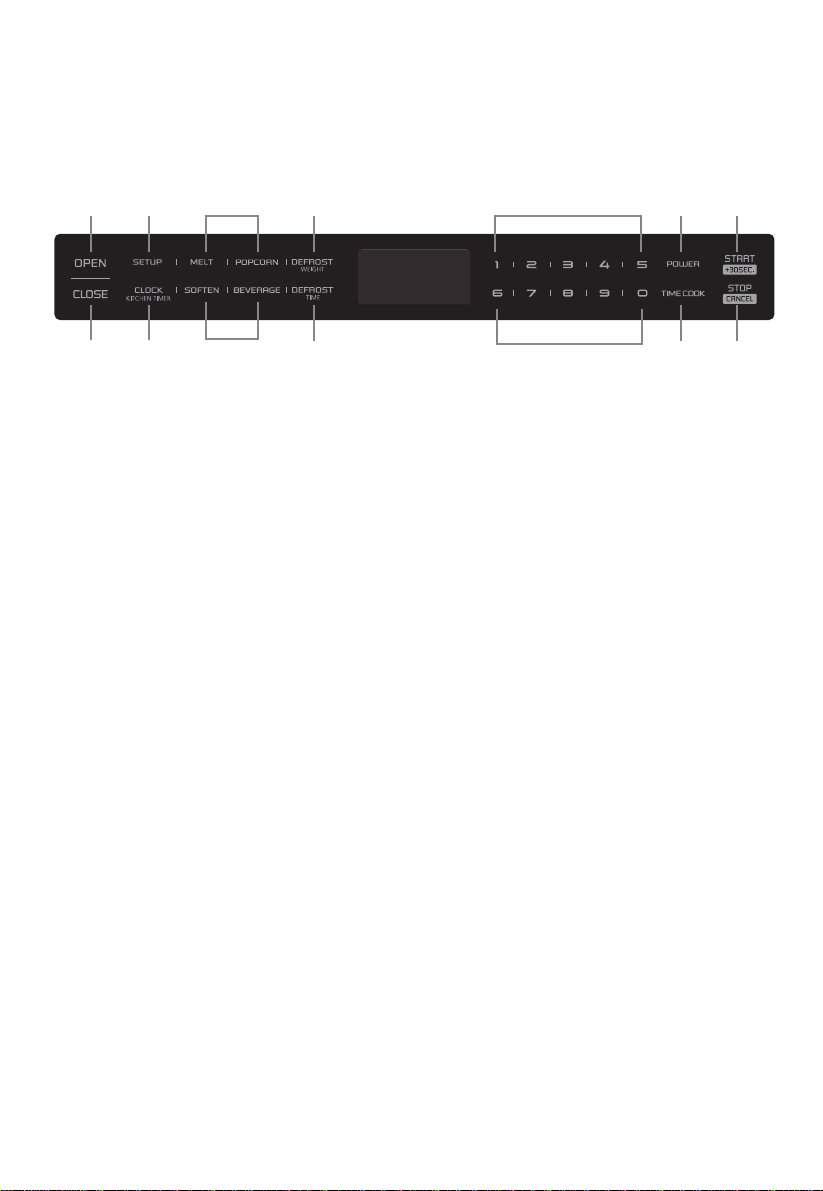
Control Panel and Features
OPERATION
(5)
(2) (3) (4) (9) (10)
(6) (7) (11) (12)
(1) (8)
(1) Open
(2) Setup
(3) Auto Menu
(4) Weight Defrost
(5) Close
(6) Clock/Kitchen timer
(7) Time Defrost
(8) Number keys
(9) Power
(10) Start/ +30sec.
(11) Time Cook
(12) Stop/C ncel
(3)
a
(8)
EN-11

3. Kitchen T imer
(1) Press "CLOCK/KITCHEN TIMER" button twice,
(2) Press the number
99 seconds.
(3) Press " to confirm setting
(4) When the kitchen time arrives, buzzer will ring 5 times. The oven turns into waiting
state. Screen will display the current time if the clock has been set. Otherwise, Screen will
Note: 1) The kitchen timer is differ from 12-hour system. Kitchen Timer is a timer.
OPERATION
operated.
outlet, buzzer sounds once. Screen displays
1. Power n
"WELCOME". Then the oven turns into waiting state. The screen displays "00:00".
(1) When the microwave oven is plugged into an
(2) In waiting state, the screen will display the current time if the clock has been set.
O
2. Clock Setting
(1) Press "CLOCK/KITCHEN TIMER" button once. The first hour figure will flash and other
(2) Press the number buttons to enter the correct time. The input time should be between
(3) Press "CLOCK/KITCHEN TIMER" to finish the setting. ":" will flash.
Note: In the process of clock setting, if the "STOP/CANCEL" button is pressed or if there
is no operation within 1 minute, the oven will go back to former setting automatically.
Screen will display 00:00. "FUNCTION"
buttons to enter the time. The maximum cooking time is 99 minutes
START/+30SEC." the . The time begins to count down.
display "00:00".
2) In the process of Kitchen Timer operation, any cooking programme cannot be
)3 "STOP/CANCEL" can be pressed to cancel the Kitchen Timer.
will light.
01:00-12:59.
Otherwise, "00:00" will display.
(3) Press "OPEN" button to open the drawer, and screen displays "OPEN". The screen will
Press "CLOSE" button to close the drawer, and the screen displays "CLOSE". The screen
If there are mistakes to open or close the drawer, buzzer will sound five times, and the
display "PLEASE CLOSE" when the drawer is fully opened.
will display the current time or "00:00" when the drawer is fully closed.
screen will display "OPEN OR CLOSE".
"0" will light.
EN-12

(1) Press "TIME COOK" button, will display "00:00". "FUNCTION" will light.
Press number buttons to input the cooking time. The maximum cooking time is 99
minutes 99 seconds.
Level
Power
10
100%
9
90%
8
80%
7
70%
6
60%
5
50%
4
40%
3
30%
2
20%
1
10%
Display PL100 PL90 PL80 PL70 PL60 PL50 PL40 PL30 PL20 PL10
11 power levels are available.
0%
PL00
0
(2) Press "POWER" button to set the power. The default power level is "PL100".
Press number buttons to select different power levels.
(3) Press "START/+30SEC." to start cooking. Buzzer sounds once. The cooking time
begins to count down. When cooking finished, buzzer sounds five times and "FINISH"
displays.
Note: In the process of ing, if the "STOP/CANCEL" button is pressed or if there is no
operation within 1 minute, the oven will go back to the former setting automatically.
sett
. Cooking Function4 Microwave
Screen
(1) Press "DEFROST WEIGHT" button. Screen displays "WEIGHT DEFROST".
(2) Press numeber buttons to input the weight to be defrosted.
(1) In waiting state, instant cooking at 100% power level with 30 seconds' cooking time can
be started by pressing "START/+30SEC". Each press on the same button will increase
cooking time by 30 seconds.
Note: "START/+30SEC." cannot be pressed to increase cooking time for defrost by weight
and Auto menu cooking.
(2) During microwave and defrost by time, "START/+30SEC."
can be pressed to increase
And "FUNCTION" will light.
The input weight should be between 0.1-6.0 lbs.
(3) Press "START/+30SEC." to start defrosting. Buzzer sounds once. The defrosting time
begins to count down. When cooking finished, buzzer sounds five times and "FINISH"
displays.
5. Fast Cooking
6. Weight Defrost Function
cooking time. Each press will increase 30 seconds.
EN-13

(1) Press "DEFROST TIME" button. displays "TIME DEFROST".
"FUNCTION" will light.And
(3) Press "START/+30SEC." to start defrosting. Buzzer sounds once. The defrosting time
begins to count down. When cooking finished, buzzer sounds five times and "FINISH"
displays.
Note: The defrosting power level is PL30.
(2) Press number buttons to enter the ng time between 00:01-99:99.defrosti
(1) Press " " button. displays "1". "AUTO MENU" and " " indicators
(3) Press "START/+30SEC." to start cooking. Buzzer sounds once. The cooking time
begins to count down. When cooking finished, buzzer sounds five times and "FINISH"
displays.
(2)
BEVERAGE
Continue to press "BEVERAGE" button, "1" or "2" will display in order.
will light.
7. Time Defrost Function
8. Auto Menu--Beverage
Screen
Screen
(1) Press "
(3) Press "START/+30SEC." to start cooking. Buzzer sounds once. "OZ" will go out. The
displays.
(2) Continue to press "POPCORN" button, "1.75", "3" or "3.5" will display in order.
POPCORN" button. displays "1.75". "AUTO MENU" and "OZ" indicators
cooking time begins to count down. When cooking finished, buzzer sounds five times
and "FINISH"
(1) Press "
(5) Press "START/+30SEC." to start cooking. Buzzer sounds once. "OZ" will go out. The
displays.
(2)
10. Auto Menu--
Continue to press "MELT" button, "BUTTER", "CHOCOLA", "CHEESE" or "MARSHMA"
cooking time begins to count down. When cooking finished, buzzer sounds five times
and "FINISH"
Melt
MELT" button. displays "BUTTER". "AUTO MENU" indicator will light.
will display in order.
(3) Press "START/+30SEC." to confirm the selection.
(4) Press "MELT" button to select the weight. "OZ" will light .except butter menu
will light.
9. Auto Menu--Popcorn
Screen
Screen
EN-14
Menu Display
Butter/Margarine BUTTER
1(STICH)
2(STICHS)
3(STICHS)
Weight
Chocolate
Cheese
Marshmallows
CHOCOLA
CHEESE
MARSHMA
4
8
8
16
5
10
(1) Press "
(5) Press "START/+30SEC." to start cooking. Buzzer sounds once. "OZ" will go out. The
displays.
(2)
1 Auto Menu--
Continue to press "SOFTEN" button, "BUTTER", "ICE-CRE" or "CHEESE" will display
cooking time begins to count down. When cooking finished, buzzer sounds five times
and "FINISH"
in order.
(3) Press "START/+30SEC." to confirm the selection.
( Press " " button to select the weight. "OZ" will light .4) except butter menu
Soften
SOFTEN" button. displays "BUTTER". "AUTO MENU" indicator will light.
SOFTEN
1.
Screen
Menu Display
Butter BUTTER
Weight
CHEESE
Ice cream/ Frozen juice ICE-CRE
8
3
8
Cream Cheese
16
32
1(STICH)
2(STICHS)
3(STICHS)
EN-15

(1) Press "
(2)
12. Buzzer On/Off
SETUP" button. displays "BUZ OFF".
Press "START/+30SEC." button. The oven will turn to waiting state. Buzzer is turned
off. No beep will sound.
(3) Press "SETUP" button. displays "BUZ ON".
(4) Press "START/+30SEC." button. The oven will turn to waiting state. Buzzer is turned
o . .n Buzzer will sound normally
Lock: In waiting state, press "STOP/CANCEL" for 3 seconds, the oven will enter into the
children-lock state. will display the current time if the clock has been set.
Lock quitting: In locked state, press "STOP/CANCEL
13. LOCK FUNCTION FOR CHILDREN
Otherwise, "00:00" will display.
" for 3 seconds to release the lock.
(1) In cooking state, press " " button to check the clock. The
current time will display for 3 seconds.
14. INQUIRING FUNCTION
(2) In the microwave cooking state, press "POWER" button to inquire
the microwave power. The current microwave power will display for 3 seconds.
CLOCK/KITCHEN TIMER
Screen
Screen
Screen
(2)
( )
(1) The buzzer sounds once by efficient press, inefficient press will be no responce.
In cooking state, "OPEN" cannot be pressed to open the drawer unless "STOP/CANCEL"
button is pressed to pause the cooking. Press "CLOSE" button to close the drawer. Then
"START/+30SEC." button must be pressed to continue cooking.
(3) If the cooking programme has been set , "START/+30SEC." is not pressed in 1 minute,
The current time will be displayed. The setting will be cancelled.
15. OTHER SPECIFICATIONS
4 If the oven door is open, the lamp will light until the oven is power off.ed
EN-16

Troubleshooting
Check your problem by using the chart below and try the solutions for each problem. If the
microwave oven still does not work properly, contact the nearest authorized service center.
TROUBLE
Oven will not start
POSSIBLE CAUSE POSSIBLE REMEDY
a. Electrical cord for oven is
not plugged in.
b. Door is open.
c. Wrong operation is set.
a. Plug into the outlet.
b. Close the door and try
again.
c. Check instructions.
Arcing or sparking
a. Materials to be avoided in
microwave oven were
used.
b. The oven is operated when
empty.
c. Spilled food remains in the
cavity.
a. Use microwave-safe
cookware only.
b. Do not operate with oven
empty.
c. Clean cavity with wet towel.
Unevenly cooked
foods
a. Materials to be avoided in
microwave oven were
used.
b. Food is not defrosted
completely.
c. Cooking time, power level
is not suit ble.
d. Food is not turned or stirred.
a. Use microwave-safe
cookware only.
b. Completely defrost food.
c. Use correct cooking time,
power level.
d. Turn or stir food.
Overcooked foods Cooking time, power level is
not suitable. Use correct cooking time,
power level.
Undercooked foods
a. Materials to be avoided in
microwave oven were used.
b. Food is not defrosted
completely.
c. Oven ventilation ports are
restricted.
d. Cooking time, power level is
not suitable.
a. Use microwave-safe
cookware only.
b. Completely defrost food.
c. Check to see that oven venti-
lation ports are not restricted.
d. Use correct cooking time,
power level.
Improper defrosting
a. Materials to be avoided in
microwave oven were used.
b. Cooking time, power level is
not suitable.
c. Food is not turned or stirred.
a. Use microwave-safe
cookware only.
b. Use correct cooking time,
power level.
c. Turn or stir food.
MAINTENANCE
a
EN-17
FOUR À MICROONDES
GUIDE D’UTILISATION
Modèle :
Lisez attentivement ces instructions avant d'utiliser le four à
microonde, et les garder soigneusement.
Si vous suivez ces instructions, votre four vous donnera de
nombreuses années de bons services.
CONSERVEZ SOIGNEUSEMENT CES
INSTRUCTIONS
13/05/21
dd/mm/yy
FMWDR30 0024
EM034D4NA

Service à la clientèle
Merci d'avoir achetéun produit FORNO. Veuillez lire l'intégralitédu manuel d'instructions avant d'utiliser votre nouvel
appareil pour la première fois. Que vous soyez un utilisateur temporaire ou un expert, il sera utile de vous familiariser avec
les pratiques de sécurité, les caractéristiques, recommandations concernant l 'exploitation et l' entretien du matériel.
Les modèles et les numéros de série sont énumérés sur le produit. Aux fins de la garantie, vous aurez également besoin
de la date d'achat.
Enregistrez ces informations ci-dessous pour référence future.
RENSEIGNEMENTS SUR LE SERVICE
Numéro de modèle:
Numéro de série:
Date d’achat:
Adresse et téléphone d’achat:
Utilisez ces numéros dans correspondance ou
appels de service concernant votre produit.
Si vous recevez un produit endommagé,
contactez votre distributeur immédiatement.
Gagnez du temps et de l'argent. Avant de faire appel
à un technicien, consultez le Guide de dépannage. Il
répertorie les causes de problèmes mineurs
d’utilisation que vous pouvez corriger vous-même.
SERVICE AU CANADA :
Conservez le manuel d'instructions à portée de main pour répondre à vos questions. En cas
d'incompréhension ou si vous avez besoin d'aide, veuillez communiquer avec notre service à la clientèle :
1-800-561-7265.
Ou par courriel : service@distinctive-online.com
Ou communiquer avec : CTM Household Appliances Inc.
11420 Albert Hudon, Montréal, Québec H1G 3J6, Canada
SERVICE aux États-Unis:
Conservez le manuel d'instructions à portée de main pour répondre à vos questions. En cas
d'incompréhension ou si vous avez besoin d'aide, veuillez communiquer avec notre service à la clientèle :
1-866-231-8893
Cette brochure peut être téléchargée à partir de www.forno.ca
Si votre matériel a besoin d 'être réparé, il est impératif d' utiliser notre centre de services clients
recommandés par Forno usine de certification des fournisseurs de services.Tous les fabricants de services
de certification ont été soigneusement sélectionnés et une formation complète.
PRÉCAUTIONS POUR ÉVITER
L'EXPOSITION POSSIBLE À L'ÉNERGIE
MICROONDE EXCESSIVE
(a) N’essayez pas de faire fonctionner ce four avec la porte ouverte, car cela peut
entraîner une exposition nocive à l’énergie des microondes.
Il est important de ne pas annuler ou altérer les dispositifs de verrouillage de
sécurité.
(b) Ne pas placer un objet entre la face avant et la porte, ou laisser de la saleté ou des
résidus de nettoyage s’accumuler sur les surfaces du joint.
(c) N’utilisez pas le four s’il est endommagé. Il est particulièrement important que la
porte du four se ferme correctement et qu’il n’y ait aucun dommage aux :
(1) PORTE (courbée)
(2) CHARNIÈRES ET LOQUETS (cassés ou desserrés)
(3) JOINTS DE PORTE ET SURFACE D’ÉTANCHÉITÉ
(d) Le four ne doit pas être réglé ou réparé par quelqu’un qui n’est pas un personnel de
dépannage qualifié.
Caractéristiques
Modèle :
Tension nominale :
120 V~ 60 Hz
Puissance nominale d’entrée
(microondes) :
1 500 W
Puissance nominale de sortie
(microondes) :
1 000 W
Capacité du four :
34 litres
Dimensions externes (l x H x P) :
600 × 380 ×640 mm
Poids net :
Environ 31,96 kg
FR-3
FMWDR300024
EM034D4NA
This manual suits for next models
1
Table of contents
Languages:
Other Forno Microwave Oven manuals


Popular Microwave Oven manuals by other brands


Conrad Electronic
Conrad Electronic 2372935 operating instructions

GE
GE Spacemaker JVM1440BH datasheet

DAEWOO ELECTRONICS
DAEWOO ELECTRONICS KOR-6L8K5S83 Operating instructions & cook book

DAEWOO ELECTRONICS
DAEWOO ELECTRONICS KOR-1N5A9S Operating instructions & cook book

Daewoo
Daewoo KQG-6617G Operating instructions & cook book

Samsung
Samsung M1779 Owner's instructions

 Operating and installation instructions")


