Fort Defiance LOG-MULE LMB-100 User manual

OWNER’SMANUAL
LOG‐MULE®
ModelNo.LMB‐100
FortDefianceIndustries,Inc.•155BNatalieBlvd.•Loudon,TN37774•865‐408‐0100
www.Log‐Mule.com
PLEASEREADENTIREMANUALBEFOREUSE.
IMPORTANTSAFETYINFORMATION
•TheLOG‐MULEisintendedforoutdoorusetotransportcutlogswhichisaninherently
dangerousactivity.Failuretocomplywithallofthesewarningsmayresultinlossofload,
damagetoLOG‐MULE,personalinjuryand/orpropertydamage.
•TheLOG‐MULEshouldonlybeusedtotransportsolidorsplitlogs.
•Donotexceed400lb.ratedcapacity.
•AvoidoperatingtheLOG‐MULEsidewaysonhillswithaload.Theloadmayshiftortipover.
•TheLOG‐MULEisnotintendedtobepulledbehindavehicleofanykind.
•Steel‐toesshoes,longpantsandglovesarerecommendedwhenusingtheLOG‐MULE.
•TheoperatorshouldkeepotherpeopleclearfromtheLOG‐MULEwhilelifting,loweringor
transportingtheload.
•Verifythatallboltsaretightbeforeeachuse.
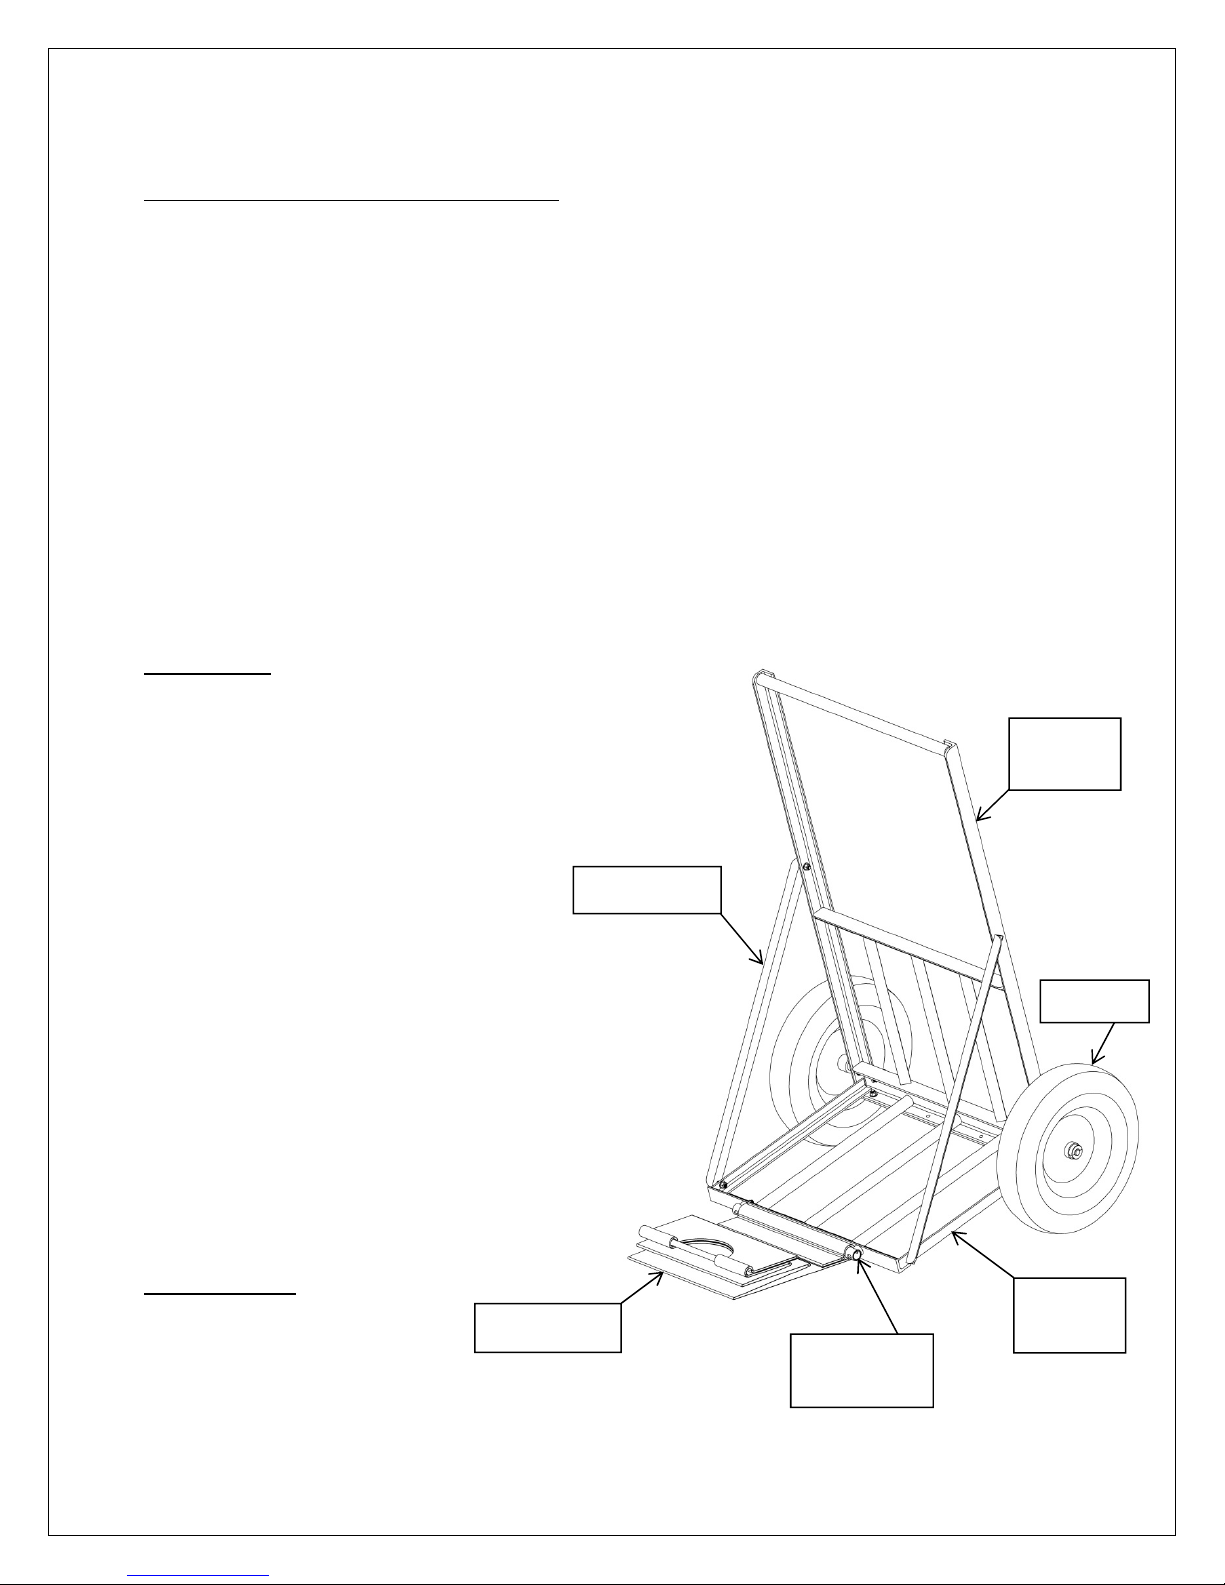
PARTSLIST
(1)TopFrame
(1)BottomFrame
(2)SideStraps
(2)Wheels
(2)Axles
(1)LoadStrap
(1)LoadStrapBracket
(2)SocketHeadCapScrews,5/16‐18x1‐1/4”Long
(8)ShortHexHeadCapScrews,5/16‐18x1”Long
(4)LongHexHeadCapScrews,5/16‐18x1‐1/2”Long
(26)FlatWashers,5/16”
(14)NylonHexNuts,5/16‐18
(2)ShaftCollars,5/8”Bore
(2)CurvedNylonSpacers,5/8”
(2)NylonSpacers,5/8”
TOOLSNEEDED
(2)1/2"Wrenches
(1)5/32”AllenWrench
(1)1/4”AllenWrench
Top
Frame
Bottom
Frame
Wheels
LoadStrap
LoadStrap
Bracket
SideStraps

ASSEMBLYINSTRUCTIONS
TowatchavideoofhowtoassembletheLOG‐MULE,pleasevisitourwebsiteatwww.Log‐Mule.com.
Step1–InstallAxlestoTopFrame
Youwillneed:
TopFrame
(2)Axles
(4)LongHexHeadCapScrews
(8)FlatWashers
(4)NylonHexNuts
Tools:Two1/2"wrenches
1. CarefullylaytheTopFramedownonatablewiththeC‐channelofftheendofthe
tablefacingup.
2. InsertoneAxlethroughthelargeholeinthesideoftheTopFrameandalignthe
holesintheAxlewiththeholesintheTopFrame.
3. AssembleaflatwasherontooneoftheLongHexHeadCapScrews.
4. InsertthescrewupthroughtheholeintheTopFrameandupthroughtheholein
theAxle.
5. Assembleasecondflatwasherontothescrew.
6. AssembleaNylonHexNutontothescrewandhandtightenwithouttools.
7. Repeatsteps3through6fortheotherholeintheAxleandtightenbothscrews
firmlyusingtools.
8. Repeatsteps2through8fortheotherAxle.
Step2–InstallBottomFrametoTopFrame
Youwillneed:
BottomFrame
(4)ShortHexHeadCapScrews
(8)FlatWashers
(4)NylonHexNuts
Tools:Two1/2"wrenches
1. Pre‐assembleoneFlatWasheroneachoftheShortHexHeadCapScrews.
2. WiththeTopFramestillonthetable,positiontheBottomFrameinsidetheC‐
channeloftheTopFrameandalignthefourholes.Theflatbarshouldsitinsideand
flatagainsttheC‐Channel.
3. InsertascrewthroughtheTopFrameandthenthroughtheBottomFrame.
4. Assembleawasherontothescrew.
5. AssembleaNylonHexNutontothescrewandhandtightenwithouttools.
6. Repeatsteps3through5fortheother3screwsandtightenall4screwsfirmlyusing
tools.
Front
View
Back
View
To
p
View BottomView
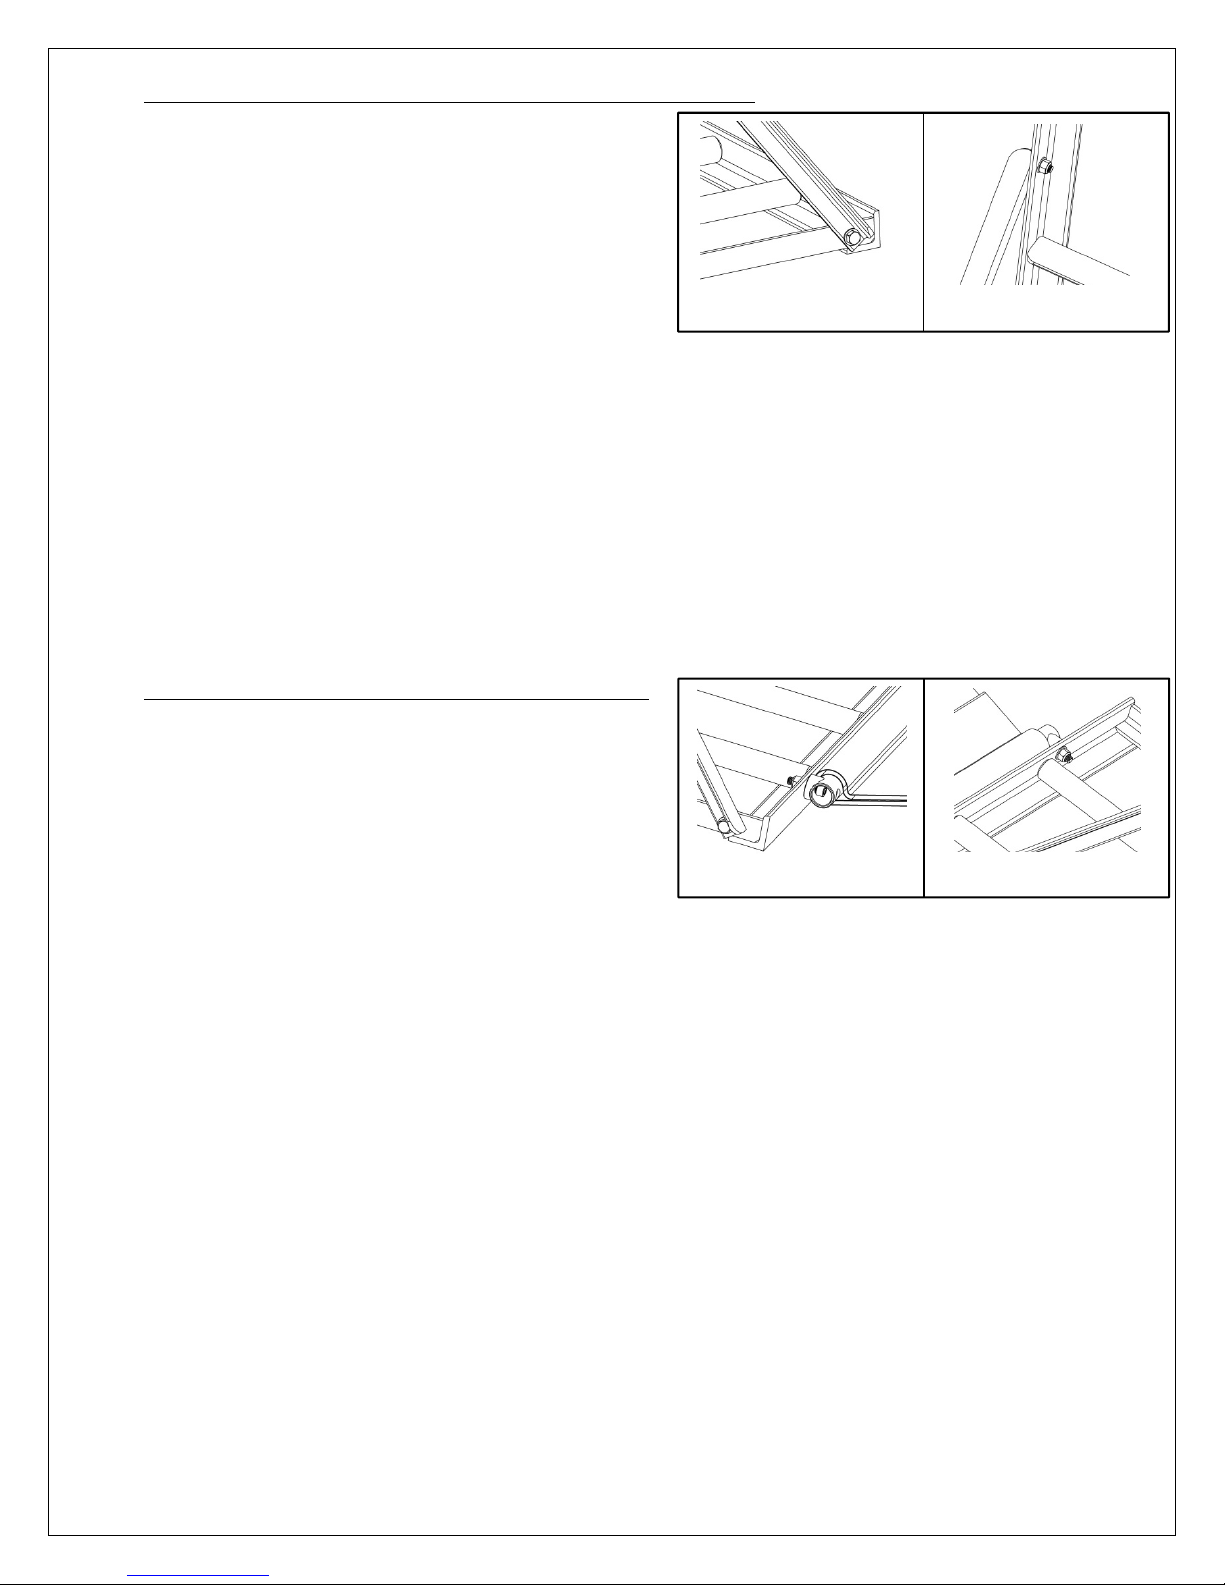
Step3–InstallSideStrapstoTopandBottomFrame
Youwillneed:
(2)SideStraps
(4)ShortHexHeadCapScrews
(8)FlatWashers
(4)NylonHexNuts
Tools:Two1/2"wrenches
1. Pre‐assembleoneFlatWasheroneachoftheShortHexHeadCapScrews.
2. PositionSideStraponthesideoftheframeandaligntheholesateachendofthe
SideStrapwiththeholesinthesideoftheframesasshown.
3. InsertascrewthroughtheSideStrapandthenthroughtheholeinthesideofthe
BottomFrame.
4. Assembleawasherontothescrew.
5. AssembleaNylonHexNutontothescrewandhandtightenwithouttools.
6. Repeatsteps3through5tofastentheotherendoftheSideStraptotheTopFrame
andtightenbothscrewsfirmlyusingtools.
7. Repeatsteps2through6fortheotherSideStrap.
Step4–InstallLoadStraptoBottomFrame
Youwillneed:
LoadStrap
LoadStrapBracket
(2)CurvedNylonSpacers
(2)SocketHeadCapScrews
(2)FlatWashers
(2)NylonHexNuts
Tools:1/4”AllenWrenchanda1/2"Wrench
1. CarefullylaytheassembledFramedownonatablewiththeBottomFrameonthe
tableandtheTopFrameawayfromyou.Youwillsee2holesinthefrontofthe
BottomFrameclosesttoyou.
2. OneendoftheLoadStraphasahandleandtheotherendhasanopeningforthe
LoadStrapBracket.SlidetheLoadStrapBracketintothisopeningandslidetheLoad
Strapallthewayontothebracketandcenteritup.Theholesateitherendofthe
bracketshouldstillbevisible.
3. Attheendofthebracket,insertaSocketHeadCapScrewfirstthroughthelarge
holeandthenthroughthesmallhole.
4. SlideoneCurvedSpacerontotheendofthescrewsothatthecurvedportionfitsup
againsttheroundLoadStrapBracket.
5. InsertthescrewthroughtheholeinthefrontoftheBottomFrame.
6. AssembleaFlatWasherontothescrew.
7. AssembleaNylonHexNutontothescrewandhandtightenwithouttools.
8. Repeatsteps3through7fortheotherendofthebracketandtightenbothscrews
firmlyusingtools.
BottomFrameViewTo
p
FrameView
Front
View
Back V
iew

Step5–InstallWheelstoAxles
Youwillneed:
(2)Wheels
(2)NylonSpacers
(2)ShaftCollars
Tools:5/32”AllenWrench
1. SlideoneNylonSpacerontheendoftheaxle.
2. SlideoneWheelontheendoftheaxle.
Note:Thewheelisnotthesameonbothsides.Thesidewiththelongerhub
stickingoutoftherimshould goontotheaxlefirst.Thereisareddotonthisside
ofthewheel.
3. SlideoneShaftCollarontheendoftheaxle.
4. WhilekeepingthewheelassemblytightagainsttheFrame,firmlytightentheshaft
collarscrewwiththeAllenWrench.
5. Ensurethatthewheelspinsfreely.
6. Repeatsteps1through5fortheotherwheel.
Congratulations!YourLOG‐MULE®isnowreadyforaction!
MAINTENANCE
YourLOG‐MULEhasbeendesignedtoprovideyouwithyearsoffaithful,maintenance‐free
service.Itcomeswithflat‐freetiressothereisnoneedtoaddairandtheprecisionbearings
aresealedsonogreasingisneeded.Tokeepitintopcondition,simplyverifythatallboltsare
tightbeforeeachuse.
Inside
View
Outside
View

USINGYOURLOG‐MULE®
TowatchavideoofhowtouseyourLOG‐MULE,pleasevisitourwebsiteatwww.Log‐Mule.com.
Smallerlogs(Reach‐thruMethod)
CAUTION●Alwaysunloadlogsslowlytokeepthemfromrollingaway.●CAUTION
Largerlogs(LoadStrapMethod)
CAUTION●UsetheLoadStraponlyasshowntopreventpuncturesandtears.●CAUTION
Unloadinglogs(LoadStrapMethod)
CAUTION●Alwaysunloadlogsslowlytokeepthemfromrollingaway.●CAUTION
LIMITEDWARRANTY
FortDefianceIndustries,Inc.warrantstheLOG‐MULE®tobefreefromdefectsinmaterialandworkmanshipfor:
1.180daysfromdateofpurchaseforResidentialuse.
2.60daysfromdateofpurchaseforCommercialuse.
Withinthisperiod,FortDefianceIndustries,Inc.shallcorrectanydefectbyrepairingorreplacingdefectivepartsoftheequipment,ormaking
availablepartsthereof,atouroption,FOBLoudon,TN.THEFOREGOINGWARRANTYISINLIEUOFANYOTHERWARRANTYORCONDITION,
WHETHEREXPRESSEDORIMPLIED,WRITTENORORALINCLUDING,WITHOUTLIMITATION,ANYSTATUTAORYWARRANTYORCONDITIONOF
MERCHANTABILITYORFITNESSFORAPARTICULARPURPOSE.ANYLIABILITYISEXPRESSLYLIMITEDTOANAMOUNTEQUALTOTHEPURCHASE
PRICEPAID,ANDALLCLAIMSFORSPECIAL,INCIDENTALANDCONSEQUENTIALDAMAGESAREHEREBYEXCLUDED.SOMESTATESDONOT
ALLOWEXCLUSIONSOFINCIDENTALORCONSEQUENTIALDAMAGESAND/ORLIMITATIONSONHOWLONGANIMPLIEDWARRANTYLASTS,SO
THEABOVEEXCLUSIONSANDLIMITATIONSMAYNOTAPPLYTOYOU.THISLIMITEDWARRANTYGIVESYOUSPECIFICLEGALRIGHTS,ANDYOU
MAYALSOHAVEOTHERRIGHTSTHATVARYFROMSTATETOSTATE.FortDefianceIndustries,Inc.shallnotbeobligatedtorepairorreplace
equipmentwhichhasbeenrepairedbyothers,abused,alteredormisused.Wefurtherstatethatweshallnotbeheldliableforanylossesdue
toneglectfuluseonthepartoftheoperator.Uponexpirationofsuchwarranty,allliabilityshallterminate.Nootherwarrantiesareexpressed
orimplied.TheLoadStrapmaybepuncturedortearundernormaluseandthereforecarriesnowarranty.
WarrantyRegistrationmustbemailedintovalidatewarrantyclaims.Productregistrationis
notasubstituteforproofofpurchase.Retaintheoriginalsalesreceiptforwarrantyclaims.
ModelNo:________________________SerialNo:____________________________
WARRANTYREGISTRATION
COMPLETE&RETURNTO
FortDefianceIndustries,Inc.
ATTN:WARRANTYREGISTRATION
155BNatalieBlvd,Loudon,TN37774
(Mustincludeacopyofthereceiptforproofofpurchase.)
Name:______________________________________________________________________________
Address:____________________________________________________________________________
City,State/Province,PostalCode:________________________________________________________
PhoneNumber:______________________________________________________________________
Emailaddress:_______________________________________________________________________
ModelNo.:__________________________________________________________________________
SerialNo:___________________________________________________________________________
PurchaseDate:______________________________________________________________________
PlaceofPurchase:____________________________________________________________________
LMB‐100
LMB‐100
Table of contents
Popular Lawn And Garden Equipment manuals by other brands


Gardena
Gardena 4066 Operator's manual

Toro
Toro ECx user guide

GÜDE
GÜDE 95504 Translation of the original instructions

Dalen
Dalen Rustic Raised Bed Garden 5357 Assembly instructions

Lucky Duck
Lucky Duck Super Swimmer HD 10516-0 quick start guide

Coopers of Stortford
Coopers of Stortford Light-Up Plinth w/Planter Instructions for use


