manuals.online logo
Brands
  1. Home
  2. •
  3. Brands
  4. •
  5. Orbit
  6. •
  7. Lawn And Garden Equipment
  8. •
  9. Orbit 56417 User manual

Orbit 56417 User manual

AUTOMATIC YARD
WATERING SYSTEM
INSTRUCTION
MANUAL
Model 56417, 62032, 94932, 62732, 91932
Introduction
Thank you for selecting the quality Orbit Automatic Yard Watering
System. You will enjoy many years of satisfactory service if proper
installation and care is observed.
The Automatic Yard Watering System keeps your yard beautiful
whether you are at home or away. Orbit gives you convenience and
flexibility, letting you use an automatic watering program or the abil-
ity to override the automatic program for special watering needs.
The Orbit System’s timer provides watering at up to 4 stations with
the option of 3 start times per day with watering periods from 1 to 99
minutes per start time.
For ease of use, the User’s Guide has step-by-step instructions for
installation, set up and operation. Please read the Guide completely
before installing, programming and operating.
Note: Use only with three 1.5 –volt (AA)
Figure 1 Key Pad and Display
Indicates different mode settings for programming.
Select to set day of the week, to set clock time, to set watering day(s), to set
watering station and duration and to set start times.
Select to use automatic watering mode.
Select to enable watering manually.
Select to suspend watering and turn off all stations.
Select to postpone watering for up to 24 hours.
Indicates the number of hours remaining on the Delay.
Indicates current day of the week and the set days for watering.
Indicates which days are selected for watering.
Indicates the duration that each station will water.
Indicates A.M. or P.M. for clock and start time.
Indicates the time to begin watering.
Indicates clock, start time and watering duration.
Push to select or unselect a setting.
Push to confirm a new setting and advance to the next setting.
Push to increase numeric setting or advance a setting.
Push to decrease numeric setting or retract a setting.
Push to cycle through the different mode settings.
Indicates low battery,or that batteries need to be replaced.
Indicates that the setting of the clock and day of the week is in process.
Indicates which watering cycle is active or being set. Also indicates which
watering station is active or being set.
One pinhole "Reset" button: Push to reset all programs and settings.
INSTALLATION
GENERAL INFORMATION
1. Location:
gChoose a spot where water drains away from house and win-
dow wells.
Warning: For outdoor use in cold water only.
2. Plumbing Codes:
gFollow all watering and back-flow (anti-siphon) prevention
codes.
3. Specifications:
gWater pressure: Min. 10 psi/Max. 80 psi working pressure
gWorking Temperature: Min. 32˚ F/Max. 167º F
gStorage Temperature: Min. -22˚ F/Max. 185º F
gElectrical: Three AA 1.5-volt alkaline batteries
4. Installing the Batteries:
gRemove timer cover and slide battery compartment cover off
in the direction of arrow. Install three AA 1.5-volt alkaline bat-
teries. Slide compartment cover back into place. (See Figure 2)
Figure 2
gCheck the timer periodically for low voltage. When the bat-
tery power drops below the safety zone, the "Low Battery"
indicator appears on the display. Replace the batteries with
new fully-charged batteries when this appears. If old batter-
ies are not replaced before they run out, all controls will be
disabled.
gReplace the timer cover.
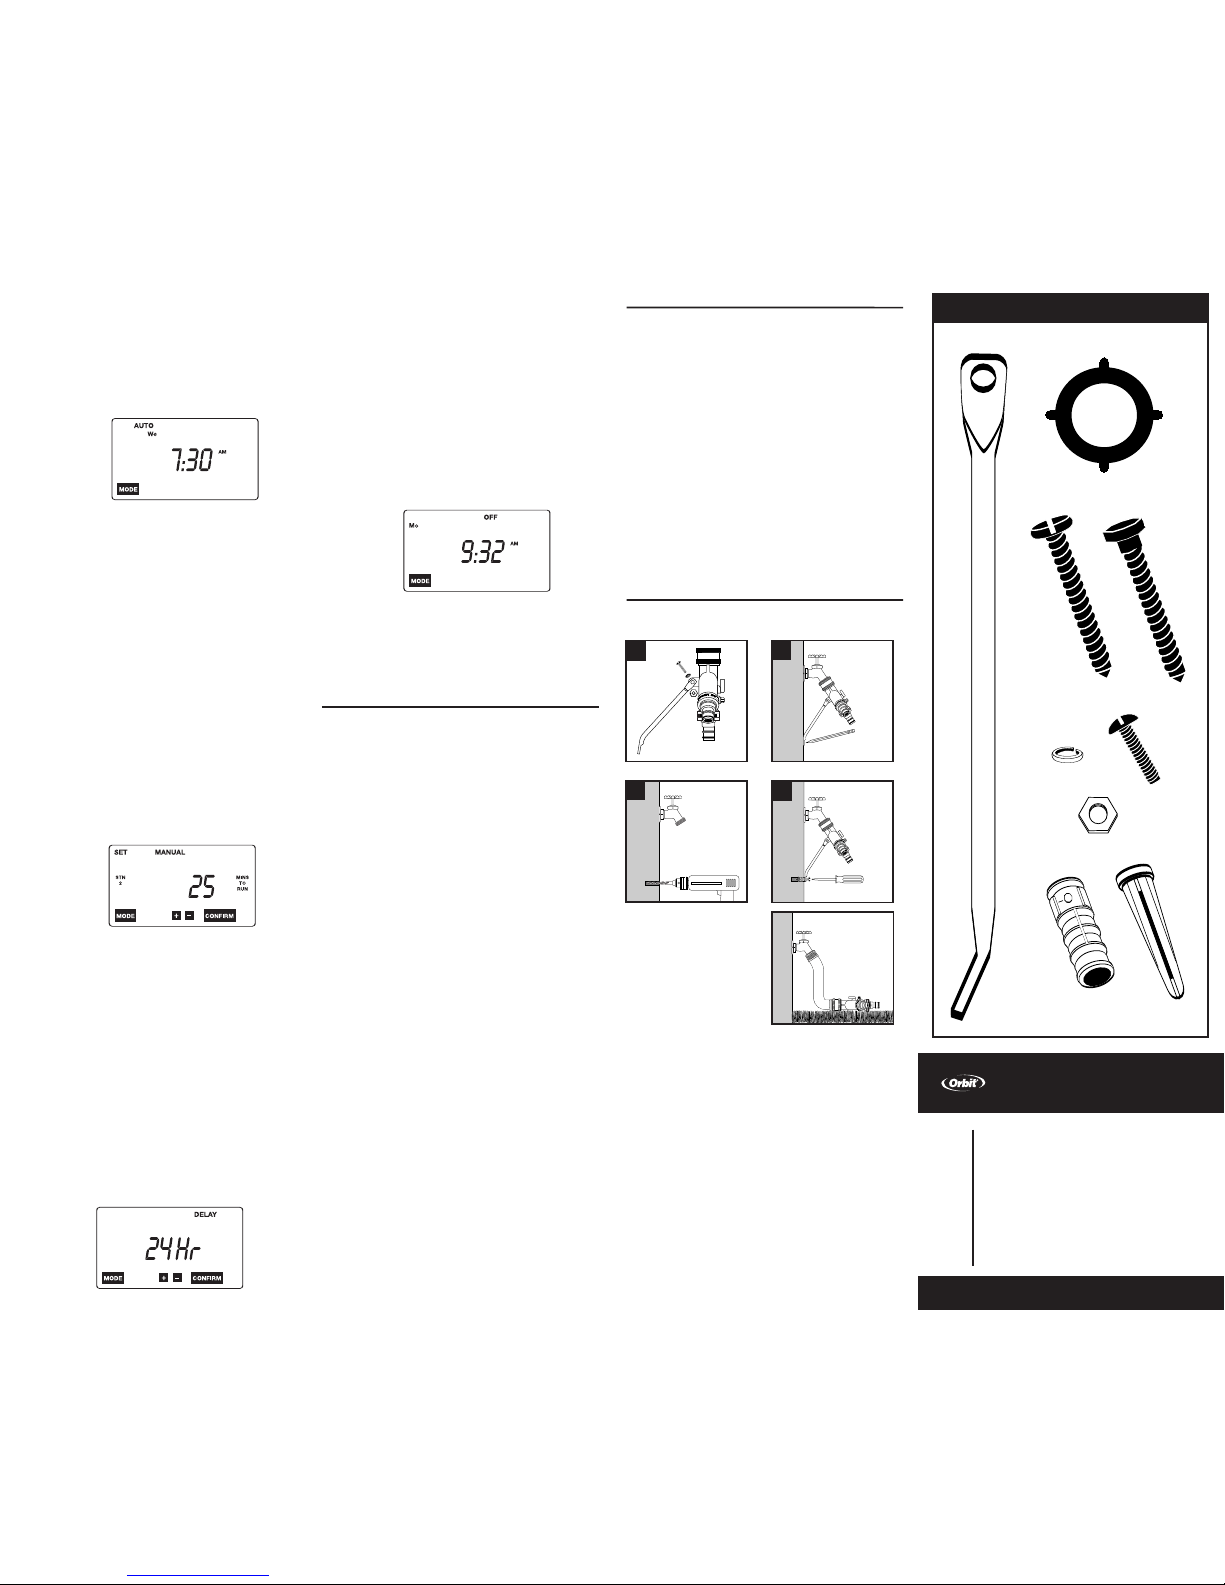
5. Attach the 4-outlet brass manifold to an outside hose faucet.
Ensure that the 4 outlet controls are in the "off" position.
Note: If desired, the brass manifold may be secured to the wall
below the hose faucet using the mounting hardware and
instructions provided.
Note: Keep Automatic Yard Watering packaging for off-season
storage.
Figure 3
6. Attach up to 4 valves as needed to the 4-outlet brass manifold.
(See Figure 3)
Note: The Automatic Yard Watering System timer may be
mounted in one of two ways:
gOn a valve’s mounting bracket opposite the brass manifold
connection.
gOn the hose faucet wall within reach of the valve’sblack con-
nector plug.
7. Select one of the options above to mount the timer. If the wall-
mount method is selected, secure the mounting bracket to the
wall using the plastic wall anchor and screws provided.
8. Attach up to 4 water connections as needed to either the brass
manifold outlets or the valve outlets.
9. Insert as many black valve connector plugs as needed into the
open ports underneath the timer.
Note: Watering stations 1-4 match the connector ports under-
neath the timer from furthest left to furthest right.
10. Open the individual brass manifold outlet controls as needed to
direct water through an attached watering connection or into
the line controlled by a valve.
11. Turn the faucet on slowly to check for leaks. Tighten manifold,
valve or water connection fittings if there are any leaks.
SET CLOCK TIME AND DAY OF WEEK
gPush the indented RESET area to erase the current settings.
gAfter pressing RESET the timer automatically will start in the
SET mode. The word SET will blink to indicate that it is selected.
gPush CONFIRM button to begin the set mode. The word
CLOCK will appear to indicate the time/day setting is
active.
gPush + or - button to select the current day of the week. The
day selected will flash. (See Figure 4)
Figure 4
gPush CONFIRM button to accept the day setting and advance
to set the clock time. The current time with A.M. or P.M. will
flash.
gPush + or – button to select the correct current time.
gPush CONFIRM button to accept the time setting and advance
to set watering days. (See Figure 5)
Figure 5
Note: When no button has been pressed for 1 minute, the timer will
automatically switch to the AUTO mode and all the programmed set-
tings. You may push MODE button to return to Mode Selecting. Push
MODE button to select SET. The word SET will blink to indicate that it
is selected.
SET WATERING DAYS
Your Orbit timer allows you to choose the days of the week for
watering. You can water every day,only certain days, or every 2nd or
3rd day.
gPush CONFIRM button to begin the set mode.
gPush CONFIRM button two more times to move past the
time/day setting. The days of the week will be flashing. (See
Figure 6)
Figure 6
gPush + or – button to advance to the next day,or to the 2nd
and 3rd day settings.
gWhen chosen day(s) are flashing, push the key to toggle the rain
drop on/off. The rain drop indicates the day(s) chosen for
watering.
gWhen the watering days are chosen, push NEXT button to
advance to set watering duration. (See Figure 7)
Note: If you choose to only water at intervals of every 2nd or 3rd
day, you cannot set specific days of the week for watering.
When no button has been pressed for 1 minute, the timer will
automatically switch to the AUTO mode and all the programmed
settings. You may push MODE button to return to Mode Selecting.
Push MODE button to select SET.The word SET will blink to indi-
cate that it is selected.
Figure 7
PROGRAMMING
SET
NEXT
Mo Tu We Th Fr Sa Su 2nd 3rd
SET
NEXT
Mo Tu We Th Fr Sa Su 2nd 3rd
SET DURATION AND START TIME FOR
WATERING
The Orbit timer allows you to set the duration (the number of min-
utes to water in each of four stations) and to set the start times for
watering for each of three watering cycles.
Note: You may push MODE button to return to Mode Selecting.
Push MODE button to select SET. The word SET will blink to
indcate that it is selected.
gPush CONFIRM button to begin the set mode.
gPush CONFIRM button two more times and NEXT button once
to move past the time/day setting and the watering days. STA-
TION (STN) 1 will show to indicate which station is being set.
MINS TO RUN will show with two digits or "- -" flashing. (See
Figure 8)
Note: STNs 1-4 match the connector ports underneath the timer
from furthest left to furthest right.
Figure 8
gPush + or – button to set the duration desired for watering
STATION (STN) 1, from 1 to 99 minutes.
gPush CONFIRM button to confirm the duration and advance to
set the duration for STATION 2.
gPush + or – button to set the duration desired for watering
STATION (STN) 2, from 1 to 99 minutes.
gPush CONFIRM button to confirm the duration and advance to
set the duration for STATION 3.
gPush + or – button to set the duration desired for watering
STATION (STN) 3, from 1 to 99 minutes.
gPush CONFIRM button to confirm the duration and advance to
set the duration for STATION 4.
gPush + or – button to set the duration desired for watering
STATION 4 (STN), from 1 to 99 minutes.
gPush CONFIRM button to confirm the duration and advance to
set start time.
gThere are three unique watering start times, or cycles, that
can be set: CYCLE A, CYCLE B and CYCLE C. Each cycle will
appear on the screen to specify which one is to be set. One,
two or three cycles may be selected. (See Figure 9)
Figure 9
gPush + or – key to set the start time for CYCLE A.
gPush CONFIRM button to accept this time and advance to set
CYCLE B.
gPush + or – button to set the start time for CYCLE B.
gPush CONFIRM button to accept this time and advance to set
CYCLE C.
gPush + or – button to set the start time for CYCLE C.
gPush CONFIRM button to accept this time and return to Mode
Selecting.
Note: When no button has been pressed for 1 minute, the timer
will automatically switch to the AUTO mode and all the pro-
grammed settings. You may push MODE button to return to
Mode Selecting. Push MODE button to select SET. The word
SET will blink to indicate that it is selected.
AUTOMATIC WATERING
Once watering days, duration and start times are programmed, the
Orbit timer will begin watering automatically.
gPush MODE button to select AUTO. The word AUTO will blink
to indicate that it is selected.
gPush CONFIRM button to begin the auto mode. The timer is
SET
MINS
TO
RUN
MODE
–
+
CONFIRM
--
STN
1
SET AUTO MANUAL OFF DELAY
START
MODE
–
+
CONFIRM
--:--
CYCLE
ABC
SET
CLOCK
MODE —
+CONFIRM
Mo Tu We Th Fr Sa Su
PROBLEM/POSSIBLE CAUSES
Water does not turn on:
1. Programming is incorrect.
2. Batteries are too weak to operate valve.
3. Pressure is in excess of 80 psi.
4. Hose faucet is turned off.
5. Timer is in the off or delay mode.
Timer display is blank:
1. Batteries are dead.
2. Faulty display.
Timer will not operate manually:
1. Water to faucet is turned off.
2. Manifold outlet valve is turned off.
3. Timer is in the off mode.
4. Station selected may not match the port station number
underneath the timer.
now ready to begin watering automatically.
(See Figure 10)
gWhen watering begins, MINS TO RUN will alternate with the
current time and day to indicate the time left on current
cycle.
gIn this mode, the unit executes any programmed schedule or
default schedule.
gNOTE: The normal operating condition is for the Valve to open
20 seconds after the programmed start time.
Figure 10
gIn this mode, extra (Manual) watering is ceased.
gIn this mode, Delay mode is canceled.
Note: When no button has been pressed for 1 minute, the timer
will automatically switch to the AUTO mode and all the pro-
grammed settings. You may push MODE button to return to
Mode Selecting. Push MODE button to select SET. The word
SET will blink to indicate that it is selected.
MANUAL (EXTRA) WATERING
The Orbit timer allows you to add an extra 1 to 99 minutes of water-
ing time for one or all stations. The manual setting does not alter
the automatic settings during or after manual use.
gPush MODE button to select MANUAL. The word MANUAL
will blink to indicate that it is selected.
gPush CONFIRM button to begin the manual mode. STATION
(STN) 1 will flash.
gTohave all stations water in manual (extra) mode, push
CONFIRM button and all the stations will water at the dura-
tion previously set.
gNOTE: The normal operating condition is for the Valve to open
2minutes after the CONFIRM button is pushed.
gTohave only one station water in manual (extra) mode, push
+or – to select which station to water.
gPush CONFIRM button to confirm the selected station to
water. MINS TO RUN will show with two digits or "- -" flash-
ing. (See Figure 11)
Figure 11
gPush + or – button to set the duration for the extra watering.
gPush CONFIRM button to confirm the desired duration. The
extra watering will begin immediately for the duration select-
ed at the selected station.
gAs watering begins, MINS TO RUN will alternate with the
current time and day to indicate the time left on manual
cycle. The station currently being watered will also show.
gTo discontinue the manual watering mode, push + and –
together, and extra watering will end immediately.
gWhen the extra watering is finished, the unit will resume auto
mode.
DELAY WATERING
The Orbit timer allows you to delay automatic watering for 1-24 hours.
gPush MODE button to select DELAY. The word DELAY will
blink to indicate that it is selected. The unit will initiate a 24
hour delay.
gPush CONFIRM button to begin delay mode. "24 Hr" will blink
and the word DELAY will appear.
(See Figure 12)
Figure 12
gPush + or – button to change the hour delay within 10 sec-
onds after pushing CONFIRM button to begin delay mode.
Otherwise, "24 Hr" and the current day and time will alternate-
ly blink and the timer will not accept a delay hour change. If
this occurs, repeat the previous three instructions.
gPush CONFIRM button to confirm the delay mode for the
desired time.
gLEFT will appear to indicate the time remaining on delay.
gTo discontinue delay watering, push MODE button.
OFF MODE
In Off Mode all watering programs are inactive and no watering will
occur.
gPush MODE button to select OFF. The word OFF will blink to
indicate that it is selected. (See Figure 13)
Figure 13
gPush CONFIRM button to begin off mode.
gWhile in off mode, the unit will continue to display current
time and day.
gTo discontinue off mode, push + and – buttons together. The
unit will resume auto mode.
gTurn the water off at the hose faucet and leave brass manifold
outlet control levers in the "on " position for each connected
valve.
gPush MODE button to select MANUAL. The words MANUAL
and SET will blink to indicate that they are selected.
gPush CONFIRM button to begin the manual mode. STATION
(STN) 1 will appear, indicating the current station
gPush + or – button to advance to the valve station matching
the connection to the timer.
Note: STNs 1-4 match the connector ports underneath the timer
from furthest left to furthest right.
gPush CONFIRM button to control running time. MINS TO RUN
will show with two digits or "- -" flashing.
gPush + or – button to set the duration for 1 minute.
gPush CONFIRM button to open valve, draining water and
relieving pressure. Repeat the previous six steps, if neces-
sary,for other valve connections with the timer.
gMove the individual brass manifold outlet control levers to the
"off" position.
gRemove as many black valve connector plugs as needed from
the ports underneath the timer.
gRemove the timer either from the valve or from the wall-
mounted bracket.
gClean and dry the timer,if needed.
gRemove the batteries. Clean the contacts in the battery com-
partment. Apply new battery and terminal protection com-
pound. If the batteries show any sign of corrosion, discard
them.
gStore timer in a warm and dry place (avoid freezing).
gRemove as many water connections as needed from either
the brass manifold outlets or the valve outlets.
gRemove as many valves as needed from the 4-outlet brass
manifold.
gRemove the 4-outlet brass manifold from the outside hose
faucet.
gPlace Automatic Yard Watering System components in origi-
nal packaging for off-season storage.
OFF-SEASON STORAGE & MAINTENANCE
PN 62032-24E Rev F
Orbit®Irrigation Products, Inc.
North Salt Lake, UT 84054
1-800-488-6156
www.orbitonline.com
©2008 Orbit Irrigation Products, Inc.
All rights reserved. All trade names are registered
trademarks of respective manufacturers listed.
TROUBLESHOOTING
MOUNTING BRACKET INSTALLATION INSTRUCTIONS
PRODUCT INCLUDES
s
1
4
s
1
4
CAUTION:
nUse a lead anchor when installing into masonry; use a
plastic anchor when installing into stucco.
nBrace must be installed to avoid damage to the hose
faucet. Refrain from putting pressure on the manifold by
tugging at the hose.
nFor outdoor use with cold water only.
nCheck local plumbing codes. Codes vary and some may
require use of anti-siphon valves to be installed at the
ends of the manifold.
nFreezing areas: Disconnect the manifold from the faucet
prior to freezing weather to avoid faucet damage.
4
Layout B
Layout A
3
2
1
NOT USED
NOT USED
NOT USED
BLACK
NOT USED
NOT USED
NOT USED NOT USED
62032-24E RF.QXD
10.236"
SH
SUM001098
11.21.08
XX
21
XX
8.661" XX
ORBIT

This manual suits for next models

4

Other Orbit Lawn And Garden Equipment manuals

Orbit 24723 User manual

Orbit

Orbit 24723 User manual

Orbit B-hyve User manual

Orbit

Orbit B-hyve User manual

Orbit 20050 User manual

Orbit

Orbit 20050 User manual

Orbit 56041 User manual

Orbit

Orbit 56041 User manual

Orbit b-hyve WT24E User manual

Orbit

Orbit b-hyve WT24E User manual

Orbit 56905 User manual

Orbit

Orbit 56905 User manual

Orbit 470228 Guide

Orbit

Orbit 470228 Guide

Orbit 56041 User manual

Orbit

Orbit 56041 User manual

Orbit 56544 User manual

Orbit

Orbit 56544 User manual

Orbit 56905 User manual

Orbit

Orbit 56905 User manual

Orbit eco-LOCK User manual

Orbit

Orbit eco-LOCK User manual

Orbit Yardworks 62015 User manual

Orbit

Orbit Yardworks 62015 User manual

Orbit ArizonaMist 20030 User manual

Orbit

Orbit ArizonaMist 20030 User manual

Orbit WaterMaster series User manual

Orbit

Orbit WaterMaster series User manual

Popular Lawn And Garden Equipment manuals by other brands

EZ FLO EZ 1010-HB Installation and operating guide

EZ FLO

EZ FLO EZ 1010-HB Installation and operating guide

Billy Goat Grazor GZ400H Operator's manual

Billy Goat

Billy Goat Grazor GZ400H Operator's manual

GEIGER Palatino Exclusive Line URBAN Assembly instruction

GEIGER

GEIGER Palatino Exclusive Line URBAN Assembly instruction

Grillo FM13.09 Operator's manual

Grillo

Grillo FM13.09 Operator's manual

MO-EL 505.700 MO-BUTTERFLY Use and maintenance

MO-EL

MO-EL 505.700 MO-BUTTERFLY Use and maintenance

Gardena Select 1891 Operator's manual

Gardena

Gardena Select 1891 Operator's manual

EINHELL GAS 4.8F operating instructions

EINHELL

EINHELL GAS 4.8F operating instructions

Kubota AP-SRT62 Operator's manual

Kubota

Kubota AP-SRT62 Operator's manual

Stiga Park series Instructions for use

Stiga

Stiga Park series Instructions for use

Gardena EVC 1000 operating instructions

Gardena

Gardena EVC 1000 operating instructions

Costway OP70661 user manual

Costway

Costway OP70661 user manual

Lentek e-trap Directions for use

Lentek

Lentek e-trap Directions for use

Simplicity 1691789 Operator's manual

Simplicity

Simplicity 1691789 Operator's manual

Lechuza CUBE 40 installation instructions

Lechuza

Lechuza CUBE 40 installation instructions

Agri-Fab 45-02167 manual

Agri-Fab

Agri-Fab 45-02167 manual

Alpine BVF264 quick guide

Alpine

Alpine BVF264 quick guide

Abbriata M100 Series Use and maintenance handbook

Abbriata

Abbriata M100 Series Use and maintenance handbook

Bush Hog Tough Dual-Probe Bale Spear brochure

Bush Hog

Bush Hog Tough Dual-Probe Bale Spear brochure

manuals.online logo
manuals.online logoBrands
  • About & Mission
  • Contact us
  • Privacy Policy
  • Terms and Conditions

Copyright 2025 Manuals.Online. All Rights Reserved.