Fortis CenHub IT801 User manual

LETTER
8.5” X 11”
CREATIVE PROOFREADER COPY COPYWRITER CREATIVE ACCOU T
DIRECTOR SUPERVISOR SERVICES MA AGER
MA AGER
CHUM1605-BDEE
CenHub Pea Per s IT801 User Manual
Job Opened: January 11, 2016
Requested In-Home Date: ________________
Latest Revision: March 8, 2016
Approved: March 11, 2016
Installed by:__________________________________________
Date: __________________________________________
Number of Thermostats: ____________________________
Notes:________________________________________________
______________________________________________________________
______________________________________________________________
______________________________________________________________
______________________________________________________________
IT801 Thermostat
User’s Manual
The complete guide to the set up and operation of your new smart Wi-Fi® thermostat.
The smart Wi-Fi thermostat system learns your comfort preferences, then nds opportunities to
automatically save you energy and money. It also offers valuable energy-saving advice based on your
portal and thermostat usage. Although the system operates automatically, you can act on these
personalized tips to save even more—so you’re always in control.
1-844-258-7761 • CenHubPeakPerks.com
Lowering the demand for electricity helps to conserve resources and create a more sustainable energy future.
CHU 1605
CHUM1605 –CenHub Peak Perks IT801 User Manual
Piece: Manual
Quantity: XXXXX
Size: 8.5 x 11”
Colors: 4/4
Finishin : Fold, Trim
Mail: N/A
Program Specific Checklist Name: Date:
®Phone Number _________ _________
®URL _________ _________
®Program Details _________ _________
303819_Comv rg _28pg_Broch_R1.qxp_Layout 1 3/12/16 2:10 AM Pag 1

LETTER
8.5” X 11”
CREATIVE PROOFREADER COPY COPYWRITER CREATIVE ACCOU T
DIRECTOR SUPERVISOR SERVICES MA AGER
MA AGER
2 CenHub Peak Perks Web-Programmable Wi-Fi® Thermostat User’s Manual
Table of Contents
Step 1: Getting Started ......................................................................................................................................................................................3-5
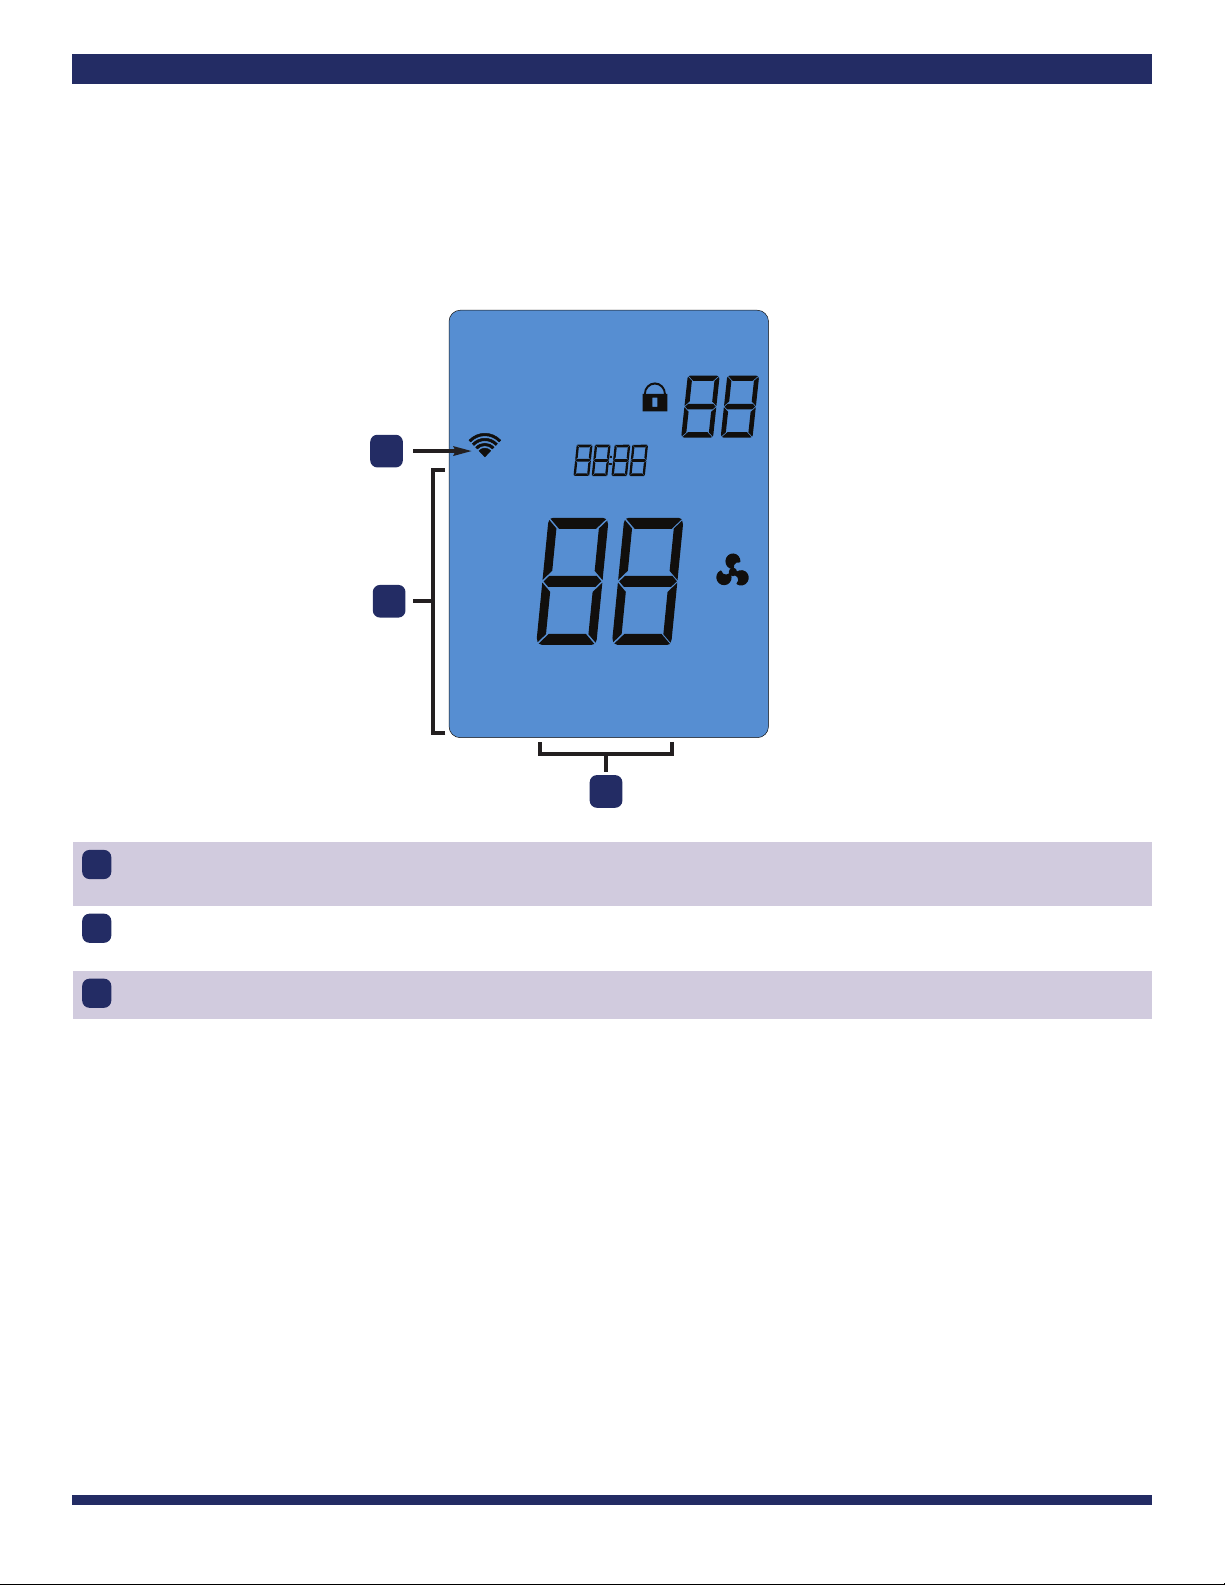
A. Thermostat Buttons and Indicators................................................................................................................................................3
B. Thermostat Display ..........................................................................................................................................................................4-5
Step 2: ain enu and Thermostat Settings ..........................................................................................................................................6-14
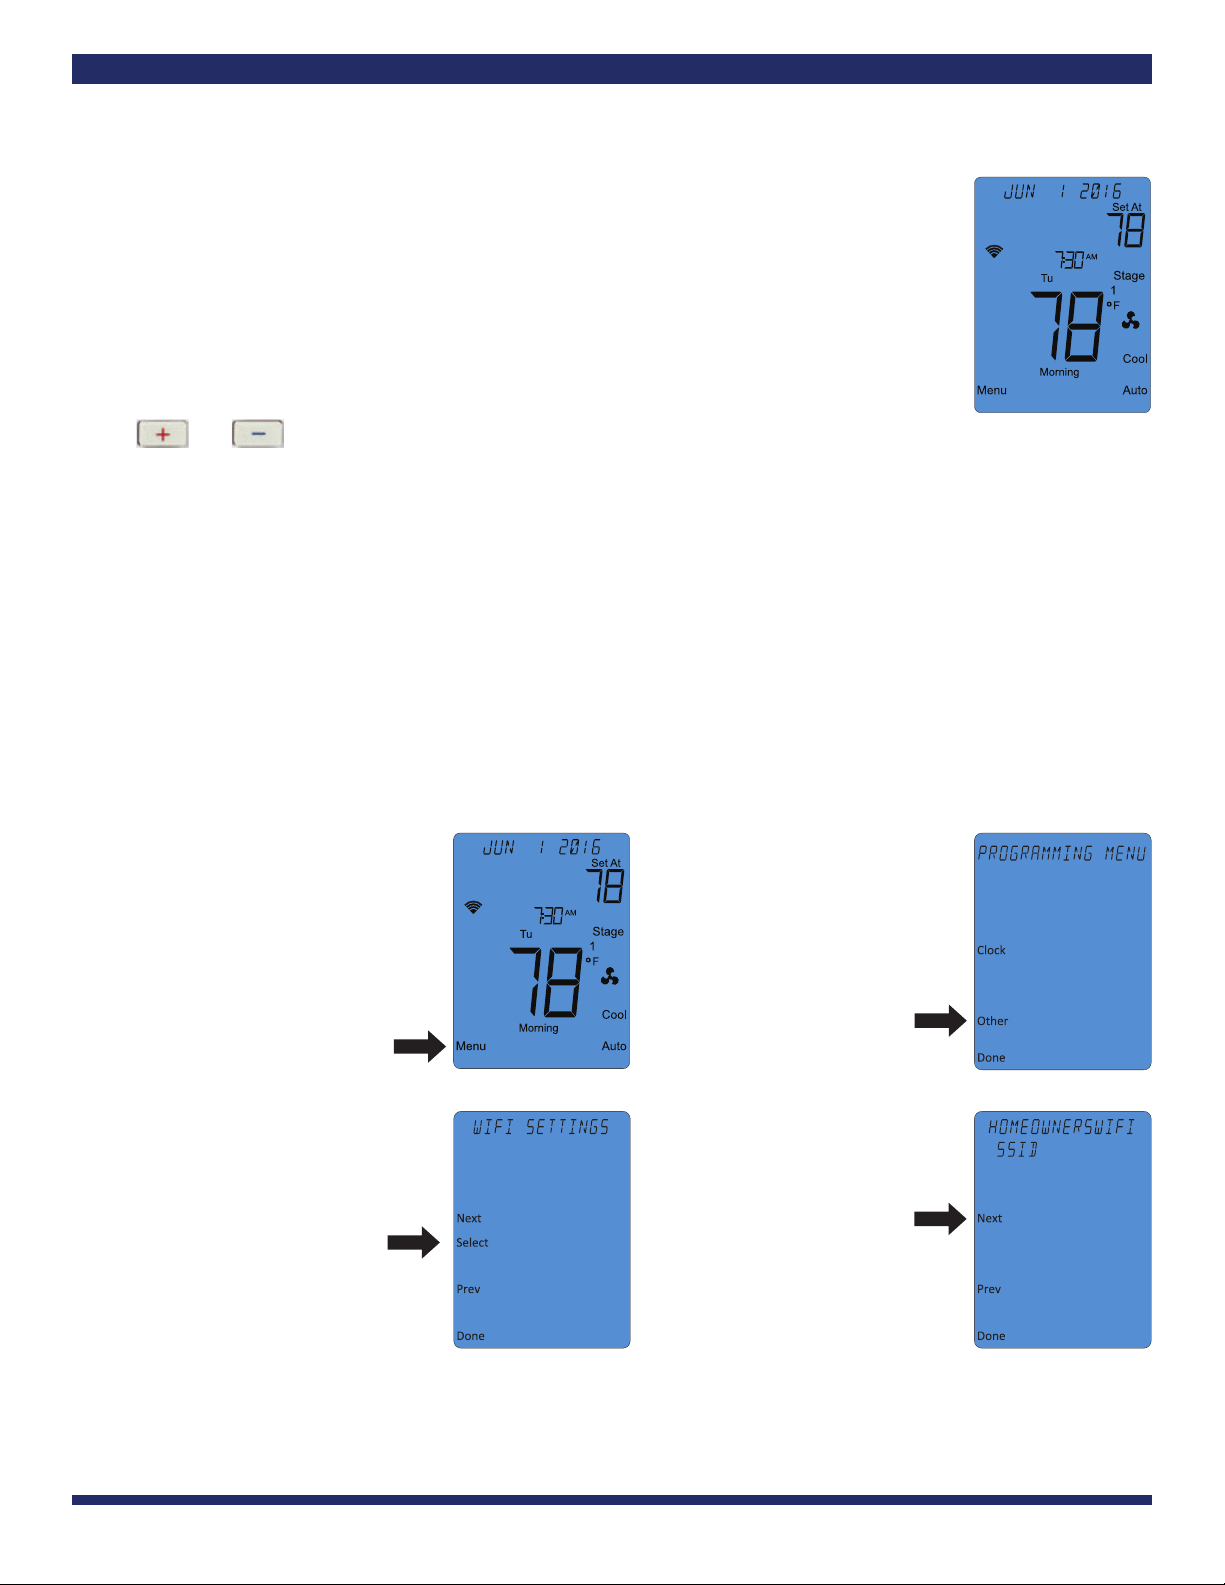
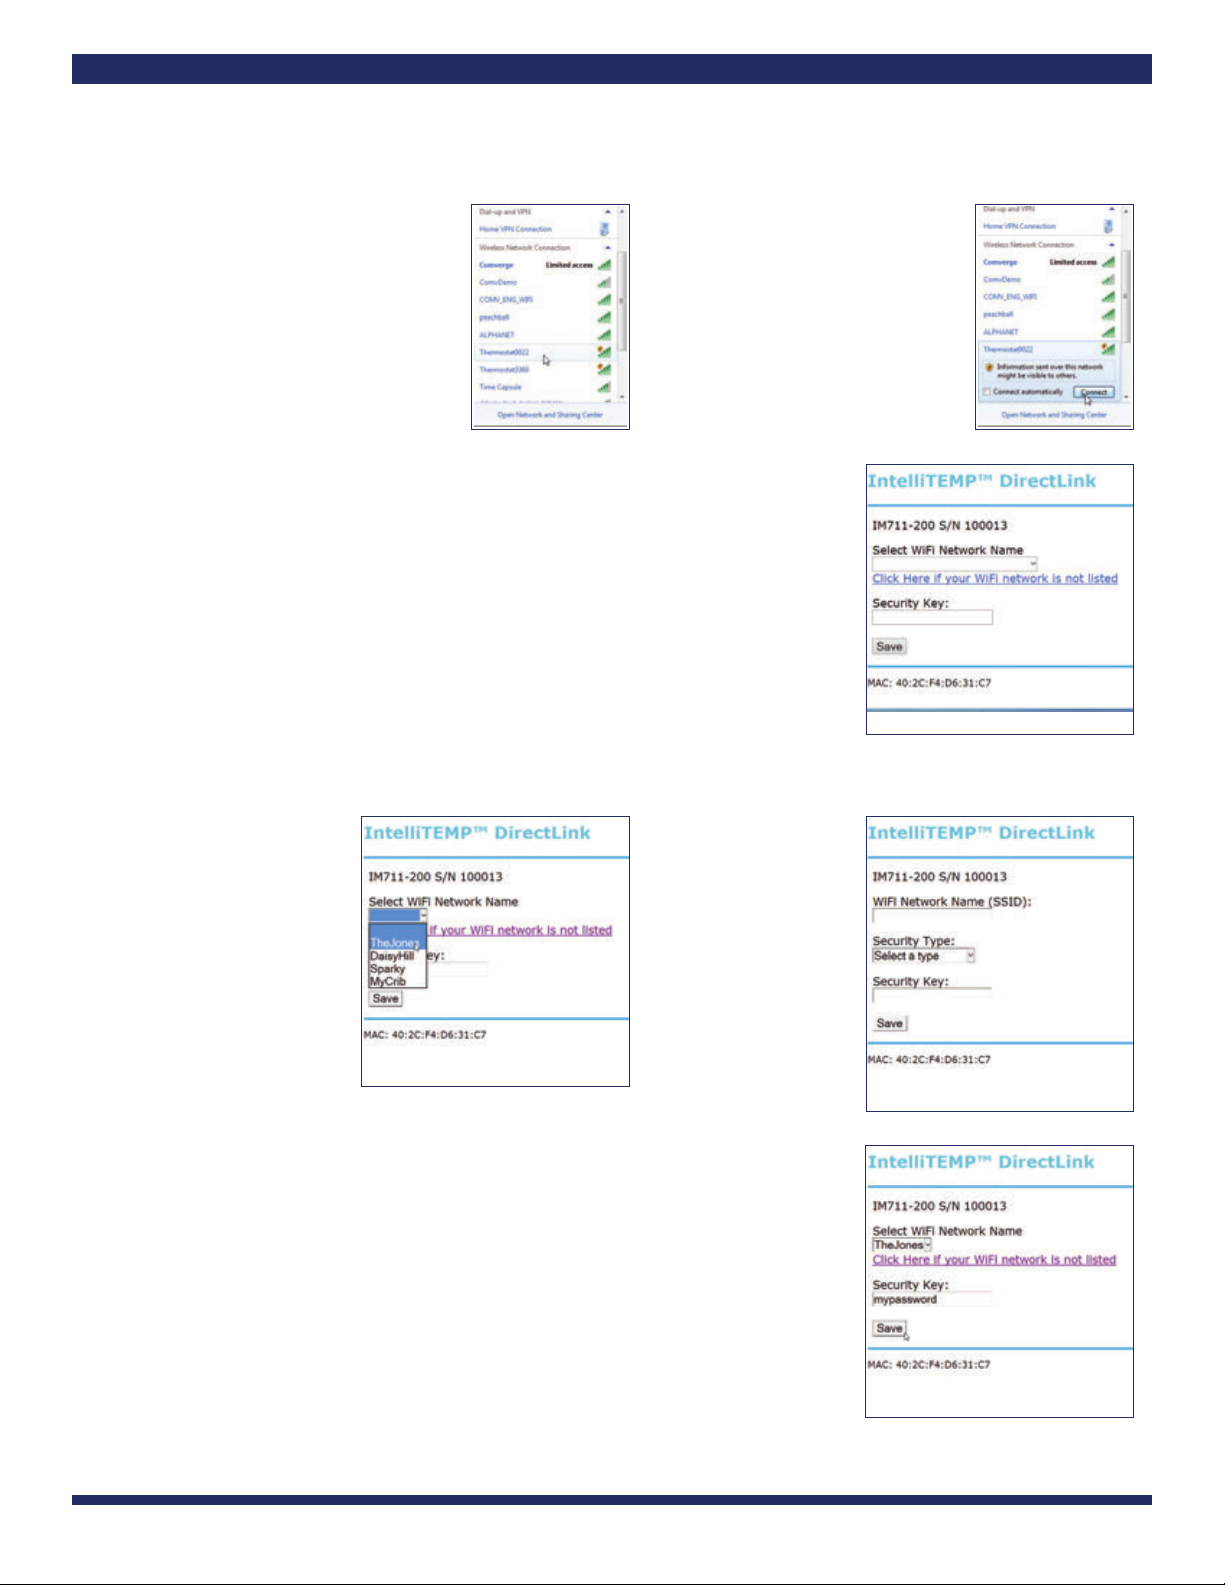
A. Wi-Fi®Settings enu ........................................................................................................................................................................6-9
B. Filter Timer Settings enu ........................................................................................................................................................10-11
C. Reset Filter Timer ................................................................................................................................................................................11
D. LCD Backlight Settings enu ........................................................................................................................................................12
E. Nightlight Settings enu ..........................................................................................................................................................12-13
F. Keypress Beep Conrmation enu ..............................................................................................................................................13
G. Time-of-Day (TOD) Recovery..........................................................................................................................................................14
Step 3: How to Set a Temperature “Hold”................................................................................................................................................15-16
A. Temporary Hold ..................................................................................................................................................................................15
B. Timed Temporary Hold ..............................................................................................................................................................15-16
C. Permanent Hold ..................................................................................................................................................................................16
D. Ending a Hold ......................................................................................................................................................................................16
Step 4: Using the Keypad Lock....................................................................................................................................................................17-19
A. Partial (PART) Lockout ......................................................................................................................................................................17
B. Full (FULL) Lockout ............................................................................................................................................................................18
C. Unlocking the Keypad ......................................................................................................................................................................19
Step 5: Conservation Events ........................................................................................................................................................................20-21
Troubleshooting................................................................................................................................................................................................22-24
Your CenHub Peak Perks thermostat controls your central air conditioning and heating system. The types of
compatible systems include:
Central Air Conditioners:
• Single Stage
• ulti-Stage
Furnaces:
• Single Stage Gas or Oil
• ulti-Stage Gas or Oil
• Single Stage Electric
• ulti-Stage Electric
• Two-Wire Hydronic
• illivolt Heat System
Aux Heat:
• Single Stage Electric
• ulti-Stage Electric
All compatible components are connected and congured by the CenHub Peak Perks technician during installation.
CHUM1605 –CenHub Peak Perks IT801 User Manual
Piece: Manual
Quantity: XXXXX
Size: 8.5 x 11”
Colors: 4/4
Finishin : Fold, Trim
Mail: N/A
Program Specific Checklist Name: Date:
®Phone Number _________ _________
®URL _________ _________
®Program Details _________ _________
CHUM1605-BDEE
CenHub Pea Per s IT801 User Manual
Job Opened: January 11, 2016
Requested In-Home Date: ________________
Latest Revision: March 8, 2016
Approved: March 11, 2016
303819_Comv rg _28pg_Broch_R1.qxp_Layout 1 3/12/16 2:10 AM Pag 2

LETTER
8.5” X 11”
ightlight Enables or disables illumination. Provides night light function. Can be used to
activate the LCD back light.
FA Button Changes fan setting (Auto/On)
SYSTEM Button Changes operating mode (Off, Cool, Off, Heat, Aux and Off)
User Program Buttons Facilitate various operations in different menus
Temperature Setpoint Buttons Changes temperature up or down
LEDs Indicates status of conservation events
Module Slot Houses the communications radio module
CREATIVE PROOFREADER COPY COPYWRITER CREATIVE ACCOU T
DIRECTOR SUPERVISOR SERVICES MA AGER
MA AGER
CenHub Peak Perks Web-Programmable Wi-Fi® Thermostat User’s Manual 3
Step 1: Getting Started
A. Thermostat Buttons and Indicators
1
2
3
4
5
7
1
2
3
4
5
6
7
6
CHUM1605 –CenHub Peak Perks IT801 User Manual
Piece: Manual
Quantity: XXXXX
Size: 8.5 x 11”
Colors: 4/4
Finishin : Fold, Trim
Mail: N/A
Program Specific Checklist Name: Date:
®Phone Number _________ _________
®URL _________ _________
®Program Details _________ _________
CHUM1605-BDEE
CenHub Pea Per s IT801 User Manual
Job Opened: January 11, 2016
Requested In-Home Date: ________________
Latest Revision: March 8, 2016
Approved: March 11, 2016
303819_Comv rg _28pg_Broch_R1.qxp_Layout 1 3/12/16 2:10 AM Pag 3

LETTER
8.5” X 11”
Messaging Display Displays current date, HVAC system status, conservation event status, and
CenHub Peak Perks-related messages. In the event of a power outage, the clock will
maintain the correct time for 24 hours
Lock Icon Conrms keypad lockout, preventing unwanted changes to thermostat settings
HOLD Indicator Appears only when thermostat program is overridden
Time and Day Display Indicates current time and day of the week
HEAT/COOL Stage Display When ON, the indicated stage is active; when OFF, the state is inactive; when ashing,
compressor delay is active
Fan Status Appears only when fan is on
System Status Displays current operation mode according to system conguration as set
by installer
•Off – system is OFF
•Cool
•Off
•Heat
•Aux Heat
•Off
Fan Mode •Auto
•On
CREATIVE PROOFREADER COPY COPYWRITER CREATIVE ACCOU T
DIRECTOR SUPERVISOR SERVICES MA AGER
MA AGER
CHUM1605-BDEE
CenHub Pea Per s IT801 User Manual
Job Opened: January 11, 2016
Requested In-Home Date: ________________
Latest Revision: March 8, 2016
Approved: March 11, 2016
4 CenHub Peak Perks Web-Programmable Wi-Fi® Thermostat User’s Manual
Step 1: Getting Started
B. Thermostat Display
Aux
Auto
On
Energy
Perm
Menu
Done
Timed
Prev
Other
Select
Utility
Sched
Run
Next
Clock
Set At
HOLD
O
1
CF
Stage
24
3
MoTu WeThFr
Sa
Su
AM
PM
Evening
Morning
Night
Day
Un Occupied
Off
Cool
Heat
¿¿¿¿¿¿¿¿¿¿¿¿¿¿¿¿
1
2
3
4
5
7
6
1
2
3
4
5
6
7
8
8
CHUM1605 –CenHub Peak Perks IT801 User Manual
Piece: Manual
Quantity: XXXXX
Size: 8.5 x 11”
Colors: 4/4
Finishin : Fold, Trim
Mail: N/A
Program Specific Checklist Name: Date:
®Phone Number _________ _________
®URL _________ _________
®Program Details _________ _________
303819_Comv rg _28pg_Broch_R1.qxp_Layout 1 3/12/16 2:10 AM Pag 4

LETTER
8.5” X 11”
Time Of Day Program
Interval
Displays current programming interval setting
User Buttons Display
(Programming Buttons)
Actions to be performed when corresponding user button is pressed
Link Status Indicates status of Wi-Fi®link
CREATIVE PROOFREADER COPY COPYWRITER CREATIVE ACCOU T
DIRECTOR SUPERVISOR SERVICES MA AGER
MA AGER
CHUM1605-BDEE
CenHub Pea Per s IT801 User Manual
Job Opened: January 11, 2016
Requested In-Home Date: ________________
Latest Revision: March 8, 2016
Approved: March 11, 2016
Step 1: Getting Started
B. Thermostat Display (continued)
Aux
Auto
On
Energy
Perm
Menu
Done
Timed
Prev
Other
Select
Utility
Sched
Run
Next
Clock
Set At
HOLD
O
1
CF
Stage
24
3
MoTu WeThFr
Sa
Su
AM
PM
Evening
Morning
Night
Day
Un Occupied
Off
Cool
Heat
¿¿¿¿¿¿¿¿¿¿¿¿¿¿¿¿
9
10
11
9
10
11
NOTE: Should a communications error (CO ERROR) display in the thermostat messaging area, please call CenHub Peak Perks at
1-844-258-7761 immediately. The message indicates a communication problem between your thermostat and CenHub Peak Perks.
In some instances, the utility will program the thermostat to also display whom to contact during a communications error.
CenHub Peak Perks Web-Programmable Wi-Fi® Thermostat User’s Manual 5
CHUM1605 –CenHub Peak Perks IT801 User Manual
Piece: Manual
Quantity: XXXXX
Size: 8.5 x 11”
Colors: 4/4
Finishin : Fold, Trim
Mail: N/A
Program Specific Checklist Name: Date:
®Phone Number _________ _________
®URL _________ _________
®Program Details _________ _________
303819_Comv rg _28pg_Broch_R1.qxp_Layout 1 3/12/16 2:10 AM Pag 5

LETTER
8.5” X 11”
CREATIVE PROOFREADER COPY COPYWRITER CREATIVE ACCOU T
DIRECTOR SUPERVISOR SERVICES MA AGER
MA AGER
CHUM1605-BDEE
CenHub Pea Per s IT801 User Manual
Job Opened: January 11, 2016
Requested In-Home Date: ________________
Latest Revision: March 8, 2016
Approved: March 11, 2016
6 CenHub Peak Perks Web-Programmable Wi-Fi® Thermostat User’s Manual
Step 2: ain enu and Thermostat Settings
The User Programming enu table (next page) summarizes the conguration items that the user can
adjust, and provides a convenient space to keep track of your settings.
To enter the User Programming enu:
1. Ensure the thermostat is at the home screen (see example at right).
2. Press the Menu button. The display will show the rst level of the User Programming enu.
3. While in the User Programming enu:
•The and buttons change settings
•The ext and Previous buttons move from one item screen to another
•The Done button exits the User Programming enu
A. Wi-Fi®Settings enu
This menu displays the name of the wireless Internet access network to which the thermostat is connected. In this menu,
you may reset your wireless Internet connection [RESET WI-FI®] or remain connected to the existing network [CLIE T].
The default setting is CLIE T.
STEP 1: Return Thermostat to Wi-Fi®Conguration Mode
Sometimes it might be necessary to move the wireless Internet accessible thermostat to a different wireless Internet
access network, change your network name or change your network password. To do this, you will need to disconnect
your CenHub Peak Perks thermostat for your wireless Internet network as follows:
1. On the ain enu screen,
press the Menu button.
2. Press the Other button. The
thermostat will display the
WI-FI®SETTI GS menu.
3. Press the Select button. The
message area of the thermostat
will display the wireless Internet
access network name (SSID) to
which you are currently
connected.
4. Press the ext button. The top
line of the message area will
ash CLIE T.
CHUM1605 –CenHub Peak Perks IT801 User Manual
Piece: Manual
Quantity: XXXXX
Size: 8.5 x 11”
Colors: 4/4
Finishin : Fold, Trim
Mail: N/A
Program Specific Checklist Name: Date:
®Phone Number _________ _________
®URL _________ _________
®Program Details _________ _________
303819_Comv rg _28pg_Broch_R1.qxp_Layout 1 3/12/16 2:10 AM Pag 6

LETTER
8.5” X 11”
CREATIVE PROOFREADER COPY COPYWRITER CREATIVE ACCOU T
DIRECTOR SUPERVISOR SERVICES MA AGER
MA AGER
CHUM1605-BDEE
CenHub Pea Per s IT801 User Manual
Job Opened: January 11, 2016
Requested In-Home Date: ________________
Latest Revision: March 8, 2016
Approved: March 11, 2016
Step 2: ain enu and Thermostat Settings (continued)
5. Press the button to
advance the display to
RESET WI-FI®.
6. As RESET WI-FI®is ashing, press
the Select button.
STEP 2: Connect to a Wireless Internet etwork
In the conguration mode, the CenHub Peak Perks thermostat acts like a wireless Internet access point. This allows the user
to use any wireless Internet-enabled device to connect to the thermostat and congure it to use their Wi-Fi®settings with a
standard Web browser.
NOTE: If any settings on your wireless Internet router are changed at any time during this step, you must cycle the power
to your thermostat and restart this procedure.
1. On the thermostat ain enu
screen, press the Menu button.
2. Press the Other button. The
thermostat will display the
WI-FI®SETTI GS menu.
3. Press the Select button. 4. The message area of the
thermostat will display
THERMOSTAT followed by the
last four digits of the thermostat’s
Wi-Fi®module serial number. This
is the network name (SSID) you
will use to connect to the
thermostat.
If you continue to have connectivity problems, please call the CenHub Peak Perks customer service center at
1-844-258-7761.
CenHub Peak Perks Web-Programmable Wi-Fi® Thermostat User’s Manual 7
CHUM1605 –CenHub Peak Perks IT801 User Manual
Piece: Manual
Quantity: XXXXX
Size: 8.5 x 11”
Colors: 4/4
Finishin : Fold, Trim
Mail: N/A
Program Specific Checklist Name: Date:
®Phone Number _________ _________
®URL _________ _________
®Program Details _________ _________
303819_Comv rg _28pg_Broch_R1.qxp_Layout 1 3/12/16 2:10 AM Pag 7

LETTER
8.5” X 11”
CREATIVE PROOFREADER COPY COPYWRITER CREATIVE ACCOU T
DIRECTOR SUPERVISOR SERVICES MA AGER
MA AGER
CHUM1605-BDEE
CenHub Pea Per s IT801 User Manual
Job Opened: January 11, 2016
Requested In-Home Date: ________________
Latest Revision: March 8, 2016
Approved: March 11, 2016
Step 2: ain enu and Thermostat Settings (continued)
5. Use a Wi-Fi®-enabled smartphone,
tablet, or computer to connect to
the thermostat. Open the Wi-Fi®
settings menu on your device and
select the THERMOSTAT name
displayed in Step 4.
6. You may receive a notication
that you are connected to a
non-secure
network. Select OK
or CO TI UE
.
7. Open the web browser on your device. If your browser is set to automatically open a
web page, the IntelliTE P conguration page should automatically appear.
8.
If the settings page does not appear after a few seconds, type “directlink/settings”
in
the address bar, then press E TER. If the settings page still does not appear, on the
thermostat ain enu screen, press the button next to Menu. Then press the
button next to Other. The thermostat will display the WI-FI®SETTI GS menu.
Press the button next to Select. The message area of the thermostat will display
the Wi-Fi®network name (SSID) to which you are currently connected. Press the
button next to ext. The IP Address of your device will be displayed in the
thermostat’s message area. In the browser bar of your device, type “http://”
followed by the IP address displayed on the thermostat. Press E TER.
9. Use the pull-down
on the settings page
to select your user
network name.
10. If your wireless
Internet router is
set
to hide the network
name or your network
is not listed in the
pull-down, click on the
link below
the pull-
down to display the
manual settings page.
11. Enter the network password for your network.
12. Once all elds are lled in correctly, click on the Save button.
8 CenHub Peak Perks Web-Programmable Wi-Fi® Thermostat User’s Manual
CHUM1605 –CenHub Peak Perks IT801 User Manual
Piece: Manual
Quantity: XXXXX
Size: 8.5 x 11”
Colors: 4/4
Finishin : Fold, Trim
Mail: N/A
Program Specific Checklist Name: Date:
®Phone Number _________ _________
®URL _________ _________
®Program Details _________ _________
303819_Comv rg _28pg_Broch_R1.qxp_Layout 1 3/12/16 2:10 AM Pag 8

LETTER
8.5” X 11”
CREATIVE PROOFREADER COPY COPYWRITER CREATIVE ACCOU T
DIRECTOR SUPERVISOR SERVICES MA AGER
MA AGER
CHUM1605-BDEE
CenHub Pea Per s IT801 User Manual
Job Opened: January 11, 2016
Requested In-Home Date: ________________
Latest Revision: March 8, 2016
Approved: March 11, 2016
14. After clicking on Apply, the web page will now display the form shown
on the right. The Wi-Fi®thermostat will close the wireless Internet
connection to your device. It will then attempt to connect to your
wireless Internet accessible router. If there was an error detected in one
of the settings you will be prompted to return to the settings page and
correct the error.
Step 2: ain enu and Thermostat Settings (continued)
13. The settings page will now show an overview of the settings you entered.
If all settings are correct, click on Apply. If you need to correct any
settings, click on Cancel.
CenHub Peak Perks Web-Programmable Wi-Fi® Thermostat User’s Manual 9
CHUM1605 –CenHub Peak Perks IT801 User Manual
Piece: Manual
Quantity: XXXXX
Size: 8.5 x 11”
Colors: 4/4
Finishin : Fold, Trim
Mail: N/A
Program Specific Checklist Name: Date:
®Phone Number _________ _________
®URL _________ _________
®Program Details _________ _________
303819_Comv rg _28pg_Broch_R1.qxp_Layout 1 3/12/16 2:10 AM Pag 9

LETTER
8.5” X 11”
CREATIVE PROOFREADER COPY COPYWRITER CREATIVE ACCOU T
DIRECTOR SUPERVISOR SERVICES MA AGER
MA AGER
CHUM1605-BDEE
CenHub Pea Per s IT801 User Manual
Job Opened: January 11, 2016
Requested In-Home Date: ________________
Latest Revision: March 8, 2016
Approved: March 11, 2016
B. Filter Timer Settings enu
The lter timer is an indicator to the user to check and/or replace the HVAC air lter.
Filter Timer enu allows you to set the number of days before the CHA GE FILTER alert appears in the thermostat
display. It also allows you to disable the lter timer and the Reset Filter Timer. The default setting is 90 days, but lters
should be checked every month. How often you change them can impact the quality of your indoor air and the efficiency
of your HVAC system. To set/reset the lter timer:
Step 2: ain enu and Thermostat Settings (continued)
1. Press the Menu button. The
Programming menu screen
title
will appear in the
messaging area.
2. Press the Other button to
advance the menu screen to the
WI-FI®SETTI GS menu.
To disable the lter timer:
1. Press the Menu button. The
Programming menu screen
title will appear in the
messaging area.
2. Press the Other button to
advance the menu screen to the
WI-FI®SETTI GS menu.
3.
Press the ext button to advance
to the FILTER TIMER screen.
4. Set the number of days until the
CHA GE FILTER message will
appear in the display window by
pressing the or
button. The day setting will
advance or regress
in 5-day
increments.
5. Press Done
.
10 CenHub Peak Perks Web-Programmable Wi-Fi® Thermostat User’s Manual
CHUM1605 –CenHub Peak Perks IT801 User Manual
Piece: Manual
Quantity: XXXXX
Size: 8.5 x 11”
Colors: 4/4
Finishin : Fold, Trim
Mail: N/A
Program Specific Checklist Name: Date:
®Phone Number _________ _________
®URL _________ _________
®Program Details _________ _________
303819_Comv rg _28pg_Broch_R1.qxp_Layout 1 3/12/16 2:10 AM Pag 10

LETTER
8.5” X 11”
CREATIVE PROOFREADER COPY COPYWRITER CREATIVE ACCOU T
DIRECTOR SUPERVISOR SERVICES MA AGER
MA AGER
CHUM1605-BDEE
CenHub Pea Per s IT801 User Manual
Job Opened: January 11, 2016
Requested In-Home Date: ________________
Latest Revision: March 8, 2016
Approved: March 11, 2016
3. Press the ext button to
advance to the FILTER TIMER
screen.
4. Press the or button
to reach Off.
5. Press Done.
Step 2: ain enu and Thermostat Settings (continued)
C. Reset Filter Timer
Filter Timer Reset
The lter timer is an indicator to the user to check and/or replace their HVAC air lter. The lter timer can be reset at any
time —whether there is an active CHECK FILTER message display or not. The lter timer can be reset from within the
FILTER TIMER user programming menu by pressing the SELECT button. The countdown timer (ashing value) will be
reset to the user selected lter timer value displayed at the end of the top display line. When returning to the main
operating screen, the FILTER RESET message will be displayed and CHECK FILTER message will no longer be displayed
to conrm that the lter has been reset.
There is also an easy way for the user to reset the lter timer value to the default value from the main operating screen
without the need to enter the programming menu. To reset the lter timer, press and hold the FA button for 3 seconds
until the message FILTER RESET is displayed. The lter timer will be reset to the user dened value and the CHECK
FILTER message will no longer be displayed in the message display area.
NOTE: If the FILTER TIMER in the user settings menu is set to OFF, this lter timer reset is not being used.
CenHub Peak Perks Web-Programmable Wi-Fi® Thermostat User’s Manual 11
CHUM1605 –CenHub Peak Perks IT801 User Manual
Piece: Manual
Quantity: XXXXX
Size: 8.5 x 11”
Colors: 4/4
Finishin : Fold, Trim
Mail: N/A
Program Specific Checklist Name: Date:
®Phone Number _________ _________
®URL _________ _________
®Program Details _________ _________
303819_Comv rg _28pg_Broch_R1.qxp_Layout 1 3/12/16 2:10 AM Pag 11

LETTER
8.5” X 11”
CREATIVE PROOFREADER COPY COPYWRITER CREATIVE ACCOU T
DIRECTOR SUPERVISOR SERVICES MA AGER
MA AGER
CHUM1605-BDEE
CenHub Pea Per s IT801 User Manual
Job Opened: January 11, 2016
Requested In-Home Date: ________________
Latest Revision: March 8, 2016
Approved: March 11, 2016
Step 2: ain enu and Thermostat Settings (continued)
D. LCD Backlight Settings enu
This menu allows you to choose when the LCD backlight illuminates.
To choose when the backlight illuminates:
1. Press the Menu button. The
menu screen title will appear in
the messaging area.
2. Press the Other button to
advance the menu screen to the
WI-FI®SETTI GS menu.
3. Press the ext button to
advance to the LCD
BACKLIGHT screen.
4. Use the or button to
select from:
AUTO (default) Illuminates
whenever any button is pressed.
O Continuous illumination.
MA UAL Illuminates only
when IGHTLIGHT button is
pressed.
5. Press Done.
E. Nightlight Settings enu
This menu allows you to choose when the nightlight illuminates.
1. Press the Menu button. The
menu screen title will appear in
the messaging area.
2. Press the Other button to
advance the menu screen to the
WI-FI®SETTI GS menu.
12 CenHub Peak Perks Web-Programmable Wi-Fi® Thermostat User’s Manual
CHUM1605 –CenHub Peak Perks IT801 User Manual
Piece: Manual
Quantity: XXXXX
Size: 8.5 x 11”
Colors: 4/4
Finishin : Fold, Trim
Mail: N/A
Program Specific Checklist Name: Date:
®Phone Number _________ _________
®URL _________ _________
®Program Details _________ _________
303819_Comv rg _28pg_Broch_R1.qxp_Layout 1 3/12/16 2:10 AM Pag 12

LETTER
8.5” X 11”
CREATIVE PROOFREADER COPY COPYWRITER CREATIVE ACCOU T
DIRECTOR SUPERVISOR SERVICES MA AGER
MA AGER
CHUM1605-BDEE
CenHub Pea Per s IT801 User Manual
Job Opened: January 11, 2016
Requested In-Home Date: ________________
Latest Revision: March 8, 2016
Approved: March 11, 2016
3. Press the ext button to
advance to the IGHTLIGHT
screen.
4. Use the or button to
select from:
OFF (default) Always off.
O Always on.
5. Press Done.
Step 2: ain enu and Thermostat Settings (continued)
F. Keypress Beep Conrmation enu
This menu allows you to enable or disable an audio beep conrmation of every key press.
1. Press the Menu button. The
menu screen title will appear in
the messaging area.
2. Press the Other button to
advance the menu screen to the
WI-FI®SETTI GS menu.
3. Press the ext button to
advance to the KEYPRESS BEEP
Conrmation enu screen.
4. Use the or button to
select from:
OFF (default) No beep
conrmation.
O Sounds a beep with every
key press.
5. Press Done.
CenHub Peak Perks Web-Programmable Wi-Fi® Thermostat User’s Manual 13
CHUM1605 –CenHub Peak Perks IT801 User Manual
Piece: Manual
Quantity: XXXXX
Size: 8.5 x 11”
Colors: 4/4
Finishin : Fold, Trim
Mail: N/A
Program Specific Checklist Name: Date:
®Phone Number _________ _________
®URL _________ _________
®Program Details _________ _________
303819_Comv rg _28pg_Broch_R1.qxp_Layout 1 3/12/16 2:10 AM Pag 13

CREATIVE PROOFREADER COPY COPYWRITER CREATIVE ACCOU T
DIRECTOR SUPERVISOR SERVICES MA AGER
MA AGER
CHUM1605-BDEE
CenHub Pea Per s IT801 User Manual
Job Opened: January 11, 2016
Requested In-Home Date: ________________
Latest Revision: March 8, 2016
Approved: March 11, 2016
LETTER
8.5” X 11”
Step 2: ain enu and Thermostat Settings (continued)
G. Time-of-Day (TOD) Recovery
This feature turns your system on before the TOD programming time to attempt to reach the set point at the start of the
TOD period.
1. Press the Menu button. The
menu screen title will appear in
the messaging area.
2. Press the Other button to
advance the menu screen to the
WI-FI®SETTI GS menu.
3. Press the ext button to
advance to the TOD
RECOVERY screen.
4. Use the or button to
select from:
O Attempt to reach the TOD
setpoint at the start of the
TOD period.
OFF Switch to the new TOD
setpoint at the start of
the period.
5. Press Done.
14 CenHub Peak Perks Web-Programmable Wi-Fi® Thermostat User’s Manual
CHUM1605 –CenHub Peak Perks IT801 User Manual
Piece: Manual
Quantity: XXXXX
Size: 8.5 x 11”
Colors: 4/4
Finishin : Fold, Trim
Mail: N/A
Program Specific Checklist Name: Date:
®Phone Number _________ _________
®URL _________ _________
®Program Details _________ _________
303819_Comv rg _28pg_Broch_R1.qxp_Layout 1 3/12/16 2:10 AM Pag 14

LETTER
8.5” X 11”
CREATIVE PROOFREADER COPY COPYWRITER CREATIVE ACCOU T
DIRECTOR SUPERVISOR SERVICES MA AGER
MA AGER
CHUM1605-BDEE
CenHub Pea Per s IT801 User Manual
Job Opened: January 11, 2016
Requested In-Home Date: ________________
Latest Revision: March 8, 2016
Approved: March 11, 2016
Step 3: How to Set a Temperature “Hold”
You can override the thermostat’s programmed temperature setpoint at anytime by choosing one of three types of hold
operations, explained below. The type you choose determines when the hold will end and the thermostat returns to its
programmed schedule.
When you set a hold, the word HOLD will be displayed beneath the temperature setpoint on the thermostat display screen. The
word RU will be displayed next to the top left button indicating an active hold. The type of hold (Temporary, Timed Temporary,
Permanent) will be displayed in the messaging area at the top of the thermostat. This message will appear in rotation with other
messages such as the current date and other active thermostat operations.
A. Temporary Hold
A temporary hold lasts until the start of the next time-of-day program schedule period, or until you manually end it.
To set a temporary hold:
1. Press the or button
to adjust the setpoint to the
desired temperature.
2. Wait 5 seconds for the
thermostat to conrm your hold
on the display.
B. Timed Temporary Hold
A timed temporary hold lasts until the time you have designated it to end, or until you manually end it. To set a timed
temporary hold:
1. Press the or button to adjust the setpoint to the desired temperature.
2. The word TIMED will display for 5 seconds after you set the hold temperature. Press the button
next to it.
CenHub Peak Perks Web-Programmable Wi-Fi® Thermostat User’s Manual 15
CHUM1605 –CenHub Peak Perks IT801 User Manual
Piece: Manual
Quantity: XXXXX
Size: 8.5 x 11”
Colors: 4/4
Finishin : Fold, Trim
Mail: N/A
Program Specific Checklist Name: Date:
®Phone Number _________ _________
®URL _________ _________
®Program Details _________ _________
303819_Comv rg _28pg_Broch_R1.qxp_Layout 1 3/12/16 2:10 AM Pag 15

CREATIVE PROOFREADER COPY COPYWRITER CREATIVE ACCOU T
DIRECTOR SUPERVISOR SERVICES MA AGER
MA AGER
CHUM1605-BDEE
CenHub Pea Per s IT801 User Manual
Job Opened: January 11, 2016
Requested In-Home Date: ________________
Latest Revision: March 8, 2016
Approved: March 11, 2016
LETTER
8.5” X 11”
Step 3: How to Set a Temperature “Hold” (continued)
3. The current time display in the center of the screen will begin
ashing. Press the button to set the time you want the
temperature hold to end.
You may adjust the time in 15-minute increments and set a timed
temporary hold for up to 24 hours. Press Select when the desired
time is displayed. Once the hold time is set, the display returns to
the current time.
C. Permanent Hold
A permanent hold lasts until you manually end it. To set a permanent hold:
Press the or button to the desired temperature.
The word PERM will display for 5 seconds after you set the hold
temperature. Press the button next to it.
D. Ending a Hold
To end a temporary or timed temporary hold before the end of its
assigned duration, or to end a permanent hold, press the button next
to the RU display. This
ends the active hold and returns the thermostat
to its program schedule
.
OTE: When setting a temporary
or timed temporary hold, failure to
press the button next to the TIMED display within 5 seconds will
cause a default to temporary hold. When setting a permanent hold,
failure to press the button
next to the PERM display will also
cause a
default to temporary hold.
16 CenHub Peak Perks Web-Programmable Wi-Fi® Thermostat User’s Manual
CHUM1605 –CenHub Peak Perks IT801 User Manual
Piece: Manual
Quantity: XXXXX
Size: 8.5 x 11”
Colors: 4/4
Finishin : Fold, Trim
Mail: N/A
Program Specific Checklist Name: Date:
®Phone Number _________ _________
®URL _________ _________
®Program Details _________ _________
303819_Comv rg _28pg_Broch_R1.qxp_Layout 1 3/12/16 2:10 AM Pag 16

CREATIVE PROOFREADER COPY COPYWRITER CREATIVE ACCOU T
DIRECTOR SUPERVISOR SERVICES MA AGER
MA AGER
CHUM1605-BDEE
CenHub Pea Per s IT801 User Manual
Job Opened: January 11, 2016
Requested In-Home Date: ________________
Latest Revision: March 8, 2016
Approved: March 11, 2016
LETTER
8.5” X 11”
Step 4: Using the Keypad Lock
The CenHub Peak Perks thermostat enables you to limit user access through its keypad lockout feature. This security prevents
unwanted changes to the thermostat settings and programming. You may select your level of security from two types of lockouts:
A. Partial (PART) Lockout
Prevents other users from changing any programming values while still allowing users access to operational changes
such as setting a hold or changing the system operation mode. To set a partial lockout:
1. At the main operating screen,
press and hold the and
buttons simultaneously
for 3 seconds.
2. The display will change to the
KEYPAD LOCK TYPE screen with
OFF ashing. Select PART by
pressing the or
button.
Press ext.
3. Enter a four-digit security code
of your choosing. This code will
be required to unlock the
keypad in the future. To enter
the code, press the or
button to change the rst
digit, then press ext. Repeat
the above process for the last 3
digits, then press the
Done button.
4. Your security code is now saved
and the keypad lock is now
active. The thermostat will return
to the main operating screen and
display a temporary KEYPAD
LOCKED message. The screen
will now constantly display a
lock icon indicating an active
keypad lock.
CenHub Peak Perks Web-Programmable Wi-Fi® Thermostat User’s Manual 17
CHUM1605 –CenHub Peak Perks IT801 User Manual
Piece: Manual
Quantity: XXXXX
Size: 8.5 x 11”
Colors: 4/4
Finishin : Fold, Trim
Mail: N/A
Program Specific Checklist Name: Date:
®Phone Number _________ _________
®URL _________ _________
®Program Details _________ _________
303819_Comv rg _28pg_Broch_R1.qxp_Layout 1 3/12/16 2:10 AM Pag 17

CREATIVE PROOFREADER COPY COPYWRITER CREATIVE ACCOU T
DIRECTOR SUPERVISOR SERVICES MA AGER
MA AGER
CHUM1605-BDEE
CenHub Pea Per s IT801 User Manual
Job Opened: January 11, 2016
Requested In-Home Date: ________________
Latest Revision: March 8, 2016
Approved: March 11, 2016
LETTER
8.5” X 11”
Step 4: Using the Keypad Lock (continued)
B. Full (FULL) Lockout
Prevents any type of user activity through the keypad except for turning on the backlight (if it was previously
enabled). The user cannot change program settings, mode of operation, fan mode of operation or set/end a hold.
To set a full lockout:
1. At the main operating screen,
press and hold the and
buttons simultaneously
for 3 seconds.
2. The display will change to the
KEYPAD LOCK TYPE screen
with OFF ashing. Select FULL
by pressing the or
button.
Press ext.
Code Date
3. Enter a 4-digit security code of
your choosing. This code will
be required to unlock the
keypad in the future. To enter
the code, press the or
button to change the rst
digit, then press ext. Repeat
the above process for the last 3
digits, then press the
Done button.
4. Your security code is now saved
and the keypad lock is now
active. The thermostat will return
to the main operating screen and
display a temporary KEYPAD
LOCKED message. The screen will
now constantly display a lock icon
indicating an active keypad lock.
OTE: You will set your four-digit security code the rst time you set a keypad lockout. The code will remain the same
until you change it manually. There is no way to unlock the keypad lock if you forget your code, so choose a number that
has meaning and notate it below in the space provided.
18 CenHub Peak Perks Web-Programmable Wi-Fi® Thermostat User’s Manual
CHUM1605 –CenHub Peak Perks IT801 User Manual
Piece: Manual
Quantity: XXXXX
Size: 8.5 x 11”
Colors: 4/4
Finishin : Fold, Trim
Mail: N/A
Program Specific Checklist Name: Date:
®Phone Number _________ _________
®URL _________ _________
®Program Details _________ _________
303819_Comv rg _28pg_Broch_R1.qxp_Layout 1 3/12/16 2:10 AM Pag 18

CREATIVE PROOFREADER COPY COPYWRITER CREATIVE ACCOU T
DIRECTOR SUPERVISOR SERVICES MA AGER
MA AGER
CHUM1605-BDEE
CenHub Pea Per s IT801 User Manual
Job Opened: January 11, 2016
Requested In-Home Date: ________________
Latest Revision: March 8, 2016
Approved: March 11, 2016
LETTER
8.5” X 11”
Step 4: Using the Keypad Lock (continued)
C. Unlocking the Keypad
1. At the main operating screen,
press and hold the and
buttons simultaneously for
3 seconds.
2. The display will change to the
E TER LOCK CODE screen with
“5555” ashing. Enter your 4-digit
security code by pressing the
or button to change the rst
digit, then press ext. Repeat the
above process for the last 3 digits,
then press the Done
button.
3. If the correct code is entered,
KEYPAD U LOCKED will
appear in the message area of
the screen. The thermostat will
return to the main operating
screen and the lock icon will no
longer be displayed.
4. If an incorrect code is entered,
the thermostat will return to the
main operating screen, display
the temporary message
U LOCK FAILED, continue to
display the lock icon and remain
in the locked mode.
CenHub Peak Perks Web-Programmable Wi-Fi® Thermostat User’s Manual 19
CHUM1605 –CenHub Peak Perks IT801 User Manual
Piece: Manual
Quantity: XXXXX
Size: 8.5 x 11”
Colors: 4/4
Finishin : Fold, Trim
Mail: N/A
Program Specific Checklist Name: Date:
®Phone Number _________ _________
®URL _________ _________
®Program Details _________ _________
303819_Comv rg _28pg_Broch_R1.qxp_Layout 1 3/12/16 2:10 AM Pag 19

CREATIVE PROOFREADER COPY COPYWRITER CREATIVE ACCOU T
DIRECTOR SUPERVISOR SERVICES MA AGER
MA AGER
CHUM1605-BDEE
CenHub Pea Per s IT801 User Manual
Job Opened: January 11, 2016
Requested In-Home Date: ________________
Latest Revision: March 8, 2016
Approved: March 11, 2016
LETTER
8.5” X 11”
Step 5: Conservation Events
A CenHub Peak Perks conservation event may occur for up to 4 hours during summer weekday afternoons when electricity use is
at its highest. During these times, your cooling system’s compressor cycles during part of each hour relative to the hour prior to
the event.
Your CenHub Peak Perks thermostat will keep you informed when a conservation event occurs. The message display and green
LED indicator will signal when your compressor is resting and when it is active during a conservation event. The message and
indicator will change during the event coincident with your cycling level.
A. Conservation (Disabled) Phase Displays
1. The green LED indicator remains lit throughout the conservation phase.
2. The message CO TROL ACTIVE appears in the message display rotation.
3. A message showing the approximate time remaining in the conservation event also appears in the message
display rotation.
B. Cooling (Enabled ) Phase Displays
1. The green LED indicator ashes 1/2 second off, 1- 1/2 seconds on when the thermostat is allowed to run normally
during the conservation event.
2. The message CO TROL EVE T appears in the message display rotation.
3. A message showing the approximate time remaining in the conservation event also appears in the message
display rotation.
20 CenHub Peak Perks Web-Programmable Wi-Fi® Thermostat User’s Manual
CHUM1605 –CenHub Peak Perks IT801 User Manual
Piece: Manual
Quantity: XXXXX
Size: 8.5 x 11”
Colors: 4/4
Finishin : Fold, Trim
Mail: N/A
Program Specific Checklist Name: Date:
®Phone Number _________ _________
®URL _________ _________
®Program Details _________ _________
303819_Comv rg _28pg_Broch_R1.qxp_Layout 1 3/12/16 2:10 AM Pag 20
Table of contents
Popular Thermostat manuals by other brands

White Rodgers
White Rodgers 1F82-261 Installation and operation instructions

Dometic
Dometic 3314080.000 BLACK operating instructions

Eurotronic
Eurotronic Comet Zigbee quick start guide

Solid State Heating
Solid State Heating TSSHC-3DNPSB-16.7A user guide

EPH Controls
EPH Controls CRTP2 Installation and operation guide

VDH
VDH ALFA 52-VS user manual

Honeywell
Honeywell TH6320WF01 user guide

Elko
Elko Thermo ATR quick start guide

domat
domat THERMASREG FS-20 Operating Instructions, Mounting & Installation

GENERAL LIFE
GENERAL LIFE HT250 SET manual

Cool Solutions
Cool Solutions COOLSPACE/EnTouch Pro user guide

Cypress Envirosystems
Cypress Envirosystems WPT Series Operation and maintenance